
Last Seen Blogs


Link
Feedback from MicroScope’s virtual channel event reveals some insights into the current thinking in the industry, with the majority focusing on virtual events and stating they're happy with support – but nearly a quarter say more could be done
It is going to be a while until the show floors are heaving and the delegates are packing out halls at hotels across the major conference cities.
One of the big impacts of the coronavirus has been on the channel’s events calendar, with the vast majority of scheduled shows and conferences cancelled for 2020.
This has forced vendors to move events online and, so far, those virtual alternatives have proved to be successful, with many reporting high number of registrations and decent levels of participation.
To get a handle on the outlook on the event front, MicroScope hosted its own virtual event entitled ‘Navigating a post-pandemic world’, and polled those who tuned in about the channel and the pandemic response.
The majority agreed that they had no plans to host events this year, with everything moving to digital. Only a lone respondent revealed that they had plans to do both physical and virtual.
Another question that was posed during the event was around the question of channel support and whether there was a feeling that vendors had gone far enough. From fairly early on into the pandemic, resellers have been given options to access market development funds (MDF), use vendor finance and gain access to training tools.
The audience at the virtual event largely saw the efforts by vendors in a positive light, with 85% saying they had done a supportive job, but the 15% who disagreed indicated that some in the channel had been frustrated with the levels of help that were made available.
The event also highlighted the challenges that many in the channel have when it comes to digital marketing – leads have been left on the table and others have been poorly acted on during the crisis.
When asked if email was the main vehicle for following up on a lead, the vast majority (74%) agreed that it was, but a quarter saw it only as an occasional method of keeping in touch with potential prospects.
Vendors have been under increasing pressure to help share best practice around digital marketing. One source said that it had stepped up the efforts it was making internally to make sure its inside sales team was sharing quality information.
“There is no point giving someone information that is cold, so we work hard to make sure it is hot before we pass it over to a partner,” said the source.
Others in the industry have already indicated that they are taking steps to provide more detailed information for partners.
In May, Jamie Farrelly, vice-president of Europe, Middle East and Africa (EMEA) channels and mid-market sales at Veritas, said that the vendor was increasing the depth of support it could offer its partners.
In the enterprise market, the arms are going around platinum and key partners with the activate programme, with the top 2,000 partners given a “white glove” programme with social nurturing and a handle on account-based marketing on what customers are talking about.
Juniper Networks is another example of those looking to make sure that it is giving its channel the best shot at gaining fresh customers. Sander Groot, head of EMEA channels at Juniper, said that the vendor is funding many ongoing demand-generation campaigns to support partner growth.
“We have freed up a lot of MDF, this is by far the biggest investment I have seen in the past 18 years I have been at Juniper Networks,” he said.
0 notes
Link
VR and AR equipment are showing significant promise in the wake of the COVID-19 pandemic. Here experts share how companies are benefiting from the technologies in three major areas.
Alternative reality platforms such as virtual reality, augmented reality, mixed reality and extended reality were touted as the next generation of computing platforms for years -- an idea which has not materialized despite billions of investments, until now.
As a result of the COVID-19 pandemic, there recently has been a big push for more adoption of the technology. The sudden need for virtual meetings, remote collaboration, more efficient workflows and reduced IT costs is working in favor of VR and AR in the enterprise.
Here, experts share their experience on the innovative use of VR and AR technology during the pandemic and what the future holds for the industry.
Training and education
One of the most profound impacts of VR is in the training and education space, and for several good reasons, including its speed.
According to Derek Belch, CEO and co-founder of Strivr, an immersive learning solutions provider, VR equipment has enabled Walmart to reduce the time spent training associates -- from eight hours to 15 minutes. Additionally, when Walmart rolls out new equipment, the training can take place even before the machinery arrives.

Derek Belch
VR not only saves the need for employees and trainers to travel, but also spares companies or manufacturers from shutting down an active line for the sake of training frontline workers on safety measures. "Immersive environments allow for mistakes and repetition," Belch said. "In VR, mistakes are free."
The use of VR also allows employees to receive training on critical situations, as is the case with Verizon, which is using the technology to train 22,000 employees on how to react to situations such as an armed robbery. "VR allows them to experientially go through the critical steps of de-escalating a high-risk moment and to make the right decisions under intense pressure," Belch pointed out.

Ankur Aggarwal
Similarly, Veative Labs offers employees in the power, oil and gas industry a safe training environment where they can learn in a simulated world without being exposed to the hazards. "We are able to assess their performance and compare the employees and determine if they are ready for a certain task or not," said Ankur Aggarwal, CEO at the immersive technology solutions company.

Dave Dolan
In addition, there are some trainings that just wouldn't be possible without the use of AR and VR technology. Healthcare practitioners rely on cadavers to learn the human anatomy, which is a mandatory practice for training doctors, dentists, as well as surgeons. Unfortunately, the donation of cadavers is at an all-time low, while demand is higher than ever. As demonstrated by MAI's BodyMap, which calls itself the Google Maps of the human body, physicians can train in VR without needing to dissect a real human body -- and without ever going short of supply.

Mattney Beck
While training in VR also cuts costs considerably, there is a bigger reward, according to Dave Dolan, chief product officer at Veative Labs: People learn better when they do something, compared to when they read about it, he said. The distraction-free and judgment-free environment of VR training helps users focus on learning and enables them to understand a topic further.
Mattney Beck, senior manager of product marketing at Lenovo, backs up this assessment. "Case studies generally show VR offers better and faster learning, with some learning situations proving a 75% retention rate versus only 5% using traditional, lecture style methods," Beck said. "In addition, a 30%-40% increase in learning times and 30%-40% fewer mistakes compared to those conventionally trained can be achieved."
Remote collaboration
The benefits of AR and VR in the enterprise go beyond the training period, as the technologies can be used to offer field assistance. Veative Labs is using mixed reality to provide frontline workers information about the components they are working on, as well as real-time equipment performance data. By connecting the system to output data from IoT sensors, the safety of the frontline workers is greatly improved. For example, the workers are warned if a certain component is too hot for maintenance and should be revisited later.
The same system also allows users to remotely connect to an expert who can view what they are seeing and offer remote assistance. TeamViewer, a company known for remote connectivity solutions, has released an AR-based platform called Pilot, which lets enterprise technicians, as well as medical professionals, connect to a remote expert who can draw, add text or tag real-world objects to the video stream with 3D markers for reference.
Marketing
Speaking of travel, one popular trend within the VR industry is performing a virtual walkthrough. Because of travel restrictions, universities and companies across several industries found VR and AR as a better alternative to offer remote walkthroughs to their potential clients. Even exhibitions can be set up and attended remotely.

Matthew Key
The added benefit, aside from social distancing, is the ability to alter the exhibited items on the go. For example, a car customer can view a vehicle in different colors before making a purchase. But the technology can also be used in a much more functional purpose. According to Matthew Key, founder and managing director at Engine Creative, the AR experience can make use of hotspots to highlight more information. "Visitors were able to interact with a Honda Civic car and delve into the different engine parts and specifications," he said.
The use of VR and AR enables customers to interact before purchasing and shops have found it as a way to reduce the staggering number of products ordered online that is currently hovering around 30%.
"With COVID-19, we've seen a surge of inquiries to transform retail shopping environments into augmented and virtual experiences that let shoppers navigate [the store] in their own homes," Key added.
The future of VR and AR in the enterprise

Jon Cheney
In 2019, IDC predicted that spending on AR and VR will reach $160 million in 2023, while PwC predicted a $1.5 trillion market by 2030. Both assessments were conducted before the pandemic, which is already creating a significant boost in the industry. "Since the beginning of March [2020], when much of physical retail shut down, we've seen a 600% increase in AR usage through our customers' websites," said Jon Cheney, co-founder and CEO at Seek, a web-based AR solutions platform. "Our customer data shows conversion rates are increasing anywhere from 10% to as much as 200%."
We'll most likely see another boost come from 5G technology, which enables the use of more lightweight devices, making the headsets more suitable for long-term wearing.
0 notes
Link
1) ls
Need to figure out what is in a directory? ls is your friend. It will list out the contents of a directory and has a number of flags to help control how those items are displayed. Since the default ls doesn't display entries that begin with a ., you can use ls -a to make sure to include those entries as well.
nyxtom@enceladus$ ls -a ./ README.md _dir_colors _tern-project _vimrc install.sh* ../ _alacritty-theme/ _gitconfig _tmux/ alacritty-colorscheme* .git/ _alacritty.yml _profile _tmux.conf .gitignore _bashrc _terminal/ _vim/ imgcat.sh*
Need it in a 1 column layout (one entry per line)? Use ls -1. Need to include a longer format with size, permissions, and timestamps use ls -l. Need those entries sorted by last changed use ls -l -t. Need to recursively list them? Use ls -R. Want to sort by file size? Use ls -S.
2) cat
Need to output the contents of a file. Use cat! Bonus: use cat -n to include numbers on the lines.
nyxtom@enceladus$ cat -n -s _dir_colors 1 .red 00;31 2 .green 00;32 3 .yellow 00;33 4 .blue 00;34 5 .magenta 00;35 6 .cyan 00;36 7 .white 00;37 8 .redb 01;31 9 .greenb 01;32
3) less/more
Are finding that "cat-ing" a file is causing your terminal to scroll too fast? Use less to fix that problem. But wait, what about more? less is actually based on more. Early versions of more were unable to scroll backward through a file. In any case, less has a nice ability to scroll through the contents of a file or output with space/down/up/page keys. Use q to exit.
Need line numbers? use less -N
Need to search while in less? Use /wordshere to search.
Once you're searching use n to go to the next result, and N for the previous result.
Want to open up less with search already? Use less -pwordshere file.txt
Whitespace bothering you? less -s
Multiple files, what!? less file1.txt file2.txt
Next file is : and then hit n, previous file is : then hit p
Need to pipe some log output or the results of a curl? Use curl dev.to | less
Less has bookmarks? Yep. Drop a marker in less for the current top line with m then hit any letter as the bookmark like a. Then to go back, hit the '(apostrophe key) and the bookmark letter to return (in this case a).
Want to drop into your default editor from less right where you are currently at and return back when you're done? Use v and your default terminal editor will open up at the right spot. Then once you've quit/saved in that editor you will be right back where you were before. 😎 Awesome! 🎉
4) curl
Curl is another essential tool if you need to do just about any type of protocol request. Here is a small fraction of ways you can interact with curl.
GET `curl https://dev.to/
Output to a file curl -o output.html https://dev.to/
POST curl -X POST -H "Content-Type: application/json" -d '{"name":"tom"}' http://localhost:8080
BASIC AUTH `curl -u username:password http://localhost:8080
drop into cat cat | curl -H 'Content-Type: application/json' http://localhost:8080 -d @-
HEAD curl -I dev.to
Follow Redirects curl -I -L dev.to
Pass a certificate, skip verify curl --cert --key --insecure https://example.com
5) man
If you are stuck understanding what a command does, or need the documentation. Use man! It's literally the manual and it works on just all the built in commands. It even works on itself
$ man man NAME man - format and display the on-line manual pages SYNOPSIS man [-acdfFhkKtwW] [--path] [-m system] [-p string] [-C config_file] [-M pathlist] [-P pager] [-B browser] [-H htmlpager] [-S section_list] [section] name ... DESCRIPTION man formats and displays the on-line manual pages. If you specify section, man only looks in that section of the manual. name is normally the name of the manual page, which is typically the name of a com- mand, function, or file. However, if name contains a slash (/) then man interprets it as a file specification, so that you can do man ./foo.5 or even man /cd/foo/bar.1.gz. See below for a description of where man looks for the manual page files. MANUAL SECTIONS The standard sections of the manual include: 1 User Commands 2 System Calls 3 C Library Functions 4 Devices and Special Files 5 File Formats and Conventions 6 Games et. Al. 7 Miscellanea 8 System Administration tools and Deamons Distributions customize the manual section to their specifics, which often include additional sections.
6) alias
If you ever need to setup a short command name to execute a script or some complicated git command for instance, then use alias.
alias st="git status" alias branches="git branch -a --no-merged" alias imgcat="~/dotfiles/imgcat.sh"
Bonus: add these to your ~/.bashrc to execute these when your shell starts up!
7) echo
The "hello world" of any terminal is echo. echo "hello world". You can include environment variables and even sub commands echo "Hello $USER".
8) sed
Sed is a "stream editor". This means we can do a number of different ways to read some input, modify it, and output it. Here's a few ways you can do that:
Text substitutions: echo 'Hello world!' | sed s/world/tom/
Selections: sed -n '1,4p' _bashrc (n is quiet or suppress unmatched lines, 1,4p is p print lines 1-4.
Multiple selections: sed -n -e '1,4p' -e '8-10p' _bashrc
Every X lines: sed -n 1~2p _bashrc (use ~ instead of , to denote every 2 lines (in this case 2)
Search all/replace all: sed s/world/tom/gp (g for global search, p is to print each match instance)
NOTE the sed implementation might differ depending on the system you are using. Keep this in mind that some flags might be unavailable. Take a look at the man sed for more info.
9) tar

If you need to create an archive of a number of files. Don't worry, you'll remember these flags soon enough!
-c create
-v verbose
-f file name
This would look like:
tar -cvf archive.tar files/
By default, tar will create an uncompressed archive unless you tell it to use a specific compression algorithm.
-z gzip (decent compression, reasonable speed) (.gz)
-j bzip2 (better compression, slower) (*.bz2)
tar -cvfz archive.tar.gz files/
Extraction is done with:
-x extract
Similar options for decompression options and verbose:
# extract, verbose, gzip decompress, filename tar -xvzf archive.tar.gz
10) cd
Change directories. Not much to it! cd ../../, cd ~ cd files/ cd $HOME
11) head
head [-n count | -c bytes] [file ...]
head is a filter command that will display the first count (-c) lines or bytes (-b) of each of the specified files, or of the standard input if no files are specified. If count is omitted, it defaults to 10.
If more than a single file is specified, each file is preceded by a header consisting of the string ''==> XXX <=='' where XXX is the name of the file.
head -n 10 ~/dotfiles/_bashrc`
12) mkdir
mkdir creates the directories named as operands, in the order specified, using mode rwxrwxrwx (0777) as modified by the current umask. With the following modes:
-m mode: Set the file permission bits of the final directory created (mode can be in the format specified by chmod
-p Create intermediary directories as required (if not specified then the full path prefix must already exist)
-v Verbose when creating directories
13) rm
remove the non-directory type files specified on the command line. If permissions of the file do not permit writing, and standard input is terminal, user is prompted for confirmation.
A few options of rm can be quite useful:
-d remove directories as well as files
-r -R Remove the file hierarchy rooted in each file, this implies the -d option.
-i Request confirmation before attempting to remove each file
-f Remove files without prompting confirmation regardless of permissions. Do not display diagnostic messages if there are errors or it doesn't exist
-v verbose output
14) mv
mv renames the file named by the source to the destination path. mv also moves each file named by a source to the destination. Use the following options:
-f Do not prompt confirmation for overwriting
-i Cause mv to write a prompt to stderr before moving a file that would overwrite an existing file
-n Do not overwrite an existing file (overrides -i and -f)
-v verbose output
15) cp
copy the contents of the source to the target
-L sumbolic links are followed
-P Default is no symbolic links are followed
-R if source designates a directory, copy the directory and entire subtree (created directories have the same mode as the source directory, unmodified by the process umask)
16) ps
Display the header line, followed by lines containing information about all of your processes that have controlling terminals. Various options can be used to control what is displayed.
-A Display information about other users' processes
-a Display information about other users' processes as well as your own (skip any processes without controlling terminal)
-c Change command column to contain just exec name
-f Display uid, pid, parent pid, recent CPU, start time, tty, elapsed CPU, command. -u will display user name instead of uid.
-h Repeat header as often as necessary (one per page)
-p Display about processes which match specified process IDS (ps -p 8040)
-u Display belonging to the specified user (ps -u tom)
-r Sort by CPU usage
UID PID PPID C STIME TTY TIME CMD F PRI NI SZ RSS WCHAN S ADDR 501 97993 78315 0 5:28PM ?? 134:30.10 Figma Beta Helpe 4004 31 0 28675292 316556 - R 0 88 292 1 0 14Aug20 ?? 372:58.39 WindowServer 410c 79 0 8077052 81984 - Ss 0 501 78315 1 0 Thu04PM ?? 17:55.75 Figma Beta 1004084 46 0 5727912 109596 - S 0 501 78377 78315 0 Thu04PM ?? 22:16.66 Figma Beta Helpe 4004 31 0 5893304 59376 - S 0 501 70984 70915 0 Wed02PM ?? 8:58.36 Spotify Helper ( 4004 31 0 9149416 294276 - S 0 202 266 1 0 14Aug20 ?? 108:51.87 coreaudiod 4004 97 0 4394220 6960 - Ss 0 501 70979 70915 0 Wed02PM ?? 2:09.53 Spotify Helper ( 4004 31 0 4767800 49764 - S 0 501 97869 78315 0 5:28PM ?? 0:32.51 Figma Beta Helpe 4004 31 0 5324624 81000 - S 0 501 70915 1 0 Wed02PM ?? 9:53.82 Spotify 10040c4 97 0 5382856 92580 - S 0
17) tail
Similar to head, tail will display the contents of a file or input starting at the given options:
tail -f /var/log/web.log Commonly used to not stop the output when the end of the file is reached, but wait for additional data to be appended. (Use -Fto follow when the file has been renamed or rotated)
tail -n 100 /var/log/web.log Number of lines
tail -r Input is displayed in reverse order
tail -b 100 Use number of bytes instead of lines
18) kill
Send a signal to the processes specified by the pid
Commonly used signals are among:
1 HUP (hang up) 2 INT (interrupt) 3 QUIT (quit) 6 ABRT (abort) 9 KILL (non-catchable, non-ignorable kill) 14 ALRM (alarm clock) 15 TERM (software termination signal)
You will typically see a kill -9 pid. Find out the process with ps or top!
19) top
Need some realtime display of the running processes? Use top for this!
Processes: 517 total, 3 running, 3 stuck, 511 sleeping, 3013 threads 16:16:07 Load Avg: 2.54, 2.63, 2.57 CPU usage: 12.50% user, 5.66% sys, 81.83% idle SharedLibs: 210M resident, 47M data, 17M linkedit. MemRegions: 153322 total, 5523M resident, 164M private, 2621M shared. PhysMem: 16G used (2948M wired), 431M unused. VM: 2539G vsize, 1995M framework vsize, 14732095(0) swapins, 17624720(0) swapouts. Networks: packets: 81107619/74G in, 103172624/63G out. Disks: 44557301/463G read, 15432059/228G written. PID COMMAND %CPU TIME #TH #WQ #PORTS MEM PURG CMPRS PGRP PPID STATE BOOSTS %CPU_ME %CPU_OTHRS UID FAULTS COW MSGSENT MSGRECV SYSBSD 97993 Figma Beta H 53.0 02:19:46 26 1 271 347M+ 0B 109M 78315 78315 sleeping *0[1] 0.00000 0.00000 501 5042481+ 5175 29897392+ 8417371+ 19506598+ 62329 Slack Helper 21.6 05:18.63 20 1 165+ 123M- 0B 27M 62322 62322 sleeping *0[4] 0.00000 0.00000 501 2124802+ 13816 813744+ 435614+ 1492014+ 0 kernel_task 9.6 07:47:25 263/8 0 0 106M 0B 0B 0 0 running 0[0] 0.00000 0.00000 0 559072 0 1115136682+ 1057488639+ 0 60459 top 5.5 00:00.65 1/1 0 25 5544K+ 0B 0B 60459 83119 running *0[1] 0.00000 0.00000 0 3853+ 104 406329+ 203153+ 8800+
20) and 21) chmod, chown
File permissions are likely a very typical issue you will run into. Judging from the number of results for "permission not allowed" and other variations, it would be very useful to understand these two commands when used in conjunction with one another.
When you list files out, the permission flags will denote things like:
-rwxrwxrwx
- denotes a file, while d denotes a directory. Each part of the next three character sets is the actual permissions. 1) file permissions of the owner, 2) file permissions of the group, 3) file permissions for others. r is read, w is write, x is execute.
Typically, chmod will be used with the numeric version of these permissions as follows:
0: No permission 1: Execute permission 2: Write permission 3: Write and execute permissions 4: Read permission 5: Read and execute permissions 6: Read and write permissions 7: Read, write and execute permissions
So if you wanted to give read/write/execute to owner, but only read permissions to the group and others it would be:
chmod 744 file.txt
With chown you can change the owner and the group of a file as such as chown $USER: file.txt (to change the user to your current user and to use the default group).
22) grep
Grep lets you search on any given input, selecting lines that match various patterns. Usually grep is used for simple patterns and basic regular expressions. egrep is typically used for extended regex.
If you specify the --color this will highlight the output. Combine with -n to include numbers.
grep --color -n "imgcat" ~/dotfiles/_bashrc 251:alias imgcat='~/dotfiles/imgcat.sh'
23) find
Recursively descend the directory tree for each path listed and evaluate an expression. Find has a lot of variations and options, but don't let that scare you. The most typical usage might be:
find . -name "*.c" -print print out files where the name ends with .c
find . \! -name "*.c" -print print out files where the name does not end in .c
find . -type f -name "test" -print print out only type files (no directories) that start with the name "test"
find . -name "*.c" -maxdepth 2 only descend 2 levels deep in the directories
24) ping
Among many network diagnostic tools from lsof to nc, you can't go wrong with ping. Ping simply sends ICMP request packets to network hosts. Many servers disable ICMP responses, but in any case, you can use it in a number of useful ways.
Specify a time-to-live with -T
Timeouts -t
-c Stop sending and receiving after count packets.
-s Specify the number of data bytes to send
PING dev.to (151.101.130.217): 56 data bytes 64 bytes from 151.101.130.217: icmp_seq=0 ttl=58 time=17.338 ms 64 bytes from 151.101.130.217: icmp_seq=1 ttl=58 time=32.732 ms 64 bytes from 151.101.130.217: icmp_seq=2 ttl=58 time=14.288 ms 64 bytes from 151.101.130.217: icmp_seq=3 ttl=58 time=15.166 ms 64 bytes from 151.101.130.217: icmp_seq=4 ttl=58 time=16.465 ms --- dev.to ping statistics --- 5 packets transmitted, 5 packets received, 0.0% packet loss round-trip min/avg/max/stddev = 14.288/19.198/32.732/6.848 ms
25) sudo

This command is required if you want to do actions that require the root or superuser or another user as specified by the security policy.
sudo ls /usr/local/protected
Conclusion
There are a lot of really useful commands available. I simply could not list them all out here without doing them a disservice. I would add to this list a number of very important utilities like df, free, nc, lsof, and loads of other diagnostic commands. Not to mention, many of these commands actually deserve their own post! I plan on writing more of these in the coming weeks. Thanks! If you have suggestions, please feel free to leave a comment below!
0 notes
Link

The major reason Sass was developed was to make writing CSS more efficient and awesome. If you are looking for a preprocessor language to learn, I would strongly recommend Sass. Why Sass? Read why here. Before I proceed to explain the difference between Sass and Scss and which one is more preferable to use, I will first want to explain what Sass is all about.
Sass
Sass stands for Syntactically Awesome Style s heet. Sass is a preprocessor scripting language that is interpreted or compiled into Cascading Style Sheets. It is completely compatible with all versions of CSS. It is free to download and use.
Stylesheets are getting larger, more complex, and harder to maintain. This is where a CSS pre-processor can help.
It allows you to use variables, nested rules, mixins, functions, and more, all with a fully CSS-compatible syntax.
Sass has two syntaxes which are Sass and Scss.
Sass vs Scss
The most commonly used syntax is known as “SCSS” (for “Sassy CSS”), and it takes the CSS syntax we are used to and gives it the super powers that come with Sass. This means that every valid CSS3 stylesheet is valid SCSS as well. SCSS files use the extension .scss. This is really handy as it becomes a lot easier to convert our regular CSS styles to Scss.
/* SCSS */ $primary-color: #3bbfce; $secondary-color: #ff8700; .content { background-color: $primary-color; color: darken($secondary-color, 9%); }
The second syntax(older syntax) is Sass which was created to make CSS a bit more awesome and writing of CSS codes more efficient by taking away the use of curly-braces & semi-colons, it uses the indentation of lines to specify blocks. Files in the indented syntax use the extension .sass.
/* SASS */ $primary-color: #3bbfce $secondary-color: #ff8700 .content-navigation background-color: $primary-color color: darken($secondary-color, 9%)
With the above explanation, you can properly see the difference between Sass and Scss, the next question would be which one should I learn or which one should I use.
The truth is no one should answer that question for you, You should know what best works for you and which one suits your pattern of writing codes.
For me, I've never loved the Sass syntax because I'm already used to opening curly-braces and making use of semi-colons. And the fact that Scss is always beneficial when working as a team, I just couldn't stop using it.
0 notes
Link
BUT... before starting let's revisit this in case of functions. Believe me, that's 80% of the game.
When executing a function, this is determined by how a function is called(runtime binding).
const person = { firstName: 'Sanjeev', lastName: 'Sharma', age: 22, getIntro: function() { console.log(`${this.firstName} ${this.lastName} is ${this.age} years old.`); } } person.getIntro(); // "Sanjeev Sharma is 22 years old." function randomFunc() { console.log(this); } randomFunc(); // window object
In a method: this refers to the owner object.
In a function(sloppy mode): this refers to global object.
In a function(strict mode): this is undefined.
That's enough knowledge for this.article. 😉
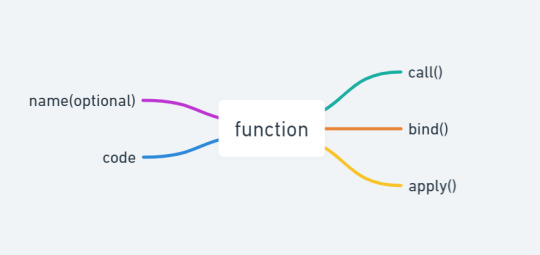
call()
According to MDN:
The call() method calls a function with a given this value and arguments provided individually.
In simple terms, you decide what will be this inside a function when calling it.
Let's understand this with a very simple example.
function personIntro() { console.log(`${this.firstName} ${this.lastName}`); }; const person1 = { firstName: 'Sanjeev', lastName: 'Sharma' }; personIntro(); // Output 1: undefined undefined personIntro.call(person1); // Output 2: Sanjeev Sharma personIntro.call({ firstName : 'Harry', lastName : 'Potter' }); // Output 3: Harry Potter
We have a function personIntro() that will try to access this and console firstName and lastName. We have three outputs:
We didn't use the call() method, so this by default will refer to windowobject. window object doesn't have any properties like firstName or lastName. Hence, we get undefined undefined.
This time we use call() and pass an object that has the required properties. this will now be person. Hence, we get a favorable output Sanjeev Sharma.
It's same as above, just trying to prove how call() works. 😝
You can also pass additional arguments in call():
function personIntro(city, state) { console.log(`${this.name} is from ${city}, ${state}`); }; const person = { name: 'Max', age: 26 } personIntro.call(person, 'Los Angeles', 'California'); // Output: Max is from Los Angeles, California
So, call() a function with this. 👀
bind()
According to MDN:
The bind() method creates a new function that, when called, has its this keyword set to the provided value, with a given sequence of arguments preceding any provided when the new function is called.
Ugh, too much information to process at once. But since now we understand call(), let's use that knowledge to understand bind().
function getPerson(person) { console.log(`${ person } is from ${ this.state }.`); } getPerson.call({ state : 'California' }, 'Max'); // Output 1: Max is from California. const personFromCalifornia = getPerson.bind({ state : 'California' }); personFromCalifornia('Max'); // Output 2: Max is from California. personFromCalifornia('Ben'); // Output 3: Ben is from California.
We made a function getPerson() that is trying to access this. There are two outputs:
We use call() and pass { state : 'California' }(first argument) to be our this. The second argument will be person.
We try to get the same output as 1 using bind(). Using bind() we can bind a this value to some function and get another function in return. In our case, we bind it with { state : 'California' } and store the returned function in personFromCalifornia. Now, when we call personFromCalifornia, we just need to pass person argument. It will already have a this value.
Just calling the same function again with a different person.
So, what are the differences b/w call() and bind()?
call() gets invoked immediately whereas bind() returns a function that we can invoke later.
call() takes additional arguments but bind() does not.
call() doesn't make a copy of the function unlike bind().
Phewww! We're almost done. 😪
apply()
According to MDN:
The apply() method calls a function with a given this value, and arguments provided as an array (or an array-like object).
It's exactly the same as call(), just with a subtle difference.
function sum(num1, num2) { console.log(this + num1 + num2); } sum.call(2, 3, 4); // Output: 9 sum.apply(2, [3, 4]); // Output: 9
call() takes argument individually but apply() takes them as an array. 😆 That's it.
0 notes
Link
In most programming languages, classes are just pieces of code that define the rules for an object, but in Python, as you must hear that everything is an object: it turns out that this is true of classes themselves. classes are actually first-class objects, they can be created at runtime, passed as parameters, returned from functions, and assigned to variables.
let's look at the below example -
class Tutorial: pass print(Tutorial()) # Output - # <__main__.Tutorial object at 0x7fd92c1500f0>
as we can see the instance of Tutorial class tells us that this is an object of the main Tutorial object. at some location.
Now just print the class itself -
print(Tutorial) # Output - # <class '__main__.Tutorial'>
The reason we're able to do this because the Tutorial class is an object, just like any other object. When you use the class keyword, Python creates this object automatically. It's an instance of a metaclass - type.

A metaclass is the class of a class; it defines how a class behaves.
Now for making it easier, let go into depth, Maybe you have come across the typekeyword in Python? Which used to finding the Type of an Object -
print(type(1)) # Output - # <class 'int'> print(type('Hey')) # Output - # <class 'str'>
As expected 1 is the type of int class, Hey is the type of str class, let's find out the Type of our Class -
print(type(Tutorial)) # Output - # <class 'type'>
This time, we get a printout that Tutorial is of type of class type. But what about the type itself? What is the type's type?
print(type(type)) # Output - # <class 'type'>
the type of type is class type, you maybe find this weird. Thus we find that typeis also its own metaclass!
Understanding How Metaclasses Work
type is a built-in metaclass in python. it is used to construct classes just like a class is used to construct the objects. So Whenever we create any class then the default metaclass(type) gets called and giving us an option to use it as an object.
That means every class in python is also an object of type, Therefore We can use type directly to make a class, without any class syntax. The type() function can be used to directly define classes by using the following three arguments -
type(<name>, <bases>, <dct>)
name - This is the internal representation of the class. This is the name of the class.
bases - This specifies anything that we inherit from a superclass or a parent class. This is a tuple of the parent class.
dct - This specifies a namespace dictionary containing definitions of class's methods and variables.
To make it more clear -
Test = type('Test', (), {})
so the above line of code is completely equivalent to this below code -
class Test: pass
there's absolutely nothing different about them.
Hence, if we want to modify the behavior of classes, we will need to write our own custom metaclass.
To create our own custom metaclass, we first have to inherit the default metaclass type, and implement the metaclass's __new__ method and/or __init__ method.
__new__: This dunder method is usually overridden type's __new__, to modify some properties of the class to be created,
before calling the original __new__ which creates the class.
__init__: This method is called when you want to control the initialization after the instance/object has been created.
class MyMeta(type): def __new__(self, name, bases, attr): print(attr) return type(name, bases, attr)
So here I have defined a simple metaclass MyMeta, and we're just going to print out the attributes so we can see how they look like. after that, I have defined another class Sample and it's having the metaclass MyMeta, with name and age variable -
class Sample(metaclass=MyMeta): name = 'bob' age = 24
Now without creating an instance this stills runs as you can see the output below -
{'__module__': '__main__', '__qualname__': 'Sample', 'name': 'bob', 'age': 24}
So how this class Sample has been created -
Interpreter sees metaclass=MyMeta defined in Sample, So now the interpreter has information that default metaclass type must not be used to create Sample class, Instead, MyMeta must be used to create Sample class.
So, the interpreter makes a call to MyMeta to create class Sample, When MyMeta is got called, __new__ of MyMeta is invoked and it prints out the attributes and using type its construct the instance of MyMeta which is Sample and returns to us the object.
This metaclass only overrides object creation. All other aspects of class and object behavior are still handled by type.
Now We've covered enough theory to understand what metaclasses are and how to write custom metaclasses. Now let's look a simple real case scenario -
let's suppose we have a requirement that all attributes of your class should be in upper case, There are multiple ways to achieve this functionality, but here we are going to achieve this using metaclass at the module level, So if in namespace dictionary(attributes) if a key doesn't start with a double underscore we need to change it to be uppercase -
class MyMeta(type): def __new__(self, name, bases, atts): print(f'current_attributes - {atts}\n') new_atts = {} for key, val in atts.items(): if key.startswith('__'): new_atts[key] = val else: new_atts[key.upper()] = val print(f'modified_attributes - {new_atts}') return type(name, bases, new_atts) class Sample(metaclass=MyMeta): x = 'bob' y = 24 def say_hi(self): print('hii')
Output -
current_attributes - {'__module__': '__main__', '__qualname__': 'Sample', 'x': 'bob', 'y': 24, 'say_hi': <function Sample.say_hi at 0x7fd92c10d048>} modified_attributes - {'__module__': '__main__', '__qualname__': 'Sample', 'X': 'bob', 'Y': 24, 'SAY_HI': <function Sample.say_hi at 0x7fd92c10d048>}
As you can see above we have printed the current attributes and created a dictionary that we used to represent our modified attributes.
Here we are just checking if the key starts with a double underscore then just adds the proper value otherwise we are adding the uppercase attribute with that corresponding value.
Now to make sure that this is working let's try, I have created an instance of Sample, and just print one of the old attributes.
s = Sample() s.x
Output -
AttributeError Traceback (most recent call last) <ipython-input-18-87b2922593a9> in <module> 1 s = Sample() ----> 2 s.x AttributeError: 'Sample' object has no attribute 'x'
As expected we have got an error AttributeError, which is totally fine because we have just modified the construction of the object, let's try to access by modified attributes -
print(s.X) s.SAY_HI()
Output -
bob hii
This is why they call it magic because with this kind of hook into the creation of classes you can really enforce quite a bit of constraint on how classes are created
So for example, if you want every single class in a specific module to never be allowed to use a certain attribute or to follow a specific pattern you could set metaclasses for those specific modules.
Conclusion
The purpose of metaclasses isn't to replace the class/object distinction with metaclass/class - it's to change the behavior of class definitions (and thus their instances) in some way.
A reasonable pattern of metaclass use is doing something once when a class is defined rather than repeatedly whenever the same class is instantiated. When multiple classes share the same special behavior, repeating metaclass=X is obviously better than repeating the special purpose code and/or introducing ad-hoc shared superclasse
0 notes
Link

Forget your bird, Love Linux
Click on playground and roll on your sleeves :c) -
playground
There are four types of the shell, we have in Linux-
Broune Shell -Sh shell
C Shell - csh or tcsh
Z shell -zsh
My Favorite - Bourne again shell -bash
To check shell type-
echo #SHELL
To print on the terminal
echo Hi from terminal !!
To view the current directory, display absolute path, means path from the root
pwd
To view all the files in a directory, -a will display hidden files as well
ls
ls -a
To change directory, it is case-sensitive, and you have to type in the name of the folder exactly as it is.
cd .. - To go back from a folder to the folder before that
cd my_directory - to goto my_directory folder
When folder name has space e.g. my bird
cd my\ bird
Create a new directory
mkdir abhishek
When folder name has a space e.g. abhishek sharma
mkdir abhishek\ sharma
make directory hierarchy from one command
mkdir -p /dir_1/dir_2/dir_3/dir_4
Run multiple commands in a single line
cd abhishek\ sharma; mkdir devops_tools; ls
Create a file
touch file_1.txt
Write content in the file
cat > file_1.txt
write anything, write- "this is my first file in Linux" and type Ctrl+d to save
another way to do it
echo "this is my first file in linux" > file_1.txt
View content
cat file_1.txt
Remove directory and file commands
mkdir removable_dir
rmdir removable_dir
mkdir removable_dir
cd removable_dir; touch removable_file.txt
rmdir removable_dir
---it gives you an error
Notes: only blank directories can be deleted with rmdir; to delete a directory, which has content in it, we will use rm -r
rm -r removable_dir
To delete a file
rm file_1.txt
Copy commands-
Copy a file to another file
cp {options} source_file target_file
cp new_file.txt copy_file.txt
Copy File(s) to another directory or folder
cp {options} source_file target_directory
touch /dir_1/dir_2/file_4.txt
cp -v /dir_1/dir_2/file_4.txt /dir_1/dir_2/dir_3/dir_4
Copy directory to directory
cp {options} source_directory target_directory
To copy a directory from one place to another use -r or -R option in cp command
cp -r /dir_1/dir_2/dir_3/dir_4 /dir_1/dir_2/
If the destination directory already has the same file, still you want to copy that file, to overwrite it use *-i*
cat > dir_1/dir_2/file_4.txt - this is me. press ctrl+d
cp -i /dir_1/dir_2/file_4.txt /dir_1/dir_2/dir_3/dir_4
Move command- mv command to move the files one place to another
touch dir_1/dir_2/file_3.txt
mv -v dir_1/dir_2/file_3.txt dir_1/dir_2/dir_3
Rename filename
touch latest.txt
want to change this file name latest to new
mv latest.txt new.txt
rm latest.txt
Search something
locate new.txt
if you want to ignore the case
locate -i New.txt
if you want a file that has the word "this"
locate -i this
If you want the file(s) that has words "this" and "me"
locate -i *this*me
To view available disk space
df
above command will show disk space in KB, to view in MB use the following command
df -m
To view disk usage by files
du
to view disk space used by a directory
du dir_1
To view Linux distro
uname
uname -a
Package manager apt-get
sudo apt-get update
sudo apt-get install nginx -y
To view your IP and name in host or network
hostname
hostname -I
To know your user account
whoami
To view user id, group id, group etc.
id
Download a file from a link
curl www.randomlink.com/downloadable-file.txt -O
OR
wget www.randomlink.com/downloadable-file.txt -O downloadable-file
Service start/stop/enable/disable/restart/status
systemctl status nginx
systemctl restart nginx
systemctl stop nginx
systemctl status nginx
systemctl start nginx
systemctl disable nginx
systemctl enable nginx
To check connection to server
ping {ip address}
ping www.google.com
0 notes
Link
Ruby is one of the underrated programming languages among modern developers. It has become popular with the Ruby on Rails framework.
Ruby is making developers happy, productive and enjoying programming. - Yukihiro Matsumoto
You are maybe coming from the JS world with a lot of frameworks or from Java and all its complexity.
If you are enough of wasting your time building software that matter and want concrete result as soon as possible, let me introduce you to Ruby.
I'll introduce you to the concept of metaprogramming.
First time I learned Ruby, my mind literally blew when I was confronted to this.
Think about a program that can generate program itself. A program that can generate executable code without the help of a developer.
No, it's not sci-fi, it's Ruby Metaprogramming !
If I had to explain to a 5 years old, imagine you want to draw a sunny city, you take your pen and write "Sunny City" on the paper. Push the button and magic happens. That's metaprogramming.
Now, I'll explain to real developers.
In Ruby, you can make runtime introspection on method. In another hand, you can ask an object about its capabilities (Do you have this method?), its variables, constants and its class and ancestors.
In this article I'll show you some examples with methods like respond_to? (? is a Ruby convention for method returning a boolean) send and define_method. But there is a lot more like method_missing, remove_method and undef_method.
I'll explain these 3 methods and finally show you the mind-blowing examples.
The Respond_to?() Method
This method tests your class if it can handle a specific message, for those who don't speak Ruby: it checks if a method can be called in a specific class.
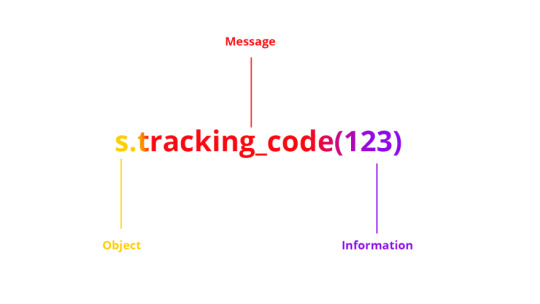
(In the Ruby vocabulary, message is known as a method).
Here is a Shipment class:
class Shipment def prepare_for_delivery @message = 'Shipment is prepared for delivery' end def tracking_code(code) @tracking_code = code end end
Use the respond_to? method to check if prepare_for_delivery method exists:
s = Shipment.new s.respond_to?(:prepare_for_delivery) ==> true
A more complete example sending a message, if this one exists, to another object.
s = Shipment.new if s.respond_to?(:cancel_shipping) s.cancel_shipping else puts "Oh no ! Shipment cannot be cancel." end
It can be used for any classes.
'hello'.respond_to?(:count) ==> true 'world'.respond_to?(:include) ==> false
Did you catch it?
Well, keep it in mind for the end of this article.
The Send() Method
You can call any method in a class with the send() method.
s = Shipment.new if s.respond_to?(:tracking_code) s.send(:tracking_code, '123ABC') # or s.send('cancel_shipping', '123ABC') else puts "Tracking code is not available." end
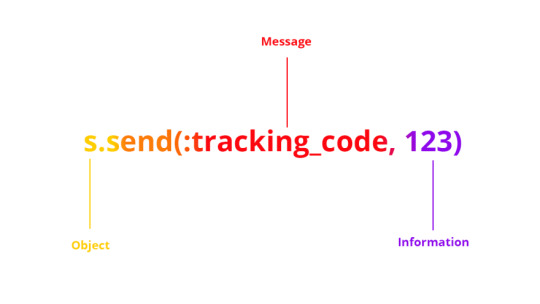
(Message is sent in the first parameter of send())
I'm hearing you saying: "Why not calling our method directly ?"
Yes, we can and I know that this example is not a real world example on how we use it.
Let's continue.
The Define_method() Method
Now that you know the logic, you could even find the behavior of this method before I explain it to you.
It… defines a method ? Well done !
class Shipment define_method :cancel do |reason| @cancelled = true puts reason end end
You just defined a new method for the Shipment class, setting an instance variable cancelled to true and printing the reason.
Wait, for the final example that will blow your mind.
Metaprogramming In One Example
You know the basics of Ruby metaprogramming, let's see the final example.

Let's embark on the sea trip to metaprogramming and set sail !
# We create a container class. We only store the product's name at instantiation class Container attr :product_name def initialize(name) @product_name = name end end # Apples ! Oranges ! All of theses fruits are contained in FruitContainer extending Container # For simplification we only have one scanner class FruitContainer < Container def apples_scanner puts "Scanning apples..." end end # Potatoes ! Broccoli ! All of vegetables are contained in VegetableContainer extending Container # For simplification we only have one scanner class VegetableContainer < Container def potatoes_scanner puts "Scanning potatoes..." end end # The Cargo containing all the containers class Cargo # The constructor accepting multiple parameters def initialize(*containers) containers.each do |container| # self.class.send is used to define singleton methods for our class # we could also use define_singleton_method self.class.send(:define_method, "inspect_#{container.product_name}") do scanner_name = "#{container.product_name}_scanner" if container.respond_to?(scanner_name) container.send(scanner_name) else puts "No scanner found." end end end end end potatoes_container = VegetableContainer.new "potatoes" apples_container = FruitContainer.new "apples" cargo = Cargo.new(potatoes_container, apples_container) cargo.inspect_apples cargo.inspect_potatoes
We used all the methods I explained. For each Container classes, we define new methods which call a method (if exists) based on their product name, a scanner.
The output:
Scanning apples... Scanning potatoes...
Now, you know what metaprogramming is and how it works. Well done.
One of the first uses case of metaprogramming is creating its own DSL (Domain Specific Languages).
There are some well-known tools based on the Ruby DSL, Chef and Puppet for DevOps peoples.
This is what makes Ruby beautiful.
0 notes
Link

we use the rm command to delete files from the server/local machine, this is rm is lifesaver command but sometimes it can be a life destroyer, so here we're gonna master of the rm command to be a lifesaver, not a destroyer. let's get into that.
Basic
Let's first create fake fille to practice with it:
$ touch myfile-{1..10}.txt
the above command will create 10 files, {1..10} will just give you 10 number, if you're curious to see run this $ echo {1..100}.
now to delete single fire,
$ rm myfile-1.txt
this will delete myfile-1.txt only. to delete multiple files add the file name after it:
$ rm myfile-2.txt myfile-3.txt myfile-4.txt
simpler is that!
if you wish to delete all files
$ rm -rf *
-r flag recursively
-f flag force, don't prompt
The above command will delete all the files in the current directory without showing any warning just because we're using -f flag to force and don't show any warning. using -rf flag, verify you're in the right directory by using $ pwdcommand, then proceed to delete files.
Advance
so far we've learned the basic of deleting files, what about the delete all files except some files, if you want to delete files but not all some fo them you want to keep, let's do it:
first enable the extglob shell option:
# shopt -s extglob
To delete all files in a directory except filename, run this below command:
$ rm -v !("filename")
To delete all files with the exception of filename1 and filename2:
$ rm -v !("filename1"|"filename2")
The example below shows how to remove all files other than all .zip files interactively:
$ rm -i !(*.zip)
Next, you can delete all files in a directory apart from all .zip and .odt files as follows, while displaying what is being done:
$ rm -v !(*.zip|*.odt)
Once you've done, turn off the extglob shell:
$ shopt -u extglob
There you've it! Thanks for reading my post, let us know what you tink, or find good solution!
0 notes
Link

This article presents a modern dark-themed design - Black Dashboard coded in different tech flavors: React, Vue, Jinja, Flask and Django. All versions of Black Dashboard design are free, open-sources, released under the MIT License by Creative-Tim, a license that permits unlimited copies for hobby and commercial projects.
The Jinja, Flask, and Django versions are provided by AppSeed, a platform that uses automation tools to generate simple starters.
Thanks for reading! Links are below (for fast-runners)
Black Dashboard - BS4 Version
Black Dashboard - React - MIT License
Black Dashboard - Vue, a nice Vue Dashboard template
Black Dashboard - Flask, a simple Flask Dashboard
Black Dashboard - Django, provided by AppSeed
Black Dashboard - Jinja template, provided by AppSeed
More starters with Black Dashboard design, provided by AppSeed

Black Dashboard - React
Black Dashboard React is a beautiful Bootstrap 4 (Reactstrap) Admin Dashboard with a huge number of components built to fit together and look amazing. If you are looking for a tool to manage and visualize data about your business, this dashboard is the thing for you. It combines colors that are easy on the eye, spacious cards, beautiful typography, and graphics.
Black Dashboard React features over 16 individual components, giving you the freedom of choosing and combining. This means that there are thousands of possible combinations. All components can take variations in color, that you can easily modify using SASS files. You will save a lot of time going from prototyping to full-functional code because all elements are implemented.
Black Dashboard React - Links
Black Dashboard - React
Black Dashboard React Demo

Black Dashboard - Vue
Vue Black Dashboard is a beautiful Bootstrap 4 and Vue.js Admin Dashboard with a huge number of components built to fit together and look amazing. If you are looking for a tool to manage and visualize data about your business, this dashboard is the thing for you. It combines colors that are easy on the eye, spacious cards, beautiful typography, and graphics. Black Dashboard comes packed with all plugins that you might need inside a project and documentation on how to get started. It is light and easy to use, and also very powerful.
Vue Black Dashboard features over 16 individual components, giving you the freedom of choosing and combining. This means that there are thousands of possible combinations. All components can take variations in color, that you can easily modify using SASS files. You will save a lot of time going from prototyping to full-functional code because all elements are implemented.
Black Dashboard Vue - Links
Black Dashboard - Vue, the product page
Black Dashboard Vue Demo

Black Dashboard - Flask
An open-source Flask Dashboard coded with authentication, database, ORM, and deployment scripts on top of modern dark design - Black Dashboard design (free version). The full list of features are below:
Modular design with Blueprints
SQLite, PostgreSQL, SQLAlchemy ORM
Alembic (DB schema migrations)
Session-Based authentication (via flask_login)
Deployment scripts: Docker, Gunicorn / Nginx
LIVE Support via Discord
Black Dashboard Flask - Links
Black Dashboard - Flask
Black Dashboard - Flask Demo - LIVE app deployment
Black Dashboard - Django
This version of Black Dashboard is a super simple Django starter coded with minimal modules, SQLite database, and deployment scripts for Docker, HEROKU, and Gunicorn/Nginx stack.
Black Dashboard Django - Links
Black Dashboard - Django, the product page hosted by AppSeed
Black Dashboard - Django, LIVE Demo

Black Dashboard - Jinja template
For newcomers, Jinja is a modern template engine used in well-known frameworks like Flask and Django. The similarities with other popular engines (Ejs, Nunjunks) make this open-source template project a good candidate for your Node.js or Eleventy projects.
Black Dashboard Jinja - Links
Black Dashboard - Jinja Demo, the LIVE deployment
Black Dashboard - Jinja, the source code

0 notes
Link

Getting paid to write technical articles is a great way to supplement your income. Especially if you already write articles for your blog. However, the first question that arises is "how can I get opportunities?", which was my question too.
As a result, I want to list a handful of websites that pay you to write technical articles for them. You can see their name, the URL, and the approximate sum they pay you.
Websites That Pay You
Therefore, let us see the websites you can pitch to write articles. The most popular publications are as follows:
Name Rate per article Description URL Twilio Up to $500 per article You are not required to use Twilio. You need to write articles with examples Twilio.com Auth0 Up to $300 per article You pick topics from a list of possible articles Auth0 Soshace $100 per article You pick topics from a list of possible articles Soshace StackOverflow Unknown There are no limitations on the topics StackOverflow WPHub Up to $200 per article Tutorials about Wordpress WPHub Vonage Up to $500 per article Technical tutorials Vonage CircleCI Up to $300 per article You can pick from a list of possible topics CircleCI Clubhouse Io Up to $600 per article Pick from a list of possible topics. Technical tutorials, and how-to guides. Clubhouse.io Code Tuts+ $100 for tips, and $250 for tutorials Pick from a list of possible articles Code Tuts+ Tutorialspoint Up to $500 per article Various technical topics. You pick from a list of topics Tutorialspoint CSS Tricks Up to $250 per article CSS articles CSS Tricks Digital Ocean Up to $400 per article Articles about OSS, infrastructure, cloud hosting, Linux, and more. It's not limited to their products Digital Ocean Hasura Up to $300 per article Articles including Hasura or GraphQL Hasura TestDriven Io Up to $500 per article Web development tutorials designed to teach critical skills needed to test, launch, scale, and optimize applications TestDriven Io
0 notes
Link
We will write a library that helps to generate border-radius for HTML elements, we will name it "radiuswizard".
This is just an example of a library that will give us the idea on how the NPM packages are written and published, so let’s start.
What you need to get started :
a- NPM account, if you don’t have it, go to https://www.npmjs.com/signup and sign up.
In order to publish your package, you will have to verify your email, so make sure to do that, also, remember the username and password because we will use them in a moment..
b- Go to your console and run npm adduser then enter your NPM account’s informations.
1- Writing The NPM Package :
we will create a folder called “radiuswizard” for our project (you can call it whatever you want).
mkdir radiuswizard && cd radiuswizard
Open this project in your code editor and let’s start writing our package.
we will make a new file ‘index.js’ which will contain our JavaScript function :
function radiuswizard(options) { let elements = document.querySelectorAll('.radiuswizard') elements.forEach(el => { if (options.circle) { el.style.borderRadius = '50%' } else { el.style.borderRadius = `25px` } }) } module.exports.radiuswizard = radiuswizard
Let’s break down what’s happening in this file, To start with, our radiuswizard function accepts an options object , our elements variable represents all the elements that have the .radiuswizard class.
If the user passes the circle as an option, the elements will get a border-radius of 50%, else it’s 25px as a default value.
Of course before we publish our package, we need to give details about it, for that let’s add a README.md file :
# Description npm package for adding border-radius to your elements. # Installation `npm i radiuswizard --save`
``` import {radiuswizard} from 'radiuswizard'; radiuswizard({ circle: false }) ```
## Options radiuswizard supports only one option: - _circle_ - _boolean_ (Defaults to false)
we have three sections in this file, the first one for describing the usage of this package, the second to tell users how they can install it, the last one is for the options, we tell the user that this package supports only one option which is boolean.
… And we finished writing the package 😁
2- Getting Ready To Publish Our Npm Package
In order to publish our package, we need to deploy this project to Github.
We will create a new public repository with this name ‘radiuswizard’, check this :
Github-docs if that's your first time making a repository on Github.
Then run these commands in the console :
git init git add . git remote add origin [email protected]:LaasriNadia/radiuswizard.git //make sure to replace LaasriNadia by your Github username git push -u origin master
One more step before publishing the package is to add a package.json file to our project. For that we run :
npm init
it will ask you some questions, these are the ones we will answer ( Press Enter to skip the other questions ) :
description : border-radius for your elements
keywords : border-radius
author : put your name here
We are now ready to publish our NPM package. 🚀
3- Publishing Our NPM Package
The only thing we have to do in order to publish our package is to run :
npm publish
If you get this error :
40 Forbidden - PUT https://registry.npmjs.org/radiuswizard - radiuswizard cannot be republished until 24 hours have passed.
It’s because we are using the same name for this package, so go back to package.json file and change the name value of this package then run npm publish again.
To make sure your package is published go to npmjs.com and search for your package’s name. You should get something like this : https://www.npmjs.com/package/radiuswizard
BONUS
We will now take the role of the user and use the package we just created. Run:
mkdir radiususage && cd radiususage npm init -y
Let’s make an index.html file in this directory :
<!DOCTYPE html> <html lang="en"> <head> <meta charset="UTF-8"> <meta name="viewport" content="width=device-width, initial-scale=1.0"> <meta http-equiv="X-UA-Compatible" content="ie=edge"> <title>Document</title> </head> <body> <img src="https://via.placeholder.com/150" alt="" class="radiuswizard"> <script src="./index.js"></script> </body> </html>
We added an image and we give it a class of radiuswizard.
Let’s add an index.js file
import { radiuswizard } from 'radiuswizard'; radiuswizard({ circle: false })
Let’s now install our package, run :
npm i radiuswizard --save
we are now ready to test our package.
We need a javascript bundler, for that we will use parcel, easy and requires zero configuration, if you don’t have it on your machine, install it by running this :
npm i parcel -g
when the installation is finished. run the development server :
parcel index.html
Now open http://localhost:1234/ in the browser:
That’s what we see :

Yaaay!! It's working, our image has a border-radius of 25px as we specified in our package. 🤩
Let’s try the circle option, go back to index.js file and give the circle a true value instead of false :
import { radiuswizard } from 'radiuswizard'; radiuswizard({ circle: true })
Now the border-radius of 50% is applied to our image:

0 notes
Link
“Scraping” can be used to collect and analyse data from sources that don’t have API’s.
In this tutorial we’ll scrape content using JavaScript from a website that’s rendered server-side.
You’ll need to have Node.js and npm installed if you haven’t already.
Let’s start by creating a project folder and initialising it with a package.json file:
mkdir scraper npm init -y
We’ll be using two packages to build our scraper script.
axios – Promise based HTTP client for the browser and node.js.
cheerio – Implementation of jQuery designed for the server (makes it easy to work with the DOM).
Install the packages by running the following command:
npm install axios cheerio --save
Next create a file called scrape.js and include the packages we just installed:
const axios = require("axios"); const cheerio = require("cheerio");
In this example i’ll be using https://lobste.rs/ as the data source to be scraped.
Inspecting the code the site name in the header has a cur_url class so let’s see if we can scrape it’s text:
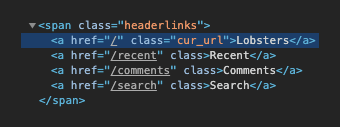
Add the following to scrape.js to fetch the HTML and log the title text if successful:
axios('https://lobste.rs/') .then((response) => { const html = response.data; const $ = cheerio.load(html); const title = $(".cur_url").text(); console.log(title); }) .catch(console.error);
Run the script with the following command and you should see Lobsters logged in the terminal:
node scrape.js
If everything’s working we can proceed to scrape some actual content from the website.
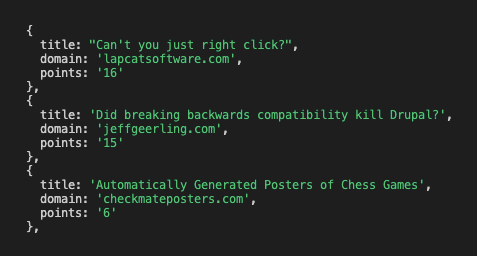
Let’s get the titles, domains and points for each of the stories on the homepage by updating scrape.js:
axios("https://lobste.rs/") .then((response) => { const html = response.data; const $ = cheerio.load(html); const storyItem = $(".story"); const stories = []; storyItem.each(function () { const title = $(this).find(".u-url").text(); const domain = $(this).find(".domain").text(); const points = $(this).find(".score").text(); stories.push({ title, domain, points, }); }); console.log(stories); }) .catch(console.error);
This code loops through each of the stories, grabs the data, and then stores it in an array called stories.
If you’ve worked with jQuery then the selectors will be familiar, if not you can learn about them here.
Now re-run node scrape.js and you should see the data for each of the stories:
0 notes
Link
Note: I understand that this post can be hard to follow for non-Hindi readers, so I have included English translation of those words after the Hindi words.
Tons of resources are available for processing English(and most roman languages) text, but not so much for other languages. In this post, we will explore How we can use spaCy for processing Hindi text.
Here we will be using spaCy module for processing and indic-nlp-datasets for getting data. We will be using text from Devdas novel by Sharat Chandra for demonstrating common NLP tasks here.
Let's install these two libraries.
pip install spacy pip install indic-nlp-datasets
from idatasets.devdas import load_devdas devdas = load_devdas() # devdas.data is a generator of paragraphs paragraphs = list(devdas.data) text = " ".join(paragraphs) words = text.split(" ")
So, words has list of all the words in the novel.
from collections import Counter cnt = Counter(words) cnt.most_common(10) # print # [('के', 696), // of # ('ने', 676), # ('नही', 672), // not # ('से', 626), // to # ('मे', 562), // in # ('की', 480), // # ('है', 444), // is # ('देवदास', 437),// Devdas # ('को', 336), // 's # ('पार्वती', 332)] // Parvati
What we see that top words are not specially meaningful, mostly connectors and articles. Let's use the spacy's hindi stop word list to get rid of those.
from spacy.lang.hi import STOP_WORDS as STOP_WORDS_HI not_stop_words = [word for word in words if word not in set(STOP_WORDS_HI) ] non_stop_cnt = Counter(non_stop_words) non_stop_cnt.most_common(10) # prints # [('नही', 782), // not # ('देवदास', 472), // Devdas # ('कहा-', 390), // said # ('पार्वती', 345), // Parvati # ('क्या', 237), // what # ('दिन', 187), // day # ('बात', 168),// Talk # ('तुम', 168), // you # ('मै', 160), // I # ('चन्द्रमुखी', 154)] // Chadramukhi
Now we see more interesting words appearing as common words. Three out of these 10 most common words (namely, 'देवदास', 'पार्वती', 'चन्द्रमुखी')[Devdas, Parvati, Chandramukhi] corresponds to three main characters around which whole love-triangle story revolves.
Printing most common word is great, isn't enough to justify a cushy data scientist job. :D So, Let's make it prettier using WordCloud.
from wordcloud import WordCloud import matplotlib.pyplot as plt wordcloud = WordCloud( width=400, height=300, max_font_size=50, max_words=1000, background_color="white", stopwords=STOP_WORDS_HI, ).generate(text) plt.figure() plt.imshow(wordcloud, interpolation="bilinear") plt.axis("off") plt.show()
This gives us this plot below.

Wait, where are all the words gone ??
After googling a bit, the github issue below talks about how we needs to devnagri fonts to render the image correctly.
https://github.com/amueller/word_cloud/issues/70
so, we modify the code to accept a custom font file
font="gargi.ttf" wordcloud = WordCloud( width=400, height=300, max_font_size=50, max_words=1000, background_color="white", stopwords=STOP_WORDS_HI, font_path=font ).generate(text) plt.figure() plt.imshow(wordcloud, interpolation="bilinear") plt.axis("off") plt.show()
This yields the image below

You may notice that the WordCloud renders the Hindi letters, but it doesn't contain the most frequent words that we saw before. Also, it doesn't have any of the accent("मात्रा"). So, what's happening here ?
The issue below talks about how "\w+" regex pattern doesn't work as expected in languages other than English. An easy work-around is to pass our own regex which matches with all Hindi letters including accents.
https://github.com/amueller/word_cloud/issues/272
So, let's fix that
wordcloud = WordCloud( width=400, height=300, max_font_size=50, max_words=1000, background_color="white", stopwords=STOP_WORDS_HI, regexp=r"[\u0900-\u097F]+", font_path=font ).generate(text) plt.figure() plt.imshow(wordcloud, interpolation="bilinear") plt.axis("off") plt.show()
This yields the image below.

This looks alright. Few things to note here.
Names of all the prominent characters show up in the word cloud.
"नहीं"(Not) word appear a lot. Which signals that characters are often not in agreement with each other.
Next up, we will talk about how you can do some other tasks such as part of speech analysis, finding names of characters/cities/organzations in a Sentence automatically.
0 notes
Link

In this article, we're going to go over my top 10 git commands I use almost every day. If you're new to programming, or just getting familiar with git, then I highly recommend becoming familiar with a few of these commands. There are some great GUIs out there, but nothing beats learning the command line.
git status
git status will display the difference between the index and the current HEAD commit, paths that have differences between the working tree and the index file, and paths in the working tree that are not yet tracked. Docs
On branch master Your branch is up to date with 'origin/master'. Changes not staged for commit: (use "git add <file>..." to update what will be committed) (use "git restore <file>..." to discard changes in working directory) modified: todo.md
You'll use this one so much that I would recommend creating an alias for it in your ~/.bashrc file with:
alias st='git status'
git add
git add updates the index using the current content found in the working tree, to prepare the content staged for the next commit. It typically adds the current content of existing paths as a whole, but with some options it can also be used to add content with only part of the changes made to the working tree files applied, or remove paths that do not exist in the working tree anymore docs
I frequently use the -p option to stage only parts of a file instead of the entire changeset when I have multiple things I've done in a single commit. It's helpful when you want to split up your work into multiple commits.
git commit
git commit will create a new commit containing the current contents of the index and the given log message describing the changes. The new commit is a direct child of HEAD, usually the tip of the current branch, and the branch is updated to point to it docs
git commit -m 'Message'
If you don't want to open up the built-in editor (aka Vim for me), you can use -mto inline your message. Since I frequently have commit hooks I usually let vimopen up to edit my message. Remember to :wqa!
git diff
git diff will show changes between the working tree and the index or a tree, changes between the index and a tree, changes between two trees, changes resulting from a merge, changes between two blob objects, or changes between two files on disk. docs
I frequently will use this one to perform diffs between branches as well. git diff branch1..branch2. You can also take a diff and output it to a file git diff > patch.diff. You can pass that file along and later apply it with git apply patch.diff.
git stash
If you're working on something and you need to store it away temporarily, use git stash. You can use git stash like a clipboard of sorts and even name it with git stash -m name. Later you can apply it with git stash apply stash^name. If you aren't naming your stash you can manipulate what's in the stash with git stash pop, git stash list. doc
git log
git log has loads of options you can use to manipulate what you are looking at. Here are a few I've used that could be helpful doc
git log --graph`: Draw a text-based graphical representation of the commit history on the left hand side of the output. This may cause extra lines to be printed in between commits, in order for the graph history to be drawn properly
git log --format=<format> or git log --pretty=<format>: Pretty-print the contents of the commit logs in a given format, where can be one of oneline, short, medium, full, fuller, reference, email, raw, format: and tformat:. When is none of the above, and has %placeholder in it, it acts as if --pretty=tformat: were given.
git log -c: With this option, diff output for a merge commit shows the differences from each of the parents to the merge result simultaneously instead of showing pairwise diff between a parent and the result one at a time. Furthermore, it lists only files which were modified from all parents.
git push
Updates remote refs using local refs, while sending objects necessary to complete the given refs. doc
git pull
Git pull is actually a combination of two commands in git. git fetch and git merge.
Incorporates changes from a remote repository into the current branch. In its default mode, git pull is shorthand for git fetch followed by git merge FETCH_HEAD.
More precisely, git pull runs git fetch with the given parameters and calls git merge to merge the retrieved branch heads into the current branch. With --rebase, it runs git rebase instead of git merge. doc
git checkout
Switch branch or restore working tree files. Updates files in the working tree to match the version in the index or the specified tree. If no pathspec was given, git checkout will also update HEAD to set the specified branch as the current branch. doc
git checkout -b <branch> is the usual way you will want to checkout a new branch. Otherwise you can also checkout an existing branch with git checkout <branch> provided the branch is available and the tree has been fetched already.
git checkout -f <filename> you can use this to restore the state of a file or a pattern of files; you can also use the added options in the case of unmerged entries such as (--ours or --theirs)
git blame
Git blame is a handy utility for determining what revision and which author is to blame for each line in a file. Many editors have plugins available to display this right into the editor. doc
While there are a number of options, the one I use most is git blame <file> but to be perfectly honest the built in git blame commands in Vim or VS Code are much better suited to navigating on the fly.
Git blame can be helpful to lookup where code was moved, how it got there, and in what specific changesets it occurred.
🎉 BONUS: git reset
Git reset has three primary forms of resetting the state of the working tree. It comes in the form of the flags --soft --hard and --mixed. doc
--soft Does not touch the index file or the working tree at all (but resets the head to , just like all modes do). This leaves all your changed files "Changes to be committed", as git status would put it.
--hard Resets the index and working tree. Any changes to tracked files in the working tree since are discarded.
--mixed Resets the index but not the working tree (i.e., the changed files are preserved but not marked for commit) and reports what has not been updated. This is the default action.
Typically, if I made a mistake in my last commit and I want to undo that change before I go and push to remote I will restage that commit as follows.
git reset --soft HEAD^. This will unstage the last commit I made and keep it in the working changes. I will make my changes and recommit. If you don't want to use this approach and you simply want to make changes on top of an existing commit, you can use git commit --amend to amend on top of the last commit.
🎉 BONUS++: git bisect
If you are having trouble figuring out when a bug was committed and you don't know the exact commit that caused it, then take a look at git bisect.
This command uses a binary search algorithm to find which commit in your project’s history introduced a bug. You use it by first telling it a "bad" commit that is known to contain the bug, and a "good" commit that is known to be before the bug was introduced. Then git bisect picks a commit between those two endpoints and asks you whether the selected commit is "good" or "bad". It continues narrowing down the range until it finds the exact commit that introduced the change. doc
You do this by running through a series of commands:
git bisect start
git bisect bad HEAD (if current HEAD has the bug)
git bisect good v1.0 (commit where everything was good)
git bisect reset (rest the current bisect session)
You can also shorthand the first 3 commands with git bisect start HEAD HEAD~10 (for last 10 commits is where the bug is somewhere).
Conclusion
That's it! It was supposed to be 10 but I added 2 more in there for good measure. There are loads of great git commands and if you are using GitHub you can even take advantage of additional commands with hub. Hub will add additional commands to interact directly with GitHub such as browse issues, create a gist, create repositories, or generate pull requests. Be sure to check out more documentation and useful commands on git-scm
0 notes
Link
Have you ever seen a calendar on a webpage and thought, how the heck did they did that? For something like that, it might be natural to reach for a plugin, or even an embedded Google Calendar, but it’s actually a lot more straightforward to make one than you might think. Especially when we use the component-driven power of Vue.
I’ve set up a demo over at CodeSandbox so you can see what we’re aiming for, but it’s always a good idea to spell out what we’re trying to do:
Create a month view grid that displays the days of the current month
Display dates from the previous and next months to so the grid is always full
Indicate the current date
Show the name of the currently selected month
Navigate to the previous and next month
Allow the user to navigate back to the current month with a single click
Oh, and we’ll build this as a single page application that fetches calendar dates from Day.js, a super light utility library.
Step 1: Start with the basic markup
We’re going to jump straight into templates. If you’re new to Vue, Sarah’s introduction series is a nice place to start. It’s also worth noting that I’ll be linking to the Vue 2 docs throughout this post. Vue 3 is currently in beta and the docs for it are subject to change.
Let’s start with creating a basic template for our calendar. We can outline our markup as three layers where we have:
A section for the calendar header. This will show components with the currently selected month and the elements responsible for paginating between months.
A section for the calendar grid header. A table header that holds a list containing the days of the week, starting with Monday.
The calendar grid. You know, each day in the current month, represented as a square in the grid.
Let’s write this up in a file called CalendarMonth.vue. This will be our main component.
<!-- CalendarMonth.vue --> <template> <!-- Parent container for the calendar month --> <div class="calendar-month"> <!-- The calendar header --> <div class="calendar-month-header" <!-- Month name --> <CalendarDateIndicator /> <!-- Pagination --> <CalendarDateSelector /> </div> <!-- Calendar grid header --> <CalendarWeekdays /> <!-- Calendar grid --> <ol class="days-grid"> <CalendarMonthDayItem /> </ol> </div> </template>
Now that we have some markup to work with, let’s go one step further and create required components.
Step 2: Header components
In our header we have two components:
CalendarDateIndicator shows the currently selected month.
CalendarDateSelector is responsible for paginating between months.
Let’s start with CalendarDateIndicator. This component will accept a selectedDate property which is a Day.js object that will format the current date properly and show it to the user.
<!-- CalendarDateIndicator.vue --> <template> <div class="calendar-date-indicator"></div> </template> <script> export default { props: { selectedDate: { type: Object, required: true } }, computed: { selectedMonth() { return this.selectedDate.format("MMMM YYYY"); } } }; </script>
That was easy. Let’s go and create the pagination component that lets us navigate between months. It will contain three elements responsible for selecting the previous, current and next month. We’ll add an event listener on those that fires the appropriate method when the element is clicked.
<!-- CalendarDateSelector.vue --> <template> <div class="calendar-date-selector"> <span @click="selectPrevious">﹤</span> <span @click="selectCurrent">Today</span> <span @click="selectNext">﹥</span> </div> </template>
Then, in the script section, we will set up two props that the component will accept:
currentDate allows us to come back to current month when the “Today” button is clicked.
selectedDate tells us what month is currently selected.
We will also define methods responsible for calculating the new selected date based on the currently selected date using the subtract and add methods from Day.js. Each method will also $emit an event to the parent component with the newly selected month. This allows us to keep the value of selected date in one place — which will be our CalendarMonth.vue component — and pass it down to all child components (i.e. header, calendar grid).
// CalendarDateSelector.vue <script> import dayjs from "dayjs"; export default { name: "CalendarDateSelector", props: { currentDate: { type: String, required: true }, selectedDate: { type: Object, required: true } }, methods: { selectPrevious() { let newSelectedDate = dayjs(this.selectedDate).subtract(1, "month"); this.$emit("dateSelected", newSelectedDate); }, selectCurrent() { let newSelectedDate = dayjs(this.currentDate); this.$emit("dateSelected", newSelectedDate); }, selectNext() { let newSelectedDate = dayjs(this.selectedDate).add(1, "month"); this.$emit("dateSelected", newSelectedDate); } } }; </script>
Now, let’s go back to the CalendarMonth.vue component and use our newly created components.
To use them we first need to import and register the components, also we need to create the values that will be passed as props to those components:
today properly formats today’s date and is used as a value for the “Today” pagination button.
selectedDate is the currently selected date (set to today’s date by default).
The last thing we need to do before we can render the components is create a method that’s responsible for changing the value of selectedDate. This method will be fired when the event from the pagination component is received.
// CalendarMonth.vue <script> import dayjs from "dayjs"; import CalendarDateIndicator from "./CalendarDateIndicator"; import CalendarDateSelector from "./CalendarDateSelector"; export default { components: { CalendarDateIndicator, CalendarDateSelector }, data() { return { selectedDate: dayjs(), today: dayjs().format("YYYY-MM-DD") }; }, methods: { selectDate(newSelectedDate) { this.selectedDate = newSelectedDate; } } }; </script>
Now we have everything we need to render our calendar header:
<!-- CalendarMonth.vue --> <template> <div class="calendar-month"> <div class="calendar-month-header"> <CalendarDateIndicator :selected-date="selectedDate" class="calendar-month-header-selected-month" /> <CalendarDateSelector :current-date="today" :selected-date="selectedDate" @dateSelected="selectDate" /> </div> </div> </template>
This is a good spot to stop and see what we have so far. Our calendar header is doing everything we want, so let’s move forward and create components for our calendar grid.
Step 3: Calendar grid components
Here, again, we have two components:
CalendarWeekdays shows the names of the weekdays.
CalendarMonthDayItem represents a single day in the calendar.
The CalendarWeekdays component contains a list that iterates through the weekday labels (using the v-for directive) and renders that label for each weekday. In the script section, we need to define our weekdays and create a computed property to make it available in the template and cache the result to prevent us from having to re-calculate it in the future.
// CalendarWeekdays.vue <template> <ol class="day-of-week"> <li v-for="weekday in weekdays" :key="weekday" > </li> </ol> </template>
<script> const WEEKDAYS = ["Mon", "Tue", "Wed", "Thu", "Fri", "Sat", "Sun"]; export default { name: 'CalendarWeekdays', computed: { weekdays() { return WEEKDAYS } } } </script>
Next is CalendarMonthDayItem. It’s a list item that receives a day property that is an object, and a boolean prop, isToday, that allows us to style the list item to indicate that it’s the current date. We also have one computed property that formats the received day object to our desired date format (D, or the numeric day of the month).
// CalendarMonthDayItem.vue <template> <li class="calendar-day" :class="{ 'calendar-day--not-current': !isCurrentMonth, 'calendar-day--today': isToday }" > <span></span> </li> </template>
<script> import dayjs from "dayjs"; export default { name: "CalendarMonthDayItem", props: { day: { type: Object, required: true }, isCurrentMonth: { type: Boolean, default: false }, isToday: { type: Boolean, default: false } }, computed: { label() { return dayjs(this.day.date).format("D"); } } }; </script>
OK, now that we have these two components, let’s see how we can add them to our CalendarMonth component.
We first need to import and register them. We also need to create a computedproperty that will return an array of objects representing our days. Each day contains a date property and isCurrentMonth property.
// CalendarMonth.vue <script> import dayjs from "dayjs"; import CalendarMonthDayItem from "./CalendarMonthDayItem"; import CalendarWeekdays from "./CalendarWeekdays";
export default { name: "CalendarMonth", components: { // ... CalendarMonthDayItem, CalendarWeekdays }, computed: { days() { return [ { date: "2020-06-29", isCurrentMonth: false }, { date: "2020-06-30", isCurrentMonth: false }, { date: "2020-07-01", isCurrentMonth: true }, { date: "2020-07-02", isCurrentMonth: true }, // ... { date: "2020-07-31", isCurrentMonth: true }, { date: "2020-08-01", isCurrentMonth: false }, { date: "2020-08-02", isCurrentMonth: false } ]; } } }; </script>
Then, in the template, we can render our components. Again, we use the v-fordirective to render the required number of day elements.
<!-- CalendarMonth.vue --> <template> <div class="calendar-month"> <div class="calendar-month-header"> // ... </div> <CalendarWeekdays/> <ol class="days-grid"> <CalendarMonthDayItem v-for="day in days" :key="day.date" :day="day" :is-today="day.date === today" /> </ol> </div> </template>
OK, things are starting to look good now. Have a look at where we are. It looks nice but, as you probably noticed, the template only contains static data at the moment. The month is hardcoded as July and the day numbers are hardcoded as well. We will change that by calculating what date should be shown on a specific month. Let’s dive into the code!
Step 4: Setting up current month calendar
Let’s think how we can calculate the date that should be shown on a specific month. That’s where Day.js really comes into play. It provides all the data we need to properly place dates on the correct days of the week for a given month using real calendar data. It allows us to get and set anything from the start date of a month to all the date formatting options we need to display the data.
We will:
Get the current month
Calculate where the days should be placed (weekdays)
Calculate the days for displaying dates from the previous and next months
Put all of the days together in a single array
We already have Day.js imported in our CalendarMonth component. We’re also going to lean on a couple of Day.js plugins for help. WeekDay helps us set the first day of the week. Some prefer Sunday as the first day of the week. Other prefer Monday. Heck, in some cases, it makes sense to start with Friday. We’re going to start with Monday.
The WeekOfYear plugin returns the numeric value for the current week out of all weeks in the year. There are 52 weeks in a year, so we’d say that the week starting January 1 is the the first week of the year, and so on.
Here’s what we put into CalendarMonth.vue to put all of that to use:
// CalendarMonth.vue <script> import dayjs from "dayjs"; import weekday from "dayjs/plugin/weekday"; import weekOfYear from "dayjs/plugin/weekOfYear"; // ...
dayjs.extend(weekday); dayjs.extend(weekOfYear); // ...
That was pretty straightforward but now the real fun starts as we will now play with the calendar grid. Let’s stop for a second a think what we really need to do to get that right.
First, we want the date numbers to fall in the correct weekday columns. For example, July 1, 2020, is on a Wednesday. That’s where the date numbering should start.
If the first of the month falls on Wednesday, then that means we’ll have empty grid items for Monday and Tuesday in the first week. The last day of the month is July 31, which falls on a Friday. That means Saturday and Sunday will be empty in the last week of the grid. We want to fill those with the trailing and leading dates of the previous and next months, respectively, so that the calendar grid is always full.

Adding dates for the current month
To add the days of the current month to the grid, we need to know how many days exist in the current month. We can get that using the daysInMonth method provided by Day.js. Let’s create a computed property for that.
// CalendarMonth.vue computed: { // ... numberOfDaysInMonth() { return dayjs(this.selectedDate).daysInMonth(); } }
When we know that, we create an empty array with a length that’s equal to number of days in the current month. Then we map() that array and create a day object for each one. The object we create has an arbitrary structure, so you can add other properties if you need them.
In this example, though, we need a date property that will be used to check if a particular date is the current day. We’ll also return a isCurrentMonth value that checks whether the date is in the current month or outside of it. If it is outside the current month, we will style those so folks know they are outside the range of the current month.
// CalendarMonth.vue computed: { // ... currentMonthDays() { return [...Array(this.numberOfDaysInMonth)].map((day, index) => { return { date: dayjs(`${this.year}-${this.month}-${index + 1}`).format("YYYY-MM-DD") isCurrentMonth: true }; }); }, }
Adding dates from the previous month
To get dates from the previous month to display in the current month, we need to check what the weekday of the first day is in selected month. That’s where we can use the WeekDay plugin for Day.js. Let’s create a helper method for that.
// CalendarMonth.vue methods: { // ... getWeekday(date) { return dayjs(date).weekday(); }, }
Then, based on that, we need to check which day was the last Monday in the previous month. We need that value to know how many days from the previous month should be visible in the current month view. We can get that by subtracting the weekday value from the first day of the current month. For example, if first day of the month is Wednesday, we need to subtract three days to get last Monday of the previous month. Having that value allows us to create an array of day objects starting from the last Monday of the previous month through the end of that month.
// CalendarMonth.vue computed: { // ... previousMonthDays() { const firstDayOfTheMonthWeekday = this.getWeekday(this.currentMonthDays[0].date); const previousMonth = dayjs(`${this.year}-${this.month}-01`).subtract(1, "month"); const previousMonthLastMondayDayOfMonth = dayjs(this.currentMonthDays[0].date).subtract(firstDayOfTheMonthWeekday - 1, "day").date(); // Cover first day of the month being sunday (firstDayOfTheMonthWeekday === 0) const visibleNumberOfDaysFromPreviousMonth = firstDayOfTheMonthWeekday ? firstDayOfTheMonthWeekday - 1 : 6; return [...Array(visibleNumberOfDaysFromPreviousMonth)].map((day, index) = { return { date: dayjs(`${previousMonth.year()}-${previousMonth.month() + 1}-${previousMonthLastMondayDayOfMonth + index}`).format("YYYY-MM-DD"), isCurrentMonth: false }; }); } }
Adding dates from the next month
Now, let’s do the reverse and calculate which days we need from the next month to fill in the grid for the current month. Fortunately, we can use the same helper we just created for the previous month calculation. The difference is that we will calculate how many days from the next month should be visible by subtracting that weekday numeric value from seven.
So, for example, if the last day of the month is Saturday, we need to subtract one day from seven to construct an array of dates needed from next month (Sunday).
// CalendarMonth.vue computed: { // ... nextMonthDays() { const lastDayOfTheMonthWeekday = this.getWeekday(`${this.year}-${this.month}-${this.currentMonthDays.length}`); const nextMonth = dayjs(`${this.year}-${this.month}-01`).add(1, "month"); const visibleNumberOfDaysFromNextMonth = lastDayOfTheMonthWeekday ? 7 - lastDayOfTheMonthWeekday : lastDayOfTheMonthWeekday; return [...Array(visibleNumberOfDaysFromNextMonth)].map((day, index) => { return { date: dayjs(`${nextMonth.year()}-${nextMonth.month() + 1}-${index + 1}`).format("YYYY-MM-DD"), isCurrentMonth: false }; }); } }
OK, we know how to create all days we need, so let’s use them and merge all days into a single array of all the days we want to show in the current month, including filler dates from the previous and next months.
// CalendarMonth.vue computed: { // ... days() { return [ ...this.previousMonthDays, ...this.currentMonthDays, ...this.nextMonthDays ]; }, }
0 notes
Link

Create a Package of Your Starting Site
Start by installing and activating the plugin on the site you want to clone—your starting site.
Now go to Duplicator in the admin menu to access the duplicator screen.

To clone your site, you need to create a package. Click the Create New button to start the process. This will open the new package screen.

Give your package a name and click the Storage tab to choose where you want to store it. With the free version of the plugin, you can store it on your server where your website is hosted. If you buy the premium version of the plugin, you have cloud storage options like Dropbox and Google Drive.

Open the Archive tab to choose to archive database tables and files. To run a quick clone, you can leave this as the default and move on to the next step.

Click the Next button to continue.
The plugin will then scan your site to check that it can be duplicated. If there are any issues, it will generate a notice and warn you.

Here the plugin has flagged the fact that there are two very large files in the uploads folder. I can choose to omit those from the package if I want or to leave them in and run the risk of having problems when I import the package to my new site. If you’re using good hosting, you shouldn’t have a problem. We recommend SiteGround for reliable WordPress hosting.
If you do filter some files, click the link to rescan your site before building your package, so the installer file has the right metadata about the size and contents of your package.
If you’ve received notices and you’re happy to continue, check the box. Then (and this applies if you haven’t got any notices too), click the Build button to build your package.
The plugin will start the process of building a package and show you a progress screen.

Once it’s done, it will show you a success screen with a link to download the files. You’ll need the archive and the installer, so download them both.
Import the Package to Your New Site
Now it’s time to import the package from your old server and use it to populate your new site.
You’ll need FTP access to your new server as you’ll have to upload the installer and archive files to it. Upload them to a new empty directory inside your root directory, such as yourdomain.com/duplicate.
Important: don’t install WordPress on the new server. The installer will install it for you with any customisations you had in the starting site.
You’ll find the installer and archive files on your computer, in your downloads folder, or wherever you saved them to. The installer is a PHP file called installer.php, and the archive is a zip file. Don’t unzip that file: upload it as a zip file.
You should now have two files in that directory: the installer and the archive.
Note: Make sure the zip file is fully downloaded before you copy it to your server, and that it’s fully copied before you go to the next part of the process.
In your new site, go to newdomain.com/folder/installer.php in your browser, where folder is the name of the directory you uploaded the files to.

Note: If you get an error message, it’s probably because you went to this screen before the zip file had fully uploaded to your server. Just wait, and refresh when it’s done.
This will take you to the first screen in the import process. If you want to configure the import, you can expand the tabs and explore the options; otherwise just leave things as they are. Check the terms & notices checkbox and click the Next button.
The plugin will extract the archive file and take you to the Install Database screen.
Here you have the option to create a new database or to remove all data from an existing database and overwrite it. As your server doesn’t have WordPress installed yet, you’ll be creating a new database. Type in the name of the new database and the username and password you’ve already set up with your hosting provider.
Tip: If you’re having problems connecting to create a database, try creating a new empty database in phpMyAdmin, and then use that database and its user with Duplicator's option to replace an existing database.
Select the options you want, and click the Test Database button. When the test runs okay, click the Next button.
You’ll see a popup checking whether you want to proceed. Click the OK button.
The Duplicator plugin will then install the database and take you to the Update Data screen.

Change the URL and path to the new site if you want to. Right now, they’ll be in the folder where you put the installer and zip files. You’ll probably want to edit those fields and use the root directory, though. Then click the Next button.
You’ll then be taken to the Duplicator installer's final screen, which tells you to log in to your new WordPress site and delete all installer files. This is important for security reasons.

If you keep the auto delete checkbox checked, the plugin will automatically delete those files the first time you log in to your new site. Your login details will be the same as they were for your old site.
Now log in to your new site, and you’ll find it’s identical to your old site. You’ve successfully cloned your WordPress site.
Cloning a WordPress Site in a Multisite Network
If you run a multisite network and want to clone one or more of the sites in it, this is even easier. Cloning sites in your network is useful when you want to create a similar site, maybe for another part of your business. Or maybe you have a base site that you use as a template for new sites in your network, and you want to clone that.
To clone sites in your WordPress multisite network, use the NS Cloner—Site Copier plugin.

Start by installing the plugin and network activating it.
Then go to NS Cloner in the WordPress admin menu. Select the site you want to clone, and give the cloned version of the site a name.

Then scroll down and click the Clone button.
The plugin will run the cloning process and give you a success message telling you it’s done. This could be quick for a small site but could take a while for a large site with lots of files. If you need to, go and make a coffee while you wait.

And that’s it! You now have a duplicate of your site on the new location in the network. You can now log in to the new site and make any adjustments you need to in order to perfect your new site.
Summary
Being able to easily clone your site without having to manually copy files and database tables to your new WordPress installation will save you lots of time if you need to move your site or create a copy of it in a new location.
Whether you’re copying your site to a fresh WordPress installation or cloning a site within a multisite network, the steps above will show you how to create a carbon copy of your site.
0 notes