
ilovegrowingcubes
My mycology sideblog
Mycology is the study of mushrooms. "Cubes" is short for Psilocybe Cubensis, the most commonly used and cultivated psilocybin mushroom. If you need help or have a question, don't be afraid to message me.
8 posts
Don't wanna be here? Send us removal request.
Last Seen Blogs

sibalutoxaba
Untitled

streamingyoutube
Sem título

buseferharbidendie
JUST AN ARCHIVE

study-southern
Miss Andrea Lilly

rtattoostudio
Untitled
Text


Ok so I’m pretty sure this is fungus gnats forming larvae. Not positive but still. These mushrooms were growing on the side of my tub and I noticed the dots on some of them. I’ve also had more big gnats in my room despite not having plants (not a ton but a noticeable amount). Fungus gnats are like common house gnats.
Gnats lay eggs in the substrate and then the larvae eat up through the inside of the stem and come out of the cap. The 3rd pic has a little brown dot that’s similar to their bite marks Ive seen in pics online.
They can’t hurt you but they’re annoying if they’re all over your house and nasty looking (the larvae look like white worms), they will ruin your yields. Drying the mushrooms will kill them obviously.
I’m going to buy some BTI tomorrow and put it in here and the rest of my tubs. BTI will not hurt mycelium and I’ve heard it works pretty well. I’ll probably use it in all my tubs from now on.
Edit: actually I have no idea what these are tbh. I’m just playing it safe and getting BTI since I imagine sooner or later I’ll have gnats. I’m a bit afraid to find out what they are since I’m squeamish about bugs :(
1 note
·
View note
Text
Also normally with pan cyans, you’re supposed to use manure. They’ll grow on coir/verm but tend to be too skinny from lack of nutrients. Originally, I was going to add 10% worm castings to this, but mine went bad and I didn’t have time to buy more. I don’t expect high yields or anything, especially since this is from multispore, so I’m just going to make a clone of whatever fruits come up (fruits= what we think of as mushrooms).
Pan cyans have finicky genetics so that’s why I would prefer a clone of a fruit instead of working with spores on agar, since then I would get the fruiting genes only. Mycelium created from multispore has thousands of different genes, each spore has to combine to produce a new genetic combination. So you get many genes that don’t fruit or are too slow.
Each fruit has a few hundred different genes in it, it’s not just 1 organism, but obviously these genes are statistically going to be similar to each other and more prone to fruiting. Not just fruiting but also conveniently fruiting in one even flush instead of sporadic pinning.
1 note
·
View note
Text


First time growing pan cyans and I noticed they have an amber colored “myc piss”. Cubensis have a yellow liquid instead, which is supposed to be an antibiotic, so it’s possible that the popcorn kernel underneath has bacteria. When cubensis have this liquid it’s no problem generally, so I wont do anything here.
3 notes
·
View notes
Text
After more experience I decided to add more info here. Most of the above post is right still, but there’s a few new things I’ve found are super important, or I should explain in depth more:
Also for context, the area I live is very humid, so if you live in a drier area you might have to adjust some of these things.
Instead of using 4 air holes for the grain jars, which is a pain to fill with polyfill, I drilled a hole in the lids about 1/4″ in diameter. I still use polyfill.
For grain I’ve stuck with popcorn tek. I get 2lb bags of JollyTime brand popcorn, they’re 1.37$ each I think? I calculated this and this is actually far cheaper than buying popcorn in bulk. This ends up being $0.30 per pint jar (excluding cost of the jar obviously).
Soak the popcorn in hot water for 18-24 hours. I use my presto 23 quart for this whole prep process, i leave the lid on while soaking. Then drain and rinse with cold water. Refill with cold water, so it’s 1/3 popcorn, 2/3 water above it. Boil on high. When it starts a hard boil, cover with the lid and turn heat down to 3/10-5/10. Simmer like this for 45-55 min. When it’s at 35 min, check how done it is every 5 or 10 minutes. When it’s done, you should be able to push your fingernail or a butter knife through the whole kernel. A very small sliver of white, uncooked starch in the middle of the kernels is OK, but not much more.
Drain and DO NOT rinse with cold water. The steam helps evaporate the water. You need to lay out the kernels to dry under a fan for 30 minutes. I put them on clean trashbags laid on the ground with a room fan blowing directly on them. Every 10 minutes, you need to turn the kernels so they dry properly. you should see them all start to change color.
They should feel moist like dried fruit kind of? Like no wetness on the outside, but you can tell there’s moisture inside still.
Put 1-2 Tbs of vermiculite in the bottom of each jar, then load the jars with the kernels. Leave a space at the stop by filling them only 3/4 full. This makes shaking them during colonization far easier. PC them for 1.5-2 hours with foil on the top. Immediately remove the jars and place spaced out on a table to cool off faster, then put them on a shelf away from direct light (to avoid greenhouse effect heat, causing bacterial infections).
If you made the jars properly, they’ll look way too moist coming out of the pressure cooker. The grains will soak in the excess moisture after 3 days though. If the jar comes out looking “perfect”, its too dry obviously. If it still has moisture outside the kernels after 4 days, it’s probably too moist.
For tubs:
Get one of those fine mist continuous spraying bottles. The one I got is 5.4 oz from the brand SegBeauty. This is actually pretty important for having good surface conditions. Having good surface conditions is what gets your mushrooms to pin and fruit, it’s vital for growing cubensis. Too little moisture means the mycelium will get damaged (bruising blue generally if it’s really damaged), too much moisture damages the mycelium (discussed in next point) and creates contams easily and the mycelium can’t grow in too much water anyways.
When your mushrooms are ready to fruit you’ll see white mycelium pointing up like strings, these are hyphae knots. If you mist at it, they’ll get matted down immediately. This isn’t the end of the world but I’ve noticed it’ll struggle to fruit there basically.
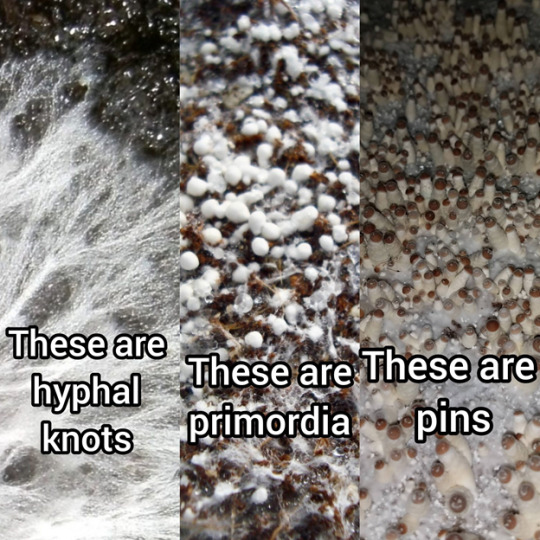
^^This is not my pic but basically hyphal knots are clumps of mycelium prepping to fruit. They will form primordia which are these very tiny white dots (smaller than a ball in a ballpoint pen). The mushroom will sense these and think which is ideal for fruiting, and select a small percentage to turn into pins. Pins are just “baby” mushrooms.
Good surface conditions is basically high humidity without being too wet, with some airflow that wicks moisture without drying it out, kind of like the space between the bread and plastic in a bag of sliced bread. You want it like that constantly. It will take a few grows to get the hang of it.
You need to spray upwards, so there’s NO spray force on the very fragile mycelium. Then the little droplets will fall onto the myc. You want little droplets covering it whenever you spray. Then you want them to evaporate (or be drunk up by the mycelium), but obviously don’t wait too long or else the mycelium will get damaged from dehydration. This process of added airflow, high humidity, and the droplets wicking off the mycelium is what triggers fruiting.
In my tubs, I do 2 of these full sprays with my bottle 2x a day. Sometimes if it’s already moist, I’ll do 1 spray. You will probably have to use a flashlight to see if there’s already little droplets on the mycelium.

^This pic is how i set up my tubs for fruiting. I get 6qt sterilite brand shoebox tubs. I colonize (about 14 days) with the normal lid on (The lid is not airtight which is good actually, like I said in the first post). Then when fruiting, I tape a few toothpicks around the rim and place an upside down tub on top of it, so it’s all resting on the toothpicks. This gap the toothpicks makes creates enough airflow. (Most people online use coins, but I thought that was a pain to balance).
(This pic is from one of my first tubs after it was spent, the “dirt” on the white plastic covering the substrate is actually spores, you can see cubensis have purple/brown spores).
For one of these tubs, i make 2.5-3.5″ of substrate total. This is 2 pint jars of grain spawn, 1/8 of a brick of pet store coir, 2-4 cups water, and 4.5 cups vermiculite. I cut up the brick with a bread knife, then put it in a glass bowl with the water and microwave 8 min (until it’s boiling hot basically). Then I mix in the verm while it’s still hot. I just leave it and stir every 30 min until it’s entirely cool (i check with a thermometer until it’s at like 78F). You might have to add back some water.
Take a big handful of substrate and squeeze it hard. Ideal moisture should make just 1 or 2 drips come out, no more. If it’s too moist just add more vermiculite. Or you can even squeeze water out of it.
This isn’t a big deal, but when you mix the sub and grain, i prefer layering it now. I think if you mix it too much the myc on the outside of the grains gets damaged.
I dont use any 12/12 lightbulb, I just have these set on a table by my window for fruiting (and a shelf for colonizing).
In the pic you can also see I used a liner to prevent side pinning (where mushrooms grow on the side of the substrate). This isn’t bad, but it’s very annoying and messy to harvest. I use my tweezers and scalpel to get them. If you have a liner (made from a trash bag usually) ideally it should stick to the substrate and prevent airflow between the walls and sub, which prevents side pinning. However, for me this didn’t work at all.
Liner or not, I’m just saying that’s why surface conditions are important. They pin like crazy on the sides if your surface isn’t ideal, since it’s moist and humid in the gaps.
You can also do “bubble wrap tek” to induce pinning. You basically put a piece of bubble wrap over it (smaller than the whole surface so it has airflow still) bubble-side down when fruiting. I did this and it worked really well. It creates those same ideal surface conditions. I just removed the bubble wrap whenever mushrooms were pushing it up a few inches. Also, if you do this method, you’ll probably need to mist significantly less.
Also, fanning is outdated. The only real use for it is trying to expel excess CO2 which sinks bc it’s heavier than air. But you don’t need to fan a ton or anything.
I don’t like spraying the top of the lid because I think the droplets on the plastic attract contams badly, even though this would raise humidity. Also drops can land on the surface and make puddles of moisture which is no good.
Also, spraying mushrooms isn’t like watering a plant where you can just dump excess water in and the plant will be fine soaking it up, or skip a few days. It’s more about maintaining humidity and moisture than watering it.
It’s good to add back the weight of whatever you harvest in water (like if you pick 200g of fresh mushrooms, add back 200g water). You just pour it along the sides (I use a pipette) and it’ll soak in mostly. Though you might want to space out this watering through the day if you have time and it’s not soaking in fast enough (you’ll see pooling water along the walls that remains there for over a day basically). Don’t pour it on the surface. If there’s any puddles, take a paper towel and dip the corner in it to soak it up.
I even tested this out of curiosity between 2 tubs and the difference in yield was dramatic to where i consider it required now. Make sure if theres any excess water you soak it with a paper towel corner dipped in it (don’t just blot whole substrate obviously and damage the myc).
You should also do this before and after colonization. Like weigh the tub immediately after spawning, and then after it’s fully colonized weigh again, add back whatever moisture was lost the same way.
The best scalpel to use for agar is a #7 handle and #11 blades. This is the same thing advertised as “Paul stamets favorite scalpel” on his site for 28$ or something, but you can get it for 10$ on eBay in a pack together. It didn’t say what scalpel it was on his site, so I just looked through medical stores at scalpels to see what matched exactly.
Edit for things i forgot to include:
The scalpel is far sharper than an x-acto knife, and the handle is flat, making side pins far easier to harvest. An X-acto knife is fine, but the scalpel is a lot nicer IMO.
You don’t generally mist during colonization, but I do when the sub gets dry. You can tell by the color of the coir. You certainly do not want it saturated. You want the coir to be in between the saturated color and dry color basically. Don’t directly spray as always, just spray upwards and let the mist fall onto it. For a 6qt tub with that one bottle I mentioned, it’s 2-3 full sprays every 1-2 days.
Edit 2: adding more...
If you get issues with trich (which you will), I have had success recently by scooping out the spot of green with a spoon very carefully and putting a ton of salt around it, like an inch around that spot. I assume it’s still in there but it seems gone after a week.
Using pickling lime in a casing layer will also help prevent trich. Normally substrates are a bit acidic, cubensis likes it a bit alkaline, trich loves the lower pH plain substrate.
If you ever get gnats you can take pantyhose and tie it around your next tubs so that they can’t get into the gaps. These fungus gnats won’t bite but they lay eggs in the dirt, and larvae (little white worms) eat through the mushroom stem inside. I haven’t had them so far thankfully but I get paranoid about finding the larvae while harvesting. Sometimes people get them. They also make a bacterial pesticide called BTI which is BTK but for gnats specifically.
Here’s a list of stuff i’ve learned from growing mushrooms, if you have any questions let me know since it’s a ton of trial and error.
- Online guides are often outdated and make things 10x harder and more expensive than it needs to be, like especially Shroomery. Reddit is better for this hobby IMO.
- Don’t start with PF tek, it’s not terrible but idk why it’s considered good for beginners because it’s more tedious than the normal method.
- Dont use horse oats, they’ll work but they take way too long (like 6-8 weeks for me which is ridiculous) and have really low yields. Rye works best but it’s hard to find for me except online. I think you can find some at brewery stores.
Putting the rest in a readmore bc it’s super long…
Keep reading
32 notes
·
View notes
Text


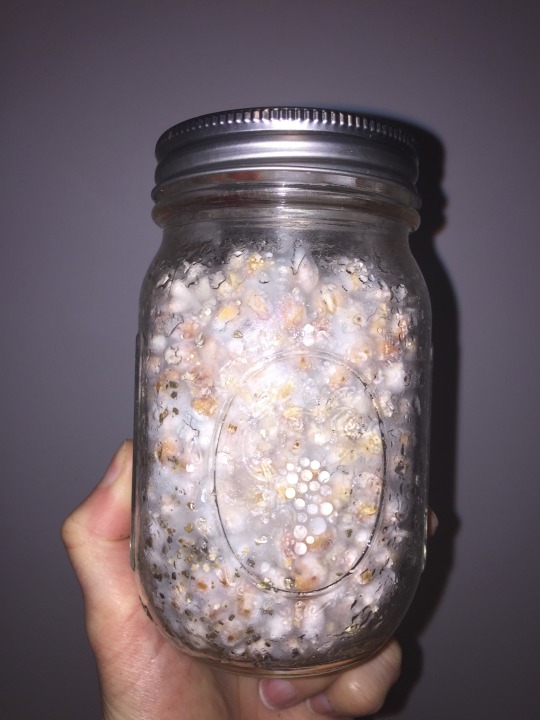


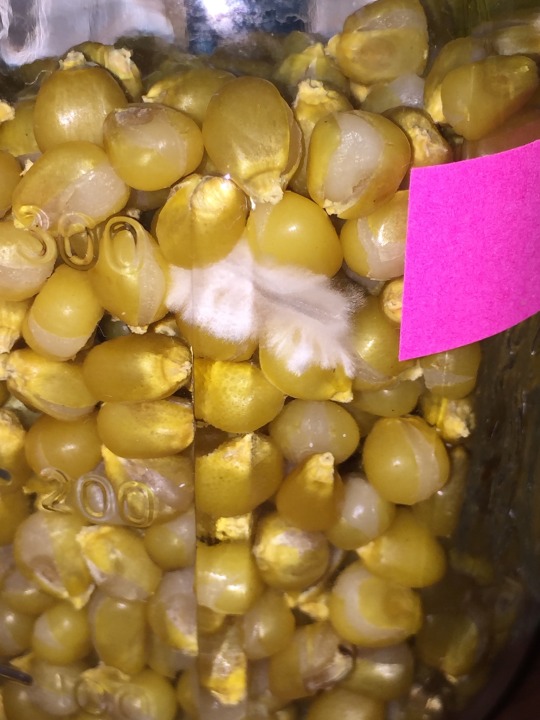
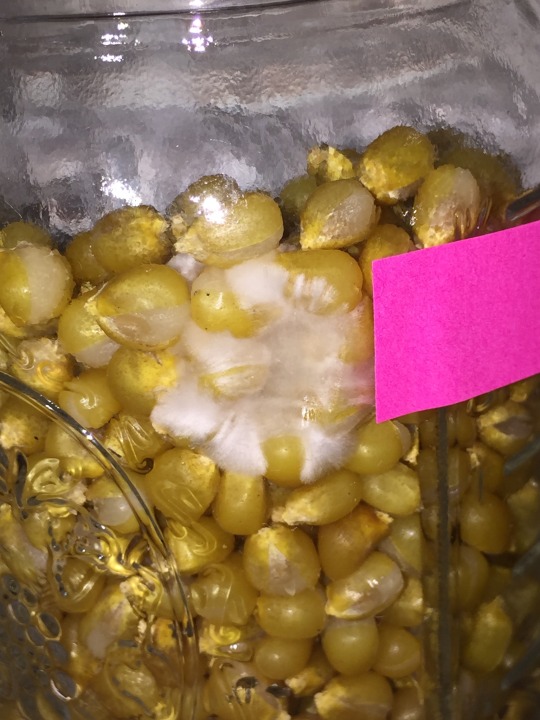
This is my first time growing pan cyans, and I’ve noticed it acts a little different from cubes. The pics of agar are from a colonized popcorn jar, I took a few colonized grains and put it into the container. The bumps you see are popcorn kernels with mycelium growing over the top.
The biggest difference is that pan cyan mycelium seems to bruise for no reason, maybe because my room is too cold (pan cyans prefer warmer temps in the 80s, wheres cubes prefer room temp). You can see the blue bruising in the jars (though it doesn’t show up as strongly in these pics as in real life) and on the agar. I worried it was bruising from contamination, but when I spawned these tonight there was no smell in the jar. They seem extremely healthy.
The jars are also noticeably warm, warmer than the cubensis jars, like it has a naturally higher body temp than cubensis. They have a wispier type of mycelium. Also, I noticed they tend to clump up in certain areas of the jar as dense white mycelium. It looks more uneven than cubensis. Hence why I was worried it was contammed.These grew in my room fine, which is kept at 70-75 degrees.
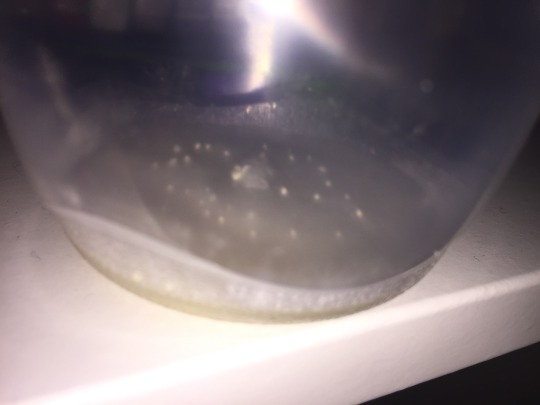
In the last pic, you can also see there’s water on the bottom of the jar for some reason. My jars weren’t too moist, and it seems like the pan cyan mycelium sweated it or something I was worried it was trying to fight off contams, but it seems fine. When i spawned these jars, I could even pour out this liquid. It was clear like water, it did not look like “myc piss” i’ve seen on cubensis (a sign of bacterial contamination, because it’s actual antibiotics it’s making). I’ll have to see how these grow.
1 note
·
View note
Text
A cubensis fruit cloned to agar, then the agar transferred to grain. The stringy texture is rhizomorphic mycelium, which is something you want to select for genetically when possible.
2 notes
·
View notes
Text
Cubensis mycelium grown on agar forming little pins. Pins are basically baby mushrooms.
5 notes
·
View notes
Text


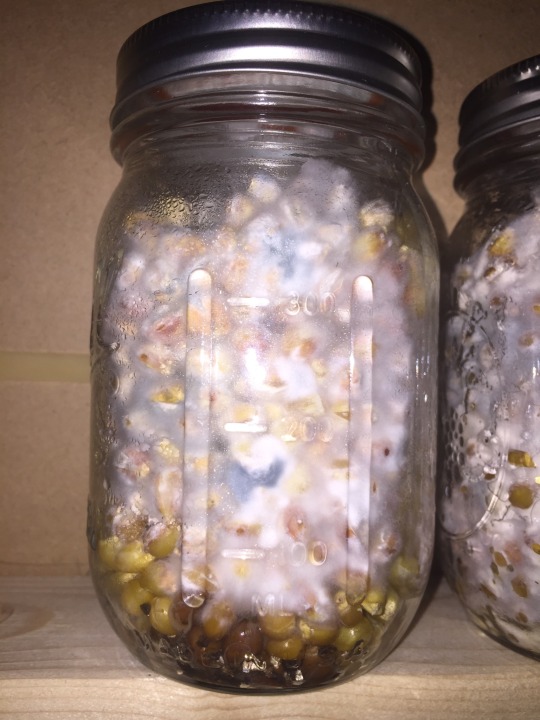
This is panaeolus cyanescens grown on popcorn, but with serious bacterial contamination. These jars are definitely getting tossed. The bacteria first appeared after a week, and now after a month you can see the mycelium wont grow near it. You know if you have bacteria from a beige slime appearing in your jars, or a nasty sweet/sour smell when you open them. Bacteria generally is caused by excess moisture and/or warmth.
1 note
·
View note