Last Seen Blogs

whiteperfectdental
Untitled

quarantoned
Thanks, COVID

rosietrace
You're online today, too?
sol1489
fuck you!

wankatu2010
題名未設定
Text
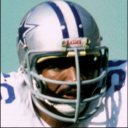
Clear Shell Football Helmet Restoration
Vintage clear shell helmets are by far my favorite type of collectible helmet. Like most old helmets, however, most of the ones we find are in bad shape. Restoration is much more difficult because you can’t just sand and paint - you have to remove the paint while trying to maintain the transparency of the shell.
Once the paint has been removed, dealing with replacement decals and painting can be just as challenging:
What to use for decals? They have to be applied to the inside of the helmet, before the paint, securely to avoid paint bleeding, and colorful enough to adequately show through the plastic shell.
How to prep the inner surface for paint considering you want the shell to be as clear as possible?
What paint to use?
How to avoid paint bleeding into the decals?
If you mess up any of this once you start painting, the only way to recover is to go back to step one and re-remove the paint and decals...yikes.
Over the last several months I've worked (and reworked) a few 1970s MacGregor helmets. I thought I'd share my experience. Some of this information may be obvious but is included for someone starting with no experience. This is by no means a complete guide, just some of what I have learned.
This work is not for the faint of heart and this information is presented without any guarantee of success. If you don’t want to deal with the heartache and disappointment that can come from trial and error (and almost certainly screwing something up bigtime) then I would recommend sticking with refurbishing regular plastic shell helmets. Those can be challenging enough just getting the paint to look right. But if you really want a reproduction of that sweet helmet worn by the likes of Joe Washington or Hollywood Henderson, without doling out hundreds or thousands of dollars, refurbishing an old clear shell might be worth it.
Paint removal
Always test a small inconspicuous area before trying to do the whole helmet.
I found that Motsenbocker's Lift Off Paint & Varnish Remover works very well and does not damage the clear plastic shell. I applied it to a 1974 MacGregor that was painted silver and after a few minutes the paint literally peeled right off with no damage to the plastic. The helmet had red horseshoe logos under the paint and that material was actually harder to completely remove. See sanding and polishing info below for the solution.
I also used Motsenbocker's on a helmet that I had repainted with Krylon spray paint. After applying the remover and letting it sit for an hour the paint came off cleanly using a plastic scraper. Again, no damage to the plastic.
I have only done this on a few vintage MacGregor helmets so results may vary if different paints were used originally, if the plastic is in poor condition, etc. I have not tried this on Kelley, Maxpro or any other older clear shells.
If you're going to try Motsenbocker's, the only place I could find it was ordering online from Home Depot. $25 for 64oz. A reseller on Walmart.com has it listed for $100 which shows how hard it is to find. As stated earlier, test it in a small area first.
I also tried CitriStrip Paint & Varnish Stripping Gel and it was more harsh, melting the clear plastic if left on more than a few minutes (similar to nail polish remover). I would not recommend it.
Cleaning up the plastic shell after stripping paint
There will be some residual paint after the Motsenbocker's. I have had success wet sanding with 400 grit to get rid of the residuals. Follow that with wet sanding with 600 grit, then 800, then 1000. Go to 1500 if you like. A spray bottle filled with water is very handy. Also, if you have stubborn paint you can use 100 grit dry to start, followed by 220-320 wet, then 400, etc., and it will clean up OK.
After wet sanding, the shell will be hazy but should be scratch free and smooth. To restore the clear shell I use Novus 7100 Plastic Polish Kit with a cordless drill with foam polishing head. #3 (heavy scratch remover) followed by #2 (fine scratch remover). Polish each step until the material dries up or wears off. Wipe out the residual after each step.
The Novus does a good job but the residue left behind, while invisible, adds to the challenge of painting. You can wash the helmet with Dawn dish soap to remove the residue; however, you will consequently lose some clarity and get some haziness (which is when I redo #2 polishing). Balancing the transparency of the shell vs. having the best surface for painting is challenging. I have applied decals (see below for details) then wiped the exposed inside with rubbing alcohol to prep for paint. I've had mixed results.
Logos and stripes
This step is probably the hardest. One option is to not use decals or vinyl at all - mask off the inside of the helmet and paint logos, stripes and then the shell. This is a viable option but painting scares me enough that I try to only have to do one color, that of the shell, and use decals for logos and stripes.
I purchased Sunnyscopa Waterslide Decal Paper from Amazon. They offer white and clear. White is only useful for white stripes or simple white logos (like Oklahoma). Anything bigger and it's very hard to work with. And of course you can't print on the white because the sticky side has to face outwards.
The clear labels are good for small things printed in black (reversed of course), like the MacGregor or Kelley logo for the back of the helmet. I have not had luck with colors on the clear decal paper, as they do not print with full opacity (washed out). That is not to say it’s impossible - maybe I don’t have the right printer. Also, the larger the decal, the more stretching needed to fit the curve of a helmet. When stretched, the ink widens with the label and you’ll eventually get gaps in the colored areas.
I have heard there are companies that print custom waterslide decals but I have not found been able to find any in my limited Google searches. Sounds expensive (relatively) and it might be hard to find anyone that will print what may be considered copyrighted material.
I have a Silhouette Cameo 4 vinyl cutter and have had some success with Oracal 651 vinyl. However, I have also had some problems with paint bleeding inside the label. I have tried applying vinyl decals with strips of clear waterslide decal paper along the edges to act as a seal against bleeding. This does a good job of preventing bleeding but:
Applying the material along all the edges can be challenging. Depending on the decals there might be a lot of edge to cover. Also, working with larger pieces of the waterslide decal paper is difficult. The edges fold over and it’s very hard to undo that, often forcing you to start with a new piece.
The decal paper keeps the paint from adhering to the plastic because, obviously, it is a layer of material between the paint and the shell. If the waterslide material lifts or is removed, the paint goes with it.
I have also purchased 8 mil white Convex GearWrap (SKU C8155W), which is thicker than Oracal and also seems more adhesive. It is possible to place decals cut in Oracal on the sticky side of the GearWrap, thus using the GearWrap adhesive to hold the decal in place on the helmet. This is an acquired skill however.
Painting
Painting clear, smooth, glossy plastic is definitely a challenge. You want to keep the plastic as clear and smooth as possible so the decals, stripes and paint show through as clearly as possible. But that goes against the normal process of prepping a surface for paint by sanding it.
That said, I have had good success with Krylon Colormaxx paints (labeled for metal, wood, plastic...). Make sure you inside surface is a clean as possible. Try wiping a small area with alcohol. As mentioned, however, you’ll probably get some haziness in the plastic when cleaning it with alcohol. Keep in mind, though, when the paint is applied it seems to “moisten” the surface, thus removing the haze.
Spray several light coats, waiting the recommended minute or two, or even longer, between coats. After several coats, hold the helmet up to a light source and examine the entirety of the inside. If you can see any light showing through the paint, focus subsequent coats on those areas. Interestingly, even if you end up with some light spots, they are not often noticeable in the finished product.
One of the advantages of painting the inside of a helmet is that if you end up with drips they won’t be visible from the outside (unless it’s metallic paint - see below).
If there are spots inside the helmet that are not properly prepped, you might see some patches where the paint “beads”. Like drips, however, this is not as big of an issue as it might seem. Try letting the coat dry for a few minutes and reapply paint. Eventually the patches will be covered. How well the paint has adhered is another story, though. Try to ensure the inner surface is as clean as possible before painting.
Metallic paints present additional challenges and I would recommend avoiding them. If you run into drips or beading, you will most likely see these defects in the finished product. Because of the metal flecks in the paint, if it is not applied evenly the finish will be uneven, and drips will be obvious. Also, if the paint is not mixed (shaken) consistently it will come out of the can in different mixtures, further hosing up the finished product. I don’t know anything about the makeup of different spray paints but I would not be surprised if metallic paints have additional ingredients that don’t mesh will with smooth plastic.
10 notes
·
View notes