Last Seen Blogs
privaterenang
Private Renang

hvdra00
No Thanks


entreelglamourylahistoria
By
Gabriela Peña Franco

futuristas
Futuristas
Text
Week 10 Reflection
Course Reflection:
Well, this is the last reflection I will be writing for this class and I must say, I thought I would be more excited. I sort of wish this class could continue because it was really really good, and probably my favourite class I have had in my very short time at UNSW.
Starting out as a complete beginner at everything, it certainly has been difficult at times to deliver good quality results. However, it has taught me a lot of skillls (or at least given me a taste of what it would be like) that I will use throughout my time at uni and of course, in my career as an industrial designer.
I actually started out not liking this class as much as I do now back the early weeks. I found the work very difficult and hard to follow, espically with the engineeering drawings. I knew engineering drawings were going to be extremely benficial for me in my career, but I really didn’t like it. I think this is mainly because I had to remember all the various light weights and rules and other characteristcs of it, and the fact that I have had no previous experience with it.
With that being said, Rob always said that if it’s not hard that means you’re not learning. This really opened my eyes to see that whenever I try to learn, things will not make sense at first but if you keep at it enough, you’ll get it eventually. With this thought in mind, I would say I grew accustomed to being challenged every week. You could even say I grew to appreciate the fact that I was being challenged because I knew I was learning something new.
Other than that, the next difficult part was certainly using 3DS Max. I have had little no experience with using these types of CAD softwares and as I have mentioned in my previous reflections about this, it was a great challenge to get a grip on it.
On the other hand, things I really liked were the perspective drawings and the foam modelling. Perspective drawings, well constructing a perspective drawing was completely new to me and definitely proved to be difficult. However, I enjoyed it a lot more because I got the hang of it a lot sooner than the other types of drawing activites we did. The foam modelling was also very fun, mainly because I really like sculpting – I like working with very hands on activites. Though it was my first time modelling with foam, it felt familiar to other types of sculpting I have done previously.
Overall, it has been an amazing experience being challenged and questioned for my choices for everything, especially with this reflections. These reflections really allowed me to think openly about my struggles and solutions for the problems, which I can say without doubt, has taken me one step closer in becoming a better industrial designer.
Lastly, I want to thank Rob, Gonz and Tom for organising and helping through the activites, it has been a rocky and exciting experince and I want to thank you all for everything you have done help me out.
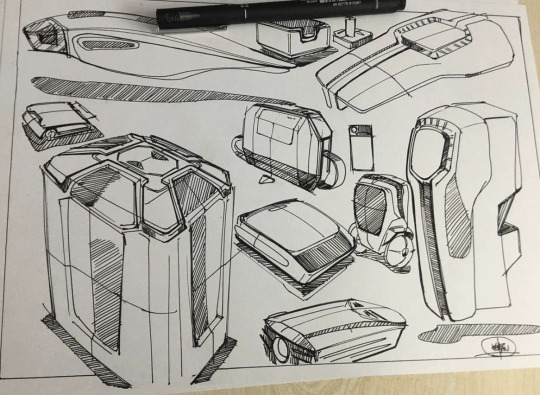
Week 10 Class Activity (Screenshots):

6 notes
·
View notes
Text
Week 9 Reflection
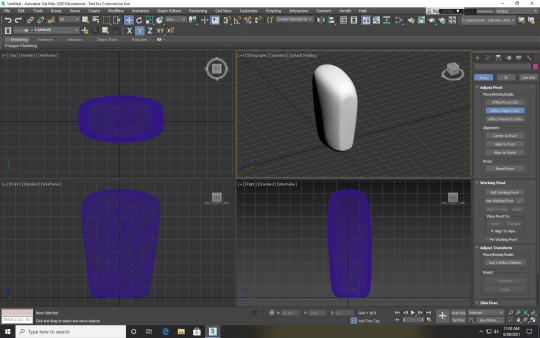
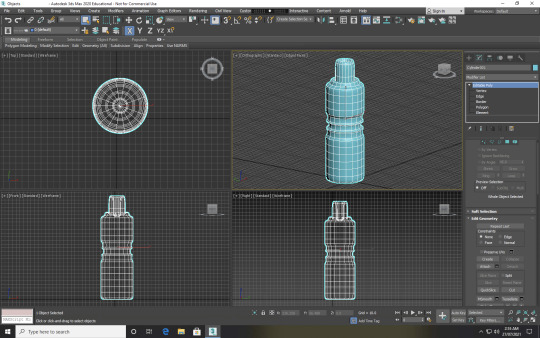
This week’s activity was to use Autodesk 3DS Max to create prototypes of the Olay bottle. From last week’s activity, having already being given a taste how this software works, I was a little excited to see what I could come up with.
My steps in creating my model was to simplify my workspace. Rob always advises to simply the workspace, which I have now really become a fan of. I used to be under the impression that having all tools out all the time would be useful if there came a time where I needed to use a certain tool. However, with the idea that sometimes less is more really made it easy to navigate through the interface. I felt that this made my work much more effiecient because I knew where everything was located.
Moving onto actually designing the bottle, I decided to start off with the most basic modelling method in the software – using basic shapes and modifiers. I thought that if I was able to create something satisfactory with these, it would make my work much easier and faster. (Coming back to the idea of efficiency and finding the best ways to accomplish the tasks.)
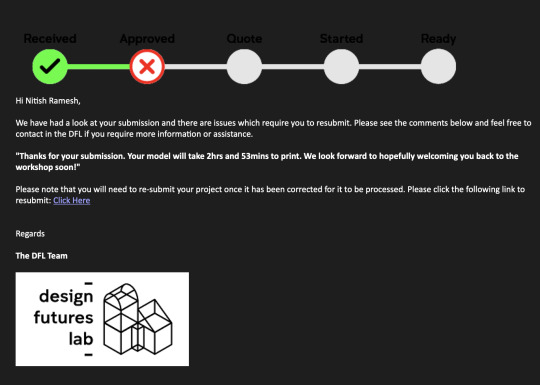
As I was working through the basic shapes and modifiers, my design was looking promising and I knew I was on the right path. As I was adding my finishing touches, MyAccess crashed and I lost my work, which was really really frustrating as it took me a lot of time experimenting with different shapes and modifiers to create that. However, to be fair, me knowing about the inconsistent nature of the programme, it was my mistake that I did not regularly save the file. Unfortunately, I also did not screenshot my process, which I thought I would do at the end (by reversing all my actions).
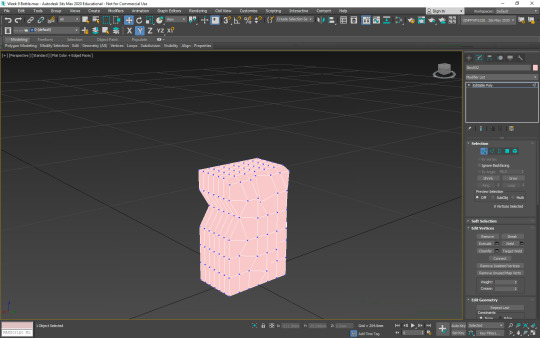
With that being said, I once again started, but this time I literally saved EVERY single change I made. This really came in handy because MyAccess crashed multiple times as I was working through the second time around and I didn’t have to worry about losing my work. Also, I thought this might be a good opportunty to try making the bottle with polygon modelling instead because I felt like redoing what I did for the first bottle would not make me better at using the software. Though I have already used polygon modelling in last week’s experimentations, the results I ended up with were by fluke and I wasn’t sure what I was doing half the time. So this time, I wanted to change the fluke to proper understanding.
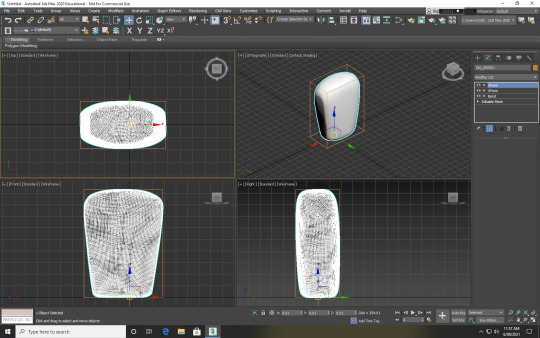
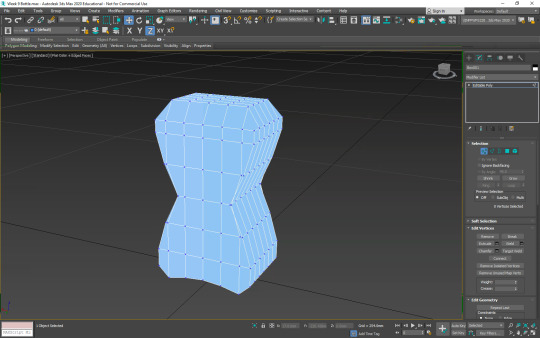
Unlike working with basic modifiers, when working with polygons, I realised I had to add segments to adjust the shapes, and the more segments I add, the more detail I can create (and the more time it will take). I started off using 10x10x10 segments for the box, which I realised was way too much for what I was trying achieve and much more time consuming. Instead, reducing the secments to 6x6x6 gave me enough segments to work on details while also making the process a little faster.
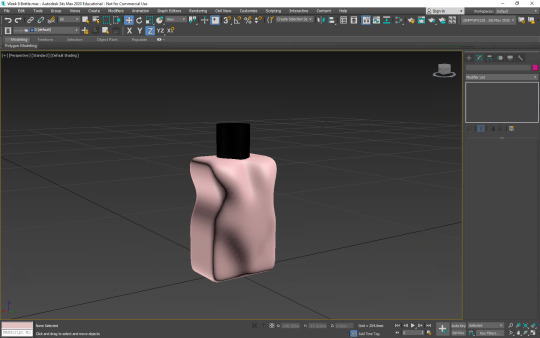
This was the final result.
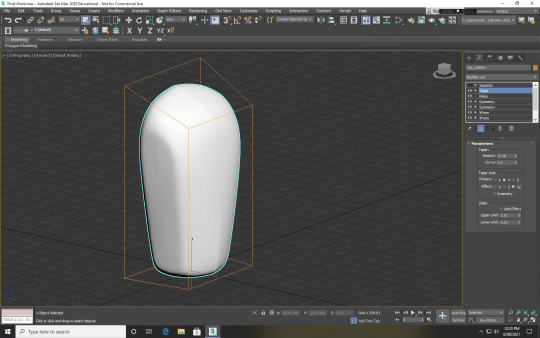
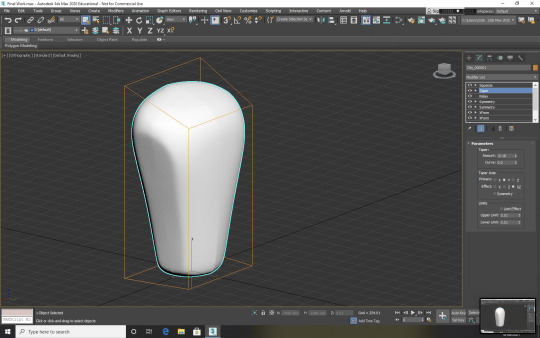
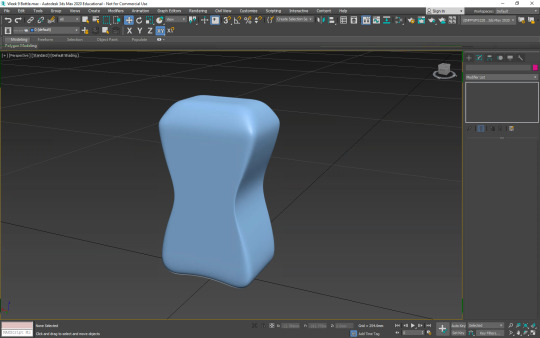
Useing NURMS with 3 itterations to create a smoother looking body.
Final design with lid.
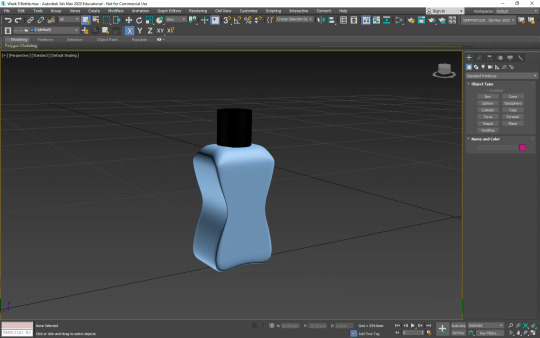
With this bottle, I am very satisfied with the outcome and it looks almost like how I imagined it to be. I also feel much more confident in my ability to use the software.
Another thing was that I figured out that I can make my design more accurately by typing in the adjustments into the respective x y z tab found in the bottom panel.
With my next bottle, I thought I would get a little more experimental with the design. I thought I would try to recreate an abstract female human figure – to direct the design for female audiences.
This was my result.
Useing NURMS with 3 itterations to create the organic shape.

Final design with lid.
With this bottle, I am not entirely satisfied with the outcome, especially with the way the shape of the female body looks. In hindsight, I think possibly adding more segments to the original shape might have given me more precision in designing this.
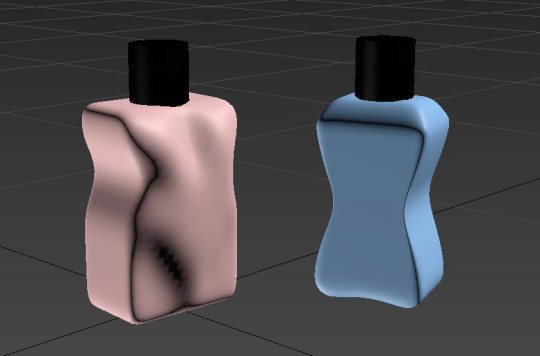
Both designs together:
In all, this has been a good learning experience for me. I became much faster and I can now say confidently that from here on out, my work will not be a result of fluke, good or bad.
I am excited to continue learning this software and other CAD softwares too. These softwares are extremely important in today’s industry, and I can see why. These are powerful tools that, once mastered, can be extremely useful in designing.
6 notes
·
View notes
Text
Week 8 Reflection
The use of CAD software for designing, especially industrial designing, is extremely important. This week, the work consisted of experimenting and learning to use one of these CAD programs – Autodesk 3DS Max.
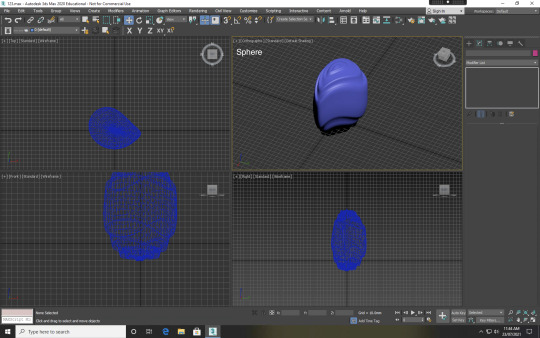
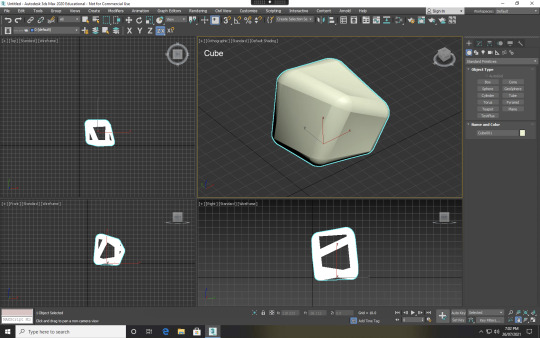
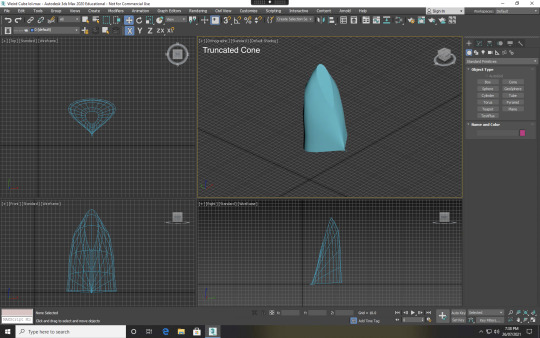
The only 3D modelling software I have had exposure was in Rhino (for BENV1010 in term 1) where I struggled in using it. I knew using 3DS wasn’t going to be easy so I braced myself for the worst! Trying to get used to the interface and the tools/mechanics of 3DS was extremely confusing for me. But luckily, part 1 of the activity was to just experiment with general 3D shapes and modifiers, which I helped a little (though I still couldn’t figure out how to use all the modifiers). We started off with a sphere and were allowed to experiment with other shapes. I used a cube and a truncated cone for the next two.
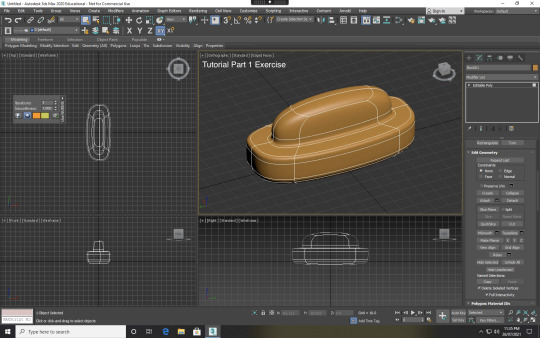
After experimenting with the tools and the interface, I then watched the online tutorials in using polygon based modelling for 3DS Max. They introduced some very interesting tools like inset, bevel, extrude and NURMS as well as other options to further manipulate the object. I went on to follwo the tutorial part 1 just to familiarise myself with these tools so I wouldn’t struggle too much later. I ended up with a satisfactory result, mainly because I was just following a step-by-step procedure.
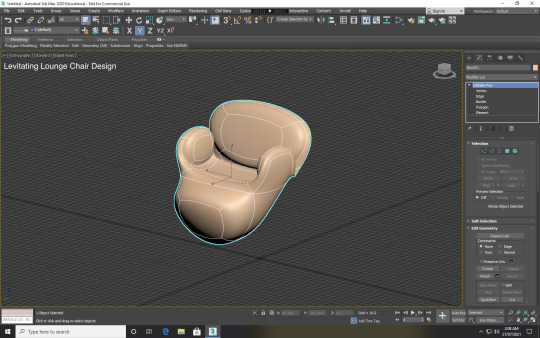
Now, I know that following a tutorial and doing things by yourself are two completely different things, but it shouldn’t be too diffucult because I’ll simply just be applying what I learnt from the two tutorials that I just watched, at least that’s what I thought. As you can guess, I was terribly wrong. I spent so much time trying to recreate something similar to the tutorials and I kept failing. I spent so much time trying to figure out where I was going wrong with my steps based on the tutorials than trying to make it my own with my specific manipulations. I pushed through this and come out with some decent results I think.
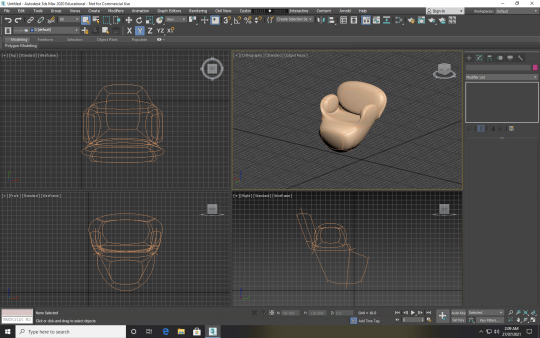
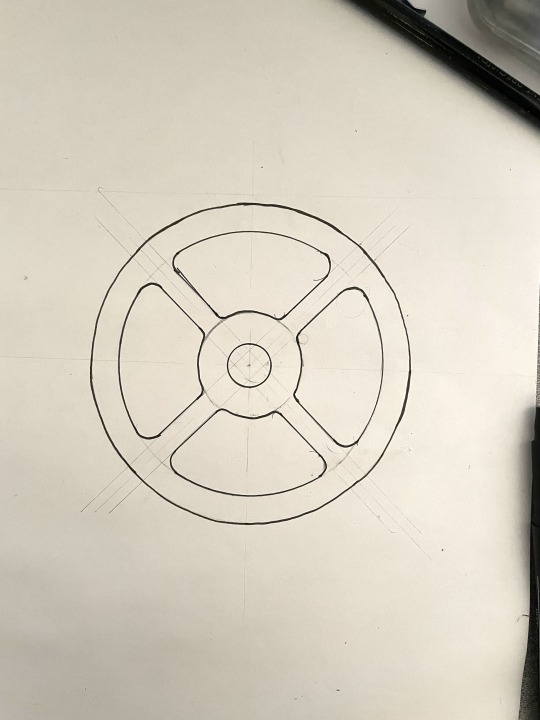
The first one I came up with was a levitating lounge chair.
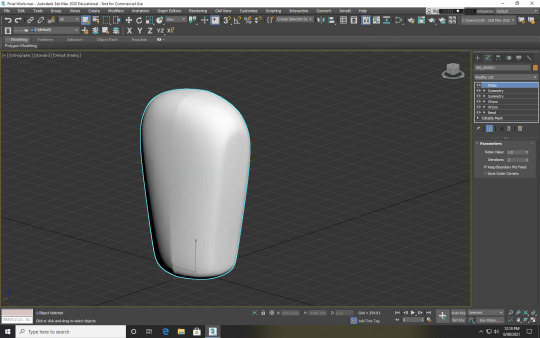
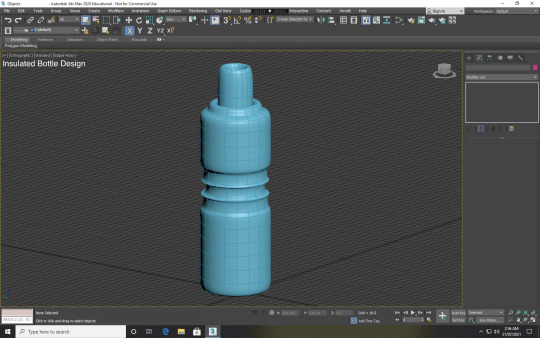
The second one I came up with was an insulated bottle.
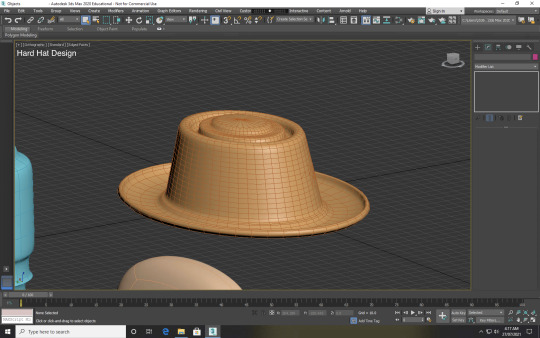
The last one I came up with was a hard hat (that looks like a regular hat).

Overall, this week was probably the most challenging for me. I need to practice more using CAD softwares (I have heard that they are all very similar to use) and make myself proficient in them for my future. Though it was challenging, I think it gave me a good taste of what to expect in learning further with these programs.
4 notes
·
View notes
Text
Week 7 Reflection
This week’s work was to create a 3D rendition of the 2D designs we created on photoshop. This was very exciting for me because I really like to do sculpting/modelmaking (though I’m not that good at it yet).
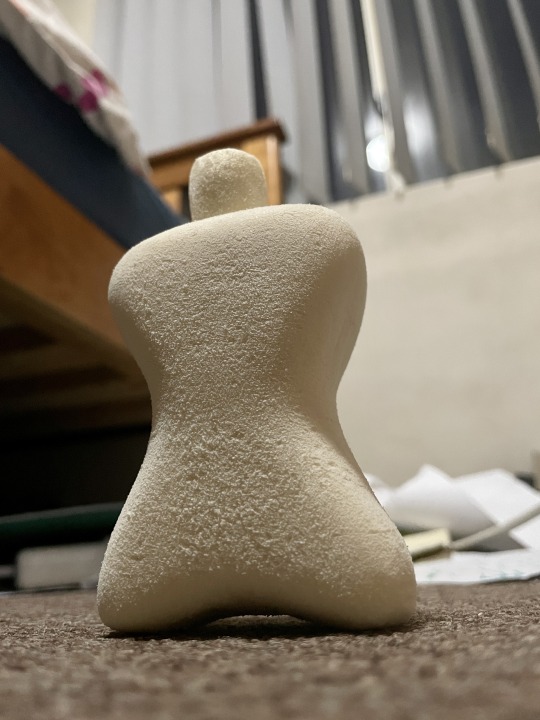
We were supposed to use blue foam blocks for our works, but due to COVID reestriction and bad planning on my end, I was unable to source it. Luckily, I did have one spare block of beige coloured foam from last term’s BENV1010 class, which JUST fit the right dimensions for the work.
In terms of my work space, I just used the small space I have between my bedroom floor. It did create a big mess of all the rasp and sand paper dust but I did wear a mask, and then I vacuumed the floor.
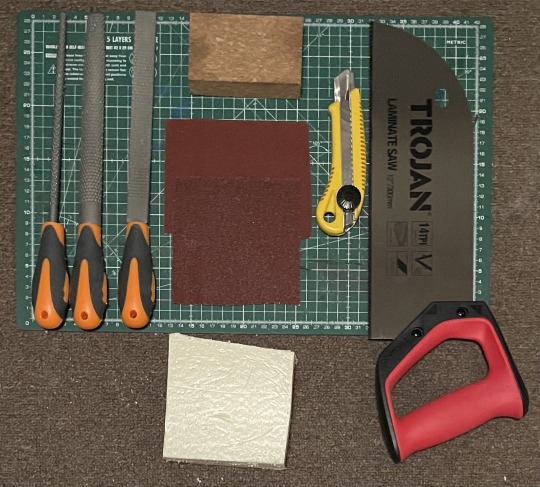
I also didn’t have any of the tools (except for the box cutter) required for making the model and had to buy them from Bunnings. I ended up purchasing a hand saw, a sanding block, a pack of 120 grit sand paper, a pack of 60 grit sand paper and a set of rasps. I am so happy I bought these tools because they really really made my process significantly easier than what I was used to. I am also sure they will come in very handy in the future for my projects to come.
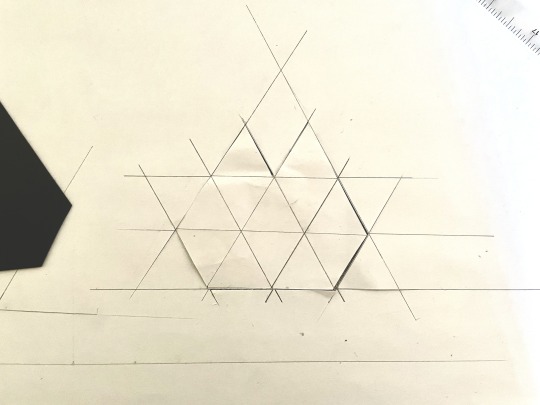
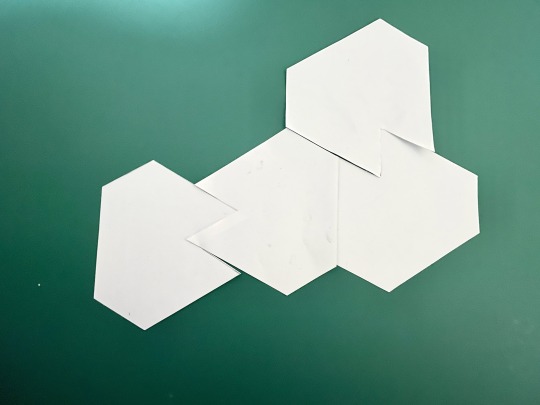
I then made templates with paper. I did not need to make many templates as the design I chose was symmetrical.

I outlined the shapes onto the block, which pretty easy, but the real hard part was using the hand saw and rasps. Since my block was already small and close to the dimensions, I had to be careful not cut off more than what was required with the saw. The rasp was also a little difficult to get used to (as it was my first time using it) as I was scared I would remove too much off my foam.
After I got a hang of it, the process bacame very fun and interesting. Overall, I am very happy with my final result.
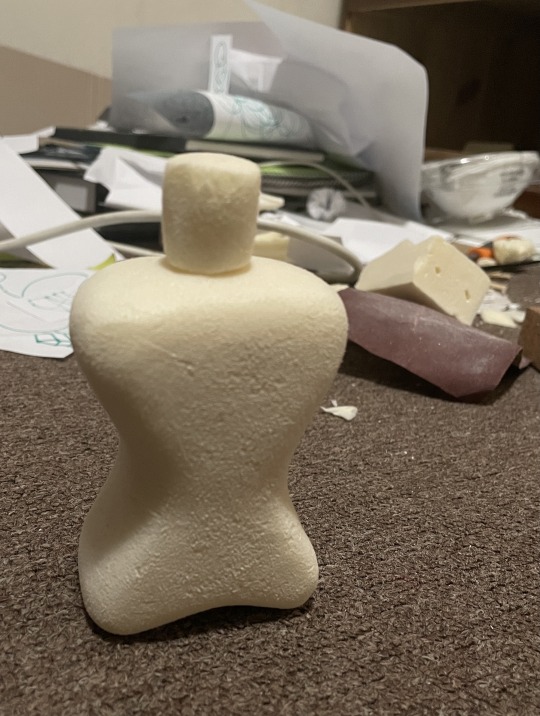
I used a toothpick to attach the lid onto the body of the bottle.
One thing I really wish I had was more foam to create more models. Though I am satisfied with this result, I wish I could have made different designs experimenting with new techniques. Other than that, this week’s work was great!
4 notes
·
View notes
Text
Week 6 Reflection
To begin this felx week, I looked into social media (specifically Instagram) to find some inspiration for industrial design concept sketching. I already followed some interesting industrial design pages on Instagram from which I often try to get inspiration for my sketches and works. I tried to look into three main things: pencil skrtching, pen sketching and combining the coloured markers with pen/pencil.
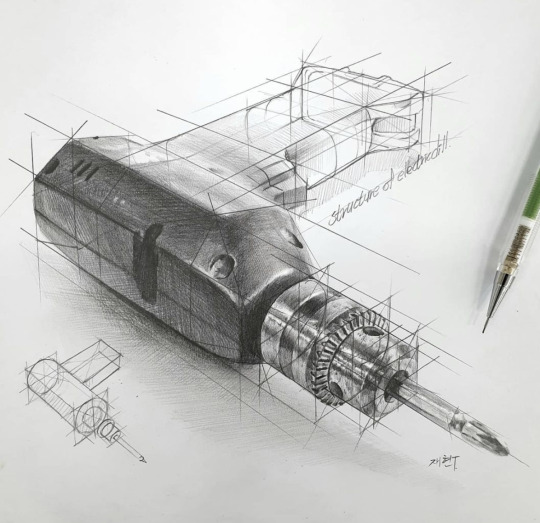
The first account is @anjjaemi – hyperrealistic drawings and sketches. As a pencil artist myself, I can really apprecaite the way the artist has used cross hatching and directional/contour based hatching to demonstrate the form and and depth of the object. The way the softer parts and the metalic parts are blended beautifully to create the realistic effect of light bouncing off the surface/texture of the drill.
The second account is @aditya.pandharpure, who has a nice and tidy integration of pen and coloured markers. I really like the looseness of the colour. Even though the colour itself is very dominating and powerful, he somehow still manages to maintain a certain level of looseness that creates the feeling that it’s open to new developments.

The third and last account is @orangemilldesign who focusses on simple pen line work to represent the concepts. Once again, the looseness and the simplicity really creates a nice aesthetic apeal for me, which I hope to emulate in my own work.
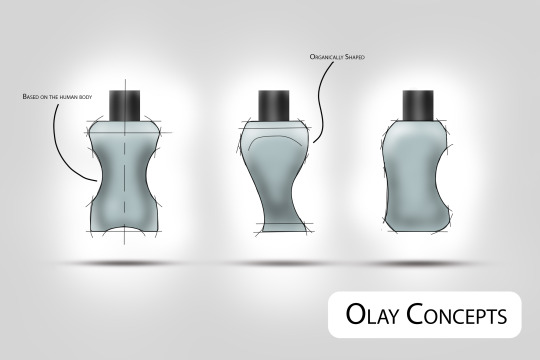
For the next part, we had to create digital concept sketches of the Olay Lotion bottle. This was extrememly exciting for me as I found the methods Rob showed us in creating these sketches to be really cool. The idea of sculpting made it sort of feel like I was actually working in 3D space. I have little experience in photoshop so there was definitely going to be a learning curve for me in trying to achieve a level of quality that I was satisfied with. It was certainly very very difficult, especially without an iPad or tablet. I really had to concetrate and hold my breath when using the mouse in creating the right shapes and outlines for my renders – this took me multiple attempts to get it to a satisfactory level. I also made a slight chance to the tutorial shown by Rob. Instead of creating a coloured rectangle in the background, I decided to create an almost spotlight/highlight-like glow in space where the concepts would be floating. I don’t think I pulled off what I was trying to achieve there, mianly because of the lack of my experience in using photoshop (though I spent an extra hour trying to experiment with the presentation).
Overall, I found this week’s work to be very challenging and exciting! I had a lot of fun working and struggling and trying to get certain things right. Unfortunately, since I do not have access to an iPad or tablets, I was unable to experiment with other softwares.
8 notes
·
View notes
Text
Week 5 (Parts 1 and 2) Reflection
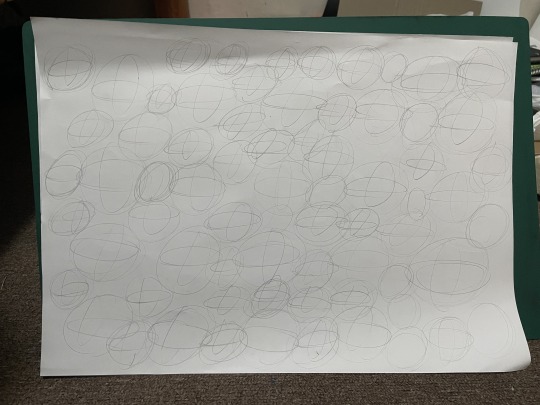
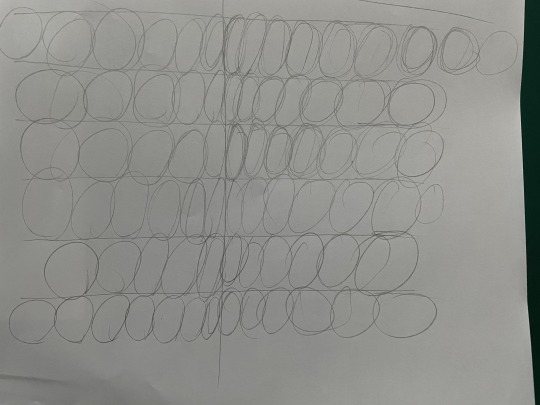
This week, we started with some warm up drills which was really effective in loosening my arm for the tasks ahead. I found drawing the circles pretty fun because it was very loose and freeing. The connecting the lines exercise was pretty fun too, though I feel like I could have done it much more accurately if I was more patient. For the contour lines exercise, I had to rush through it to keep up with the class so it looks very messy, however, it did get me to start thinking about shape and space and the curves of objects.

Next, we started on part one, which was to redesign an Olay lotion bottle and draw the front profile of it. We had to do multiple iterations of it, mainly just sketching idea. I found this to be a little challenging as I feel as though I am not a creative person. When I am asked to create something original, I struggle to come up with a “creative” idea and or something aesthetically pleasing. I believe that this is due to my lack of exposure to the process of designing, which led to some untidy and anaesthetic concept ideas. I think I can overcome this by reading more about industrial design and maybe keeping up to date on trends as well. Maybe checking in often on websites like Pinterest or Behance for inspiration.
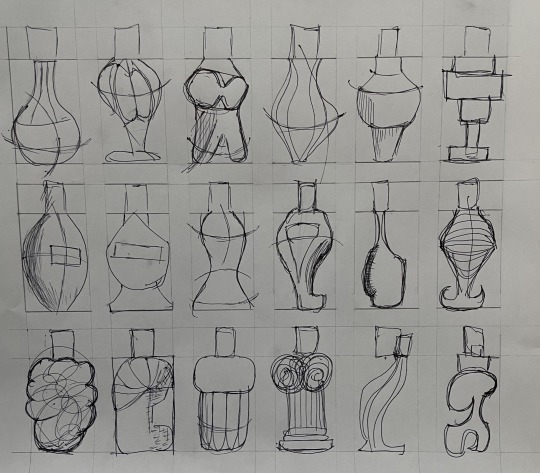
That being said, luckily, there were a couple designs I was satisfied with from the sketches of the front profile I sketched out for part two. Part two was relatively easy, or so I thought...
To begin with, I constructed a basic two-point perspective box in the dimensions outlined by the activity brief. This was pretty simple, as the experience from last week really helped in making it accurate.
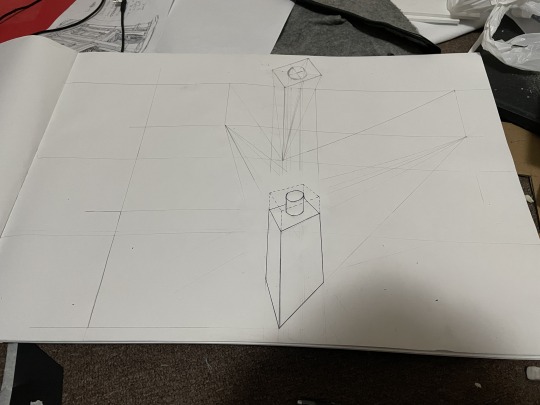
Since I was going to be doing multiple iterations of the design, I scanned in the outline and used it at a guide for the space that I will working with when creating my 3D perspective sketches of the chosen designs.
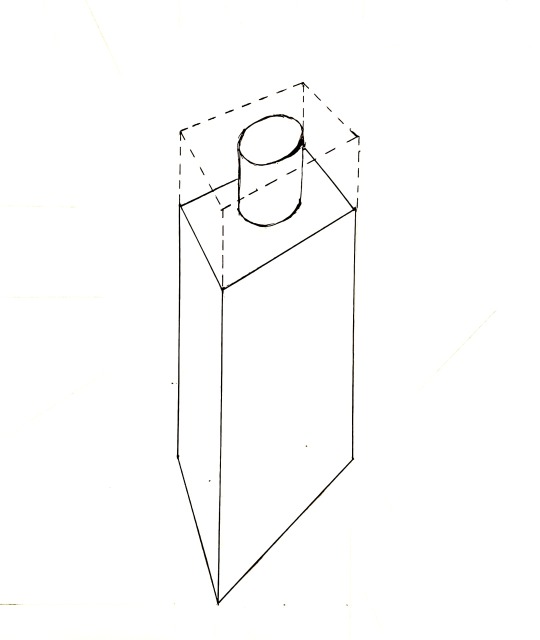
For my first design sketch, I really really struggled to work with the perspective. Whenever I did a perspective sketch, I had always just eye-balled it, as I think my understanding of proportions is pretty good from my experience from working in fine art drawing and painting. I thought that a guide would make it easier, but it turned out to have the opposite effect. The guiding space actually made it more difficult to understand the space I was working with. It made it almost limiting. I struggled to place my points accurately which resulted in distorted sketches and odd looking shapes. In fine art, though you set out the proportions at the beginning of the work, there is a larger margin for error as you can manipulate other parts of the artwork to unify with the whole work. In the constructed perspective sketches, the space is extremely well set out and inflexible. For this reason, I spent a lot more time that I thought it would take me, figuring out how to the use the space to the best of my ability (only for sketch 1, sketch 2 was a lot easier and took a lot less time).

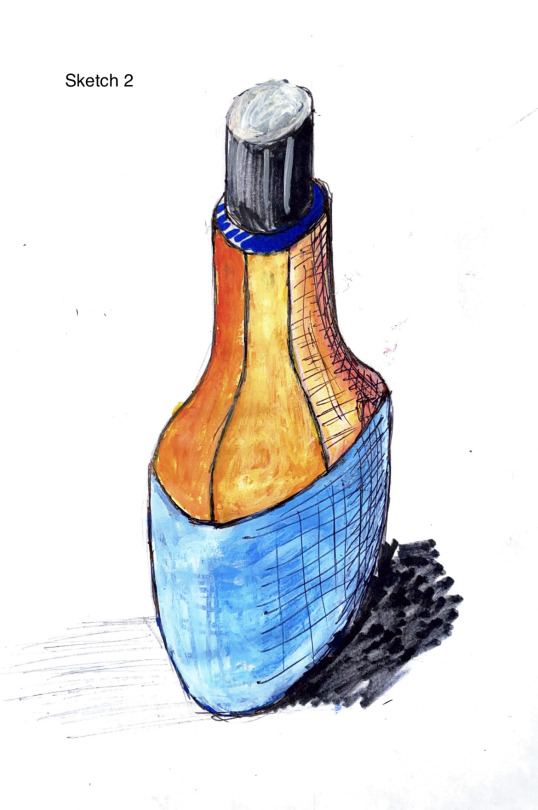
The first sketch I did was outlined with pen and shaded with pencil to show depth. The second sketch was outlined in pen and coloured in with posca, with a little bit of pen hatching to show depth. I used bright colours to make it popping and vibrant. I thought it would work nicely with the curvaceous surface of the second sketch.
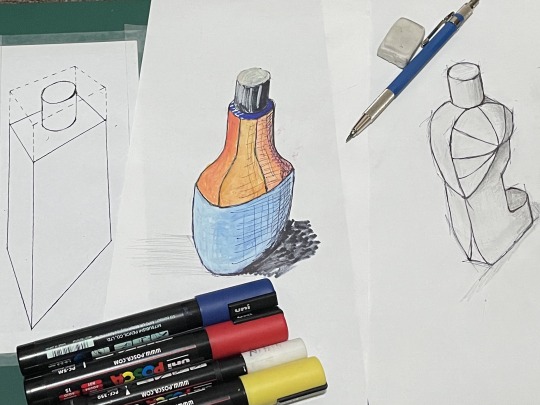
I personally like the design of sketch 1.
Overall, these two activities were pretty fun and interesting as it exposed me to the methods of creating new ideas.
6 notes
·
View notes
Text
Week 4 Reflection
Perspective drawings... probably one of the most basic things you learn in drawing in any form. I’ve been doing perspective drawing for years now, yet I had never “constructed” a perspecrtive drawing. I have never made proper scaled versions of perspetive drawings before, and this hit me hard in the lecutre. I was thinking that it was the same old basic thing I had been doing since year 9 of high school, so I was pretty confident at the begininning of the lecture. But couldn’t have been more wrong... as soon as Rob started talking, nothing made sense! Personally, I find myself to be a person who learns better by doing things than by listening to the theory. So I was terrified during the lecture for what I was about to do. AS the tutotial started, I was very concerned that I was going to make too many mistakes. In order to overcome this, I often I tell myself that if you’re struggling to start, then just start the work and figure it out. I know that might make sense but basically it means that the best way to clear the confusion is to put yourself through that confusion, where you will somehow find a way out, and in this situation, that saying came through once again! Soon after, I had Rob take me through the step-by-step process, which really really helped me gain a deeper understanding of the method which cleared my remaining doubts.
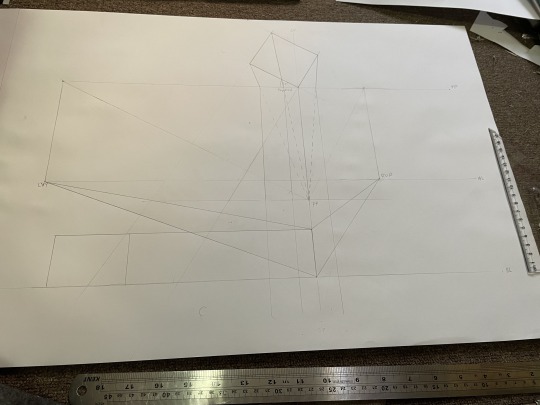
I felt that task one was very “hit or miss” based on the results my peers had in my tutorial. I saw that some needed to had to redo their sketches and some had to attach extra paper on the side. Luckily, I did not have to do any of that as the chamfered box model I made really helped me understand the space I was drawing in, resulting me to avoid those little errors. My final result I think look decent and I am pretty satisfied with it. I have also left my construction lines there to remind me the process of creating a two-point perspective for the future.
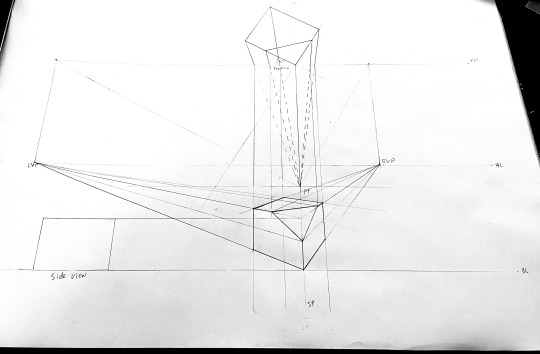
Task two was a little tricky at the beginning as I was a little confused with the diagonal lines (they looked really confusing). I wanted to attempt this without the assistance of the step-by-step guide to teach myself to do this, and it was all looking right. I had successfully added prism of the same dimensions to the bottom and the back. I hit trouble when I was trying to add my third prism to the right side. It started to look very distorted and weird. I thought I was doing wrong, even though I followed the exact same method as I used for the previous two additions. So I double checked with the step-by-step guilde and the methods that I used to create corresponded with that of the guide, so I came to the conclusion that I do not have enough space within that range to add another prism on the right. Instead, I added one to the left, and it looked right. Overall, it was a little confusing because of the distoretion issue, but I am satisfied with the result.

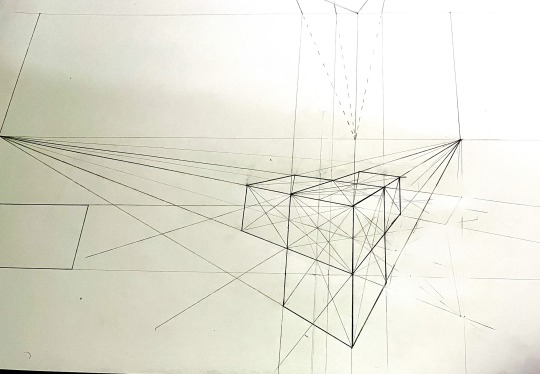
The last task, task three was relatively simplier. Constructing a cube and drawing a circle on two faces in perspective. Once again, I tried not to refer to the guide, and tried to remember what Rob said during the lecture. I was successfully able to remember everything and was able to complete the activity without much hassle. I also double checked my method with the guide after completing to make sure eveything was ok. Overall, this last task was the easiest of the three, probably because the hardest part is to create the right perspective, which had become much easier for me to do by completing tasks one and two.

In all, this week’s activies were certainly interesting, and I enjoyed myself doing these. I really like this way of constructing perspective views. I think it’s a lot cleaner and tidy, even though there A LOT of steps to remember. I am also generally satisfied with my outcomes for these tasks.
2 notes
·
View notes

Photo
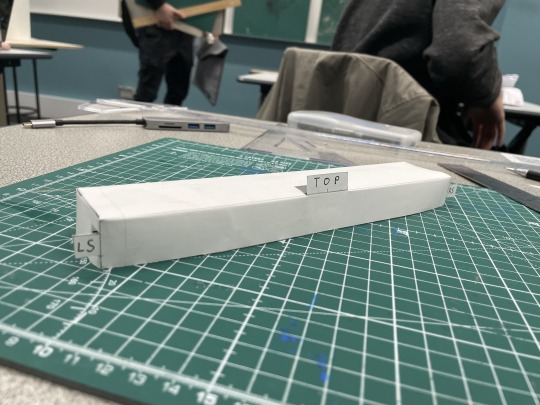

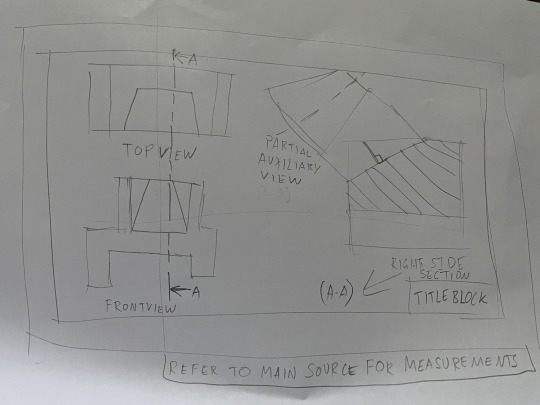
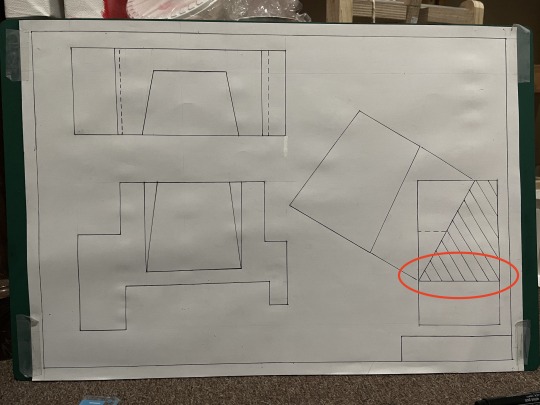
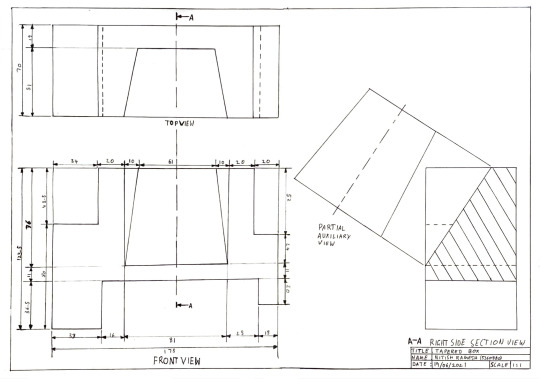
The second weeks activities were based on creating orthogonal drawings of an object. The first activity was about creating a 5 sided box that would cover the product. The purpose of this activity was to help us understand how to create a 3 face angle drawing. The process of making this 5 sided box was pretty straight forward and was not too difficult, mainly because it just consisted of drawing straight lines perpendicular to each other with the right measurements. Personally, I found this box to somewhat useful as it removed my doubts about aligning a 3 faces of an orthgonal drawing with each other. (Though it still took me a while to make it, as I wanted to make it as perfect as I could. I am sure with sustained practice, I will be able to become much faster.)
The second activity was perfect for preparing for the third activity. This section did not take me too long as they were just brief sketches with somewhat being in scale. The hardest part was definitely measuring every single tiny distance between elements of the product. This was also the most time consuming aspect of the second activity. I found that making this sort of sketch before drawing the technical version really really helped me grasp the dimensions of the product and made me much faster I know activity 3.
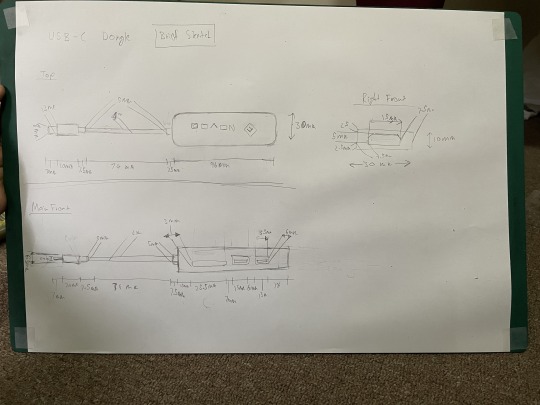
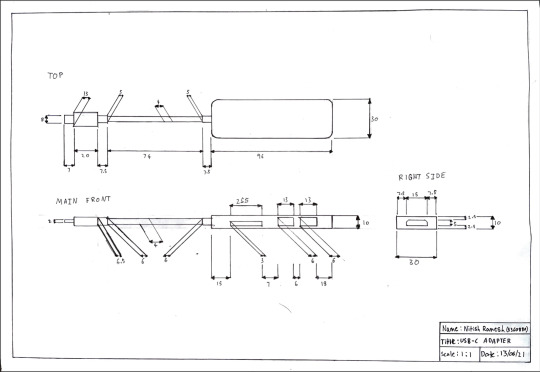
Activity 3 was by far the most challenging. My product had a lot of very very similar sized components connected to each other. For example, the wire was 4mm but the component connecting to the wire to the main body was 5mm. Instances like see this, where I had to draw lines very very close to each other accurately was certainly a challenge to do right. Just like last week, I think the reason I’m struggling is because I’ve never done anything of this type of drawing. And even though in week 1, we were introduced to these technical drawings, drawing this particular product was much more of a challenge. I think it might have been better for me to have chosen a slightly easier product to draw, just to ease me into this better, but at the same time, I think doing something harder like this will allow me get better faster.
Lastly, the arrows I used were extremely untidy. I found that there was not enough space to draw them on certain short lines. Also, the nib of the felt tip pen split as I drawing some lines which resulted in inconsistent thickness of my lines. Additionally, when I scanned the completed drawing, the scanner for some reason did not get the border lines straight (in the physical copy, the border is accurately drawn). These things affected the overall neatness of my work at the end. I did not have time to redo my work from scratch so I decided to leave it as it was. Leaving it like makes feel very dissatisfied with the final result.
Overall this week had a great balance of challenge and easiness in all the activities. I think this week has helped me develop a better understanding in the process of constructing technical drawings.
(Side note: If someone could give me ideas on how to make neater arrowheads in smaller spaces, I would appreciate that greatly!))
13 notes
·
View notes
Photo
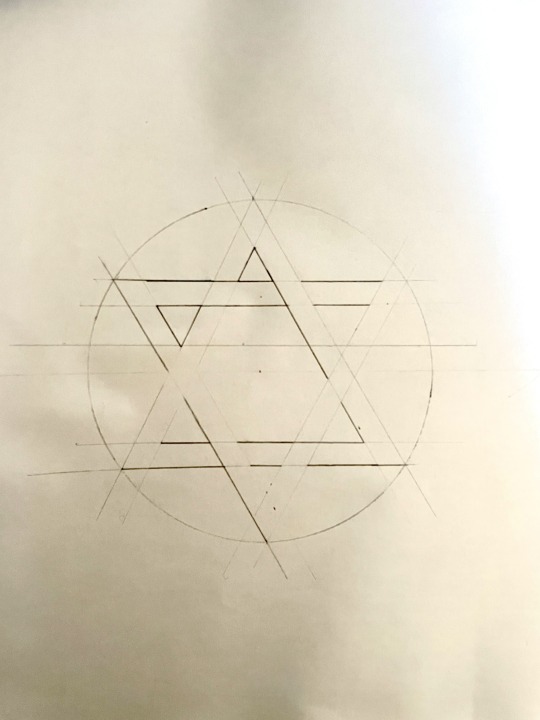
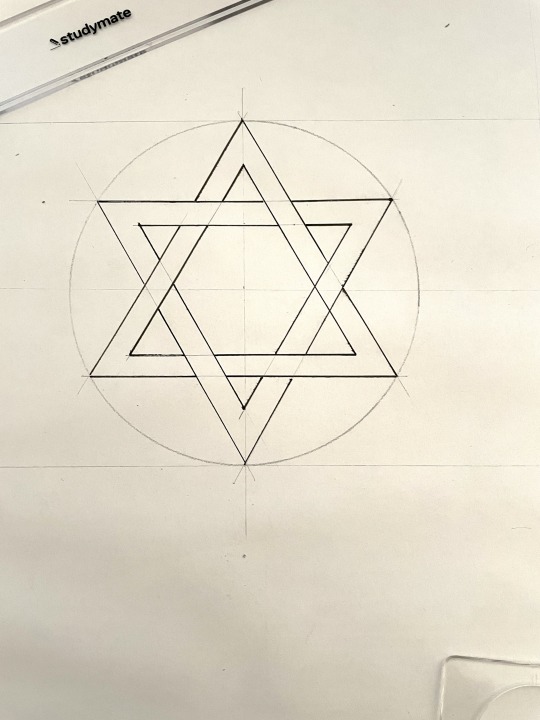
This was the first week’s activites and I think it was a great introduction to engineering/technical drawings. As an artist who specialises in pencil drawing and sketching, I was not expecting to find these activies as diffucult as I found them. These activities have shown me that just because I can draw a nice portrait of someone doesn’t mean I can precisely draw techincal drawings. I think this is because of a combination of two things: the use of the precision equipment (such as the tee square, set squares and compass) which I have little to no experience in using and, my nature as an artist to free-hand draw everything. For me, something as structured and precise like these teachnical drawings feel very unnatural for the reasons stated above, which I plan to overcome with more practice and patience.
Also, my peers helped me figure out how to use the set squares. As I used it more, I was able to figure out how to use the angles to my advantage in creating these drawings. Rob and Tom also gave me quick tips about my accuracy and also were constantly giving me feedback on my technique in using the tee square.
Overall, I found this first week’s activies a true challenge. It taught me to be more patient and that precision only comes if you go at your own pace. I think with more pratice and effort, along with feedback from the tutors, I will be able to learn a lot from this class moving forward.
(Side note: The curved and rounded edges of the tables did not help me with my accuracy. Also my compass not having a pen attachment posed as a disadvantage in my endeavor for precision as I had to do the outlines of the circles free-hand, which resulted in a slightly untidy finish.)
6 notes
·
View notes
Text
Heyy
Hi guys, as some of you may know, I am Nitish. I really like drawing and painting and art history. I am also a professional binge watcher of TV shows and movies :)
5 notes
·
View notes