
Last Seen Blogs

the-spooky-mind-of-spiderwish
The artist formerly known as a-growing-boy-needs-his-lunch

botparatodos
Bot para todos
ikanoorharini
Ika Noorharini
cheshire18cat
CShadow
bloominapril
Daydreams of an overthinker
Text
Week 12
Studio V
This week, with my deadline looming, I had to start focusing more on the presentation of my project. Unfortunately, my work is still too unreliable and difficult to set up and use that I think having it set up as part of my presentation would likely be impossible. I spoke to a few of the lecturers about possible presentation and came to the conclusion that having a video that briefly discussed the context of my work and displayed some footage would likely be the best option. I've been working on writing academically about my project and my plan at the moment is to hand in a framing statement as well as a poster, with the poster serving as a quick discussion of my project and the written statement providing a little more detail.
That way interested viewers could move just watch the video or look at the poster, or read the statement if they wanted more information.
I also used my time this week to being switching my camera sensor type from a depth camera to a laser radar (lidar). To do this I had to clean out a decent chunk of my existing development folder, and rebuild the gazebo section of my URDF. After that was complete I had to install the dependencies of the hokuyo lidar plugin, then install the plugin itself, link it to my project files and then include it in the URDF gazebo file.
I managed to get all of this done by the time I'm writing this. but I'm still having issues running the laser. I've found that while it does create a valid topic that my AI can subscribe to and read elements of, for some reason I'm not seeing a visualisation within Gazebo or when I test the laser with RVIZ. Hopefully I'll be able to fix this, I'm sure if I look into the sensor message files themselves I can discern the issue, and it's most likely simply due to the range of the laser or method of display not being tuned correctly.
0 notes
Photo

Week 11
Studio V
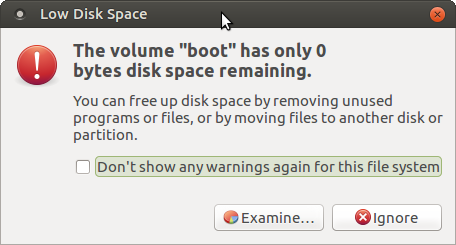
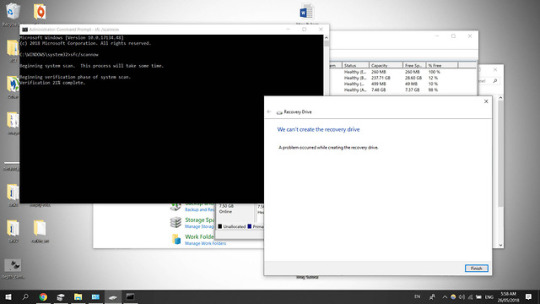
I've spent most of this week working on my final programming assignment for COMP610. But once I handed that in I planned to spend the rest of my week attempting to solve my previous persistent depth camera issues. Unfortunately, to add even more complications to my project, when I logged in to my Ubuntu partition no program would open. On attempting to move a file while trying to fix this, an error appeared telling me that I had run out of disk space on my partition. It looks like when I created my partition some of the space wasn't converted, the system took more space than I anticipated, and then one of the junk programs pre-installed on the operating system had updating automatically when I logged in, using the last chunk of space and stopping the entire system from functioning.
The system was so broken that I found I was unable to actually remove programs or gauge the space distribution on the drives from inside the Linux system. I tried to go on to my windows system and free up enough space to extend my Linux partition externally, however even while removing my paging file and disabling several core windows features to defragment my drive, I was unable to decrease my windows drive space by more than 1gb, even though I had near 100gb free. After some research I determined that I would have to store my workspace files on a hard-drive and then uninstall my Linux partition, add the drive space back on to my main drive, then recreate the partition and set up all of my workspaces again.
I found that while I was able to remove the partition space from my drive and add it back to my main drive, I wasn't able to remove the Linux partition, even though it had no space. Because the Linux reinstall would run into issues unless I removed the previous one, I figured out that the only way to get rid of the Linux partition was to reformat my entire computer and also reinstall windows.
This meant I'd also have to transfer about 150gb of data from windows before I reset everything. Fortunately I'd planned to meet my external robotics contact before this issue arose, so I was able to borrow a hard-drive and two USBs to install the windows media installer and Ubuntu partition installer on to. The process was pretty arduous, taking hours just to transfer files, during which I couldn't leave the computer, as I had to input commands for dealing with file replacement and administrator access.
After that I had to go through the tedious process of reinstalling windows, choosing all of my details, removing all the default junk programs and turning off boot features and cortana. After that, more hours for reinstalling all of my files and necessary programs before booting with linux and recreating my Ubuntu partition, this time with about three times the space, just to be sure.
Once Ubuntu was reinstalled I had to set up all of my workspaces and ROS packages from scratch, because directly copying them from the hard-drive wouldn't create the set-up and config files properly. Thankfully knowing exactly what to make and being able to copy the contents of xacro (and similar) files sped up this process to about a day of work.
One upside is that during this process I spoke with my external contact, and they mentioned that they would likely switch back to a lidar laser system rather than continuing to use a depth camera. During my research I encountered an alternate camera plugin that simulated a lidar scan, made to work with the hokuyo lidar. Switching to a lidar could solve my depth camera issues by avoiding using the openni plugin altogether. As far as I know the hokuyo lidar isn't up to date with ROS kinetic (my current ROS version), but at this point everything feels easier than working with openni.
0 notes
Text
Week 10
Studio V
This week I've continued to run into serious roadblocks. I will attempt to quickly summarise the numerous issues I ran into this week. Previously I'd traced the source of my problems to a plugin called openni that I needed to install. This week I installed the updated version of openni, openni_camera and openni_launch for kinect and then unpacked them with catkin_make. Still the same error. I did some extra research and found out that I needed to call these files from my launch file. I added the directories required and ran the program again. Still broken. I traced the directories needed back to the source and realized that openni_camera hadn't unpacked properly. I tried to reinstall but ran into the same problem. I tried to unpack the directory specifically instead of running a general catkin_make but recieved an error claiming it was an invalid target. I did more research and concluded that I might need to use an older version of openni. I directly imported an ulready unpacked version of openni_deprecated. This created a host of new errors I was unable to fix. Eventually, I found a way to add in unpacked version of openni_camera and openni_launch from another project's git directory, hoping that I could bypass my unpacking problem. This still failed to function.
I'm not sure I have many insightful things to say, after going through all of this. I've tried so many things to fix this depth camera not functioning and at this point I'm at a bit of a loss. I think I will go and discuss my progress and my issues with the robotics company I'm collaborating with and see if I can get any help or advice.
0 notes
Text
Week 9
Studio V
I've thought a lot about my issue with the camera, and I think that it's best if I leave it with errors and facing in an odd direction because the camera being accurate and helpful isn't necessarily part of my minimum viable product. With the delays that I've had and numerous errors I've encountered, it's more important that I get things working, however badly, before I fix anything, even if it's pretty major.
With this in mind, I've used send and receive rostopic testers as a framework to create a ROS node that inspect the topics published by my camera. Using this I've been able to link my camera to the first part of my AI, a bundle of python files that forms a single ROS node and have it publish to another topic, in response to the information it's receiving from Gazebo, and the simulated camera. I'm pretty happy with this, considering that it's one of the few tasks in this project that I've been able to complete with only minor errors and setbacks.
With sending and receiving between my two core nodes, I've begun working on implementing a depth camera. In the past I'd attempting to add a virtual kinetic camera simulation wholesale into my gazebo environment, and run into issues with it, so this time I tried to use the same plugin to essentially convert my pre-made and functional (mostly) normal virtual camera into a depth camera. The idea is that I would be able to minimise errors, and since I know what parts of my camera are already working, I'd be able to quickly identify the source of my issues.
Yet again, things have not gone according to plan. I immediately encountered issues with my depth camera. Initial errors included problems with formatting and connecting the new plugin to the URDF, but I was able to fix these issues. Finally, I received a massive error message which I suspect traces back to something called the openni plugin not being installed. I have to admit, I'm getting a little frustrated with the frequency of problems cropping up in this project. I had assumed before I began that ROS and Gazebo had a certain amount of update quality and maintenance that they clearly don't. I think that while there are a massive variety of useful tools that can be used, there's a certain assumption that the user is doing long-term professional work and inspecting and altering everything they incorporate, rather than quickly implementing elements from ROS open source toolkit. While this makes the system a little unwieldy for a one-semester university project, I'm not sure whether realising this before I began work in ROS would actually have dissuaded me from using it. It's important to my skillset as an aspiring roboticist that I have an understanding of ROS, as it enjoys an industry standard position in the field of robotics.
0 notes
Text
Week 8
Studio V
This weeks blog will be short. I've spent all my time that I allotted to this project this week attempting to rotate and shift my camera on the robot into position. No matter what I've tried I can't find a way to alter the initial location of the camera, and it remains upside down. I've purchased a guide and done a lot of research, and cannot locate my issue no matter what I do.
I think part of the issue is that I'm loathe to switch tasks and give up on trying to fix this problem because I know that things have to move to schedule for my project to work the way I want it to, and I think that having my camera not working properly could slow me down enough that I won't be able to do what I'd planned.
I've been thinking a lot about how to avoid the sunk cost fallacy, during this project. The idea being that the more time I spend on a particular task the less I want to abandon it and try something else, because I would feel as though I had wasted my time, regardless of whether giving up would have been the better option. To put it a little more bluntly "To continue to invest in a hopeless project is irrational. Such behaviour may be a pathetic attempt to delay having to face the consequences of one's poor judgement. The irrationality is a way to save face, to appear to be knowledgeable, when in fact one is acting like an idiot " ("sunk-cost fallacy", 2013).
From this perspective, I consider my work this week as a failure, not just because I wasn't able to fix my camera issue, but also because I didn't realize I was making a mistake investing more and more time into this task, and switch to something thay may have been more fruitful.
Sunk-cost fallacy. (2013, December 5). Retrieved June 8, 2018, from http://skepdic.com/sunkcost.html
0 notes
Photo

Week 7
Studio V
I've managed to get my camera functioning this week, after a lot of issues.
Initially I wasn't able to attach it to the SDF file, but I realised that there were some code errors in the literature I was following. After I managed to attach it, the camera wasn't creating a rostopic to send it's information to. I realised that the camera's description in the gazebo file wasn't tying it to the camera's description in the xacro file. After I fixed that it sent to a topic, but I couldn't read from the topic. This one stumped me for a couple of days, but I finally realised that the camera link topic I should have been using was actually in the gazebo file, not the one I'd been using from the xacro link name.
After all of this, I got an image displaying in through the correct topic that I could read through an external program called RVIZ. The only remaining issue is that the camera is very strangely located, and I'm not sure why this is an issue, but hopefully I can dabble with the xacro code features and get the camera to appear on the front corner of the chassis.
I'm getting a little worried about my progress at this point. I've had pretty major issues on every task I've attempted, and there's still a great deal I have to do. I'll need to fix my camera location, convert it to a depth camera and then I've still got more work to do getting my AI code to take those images and emit a response to Gazebo. My prediction at the moment is that if that's the last of the major issues I have, and only minor errors happen from now on, I'll still be able to finish my project in the state I initially imagined, however if I run into roadblocks that delay me for more than a week, I'll have to consider alternate possibilities in terms of the presentation of my work.
One of the things I appreciate about studying creative technology is that I'm able to work on projects as ambitious as this, and still consider a project successful even if the implementation didn't go according to plan.
0 notes
Photo


Week 6
Studio V
Unfortunately, this week I’ve run into more problems. I almost managed to finish my implementation of the virtual Kinect sensor into my Gazebo simulation, but when the last SDF files are added for the depth sensor plugin the next time the virtual sensor is loaded into Gazebo it crashes the program. This is quite an issue. I’ve spent a great deal of my time trying to fix this problem and attempting to find alternate ways to import and create the virtual Kinect sensor, as well as loading Gazebo itself with different settings, but so far have been unsuccessful. With my programming test and second assignment coming up, I don’t think I can commit much more time trying to solve this problem. I’ll likely have to switch over to building a different camera option and focus instead on tackling the task of integrating it into the structure of my custom bot. It’s possible that if I use the more complex, but more supported and new, URDF file structure instead of my current, older SDF, I’ll find different options for depth cameras.
One of the big challenges when I’m dealing with these issues is that I’m also new to linux, and I find that I’m making a lot of small mistakes within the linux command prompt like not re-sourcing my devel files in my workspace, or not rebuilding my workspace properly. If I were only learning one new thing this wouldn’t be so bad, but learning multiple systems at the same time means that if I do get an error when two of them interface, I’m not always sure which part of the program stack is actually causing the error.
What I can learn from this, is that it’s better to make sure I learn one system at a time and make sure each package is functioning before integrating them, if possible. I’m also learning when to move on from ideas and what to prioritize. For both of these reasons, I think right now it’s more import that I get any kind of virtual camera set up, attached to my robot description structure and have it output valid information to ROS before I switch it to a point cloud or other depth camera simulation. A virtual point cloud output is useless if I’m unable to use attach it to my robot, or have that output inform other parts of my program stack.
0 notes
Photo

Week 5
Studio V
I’ve been forced to switch from Unreal engine to Gazebo. Unfortunately, Unreal Engine isn’t syncing with ROS correctly, and is unable to send the right kind of message to other nodes. It’s a bit of a setback but fortunately I’ve prepared for this so switching over to Gazebo shouldn’t be that much of a hit to my progress.
I’ve started my work in Gazebo by building my bot in the SDF file type. So far I’ve been successful creating a description that loads a custom robot design into Gazebo, and I’m able to apply force to different wheels from the Gazebo interface. It’s important to me that the bot is custom because I want it to simulate the structure of the robot that my external contacts have as a prototype for their business right now. For this to work I’ll also have to find a way to update and alter the force applied to the wheels from an external file. I’m pretty sure that you can build simple AI in ROS by building Python script files and then creating a ROS package, but I haven’t yet tested that part of the project.
I’m also trying to test the depth camera functionality by importing Kinect simulation files from an SDF type file structure into Gazebo and receive the output in RVIZ.I’m glad I had a back-up plan in case things didn’t work out with Unreal engine, but when it comes to my projects that rely on tech I haven’t tested, I always feel like I’m taking such a big risk. It would be nice to have someone that I could talk to who understands the work that I’m doing, and had worked with the software before but unfortunately, I don’t think anybody in Colab has that kind of experience. It’s possible that implementing the next few parts of my project could go extremely smoothly and I’ll have a lot of time to polish my work, extend its functionality and focus on discussing the academic side of what I’m doing. It’s just as likely, however, that what I’m doing will prove complex enough that I’ll run into multiple errors and have to cut back the scope of my work.
I don’t think this kind of experimentation, jumping into something that’s interesting is necessarily bad, and in this situation, it’s important the I go into the deep end somewhat to get experience in ROS, so I can work with the group I’m collaborating with now, after my time at university has ended. I think that if I continue this kind of work next semester, however, I’d find someone who had worked with this software before that I could rely upon for advice occasionally. It’s not just that running into a critical error could take me two weeks to fix and be solved by someone who’d encountered the problem before in an hour, it’s also that I find it difficult to make long term plans for implementation and my program stack before I know exactly how things will interact. If I knew someone who had experience doing what I’m doing, I’d be able to run through my plan with them and get advice on whether or not what I’m planning is feasible, or whether there’s something I’m missing, or spending time on, unnecessarily.
At the moment, the best I can do is to be critical my project, cut things that unnecessary, and make sure my priorities don’t get derailed when I run into problems. If there’s one upside to working with new software on my own, it’s that I’m learning how to evaluate the risk of problems in an unknown field on my own, to search for information quickly on my own and to have a backup plan whenever I can.
0 notes
Photo


Week 4
Studio V
I submitted my presentation in class this week. For this blog I will essentially write up a slightly longer version of the points I went through when presenting. I hope that this blog will stand as an academic explanation of the more theoretical aspects of my plan.
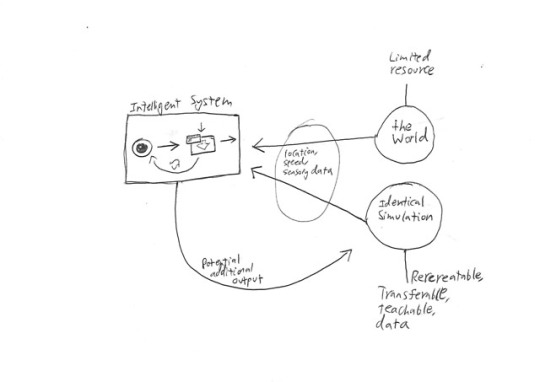
I’d like to start with a general outline of my links to posthuman. In my mind the connection between posthuman and robotics is looking at how robots can deal with tasks that exceed human ability. From this perspective posthuman physicality has already been achieved, robots are a great deal stronger than humans and capable of remarkable dexterity, when designed for it. Whether or not they are intellectually posthuman currently is debatable, but when it comes to memory, computers have us beat. My project looks at creating a system that makes use of that posthuman memory, and tries to teach a robot a skill that could be easily transmitted to other computers easily.
Human intelligence and knowledge increases as we are able to pass information to the next generation of humans. Initially this is kind of development would be small, but as language developed humans were able to pass more and more information, such as what dangers are present in the area, or how to develop some basic technologies. This is essentially at the core of my project. Posthuman in my project is the idea that AI agents can transmit 100% of their learning to other agents, as long as their functions are compatible.
My project is to create a simulation/AI program stack that simulates a real-world environment to teach the AI to navigate in that environment without having to physically be there. This frees up resources and time, as well as creating more flexibility. No physical robot is needed to test the AI’s function, the AI can run simulations in real world conditions faster and more times than a physical bot could in the same amount of time and the robot’s structure in a simulation can be changed easily to test how different forms function.
An important part of this project is how the information learned in terms of navigational intelligence can be transferred to multiple other robots, retaining 100% of the learning. In theory if I built the project that I plan to, successfully, any AI with the same navigational functionality would be able to move easily around the space you had simulated, and similar spaces. For example if I created something that was able to move around car parks, it would also be able to navigate around other car parks built with roughly the same pattern.
0 notes
Photo

Week 3
Studio V
I’ve spent this week researching and testing methods of simulation and creating my AI. I’m pretty interested in learning to use ROS, and so are the external group I’m working with. To expand on that, since I’ll be using the term ROS a lot.
ROS stands for Robotics Operating System, and is essentially the standard in robotics development. It wraps other programs and operations and creates a structure that allows them to communicate, regardless of whether these nodes are operating on different machines or across a network.
My project stack is made up of two core parts. My artificial intelligence, which will likely be a number of Python and C++ files, and my simulated environment, which is the focus of my project and my skillset. ROS wraps these two parts as nodes and creates a messaging system between them.
At the moment I think my best bet for building my simulation is to use Unreal and using a ROS There won’t be a great deal of precedent if I run into issues and less general support, however I’m already going to have to spend a long time learning new engines and programs, so if I use Unreal (which I already have a moderate understanding of) I could mitigate that lost time somewhat. If that doesn’t work, I think that I’ll avoid sinking too much time into trying to fix issues and instead cut my losses and move to Gazebo, a simulation engine typically used in collaboration with ROS, that comes with a little added complexity.
I’ve tested ROS wrapping (running unreal as a node) and it seems functional, although until I have it interact with another node using the data type I need to use I can’t be certain that it will work correctly. I’ve also made sure that creating a depth camera image in Unreal is possible, and in fact have managed to create one for myself. The next steps are to see how easily I can convert visual information for ROS, and whether receiving control instructions through ROS will be feasible.
0 notes
Text
Week 2
Studio V
I’ve decided to pursue robotics and artificial intelligence rather than game design and programming, there are too many negatives that come with going into games and I have external contacts who are interested in working with me in building an AI/simulation project. I’m also aware that a big part of creative technologies (if you aren’t going into entrepreneurial work) is showing employers that you can switch between a number of skillsets, communicate effectively and have knowledge and the ability to learn quickly over a few different fields.
At the same time, I think that it’s valuable to be able to display some expertise in a single field, especially if you have a very particular career in mind for your future. I’ve had an interest in simulations, especially environmental simulations, since my first year. I’ve continued to work in that theme in other projects throughout my degree, and I see this project as an extension of that interest, and a way to tie that learning to my employment future.
It’s still important to me that I develop skills this year and in my likely next job that are broad enough and valuable enough that I’ll be able to move into different fields should I choose to. The advantage of going into robotics from my perspective is that it develops a broad range of skills, teamwork is necessary in every level and project, and it’s complex enough that I’d be able to fall back on to other work should it become necessary. programming work after university I’ll still have the skill to go into game development, whereas the transition in the other direction would likely not be as easy.
At the moment I’m working out the details of what I’ll be constructing in AI, and how to record the details of my work. I do know that I’ll be constructing a simulated environment and prototype AI that is able to navigate in the simulation, in order to prepare it to navigate in a real-world environment.
To expand on this, the external group I’m working with are a robotics company that are interested in working with AI programmers in the coming year, and this sort of AI simulation technology would be very beneficial.
1 note
·
View note
Photo


Week 1
Studio V
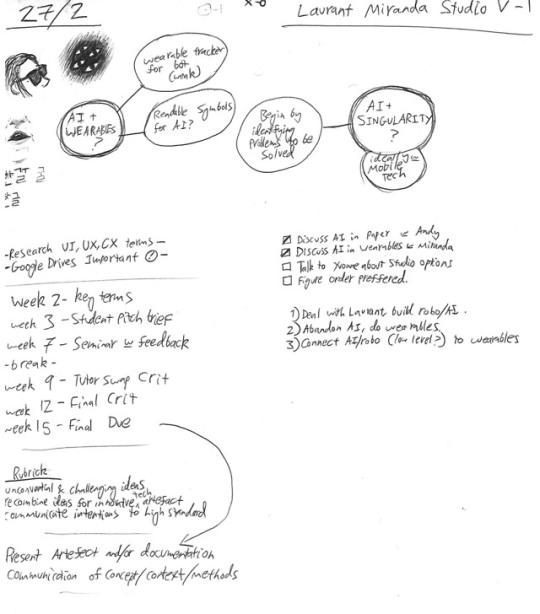
This is my first blog for Studio V, 2018. I’ll mostly be attaching related sketchbook pages as images for these documents, although they’re usually less informative than my text posts will be.
A big part of this year for me is going to be focusing on a particular area and building my portfolio within that, in the hopes of getting into a related job straight out of university.
The two areas I’m interested in exploring at the moment are artificial intelligence (particularly within robotics) and video game design/programming. Due to my late enrollment, I’m still working at getting in to some programming classes I wanted to take. It’s also turned out that some of the classmates I’ve been interested in working with in the past are thinking about making a game for their studio project this year, so as the week progresses I feel like that option becomes increasingly viable.
However the negative side of pursuing games is that I don’t think there are many good job prospects in New Zealand for game designers, I don’t feel that I have the ability or resources to launch and Indie company, and other tertiary institutions like MDS put out more obviously qualified games graduates.
I’ve discussed my options with some of the lecturers and some external contacts and I think my decision may rest on what classes I’m able to get into this semester, as well as weather I can find an AI project to work on that actually has some practical potential.
Either way, this will likely have a huge impact on the direction my career takes and thus, the course of my life. Perhaps that’s a little dramatic, but even so I feel a great deal of trepidation in committing to one path or another, and I only hope my options become more clear in the coming week.
0 notes
Text
Yooka Project : Reflective Statement : Patrick Tuohy
After forming a team, or initial ideation mostly involved building a game, something that would be fun and engaging for the paper. After looking at potential partners and competitions we could enter, we decided to take things in a more informative and serious direction. Looking through our options, my interest in evolutionary programming and space activation led us to create Yooka (the name taken from the term eukaryote), aiming to create an interactive, simulation toy type exhibition, and work with Auckland Live’s Urban Screens project.
After some brainstorming and planning for the first couple of weeks, we finished our first full conception of Yooka as an exhibition, and had our mechanical design complete. I’d learned enough from previous over-ambition in my work to make sure our plans were simple enough that we were able to stick to them without any major changes through the rest of the semester.
Interested in learning Unity, I chose to work on the front-end, building the game engine and code that would pull from the server to create and display Yooka.
Working with a program I’m not used to often creates a dilemma, where I’m not sure whether to work in an area I’m more comfortable with and likely create a more polished piece of work at the cost of learning less, or attempt to learn something new, and run the risk of handing in something incomplete or even non-functional. In this project, I attempted the latter, my first time using Unity meant that a great deal of my time was spent learning the basics of navigating and utilizing the engine. To avoid delving too far into the unknown, I attempted at first to program using JavaScript integrated with Unity, however after the inbuilt text editor started to fail to recognize the Unity engine commands, I was forced to switch to C#, and learn another tool for the first time, instead.
Thankfully, even if there is no easy set of guides for creating something a little more experimental like Yooka, when I had specific programming problems, most of the time the trawling websites like answers.unity3d.com found threads with solutions that were close to my own issues.
Of course, this was a team project, and I enjoyed working with Matt. Overall, we communicated well during the project, messaging across Facebook messenger and updating our progress on Trello. As a side note, this was the first time, after a few team-projects attempting to use Trello, that I felt it kept me organized and was helpful. Perhaps this is because programming is especially suited to being broken down into a multitude of tasks and sub-tasks and I didn’t have the luxury of thinking in that fashion in my previous work, but I will continue to use Trello in the future, and I hope future teammates will too. We didn’t coordinate our appearances in class, however, and I felt that more in-class time could have helped us to focus more on the coordination of our ideas, as it was we both worked from opposite ends of the project, and while I felt that both of them were successful, it was connecting those two together into a prototype that was delayed to near the very end of
the project.
It’s these two topics, my inexperience with Unity and the disconnect between the tasks of myself and my teammate that I felt created the greatest issues in the project. Retrospectively, I feel that despite being slow with Unity, we might have been more successfully had we first made a base unity project that did nothing except take input from a server, and then build the API and developed the rest of the Unity program outwards from that, rather than inwards from both ends. If we’d done that, we would have been developing the same project from the beginning, rather than having to test connectivity and link them together at the end. I also think that this may have allowed us to avoid unnecessary work by increasing communication and letting us more easily test and check each other’s work. On top of this, had we worked outwards, we might have used a very primitive input and output to simulate the learner experience physically, and get some-thing of a play-test running, rather than having to assume that our current design was the best option.
In terms of my learning, from just a programming standpoint this was a great experience.
Yooka is easily the largest chunk of code I’ve ever written, at almost 600 lines of code, divided into 23 functions, not taking into account all the non-scripting work on the actual Unity engine.
This is only the second non-programming paper where I’ve used programming as a part of my work, it’s good practice to code for projects that simulate the real world a little more, in that the output and functionality is more important than creating a pre-determined program with a very specific method. However, sometimes I feel like the final product is so much more important that the programming itself is somewhat devalued. My code isn’t submitted as a separate element for perusal by a programming teacher and I know that, regardless of comparative complexity, my work will probably look less visually impressive than the number of teams who submit 3D games and virtual experiences each year. On the design side, I learnt that it’s not just the outcome being over-ambitious that can damage a project, but also the process. Learning a lot of new tools, and attempting to build inwards from the front and back end of a program, then coordinate in the final weeks to create a functional product was the real ambition of Yooka.
With that being said, I’m very happy, and I feel very lucky, that things went as well as they did. Yooka is essentially everything we wanted in a prototype, it stores DNA, functions as an environmental simulation, takes tweeting photos data and parses them in. I was even able to add extra details like parents, siblings and children avoiding consuming each other, and Yooka also navigating to spawn foreign eggs. This project could so easily have ended with me handing in a broken had it’s errors and worries, and it still needs work before it can be displayed as a finished project next year, for Auckland Live, but I’m pleased with the finished result, and excited to keep working on it outside of Uni, for the Colab exhibition and eventually for Urban Screens!
0 notes
Audio
Week 12
Creative Audio
Here is the link for our team’s final Creative Audio Submission. A few of these were joint pieces, but two tracks in the album are solo works by me.
Beta Spiral is the name of my track created from samples of Famicom Disk System, the Legend of Zelda game noises, and Flooded Temple is a simpler track based on the darker melodies in the Minish Cap, for Gameboy Advance.
Working with Joachim it was extremely helpful having somebody with experience in audio who could help me, but I found that when we tried to spend a long amount of time working together, we often got distracted and didn’t do as much work as I would have liked. This is unfortunate, because my pace was much slower, and I my inexperience meant that my pace was much slower when small problems I could ask him for help with cost me an hour or more to find solutions for and fix.
I also find myself at the end of almost every Creative Tech project bemoaning all the technical problems I had, and I suppose that’s just par for the course. I wish that I had started to create music in earnest earlier, even when ableton stopped working, at least if I had a melody in my head and a few instruments I was sure I wanted to use, maybe I could have made more progress.
In the end, though, I was very happy with how Beta Spiral turned out, and I surprised myself in that I was able to turn so many of the samples I collected from the game into cool sounding synths and some actual melody and drum work.
In terms of the skills I learnt in this course, I think that the first few weeks leaning anything always shows the largest change, and I feel a lot more confident not just using the basics of DAWs, which I was completely unfamiliar with, but even doing things like editing and manipulating samples and using an EQ. I have no doubt that this course will prove invaluable in future.
0 notes
Photo

Week 11
Creative Audio
I’d done a bit of experimentation earlier in the semester with applying glide to vocals, and using high piano noises to create a creepy effect, so with my first track basically complete, I used this week creating a second track (based on the darker portions of the Legend of Zelda: the Minish Cap game, for the 2001 GameBoy Advance handheld console). It took me about half an hour to realize that the inbuilt Reaper vocal synth was broken, and another hour to find good Vocal VST that worked in Reaper (I eventually used DSK ChoirZ, which has almost no effects, but I had to settle for it). I also wanted to use something like a glockenspiel for high metallic notes, rather than a piano, but all I could find was a set of xylophone samples, which became too thin when I pitch shifted them up. The glockenspiel is uncommon enough that I couldn’t find a free VST for it, and the ones that I did find just wouldn’t work on reaper. Eventually I found a sample library of about 30 glockenspiel notes, and found a way in a VST called TX16Wx to map the samples to different notes.
I think this is one of the other issues in starting up like this, I haven’t got my program set up with virtual instruments yet, and a great deal of my time was just spent doing that. But with that out of the way, I listened to a few tracks from the Minish Cap, and picked a few chords to work with that sounded particularly dark, and recorded scales on them with the glockenspiel and a couple of vocal ranges, then created some simple melodies to test them out.
I kept all of my synths pretty clean in this piece, and didn’t use saw or square or stop the samples from fading out and in cleanly, as the level of complexity in the Minish Cap sound track was much more advanced than the original Legend of Zelda. I also felt like choosing synths that more directly matched things like vocals and instruments separated the piece from my Famicom Disk System track, which was meant to sound much more artificial.
Next week, I’m hoping to get a glide effect working on my vocals, and try complete as much more of this track as I can, before mastering and uploading it and my sample based piece.
0 notes
Photo
Week 10
Creative Audio
This week and last week I continued to work on my main track, lengthening it and adding new sections, adding some trill effects from the ‘treasure found’ and ‘magic used’ sound effects, as well using IZotope Iris to sample the ‘hurt’ noise the player makes when damaged, and stretch it out and apply a bunch of effects to turn it into a low background melody that I hoped would give the track more volume. I considered keeping this one to three or four simultaneous tracks only, as the Famicom Disk System would not be able to cope with the level of complexity, but the point of this piece was representation using sound samples from the game, rather than perfectly simulating the game’s style.
I found that now that my main track is nearing completion, I started spending too much time mixing the volumes of each track to be just right. While it probably is improving my work, I’ve realized that it’s probably more important to keep adding elements, or start working more on extra pieces, rather than trying to master things perfectly. Partially I think this is because it’s a lot easier and less scary to just mess with the volume and feel like I’m making progress rather than making big changes.
0 notes
Photo

Week 8
Creative Audio
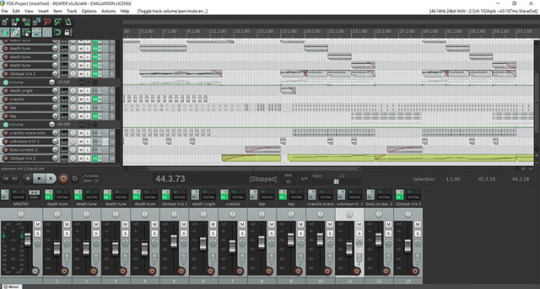
Now that I had reaper set up, and some experience in using virtual instruments and building tracks, I got to work building the core of my first track. I’d previously already created a library of sampled sounds from the original Famicom Disk System Legend of Zelda, and I’d already done a decent bit of experimentation in Ableton before my trial expired, so the focus of this week was on applying what I’ve learnt, and experimenting taking different samples and seeing how I could contort them into either interesting effects or more traditional instruments.
From the samples I’ve collected, I messed with the timing on the beta death tune loop (a couple of rising tones that looped infinitely on the first version of the game), then pitch shifted it down an octive, because I felt that having it loop through the track could have been too shrill.
I used the crackle of a bomb exploding to make a sort of crunch I’m using like a drum by using a pitch shifter to bring up the dry mix (I don’t know what that is but it makes it more crackle-y), adding a drum compressor and then EQing the low frequencies up.
To create a low and even melodic tone, I took the single bleep that repeated every few seconds when the player was on low health, and then used IZotope Iris (a VST Joachim showed me how to use) to stretch the sound out, lower the pitch drastically, and then sample only the mid to high tones.
I was able to use these to create a pretty simple melody and drum line, it’s still a little messy but I’ve got the core of my first track complete.
At certain points I felt like I wanted to clean up the samples I was using and micro-manage things more, but I held back and continued to add new samples and effects too. I think that one of the benefits of trying to make my track have a sort of dark, retro feel to it, is that when samples crackle and click and behave strangely, it doesn’t go against (and often reinforces), the style of the track.
I think I’ll continue this trend and try and experiment more with this track rather than spending too much time polishing.
0 notes