
Last Seen Blogs

bluesmon
daniela

diamondjackdaw
Local Amateur Redstone Wizard

theheightofdishonor
this same spring will never come again

kttrans
Your Favorite Trans Girl

proshipaes
A place for my problematic bullshit
Text
Proficient Instrument to Reestablish For all time Erased HTML Records From PC.
The expert device which is Hard USB Drive Data Recovery Recuperation programming is a simple and compelling answer for recover erased HTML documents from hard drive. Other than this, the device additionally recuperates debased and designed information from hard drive. This utility gives the high level elements to sweep and see the recovered HTML documents from hard drive. Essentially play out the means of the product so you can undoubtedly recuperate erased HTML from hard drive.
Stage 1:- Download Hard Drive Recuperation Device and introduce it on your framework.
Stage 2:- Presently, select the Sweep choice to recover erased HTML documents from hard drive.
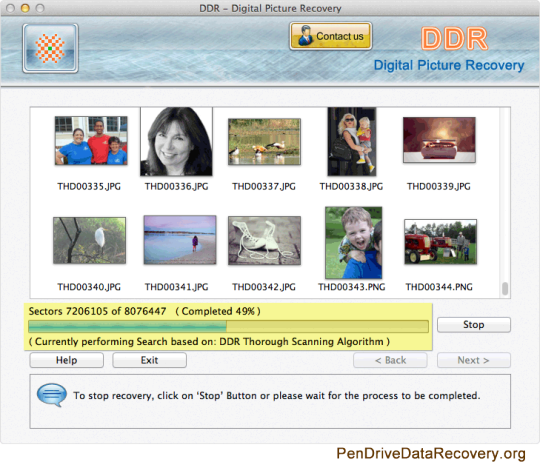
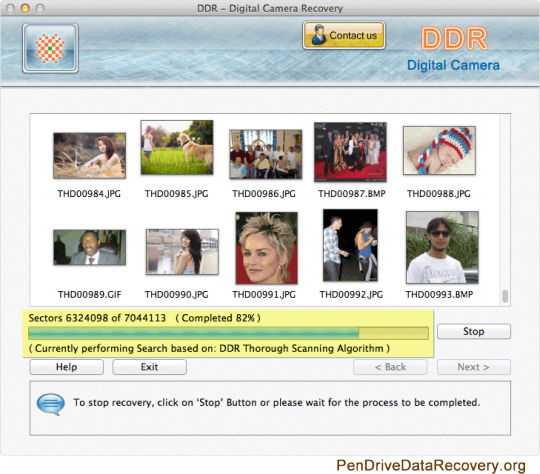
Stage 3:- When the examining is finished, you can see the recovered video erased from hard drive which are featured in red tone.
Stage 4:- Finally, SAVE the reestablished at your ideal area.
A portion of The Highlights Of The Instrument Which Make It Best Among Others
It recuperates designed and ruined records of any size limit with no information misfortune
Recuperate information from both inward and outer hard drive
The instrument effectively recover information from GBT and MBR segment
It upholds NTFS and FAT record framework
The product features the recuperated information in red tone with the goal that clients can undoubtedly recognize the recovered ones
This utility effectively recuperates information like video records, docs, pictures, and so on.
It upholds all renditions of Windows operating system
Likewise, the product gives speedy information recuperation from IDE, and SATA gadgets
End
To recover erased HTML records from hard Pen Drive Recovery , we have referenced various methods to the clients who are confronting information misfortune issues. Additionally, we encouraged utilizing the expert apparatus to reestablish forever erased HTML records from PC. As the apparatus is simple and protected to utilize and gives 100 percent assurance of information security which manual techniques don't give.
#data recovery software pen drive#Pen Drive Data Recovery#USB Drive Data Recovery#Pen Drive Recovery#USB Drive Recovery#Pen Drive Recovery software#USB Drive Recovery software#Pen Drive Data Recovery software#USB Drive Data Recovery software
0 notes
Text
Ways to Recover Deleted Objects in MS SQL Server?
Outline: SQL USB Drive Recovery Information base Heads generally plays it safe to keep up with and deal with the data sets. In any case, setback with the data set is as yet a likelihood. Since a fiasco can happen whenever. So in this article, We will examine the ways of recuperating erased Objects of SQL data set.
Microsoft SQL Server is an unlocked data set administration framework in which SQL (Organized Question Language) is utilized to speak with the SQL Server. With the assistance of SQL, the client can play out an update and recover procedure on the SQL data set. This application stores the information In the information in the Essential data set record with .mdf augmentation. Auxiliary information record with .ndf augmentation. Furthermore, Log record with .ldf document design.
Commonly SQL Servers data set Chairmen face awful circumstances, like SQL data set debasement, coincidentally erasure of the information base items. Thus to work with the data set the clients attempted to track down the answers for recuperate erased Objects of SQL data set.
On the off chance that you are likewise searching for an answer for recover erased SQL data set items, for example, Table records, capabilities, put away strategy, sees, files then you are arrived on the ideal arrangement page. Here we will examine the recuperation cycle with the assistance of Pen Drive Data Recovery Recuperate SQL Information base Programming.
"If it's not too much trouble, help! I have been utilizing SQL Server Rendition 2017 to store and deal with my SQL data set. However, unintentionally I have erased my significant SQL works and put away systems. Additionally, I neglected to take the reinforcement of the data set. So does anybody assist me with recuperating erased objects of SQL Server? Much obliged!
Significant Note: in the event that to recuperate erased data set protests Rapidly then I recommend you to take the assistance of Robotized Arrangement.
Presently Let Us Investigate the Method for recuperating Erased Articles in MS SQL Server
SQL Server Data set Recuperation Programming is an expert answer for recover erased records and other information base objects of Microsoft SQL Server. By utilizing this utility the client can see the SQL data set items like a table, put away strategy, capabilities, Perspectives, Triggers, and so forth. Likewise on the off chance that in the event that you have a ruined SQL data set, additionally the client can play out the recuperation.
This utility accompanies two different Output modes. First is the Fast Sweep mode to manage minor debasement and High level Output mode is to manage the Significant defilement situations. Additionally in the event that you don't have the foggiest idea about the SQL Server form, then the client can choose the Auto-distinguish SQL server adaptation. This component will assist with distinguishing the SQL Server adaptation consequently.
This application is outfitted with a component to review erased SQL data set objects in red tone. Additionally this application give choice to save the recuperated information as SQL Contents or CSV record. Clients can trade the information to SQL Server present in a similar machine where the device is introduced or a server organization. The device upholds SQL Server form 2019/2017/2016/2014/2012/2008/2008R2/2005. To find out about this the client can attempt the Free demo variant of this product.
Follow the Moves toward Recuperate Erased SQL Data set Articles
Introduce And Run the Product on Your Framework and Snap on the Open button.
Recuperate Erased SQL Information base Articles
2. Presently Peruse the MDF record and pick the Sweep Mode. Click on Recuperate Erased Articles choice to recuperate and review erased objects in red tone.
Recuperate Erased Information base Articles
3. Review the Erased SQL Data set Articles in Red tone. ( here red variety shows the erased tables and put away method as displayed underneath.).
Recuperate Erased Articles
4. Click on the Product button to Recuperate Erased SQL Information base items.
Recuperate Erased Items
>>How to append information base MDF without log record?
>> The most effective method to Fix SQL Server Blunder 5120 Append Information base Issue
Last Words
Commonly Pen Drive Recovery software Server data set chairmen incidentally erased SQL data set objects. So to determine this issue, this post shed a light on the subject to recuperate erased objects of SQL information base by utilizing one of the most outstanding utility. This is a high level utility that can be effortlessly downloaded to perform erased data set recuperation in a simple way.
#data recovery software pen drive#Pen Drive Data Recovery#USB Drive Data Recovery#Pen Drive Recovery#USB Drive Recovery#Pen Drive Recovery software#USB Drive Recovery software#Pen Drive Data Recovery software#USB Drive Data Recovery software
0 notes
Text
How to Transfer Data from One Google Drive to Another ?

Google Drive is the most involved help on the planet as it is a record stockpiling and synchronization administration. This implies that clients can save neighborhood information to research Drive distributed storage administration. Google Drive offers 15GB of free stockpiling to store client information imparted to Data recovery software pen drive and Google Photographs. So when the client runs out of space, it will begin looking for an answer for move records from Google Drive to another Google Drive. Presently you can finish the cycle utilizing this Google Drive movement device to know how to play out the relocation interaction without any problem.
Move Google Drive Information Expertly
Google Drive Relocation device is the most solid outsider relocation programming to assist you with moving documents from Google Drive to research Drive or space. This product moves records, for example, pictures, archive documents, and recordings. Likewise, you can move erased things from the Rubbish envelope in Google Drive. Make a full commodity report in CSV design for later reference. This apparatus has a choice to move both record and organizer consents to another Google Drive. Aside from this, the UI of the product is planned in light of client fulfillment and no extra establishment is expected to run this product on your nearby machine. You can likewise match up Google Drive with OneDrive involving this device in an extremely productive way.
Perfect Highlights of Google Drive Relocation Instrument
Move Records From Google Drive to Another Drive
This product effectively moves information things, for example, photographs, report documents, PDFs, recordings, sound documents, email client information documents, Succeed documents to another Google Drive. Clients can likewise move various Google Drive stockpiling without a moment's delay to save time. Additionally, this product can likewise duplicate Google information, for example, Google Docs, Google Accounting sheets, Google Slides, Google Structures, Google Drawings, Google Locales, Google Jamboard, and that's only the tip of the iceberg.
Move Erased Thing of Google Drive
This product can move erased information things from the Rubbish envelope of Google Drive. The client just has to turn on this choice and the product will move the Garbage envelope to another Google Drive to one more organizer with just the Rubbish name.
Stop/Resume and Stop Choice
The Google Drive Movement Apparatus will show you the continuous relocation process on the screen. In any case, assuming that the client so wants, the client can respite and resume the sending system to deal with the interference. Furthermore, clients can stop the interaction at whatever point they need it.
The product likewise upholds gradual movement. This implies that once a client duplicates the information to one more Google Drive, it won't be moved to a similar G drive on the following endeavor. It likewise upholds delta relocation, which naturally moves new mail and different things to the objective record.
This product gives a date-based sifting choice to move indicated information starting with one Google Drive then onto the next Google Drive or space. Just determine a date range in the From and To fields and the product will move the information for that date range.
Keep up with Organizer Progressive system
This product gives clients the choice to keep up with the organizer progressive system during the movement cycle. On the off chance that the choice remaining parts unrestrained during the interaction, the product will make a solitary envelope for all information without an organizer structure.
Google Drive Movement Device can move shared organizer information documents from one Google Drive to the objective Google Drive. Likewise, make another envelope with a similar name in the objective area.
Bit by bit Interaction to Move Information starting with One Google Drive then onto the next
Start with actuating your product by tapping on Initiate button.
Then, from the Arrangement tab, make your foundation determination as G Suite for both Source and Objective.
Moving further, select the responsibility class as Reports for the movement.
On the Source screen, give data like Administrator Email and Administration Record subtleties. Finally transfer testament document and tap on Approve to approve the authorizations.
Give the fundamental subtleties like Administrator Email and Application ID in the objective window and approve them similarly.
From the Clients screen, add the clients in the product board the manner in which you need to.
Last step is to approve the additional clients by tapping on Approve one final time. Once finished, click on Start Relocation button to start the exportation interaction.
Observational Decision
Google Pen Drive Data Recovery Movement Apparatus is the most complex programming that permits clients to move their Google information to another Google Drive or area without losing information. Subsequent to thinking about every one of the capabilities and administrations given by this product, I might want to rate this apparatus as 9.6 out of 10. Generally speaking, this is the most dependable and astounding programming in the Google Drive movement process.
#data recovery software pen drive#Pen Drive Data Recovery#USB Drive Data Recovery#Pen Drive Recovery#USB Drive Recovery#Pen Drive Recovery software#USB Drive Recovery software#Pen Drive Data Recovery software#USB Drive Data Recovery software
0 notes
Text
What Happens When You Delete a File From a USB Flash Drive – Recover Data.

Most clients have endured information misfortune issues, At whatever point they store their significant information in USB Drive Data Recovery streak drive. Fundamentally, the majority of the clients know nothing about the truth i.e., when they regularly erase or for all time erased by squeezing shift+delete button any document from a glimmer drive. Thus, the record will be erased forever from USB drive on the other hand of going to the reuse receptacle. After for all time erasure, clients track down a moment answer for recuperate forever erased records from USB streak drive.
There is no manual strategy that assurances to recuperate erased information from USB drive. Fundamentally, utilizing programming is the most ideal way to obtain unmistakable outcomes. Thus, with the assistance of this article, we are to determine the most generally asked inquiries; like what happens when you erase a record from a USB streak drive and how to recover the erased information.
Subjects Shrouded in this Blog:
Where do erased records from USB go?
How to recuperate erased records from USB streak drive?
How to recuperate erased documents from USB without programming?
Where Do Erased Records From USB Go?
Typically erased records from USB streak drive are erased forever as opposed to going to the reuse container. So you can't simply reestablish the things from the reuse canister. All things considered, the erased documents from USB are not in reuse container.
Be that as it may, in the event that you consider the response in specialized terms, the erased records really are as yet present on the actual drive. It's simply that the capacity utilized by it is stamped void and shouldn't be visible to clients. This is additionally the explanation that in the event that you overwrite the USB drive, the "vacant" extra room gets utilized and you lose the opportunity the recuperate the erased records of all time.
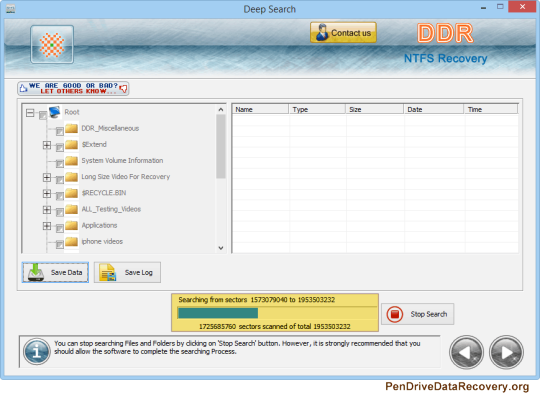
Here, we think of a successful method to in a split second recuperate erased records that are either purged from the reuse canister or forever erased ahead of time. This is an outsider instrument named Pen Drive Recuperation Device. This instrument has the ability to recuperate tainted, erased, and arranged records from USB streak drive.
Nonetheless, this product comprise of a novel element i.e., it features the erased documents in red tone. In this way, it goes easy to characterize which information is erased for all time. Additionally, this instrument has no similarity issues.
Related: How to Recuperate erased PDF records from pen drive?
Moves toward Recuperate Erased Record From USB Streak Drive
Here, in this portion, we are heading to uncover the paths to recuperate lost documents from USB streak drive in a brilliant manner. Simply follow every one of the means in a consecutive manner to really execute the recuperation technique:
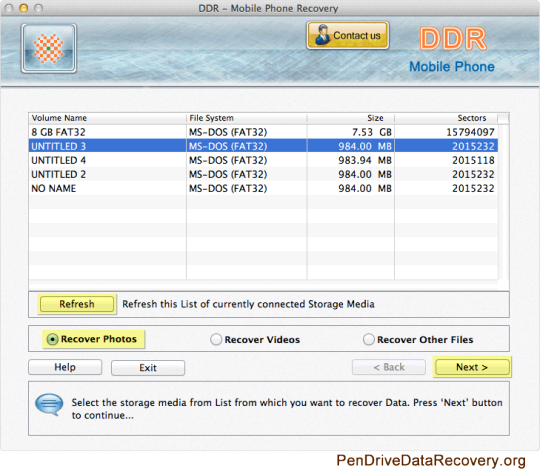
Stage 1: Right off the bat, download and introduce the product on your work area. The home screen will show the rundown of all associated USB streak drive to your framework.
Stage 2: Here, this recuperation programming gives both of you choices to filter your blaze drive for example filter and organized examine. You can pick Output choice to recuperate defiled information from USB drive or Arranged Sweep to recover erased records from drive.
how would I recuperate erased pdf records in windows 10
Stage 3: Thusly, the apparatus will list all recuperated organizer into the left board and feature in strong dark every one of the envelopes contained inside. Thus, you can investigate the envelope and view the whole information in the right sheet of the product.
Stage 4: This Pen Drive Data Recovery streak drive recuperation device will give both of you choices to store the recuperated information, for example, either save determined information or complete recuperated information. Here, you can pick the choice as indicated by your need.
#data recovery software pen drive#Pen Drive Data Recovery#USB Drive Data Recovery#Pen Drive Recovery#USB Drive Recovery#Pen Drive Recovery software#USB Drive Recovery software#Pen Drive Data Recovery software#USB Drive Data Recovery software
0 notes
Text
Remove VBA Password from MS Access –Techniques to Unlock Access Files?

This blog demonstrates the way that Pen Drive Recovery software can eliminate VBA secret phrase from MS Access documents and access the data put away in these records. MS Access makes data set records containing data in plain structure in which each table put away information that has a place with VBA project.
There are possibilities and circumstances where a client might lock the VBA project and fails to remember the secret phrase to them and get kept out of the document. Clients currently need to break the secret phrase which is a defensive layer to scramble the Entrance documents (.mdb). There are likewise situations where the documents are undermined or show mistakes and forestall admittance to the VBA project.
Here, you will track down the very best techniques to sidestep the secret key security and have the option to get to the VBA project. Peruse till the finish of the blog to figure out which is the most effective way according to your necessities and figure out how to play out the secret key recuperation or expulsion in a difficult situation free way.
What Are the Strategy to Eliminate VBA Secret word from MS Access?
We will clear up 3 straightforward strategies for play out the expulsion strategy to get the data from the records. You will track down the means for every strategy in the impending fragments so you can look at these and comprehend which is more qualified for you. To start with, we will examine the arrangements in short here:
1. Manual Strategies
Utilizing MS Access
Through Visual Essential Manager
2. Bother Free Arrangement
As referenced over, the primary strategy in the manual technique can assist you with carrying out the system utilizing MS Access data set record yet can open a document and not set or change a current secret phrase.
Same goes for the subsequent strategy, which utilizes the Visual Essential Supervisor to eliminate VBA secret phrase from MS Access. Both these techniques are restricted to not setting or changing a current secret word and require specialized skill and information on utilizing VBA codes.
Though, the third technique will assist clients with playing out the secret phrase evacuation activity with next to no difficulties and is a simple to-utilize strategy. For this, you simply have to download the VBA Secret phrase Remover Device and play out the simple tasks of evacuation.
Strategy 1 - How to Eliminate Secret word Utilizing MS Access?
Follow the offered moves toward reprieve the secret key:
1. Open the document by entering the right secret key for the data set, most importantly, record.
2. From that point forward, click on the Record tab and press the Open button to begin with the interaction to eliminate VBA secret phrase from MS Access.
3. Pick the Unscramble Data set choice and snap alright when gotten some information about selective use.
4. Then, you need to pick the Entrance Data set document (.accdb) which is to be decoded.
5. Presently, pick Open Restrictive starting from the drop list.
6. This way you can break the secret word.
7. From that point forward, click on the Document tab once more and go to the Decode Information base choice.
8. Enter the secret phrase in the Client Data set Secret key discourse box and hit alright.
Thusly, any secret key from MS Access Information base Pen Drive Data Recovery be taken out making it allowed to get to. Despite the fact that this technique appears to be straightforward, it needs some specialized information while performing it.
#Pen Drive Data Recovery#USB Drive Data Recovery#Pen Drive Recovery#USB Drive Recovery#Pen Drive Recovery software#USB Drive Recovery software#Pen Drive Data Recovery software#USB Drive Data Recovery software
0 notes
Text
Eliminate VBA Secret word from MS Access Utilizing Visual Fundamental Supervisor.

This technique utilizes ActiveX Information data recovery software pen drive (ADO.Net) inlet and works with MS Access 2003 and 2007. Follow the means:
1. Begin by making another Entrance information base and open it.
2. Presently, press the Alt + F11 keys to open the Visual Essential Supervisor.
3. From that point forward, click on the Addition choice and hit the Module button.
4. Then, at that point, you need to enter the code as given underneath:
This is a piece complex yet for the people who have some familiarity with the VBA codes and have specialized skill, this strategy can help all around. For the individuals who maintain that a less difficult methodology should eliminate VBA Secret phrase from MS Access can jump to the following strategy.
Strategy 3 - What Compels This Technique Bother Free?
This arrangement as examined above is an instrument which can undoubtedly assist clients with eliminating secret phrase for the Entrance document and is an astonishing programming. It has the capacity to break secret phrase from multilingual undertakings too. The instrument has extraordinary elements and an easy to use interface which makes it simple for clients to comprehend how it functions. We should figure it out:
1. Download and Send off the application on your Windows operating system work area.
2. Embed the expected documents in the product board by tapping on the Add File(s) choice.
3. Peruse for the documents that you want to eliminate secret word from and hit Open button.
4. At last, press the Reset choice to eliminate VBA secret phrase from MS Access.
These are the main advances that a client needs to follow while attempting to break the secret word. The product has different highlights that you can use as made sense of beneath:
Choice to create another secret word and eliminate the bygone one
Eliminates the secret key from single or different VBA projects
Viable with Numerous Windows operating system and MS Office (32/64 digit)
Breaks secret phrase of any length with no limitations
Can work with MS Access record of Office 2007, 2003, 2000, and lower variants
The Last Lines
The answers Pen Drive Data Recovery software eliminate VBA secret phrase from MS Access have been made sense of in this review. There are very few clients who have specialized skill which is the reason they could find the manual workarounds a piece troublesome and complex. Which is the reason we have given an easier methodology for the individuals who need a simple arrangement which they can utilize.
#Pen Drive Data Recovery#USB Drive Data Recovery#Pen Drive Recovery#USB Drive Recovery#Pen Drive Recovery software#USB Drive Recovery software#Pen Drive Data Recovery software#USB Drive Data Recovery software
0 notes
Text
Best Practices for Office 365 Migration – Important Points Here.
Did Pen Drive Data Recovery be aware, more than 70% of Fortune 500 organizations favored utilizing Office 365? Likewise, as per the yearly report of Microsoft, there is a huge ascent in Office 365 clients in the beyond couple of years.
Further, with the presentation of cloud benefits, this is going on rapidly. Practically completely measured associations are turning into a piece of the computerized change.
Could it be said that you are too keen on further developing your IT framework? Furthermore, need to relocate to Office 365? On the off chance that the response is indeed, it is exceptionally easy to adjust to Office 365 movement best practices.
Presently, numerous associations are don't know where to start the interaction! There are different interesting points, certain practices you want to take on before relocation.
The present blog is altogether founded on these practices and what clients need to ensure about which techniques they ought to apply.
We will begin by following the prescribed procedures for the movement from one stage.
We should investigate the practices first.
What Are the Accepted procedures for Office 365 Relocation?
In this situation like complex IT movement, you really want to begin from level zero. That is arranging.
You need to make arrangements for your Office 365 relocation. The arranging incorporates the Pre-Relocation agenda >> Picking Suitable instrument to complete Movement >> Post-Relocation agenda.
We will talk about a similar exhaustively in practically no time. This will help you when you move Office 365 to Office 365.
Alongside the abovementioned, USB Drive Data Recovery ought to keep a few essential practices while setting up an Office 365 relocation.
Pose Yourself Two or three Inquiries Prior to Taking on Office 365 Movement Best Practices
As you probably are aware, the right arrangement of inquiries assists you with arriving at the objective. Consequently, you ought to have a go at asking the underneath inquiries for an improved consequence of movement.
Is it a reasonable Office 365 arrangement for business needs?
What will the movement plan resemble and what are key achievements?
How might you deal with the downtime(if there is any)?
How might you really manage the expense of the task?
#Pen Drive Data Recovery#USB Drive Data Recovery#Pen Drive Recovery#USB Drive Recovery#Pen Drive Recovery software#USB Drive Recovery software#Pen Drive Data Recovery software#USB Drive Data Recovery software
0 notes
Text
What are the ways of preparing your staff with respect to the movement?
Subsequent to finding the solutions to the above questions, apply the accepted procedures for Office 365 relocation and move Pen Drive Recovery the pre-movement daily agenda.
Errands to Finish before Relocation Through Pre-movement Agenda
There are a couple of things you want to remember for an effective Office 365 movement. Numerous IT administrators additionally adhere to the beneath guidelines.
Set up the End-client in front of the movement cycle.
Conclude the movement day and rough time span to finish the interaction. Be practical and gauge as indicated by the volume of information.
Impart obviously and give total data to every single worker of your association.
Office 365 movement best practices incorporate monitoring the free time you face while the relocation is in process.
Likewise, put forth the boundary that is which information ought to be moved first, etc.
Dissect your on-premise stock. That is the quantity of client letter box names, email addresses, and their sizes.
Really look at your organization settings. That incorporates web association, DNS have, firewall setup, accessible transfer speed, interior switches, and so forth.
One more significant element of the pre-relocation stage is the examination of your ongoing climate. The prescribed procedures for Office 365 relocation include:
Sort out the strategies to make and synchronize the client accounts.
Cautiously analyze the quantity of licenses required by the client accounts.
The need of reinforcement and reinforcement strategies.
Do you have the organization ability to do the relocation?
Is there any need to overhaul the Antivirus, Firewall, Switches?
Client account validation is fundamental.
Besides, you want to prepare sure that your information is for relocation. To guarantee a similar mark off the accompanying rundown.
Refreshing the Dynamic index before relocation is a valuable step of Office 365 movement best practices.
Eliminate all the client accounts that are not being used for quite a while.
Matching the UPN of the Source and Objective environments is significant.
All the email addresses are legitimate inside the intermediary addresses.
Later on, there might be a requirement for filing office.
Meet the consistence prerequisite.
Then, the last assignment before the movement cycle is to set up Office 365 records. To do as such, cross out the underneath agenda.
Get sufficient Office 365 licenses and pick the well conceived plan as best practices for Office 365 relocation.
Approve all the space names.
Remember to arrange security consent, applications for use, and so on.
To wrap things up attempt a test movement
You genuinely must see each and every step and point cautiously. On the off chance that even a solitary step is missed, it could lead to a ton of issues in the movement cycle.
Since you have the information on pre-relocation rules, we will make a step in the right direction for picking the right strategy.
Best Strategy In the wake of Finding out About the Workplace 365 Movement Best Practices
With regards to taking care of an immense volume of information for relocation, taking into account specialists' recommendation is a shrewd move to make. What's more, they suggest utilizing the attempted and confided in apparatus for example Phenomenal Office 365 Movement Programming
It is dependably the best practice to utilize the product to be on the more secure side for fruitful information relocation. Consequently, plan in like manner.
Subsequent to deciding on the best administrations, presently it is the right time to prepare for the post-relocation methodology.
Post-movement Agenda from Best Practices for Office 365 Relocation
There are sure things to be dealt with in the wake of playing out the movement. They are:
You want to divert the client email records to Office 365.
Whenever relocation is finished, allocate licenses to the Workplace 365 records in somewhere around 30 days of movement.
Set up the auto-find DNS records in O365 to associate with the client letter drops to Standpoint without any problem.
You can deactivate the Source climate after the movement. However, you should be sure beyond a shadow of a doubt that every one of your information has been moved completely prior to deactivating.
Last Words
Playing out USB Drive Recovery Office 365 relocation is a seriously overpowering undertaking. Nonetheless, presently by following the prescribed procedures for Office 365 relocation, you can deliberately play out something similar.
The requirement for these practices and focuses for relocating the information from Microsoft 365 record is made sense of in this article. Gain proficiency with the significance and learn about the pre-movement and post-relocation agendas.
#Pen Drive Data Recovery#USB Drive Data Recovery#Pen Drive Recovery#USB Drive Recovery#Pen Drive Recovery software#USB Drive Recovery software#Pen Drive Data Recovery software#USB Drive Data Recovery software
0 notes
Text
How to Fix SQL Server Mistake 5120 Connect Information base?

Recuperate Erased Data set in SQL Server Utilizing LSN (Log Arrangement Numbers)
LSNs are alloted to each keep in SQL Server exchange logs. Consequently, erased columns in SQL tables Pen Drive Recovery be reestablished, on the off chance that the hour of information erasure is known. In the event that the client has not recalled the hour of information erasure, then this arrangement won't function admirably.
Prior to beginning the SQL data set recuperation process, clients ought to satisfy a few requirements to recuperate SQL data set without reinforcement utilizing LSN. To recuperate erased SQL Server information base without a hitch, it should have the Full Recuperation Model or Logged Recuperation Model at the hour of information cancellation.
Tedious - It is an extended cycle to recuperate erased data set in SQL Server, as it includes long questions to be executed.
Complex Interaction - It is an extreme errand to execute for clients not having sufficient specialized information.
Information Misfortune Dangers - More noteworthy possibilities of information misfortune and debasement while executing the questions and applications.
Suggested: For keeping away from this wrong and extended manual LSN way to deal with reestablish erased information from the table without involving data set reinforcement in the SQL waiter, utilize some high level outsider arrangements like SQL Recuperation Programming.
Computerized Answer for Recuperate Erased Information from SQL Server 2019, 2017, 2016, 2014, 2012
SQL Data set Fix Programming is a dependable way to deal with recuperate and get back erased information in SQL Server. The device permits you to recuperate erased table in a sound state. It can fix degenerate MDF document and save information straightforwardly to the live SQL Data set. It can recuperate erased put away system, triggers, tables, rules, capabilities, and so on.
Follow these moves toward the impeccable recuperate erased information in SQL Server without reinforcement.
Step-1. Send off the Product and Snap Open to stack SQL data set MDF records.
Recuperate Erased SQL Data set
Step-2. Pick "Output Mode" for filtering the MDF records quicker. Check the "Auto Recognize" choice to distinguish the SQL Server variant of MDF documents naturally and mark the "Recuperate Erased Items" choice to recuperate SQL information base erased objects.
Recuperate Erased Data set in SQL Server Without Reinforcement
Step-3. The product will show the erased records in red tone.
Recuperate Erased Information
Step-4. Click on Product Button to trade the SQL Server Data set.
Reestablish Erased Information
Likewise Read: How to fix SQL Server information base with a bad Log Document?
Last Decision
To recuperate erased USB Drive Recovery set in SQL Server without reinforcement, we have proposed the arrangement by utilizing outsider programming. It is vastly improved to involve than manual arrangements as they are an extremely monotonous and extended process. Manual methodologies likewise have many possibilities of disappointment recuperation activity appropriately on the off chance that the client didn't have a clue about the planning of information cancellation. To conquer these issues, we proposed an expert answer for recuperate erased SQL Waiter data set table. This one is ideal to perform ideal recuperation in each circumstance and assist with bringing information back.
#Pen Drive Data Recovery#USB Drive Data Recovery#Pen Drive Recovery#USB Drive Recovery#Pen Drive Recovery software#USB Drive Recovery software#Pen Drive Data Recovery software#USB Drive Data Recovery software
0 notes
Text
How to Recover Deleted Table From SQL Server?
Outline: In this review, Pen Drive Recovery software will talk about a few basic and successful strategies that you can use to recuperate erased table from SQL Waiter. Thus, continue to peruse this post since you are extremely near know the arrangement.
MS SQL Server is an incredibly respected social data set administration framework among business and corporate areas. It stores every one of its information in MDF, NDF, and LDF data set documents. Now and again, SQL information base tables are erased by clients during the administration and upkeep of the data sets, because of which heads face numerous difficult issues. Subsequently, it is essential to recuperate erased information from SQL server to return to the typical work process.
So on the off chance that you are likewise such a client who needs fast and dependable answer for how to recuperate erased table from SQL Waiter then this stage is the ideal locations to conquer this situation. Here, you will get the manual along with a mechanized answer for recovering erased table from the SQL Waiter information base. Prior to hopping onto the arrangement part knowing the purposes behind information misfortune in SQL Server is important. This way clients can execute SQL waiter recuperate dropped table in a superior manner.
Potential Purposes for SQL Server Information Misfortune
Harmed information base documents (.mdf/.ndf)
Tainted document framework
Infection assault
Human blunder
Issue with the hard plate
Unexpected power disappointment
Reestablish Erased Information from Reinforcement Utilizing SSMS
USB Drive Recovery software to the beneath referenced guidelines to recuperate erased table from SQL Waiter utilizing the reinforcement record:
Step-1. Send off SQL Server The board Studio (SSMS) on your machine. Right-click on the information bases envelope and choose the Reestablish Data set choice.
Step-2. Subsequently, check the radio button relating to From Gadget and afterward hit the peruse button (… ).
Step-3. Here, select reinforcement media type as Record and snap on the Add button.
Select the reinforcement document to reestablish the data set and press the alright button.
Step-4. Presently, your data set is reestablished effectively, an affirmation message will spring up essentially stirred things up around town button.
#Pen Drive Data Recovery#USB Drive Data Recovery#Pen Drive Recovery#USB Drive Recovery#Pen Drive Recovery software#USB Drive Recovery software#Pen Drive Data Recovery software#USB Drive Data Recovery software
0 notes
Text
How to Recover Deleted Items from Recycle Bin?

In the wake of erasing information from your PC, Pen Drive Recovery software will actually want to recuperate erased things from reuse container in Windows 11,10,8,7 and so on. The reuse receptacle is an impermanent stockpiling area for information that have been erased, and it permits you to recover erased documents before it is past the point of no return. How would it be advisable for you to respond if, nonetheless, you have taken out the records from the reuse receptacle?
Just sit back and relax, in this review, I will clarify for you the total and most secure strategies to reestablish erased things from reuse canister even after they unfilled. so read the total aide cautiously.
Yet, in some cases many inquiries ring a bell like what happens when we erase the information forever. So prior to beginning, the interaction, examine the response to the inquiry to recuperate erased records from outside hard drive.
What Happen When We Erase the Records/Envelopes?
At the point when records are taken out in Windows, they are shipped off the Reuse Canister, a transitory stockpiling region where they will stay until the predetermined time has slipped by (30 days from the day of erasure). The data is then erased from the Reuse Canister.
USB Drive Recovery may for all time eliminate data without utilizing the Reuse Receptacle in the event that you erase it utilizing the Shift + Del keys. Information erasure isn't unrecoverable. It's just the "document reference" that vanishes when you erase a record, delivering it inaccessible to every other person. Nonetheless, until they are eradicated, the record items will stay available on your gadget.
#Pen Drive Data Recovery#USB Drive Data Recovery#Pen Drive Recovery#USB Drive Recovery#Pen Drive Recovery software#USB Drive Recovery software#Pen Drive Data Recovery software#USB Drive Data Recovery software
0 notes
Text
How to Recuperate Shift Erased Records from PC?

How Might I Recuperate Erased Things from Reuse Container utilizing Manual Strategies?
Here Pen Drive Recovery will show you 2 to 3 manual techniques to recuperate erased things from reuse receptacle in Windows 11, 10, 8, 7, and different adaptations. Every one of the means are referenced underneath:
Strategy 1: Utilizing the Reestablish symbol
Open reuse bean on your machine.
Here your all-erased records and organizers will show.
From that point forward, look for the necessary record, which you need to recuperate erased information from PC hard drive.
look for the expected record
Presently select the required document and right snap on it and pick the "Reestablish" symbol.
Presently your chose record will be reestablished to its recently put away area.
Likewise Read: Simple Manual for Recuperate Erased Video Records From Hard Drive
Technique 2: Reuse Container Symbol not Apparent to Recuperate Erased Things
Find reuse container and right-click on it.
And afterward, choices will show up and pick the "Customize" choice.
look for the expected document
Presently pick the "Subjects" (for Windows 11, 10) choice from the rundown in any case pick the "Change Work area" (for different variants) symbols.
From that point onward, click on the "Work area Symbol Settings" from the right board.
Presently a work area setting page will show up and from here find reuse container symbol and empower the case.
recuperate erased things from reuse container
In conclusion, reuse canister symbol will show up on the work area.
Presently follow the initial step to recuperate erased things from reuse canister Windows 10.
In any case, imagine a scenario where reuse container is unfilled for you, presently how will you recuperate the erased information. Sit back and relax, I will show you the most secure techniques to recuperate erased things from reuse canister after they vacant.
Most secure Answer for Reestablish Erased Things from Reuse Receptacle after Void
One of the most amazing devices is USB Drive Recovery software Information Recuperation Apparatuses. This product recuperates a wide range of erased information like regularly or for all time erased information after void. Additionally, this product reestablishes totally eliminated information like Pictures, recordings, reports, and different information without losing any information.
The product has an extremely basic and easy to understand interface for all specialized and non-specialized clients.
Moves toward Recuperate Erased Things from Reuse receptacle
Download and introduce the product on your machine.
programming to recuperate erased things from reuse receptacle
Presently pick the Segment from where you need to recuperate information and hit on the "Output" symbol.
And afterward, every one of the erased documents and organizers in red variety will show up on the screen.
erased records and envelopes
Presently select the envelope and hit on the "Save" symbol to recuperate erased things from reuse receptacle.
How to Forestall Unintentional Cancellation?
On the off chance that you erase documents in some cases and, figure out how to reestablish them. If so, changing the settings might assist with mitigating a portion of the burden. You have the choice of designing an inquiry that will show prior to erasing a particular record, requesting that you affirm that you really do as a matter of fact wish to eliminate the document. Follow these techniques to easily recuperate records that have been erased from the reuse canister, and you will be incited each time you eliminate a document.
Right-click on the "Reuse receptacle" and pick the "Properties" choice from the rundown.
Presently a discourse will show up and here empower the "Show Erase Affirmation Exchange" box.
Ultimately, hit the alright symbol.
Presently, at whatever point you erase anything you will get an affirmation message.
Last Words
Following an assessment Pen Drive Data Recovery various thought processes, we have gone through the numerous manual methodology to recuperate erased things from reuse canister in Windows 11, 10, 8, 7, and different forms. Be that as it may, there are conditions in which the results created by these methodologies are not adequate.
#Pen Drive Data Recovery#USB Drive Data Recovery#Pen Drive Recovery#USB Drive Recovery#Pen Drive Recovery software#USB Drive Recovery software#Pen Drive Data Recovery software#USB Drive Data Recovery software
0 notes
Text
Migrate Exchange 2010 to 2016 – Complete Step-by-Step Process
Outline: This blog will give a point by point portrayal of how you can relocate Trade 2010 to 2016 in a bit by bit process. In addition to the movement cycle, we have likewise made sense of the pre-relocation steps that you really want to finish the interaction in a consistent way.
As Trade Server 2010's help finished on October 13, 2020, numerous associations have redesigned their Trade Server to the most recent variant. Presently, there is a choice to either move to Trade 2016 or Trade 2019 as these are the most favored Trade Servers by directors.
In the event that you haven't moved USB Drive Recovery to the refreshed Trade Server and are searching for a method for relocating Trade 2010 to 2016, this review is for you. Here, you will get every one of the definite strides on how you can complete the relocation cycle in a consistent way.
There are two different ways utilizing which a client can move Trade Server 2010 to 2016 for example a manual arrangement and a robotized way. To start with, we will examine the manual way in a bit by bit way.
A short outline of movement steps physically:
Trade Server Measuring
Satisfy Trade Server Prerequisites
Trade Server Establishment
Trade Server Setup
Making Concurrence of Trade Servers
Post box Relocation
Trade 2010 to 2016 Relocation Utilizing a Manual Way
1. Trade Server Measuring
As you are now running Trade Server 2010, you could have a thought of the exhibition of the current server. In this way, you can consider expanding the Slam, Plate Space, and Processor to guarantee smooth dealing with the new Trade 2016 Server.
You can likewise consider lessening or expanding the post box portions and guaranteeing that you have sufficient extra room for letter drop and reinforcement stockpiling.
Moreover, you can likewise give thought to isolating Trade logs, Trade information base, and Windows volume.
2. Consent to Trade Server Necessities
It is important to have the right arrangement of assets to set up another Trade Server and relocate Trade 2010 to Trade 2016.
Windows Server 2012 onwards
Something like .Net 4.5.2 (The most recent rendition is suggested)
Trade 2010 Server should be refreshed to SP3 - Update Rollup 11
Standpoint 2010 SP2 with KB2965295 and KB2956191
Useful Promotion 2008 or above
When you satisfy this multitude of necessities, you can now continue with Trade 2016 establishment.
3. Trade Server 2016 Establishment
Presently download the most recent Trade 2016 variant and carry out the accompanying advances:
1. First change the registry to the Trade's download area.
2. Plan Promotion Pattern
3. Presently update Dynamic Registry with new Trade objects
4. The subsequent stage includes space planning (You should play out this for every one of your areas)
5. Introduce Trade 2016 on this Server
6. At last, reboot the server.
One more step for Trade 2010 to 2016 movement finishes here. Presently, go through the following segment to continue further.
4. Trade Server Arrangement
1. Presently login to ECP to test that all is running well. For this, open a program and type
2. Update the Help Association Point in the Dynamic Catalog. Likewise, guarantee that the Server Association focuses to your current autodiscover URL.
Eg. - autodiscover.domain.com/autodiscover/autodiscover.xml
A short time later, we will direct this name toward New Trade 2016 Server.
3. Send out your public SSL from the old Trade Server and Import it into the new Trade Server.
4. Presently restart the IIS to apply the new SSL endorsement.
5. Open EMS on your machine and run the accompanying content to refresh all virtual index URLs. When this large number of steps are performed, you can continue for Trade 2010 to Trade 2016 relocation.
6. At long last, audit the Trade DB settings and guarantee that you make DBs as per the circle design and prerequisites.
Understand More - You can likewise peruse how to send out Trade letter boxes to PST design.
5. Conjunction Arrangement
Presently it is the right time to connect the new server to the former one.
Point all the outer DNS records for messages to the new server and update all firewall rules (if any). (The messages will currently stream into the new Trade Server and afterward to the bygone one).
Eliminate ExternalURL Worth from the past server.
Point all the Inner Trade Records connected with messages to the new server.
6. Move Trade 2010 to 2016
Send off Trade Administrator Center >> go to Beneficiaries >> movement tab.
Trade 2010 to 2016 Relocation
Click on the Transition to an alternate data set choice.
Under the New Relocation Clump window, pick the "Select your desired clients to move" choice or the "Determine the clients with a CSV record" choice for mass movement.
Click on the Following button in the wake of adding every one of the clients.
Enter a Relocation bunch name.
Presently, select the "Move the essential letter box and the document post box in the event that one exists" radio button under the Chronicle segment.
Click on the Peruse button to choose the objective data set where you need to move Trade 2010 to 2016.
Enter the post box subtleties to which you need to send the relocation subtleties.
You can either go with the "Consequently start the cluster" choice or select the "Naturally complete the movement clump" choice to finish the group.
Following that, click on the New button.
You can likewise pick a movement cluster physically by choosing the "Physically select the clump later" choice.
For this, go to the Beneficiaries tab >> relocation tab and afterward physically select a cluster. A while later, click on the Total this relocation clump choice.
You can then open the relocation tab to actually look at the movement status by choosing that clump.
After fulfillment of the relocation cycle, presently the time has come to decommission the Trade 2010 Server. For that, you really want to deal with the accompanying places:
The switch is highlighting the new Trade Server after Trade 2010 to Trade 2016 relocation.
Guide the outer area DNS toward the new server. (On the off chance that you have an outer IP Address for the server)
Guide scanners and multi-capability printers toward the new server.
Whenever you have played out this large number of activities, you can play out the decommission interaction easily.
Perform Trade 2010 to 2016 Relocation in a Computerized Manner
In the event that you have set up Trade Server 2016 on your framework effectively and need a straightforward way utilizing which you can play out the movement, then you can consider Trade 2010 to 2016 Relocation Device. This cutting-edge arrangement offers plentiful elements to make your whole cycle a breeze.
In this device, Pen Drive Recovery software simply have to add the EDB document from Trade Server 2010 and pick Live Trade Server as your objective stage. There are numerous extra channels and customization choices to channel your information relocation process.
There is a classification based channel that will assist you with moving just specific letter drop things from Trade 2010 to 2016. Moreover, there is a date-based channel to relocate information from a particular time range.
In like manner, there are numerous valuable elements to make your occupation easy. Furthermore, the product accompanies a demo rendition that will allow you to attempt every one of the highlights free of charge.
#Pen Drive Data Recovery#USB Drive Data Recovery#Pen Drive Recovery#USB Drive Recovery#Pen Drive Recovery software#USB Drive Recovery software#Pen Drive Data Recovery software#USB Drive Data Recovery software
0 notes
Text
What are the moves toward relocate Trade 2010 to 2016 utilizing this utility?
A. Straightforward and Fast Strides USB Drive Recovery software Trade 2010 to Trade 2016 movement are:
Stage 1. Download the high level utility free of charge.
Stage 2. Add Trade EDB document to instrument.
Stage 3. Pick Live Trade as a product choice.
Stage 4. Enter subtleties for objective Trade.
Stage 5. At last, begin the movement interaction.
Q. Is this previously mentioned utility allowed to utilize or require a permit to perform movement?
A. This Trade 2010 to 2016 movement device isn't allowed to utilize however offers a free preliminary form. To attempt the demo adaptation of this utility prior to buying the authorized variant, then you can download and attempt the product for nothing. This product will assist you with relocating 25 things for every envelope from every letter box put away in the EDB record. Furthermore, you can likewise test every one of the highlights presented in this utility.
Q. Does this application uphold public organizer relocation too?
A. Indeed, Pen Drive Data Recovery software product to relocate Trade 2010 to 2016 is adequately progressed to move total letter box information to the objective stage including public envelopes too. In addition, it likewise watches out for the information respectability in the meantime.
Q. Are there any possibilities of information cancellation or adjustment during the movement interaction?
#Pen Drive Data Recovery#USB Drive Data Recovery#Pen Drive Recovery#USB Drive Recovery#Pen Drive Recovery software#USB Drive Recovery software#Pen Drive Data Recovery software#USB Drive Data Recovery software
0 notes
Text
Resolve Microsoft SQL Server Error 5120 Attach Database Problem.

Microsoft SQL Server is a broadly utilized data set administration framework. The essential capability of this application is to store and recover the information mentioned by the SQL client. Furthermore, SQL (Organized Inquiry language) is utilized to perform procedure on the information. Be that as it may, some of the time SQL information base clients experience one of the normal SQL Server mistake 5120 connect data set issues. Allow us to take an illustration of a Question requested by the client in one from the gathering sites. Obviously, Pen Drive Data Recovery software will assist us with grasping the circumstance in a superior manner.
Essentially, this issue happens when Microsoft SQL Server data set clients don't have the approval to get to the MDF and NDF documents of the data set. Prior to continuing to the arrangement part let us initially talk about the different reasons for this issue.
Likewise Read: How to Recuperate Erased Data set in SQL Server Without Reinforcement
Explanations for Microsoft SQL Server Mistake 5120 Connect Data set Issue
1. In the event that your MDF records are not at the precise area or MDF data set documents are put away in another drive of the PC.
2. On the off chance that on the off chance that you are not running your Microsoft SQL Server the executives studio with administrator freedoms.
3. On the off chance that framework drives don't have consent to store the server record inside them. Then additionally, all things considered, it will show the mistake 5120 in SQL Server 2019, 2017, 2016, 2014, 2008 R2, 2008, and 2005.
Additionally Read: SQL Server Doesn't Exist or Access Denied Mistake - Settled
Shrewd and Effective Answer for This Issue - SQL Server Mistake 5120
On the off chance that you are confronting a Microsoft SQL server blunder 5120 connect data set issue, I recommend you reestablish the whole information from the reinforcement or fix the degenerate SQL data set MDF record. If you have any desire to recuperate the information without reinforcement, you can take the assistance of SQL Server Recuperation Apparatus. Additionally, it fixes adulterated MDF and NDF records and commodities them to the SQL data set, SQL Contents, or CSV Configuration. The product permits the client to recuperate erased articles like Tables, put away methodology, capabilities, triggers, sees, and so forth, Additionally, this product is viable with SQL Waiter 2019 and its beneath variant.
Moves toward Recuperate SQL Data set without reinforcement and Resolve Microsoft SQL Server Mistake 5120 :
Step-1. Introduce the Product on your machine. Click on Open and Peruse the MDF record from your framework.
SQL Server 5120 mistake
Step-2. Presently pick the Sweep Mode, and select the SQL Server form, the client can choose the recuperate erased objects choice to see erased objects in red tone.
SQL Server Mistake 5120 Connect Information base
Step-3. Click on the Data set Objects to see SQL data set things.
SQL Server Mistake 5120 Connect Information base
Step-4. Click on the Commodity button to send out the MDF record information to the SQL Server Data set, SQL Content, or CSV Document Configuration.
SQL Server Mistake 5120 Connect Data set
End
At long last, in this article, USB Drive Data Recovery software have talked about the answer for SQL server blunder 5120 Append Data set mistake issue looked by the clients. Likewise, we have given different explanations behind this issue. Subsequently, to determine this issue the client can take the assistance of an expert instrument. Subsequently, it is a high level and independent answer for resolve Microsoft SQL server blunder 5120 cleverly.
#Pen Drive Data Recovery#USB Drive Data Recovery#Pen Drive Recovery#USB Drive Recovery#Pen Drive Recovery software#USB Drive Recovery software#Pen Drive Data Recovery software#USB Drive Data Recovery software
0 notes
Text
How to Import Contacts into Google Contacts from Excel?

Synopsis: Would Pen Drive Data Recovery say you are one of those individuals who are searching for an answer for import contacts into Google contacts from Succeed? On the off chance that your response is yes! Then read this article. This post assists clients with knowing how to move Succeed contact records to research account. So remain with us.
Microsoft Succeed is as of now famous to store and oversee a lot of information. Most clients save their contacts on a Succeed sheet with subtleties. In this way, How about we start the article by examining the question of how to move succeed contacts to research contacts.
Then again, Gmail is a simple to-utilize, free email instrument that is generally involved all over the planet for both individual and business purposes. Contacts and telephone numbers assume a significant part in many individuals' lives. Additionally, clients would rather not lose information in that frame of mind because of specialized or human disappointments.
That is the reason it's vital to back up or duplicate your contacts to a protected stage, for example, Google Contacts. Additionally, since the client can rapidly call or email her from her Office PC, there are numerous ways of bringing in Succeed record to Gmail.
These days, all clients are going to cloud applications and furthermore really like to store significant information, for example, contacts in cloud applications. A free cloud administration for putting away contacts is Google Contacts. prior to moving the transformation cycle. Prior to understanding this interaction we should investigate the reasons.
Why Need to Import Succeed Record to find out about Contacts?
The purpose for changing over your succeed contacts is Gmail doesn't uphold the import of Succeed XLS/XLSX records. This review brief you about the method to move Succeed contacts into Google contacts.
Here are the top motivations behind why you ought to change to find out about Contacts now:
Utilizing Google Gmail gives you additional security while marking in to your record.
This program oversees labels in a deliberate and coordinated manner.
The adaptability of the email client makes it simple to design with other email clients assuming the need emerges from now on.
It has progressed elements to add/mark explicit messages as significant, uninitiated, read, and so forth.
This rundown is live and I really want to rapidly switch between Succeed contacts and import them.
Master Answer for Import Contacts into Google Contacts from Succeed
The previously mentioned arrangement is proficient to import succeed contacts to research contacts yet Gmail upholds CSV record design. You can import XLS/XLSX documents directly to Gmail contacts rapidly or effectively, by utilizing this Best Succeed Converter Wizard, which allows you to send out your XLS records directly to Gmail designs with keeping up with the subtleties grouping. So you'll have to change over your XLS document to CSV, which is upheld by Google Contacts.
The device offers double modes for transferring XLS records in bunches or each in turn. This product permits you to add single or numerous documents, and furthermore convert Succeed record to HTML, other than that it can change over different arrangements like proselyte Succeed Contacts to PDF and other various configurations. This wizard makes the technique simple to move Succeed contacts into Google contacts with next to no measure mistake or information misfortune. It upholds every one of the renditions of succeed and is likewise viable with every one of the Windows forms.
Significant Hints: USB Drive Data Recovery free Download Succeed Converter Instrument, clients can send out just initial 10 contacts for each Succeed Document as a demo his variant. Client can buy full his authorized variant and enact this instrument to appreciate consistent exchange of Succeed contact sheets. The activity of this great device to change over Succeed contacts to CSV is exceptionally simple and proficient.
#Pen Drive Data Recovery#USB Drive Data Recovery#Pen Drive Recovery#USB Drive Recovery#Pen Drive Recovery software#USB Drive Recovery software#Pen Drive Data Recovery software#USB Drive Data Recovery software
0 notes
Text
Repair DBX File – DBX Repair Tool for Corrupt DBX Files?
fix DBX fileThough Viewpoint Express is an old email client given by Microsoft, however it's as yet well known among work area clients. Pen Drive Recovery makes DBX envelopes compared to their post box for putting away email messages. Tragically, DBX organizers are not safe to debasement. You can lose all your important email messages always because of defilement. In such circumstance, you ought to fix DBX record by utilizing brilliant DBX Fix device.
Like a Standpoint information document, Viewpoint Express' DBX records additionally have a size limit of 2 GB. This particular size constraint is pertinent on both Inbox.dbx as well as Sent Items.dbx organizers. In the event that the size of any of these envelopes surpasses and goes past 2 GB, you would deal with some difficult issue, for example, program begins hanging, unavailability of DBX records, DBX defilement, and some more.
While sending or getting an email message assuming this blunder 0x800c0133 happens, this implies either the DBX envelopes have been crossed as far as possible or they are close to around 2 GB of size. You should really look at the size of your DBX envelopes, with the goal that you can keep away from defilement if conceivable.
Stage 1: Send off Viewpoint Express on your framework.
dbx document area
Go to Instruments > Choices.
Stage 2: In the Choices window, click Upkeep tab > Store Organizer… .
Stage 3: Go to where your DBX organizers are put away and actually take a look at their size there.
On the off chance that the size has been now surpassed, you have no other choice aside from fixing the organizer with the assistance of an outsider DBX Fix instrument. In any case, in the event that the size is under 2 GB, you have pretty fair opportunities to stay away from defilement. How?
How to Fix DBX Record?
Eliminate or erase every one of the undesirable messages, copy things, enormous connections, and so forth from your DBX envelopes. By doing this, you would get sufficient free space in your DBX organizers to store more messages information. This is the best way to stay away from debasement in DBX records because of size limit issue.
On the off chance that your DBX record has been now adulterated before USB Drive Recovery can do anything, you'll be left just a single arrangement, for example an outsider device to fix Viewpoint Express DBX records. By and large, an outsider DBX fix device examines degenerate DBX envelopes and fixes the mistakes and debasement issues from them. It recuperates most extreme potential messages from degenerate DBX envelopes and save them at client characterized area. Get progressed DBX Fix instrument to fix DBX record.
#Pen Drive Data Recovery#USB Drive Data Recovery#Pen Drive Recovery#USB Drive Recovery#Pen Drive Recovery software#USB Drive Recovery software#Pen Drive Data Recovery software#USB Drive Data Recovery software
0 notes