rawaabeauty
RAWAA BEAUTY
Rawaa Beauty the quality or aggregate of qualities during a person or thing that provides pleasure to the senses or pleasurably exalts the mind or spirit.
15 posts
Don't wanna be here? Send us removal request.
Last Seen Blogs

abgmantop76
NIK ELIN LET'S FUCK LIKE CRAZY..

tabihands
Seunghyun's hands.

pollopuma12
By: Pollo

veszra
Veszra
baralhociganoemagia
Baralho Cigano & Magia
Text
10 Beautiful Short Hairstyles for Women over 45

When you’re growing older your haircut should stay young and current – short haircuts for ladies over 45 are becoming more elegant and complicated per annum . With more hairstylists joining the sector daily, there are plenty of new hair ideas generated which suggests there’s something out there to suit your needs and preferences. inspect these 10 beautiful hairstyles for ladies over 45.
1. Short Feathered Cut. for ladies with fine hair, thicken up your piece-y layers with hair curlers or some texturizing spray.
2. White Hair Over 45. White pixies with undercuts will always look stylish on older women.
3. Short Cut with Body. The short feathered cut with teased roots and babylights provides a voluminous hairstyle flattering for many women.
4. White Feathered Bob. The short white bob with feathered bangs is that the epitome of elegance. When it involves short bob haircuts, texture and shape are crucial.
5. Short Layered Blonde Hairstyle. Keeping layers wavy and feathered boosts texture and movement in short-to-medium hair.
6. Short Crop with Undercut. Pixies with short temples and nape are great hairstyles for ladies 45 and up with a round face because undercuts can reduce the face and cause you to look younger.
7. Bouncy Cut with Thin Bangs. Want to undertake some cute bangs but don’t want anything drastic? Thin, piecey bangs are easily arranged to remain where you would like them.
8. Black and White Curly Cut. the lovable curly haircut shows off white hair as a face frame under voluminous black locks.
9. Short Blunt Style. A blunt cut during a shorter length will visually strengthen the jawline of girls in their 60s.
10. Short Top Long Sides. Very short cuts with longer sides are an excellent chic option if you’re 45 and older and searching for a chic style.
0 notes
Text
8 easy steps to diy balayage hair for lazy girls

This DIY Balayage is important for those that are always during a time crunch. Busy schedules and demanding tasks usually deprive girls like me the time to go to the salon as often as I should. due to this dilemma, it's impossible to take care of any hair color that i would like .
As a solution to the crisis, balayage is that the transcendent hair color to possess . This just happens to be that sort of hair color that doesn’t need obsessive upkeep. It isn’t easy to seek out the time and put aside money to possess slightly from hair color every three weeks.
A salon visit amounting to 200 USD per visit isn't exactly a practical move. as long as the balayage may be a low-maintenance hair color, I even have come up with a DIY version that yields an equivalent beautiful result.
Don’t worry! Anyone can do that , albeit you don’t have professional experience in coloring hair.
how to balayage reception
Tired of the expensive salon visits for your hair color treatments? Perhaps it’s time to think about balayage reception .
It may sound intimidating, but it's doable. With the straightforward tutorial I’ve found out for you, you’ll be ready to learn a subtle and effortless thanks to achieve that stunning color that creates your hair seems like it's been kissed by sunlight.
Again, you don’t got to stress about the accuracy of your strokes. you only got to recall a touch of the watercolor lessons you had once you were a child . this is often all you need to hand-paint your hair and produce the subtle highlights that you simply want.
You can even get a kit that permits you to the touch up your colors for less than 28 USD. Just remember to put a humid towel nearby so you'll clean excess dye on your face or your gloves.
things you’ll need
L’Oreal Quick Blue Powder Bleach (get 3 packs for long hair & bleach smaller section)
Clairol Professional Pure White 20 Vol
Ion Keratin Smoothing Masque
Clairol Shimmer Lights Shampoo + Conditioner ( to avoid hair brassiness/ to avoid hair to urge orange)
bowl and brush or applicator bottle
Teasing brush
disposable gloves
step by step instructions
step 1
read and follow the instructions from the box
You should select colors that are two to 3 shades lighter than your hair’s natural color.
Though you’re already wont to the brand of hair coloring you've got been using, still perform an allergy test. Allergies can develop over time.
step 2
clip your hair up
wist one section of hair and tease the start to stop dye from getting too on the brink of your roots
Layering is vital in balayage because it allows you to paint different segments of your hair to make depth. you'll prefer to have as many layers as you would like . Pull a neighborhood of your hair up. Secure it with a clip or a knot. Then, you'll start with a skinny layer of hair.
Start with clean, dry hair.
Use the tail end of the comb to make top, middle, and bottom sections separated during a halo-Esque part round the head, from ear to ear.
step 3
tease and DIY balayage twist
The objective in balayage is to include the lighter color into your natural hair color. Maintaining your naturally colored roots is significant in maintaining the hair color effect.
Wear disposable gloves. Create a middle division on your hair.
Run your comb from that center point to your left ear then to your right ear.
Now that you simply have 4 sections of hair, it are often easier for you to figure .
Twist sections then twist. Twist one section of hair first. Tease the start point of that twist to stop the dye from getting too on the brink of your hair roots.
step 4
apply the hair coloring
After teasing the start point of the hair roots, start applying the hair color at the ends of every section. Color them completely then apply color again from the mid-length of the section right down to the ends.
You can use a brush to spread the colour on your strands. you'll use your fingers to possess a more natural effect. Keep applying the dye, leaving the roots alone. Naturally, the roots are the foremost immune to sunlight exposure de-coloring.
step 5
secure the primary section
Use hair grips to secure the hair whilst you're employed through each small section.
Clip the section of hair that you’ve worked on already, separating it from the sections that aren’t done yet. this enables you to figure quickly and simply .
step 6
release another hair section
Don’t be afraid to paint through the free-hand technique. In balayage, it's not a problem if your highlights aren't symmetrical. If you color freely, you'll have a more natural look.
step 7
apply the finishing touches
You have the facility to regulate the quantity of color you would like to use in your balayage. it's also up to you to make a decision which section you would like to paint more.
A good example is during the summer months. you'd want to place more highlights around your face to stress the highlights you've got within the remainder of your hair.
step 8
rinse, apply the treatment, and dry naturally
Rinse, treat, and dry. After rinsing the bleach, apply the hair toners. Reading the instructions on the kit again to form sure you don’t leave the colour on longer than it should be. Rinse your hair with lukewarm water.
step 9
Apply a hair toner (Wella Color Charm Blonde Hair Toners in T11 and T18 ) (check the product’s instructions) if you want to then treat it after. Rinse your hair again and leave your hair to dry on its own.
After rinsing the hair toner, apply the Ion Keratin Smoothing Mask or any of your favorite deep conditioning hair mask. Let it sit for about 3 minutes and rinse thoroughly.
how long wouldn't it fancy do diy balayage?
Considering that sectioning of the hair can a touch of your time , this might take up to an hour, counting on the specified highlight effect you would like .
The better you section off the hair, the more efficient use you'll make of the time you spend on achieving your DIY balayage.
1 note
·
View note
Text
how to get rid of sebaceous filaments

Those gray dots over your nose? determine what are they and the way to stop and the way to urge obviate sebaceous filaments. The blackheads are always frustrating to eliminate from your skin. Some people squeeze them. Others use pore strips.
Though the methods are different, people feel an equivalent way about them—they’re frustrated.
The hideous black growths on your nose may begin after the extraction process, but over time, all of them refill again. It seems like you’re trapped during a vicious circle.
Most people accept the blackhead corrugations on their noses, often embarrassed at the thought of anyone watching the side of their faces. Among these people was me, years ago.
After paying more attention to what these blackheads are, I even have acknowledged some interesting news about them. it's going to be either good or bad news, counting on how you perceive it.
Much research and discernment have led me to conclude that they're not blackheads in the least. they're “sebaceous filaments”. These formations are natural and normal. they're even healthy because they're a part of your body.
what do sebaceous filaments look like?
Did you see tiny gray/tan dots everywhere your nose? Those are sebaceous filaments which will make pores appear enlarged. They emit an extended string of white or yellow gunk like tiny snakes once you squeeze them, but they're not clogged pores.
They’re a part of our skin’s natural occurrence and though it’s possible to extract/squeeze these gunks, the trouble is futile as they always come.
how are you able to tell the difference between blackheads and sebaceous filaments?
how are blackheads and sebaceous filaments different from each other?
While sebaceous filaments are normal skin on the skin, blackheads or open comedones are non-inflammatory acne. they typically have more accumulated sebum and dead skin cells and tend to distend to finish up swelling the pore shape.
It is the oxidized melanin and lipids cap that provides blackheads or comedones it’s the dark or black look. You, however, don't get to ascertain sebaceous filaments with a dark cap just like the ones on blackheads. they tend to blend with the skin, which is why it’s considered more of a drag.
There is another difference between the 2 which you'll not notice together with your eyes. this is often that the follicles with sebaceous filaments have a granular layer that's visible. this is often the skin’s third layer called the stratum. However, it doesn't have any acanthosis, which is the thickening of skin layers.
Another team of researchers from Germany discovered that blackheads or open comedones had some acanthosis and a comparatively normal stratum. that they had also noticed that open comedones had comparatively smaller glands but excessive skin cells within the hair follicles than sebaceous filaments.
Another author mentions that there's something else that's different between a blackhead and sebaceous filament. consistent with the author, the blackhead’s skin cells tend to become sticky and eventually accumulate to make a plug.
Sebaceous Filaments
Sebaceous filaments are flat and are available out easily if you pinch the skin.
They help reach the oil of your skin to succeed in the surface so that your skin is often moisturized naturally. they're often mistaken for blackheads because they often appear grayish.
Sebaceous filaments are often found on decent oily areas like your nose and around it. They also appear in your chin’s crease.
They are smooth, evenly-spaced gray or tan dots. they're found much deeper within the skin. However, they address blackheads overtime thanks to infections, hence the pores might turn black dots if they continue to be clogged for a protracted period of your time.
Blackheads
On the opposite hand, blackheads are blocked pores which are especially common on the nose where we tend to be oiler. they tend to be raised, a litter bigger, and wish more effort to urge removed.
They are called blackheads because when the highest a part of a blackhead reaches the surface of the skin, it becomes exposed to oxygen. tend to be raised, a touch bigger, and their removal requires a touch more effort
It then oxidizes and turns black. Blackheads are bumpier, larger, and darker than sebaceous filaments.
so, what’s the takeaway?
This suggests that the 2 should be considered to be a neighborhood of the chain and will not be divided into two differing types. they're both triggered by the continual production of stem cells and sebum. It’s due to the traditional accumulation in sebaceous filaments that they eventually become blackheads or open comedones.
So it doesn’t matter if someone has sebaceous filaments on their chin or nose. They realize it is some things normal and is named either blackheads or sebaceous filaments.
What is often done is to undertake to form them less prominent. I don't mind ‘correcting’ people that say they need blackheads on the nose. it's fine goodbye as each side know what they mention.
how are blackheads and sebaceous filaments similar?
Postpuberal people with large facial pores and seborrhea are susceptible to have sebaceous filaments within the alae nasal and dentofacial areas of their face. Microcomedones are quite common in these areas, which can eventually become blackheads or open comedones.
Using your fingertips to pinch the skin or using the cyanoacrylate-technique helps express the cylindrical, whitish-yellow colored sebaceous filaments found in facial parts rich in sebaceous follicles.
These cylindrical sebaceous filament tubes comprise of dead skin cells, bacteria, sebum and should even have fine hair. Similarly, blackheads or open comedones comprise dead skin cells, sebum, bacteria, and should even have fine hair.
what causes sebaceous filaments?
” like blackheads, sebaceous filaments also represent a condensation of oils and skin scales within the exocrine gland duct but the condensation isn't fully concealed and doesn't usually end in complete obstruction of the duct. blackheads occur when skin scale and skin oils solidify to make plugs within the ducts leading from oil glands deep within the skin to the skin surface. ”
is it okay to get rid of sebaceous filaments?
The answer is not any.
Experts discourage anyone to require them out by any means. it's harder to require sebaceous filaments out. a bit like once you get your blackheads removed, having sebaceous filaments taken out usually results in scarring and irritation. this might even cause the eruption of a spot if ever your weak pore becomes infected.
are sebaceous filaments normal?
Now that you simply know the difference between blackheads and sebaceous filaments, please do your best to resist popping them or excavating them in any way. The brighter side of things is that you simply don’t get to use pore strips or have them removed during a facial treatment anymore.
While it’s true that you simply are cursed with sebaceous filaments, you shouldn’t feel bad in the least. They don’t alter your appearance in a bad way and, everyone has them. People don’t even notice others having sebaceous filaments. So, you don’t get to worry anymore.
Embrace your sebaceous filaments. they assist your skin look youthful and supple. consider sebaceous filaments as efficient helpers in maintaining your healthy skin.
how to best reduce blackheads or sebaceous filaments?
how does one get obviate sebaceous filaments naturally?
It is an incontrovertible fact that sebaceous filaments and blackheads tend to vary after a hard and fast time. consistent with the team of German researchers, sebaceous filaments reform after 30 days, anecdotal evidence proves that it's going to happen earlier in some people.
Blackheads will only change if whatever obstruction it's in it's removed. And if it does reform, it's usually smaller than the previous size. Consistently removing waste from the pore’s upper region helps make both blackheads and sebaceous filaments less prominent.
This is easily done manually through gentle exfoliation or chemical exfoliation. Chemical exfoliation uses glycolic or salicylic acids or retinoids. Some dermatologists I had spoken to recommend using tazarotene because they assert it’s the foremost effective.
0 notes
Text
11 tips Morning Rituals That Can Change Your Life

Your morning is often that make-or-break time that sets you up for an honest day or a nasty day. Here are 11 habits you'll establish which will put you on the trail of stringing together an honest day after an honest day.
1. Drink A Glass Of Warm Lemon Water
It’s like oil for the Tinman because it goes to figure lubricating all of your different internal systems.
You want the water to be warm so that it’s not a shock to your system very first thing within the morning. The lemon will help get your gastrointestinal system ready for the approaching meals and makes the water tastier. you'll add a touch of honey thereto also if you would like to chop down on a number of the tartness.
The Re-hydration Process
When you awaken within the morning you’ve just gone without water for about 8 hours, so it’s important to show things around and begin up the flow of water again. What you don’t want to try to do is skip the water and go alongside your day, having breakfast and other beverages before addressing your need for water.
2. awaken Earlier
This is a priority one because to suit during a fantastic morning you’re getting to need some overtime compared to your current routine.
If you’ve become an evening owl due to the peace it affords, you’ll be equally satisfied by an equivalent peace an early morning provides, and it’s simply a matter of shifting some time to the wee hours of the morning instead of late in the dark. The difference in your body is noticeable.
The Ideal Time To awaken
Wake up in conjunction with circadian rhythms if possible. Civil twilight may be a great time to awaken because there'll be enough light to ascertain, the birds are chirping, and you continue to have time to catch the sunrise if you’re keen. Since this point varies by the time of year, it's going to be more feasible during some seasons than others. Give yourself an hour and a half before you've got to be out the door.
3. Scrape Your Tongue
Taking time to scrape your tongue may be a one morning routine you won’t want to offer up once you begin it. It helps get obviate morning breath and is also in line with the rejuvenation process you would like to try to to to form the transition from sleep to wakefulness every day.
As a bonus, you’ll be ready to taste your food better without the film that’s on your tongue even after brushing your teeth.
The Right Scraper
Some toothbrushes accompany a built-in scraper on the rear of the top. If yours doesn’t have one you’ll want to take a position in one. you'll find some that are just a plastic triangle-shaped scraper, et al. that feature special bristles that are designed to urge into the grooves of your tongue. you'll also accompany the sort that's chrome steel and U-shaped to urge the work done.
4. Do A Stretching Routine
Here’s an excellent 5-minute stretch that you simply can neutralize the morning to wake your muscles up and obtain them ready for the day ahead. you ought to always modify any workout to your abilities, and search until you discover one that resonates with you.
You can also use this point to try to do a yoga routine, or an exercise routine if you are feeling so inclined or try to reduce. you organically start to desire you'll do quite just stretch.
0 notes
Text
Tips to Look Amazing Every Day for Busy Moms

There is just one thing every mom has in common which has little or no time for themselves.
Gone are the times where you'll spend hours preparing for an evening out. Currently, getting quite a quarter-hour within the morning to urge ready would be a dream.
So what are you able to neutralize those precious “spare” 5 minutes? What beauty secrets are you able to squeeze in?
A retinol peel
While I rarely attend get something like this done, I'm really glad I did this one. Because your skin is super sensitive afterward to the sun, I don’t recommend doing it in summer. I did a retinol peel 3 years after my first was born. My skin was so dull, splotchy, and beginning to show wrinkles.
It was sort of a push button. It took off years. If I had known such a fast fix existed, then I might have done it such a lot sooner. I like this one by Skinceuticals.
Lotion after every shower, but within the shower
Lotion “hydrates” your skin by sealing in moisture. There must be moisture to lock it into your skin. After a shower, the high humidity plus the water on your skin are often sealed onto your skin employing a lotion.
Simply pat your skin dry then lather on a lotion. I love CeraVe moisturizing cream. My skin is super sensitive. I even have never reacted thereto, plus it's also pretty inexpensive. regardless of what you choose you would like to seem for 2 key ingredients: Ceramides which can help restore your skin’s natural barrier and mucopolysaccharide, a molecule that holds water and thus will keep it on the skin.
Try some new accessories
It always amazes me what proportion a belt or scarf can dress up an easy outfit. Another thing that I even have been performing on is to only dress up my look by using jewelry. it's such a simple thanks to looking put together. This helps me feel better about myself albeit I don’t even leave the house that day.
I like to wear jewelry, but I don’t have the time to select stuff out. Also, picking out gifts isn’t my hubby’s forte. However, he can certainly check-in for a subscription box on my behalf. one among the newer gifts he got me was a subscription box for jewelry. I like it. I mean, who doesn’t love getting mail?
My favorite boxes that I even have found thus far are:
Penny and Grace: My favorite jewelry subscription box. It adds only enough to form me feel more put together. I also just love a number of their designs.
Cate + Chloe VIP: I found this box to be more dressy but classic jewelry.
Buddhi Box Jewelry: they need right down to earth styles. While this isn’t my everyday style, I'm considering an earth-goddess at the bottom and love tons of their pieces.
Upgrade your haircut
The absolute best thanks to finding a hairdresser you'll like is to seek out someone with hair you wish. Now, just ask them who their hairdresser is. you'll even invite their name if you are feeling brave enough and at your appointment with the hairdresser, explain that you simply like how they did that person’s hair.
A haircut can cause you to look 10 years younger or older. It can be an enormous difference. Another thing I noticed is that I looked my best when my hair would “style” itself. In other words, I needed a hair cut that might look good with minimal effort since I had no time for it.
Before getting an honest haircut, I might wear my hair up a day. Now, I spend about 2 minutes thereon within the morning and that I can wear it down all day.
Sunblock every morning and grab that baseball hat and sunglasses
I chase my kids around applying sunblock and putting hats and sunglasses on them. While they hate it, someday they're going to thank me because protecting your skin from the sun is that the best thanks to preventing aging. Dermatologists say 80-90% of skin aging is caused by the sun.
And this is often applicable to you too! believe it, if you started protecting your skin daily for a year from the sun, which may be 300 and sixty-five days less damage now next year. While it won’t cause you to seem better instantly, you'll thank yourself that you simply started. And now they're saying that by protecting your skin, your skin can spend its resources fixing the damage already done instead of trying to affect new damage.
Have someone clothing buy you.
After the ever-changing size phase of pregnancy and postpartum, I even have almost neglected my closet and it shows. Changing that was one of the foremost amazing feelings ever. I felt like me again.
Nowadays there seems to be a subscription box for everything but seriously take advantage of these. nobody needs online shopping quite moms. I even have numerous items on amazon subscription.
I also really miss clothing shopping and buying clothing online just isn’t the same. Signing up for style boxes on the other hand I found to be really fun thanks to the surprise element. I even have found that those I even have tried nailed it on my style.
The ones I actually like are
Stitch Fix: I even have used Stitch Fix on and off for several years. I like how you'll just order it whenever. I always link to a Pinterest fashion board and haven't been disappointed with what I buy. The styling fee of $20 isn’t bad and should be applied to your purchase.
Trunk Club: this is often the subscription box of Nordstrom. If you've got a Nordstrom Mastercard, there's no styling fee. If you don’t have one, it's a $25 fee, which is credited toward your purchase. you furthermore may get to ascertain the “trunk” before it ships and swap out what you don’t love. I live nowhere near a Nordstrom, so this is often absolutely amazing to me. I also love their stylists.
If you're still having kids, then you've got just found the simplest thanks to grabbing maternity and postpartum outfits. Most style boxes have great options, just make certain to inform them within the message that you simply want items specific for pregnancy or postpartum.
Invest during a great undereye concealer
I recently went and got my makeup done. My biggest takeaway was that I wasn’t using the right makeup for my age. Your skin changes over time then should your makeup.
For instance, as you age, your skin becomes less hydrated so you ought to use a creamy foundation. Additionally, you ought to only use foundations with yellow undertones. This looks best on everyone regardless of what your skin tone is.
And you ought to also use a creamy hydrating undereye concealer. I used to be shocked at what proportion this helped my appearance. The one that I even have converted to is Bobbi Brown Intensive Skin Concealer. I also now use their foundation.
Start using mucopolysaccharide
Your absolute must to having great skin. it'll uptake such a lot of water and keep it at your skin’s surface. I invested in an eye fixed cream and cold cream. I couldn’t believe the difference it made in my lines the minute I put this on.
Also, my skin has never felt so wonderful. I'm so addicted. My favorite brand is that the Skinceuticals Hydrating B5 Gel. it's expensive but makes an enormous difference in my skin. Another awesome brand that I even have tried and adore is also the standard. Their products are a fraction of the value. Don’t be discouraged by the very fact that the mucopolysaccharide is merely 2% during this product. a better concentration doesn't mean it works better, consistent with dermatologists.
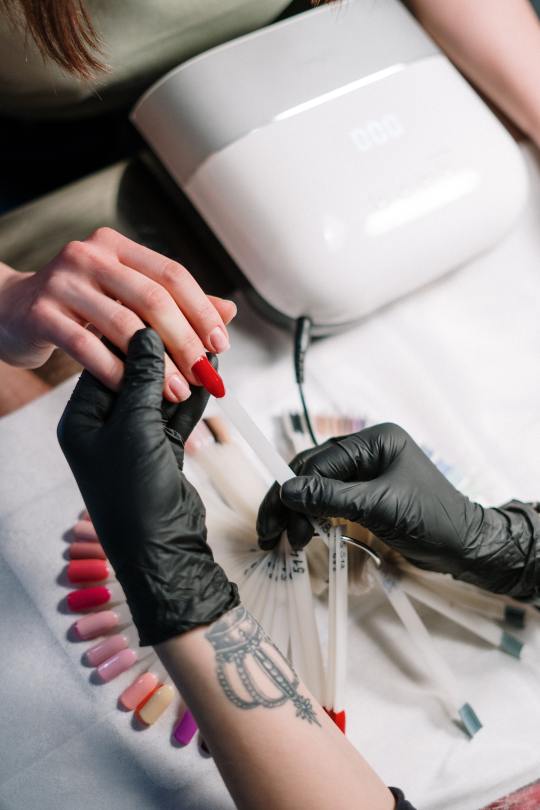
DIY Dip Nails
I just don’t feel good without my nails did. I do them just because I like having my nails done. However, I just didn’t have the time to urge them through with little reception. We were also trying to save lots of money. So I decided to offer DIY a try.
I grabbed the Revel Starter Kit, nail enamel remover clips, and acetone off amazon. Now, remember, there's a learning curve. the primary manicure I gave myself was pretty sad. However, I learned tons throughout 10 nails. My second manicure was far better . I'm now a professional and absolutely cannot see why I might return to paying such a lot more once I can roll in the hay at a fraction of the value. the training curve was well worthwhile.
In addition to reading all the directions and tips that accompany the set, watch many youtube videos.
Find ways to lower stress
I’m sure we all skills important this is often to feeling healthy and searching amazingly. But really what percentage folks truly prioritize this?
Pick one or two belongings you can do this will hamper on stress or allow you to urge more sleep. an honest initiative is to take a seat down for a moment and make an inventory of everything that stresses you out. Now, pick a couple of that you simply want to figure on or think you'll improve. Now, attempt to come up with strategies to enhance them.
For me, these were the items that I added to decrease stress.
Using meal-prep that might allow me to prep 2 weeks of dinners in about 2 hours. This far and away was the most important de-stressor on behalf of me. It saves me on the average over an hour a day at dinnertime that I usually spent prepping and cleaning up.
Changing up kids’ schedules so I used to be ready to get a minimum of two or three 15-minute kid-free breaks within the day. If you've got little or no ones and naps don’t line up, then getting a moment to breathe is tough. I started changing up when quiet times happened and independent play so that I might get breaks.
Going on a 10-minute run at the top of the day. Exercise just doesn’t fit into my schedule immediately. However, I do know it does wonders for my sanity and skin. Therefore, I do mini workouts like a fast run down the block.
Making and sticking to a cleaning schedule. I become overwhelmed once I know the house needs a deep clean. By tackling a special big chore a day, I feel we don’t reach that state.
Trading babysitting with a lover to urge errands avoided kids. I also use this point to urge a haircut and grab a coffee. Even once I am on babysitting duty, it’s still an excellent deal because to a particular degree, kids entertain one another.
Since subscription boxes seem to be a topic of this article… another subscription box my husband got me was a plant subscription box, which is so perfect on behalf But the important benefit was what proportion it changed my SAD (seasonally affected depression) within the winter.
And get more sleep
The last item I would like to try after my kids finally attend bed is to attend bed myself. But honestly, I want more sleep. I mean, what mom doesn’t? Sleep not only can ruin your mood all day but can also wreck your skin. at some point a weekend, my husband wakes up with the youngsters and that I sleep in as long as I can. I then trade him for the opposite morning.
This extra sleep can reset me for the subsequent week and permit me to start outperforming on my sleep. If you'll attend bed earlier, awesome. If you'll find how to require a 20-minute nap, then roll in the hay. A 20-minute nap is simpler than coffee so once I can, I always take the nap.
Pursue yourself Today
It is hard to seek out the time to prioritize you but it's important. To be an honest mom, you would like to feel good. you would like to possess self-confidence. you would like to be healthy. Find ways to feature self-care into your every day and you'll be surprised at what proportion of a difference it'll make.
The first day I took a ten-minute run after not understanding for over a year, I felt sort of a new person. I also can’t believe what proportion of a change there was from something so simple as swapping out my makeup or skin products.
Lastly, treat yourself to something like a spa day if you'll swing it. If not, grab a fun subscription box of either clothing or jewelry to upgrade your wardrobe. If you're like me and love having your nails done, then try a DIY solution. they need to be improved immensely within a previous couple of years.
0 notes
Text
6 Super Easy Step-by-Step Nail Art Design
While you'll always attend the salon to urge intricate nail art done, you'll also create designs yourself at home! All you would like maybe a few handy tools, nail enamel, and our favorite step-by-step nail art design tutorials to steer the way! These tutorials will make it easy to urge any trendy nail art you’ve been coveting on social media.
Nail Art Design Supplies to take a position In
1. Nail Art Striping Tape
You can make cool designs with nail art striping tape! It’s easy to use and self-adhesive, so there’s no glue or mess involved! Clean the surface of your nail where the tape goes to be placed, place your chosen sticker and tip and rub it gently several times. Apply a top coat (see our favorite one below) for the best results!
2. Thin Tip Brush
A thin tip brush is going to be extremely helpful in your nail art endeavors. it'll assist you to create thin lines and complex details for any design you would like to try to to. confirm to wash the comb with nail enamel remover after you’re through with your nail art.
3. an honest Top Coat
When you’re creating nail art, you would like it to remain intact as long as possible. an honest top coat seals within the color and adds a protective layer so your polish stays on and continues looking great!
4. Nail Dotting Tool
Many nail art designs use dots, so a dotting tool is vital. you'll create polka dots, flowers, then far more with the assistance of this handy tool!
5. nail enamel Corrector Pen
A corrector pen is so important, especially if you’re a beginner (even more advanced manicurists need them from time to time!). They erase errors and imperfections, ensuring your nail art looks its best! Correct smudges, erase nail enamel on your cuticles, and make corrections to any design you'll mess up!
6 Step-By-Step Nail Art Design Tutorials
This nail art tutorial covers two trends in one – rainbow nails and negative space nails! Before she starts her nail art design, she cleans up her nails employing a cuticle pusher and nail buffer. She uses a gel base and top coat to make sure her nail art lasts as long as possible, and in fact, you’ll need a UV nail light to cure your nails!
This ombre nail art is so fun, especially for summer months! Usually, the ombré design is completed horizontally on nails, but this design gives the ombré look a pleasant twist. You’ll need products including dip powders (you can purchase a group of them here), a base and topcoat, and activator, and she or he also uses the Wet n’ Wild Crease Brush for application.
This pastel french tip nail art is very easy and can cause you to look so on-trend. You’ll need a UV nail lamp (this one comes with free tools!), alcohol wipes, a nail file with a buffer, and pastel nail polish!
This super simple tutorial shows you ways to urge metallic stripe nails during a few easy steps! Metallic nails are very in immediately, and if you don’t want to travel full-on metallic with the color, this is often an excellent thanks to boasting the trend more subtly. All you would like is your choice of nail enamel color, tweezers, small scissors, and metallic nail art stripping tape.
These abstract floral nails are simply gorgeous! They’re colorful, fun, and excellent for the spring/summer season! You’ll need a skinny tip brush for this design because the flowers are very intricate. Start with a white nail enamel for the bottom and choose your favorite colors for the flowers. Follow along and you’ll master this beautiful nail art in no time!
Negative space nails are on-trend for the past few years and it’s still one among the good nail art designs to rock. you'll choose the nail enamel colors you would like to use, but confirm they’re contrasting for the simplest results. You’ll also need scissors and delicate surface FrogTape. The tape will create a crisp edge with none residue, which is vital for negative space nails. Don’t forget the topcoat to finish!
Nail art may be a good way to urge creative reception, and it’s incredibly impressive! Give these tutorials an attempt to you’re bound to get the most important compliments.
0 notes
Text
11 Tips and Tricks: How to Wax Your Own Eyebrows at Home

Are your eyebrows getting a touch unruly? While some women love the overgrown, bushy brow look, others prefer them to be perfectly tamed and structured. If you fall under the latter group, you likely want to find out the way to wax your eyebrows. it's going to sound intimidating, but following the proper steps and using the simplest products will ensure a flawless at-home eyebrow wax! inspect our greatest tips and tricks to urge gorgeous waxed eyebrows from the comfort of your home!
Eyebrow Waxing Products to take a position In
1. Clean + Easy Pre Wax Cleanser
Before waxing your eyebrows, confirm to prep your skin with a pre-wax cleanser. it'll protect your skin from irritation, and disinfect and prepare the skin for effective hair removal. This cleanser wipes away dirt, bacteria, makeup, and oils for a fuss-free hair waxing experience!
2. GiGi Hemp Wax At-Home Hair Waxing Kit
Infused with the newest wax technology, your skin will stay soft for extended without feeling itchy due to slower hair regrowth. The wax conforms to the curves of your brows and features a strong adherence, getting obviate hairs as short as 2mm! Formulated with hemp seed oil, it minimizes after-wax redness and leaves the skin feeling smooth and moisturized.
3. Parissa Strip Free Hot Wax for Face, Brow, and Bikini
This DIY waxing kit is right for waxing short, coarse hair in small and delicate areas like the eyebrows. It’s formulated with skin safe ingredients that won’t burn the skin or cause an allergy. instead of applying strips, you merely apply a thick layer of the wax, let it cool, and peel it off for smooth, hairless skin.
4. GiGi Wax Off Wax Remover
Infused with burn plant and essential oils, it moisturizes and cleanses the skin for a velvety finish post-wax. It smells like coconut and reduces skin irritation and redness, preventing the skin from dryness and flaking after waxing.
5. Calm After Wax Azulene Oil
After you wax your eyebrows, it’s important to condition your skin to scale back redness and inflammation. Azulene oil soothes and softens the skin after waxing, promoting healthy, softer skin. You won’t need to worry about the dreaded redness and irritation which will sometimes follow a wax.
How to Shape Eyebrows: 4 Tips
1. Find Your Natural Eyebrow Shape
Figure out where your eyebrows begin and end and where your natural arch is. Find the start of your brows by holding a pencil vertically at the center of every one of your nostrils. Mark that spot then move the pencil to the surface of your iris to seek out your arch and mark that too. Then pivot the pencil until it grazes the outer corner of your eye to seek out the top of your arch. Draw a line connecting the three marks to make an overview of your brows.
2. Brush and Trim Your Brows
Before you wax your eyebrows, it’s important to brush and trim them. Use a spoolie brush to brush your brow hairs up. Having all of your hairs getting into an equivalent direction will make them easier to shape. you'll notice some hairs are longer than the others. to form the waxing process easier, use eyebrow scissors to trim off the highest of those hairs.
3. Use Proper Waxing Technique
Now it’s time to wax! confirm you employ natural daylight and don’t under any circumstances use a magnifying mirror. Use small wax strips, like those we mentioned above in our favorite products, and confirm the strips are move the proper length. Apply the strips along the lines you’ve created, ensuring the strip has adhered to your skin. Remove the strip quickly and confirm you pull within the direction your hair grows.
4. Pluck
Once you’ve waxed your eyebrows, you’ll want to pluck out any remaining hairs. Search for any hairs outside the road you made and obtain the tweezers on the brink of the skin. Pull within the direction the hair is growing so it’s as painless as possible.
0 notes
Text
9 Best Women’s Hairstyles for Big Noses

Having a prominent nose is nothing to be ashamed of, however, if it causes you to feel self-conscious, there are numerous ways to form your nose look smaller. While there are makeup tips and techniques you'll use like contouring, today we’re that specialize in the simplest haircuts and hairstyles for giant noses. you'll not know it, but what you are doing together with your hair can do tons for your face (good or bad). Some certain cuts and designs will emphasize your countenance et al. which will bring attention faraway from sharper, harsher features and soften your look. If you’re concerned about how your nose looks daily, take a glance at these sexy, stylish hairstyles for giant noses!
Short Hair Hairstyles for giant Noses
1. Layered Bob
A bob haircut may be a short hairstyle that sits around your jawline. It floats above the shoulders and maybe a classic cut that will never leave of favor. A layered bob will make your nose look smaller, bringing more attention and dimension to your hair and faraway from your nose.
2. the way to Style a Lob
A little bit longer than a bob cut, a lob is another great short haircut if you've got an enormous nose. Watch this tutorial to find out the way to create delicate waves that will frame the face and convey attention faraway from an extended, sharp nose. She suggests employing a volumizing product, and after you style it with a home appliance, use a texture cream and hairspray.
3. Optimal Highlights/Colouring
Although this goes for all hair lengths, it’s very true for brief hairstyles since they highlight your features quite longer hairstyles. Adding highlights to your hair gives it more dimension and reflects the sun, bringing attention to your hair and faraway from your face. Solid hair color will attract more attention to the middle of the face, and specifically the nose. If you favor a solid hair color, lighter shades like ashen, brown, and wheat blond are best to require attention faraway from the face.
Medium Hair Hairstyles for giant Noses
1. Soft Waves
Soft waves widen the face, which finishes up shrinking the nose. Waves add volume to your hair, creating a much bigger canvas for the attention to fall. Your nose will look more proportionate if your face and hair are thickened by waves. Use a curling wand and salt spray to urge your soft waves.
2. Side-Swept Bangs
Side-swept bangs will take attention faraway from the nose and soften your countenance overall. They’re very flattering for anyone who features a prominent nose, especially if you wear them with a hairstyle like soft waves or curls. confine mind that blunt bangs can draw more attention to the nose, so confirm to remain faraway from those!
3. Soft Layers
Putting layers in medium length hair may be a great idea for those that have big noses. Layered hair adds softness to your features while creating visual interest that accents the lips and eyes, and takes focus faraway from the nose. Whether you style it wavy or straight, soft layers can make an enormous difference.
Long Hair Hairstyles for giant Noses
1. Hair Tutorial: the way to Create a Deep Side Part via Byrdie
A deep side part may be a great hairstyle for prominent noses because it gives your hair many volumes and draws the attention upward and to the side. a middle part draws the attention vertically, putting your nose front and center, while a side part takes the stress off your nose. For this look, you’ll need a hairspray, a hairbrush, a hairdryer, and a rat tooth comb. Follow her step-by-step tutorial and you’ll get the gorgeous look in no time!
2. Curls
Curly hairstyles are ideal for camouflaging prominent noses, especially if you've got long hair. you'll experiment with rollers, curling irons, and curling wands to seek out the simplest curl for you. Curls will soften your look, balancing out harsh lines on your face. They’ll also widen your face, which can make your nose look comparatively smaller.
3. Long Layers
Long layers will instantly make your features (specifically your nose) look less harsh. If you've got a point, long nose, putting layers in your long hair will ensure your nose is softer and not so prominent. Layers will make your hair more voluminous and multi-structured, camouflaging any features you don’t want to face out.
Having an enormous nose is nothing to be embarrassed over, however, if you’re trying to find ways to meet your features, try these haircuts and styles!
0 notes
Text
make your face look thinner: 8 beauty Hacks and tricks

I’m very fortunate to possess taken after my dad’s side of the family. I even have his height, fast metabolism, blue eyes, light hair, and sarcastic sense of humor, but if there’s one thing I wish I didn’t inherit from him, it’s my ridiculously round face. I can’t tell you ways many of us pinched my cheeks once I was a touch girl, and while most of the people complain about certain foods getting to their hips, cheese and chocolate always seem to travel straight to my face.
I’m serious.
The good news is that I also inherited my dad’s curiosity and resourcefulness, and while I'll not like that I carry most of my weight in my face, I’ve learned tons of great tips over the years, and today I’m sharing 8 of my best beauty tricks to form your face look thinner.
1. GIVE YOUR HAIR SOME VOLUME
In addition to a round face, I used to be also blessed hair that isn’t curly or straight, which features a weird, frizzy kink thereto, and have spent the last 20+ years applying serums and using various hot tools in an attempt to form it as sleek, smooth, and straight as possible. the great news is that I could talk your ear off about the simplest products and techniques to urge humid-resistant straight hair, but because it seems, straight hair Ideally, I attempt to add a touch of a curl to my locks to offer it a touch lift, but on the mornings I don’t have time to fuss about with my curling wand, I confirm to feature a touch Moroccanoil Volumizing Mousse to my roots and blow dry my hair up and faraway from my face with an outsized, round brush. I then tease it at the top and sides and add a touch of hairspray so my hair doesn’t fall through against my head as soon as I walk out the front entrance.
2. concentrate TO YOUR EYEBROWS
If you’ve been following my blog for a short time now, you recognize that I'm hooked into my eyebrows. Why? Because thick, angular eyebrows make your face look longer and slimmer, and since I over-plucked my brows for the greater a part of my 20s and early 30s, I spend tons of your time testing out different products and watching YouTube tutorials in an attempt to form my eyebrows look thicker than they are. To date, my list of must-have brow products is the Anastasia Beverley Hills Brow Wiz and therefore the Anastasia Beverly Hills Clear Brow Gel. I also love the Benefit Cosmetics Gimme Brow for days when I’m during a rush!
3. EMBRACE THE CAT EYE
I usually reserve the cat-eye search for big nights out because I feel it’s a touch too sexy for college drop-offs and pick-ups, but I recently discovered this makeup. And if you think that about it, it is sensible. By drawing attention to the corner of your eyes, you’re giving the illusion that your face is triangular, which makes it look leaner.
The eyeliner may be a bit heavy on behalf of me, but I love the general look and merchandise recommendations. And if you’re trying to find a reasonable eyeshadow palette that's adequately subtle for every day, inspect the Naked2 Basics Eyeshadow Makeup Palette. I like mine!
4. find out how TO CONTOUR AND HIGHLIGHT
A little bronzer and highlighter can go an extended WAY in defining your cheekbones, jawline, and nose. It takes a touch a little bit of practice, but with the proper products and brushes, you'll transform your face during a matter of minutes.
I recently splurged on Benefit Cosmetics Hoola, which I like because it's far more natural than the pharmacy products I wont to use, except for me, it had been more about having the proper brushes and learning the right techniques. I swear by my NARS Ita Kabuki Brush No. 21, and Jaclyn Hill breaks down everything you would like to understand within the tutorial above.
5. choose DARKER HAIR COLORS
After strategically hiding my grey hair without permanent hair coloring for a couple of years, I finally took the plunge and got highlights, and it's made such a difference in my face shape. As my stylist explained to me, lighter hair tends to form your face look wider, and while my complexion doesn’t lend itself to brown or black hair, strategically placing low lights throughout my locks has given the illusion that my face is thinner than it is. confirm to ask your stylist about this trend next time you enter for a cut and color – you'll be amazed at what a difference the right color can make!
6. GROW OUT YOUR BANGS
About a year before I got pregnant with my daughter, I decided to chop short, blunt bangs, and it had been perhaps one among the worst decisions I’ve made in my adult life. It added an honest 20 minutes to my morning routine, I used to be constantly going for hair trims, and together of my coworkers nicely-acknowledged once I got pregnant, it made my face look wider, especially while they were growing out. the great news is that long, face-framing layers have the other effect, especially once they fall below your chin.
7. WEAR LONG, DANGLY JEWELRY
I recently started fooling around with accessories, and thru tons of trial and error, I’ve learned that long earrings can go an extended way in making your face look thinner because they draw your eyes downwards. Long necklaces also can make a difference as they create your neck look longer and slimmer. Who knew?!
8. DRAW ATTENTION TO YOUR EYES
My final tip for creating a round face look slimmer is to spend touch overtime on your eye makeup. The more your eyes pop, the more attention they’ll get, leaving your admirers less time to note the imperfections of your face. So grab that eyeliner and mascara, and practice your cat-eye techniques because your diligence can pay off!
0 notes
Text
26 beauty tips Makeup Routine: Beauty hacks for Busy Moms

Life as a working mom has motivated me to undertake out plenty of beauty hacks for busy moms over the years, and I’ve come up with some quick and dirty beauty tips to form myself look good in less time. Whether I stay awake too late binge-watching my favorite shows on Netflix, press the snooze button one too repeatedly, forget to pack my daughter’s lunch the night before, or another disaster strikes, mornings are always hectic in our household, and these beauty hacks help me look and feel more put together than I am.
How to Prolong a Hair Wash
A collection of beauty hacks for busy moms wouldn’t be complete without tips and tricks to combat greasy, dirty hair. Why? Fortunately, there are certain belongings you can do to assist make dirty hair look clean in record-breaking time. Here are 3 of my favorites!
Use dry shampoo before bed: most of the people use dry shampoo within the morning, and while that strategy helps take in hair oils, I’ve found it far more effective.
Brush and blow-dry: If you would like to stretch your hair wash even further, you'll be got to apply a touch extra dry shampoo once you awaken. provides it a touch of favor together with your hand blower.
Embrace the messy bun: I even have friends who can go 3, 4, and sometimes 5 days in between shampoos, but I’m not that lucky. My hair is just too light and shows grease like nobody’s business. the great news is that I’ve mastered the messy bun, which offers a wonderful (and stylish) alternative when dry shampoo just won’t cut it.
How to Hide Gray Hair
I recently celebrated my 40th birthday and decided to treat myself to my first set of blonde highlights to cover all of the silver streaks that have haunted residence on my head. But before this momentous event, I had quite a few tricks I wont to hide gray hair which was relatively successful. Here are the three hair hacks I swear by:
Change your hair part: Sounds too easy to be true, I know, but parting your hair on the other side of your head, or embracing a messy part, can sometimes help hide gray hair. I find this strategy also goes an extended way in prolonging a hair cut because it adds a touch of change and helps hide split ends!
Touch up with eyeshadow: If you’re thanks to getting your roots dyed but don’t have time to form it to the salon, apply a matte eyeshadow an equivalent shade of your hair to your part employing a makeup brush. Works wonders!
Invest during a good touch-up product: If your gray strands and roots are unresponsive to a replacement hair part and/or a touch eyeshadow, consider investing during a good touch-up product. There are tons of great ones out there, but my hairstylist and that I prefer the COLOR WOW Root cover because it adheres to the hair without feeling oily or sticky and it's very natural.
How to Hide Puffy Eyes and Minimize Wrinkles
Chronic sleep deprivation and parental worry combined with plenty of tickling and laughter mean one thing: puffy eyes with many wrinkles. Seems pretty unfair, I know, but there are many belongings you can do behind the scenes to form your blinkers look younger.
Apply copra oil before bed: We all know copra oil is sweet for practically everything (right?), and it seems it's anti-aging properties also. Massage a little portion into the world around your eyes to assist reduce the looks of crow’s feet, fine lines, and dark under-eye circles.
Reduce puffiness with tea ice cubes: The anti-inflammatory benefits of tea can do wonders for hiding puffy eyes. Simply brew a batch of concentrated tea and pour into cube trays, then wrap a few of frozen cubes with a dish towel and apply to tired, swollen eyes for fast relief.
Moisturize before makeup: As an additional safeguard, invest during a good under eye moisturizer and apply it underneath your concealer to scale back swelling, smooth skin, and stop your concealer from getting trapped within the fine lines around your eyes. I swear by La Roche Posay’s Hydraphase Hyaluronic Under Eye Puffiness Cream.
Use a hydrating concealer: When it involves hiding under-eye circles and minimizing the looks of wrinkles, not all concealers are created an equivalent. Find a moisture-rich formula like Estee Lauder’s Waterproof Extreme Concealer and gently pat it onto your under-eye area using your annualry for max coverage.
How to Get Beach Waves Fast
While beach waves appear as if a fast and straightforward hairstyle for lazy summer afternoons, learning the way to get perfect waves may be a process in and of itself. the great news is that there are plenty of belongings you can do to urge sexy beach waves without the fuss. Here are 3 simple things that have helped transformed my hair during the summer months:
Invest during a good texturizing spray: Contrary to popular belief, the key to sexy beach waves has nothing to try to to with technique. the simplest curling wand within the world won’t be supplying you with perfectly imperfect tousled hair unless you prep your locks with one important product: texturizing spray. Perfect for creating volume and lovely waves that last, a product like Bumble and Bumble’s Surf Spray may be a game-changer when it involves sexy summer hairstyles.
Learn the scarf technique: This no-heat technique leads to gorgeous curls that look professionally done. All you've got to try to do is place a headscarf on your head and twist strands of your hair around the headband. Leave it certain a couple of hours, or maybe better, roll in the hay it like that overnight. inspect the Cosmos Stretchy Cotton Sports Headbands – they’re cheap and cheery and obtain the work done!
Try braiding your hair then pressing your flat iron over the top of the braid(s) to hurry up the ‘curling’ process. It’s surprisingly effective!
Nail Hacks Every Girl Should Know
There’s nothing like getting to the salon to urge a mani. It’s relaxing, fun, and you get to be pampered and primped, but it’s also time-consuming and expensive, and much of the moms often skip this luxury altogether. the great news is that there are plenty of great nail hacks you'll use to urge an ideal DIY polish application from the comfort of your house.
Prep nails with white distilled vinegar to form polish last: Before you apply your base coat, clean your nails with white distilled vinegar. Not only will it last longer, but your polish also will continue smoother for flawless looking nails.
Cover cuticles with Elmer’s Glue: Sounds crazy, I know, but if you apply non-toxic Elmer’s Glue to your cuticles before applying polish, you'll remove all imperfections post-polish to make sure a particular application every single time.
Prevent chips by applying an additional topcoat: Before applying your topcoat everywhere your nails, apply a layer just to the ideas for added protection as that’s the part of your nails that tends to chip most. Sally Hansen’s Insta-Dri Chip-Resistant Top Coat always seems to last the longest with my nails.
If you would like your polish to dry super fast, dip your nails in cold water post-polish. It works!
How to Draw Perfect Eyebrows Every Single Time
The “in” shape may change, and one year they could be bushier and thicker than others, but one thing is for sure: perfectly shaped eyebrows can make an enormous difference for your face, and everybody has taken notice. inspect these eyebrow hacks for perfectly defined brows!
Get the right eyebrow arch using the spoon trick: If you struggle to draw natural-looking eyebrows, this eyebrow hack is for you. Place the spoon bowl-side down underneath your eyebrows with the tip of the spoon pointing towards your nose, and use the sting of the spoon as a guide to assist draw your eyebrows with an outlined makeup just like the ANASTASIA Beverly Hills Brow Whiz. Genius!
Hide imperfections with concealer: If your brows didn’t end up precisely the way you wanted them to, or you’re overdue for an eyebrow wax, you'll hide imperfections with a touch little bit of concealer and a little makeup brush (I find the Sigma Beauty Flat Definer E15 brush works perfectly). I find this method gives away a more defined look, which is ideal for an evening on the town with the women.
Make them pop with white liner: If you would like to offer your brows an additional lift, add a touch white eyeliner above and below your brows and blend. Don’t have a white liner, or find it too bright? BENEFIT COSMETICS offers a good better alternative with their High Brow Glow pencil.
Smooth unruly eyebrows with Vaseline: if you’re pressed for time and can’t attract your brows, you'll still give them a refined look with a dab of Vaseline followed by an honest comb together with your favorite eyebrow spoolie.
While the daytime smokey eye may be a look many folks would like to sport on the daily, few folks have that sort of your time (or skill). the great news is that there are plenty of eyeshadow hacks you'll use to form your eyes pop with little to no effort. Here are 5 of my favorites:
Prime your eyes: Before you apply eyeshadow or eyeliner to your lids, apply an honest eyeshadow primer (I swear by Urban Decay’s Eyeshadow Primer Potion) for a smoother application and all-day wear.
Invest within the right brushes: If you struggle to duplicate all of the eyeshadow looks you see on YouTube, it’s probably because you don’t have the proper brushes. While drugstore brands get the work done, high-end brushes allow better product application and blending for a flawless, professional-looking finish. The Sigma Beauty Basic Eyes Kit may be an excellent spot to start – it's all of the essentials at an honest price!
when you’re short on time but still want to seem presentable.
Applying white or nude eyeliner to your lower waterline will make your eyes look bigger and more awake.
Learn the eyelash curler trick for perfect eyeliner: If you struggle to use eyeliner, Wayne Goss has you covered together with his eyelash curler trick. It takes a touch of practice, but you’ll be happy once you master it!
0 notes
Text
11 Tips and Tutorials: Makeup for Fair Skin and Freckles

Freckles are beautiful, but they will make makeup application rather confusing. If you've got fair skin and freckles, you've got a variety of options, whether you would like to spotlight your freckles, hide them, or conceal specific areas. We’re all for showing off your freckles and making them pop, but we also know there could also be times once you want to hide them up. Whatever you select, we have the ideas and tutorials for you! inspect our go-to guide makeup for fair skin and freckles!
Tips and Products for Fair Skinned Gals
1. Concealer is vital
Fair skin tends to point out blemishes and redness far more than darker skin does. Invest during a concealer that’s high coverage, creamy and non-drying so it doesn’t make your skin look cakey. you'll use it to hide your under-eye bags also as pesky red spots!
2. Blush > Bronzer
Sometimes bronzer can look too caked on when you’re pale. Instead, a baby pink blush will offer you a momentary glow and subtle flush. Blush makes your skin look healthier and more natural than a bronzer will! bronzer and shades aside from baby pink can make your skin look orangey.
3. Always Wear Sunscreen
Everyone should wear sunscreen every day, but it’s especially important if you’re a good skinned gal. attempt to keep your skin out of the sun the maximum amount as possible, but if you are doing leave within the sun, confirm to wear sunscreen with SPF of 30 or more (even within the winter!).
4. Beat Blotchiness
Blotchiness is often a significant pain for women with fair skin. Use a redness corrector cream to banish blotchy skin and make a smooth, flawless foundation to use the remainder of your makeup!
5. Try Switching to Brown Mascara and Eyeliner
Black mascara and eyeliner tend to seem harsh on super pale skin. Try switching to a dark brown shade for a more subtle, natural look. They’ll still highlight your eyes and can blend in far better together with your skin tone than black will.
Tips to reinforce Freckles
6. Choose a Sheer Foundation or Tinted Moisturizer
If you would like to point out off your freckles, choose a foundation that makes a sheer veil over the skin. A sheer foundation, BB cream, or tinted moisturizer will typically work best for this! Any product with an excessive amount of opacity will make your freckles look muddy or hide them altogether.
7. Use a Cream Highlighter
Highlighter works beautifully on freckled skin. additionally, to employing a tinted moisturizer, add a luminous cream highlighter like Fenty’s Shimmer Skinstick to form your skin appear as if it’s glowing from the within out! The light-as-air shimmer formula allows you to spotlight your cheekbone to offer your skin a youthful look while letting your freckles shine through.
8. Use a Brow Pencil to Deepen Your Freckles
If your freckles start to fade during winter, or if you would like your freckles to be more pronounced any time of year, use a brow pencil like Anastasia Brow Wiz to lightly deepen your freckles. it'll offer you a natural, sun-kissed look all year round!
Tips to cover Freckles
9. Use a color Corrector Before Foundation
Using foundation over freckles that haven’t been color corrected usually doesn’t look so great. A color-correcting primer will help neutralize the colors, also as prep your skin for subsequent makeup steps. If your freckles are more reddish, use a green-hued corrector; if they’re more purplish, choose a yellow-hued corrector. The Stila Correct & Perfect beat One Colour Correcting Palette is amazing!
10. Use Coverage Products That Match Your Skin’s Undertone
Make sure to select coverage products that match your skin’s undertone, instead of the undertone of your freckles. Use the color of your neck and chest to work out the simplest concealer and foundation shades for your skin!
11. Use Smaller Brushes for Concealer
If you would like to urge precise coverage of your freckles, confirm to use a little tapered blending brush. you'll target specific areas and make the coverage you desire! you'll also use the tip of a Beautyblender to urge an equivalent effect.
0 notes
Text
Beauty Secrets We Swear By: 12 Glowing Skin Tips Every Girl Needs
Skincare isn’t something that ought to be taken lightly. As we age, our skin needs our education and understanding more and more. we'd like to avoid skincare mistakes, and use products that hydrate, firm, and benefit our skin. There’s no excuse to not follow a correct skincare regime. Without one, our complexions are sure to become dull, dry, and fatigued. If you’re able to transform your skin, inspect our glowing skin tips every girl needs!
Skincare Mistakes to Avoid
1. Sleeping with Makeup On
This is one of the most important no-nos when it involves good skin. don't ever roll in the hay your makeup on, regardless of how tired you're. If it helps, leave some makeup wipes on your bedside table for the night’s once you just can’t make it to the toilet. Your skin renews itself while you sleep and once you leave your makeup on, you’re not allowing it to try to that. It can cause extensive damage to your skin and doesn’t allow it to breathe, making your complexion look tired and fatigued.
2. Cleansing Too Often
Yes, it’s possible to wash your face too often. you'll think the more you cleanse, the higher, but the reality is, when you’re constantly cleaning, you strip your skin of the highest layer of oil, triggering more boring, which may cause acne and blackheads. For a glowing complexion, cleanse twice per day and confirm to follow with a hydrating moisturizer.
3. Exfoliating an excessive amount of, Or insufficient
Exfoliation is a crucial step in your skincare process, but an excessive amount of exfoliation is often damaging for your skin. On the flip side, never exfoliating means you aren’t getting obviate the build from bacterial and dead skin cells that survive your face. Exfoliate twice per week for the best results!
4. Not Cleaning Your Makeup Brushes
Cleaning your makeup brushes are often an annoying task, but it’s so necessary for healthy, glowing skin. confirm to scrub your makeup brushes every fortnight approximately. They accumulate bacteria, dead skin cells, and oil, which may clog your pores and cause breakouts and dull skin. Cleaning your brushes is a component of a hygienic skincare routine, so confirm you are doing so consistently.
5. You Touch Your Face and Don’t Clean Your Phone
These two go hand in hand because both your phone and hands carry such a lot of dirt and bacteria it’s disgusting. Try your best to not touch your face throughout the day as doing so can spread dirt, oil, and bacteria to your skin. This also goes for your phone. If you talk on your phone tons, confirm to wash it constantly. Otherwise, all the gunk that lives on your phone will transfer to your face, causing clogged pores and breakouts.
Glowing Skin Tips We Swear By
6. Drink More Water and fewer Caffeine
Water hydrates your skin, while caffeine dehydrates it – so which one does one think is better? Drink the recommended 8 cups of water throughout the day. Not only will it help your skin glow from the within out, but water also has many health benefits including flushing excretion, regulating blood heat, and keeping you energized.
7. Use the proper Products for Your Skin Type
Everyone’s skin is different – what works for a beauty blogger or one among your best friends might not work for you. stick with products that are formulated to offer your skin type what it needs. If you've got sensitive skin, search for oil-free and fragrance-free products; if you've got dry skin, look for products that deliver extra moisture; if you’re susceptible to breakouts, search for ingredients that prevent acne, like 2-hydroxybenzoic acid. Once you discover the products that employment best for your specific skin type, you’ll notice an enormous difference in your complexion.
8. Wear Sunscreen Everyday
Do your skin a favor, and protect it by wearing sunscreen every day. Yes, even within the winter. Sunscreen is that the best thanks to preventing signs of early aging, to not mention carcinoma. Some beauty and skincare products contain sunscreen, but if yours don’t, conform to use it under your makeup. If you call at the sun, re-apply every two to four hours to form sure you’re protecting your skin. this may keep it looking young, glowing, and beautiful!
Glowing Skin Products to take a position In
9. Glossier Super Glow vitamin C Face Serum
Want some serious glow for your complexion? Glossier Super Glow amps up the brightness of your skin with ingredients like vitamin C and Magnesium. The incredible formula energizes and evens your skin tone, creating a light-weight reflecting complexion. It improves the design of dark spots without irritation, leaving your skin feeling recharged and rejuvenated.
10. Tata Harper Regenerating Cleanser
This cleanser is an investment that’s well well worth the tag. A daily cleansing and exfoliating treatment, it buffs the skin, giving it a refined, radiant look. With 16 high-performance botanical ingredients, it dissolves build-up, refines pores, and boosts hydrating for seriously healthy-looking skin.
11. Aveeno Ageless Restorative Night Cream
A good night cream is vital to glowing skin, and this one is full of antioxidants to enhance the looks of fine lines and wrinkles, and reduce the consequences of elastin and collagen loss. It’s super hydrating, strengthening your skin’s natural moisture barrier, revealing beautiful, glowing skin.
12. Believe truth Cream Aqua Bomb
This lightweight gel-cream gives your skin a burst of hydration for a stunning, healthy glow. It acts as a cooler and refresher for dull, dry skin, absorbing quickly so you’re not left with any greasiness. It’s formulated with Lady’s Mantle, which is understood for its skin-nurturing properties, also as ceramide 3 and glycerin to assist your skin to retain and maintain moisture.
0 notes
Text
10 Sun Kissed Makeup How to Get Dewy Skin: Tips and Tutorials

When summer rolls around, all most people want is to rock that dewy, just-got-home-from-the-beach look. There’s something about dewy skin that makes you look fresh, radiant, and ready to need on anything life throws your way. If you’re wondering the thanks to get dewy skin without looking like you only stepped out of the shower, we’re supplying you with our greatest tips and tutorials so you'll head into the summer looking as glowing and vibrant as possible!
What is Dewy Skin?
Dewy skin could also be a kind of skin finish. Unlike matte skin that’s destitute of any excess oil, dewy skin features a moist appearance. Dewy skin has natural oils that reflect light and make your skin look glowing and radiant. it had been made popular by celebrities like Kendall Jenner and Gigi Hadid and is achieved with strategic highlighting and bronzing.
Dewy skin causes you to seem young and vibrant! It leaves your skin looking well moisturized, and softens fine lines and imperfections. It makes your skin look healthy and provides off the illusion of an active lifestyle (whether you've one or not!).
Ways to Fake Dewy Skin
1. Always Wear Sunscreen
Tanned skin and dewy skin don’t always go hand in hand. once you give your skin an excessive amount of sun exposure, it thickens up the layer of dead skin on the surface, causing it to look dull and rough. However, if you wear sunscreen on the daily (we love this sunscreen), it allows your skin to stay young, plump, and glowy.
2. Apply Makeup Immediately After Moisturizing
If you'd just like the design of dewy skin, slather on your moisturizer and apply your foundation and concealer immediately afterward. this permits your foundation and concealer to blend in additional easily, supplying you with a shocking , glowing finish.
3. Use a Cream Blush
Loose and pressed powder blush mattifies the skin, so a cream blush is your best bet for a dewy complexion. Apply cream blush to the apples of your cheeks, along the sides of your forehead, down your T-zone, and even over your eyelids for a natural flush.
4. Use a Moisturizing Mist
There are many great options out there for moisturizing mists you'll use over your makeup. Whenever you'd wish to offer your skin a moisture boost, apply a spritz to plump up your skin and make it glow!
5. Fake Tanner
While fake tanner used to depart the Oompa Loompa alarm, there are great quality fake tanners out there lately. A natural-looking fake tan will make your skin look radiant and assist in supplying you with that dewy skin look you’re going for. We’ve written an entire post about fake tanner alongside our favourite products and best application tips, which you'll read HERE.
Sun Kissed Makeup Tips
6. Use Bronzer Strategically
Bronzer is one among the only ways to urge a sun-kissed look, especially if you use it strategically. Apply bronzer to the apple of your cheeks and follow your cheek and jaw contour to sculpt your face. you need to also apply bronzer to your temples and sides of your nose for a glowing appearance.
7. Illuminate With a Highlighter
A good highlighter will illuminate and provides dimension to your face, making it look nice and sun-kissed. Blend it along your brow bone, down the bridge of your nose, and to the inner corner of your eyes. Swipe and pat highlighter along your cheekbones, then blend it certainly a flawless glow.
8. Add Some Blush
Sun-kissed, glowing skin is typically made better with slightly blush! After you’ve bronzed and highlighted, you'd wish to feature some color back to your face. Apply cream blush to the apples of your cheeks for a stunning flush of color.
9. Skip Lip Gloss
Since lipgloss is super, well, glossy, it can end up competing along side your dewy skin. Instead, use a hydrating lipstick with a subtle shine. you'll also choose more of a matte finish if that suits you better.
10. Say No To Shimmery Foundation
Highlighter has enough shimmer in it to supply you a pleasing sun-kissed glow – you don’t need shimmer in your foundation, too. The shimmery foundation has light-reflecting particles, so it won’t provide you with that natural dewy look.
0 notes
Text
15 Breathtaking yet Super-Quick Morning Beauty Hacks for Lazy Girls
Do you find it an enormous struggle to urge out of the bed every morning and obtain ready for school, work, or a simple day out? If yes, then getting yourself some makeup in such hours might sound almost a challenge. But, some wonderful tricks and hacks can allow you to achieve the foremost stunning and delightful looks for yourself, that too in only a matter of jiffy. Here are 15 Breathtaking yet Super-Quick Morning Beauty Hacks for Lazy Girls which will come to your rescue forever, and ever!
1. Thicken Your Eyelashes
Are you one among those that love those luscious thick lashes, but don’t wish to fake a fuller fringe using false eyelashes? Here’s how you'll create sexy, thick-looking lashes using your regular mascara and a few loose powders. These spectacular, thick eyelashes are effortless to wear and provides a splendid outlook as depicted during this quick tutorial that guides you thru achieving the design reception in only a matter of few steps. you'd love how natural and clump-free your lashes look!
2. Mascara As Liner
At times, we will feel our shoulders hurting under a load of our handbags that are becoming so heavy. Especially, if you're traveling, you only can’t manage to hold all of your makeup supplies with you. an excellent little hack to use your mascara as the liner can make things surprisingly convenient. you only need mascara and a liner brush to urge going with this amazing trick. Carissa Ferreri shares a step-by-step tutorial to realize a stunning search for your eyes with this hack with utmost grace.
3. Easy Smoky Eye
Creating a seductive smokey eye takes just a touch little bit of effort and time, alongside a number of your most elementary makeup products. All you would like to follow may be a clever application of your eye makeup supplies, and to back the statement, even more, there may be a tutorial that takes you thru doing the wink-worthy eyes with the assistance of your favorite smudge-able liner and mascara.
4. Get obviate Baggy, Dark Under Eyes
Most women struggle with those dark, puffy, and saggy circles that develop below their eyes thanks to aging and therefore the lack of proper sleep Some clever makeup can perhaps, come to your rescue. Whether its the right thanks to de-puff those buggers, apply concealer to cover the darkness, the key to understanding the liner, or the way to progress your eyebrows to urge an overall eye makeup which will get that dark under eyes vanished, the below tutorial covers it all with the assistance of detailed instructions and pictures.
5. DIY Gel Liner: Instant Intensity
Did you've got any concept you'll transform any Kohl pencil eyeliner from the pharmacy into an intense, dark, gel eyeliner? The key to urge that gorgeous smudge is to carry it under the flame for no quite one second, followed by a couple of steps which will work a bit like magic to assist you to get the grease-paint like look with a daily eyeliner. to find out how you'll work this system out, inspect the below tutorial by the sweetness Department that guides you thru making your very own DIY Gel Liner.
6. 4 Tricks to form Perfume Last All Day
It’s amazing how a pleasant perfume can cause you to fragrant and fresh the instant you apply it, but the difficulty we experience with scents is that they have a tendency to dissolve because the day passes, and therefore the fragrance disappears entirely by the evening. The below blog takes you thru four different tricks to form your perfume last all day long.
7. Pucker Up: 5 Tips for Kissable Lips
Do you wish to master the art of sexy, gorgeous lips that flaunt a stunning plump? Ravishing, perfectly balanced puckered up lips is simply the right amount of classy and sexy. Here is strictly how you'll get one among the foremost attractive and on-trend looks for your lips which may look complicated, but is quite pretty simple to tug off. to realize the ever-desirable, kissable lips, you only got to follow a group of 5 tips as explained during this guide by Lauren Conrad and provides a stunning dimension to your complete look.
8. Hydrate Skin While You Sleep
To achieve a fresh and supple skin, it’s essential to stay it properly moisturized and hydrated. But, at times, once you are rushing to urge ready quickly within the morning, you would possibly not get enough time to require proper care of your skin. Worry no more! There’s a touch something you'll do to stay it perfectly hydrated. rather than moisturizing within the morning, you'll confirm you provides it the specified amount of moisture in the dark while you sleep, with this quick hack shared by Pop Sugar.
9. In Red Lipstick We Trust
Already late for work? no matter how less of a time you've got to prepare, you will always manage to look glam with one of those makeup products that’s already kicking Something that you simply simply can always trust without a doubt when it involves looking great could also be red lipstick. Take a look at this quick tip by Pop Sugar that tells you what can a red pout do for creating you look awesome.
10. Shower the Night Before
The largest a neighborhood of the morning routine is devoted to getting a shower and washing your hair, which also might get slightly troublesome once you're during a rush. The below quick guide by Pop Sugar not only explains you ways you'll save a superb deal of some time by taking a shower the night before instead of doing it within the morning once you're already short on time but also explains some amazing benefits of taking a shower and rinsing your hair before you hit the bed.
11. the proper Messy Bun in 3 Steps
This quick hair up-do is great when it involves letting you embrace your hair, whether you purchased some coils or straight strands, confidently. Flaunt a messy yet pretty bun that’s not only a superb blend of sexy and sporty but is additionally super quick to undertake to. Some bobby pins and just three steps are all you'd wish to tug off this chic look twisting and pinning your hair that you simply simply can gracefully wear to work. Take a look at how you'll achieve a fairly Messy Bun with the below tutorial.
12. Eye Makeup – Line and Curl
When it involves enhancing the frame of your eyes, curling the eyelashes can convince be no but magic. If you're trying to seek out a quick method to urge gorgeously curled lashes even once you can’t spend hours before the mirror, perhaps, this hack is all you'd like. This tutorial by Beauty Point of View takes you thru an exquisite trick to line your eyes perfectly while you curl your lashes to understand a soft, smudged, and stunning look within minutes.
13. Perfect Line, Every Time!
This one is for all you ladies who struggle to understand a fine eyeliner and equal curves with their eye shadows on both eyes. This awesome tutorial by Beauty Point Of View introduces a genius tip to use a Credit or card, some white tape, or a sticky note, in conjunction with your favorite eye shadows and gel liners for a shocking eye-make that's going to eliminate all those exhausting minutes you spend every morning on attempting those stunning, perfectly ravishing eyes!
14. Use Card For Tidy Application
Applying mascara to your lovely lashes is usually amid soft efforts to scrub up the tiny bits that get smudged here and there. it has been rightly said that a picture speaks a thousand words. To back the statement even better, the below quick pictorial tip by Top Inspired takes you thru a stimulating because of achieving the foremost tidy applications of your mascara employing an easy something that’s lying in your drawer, a card or a touch of paper!
15. The 5-Minute Makeup
Putting together the whole look that highlights your lovely countenance during a chic, beautiful and appealing manner takes quite a batch of some time every morning while you're preparing to hit the work. But, there are days once you haven’t got those huge moments to spend in performing some makeup. This 5-Minute Makeup can come to your rescue in those mornings and assist you to achieve the superbly done eyes, shocking skin, and great lips!
0 notes
Text
13 Tips to Get Fuller Lips Naturally: That Work!

Fuller, more voluminous lips are the goal for several women, but not everyone wants to visit the lengths of getting synthetic lip fillers. You shouldn’t get to urge a cosmetic procedure done just because you'd sort of a fuller pout. There are some ways to urge bigger-looking lips the natural way. Today we’re breaking down the thanks to getting fuller lips naturally so you'll achieve the pouty look you'd like without foundering the needle!
Why Do Women Want Fuller Lips?
You don’t get to look far to determine that fuller lips are equated with being more attractive. The media praises star like Angelina Jolie, Scarlett Johansson, and Julia Roberts as being a variety of the sexiest women within the planet, and, with the rise of influencers like Kylie Jenner, big, lush lips have taken on a lifetime of their own.
If fuller lips cause you to feel better and more confident, why not enhance them? Just don’t do anything that makes you're feeling uncomfortable. for several women, natural lip enhancers are because of going. Sound like your cup of tea? we've just the ideas and products for you!
8 Natural Lip Enhancement Tips to undertake
1. Use Your Toothbrush
Yes, you read that right. you'll use your handy dandy toothbrush to naturally enhance your lips! The smoother your lips are, the more light they're going to reflect, and thus the larger, and more luscious they’ll look. Dunk your toothbrush in water and gently buff your lips during a little circular motion. this might also boost your circulation, giving your lips a pleasing rosy hue.
2. Enhance Your Cupid’s Bow
Enhancing your cupid’s bow (the dip on the very best of your lips) will go an extended way in supplying you with fuller, more magnified lips. Dab a pinch of highlighter to the skin in the middle of your upper lip. Your lips will look bigger due to the magic of sunshine reflection!
3. Try Some Sugar
Sugar could also be a natural exfoliant. Mix it'll some coconut oil and you’ll have an efficient natural lip scrub! Exfoliating your lips with this mix will leave you with fuller lips and pleasant rosy color.
4. Fill Out Your Lips with Liner
Lip liner doesn’t only get to be used to line your lips. to understand the planning of fuller lips, line your lips with a color that’s one or two shades darker than your natural lip color, and fill your lips in.
5. Use Lighter Lipstick Shades
Dark lip shades can flatten your lips, making them look smaller. Light lip colors, on the other hand, make your lips look naturally more full. Rock your favorite nude or pale pink shades to strengthen the planning of your lips!
6. choose Gloss
You’ve heard us talking about the importance of reflecting light off your lips quite a few times now. one of the only ways to undertake to try to do this? A shiny, shimmer-flecked lip gloss! Use a transparent lipgloss in the middle of your lips for the last word pout highlight.
7. The Ice(ing) on the Cake
Massage a cube on your lips for 2 minutes. this might compress your blood vessels, making them look red and plump!
8. Make a DIY Lip Mask
Why not try a lip mask for fuller lips? one of the foremost effective DIY lip masks is that the ‘Bomb Lip Plumper’ by My Awesome Beauty! Combine ginger powder, cayenne powder, cinnamon powder, flavorer, and oil. Massage it certain 20 seconds and let it sit for 2 to 3 minutes.
5 Natural Lip Plumper Products We Swear By
9. Kimi Lip Max Lip Plumper: This all-natural lip plumper uses ingredients that increase the circulation of the lips, like bee venom, Manuka honey, vitamin E, and shea butter. It delivers moisture and nutrients to repair damaged skin and leaves your lips feeling smooth and searching more enhanced!
10. Miss Savage Lip Plumper Gloss: A gloss that also does double duty as lip plumper? Count us in! With hydrating ingredients like vitamin E, and a mix of ingredients which can assist you to realize poutier, more voluminous lips, this gloss could also be a must! It also diminishes the looks of vertical lines and creases, creating a smooth gorgeous look!
11. Organic 101 Natural Lip Therapy: Formulated with 15 active ingredients that end in fuller, healthier and softer lips, this chapstick is one product you’re going to want in your purse! instead of using irritants to draw blood to the lips and cause temporary swelling, this product helps your lips rebuild their collagen protein structure so you get fuller lips within minutes!
12. Dior Addict Lip Plumping Moisturizing Gloss: This plumping gloss is loved for its ability to supply your lips instant volume and shine! Plus, it'll moisturize your lips with a warm vanilla scent!
13. Fresh Sugar Lip Treatment: a mix of sea fennel to fill in lip lines and define your lip area, and hyaluronic filling spheres to plump lips and boost their volume, this lip treatment is all you'd like for fuller lips. It also contains ingredients like plum seed oil and passionflower seed oil to hydrate your lips!
If you’re looking to urge fuller lips naturally, try the subsequent pointers and products! They’re sure to get you the pout you’ve been craving!
1 note
·
View note