roofingwilmingtonde
Dynamic Remodel & Repair Roofing Wilmington
Roofing Wilmington DE
13 posts
Don't wanna be here? Send us removal request.
Last Seen Blogs

cali-oops
いつも笑顔で待っている

xenosavant01
Untitled

edibrad13
JUST A WEE MINUTE.

shian-sv
The Guy Of Night

chelshes-blog
chelsea
Text
Roofing A House Step By Step
Right off the bat, we want to set your expectations that the roofing process can be long and tedious. Not only are you going to be investing time, effort, and money in making sure that your roof is in the right condition when it’s done, but you’re also investing in the labor cost of roofing contractors.
In some cases, homeowners take it upon themselves to install their roofs without the supervision of professional and qualified roofing specialists. This might help them save money in the short-term, but the improper way of installing a roof can also inadvertently lead to more problems in the future. If you’re going to install your roof with your own means and materials, it’s best to have the supervision of a professional. After all, if you’re going to invest thousands of dollars in terms of materials for your roof, you might as well carefully follow the steps to mitigate damages.
But before anything else, we have to know what is required to start the roofing process.
Your Roof’s Design
A roof’s design is one of the main determining factors that will not only affect the aesthetic finish of your roof and your home but will also grant different long-term advantages. Each roof design has its own unique advantages and it’s best to do some research first before looking for the right roof design.
Each roof design will have certain roofing materials specifically tailored for it. Flat roofs tend to use EPDM, TPO, and PVC. Gable shaped roofs and hip roofs tend to use shingles, tiles, and metal roofing. It’s best to keep this in mind when choosing the right materials for the job.
Likewise, gable shaped roofs are quite resistant to the effects of rain, high winds, and snow since the triangular shape can shed water and ice easily. Flat roofs, on the other hand, are susceptible to water damages and the fluctuation of temperatures but can give extra space for HVAC equipment and space for development.
Choosing Your Roofing Material
As discussed in the previous section, each roof design will correspond to certain roofing materials. Certain roofing materials tend to fair well on warmer weather, but there are also some materials that are durable even when faced with harsh cold weather conditions.
If you’re not sure about what materials you should be choosing, you can always consult your local roofing contractor. You can also do your own independent research on what you can use for your roof.
Tools You Will Need
Just like building any other part of your home; you’ll need the right equipment and tools for the job. The right equipment can make sure that you are safe from the potential hazards that might cause accidents on your roof. Additionally, the right tools can also expedite the process of installing your roof.
Before doing anything else, make sure that you have the following tools:
Roofing Hatchet
Hammer
Roofing Shovel
Measuring Tape
Prying bar
Framing Square
Chalk
Tin Snips
Hammer Tacker
Power Nailer
Saws
Roofing cement
Caulking Tool
Steps In Roofing Your House
No worries, if you think that the process of installing a roof might be overwhelming, then you can follow these easy steps to make sure that your roof is in good condition once it’s done.
Securing Your Permits
First things first, we have to know what are the building codes in our area and if it’s compatible with our plans. Once that’s done, we have to secure the permits to avoid any legal civil code penalties.
Remove The Old Roof (If Necessary)
If you’re trying to replace an old set of roofing materials, then you’ll have to remove the old roof. Homeowners have to keep in mind that certain roofing materials will have a different way of installation. Likewise, these materials will also need to be removed in a different way. Removing your roof can be a bit messy, so you’ll need to remove the waste with a roofing shovel once you’re done.
If you’re not up for it, you can have a roofing contractor do it for you.
Install Drip Molding And Flash Roof Valleys
The installation of drip molding and flash roof valleys can help make sure that water does not seep into your roof’s interiors. You’ll need to align the drip molds with each nail by 12 inches. You can also nail your roof valley flashing with the same process.
Apply Adhesives
Roof adhesives can help make sure that your roof shingles are watertight. This will help mitigate the effects of water damage on your roof. Be sure to install adhesives on warmer weather conditions since there are certain adhesives that won’t settle on cold weather. Once the adhesives have now dried, all you need to do now is enjoy your roof!
The Right Professional
It might be overwhelming when you think of how you’re going to be installing your roof, but as long as you’re following the instructions and the advice of your roofing contractor, you’re on the right spot. Moreover, having a roof that is properly installed can ensure that its durability and longevity is extended.
However, there might be situations where your roof needs to be installed with professional supervision. If your roof system does require delicate and professional work from a roofing contractor, then you should commission the services of a licensed and qualified roofer. There’s no hurt in doing your own research first on the previous works of roofing contractors near your place before making any final decisions.
Related Articles
How To Tell How Many Layers of Shingles
Flat Roof to Pitched Roof Transition
Can You Shingle A Roof in the Rain
from Dynamic Remodel https://ift.tt/3dCbWTD
via IFTTT
0 notes
Text
Can You Shingle A Roof In The Rain
When it comes to installing or replacing a roof, one factor that homeowners and contractors have to keep in mind is the weather. If you’ve gone this far in reading articles about roofing, you’ll know that water damage in the form of leaks can easily compromise your roof’s integrity.
A finished roof can easily protect your home from the different elements of the weather. In most cases, the formation of leaks is rare on finished roofs. However, unfinished or roofs that are still being worked on can be easily damaged when faced with heavy rain, snow, and even high winds. That said, the question still remains: Is it possible to shingle during the rain?
But before we can answer the question we have to know why are contractors not recommending on working on a roof while it’s raining. Then, we’ll discuss the necessary preparations needed to roof under such conditions.
Why Shouldn’t I Shingle In The Rain?
Let’s say that you’re coming home from a long day at work and when you get home, you notice that your ceiling is ‘sweating’. Then after a few months, you’ll notice that there’s going to be some dark stains and swellings on your ceiling that’s caused by water that’s trapped on your roof. So you contact your roofing contractor for an extensive inspection of your roof and they don’t find any leaks, but they still tell you that you need to get a roof replacement to remove the mildews and trapped water on your roof’s interiors.
What could be the cause? Then you realize that when your roof was being installed, it was raining and the water got trapped on your roof when the roofing process was being done. You wouldn’t want that to happen to your roof and spend another large sum of money, would you?
Reasons Why You Shouldn’t Shingle Under The Rain
To give you a simpler answer to the question: No, you shouldn’t shingle under the rain. Roofing materials usually cost thousands of dollars and you’re also going to be doing days worth of work in placing adhesives and nailings on your new set of shingles. If you’re going to be roofing under less-than-favorable conditions, you’re gearing towards a roof that’s going to be more susceptible to water damage. Additionally, it’s counter-intuitive to be installing your roof while it’s raining since your roof is there to protect your home from rain and other natural elements in the first place.
Moreover, roof cement and certain adhesives won’t stick if they are exposed to lower temperatures. In most cases, these adhesives will take a few weeks to settle; by that time, you’ll have multiple damages to your roof.
What Should I Do?
If you haven’t worked on your roof just yet, the best course of action is to wait for better weather conditions. If you have now started working on your roof, you can use sheets of ice and water protection or even a tarp to keep your roof dry while the rain subsides.
Additionally, if you’re not up for the task of going up to your roof because of potential hazards, you can have a qualified professional roofing contractor do the work for you. Having professional supervision can help mitigate water damage from the rain.
Hiring A Professional
Installing shingles on your roof is a relatively easy task than other roofing materials. However, when it’s raining, the process of installing can be a bit tricky and you’re faced with more potential hazards. If you’re not up for the task of shingling your roof during unfavorable weather, you can always have a licensed and qualified roofer doing it for you. In the long run, having a professional work on your roof can help save you thousands of dollars worth of repair and damages.
The bottom line is that you shouldn’t be working on your roof if it’s raining. If you’re on a tight schedule and you really need your roof done by the end of the day, you can always ask a roofing contractor that specializes in shingling your roof during not-so-favorable weather conditions. You can also talk to your roofing contractor that you want to have it rescheduled to a later date.
If the risk of damage from rain is too great, most contractors will place a tarp on your roof and will return to working on it once it’s now sunny. If ever you’re working on your roof when it’s raining and there’s an emergency leak, you should call your contractor immediately to avoid any further water damages. Once water gets trapped inside your roof’s interiors, this could result in more damages.
Related Articles
Attaching Pergola to House with Vinyl Siding
How To Tell How Many Layers of Shingles
Flat Roof to Pitched Roof Transition
from Dynamic Remodel https://ift.tt/2TQLWMv
via IFTTT
0 notes
Text
Flat Roof To Pitched Roof Transition
Let’s face it: not everything that looks physically beautiful is perfect and that may include flat roofs. It is more prone to leaks, water damage and formation of mold compared to the standard pitched roof which means additional burden of coating and seals maintenance.
A flat roof is usually the epitome of modern homes – stylish, sleek and minimal. There’s just one factor that does not seem to be compatible with it: gravity. Its structural member sags over time and dents acquired over time may lead to ponding which is detrimental to its durability.
While we cannot expect perfection in everything, some issues are not worth overlooking either. The expensive lifestyle that flat roofs have to keep up means hundreds of dollars pilling up as its constant replacement tends to let homeowners take a second look at their roofs before switching back to the pitched roof.
Fortunately, a lot of things can happen in the wonderful world of constructing and renovating one’s home and an endless option seems to be available in the market that is sure to suit a customer’s taste and style. We’ve done the leg work and here’s what to consider when doing the next big move:
Replacement Cost
The conversion process is inevitably going to change the existing structure. Think of this as a human body and the roof acting like the spine that holds everything together. The complex list of things to be done along with its materials may skyrocket a cost of up to $30, 0000. Therefore, it is highly suggested to investigate what the best roofing system should be and whether or not it is worth the investment.
In essence, an entire roof does not need to be changed and there are affordable choices available if only one or two concerns need to be addressed that an experienced roofing contractor can easily tend to.
Design Change
The replacement process can make or break how you want your home to be and there are usually two ways to go about this. The first option is simply installing a pitches roof over the flat one or to extend one’s home by building a new floor where the pitched roof can sit above it.
Removing the old roof may be costly but it can also open doors to new spaces such as a cathedral ceiling or an attic where one can store seasonal items without any worries. Though it is often deemed optional, some roofs have to be extracted for safety measures because the walls present might not be strong enough to support two roofs at the same time that can cause the entire thing to collapse.
Moreover, this offers easier insulation and ventilation which cools down one’s home faster than a flat roof and that also means cutting on your electricity bills as well. The comfort it brings is enough to make one highly reconsider a change in their home.
However one intends to go about it, the change is definitely going to affect the structure of one’s nesting place. The pre-existing condition of the house severely limits the next steps to take in renovating the place as not all options may be appropriate. Just be sure to consult with your architect and other professionals before leaping on to impulsive decisions.
Additional Costs
It is undeniable that the easiest route is to provide two additional angled planes on top of the existing flat roof. However, there is nothing wrong with considering an extra layer of protection such as valleys and gables and that means added costs. Though it is indeed costly, the investment it is sure to reap its rewards long-term as this means less maintenance and changes in the future.
Aside from the exterior change of rising the height of the roof, a lot can change can happen inside one’s home as systems inevitably intertwine. This means that longer water pipes and upgrading the heating systems may be necessary to co-exist in the new set-up of your home.
Pitched roofs have continued to prove its longevity from time immemorial as we continue to envision our homes with it due to its efficacy and the way it dances well with gravity. Though this is not a one-time change, it is definitely better to save one’s self with the constant hassle of repairing one’s roof.
There is no home that cannot be improved by licensed professionals equipped with exquisite workmanship with the use of high-quality materials in the market today.
Related Articles
Are 3 Layers of Shingles on Roof Okay?
Attaching Pergola to House with Vinyl Siding
How To Tell How Many Layers of Shingles
from Dynamic Remodel https://ift.tt/39BDypF
via IFTTT
0 notes
Text
How To Tell How Many Layers Of Shingles
When you’re moving into a house that had a previous owner, the first thing that you have to do is to look at the history of your home. Doing an extensive inspection of your new home’s roof can help you be more aware of what you have to repair and replace. The regular maintenance of your roof can help extend its lifespan.
But just like any roofing material out there, shingles do have a lifespan. When there’s permanent damage to your roof, the best solution is to opt for a roof replacement. However, there are some homeowners who would choose to get around the process of tearing down a roof since it’s a messy and time-consuming process. As a result, there are some homes that have layers of shingles being stacked on top of each other.
If you’re moving into your new home, you’ll need to check how many layers of shingles are on your roof. The number of shingles on your roof will give you a good glimpse on what’s the expected lifespan of your roof and whether you need to replace it or not.
But before we get into how many layers of shingles could be on your roof, we have to first look at what kind of damages overlaying could do to your home.
Should I Overlay?
There is an ongoing debate in the roofing industry on whether roofing materials should be layered on top of each other. In most cases, roofing contractors would not recommend this as a way of installing a roof. In the short term, you might be able to save money and expedite the process of having a new set of roofing materials on your roof, but it will also inadvertently lead to future problems and issues.
Disadvantages Of Overlaying
There’s a reason why roofing contractors would suggest not to overlay and these are some of the reasons:
Voids Warranties
Warranties are very specific about what they cover. Most warranties will cover only human errors and some will also cover damages incurred by factory defects and the installation process. However, warranties can become void if your roof is being overlayed with another set of shingles.
It’s recommended that you contact your shingle’s manufacturers on what the warranties cover.
More Weight
When you’re overlaying, you’re essentially stacking up different sets of roofing materials on top of each other. If you’re going to stack shingles on an average 1600 square feet roof, your roof is going to weigh more than a ton. If your roof’s supporting structure can’t support the weight, then this can lead to your roof getting damaged, or even sagging in the long-term.
More Expensive On The Long Run
Not only does overlaying conceal damages, but the new layer will adhere to the shape of the older layer. If your older layer’s shingles are bulging and sagging, then your new layer will take the same shape which can lead to future damages. If you’re investing money on your roofing materials, then you wouldn’t want to replace them again because of the damages, would you?
Benefits Of Overlaying
In most cases, the reason why most homeowners opt to overlay their roof is that it’s a process that doesn’t take much effort or time. Here are the following reasons why people choose to overlay:
Cheaper
In the short term, you’re paying less for the installation of a new set of shingles. Roof replacements mean that you will need to have your older layer replaced with a new set which can be an extra cost to your contractor’s labor fee.
Not Much Effort And Energy
Since you’re skipping the whole tearing-down-your-roof process, it won’t take up as much energy and effort. Moreover, you can skip installing your new set of shingles. Moreover, it’s less mess since there’s no debris from tearing down your roof.
Saves Time
Roof replacements can usually take well over a week to finish. If you’re just installing shingles on top of each other, you’re expediting the process and shortening it to a few days instead.
Ultimately, there are more disadvantages to overlaying than there are advantages and homeowners should be mindful of these factors. Replacing or installing a roof will usually cost thousands of dollars worth of roofing materials, and we’re still not going into the labor costs which can also amount to the same amount. That said, overlaying can damage your new set of materials which means that it’s a better decision to go through the whole roof replacement process instead.
How Many Layers Should There Be?
To summarize everything, old houses tend to have two layers of shingles since it’s the average amount of weight that the supporting beams of old roofs can handle. Most modern roof designs can usually handle around 4 layers of shingles. Again, this isn’t something that is advisable since it can lead to many roofing problems.
If you’re not up for the task, then the best course of action in looking at how many shingles your roof has is to have a home inspector or a roofing contractor look at it. Having professional advice can save you thousands of dollars worth of money that might have gone unnecessarily towards a roof replacement.
Related Articles
Fixing Water Getting Behind Vinyl Siding
Are 3 Layers of Shingles on Roof Okay?
Attaching Pergola to House with Vinyl Siding
from Dynamic Remodel https://ift.tt/2TxxDMt
via IFTTT
0 notes
Text
Attaching Pergola to House with Vinyl Siding
For thousands of years, roofs have been an integral part of keeping us dry and protected from extreme temperatures and strong winds. However, these are not just the purposes of roofs. Most of the time, it’s roofs are there to give your roof a classy aesthetic that will draw the attention of your visitors and passers-by.
Additionally, there are some roofs that don’t have to be placed on a house and there are some that are used to protect gazebos, patios and an area of your backyard where you can chill out and relax. One of these kinds of roofs is the pergola which is getting more popular as the years go by.
If you’re looking at the different exterior and interior design magazines, you’ll notice that pergolas are getting increasingly popular. In most suburban areas in the warmer parts of the United States, you’ll see pergolas in patios, backyards, and gazebos.
But before we get into how we can attach a pergola to the top of your patio, we have to first look at the advantages that it can give and weigh-in on how these will affect the vinyl sidings of your roof.
What is a Pergola?
Pergolas are roof structures that protrude out of your house and are supported and mounted into four sturdy beams that have a crossbeam. Most of the time, pergolas have a stylish lattice that’s installed across the main top.
There are some pergolas that are enclosed that can protect you and your outdoor furniture from rain, but there are also pergolas that have a minimal structure were the roof is not enclosed and only the lattice remains on your roof. A common pergola is relatively large and spans a good amount of area.
The main purpose of pergolas is to provide an area for individuals to interact in with protection from the elements without having to be necessarily ‘inside’ your home. In most cases, pergolas are used to entertain guests in a more public area and sometimes it’s also used for a more private way of relaxing.
Requirements
Joint Hangers for Concrete and Ledger Boards for Wood
It’s best to use joint hangers for concrete pergolas as it can withstand more weight and ledger boards are best used for wooden pergolas to give it a more rustic feel.
Lean-to Styles Work on Foundation Homes
If your home does not have a traditional foundation, it’s best to have a pergola that’s independently being held by 4 supporting posts.
Paint Your Pergola Prior To Building It
It’s important that you let the paint dry on your pergola first before installing it on your vinyl sidings since the paint might ruin the color and painting of your vinyl sidings if you paint it right after you assemble it.
Attaching a Pergola
Measuring and Installing a Ledger Board
First thing’s first, we have to mark and measure where we will be placing our pergolas. Commonly, pergolas are placed on patios, near garages, and right outside your backyard. It’s best to use screws that are made of galvanized steel to anchor to your home.
Anchoring the Posts
There’s going to be a bit of weight on any independent posts, so it’s recommended on using anchors that are sturdy and will last a long time.
Installation of Main Beam Structures on the Main Anchored Points
The next step involves the installation of top beam structures that serve to connect the pair of free-standing posts. Another reason that this structure is set in place is to provide additional support for the roof rafters.
Installation of the Rafter and Matching Rafter Clips
Finally, the rafter clips have to be mounted to the ledger board to provide support to the rafters. Then, the rest is smooth sailing by just putting on the rafters and finishing the project.
Installing Pergolas on Vinyl Sidings
Vinyl sidings are one of the first lines of defense against the elements by being resistant to water, Attaching a pergola to your house that contains vinyl sidings can help extend the longevity of your vinyl sidings as it also serves as an overhang were water can redirect towards off of your sidings.
Most homeowners would install pergolas as an extension to their roof by installing on the eaves of the roof which can serve as a make-shift overhang or simply leaning on the vinyl sidings.
Having a pergola on your patio or at the backyard can help keep your outdoor furniture dry while you enjoy having a good cup of coffee on a quiet afternoon or when you’re entertaining some guests by your patio.
If you’re attaching a pergola to your vinyl siding Wilmington DE, it’s best to plan things out with your local roofing contractor first.
Related Articles
Are 3 Layers of Shingles on Roof Okay?
Fixing Water Getting Behind Vinyl Siding
Steps To Installing Architectural Shingles on a Hip Roof
from Dynamic Remodel https://ift.tt/2Ski0YB
via IFTTT
0 notes
Text
Fixing Water Getting Behind Vinyl Siding
The first thing that most homeowners think when it comes to vinyl sidings is that it can add to the aesthetic value of the exterior of their home. But there’s more than what meets the eye with vinyl sidings since it serves an important purpose of protecting your home’s foundations against the elements.
But just like every material that you can find in your local builder’s depot, vinyl sidings do have a limited lifespan and can still be vulnerable to horizontally-propelled rainwater and snow. If water does seep in towards the nooks and crannies of your vinyl sidings, then this can lead to subtle water damages.
Before we get into the preventive measures in keeping your vinyl sidings dry and away from damage, we have to first look into the causes and long-term effects of water damages so that we can effectively take the necessary precautions in future plans.
Causes of Water Damage
Although cases of water damage on vinyl sidings are quite rare, it is possible since these types of sidings are not 100% watertight. As years will pass by, you will see a mix of dirt and water near your vinyl sidings which are a tell-tale sign that you have to check for damages on your sidings.
The most important factor that most homeowners have to be aware of is that siding alone will not protect your walls and the foundations of your home. A well-planned roof, gutter system, and drainage system have to work together to keep water off your sidings. Just like a well-oiled machine, each part of the home’s system has a necessary function and they all have to work efficiently to keep your home safe and secure.
Clogged gutters
Gutters are your primary way of redirecting water off of your roof and far away from your roof’s foundations. If left unchecked, debris like leaves, granules, and snow can accumulate on the passageways of water. If these gutters become clogged, then water can flow out closer to your house’s foundations and eventually find themselves on your sidings.
Lack of Drainage System
Gutters are usually connected to downspouts that dispose of water far from your sidings. During storms and heavy rains, having an efficient drainage system can keep your sidings dry and create a gap far from your sidings.
Lack of Overhangs
Another way of keeping water far from your sidings is through an extension of your roof in the form of overhangs. Overhangs provide additional protection, insulation, and shade against the elements.
Long-term Effects of Water Damage
Once water seeps into the main structure of your sidings, this can cause damage to your home’s foundations and supporting structures. Once you see the following symptoms, it’s best to contact your local contractor as soon as possible to mitigate any further damage.
Rotting Sheathing
Most sheathing materials are made out of wood. Normally, this layer should not be exposed to water and other elements. If ever this is exposed to water and moisture, rotting can occur and can slowly chip away at the health of your sheathing.
Fungal Growth
Molds, mildews, and molds can form if moisture builds up on your interiors. These organic growths are quire unsightly and can drastically affect the aesthetic value of your home. Moreover, these can also affect the integrity of your home.
Damage to Wall Foundations and Support
Damages to your home’s foundations and supporting structures can lead to a domino effect of other damages. Normally, a supporting structure that’s compromised wouldn’t be able to hold on to the weight of the roof and, therefore, cause damages to your roof if left unattended.
Dry Rot
Just because you’ve removed all the moisture from your home’s interior doesn’t mean that all fungi have been killed off. Dry rot can occur when certain types of fungi are left on your wooden panels and support.
Preventing Water Damage
Water damage is quite tricky to fix. Compared to replacing missing sidings and shingles, or repairing broken materials, water damage can seep towards the interiors of your walls and an extensive inspection has to be done to determine the damages.
For eyes that are not well-trained in looking for subtle damages, prices can easily rack up if rotting is not identified. As such, it’s best to take the following preventive measures:
Proper flashing techniques
Having a good house wrap
Effective caulking of sidings
If you think that these preventive measures are a bit too overwhelming for you, then don’t worry, there are always siding experts that can handle these housing problems. It is important to ensure that your home’s vinyl siding Wilmington DE is in good condition, even during harsh weather conditions.
Related Articles
Attaching Pergola to House with Vinyl Siding
Are 3 Layers of Shingles on Roof Okay?
Steps To Installing Architectural Shingles on a Hip Roof
from Dynamic Remodel https://ift.tt/2QgA7MD
via IFTTT
0 notes
Text
Steps To Installing Architectural Shingles on a Hip Roof
Throughout history, shingles have been a staple for any roofing system. Through heavy rain, snow, and strong winds, shingles have held their ground and have kept countless homes dry by disposing of rainwater and snow away from the walls and the foundations of homes.
Asphalt shingles are one of the more prevalent roofing materials that you’ll find in your local builder’s depot across the United States. For decades, these shingles have been the main staple in most gabled and hipped roof designs. Compared to most roofing materials like metal roofing and slate tile roofs, asphalt shingles don’t really hold up to them in terms of durability and strength. Developed during the 1980s, architectural shingles would become the answer to the limited lifespan of asphalt shingles.
Architectural Shingles
Architectural shingles were the answer to the limited lifespan of asphalt shingles so that it could compete with other more sturdy roofing materials. Architectural shingles contain a more potent mix of fiberglass mat and ceramic-based granules that can greatly increase resistance from impact, fire resistance, and overall tensile strength against high winds and hailstorms.
There are two kinds of architectural shingles and they both emulate the same texture and color schemes of some of the most luxurious shingles that you can find in the market:
Cedar Shakes Architectural Shingles
It’s no surprise that cedarwood is one of the most highly sought-after shingles that you can find in the market. If you want to give your house that rustic cedar shake look while still having the unique traits of architectural shingles, then cedar shakes are right up your alley.
Slate Tile Architectural Shingles
Normally, slate tiles are one of the heaviest roofing materials that you can install on your roof and will sometimes weigh over a ton if you have a large area to install on. Architectural shingles let you imitate the classy texture and durability of architectural shingles without the weight problem.
Keep in mind that these shingles do look like cedar shakes and slate tiles, they are not necessarily made of cedarwood and naturally cut stone and do not have the same characteristics of those roofing materials.
Preparing Your Hip Roof
If you’re not sure about what you have to prepare for the re-roofing or installation process, you can always consult your professional roofing contractor on the materials required. Be sure to also secure a permit and to make sure that you’ve done your research on your roof’s design before making any final decisions.
Installation Process
Add Protection
Obviously, your roof is there to protect your home from water damage. Start by adding the necessary flashings to the edges of the ridges of your roof and to any material that’s on your roof. It’s also recommended in adding strips of tin to the edges of your hip roofs.
Adding Shingles
The first shingle that you’ll be placed on your roof will determine if you have properly installed your shingles. The shingle has to lie on the bottom edge of your hip roof before carefully cutting the edges of the shingles. Once you have correctly lined all the shingles, you have to nail the top edge of the shingle in place.
Adding More Shingles
Keep on adding shingles by following the pattern. The last shingle should be nailed properly to keep it in place. Roof cement can also help keep your shingles in place.
Essential Roofing Tips
In most cases, the most common reason why a hip roof system will fail is that the shingles have been installed improperly. If ever the first shingle that’s installed is misplaced, then the rest of the other shingles will also bulk and bulge from the pressure of the other shingles. Moreover, the installation process should be done on a warm sunny day since roofing and building materials tend to expand in higher temperatures, it’s easy to have an accurate measurement of your shingles in the process.
Again, having professional roofing specialists install your architectural shingles will ensure that they are installed properly.
At the end of the day, following procedures and instructions will make sure that everyone is safe and that your roof is installed the correct way. Sure, installing a roof might take up a lot of time, effort, and money, but you are also essentially investing in the long-term lifespan of your roof. After all, if you really want something done right, hire an expert to do it for you.
Be sure that you’re hiring a licensed roofing contractor that has the manpower and expertise in installing the proper roofing Wilmington DE.
Related Articles
Attaching Pergola to House with Vinyl Siding
Are 3 Layers of Shingles on Roof Okay?
Steps To Installing Architectural Shingles on a Hip Roof
from Dynamic Remodel https://ift.tt/3613Akt
via IFTTT
0 notes
Text
Are 3 Layers of Shingles on Roof Okay?
Shingles have been an integral part of any roofing system for centuries since they serve as the first line of defense against rainwater, snow, and strong winds that can damage your roof. However, just like every other roofing and building material out there, roof shingles are not perfect and they can still be damaged and deteriorate over time. Eventually, you’ll need to replace the shingles on your roof.
However, there are other ways of saving up time and resources. One thing that most contractors and homeowners do is overlay shingles on top of each other. Usually, this is a good way of expediting the process of re-roofing, but will also have some repercussions.
But before we get into what’s the most optimal amount of layers that you can place on your roof, we have to first look at what are the pros and cons of overlaying shingles.
Advantages of Overlaying
Cost Effective
The most common reason why homeowners choose to overlay their roof is that it’s a cheaper alternative than having to tear down a whole roof and replacing it with fresher roofing materials.
Saves You Time
when you’re tearing off a roof, you have to go through multiple processes of tearing off the roofing materials for each layer. However, when you’re overlaying, you can skip multiple processes.
It’s Not Messy
Right after tearing off a roop, you’ll be expecting a lot of debris falling off from your roof which can leave a mess. When you’re overlaying, you won’t have to clean up any debris from the re-roofing process.
Disadvantages of Overlaying
Yes, there might be some advantages to overlaying your roof, but we have to also take into account that there will always be some repercussions in having too many layers. Again, it’s always a good practice to consult your roofing specialist first.
Can Conceal Damage
Sure, overlaying can conceal damages and is away from the visible eye, but this will inadvertently lead to more damages for the newer layer in the future. If ever you have molds and mildews on the older layer, this could spread to your newer layer and slowly chip away at the integrity of it.
Accumulated Weight
Certain roofing materials like slate tile roofs can weigh over a ton. Can you just imagine stacking 3 heavy roofing materials over each other? Having too much weight on your roof can cause damage to the supporting structures of your roof. Moreover, this can drastically affect the lifespan of your roof as it will bend and break your steel and wooden beams.
Will Affect Inspection Reports
If you’re planning on increasing the monetary value of your home, a home inspector will view multiple layers of shingles as a negative for your home since this can imply that there are damages that have been concealed and organic growth could easily make its way towards the newer layer.
More Insulation
A rule-of-thumb for roofing specialists is that the thicker your roof is, the more insulation that it will give to your home. Sure, this might seem like a good way of retaining heat during colder climates, but this will cause inhabitants to feel uneasy about warmer climates. Moreover, moisture could be trapped inside your home from too much insulation which can result in the growth of molds and mildews.
Ultimately, overlaying shingles on top of each other might have advantages, but there are also disadvantages that have to be weighed in when considering your roofing Wilmington DE. But of course, you have to take into account the certain roofing material that you’re installing since each type of shingle has its own unique properties.
While there are some that bode well with overlaying, there are other shingles that do not bode well with having another set of shingles placed on top of it. However, consulting your roofing contractor will give you an extensive answer based on the specific roofing material that you’re using.
Related Articles
Attaching Pergola to House with Vinyl Siding
Fixing Water Getting Behind Vinyl Siding
Steps To Installing Architectural Shingles on a Hip Roof
from Dynamic Remodel https://ift.tt/2SjHt4x
via IFTTT
0 notes
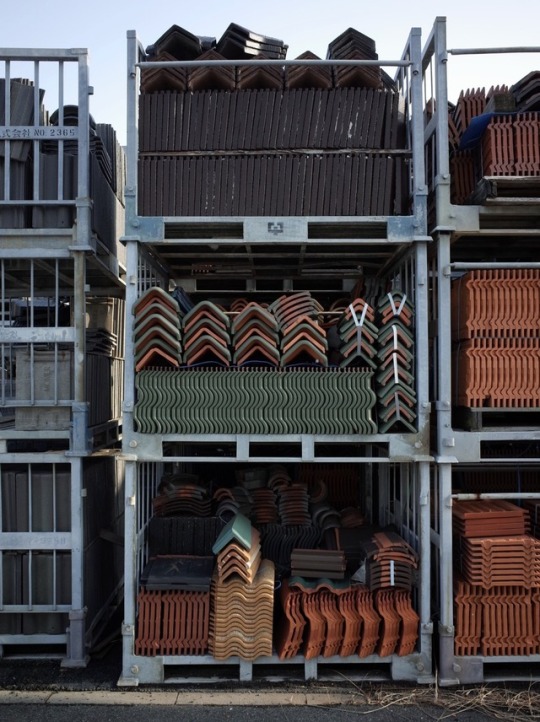
Photo
We provide you with expert repairs, installations, and replacement at all areas of your roof! Call Dynamic Remodel & Repair Roofing Wilmington today - 302-543-5573!
0 notes
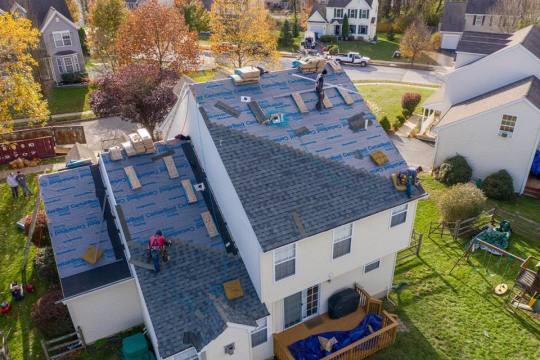
Photo
Anyone can replace a roof, install new siding, build a deck or replace windows, but not everyone can serve the customer by doing it at an affordable rate at the customer’s convenience. That’s what we’re all about at Dynamic Remodel & Repair Roofing Wilmington. Call 302-543-5573 now!
0 notes
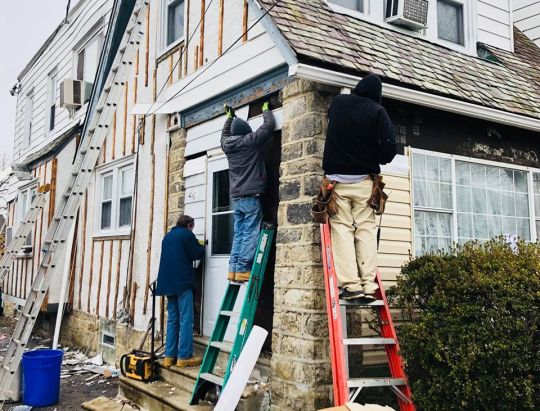
Photo
Dynamic Remodel & Repair Roofing Wilmington is a local residential contractor located in 2505 Concord Pk Ste B Wilmington, DE 19803. We are specializing in roofing, siding, and window installation. We are licensed and insured in DE and PA. Call (302) 543-5573 for free estimates!
0 notes