
Last Seen Blogs

creditsetprets
L'actualité de l'économie et celle du crédit

rorvk
endless metal love

diddleskittles
XXX

kmt123whatsthetea
Welcome to the house of horny

mhagha
mhAgha
Photo
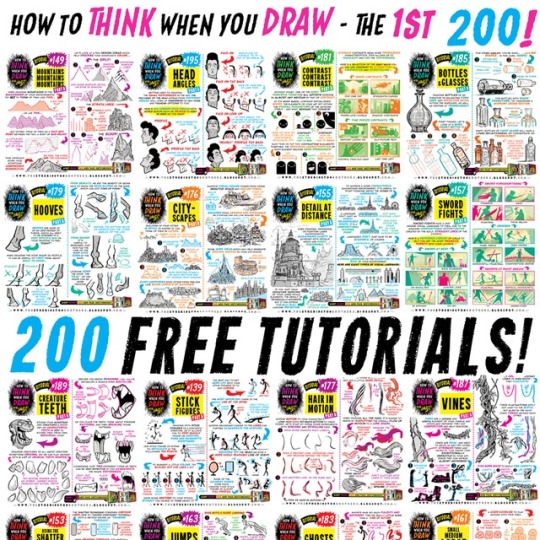
How to drawHere it is! The FULL SET of EVERY how to THINK when you draw TUTORIAL I’ve EVER DONE, in ALPHABETICAL ORDER! Enjoy, link, pin, share! Cheers!
Lorenzo!
How to draw ANGRY EXPRESSIONS
How to draw BATTLE DAMAGE
How to draw BIRD HEADS
How to draw BOOKS
How to draw BOTTLES and GLASSES
How to draw BOXES
How to draw BREAKING GLASS
How to draw BRICKWORK
How to draw CABLES and WIRES
How to draw CAR CHASES
How to draw CATERPILLAR TRACKS
How to draw CAVES
How to draw CHARACTERS (3-SHAPES)
How to draw CHARACTERS (FLIPPED-SHAPES)
How to draw CHARACTER SHAPES
How to draw CITYSCAPES
How to draw COMIC COVERS
How to draw COMPOSITION
How to draw CONTRAST
How to draw CONVERSATIONS
How to draw CREATURE TEETH
How to draw CROSS-CONTOURS
How to draw DETAIL AT DISTANCE
How to draw EARS
How to draw FABRIC
How to draw FEET & SHOES
How to draw FEMALE HANDS PART ONE
How to draw FEMALE HANDS PART TWO
How to draw FLAGS
How to draw FOOD TRUCKS
How to draw FOREGROUND MIDGROUND BACKGROUND
How to draw GAME BUILDINGS
How to draw GEMS and CRYSTALS
How to draw GHOSTS
How to draw GIRL’S HAIR
How to draw GOLD
How to draw GRASS
How to draw HAIR (1940s styles)
How to draw HAIR IN MOTION
How to draw HAPPY EXPRESSIONS
How to draw HEAD ANGLES
How to draw HOOVES
How to draw HORNS
How to draw HORSE HEADS
How to draw IMPACT DEBRIS
How to draw IN 3D
How to draw INTEGRATING LOGOS
How to draw INTERIOR BASICS
How to draw IN-WORLD TYPOGRAPHY
How to draw JUMPS
How to draw JUNGLE PLANT CLUSTERS
How to draw JUNK HOUSES
How to draw LAMP POSTS
How to draw LAVA
How to draw LIGHTNING and ELECTRICITY
How to draw MECHANICAL DETAILS
How to draw MUSHROOMS and FUNGUS
How to draw MONSTER HEADS
How to draw MONSTER TENTACLES
How to draw MONSTER TRUCKS
How to draw MOUNTAINS
How to draw NEGATIVE SPACE
How to draw NEWSPAPERS
How to draw NOSES
How to draw OVERGROWN VEGETATION
How to draw PEBBLES AND GRAVEL
How to draw PERSPECTIVE BOXES
How to draw PIGS
How to draw PILLOWS and CUSHIONS
How to draw POD HOUSES
How to draw POURING LIQUID
How to draw ROBOT ARMS
How to draw ROCK FORMATIONS
How to draw RUNNING FIGURES
How to draw SAND
How to draw SAUSAGE DOGS
How to draw SEA WEED
How to draw SHADOW COMPOSITION
How to draw SHOULDER ARMOUR
How to draw SIEGE WEAPONS
How to draw SILHOUETTE THUMBNAILS
How to draw SMALL FLAMES
How to draw SMALL, MEDIUM, LARGE
How to draw SMOKE EFFECTS
How to draw SNOW
How to draw SPACE BIKES
How to draw SQUIRRELS
How to draw STICK FIGURES
How to draw SWORD FIGHTS
How to draw THE HORIZON
How to draw TIKI STATUES
How to draw TREASURE CHESTS
How to draw TREE BARK
How to draw TREE ROOTS
How to draw USING THE SHATTER TECHNIQUE
How to draw VEHICLE STANCE
How to draw VINES
How to draw VINTAGE PLANES
How to draw WATER
How to draw WOODEN HOUSES
4K notes
·
View notes
Photo

Here’s a BRAND NEW TUTORIAL: How to THINK When You Draw PEBBLES and GRAVEL!
And join us on OUR TWITTER EVERY SUNDAY for #SkillUpSunday, and every Firday for #FridayFundamentals as we have TONS more FREE TUTORIALS,REFERENCE SETS and RESOURCES coming for you! GO HERE to see more!
And GO HERE FOR 150 FREE TUTORIALS!!
Lorenzo!
313 notes
·
View notes
Photo
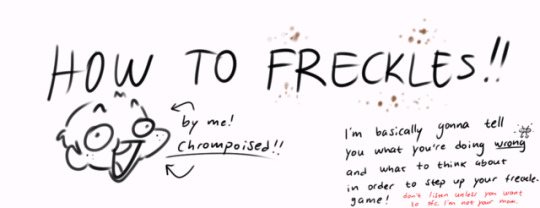


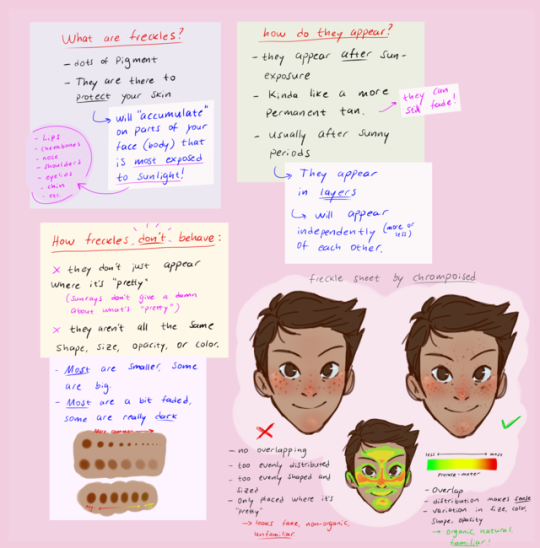
Look!! I made a freckle sheet!
Having troubles making freckles look natural? This is how I draw them! I basically use myself as a reference because I’m a literal salami. Though, you should keep in mind that freckles look and act VERY differently from person to person, but these are just some tips and tricks. The same principles applies for all skin tones because in my experience, they don’t act much different.
Also a thing I forgot to draw on the “correct” face is variation in color.. it could look better if I had remembered it but I just forgot and I already merged the layers to what can u do :P
Some things that didn’t fit on the sheet:
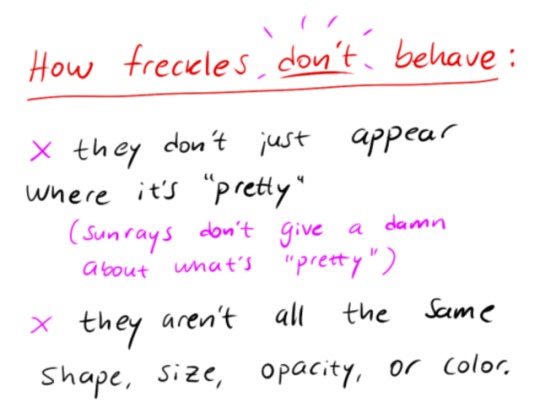
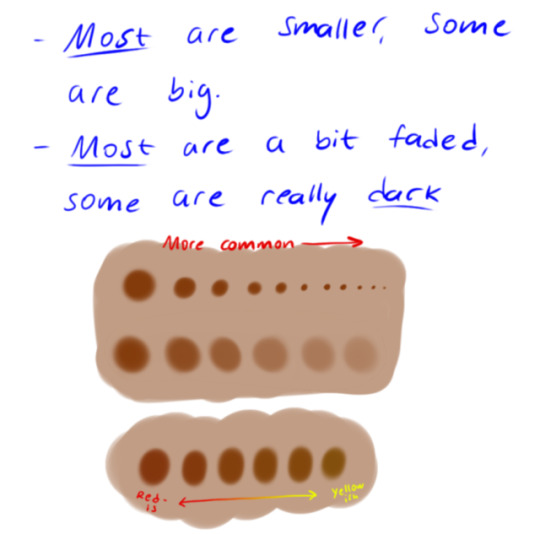
Freckles can appear in places where they aren’t necessarily “supposed to be” (referring to the “freckle-meter”). Sometimes sun rays hit places if usually doesn’t because it’s a different time of day, or you simply tilt your head. It happens! So don’t be afraid to add a few freckles that seem “out of place”
It’s completely possible to have patches where you don’t have freckles. For example; freckles don’t appear on scars (in my experience) or on places where a wound has just healed, but no scar is visible (because the freckles haven’t had time to develop yet). Or completely random!
Freckles are more or less associated with children, but adults are just as likely to have freckles! Sometimes they do fade, but most of the time they don’t.
Freckles aren’t limited to pale people! They just aren’t. Dark skinned people can have freckles too and it’s ~BEAUTIFUUUUL~
Now that I think about it, this principle should work for make-up as well, so take notes cosplayers! And have fun with this new freckle-knowledge. Use it wisely!
372 notes
·
View notes
Note
so I am havin a lil trouble with poses, specifically different body types doing poses that aren't front facing. I just can't seem to do the curves in a way that looks organic or natural? I really love you and your art so I was hopin for some advice maybe? Love you a lot oki bye -shuffles away-
THANK YOU AND HOOOO BOIII what you’re talking about is one of the most crucial principles in order to create dynamic drawings, and it’s called ~flow~!!!! The principle is really simple, but practicing takes quite some time, because it’s something you sorta just have to get the hang of. And I know you’re probably like UUUUGH, but flow is just one of those things, and there are no short cuts!!
But basically, flow is all about curves!

(((I think it’s actually called C-curve not U-curve but MEH)))
And you get them by drawing fast and looooong lines. Literally just go swoosh over the paper. Don’t think too much about getting it perfect, just. get the line down. get the flow and ~feel the flow~!!
Why practice this? Because the human body is composed of curves! You just add mass to your curves, and then you have your posture.
Let’s take a character and analyze their posture as an example:(this is Shiro from Voltron legendary defender, (surprise surprise))
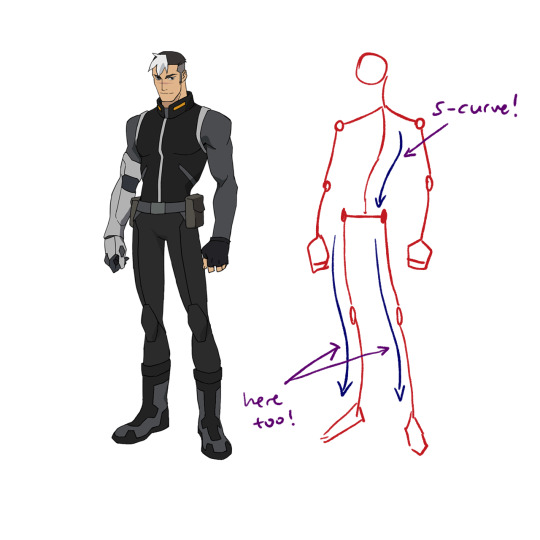
You see S-curves in his back and legs! Sure, the curves are quite subtle, but they’re still there! He also has an “over-all” sorta curve to him:
See?
In short: You can break down an entire posture from one C- or S-curve, down to many C- and S-curves! The arms follow one S/C-curve, same goes for the back, the legs etc. They all follow a curve individually, but also follow one single curve all together!
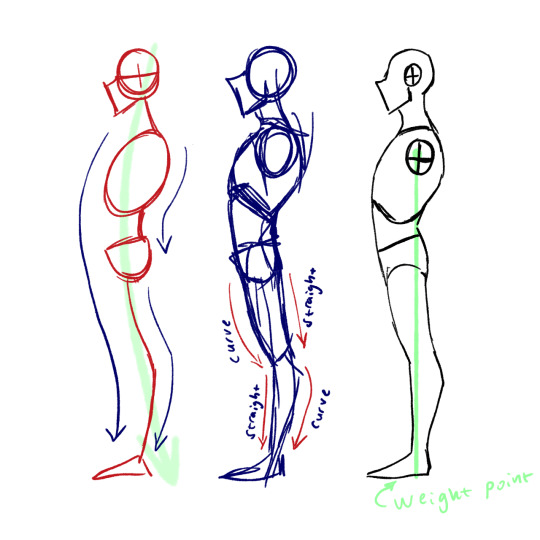
It’s easier to see the curves from a side view like this:
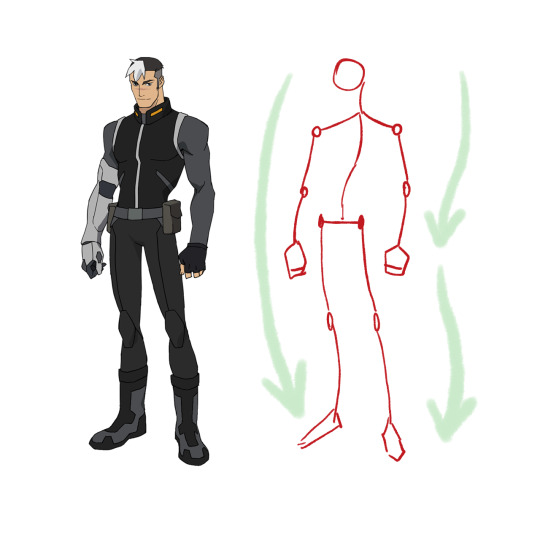
This is a less relaxed pose though. To draw a more relaxed pose like Shiro’s, move the hips forward and make them lean a bit backwards, like this:
Notice how I draw the legs ALMOST straight here. If you look closely though, they are actually C-curves (at least the one on the right lol)! I usually add extra curves on top later, which makes them look like an S-curve (like in the picture above this one). It’s the “over-all” curve of the legs, sorta.
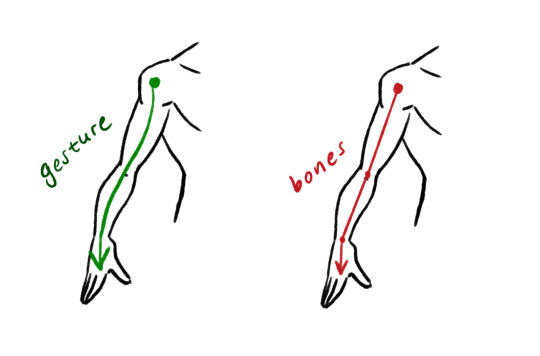
Are we done? NO! There’s one more thing to remember and that is that NO GESTURE FOLLOWS A STRAIGHT LINE!!! So that’s one major mistake to look out for, completely straight lines. Because that will surely take away the flow from your drawing. Here’s an example:

And we’re talking about gesture here. Not the structure of the bones! The bones are usually straight (in the limbs at least, to some degree), but the flow that the gesture has is never straight!
The more you draw with flow, the more naturally it’ll come. Observe others and analyze their poses help a lot!
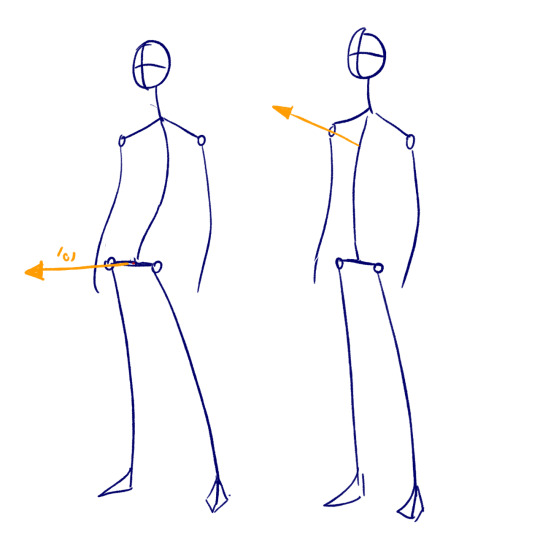
Here are some examples I have done:

Aaand I think that’s about it!
Thank you for reading!! I hope it helped! ✨💖
2K notes
·
View notes
Text
How to do “extra” facial expressions!
Drawing basic facial expressions is not the hardest. Most people can draw a sad face, a happy face, angry etc., but making more multidimensional expressions is more of a challenge. I have gotten a lot of compliments on how I draw facial expressions, (specifically “angsty ones”) telling me that they are very dramatic and well… expressive! And there are actually only a few things I think about when I draw faces that take them to the next level, so I thought i’d illustrate them all here!
SUPER IMPORTANT TIP BEFORE WE START: Look at your own face when you draw faces. Even making the face when you are drawing (you don’t even have to look at it), will give you some sense of how the face muscles pull and where things fold and stretch, because you can feel it. You are the best reference when it comes to facial expressions!
Angles
Draw the head in an angle that matches the expressions you want to make. It is not a requirement, but is going to add to the effect.
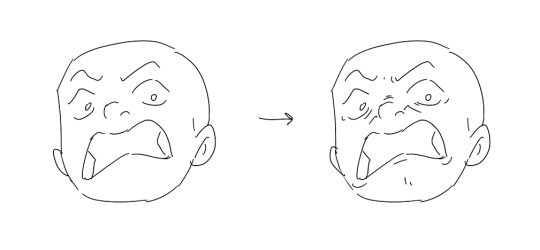
Symmetry vs asymmetry
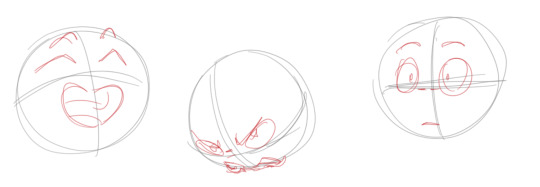
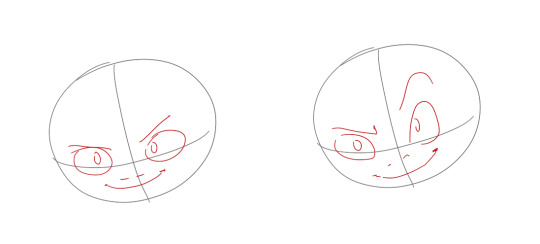
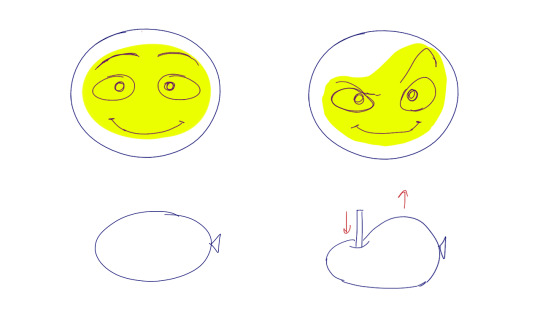
A face is rarely symmetric. Unless the face the character is making is 100 % relaxed or even dissociating, the eyebrows, mouth and facial muscles will have different placements of their respective side. This image shows the dramatic impact asymmetry has on a face:

That’s the difference between a smile and a smirk!
The first one’s like “oh yeah?” and the second is like “oH YEAH??”
The “balloon squishing principle”
This is something I did subconsciously, and I didn’t know about until I made this tutorial. And this principle goes hand in hand with an asymmetric face. Basically, if you squish one part of the face, you need to even out the empty space by “inflating” the other part of the face so that it doesn’t appear shrunken. The picture hopefully explains it:
Teeth
Don’t forget to add the gum when the mouth is open to its full potential!
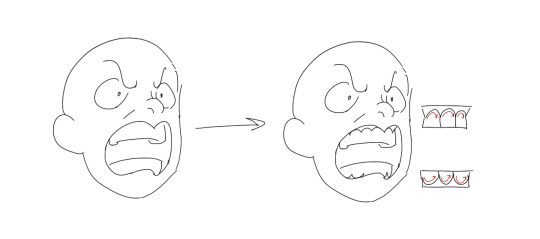
Squinting and folding
Adding folds around the eyes when a character is squinting makes a HUGE difference. It makes a smile more genuine and a growl more intimidating. Adding folds to the face in general makes your characters more lifelike and ‘visually relatable’. Like, they look human, and less plastic or fake.
and so on..
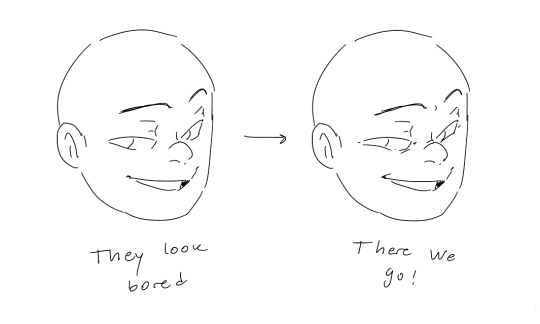
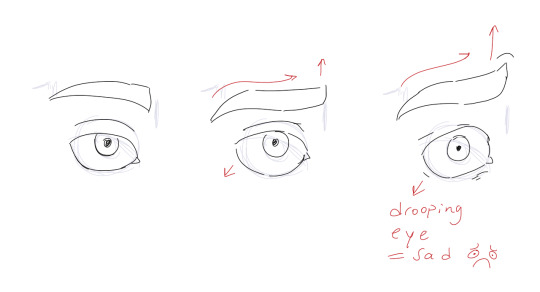
Pupils and irises
The placement of the iris and pupil in relation to the eyelids is very important! The less of the white you see, the more relaxed the character is.

And then of course eyebrows and eyes go hand in hand!

Gestures, spitting, sweating…
Adding more elements than just a face is key to making the character actually look like they are feeling what you want them to feel. Just the tiniest sweat drop adds to their anxiety, spitting adds frustration to their rage, slouching shoulders, waving hands, a double chin, extreme angles, the list goes on! Add whatever and see what kind of impact it makes! Does it do the trick? Great! Add it!
Over exaggeration!!
Remember that you can almost always exaggerate more. Don’t be afraid to do draw “too much” because you’re just experimenting. See what works and what doesn’t. What do you like to exaggerate?


Now that you know some theory, it’s time to practice!
Practicing!!
The 25 Essential Expressions (a classic! I’ve done it multiple times)
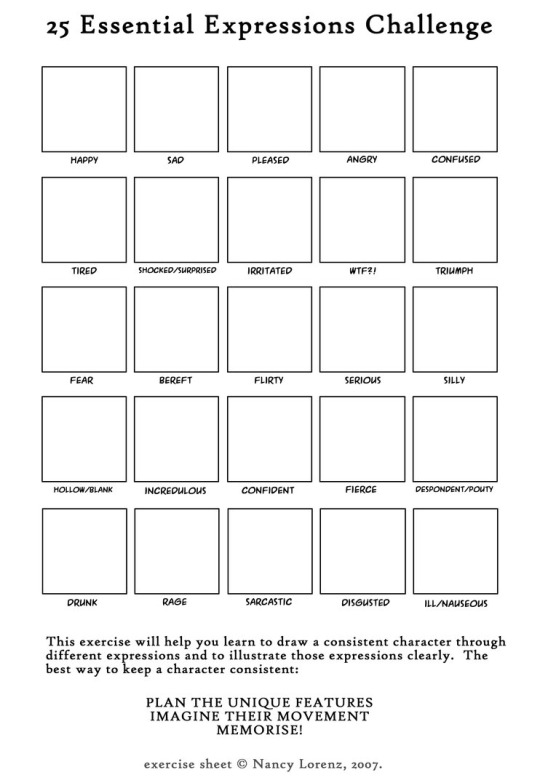
And the one I do when I’m bored:
Fill a page with circles and fill them in with different expressions. Try and exaggerate as much as you can!
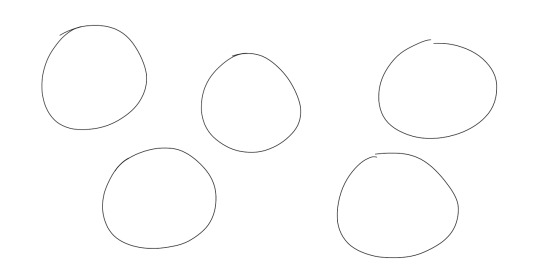
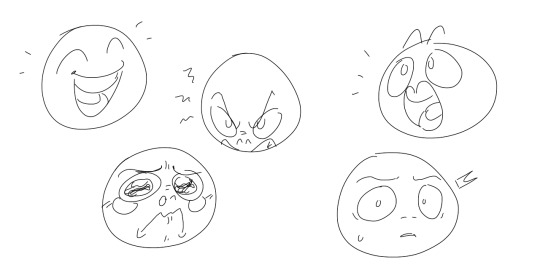
This is mostly for experimenting. They are quicker to draw than complete faces, but the same rules should apply!
And that’s about it!
I don’t know if I covered everything in this tutorial, since some things might be obvious for me, and this post perhaps only scratches the surface. So feel free to send me a message if you want an explanation about something more in depth! Thank you for reading! And now DRAW!!! ✨🎨
168K notes
·
View notes
Photo
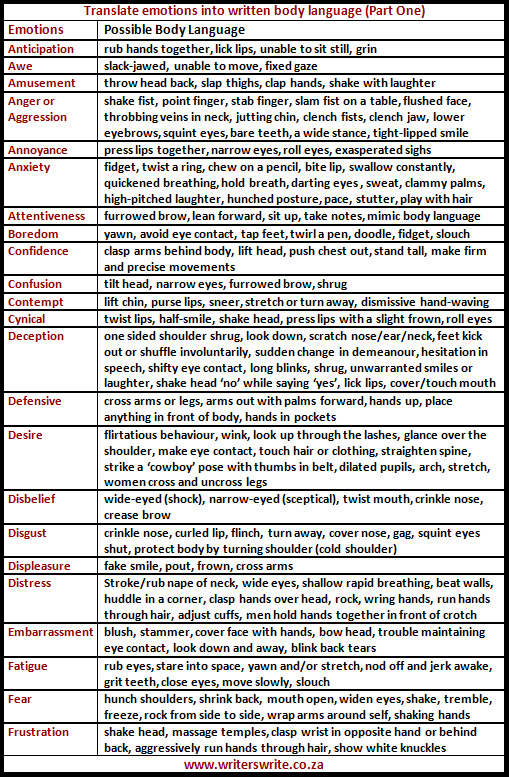
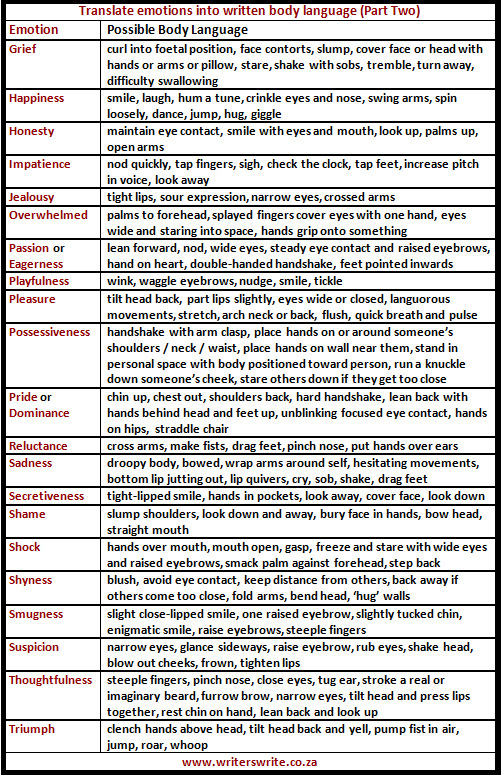
Cheat Sheets for Writing Body Language
We are always told to use body language in our writing. Sometimes, it’s easier said than written. I decided to create these cheat sheets to help you show a character’s state of mind. Obviously, a character may exhibit a number of these behaviours. For example, he may be shocked and angry, or shocked and happy. Use these combinations as needed.
by Amanda Patterson
360K notes
·
View notes
Note
Hello I was just wondering what font you use for translations because they look really nice and Im making a webcomic but the fonts I have don’t really fit....
Hello. For me, different genre uses different font. Plus, I’m not sure which fonts you’re talking about. So I’ll suggest the website that we made reference to
- http://prettyanonymo.us/index.php/scanlation-resources/anonblacks-typesetting-guide/
- https://mangadex.org/thread/5207/scanlation-font-resource
If you’re talking about a particular font, drop an ask together with the series title and we’d be glad to list the fonts^^
- wawaa
16 notes
·
View notes
Photo

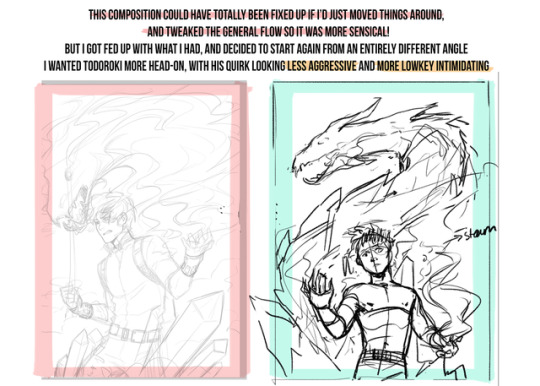


at last, a sorta tutorial!
This is honestly a very loose, general rule of thumb when you’re considering how to put together a drawing - take everything I’ve said with a grain of salt (and a dash of your own experience), because composition and flow is super subjective
this is just some shared personal tips based on my own learning - but I hope it helps anybody who might be struggling n_n
8K notes
·
View notes
Text
Langblr community vocabulary in Japanese

Based on my Finnish vocabulary list.
多言語ブログ [たげんごブログ] - language blog
ブログ - blog
ブロガー - blogger
タンブラー - tumblr
コミュニティ - community
オタク - nerd
言語 [げんご] - language
母国語 [ぼこくご] - native language
目標言語 [もくひょうげんご] - target language
語学 [ごがく] - foreign language study
言語学 [げんごがく] - linguistics
文化 [ぶんか] - culture
文法 [ぶんぽう] - grammar
語彙 [ごい] - vocabulary
辞書 [じしょ] - dictionary
文房具 [ぶんぼうぐ] - stationery
リソース - resources
ウェブサイト - website
アプリケーション - application
本 [ほん] - book
助言 [じょげん] - advice
質問 [しつもん] - question
答え [こたえ] - answer
画像 [がぞう] - picture, image
ビデオ, 動画 [ビデオ, どうが] - video
音楽 [おんがく] - music
チャレンジ - challenge
アンケート - questionnaire
ミーム - meme
冗談 [じょうだん] - joke
ムードボード - moodboard
チャット - chat
ブログを書く [ブログをかく] - to blog
勉強する [べんきょうする] - to study
学ぶ [まなぶ] - to learn
教える [おしえる] - to teach
説明する [せつめいする] - to explain
練習する [れんしゅうする] - to practice
上達する [じょうたつする] - to improve
直す [なおす] - to correct
話す [はなす] - to speak
聞く [きく] - to listen
書く [かく] - to write
読む [よむ] - to read
翻訳する [ほんやくする] - to translate
通訳する [つうやくする] - to interpret
議論する [ぎろんする] - to debate
質問する [しつもんする] - to ask
答える [こたえる] - to answer
手伝う [てつだう] - to help
助言する [じょげんする] - to advice
勧める [すすめる] - to recommend
応援する [おうえんする] - to support
旅行する [りょこうする] - to travel
友達を作る [ともだちをつくる] - to make friends
多様な [たような] - diverse
多言語の [たげんごの] - multilingual
親切な [しんせつな] - friendly
寛容な [かんような] - tolerant
勤勉な [きんべんな] - hardworking
人気がある [にんきがある] - popular
楽しい [たのしい] - fun
3K notes
·
View notes
Text
Me: “I need to learn more [insert language] vocabulary”
Me: *reblogs numerous vocabulary lists in that language*
Me: *never looks at the vocabulary list again*
3K notes
·
View notes
Text
I hope all the people who think the arts are worthless have never watched a film, visited an art gallery, seen a play, got a tattoo, read a book, listened to music, spoken a foreign language, eaten at a restaurant, played an instrument, gone to a museum,
528 notes
·
View notes
Text
i actually like the new styles great artists like hyanna-natsu, neko-rina, and sasucchi95 are inspiring. what i mean specifically by that is people using more colors in their art. i really love when artists use a lot of different colors, like for white hair, shading with blue/purple/pink and highlights with green/yellow or lots of colorful rimlighting. i dont know if it’s because of them that it’s a popular thing now, but whatever it is i love that more artists are using different colors other than just light blue base color -> dark blue shading -> light blue/white highlights.
3 notes
·
View notes
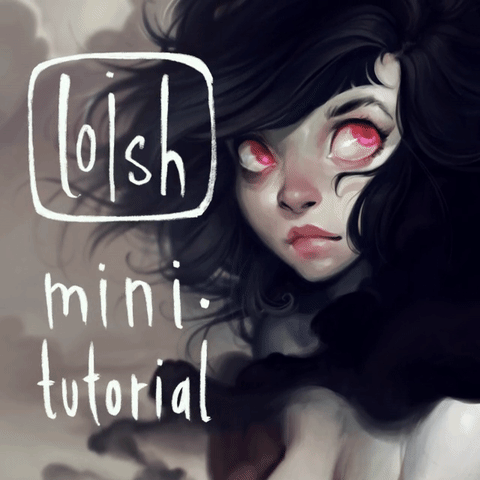
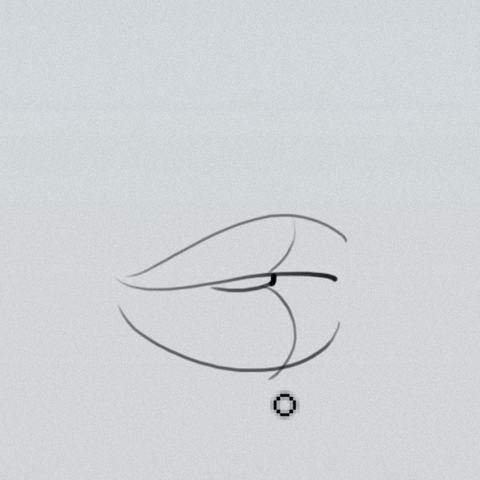
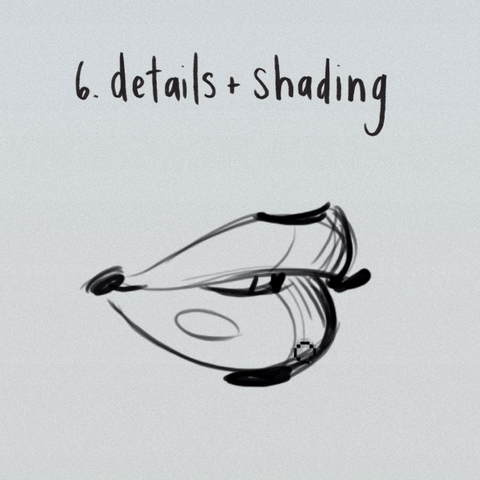
Photo


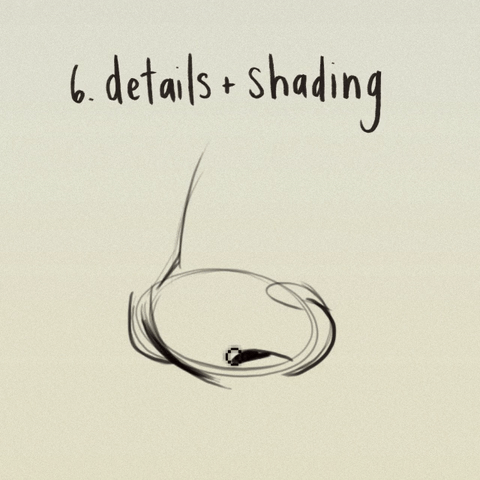

more mini tutorial gifsets :) for the video version check out https://www.instagram.com/p/BGZfej3R_OM/?taken-by=loisvb
26K notes
·
View notes


Text
Attention ALL artists!
You sure have seen this post. It has spread like wildfire over the past few days so I doubt there is any artist out there who hasn’t seen it. But even if you didn’t, you should read on because I’m about to tell you a handy little thing that can help you to protect your art from such assholes as the anon who submitted this bullcrap, as well as art thieves in general.
The magic word is Metadata.
Metadata is like an invisible signature that is embeded into a file. It can contain all kinds of information, like Title, date, keywords for online seach engines, and copyright information. And the best thing is, since this information is “hidden” in the code of your picture, it’s hard to remove it.
There is a nice basic tutorial on how to add Metadata, or “additional file information” to your images in photoshop. It’s really, really easy so check it out!
“Adding Your Contact And Copyright Info To Your Photos With Photoshop” on PhotoshopEssentials.com
I’m not sure if you can do the same with any other art program. If you know how to do this in other programs / can confirm that it works the same way there, please tell me so I can add the information to this post.
Adding the Metadata will not stop idiots from taking and reposting your art. It also won’t make them stop editing out your signature. It WILL however, help you prove that you are the original artist whenever you have to.
Always remember my friends. You, the artist, are protected by law. No one has the right to take your intellectual property and hard work and repost, use or edit it without your permission. Ever.
194K notes
·
View notes