
shang-chi
a resource blog
just reblogging various resources i may want to use in the future.
209 posts
Don't wanna be here? Send us removal request.
Last Seen Blogs

kookuweb
Review

leeyoujeong
라온제나
what-is-this-blog-even
The Ramblings of a Dork Who Cant Even
chr-onostasis
art stuff
iwanttobeadentist
I Want To Be A
Dentist
Text
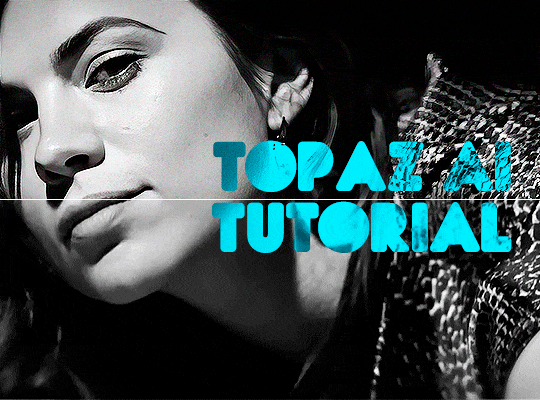
TOPAZ AI TUTORIAL
i was asked to do a tutorial for Topaz AI (a software that enhances screencaps), so here it is! :)
[tutorial under the cut]
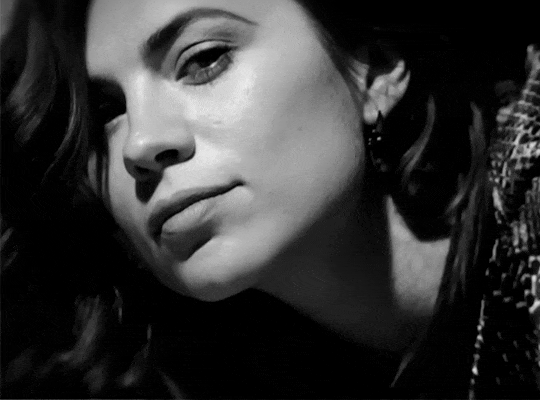
i’m going to gif a 720p YouTube video from 12 years ago as an example. it’s the bottom of the barrel when it comes to image quality, but in the end, you won’t believe it was once so shitty. here’s the gif, without any editing:
THE APPLICATION
Topaz AI is a paid software for image enhancement. you can download it for free, but your images will have watermarks. here's a random link that has nothing to do with this tutorial.
you can use Topaz AI as a Photoshop plugin or use the software separately. i will explain both methods in this tutorial.
USING SEPARATELY
it’s the way i do it because it’s more computer-friendly, the plugin can take a toll on your PC, especially when you’re dealing with a lot of screencaps.
you first take screencaps as you normally would (if you don’t, here’s a tutorial on how to do it). open Topaz AI and select all the images. wait a while for the software to do its thing.

on the left, there is your screencap untouched. on the right, is your edited version. if you click the edited screencap and hold, Topaz will show you the original, that way you can compare the versions even better than just looking at them side by side.
Topaz AI will automatically recognize faces, if any, and enhance them. this can be toggled off, by disabling the “recovering faces” option in the right panel. it’s always on for me, though. you can tweak this feature by clicking on its name, the same thing for the others.
Topaz AI will also automatically upscale your screencaps if they’re too small (less than 4k). it will upscale them to achieve said 4k (in this gif’s case, the original 1280x720 screencaps became 4621x2599). i suggest that you let the app upscale those images, giving you more gif size flexibility. you can change into whatever size you want if you want something less heavy to store. don’t worry though, even these “4k screencaps” are very light megabytes-wise, so you won’t need a supercomputer. it might take a while to render all your screencaps, though, if you’re on a lower-end computer. (the folder with the edited screencaps ended up being 1GB, but that’s because it contains 123 screencaps, which is a lot of screencaps for 4k giffing).
two options won’t be automatically selected, Remove Noise and Sharpening, you will need to enable them to use them. rarely i don’t use Remove Noise, as is the best tool to remove pixelization. the Sharpening option depends on the gif, sometimes your gif will end up too over-sharpened (because of Topaz’s sharpening and later your own). that said, i used the Sharpening option on this gif.

next, select all images by clicking the “select all” button. you will notice that one of the screencaps’s thumbnails (in my case, the first one) will have small icons the others don’t have. this is the screencap you enhanced. you will need to click the dots menu, select “apply”, and then click “apply current settings to selected images”. this way, every screencap will have the same settings. if you don’t do this step, you will end up with one edited screencap and the rest will remain untouched!

all things done, click “save X images”. in the next panel, you can select where to save your new screencaps and how you want to name them. i always choose to add a topaz- prefix so i know what files i’m dealing with while giffing.
just a note: if your way of uploading screencaps to Photoshop is through image sequence, you will need to change the names of your new screencaps so PS can perceive that as a sequence (screencap1, screencap2, etc). you can do that by selecting all the screencaps in your folder, then selecting to rename just one of them and the rest will receive numbers at the end, from first to last. you don’t need to rename them one by one.
here’s the first gif again, without any editing:
without Topaz enhancement but with sharpening:

without sharpening, only the Topaz enhancement:

with Topaz enhancement and sharpening:
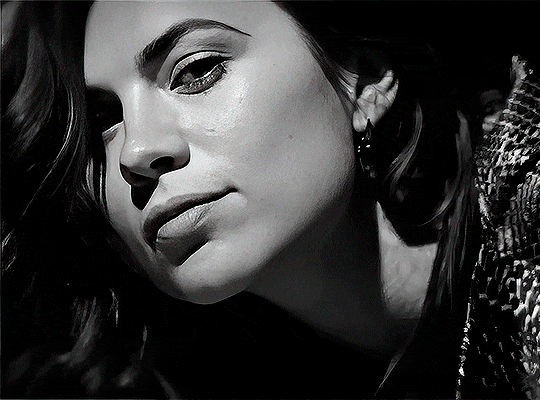
her skin is so smooth that it is a bit unrealistic. i could have edited that while tweaking the “Recovering Faces” option and/or the “Remove Noise” option, but i prefer to add noise (filter > noise > add noise) when necessary. this way, i don’t risk not enhancing the quality of the screencaps enough.

i added +3 of noise, making the gif look more natural. it’s a subtle difference, but i thought it necessary one in this case. you can continue to edit your gif as your heart desires.
VOILA! 🥳
AS A PHOTOSHOP PLUGIN
if you have Topaz AI installed on your computer, Photoshop will recognize it. you will find it in filter > Topaz Labs > Topaz AI. while in timeline mode, select the filter. the same Topaz AI window will pop up and you can tweak things the same way you do when you use the software separately. by using the plugin, you don’t need to upload your edited screencaps or use screencaps at all, a video clip (turned into a Smart Layer, that is) will suffice. the downside is that for every little thing you do, Topaz AI will recalculate stuff, so you practically can’t do anything without facing a waiting screen. a solution for that is to edit your gif in shitty quality as you would edit an HD one and at the very end, you enable Topaz AI. or just separately edit the screencaps following the first method.
this is it! it's a very simple software to use. the only downside is that it can take a while to render all screencaps, even with a stronger computer, but nothing too ridiculous.
any questions, feel free to contact me! :)
125 notes
·
View notes
Note
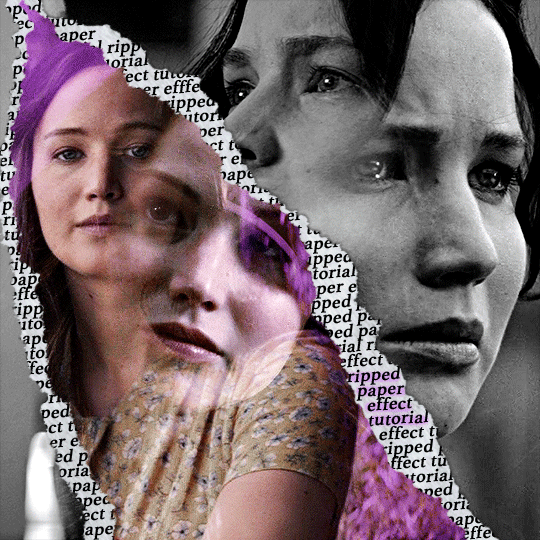
could you please do a tutorial of your game of thrones 'so much for stardust' gifs where it has the ripped paper textures? it's so pretty, and i'd like to learn how to do one with just the texture in the middle and two gifs on either side, like half and half and just having a rip in the middle. it's so cool how you did a gif in the middle though so i wanted to ask as well! all of them are so cool looking. you are extremely talented. if you don't want to though i understand :) thank you
TORN PAPER EFFECT + BLENDING TUTORIAL
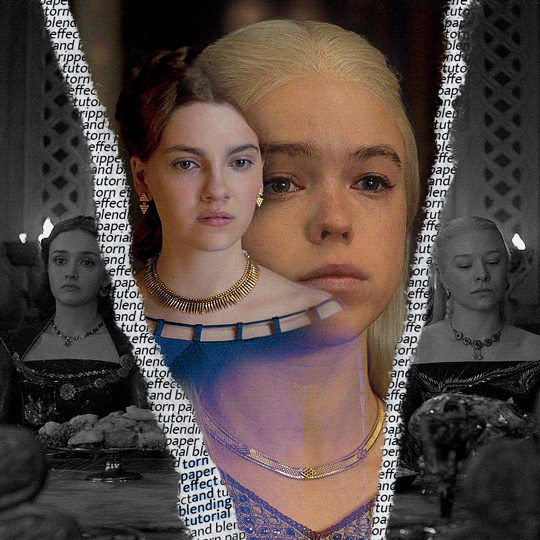
thank you so much for your sweet words, dearest anon and i'm sorry it took so long to answer but it's here now so i'll try my best to explain <3
disclamer: this is the first tutorial i ever made, it's very screenshot heavy and it assumes the basic knowledge of ps and gifmaking. if there's something you don't understand, don't hesitate to ask <3 so, let's get to it!
1. PREPARING THE BASE
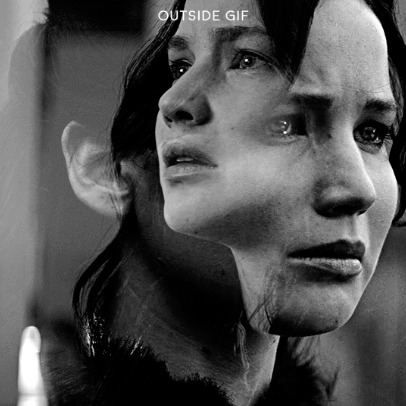
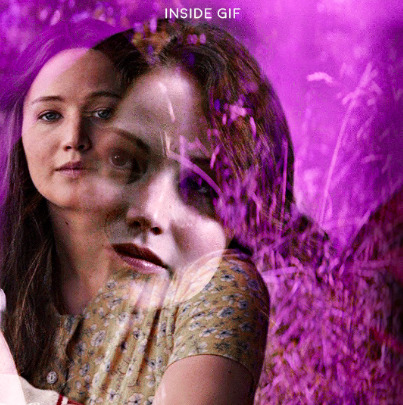
As you can see in this shot there's a lot of space between Rhaenyra and Alicent and that makes it perfect for the ripped paper overlay without hiding much of the base gif. So the first thing i did was to crop it like this:
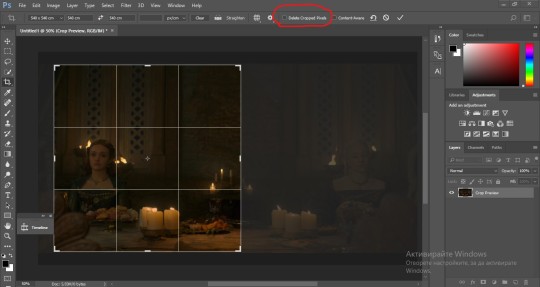
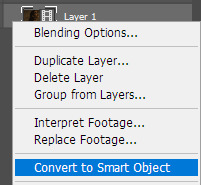
Also you want to make sure that the highlighted box (delete cropped pixels) is unchecked! After taking the usual steps for the animation (creating frames from layers, reversing the frames, setting frame delay) you continue with the video timeline and convert your frames into a smart object.
psa: if you don't have the motivation or the time to play around with coloring here are some psds i recommend: 1, 2; as for the sharpening i think this one is the best.
now that you have your smart object sharpened and colored what you want to do next is drag it to the end of the canvas and duplicate it. after that you move the copy on the other end like the original and make sure it's under the coloring layers, like this:
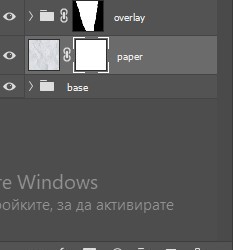
After that you have to create layer masks (the highlighted icon above) for both smart object and the copy and change the blending option of the copy to screen or lighten (whatever looks best!). So this is how it looks now:
pls ignore that there are no layer masks on the smart objects i just added them after changing the blending rip </3
Now, as you see both gifs are like fighting eachother for their rightful place on the canvas. (fgfgfdf) To fix that you have to use a soft round brush to delete the parts you don't want. (feel free to play around with the brush however you want to get the result you want!) Here's my result:
2. THE OVERLAY
Now for the both gifs you want to use for the ripped paper effect you pretty much apply the same steps as the ones you did with the gifs for the base. Here are the two gifs i chose:

Before blending both gifs however you want to create a clipping mask for each of the smart objects coloring layers, like this:
And now you're ready to blend both gifs together! You choose the group with one of the gifs and change the blending again to screen or lighten and place the said group on top of the other. So this is how it looks now:
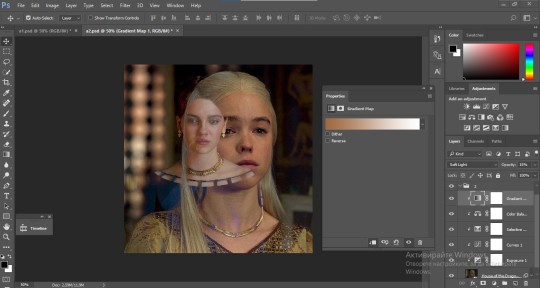
optional: if you feel like the base gif doesn't pop out enough you can always add a gradient map on one of both gifs and play around with the opacity and the color you think fits best.
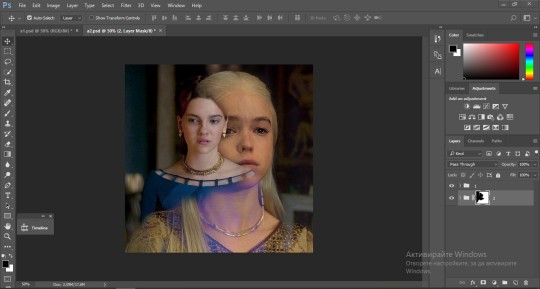
Then you add a layer mask on the overlay gif group and again play around with the brush to delete what you don't want. So this is the final result:
ps - don't repeat my mistake by placing the group with the layer mask under the other group. it should be on top and the blending option should be lighten or screen.
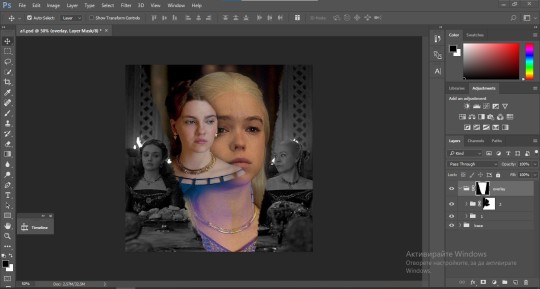
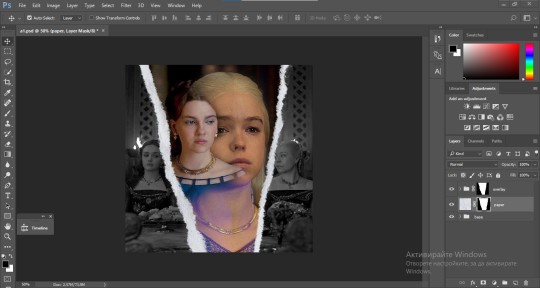
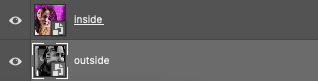
After blending both gifs together, you're ready to place them on the base. So first thing you want to do first is place both groups of each gif in one single group together. Then you duplicate the said group in the psd of the base gif and create a layer mask. This is how it should looks:

Now, in order to create the ripped paper effect, you'll have to download a ripped paper brush pack. This is the one i use. After loading the brushes in ps (if you don't know how here is explained) you're ready to begin! Change the size and angle however you'd like to make it look how you want. And if you want you can move the overlay gif by choosing both groups in case you aren't happy with the adjustment. This is how it looks like so far:
We're almost done! Now you have to find a paper texture, (i got mine from google) place it between both groups of your gifs and create a layer mask, like so:
What you have to do here is pretty much the same thing you did with the overlay gifs. Still, make sure there's enough space for the text you want to write in. However, if you think that the space isn't enough you can just delete a bit more of the overlay gifs. Here's mine:
3. THE TEXT
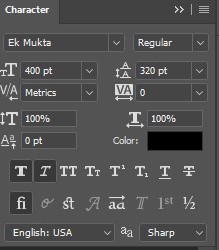
You're finally ready to type out the text you want! If you're having troubles with choosing the right font and size, here are my text settings:
You can always play around with the angle and if your text is too small, zoom in so you can place it just how you like it. And since i'm a bit lazy to deal with it later, i choose to add the highlight color while it's still zoomed. You just have to add an layer above the text and use a soft round brush with opacity from 70-75% and flow from 15-18%.
For the repeated text you want to make sure you create a big space for writing so it can contain the whole space of the torn paper. Also, write where the text will be seen only and use the tab button to skip the space where the gif is. This is how it looks:
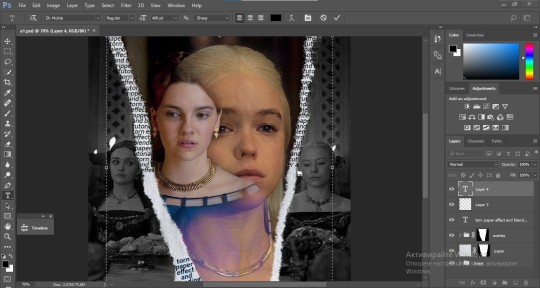
Once you're done with writing the repeated text, you want to select all the character layers and the highlight layer and move them under the overlay gif and on top of the paper, like this:
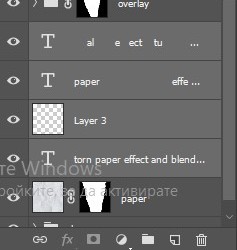
With the layers still selected and in order to contain the text within the paper the last thing you want to do is create a clipping mask. And that's It. You're done! This is the final result:
97 notes
·
View notes
Text

Someone asked me how I created the fade transition in this gifset which I’ll try to explain in the most comprehensive way that I can. If you've never done something like this before, I suggest reading through the full tutorial before attempting it so you know what you'll need to plan for.
To follow, you should have:
basic knowledge of how to make gifs in photoshop
some familiarity with the concept of how keyframes work
patience
Difficulty level: Moderate/advanced
Prep + overview
First and foremost, make the two gifs you'll be using. Both will need to have about the same amount of frames.
For ref the gif in my example is 540x540.
I recommend around 60-70 frames max total for a big gif, which can be pushing it if both are in color, then I would aim for 50-60. My gif has a total of 74 frames which I finessed using lossy and this will be explained in Part 4.
⚠️ IMPORTANT: when overlaying two or more gifs and when using key frames, you MUST set your frame delay to 0.03 fps for each gif, which can be changed to 0.05 fps or anything else that you want after converting the combined canvas back into frames. But both gifs have to be set to 0.03 before you convert them to timeline to avoid duplicated frames that don't match up, resulting in an unpleasantly choppy finish.
Part 1: Getting Started
Drag one of your gifs onto the other so they're both on the same canvas.
The gif that your canvas is fading FROM (Gif 1) should be on top of the gif it is fading INTO (Gif 2).

And here's a visual of the order in which your layers should appear by the end of this tutorial, so you know what you're working toward achieving:

Part 2: Creating the grid
Go to: View > Guides > New guide layout
I chose 5 columns and 5 rows to get the result of 25 squares.

The more rows and columns you choose, the more work you'll have to do, and the faster your squares will have to fade out so keep that in mind. I wouldn't recommend any more than 25 squares for this type of transition.

To save time, duplicate the line you've created 3 more times, or as many times as needed (key shortcut: CMD +J) and move each one to align with the guides both horizontally and vertically. You won't need to recreate the lines on the edges of the canvas, only the ones that will show.
After you complete this step, you will no longer need the guides so you can go back in and clear them.

Follow the same duplicating process for the squares with the rectangle tool using the lines you've created.
Align the squares inside the grid lines. The squares should not overlap the lines but fit precisely inside them.
This might take a few tries for each because although to the eye, the squares look all exactly the same size, you'll notice that if you try to use the same duplicated square for every single one without alterations, many of them will be a few pixels off and you'll have to transform the paths to fit.
To do this go to edit > transform path and hold down the command key with the control key as you move one edge to fill the space.
Once you're done, put all the squares in their separate group, which needs to be sandwiched between Gif 1 and Gif 2.

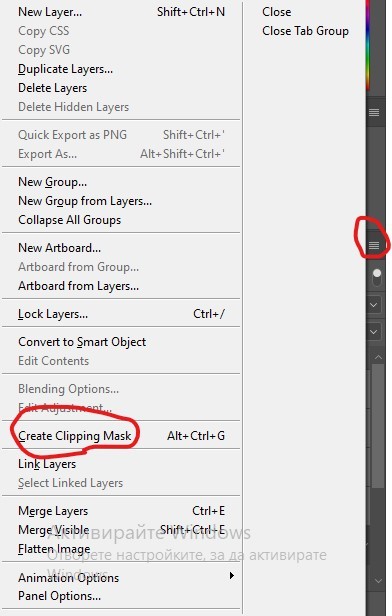
Right click Gif 1 and choose "create clipping mask" from the drop down to mask it to the squares group. This step is super important.
After this point, I also took the opacity of the line groups down to about 40% so the lines wouldn't be so bold. Doing this revealed some squares that needed fixing so even if you aren't going dim the lines, I recommend clicking off the visibility of the lines for a moment to make sure everything is covered properly.

Part 3A: Prep For Key framing
I wanted my squares to fade out in a random-like fashion and if you want the same effect, you will have to decide which squares you want to fade out first, or reversely, which parts of Gif 2 you want to be revealed first.
In order to see what's going on underneath, I made Gif 1 invisible and turned down the opacity of the squares group.

If you want text underneath to be revealed when the squares fade away, I would add that now, and place the text group above Gif 2, but under the squares group.

Make a mental note that where your text is placed and the order in which it will be revealed is also something you will have to plan for.
With the move tool, click on the first square you want to fade out. Every time you click on a square, it will reveal itself in your layers.
I chose A3 to be the first square to fade and I'm gonna move this one to the very top of all the other square layers.
So if I click on D2 next, that layer would need to be moved under the A3 layer and so on. You'll go back and forth between doing this and adding key frames to each one. As you go along, it's crucial that you put them in order from top to bottom and highly suggested that you rename the layers (numerically for example) which will make it easier to see where you've left off as your dragging the layers into place.

Part 3B: Adding the Keyframes
This is where we enter the gates of hell things become tedious.
Open up the squares group in the timeline panel so you can see all the clips.
Here is my example of the general pattern that's followed and its corresponding layers of what you want to achieve when you're finished:

So let’s try it!
Expand the control time magnification all the way to the right so you can see every frame per second.

As shown in Part 3A, select your first chosen square.
Where you place the time-indicator on the panel will indicate the placement of the keyframe. Click on the clock next to opacity to place your first keyframe.

Move the time-indicator over 3 frames and place the next key frame.

Things to consider before moving forward:
Where you place your very first keyframe will be detrimental. If you're using a lot of squares like I did, you may have to start the transition sooner than preferred.
If you're doing 25 squares, the key frames will have to be more condensed which means more overlapping because more frames are required to finish the transition, verses if you're only using a 9-squared grid. See Part 4 for more detailed examples of this.
The opacity will remain at 100% for every initial key frame, and the second one will be at 0%.

Instead of creating two keyframes like this and changing the opacities for every single clip, you can copy the keyframes and paste them onto the other clips by click-dragging your mouse over both of them and they'll both turn yellow. Then right click one of the keyframes and hit copy.
Now drop down to your next clip, move your time-indicator if necessary to the spot where the first keyframe will start and click the clock to create one. Then right click it and hit "paste".


Tip: When you have both keyframes selected, you can also move them side to side by click-dragging one of them while both are highlighted.
Your full repetitive process in steps will go as follows:
click on square of choice on the canvas
drag that square layer to the top under the last renamed
in timeline panel: drop down to next clip, move time-indicator tick to your chosen spot for the next keyframe
create new keyframe
right click new keyframe & paste copied keyframes
repeat until you've done this with every square in the group
Now you can change the opacity of your squares layer group back to 100% and turn on the visibility of Gif 1. Then hit play to see the magic happen.
PART 4: Finished examples
Example 1

the transition starts too soon
Cause: initial keyframe was placed at frame 0
the squares fade away too quickly
Cause: overlapping keyframes, seen below.
(this may be the ideal way to go with more squares, but for only 9, it's too fast)

Example 2

more frame time for first gif
transition wraps up at a good point
Cause: in this instance, the first keyframe was placed 9 frames in, and the keyframes are not overlapping. The sequential pair starts where the last pair ended, creating a slower fade of each square.


Part 5: Final Tips and Saving
You can dl my save action here which will convert everything back into frames, change the frame rate to 0.05 and open the export window so you can see the size of the gif immediately.
If it's over 10gb, one way to finesse this is by use of lossy. By definition, lossy “compresses by removing background data” and therefore quality can be lost when pushed too far. But for most gifs, I have not noticed a deterioration in quality at all when saving with lossy until you start getting into 15-20 or higher, then it will start eating away at your gif so keep it minimal.

If you've done this and your gif is losing a noticeable amount of quality and you still haven’t gotten it below 10gb, you will have no choice but to start deleting frames.
When it comes to transitions like this one, sometimes you can't spare a single frame and if this is the case, you will have to return to the timeline state in your history and condense the key frames to fade out quicker so you can shorten the gif. You should always save a history point before converting so you have a bookmark to go back to in case this happens.
That's pretty much it, free to shoot me an ask on here or on @jugheadjones with any questions.
232 notes
·
View notes
Text
GIFMAKERRESOURCE/TORTUREDPOETS FONT PACK #7
I do not own these fonts, so there is no need to credit me, but please like or reblog if you found this helpful!
DOWNLOAD HERE
140 notes
·
View notes
Photo

12 RIPPED PAPER BRUSHES ✨
following my previous brush pack, here are 12 ripped paper effect brushes.
please like or reblog if using !
do not repost, redistribute or claim as your own !
this resource is free, but if you chose to buy it, i thank you from the bottom of my heart for supporting me ♡♡♡
you can download it here!
796 notes
·
View notes
Text


Neural Filters Tutorial for Gifmakers by @antoniosvivaldi
Hi everyone! In light of my blog’s 10th birthday, I’m delighted to reveal my highly anticipated gifmaking tutorial using Neural Filters - a very powerful collection of filters that really broadened my scope in gifmaking over the past 12 months.
Before I get into this tutorial, I want to thank @laurabenanti, @maines , @cobbbvanth, and @cal-kestis for their unconditional support over the course of my journey of investigating the Neural Filters & their valuable inputs on the rendering performance!
In this tutorial, I will outline what the Photoshop Neural Filters do and how I use them in my workflow - multiple examples will be provided for better clarity. Finally, I will talk about some known performance issues with the filters & some feasible workarounds.
Tutorial Structure:
Meet the Neural Filters: What they are and what they do
Why I use Neural Filters? How I use Neural Filters in my giffing workflow
Getting started: The giffing workflow in a nutshell and installing the Neural Filters
Applying Neural Filters onto your gif: Making use of the Neural Filters settings; with multiple examples
Testing your system: recommended if you’re using Neural Filters for the first time
Rendering performance: Common Neural Filters performance issues & workarounds
For quick reference, here are the examples that I will show in this tutorial:
Example 1: Image Enhancement | improving the image quality of gifs prepared from highly compressed video files
Example 2: Facial Enhancement | enhancing an individual's facial features
Example 3: Colour Manipulation | colourising B&W gifs for a colourful gifset
Example 4: Artistic effects | transforming landscapes & adding artistic effects onto your gifs
Example 5: Putting it all together | my usual giffing workflow using Neural Filters
What you need & need to know:
Software: Photoshop 2021 or later (recommended: 2023 or later)*
Hardware: 8GB of RAM; having a supported GPU is highly recommended*
Difficulty: Advanced (requires a lot of patience); knowledge in gifmaking and using video timeline assumed
Key concepts: Smart Layer / Smart Filters
Benchmarking your system: Neural Filters test files**
Supplementary materials: Tutorial Resources / Detailed findings on rendering gifs with Neural Filters + known issues***
*I primarily gif on an M2 Max MacBook Pro that's running Photoshop 2024, but I also have experiences gifmaking on few other Mac models from 2012 ~ 2023.
**Using Neural Filters can be resource intensive, so it’s helpful to run the test files yourself. I’ll outline some known performance issues with Neural Filters and workarounds later in the tutorial.
***This supplementary page contains additional Neural Filters benchmark tests and instructions, as well as more information on the rendering performance (for Apple Silicon-based devices) when subject to heavy Neural Filters gifmaking workflows
Tutorial under the cut. Like / Reblog this post if you find this tutorial helpful. Linking this post as an inspo link will also be greatly appreciated!
1. Meet the Neural Filters!
Neural Filters are powered by Adobe's machine learning engine known as Adobe Sensei. It is a non-destructive method to help streamline workflows that would've been difficult and/or tedious to do manually.
Here are the Neural Filters available in Photoshop 2024:


Skin Smoothing: Removes blemishes on the skin
Smart Portrait: This a cloud-based filter that allows you to change the mood, facial age, hair, etc using the sliders+
Makeup Transfer: Applies the makeup (from a reference image) to the eyes & mouth area of your image
Landscape Mixer: Transforms the landscape of your image (e.g. seasons & time of the day, etc), based on the landscape features of a reference image
Style Transfer: Applies artistic styles e.g. texturings (from a reference image) onto your image
Harmonisation: Applies the colour balance of your image based on the lighting of the background image+
Colour Transfer: Applies the colour scheme (of a reference image) onto your image
Colourise: Adds colours onto a B&W image
Super Zoom: Zoom / crop an image without losing resolution+
Depth Blur: Blurs the background of the image
JPEG Artefacts Removal: Removes artefacts caused by JPEG compression
Photo Restoration: Enhances image quality & facial details
+These three filters aren't used in my giffing workflow. The cloud-based nature of Smart Portrait leads to disjointed looking frames. For Harmonisation, applying this on a gif causes Neural Filter timeout error. Finally, Super Zoom does not currently support output as a Smart Filter
If you're running Photoshop 2021 or earlier version of Photoshop 2022, you will see a smaller selection of Neural Filters:


Things to be aware of:
You can apply up to six Neural Filters at the same time
Filters where you can use your own reference images: Makeup Transfer (portraits only), Landscape Mixer, Style Transfer (not available in Photoshop 2021), and Colour Transfer
Later iterations of Photoshop 2023 & newer: The first three default presets for Landscape Mixer and Colour Transfer are currently broken.
2. Why I use Neural Filters?
Here are my four main Neural Filters use cases in my gifmaking process. In each use case I'll list out the filters that I use:

Enhancing Image Quality:
Common wisdom is to find the highest quality video to gif from for a media release & avoid YouTube whenever possible. However for smaller / niche media (e.g. new & upcoming musical artists), prepping gifs from highly compressed YouTube videos is inevitable.
So how do I get around with this? I have found Neural Filters pretty handy when it comes to both correcting issues from video compression & enhancing details in gifs prepared from these highly compressed video files.
Filters used: JPEG Artefacts Removal / Photo Restoration
Facial Enhancement:
When I prepare gifs from highly compressed videos, something I like to do is to enhance the facial features. This is again useful when I make gifsets from compressed videos & want to fill up my final panel with a close-up shot.
Filters used: Skin Smoothing / Makeup Transfer / Photo Restoration (Facial Enhancement slider)
Colour Manipulation:
Neural Filters is a powerful way to do advanced colour manipulation - whether I want to quickly transform the colour scheme of a gif or transform a B&W clip into something colourful.
Filters used: Colourise / Colour Transfer
Artistic Effects:
This is one of my favourite things to do with Neural Filters! I enjoy using the filters to create artistic effects by feeding textures that I've downloaded as reference images. I also enjoy using these filters to transform the overall the atmosphere of my composite gifs. The gifsets where I've leveraged Neural Filters for artistic effects could be found under this tag on usergif.
Filters used: Landscape Mixer / Style Transfer / Depth Blur
How I use Neural Filters over different stages of my gifmaking workflow:
I want to outline how I use different Neural Filters throughout my gifmaking process. This can be roughly divided into two stages:
Stage I: Enhancement and/or Colourising | Takes place early in my gifmaking process. I process a large amount of component gifs by applying Neural Filters for enhancement purposes and adding some base colourings.++
Stage II: Artistic Effects & more Colour Manipulation | Takes place when I'm assembling my component gifs in the big PSD / PSB composition file that will be my final gif panel.
I will walk through this in more detail later in the tutorial.
++I personally like to keep the size of the component gifs in their original resolution (a mixture of 1080p & 4K), to get best possible results from the Neural Filters and have more flexibility later on in my workflow. I resize & sharpen these gifs after they're placed into my final PSD composition files in Tumblr dimensions.
3. Getting started
The essence is to output Neural Filters as a Smart Filter on the smart object when working with the Video Timeline interface. Your workflow will contain the following steps:
Prepare your gif
In the frame animation interface, set the frame delay to 0.03s and convert your gif to the Video Timeline
In the Video Timeline interface, go to Filter > Neural Filters and output to a Smart Filter
Flatten or render your gif (either approach is fine). To flatten your gif, play the "flatten" action from the gif prep action pack. To render your gif as a .mov file, go to File > Export > Render Video & use the following settings.

Setting up:
o.) To get started, prepare your gifs the usual way - whether you screencap or clip videos. You should see your prepared gif in the frame animation interface as follows:

Note: As mentioned earlier, I keep the gifs in their original resolution right now because working with a larger dimension document allows more flexibility later on in my workflow. I have also found that I get higher quality results working with more pixels. I eventually do my final sharpening & resizing when I fit all of my component gifs to a main PSD composition file (that's of Tumblr dimension).
i.) To use Smart Filters, convert your gif to a Smart Video Layer.
As an aside, I like to work with everything in 0.03s until I finish everything (then correct the frame delay to 0.05s when I upload my panels onto Tumblr).
For convenience, I use my own action pack to first set the frame delay to 0.03s (highlighted in yellow) and then convert to timeline (highlighted in red) to access the Video Timeline interface. To play an action, press the play button highlighted in green.

Once you've converted this gif to a Smart Video Layer, you'll see the Video Timeline interface as follows:

ii.) Select your gif (now as a Smart Layer) and go to Filter > Neural Filters

Installing Neural Filters:
Install the individual Neural Filters that you want to use. If the filter isn't installed, it will show a cloud symbol (highlighted in yellow). If the filter is already installed, it will show a toggle button (highlighted in green)

When you toggle this button, the Neural Filters preview window will look like this (where the toggle button next to the filter that you use turns blue)

4. Using Neural Filters
Once you have installed the Neural Filters that you want to use in your gif, you can toggle on a filter and play around with the sliders until you're satisfied. Here I'll walkthrough multiple concrete examples of how I use Neural Filters in my giffing process.
Example 1: Image enhancement | sample gifset
This is my typical Stage I Neural Filters gifmaking workflow. When giffing older or more niche media releases, my main concern is the video compression that leads to a lot of artefacts in the screencapped / video clipped gifs.
To fix the artefacts from compression, I go to Filter > Neural Filters, and toggle JPEG Artefacts Removal filter. Then I choose the strength of the filter (boxed in green), output this as a Smart Filter (boxed in yellow), and press OK (boxed in red).
Note: The filter has to be fully processed before you could press the OK button!

After applying the Neural Filters, you'll see "Neural Filters" under the Smart Filters property of the smart layer

Flatten / render your gif
Example 2: Facial enhancement | sample gifset
This is my routine use case during my Stage I Neural Filters gifmaking workflow. For musical artists (e.g. Maisie Peters), YouTube is often the only place where I'm able to find some videos to prepare gifs from. However even the highest resolution video available on YouTube is highly compressed.
Go to Filter > Neural Filters and toggle on Photo Restoration. If Photoshop recognises faces in the image, there will be a "Facial Enhancement" slider under the filter settings.

Play around with the Photo Enhancement & Facial Enhancement sliders. You can also expand the "Adjustment" menu make additional adjustments e.g. remove noises and reducing different types of artefacts.

Once you're happy with the results, press OK and then flatten / render your gif.
Example 3: Colour Manipulation | sample gifset
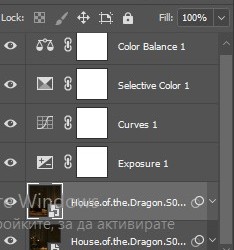
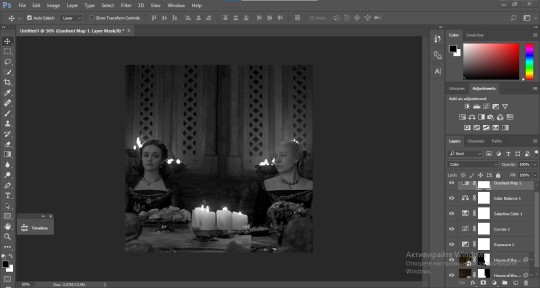
Want to make a colourful gifset but the source video is in B&W? This is where Colourise from Neural Filters comes in handy! This same colourising approach is also very helpful for colouring poor-lit scenes as detailed in this tutorial.
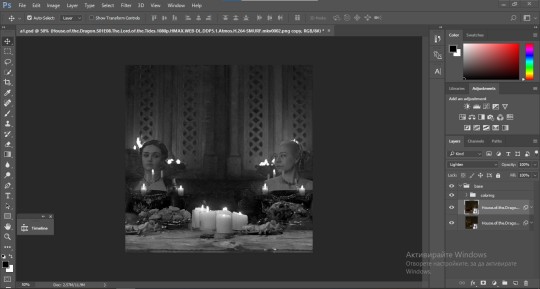
Here's a B&W gif that we want to colourise:

Highly recommended: add some adjustment layers onto the B&W gif to improve the contrast & depth. This will give you higher quality results when you colourise your gif.
Go to Filter > Neural Filters and toggle on Colourise.

Make sure "Auto colour image" is enabled.
Play around with further adjustments e.g. colour balance, until you're satisfied then press OK.
Important: When you colourise a gif, you need to double check that the resulting skin tone is accurate to real life. I personally go to Google Images and search up photoshoots of the individual / character that I'm giffing for quick reference.
Add additional adjustment layers until you're happy with the colouring of the skin tone.

Once you're happy with the additional adjustments, flatten / render your gif. And voila!

Note: For Colour Manipulation, I use Colourise in my Stage I workflow and Colour Transfer in my Stage II workflow to do other types of colour manipulations (e.g. transforming the colour scheme of the component gifs)
Example 4: Artistic Effects | sample gifset
This is where I use Neural Filters for the bulk of my Stage II workflow: the most enjoyable stage in my editing process!
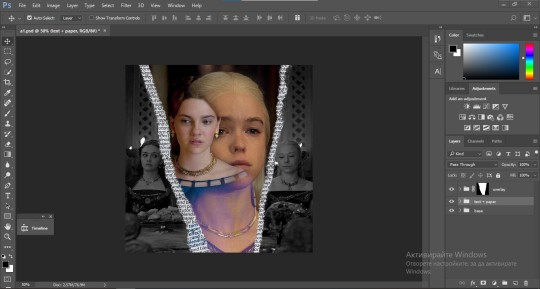
Normally I would be working with my big composition files with multiple component gifs inside it. To begin the fun, drag a component gif (in PSD file) to the main PSD composition file.
Resize this gif in the composition file until you're happy with the placement

Duplicate this gif. Sharpen the bottom layer (highlighted in yellow), and then select the top layer (highlighted in green) & go to Filter > Neural Filters

I like to use Style Transfer and Landscape Mixer to create artistic effects from Neural Filters. In this particular example, I've chosen Landscape Mixer
Select a preset or feed a custom image to the filter (here I chose a texture that I've on my computer)

Play around with the different sliders e.g. time of the day / seasons
Important: uncheck "Harmonise Subject" & "Preserve Subject" - these two settings are known to cause performance issues when you render a multiframe smart object (e.g. for a gif)

Once you're happy with the artistic effect, press OK
To ensure you preserve the actual subject you want to gif (bc Preserve Subject is unchecked), add a layer mask onto the top layer (with Neural Filters) and mask out the facial region. You might need to play around with the Layer Mask Position keyframes or Rotoscope your subject in the process.
After you're happy with the masking, flatten / render this composition file and voila!

Example 5: Putting it all together | sample gifset
Let's recap on the Neural Filters gifmaking workflow and where Stage I and Stage II fit in my gifmaking process:
i. Preparing & enhancing the component gifs
Prepare all component gifs and convert them to smart layers
Stage I: Add base colourings & apply Photo Restoration / JPEG Artefacts Removal to enhance the gif's image quality
Flatten all of these component gifs and convert them back to Smart Video Layers (this process can take a lot of time)
Some of these enhanced gifs will be Rotoscoped so this is done before adding the gifs to the big PSD composition file
ii. Setting up the big PSD composition file
Make a separate PSD composition file (Ctrl / Cmmd + N) that's of Tumblr dimension (e.g. 540px in width)
Drag all of the component gifs used into this PSD composition file
Enable Video Timeline and trim the work area
In the composition file, resize / move the component gifs until you're happy with the placement & sharpen these gifs if you haven't already done so
Duplicate the layers that you want to use Neural Filters on
iii. Working with Neural Filters in the PSD composition file
Stage II: Neural Filters to create artistic effects / more colour manipulations!
Mask the smart layers with Neural Filters to both preserve the subject and avoid colouring issues from the filters
Flatten / render the PSD composition file: the more component gifs in your composition file, the longer the exporting will take. (I prefer to render the composition file into a .mov clip to prevent overriding a file that I've spent effort putting together.)
Note: In some of my layout gifsets (where I've heavily used Neural Filters in Stage II), the rendering time for the panel took more than 20 minutes. This is one of the rare instances where I was maxing out my computer's memory.
Useful things to take note of:
Important: If you're using Neural Filters for Colour Manipulation or Artistic Effects, you need to take a lot of care ensuring that the skin tone of nonwhite characters / individuals is accurately coloured
Use the Facial Enhancement slider from Photo Restoration in moderation, if you max out the slider value you risk oversharpening your gif later on in your gifmaking workflow
You will get higher quality results from Neural Filters by working with larger image dimensions: This gives Neural Filters more pixels to work with. You also get better quality results by feeding higher resolution reference images to the Neural Filters.
Makeup Transfer is more stable when the person / character has minimal motion in your gif
You might get unexpected results from Landscape Mixer if you feed a reference image that don't feature a distinctive landscape. This is not always a bad thing: for instance, I have used this texture as a reference image for Landscape Mixer, to create the shimmery effects as seen in this gifset
5. Testing your system
If this is the first time you're applying Neural Filters directly onto a gif, it will be helpful to test out your system yourself. This will help:
Gauge the expected rendering time that you'll need to wait for your gif to export, given specific Neural Filters that you've used
Identify potential performance issues when you render the gif: this is important and will determine whether you will need to fully playback your gif before flattening / rendering the file.
Understand how your system's resources are being utilised: Inputs from Windows PC users & Mac users alike are welcome!
About the Neural Filters test files:
Contains six distinct files, each using different Neural Filters
Two sizes of test files: one copy in full HD (1080p) and another copy downsized to 540px
One folder containing the flattened / rendered test files
How to use the Neural Filters test files:
What you need:
Photoshop 2022 or newer (recommended: 2023 or later)
Install the following Neural Filters: Landscape Mixer / Style Transfer / Colour Transfer / Colourise / Photo Restoration / Depth Blur
Recommended for some Apple Silicon-based MacBook Pro models: Enable High Power Mode
How to use the test files:
For optimal performance, close all background apps
Open a test file
Flatten the test file into frames (load this action pack & play the “flatten” action)
Take note of the time it takes until you’re directed to the frame animation interface
Compare the rendered frames to the expected results in this folder: check that all of the frames look the same. If they don't, you will need to fully playback the test file in full before flattening the file.†
Re-run the test file without the Neural Filters and take note of how long it takes before you're directed to the frame animation interface
Recommended: Take note of how your system is utilised during the rendering process (more info here for MacOS users)
†This is a performance issue known as flickering that I will discuss in the next section. If you come across this, you'll have to playback a gif where you've used Neural Filters (on the video timeline) in full, prior to flattening / rendering it.
Factors that could affect the rendering performance / time (more info):
The number of frames, dimension, and colour bit depth of your gif
If you use Neural Filters with facial recognition features, the rendering time will be affected by the number of characters / individuals in your gif
Most resource intensive filters (powered by largest machine learning models): Landscape Mixer / Photo Restoration (with Facial Enhancement) / and JPEG Artefacts Removal
Least resource intensive filters (smallest machine learning models): Colour Transfer / Colourise
The number of Neural Filters that you apply at once / The number of component gifs with Neural Filters in your PSD file
Your system: system memory, the GPU, and the architecture of the system's CPU+++
+++ Rendering a gif with Neural Filters demands a lot of system memory & GPU horsepower. Rendering will be faster & more reliable on newer computers, as these systems have CPU & GPU with more modern instruction sets that are geared towards machine learning-based tasks.
Additionally, the unified memory architecture of Apple Silicon M-series chips are found to be quite efficient at processing Neural Filters.
6. Performance issues & workarounds
Common Performance issues:
I will discuss several common issues related to rendering or exporting a multi-frame smart object (e.g. your composite gif) that uses Neural Filters below. This is commonly caused by insufficient system memory and/or the GPU.
Flickering frames: in the flattened / rendered file, Neural Filters aren't applied to some of the frames+-+
Scrambled frames: the frames in the flattened / rendered file isn't in order
Neural Filters exceeded the timeout limit error: this is normally a software related issue
Long export / rendering time: long rendering time is expected in heavy workflows
Laggy Photoshop / system interface: having to wait quite a long time to preview the next frame on the timeline
Issues with Landscape Mixer: Using the filter gives ill-defined defined results (Common in older systems)--
Workarounds:
Workarounds that could reduce unreliable rendering performance & long rendering time:
Close other apps running in the background
Work with smaller colour bit depth (i.e. 8-bit rather than 16-bit)
Downsize your gif before converting to the video timeline-+-
Try to keep the number of frames as low as possible
Avoid stacking multiple Neural Filters at once. Try applying & rendering the filters that you want one by one
Specific workarounds for specific issues:
How to resolve flickering frames: If you come across flickering, you will need to playback your gif on the video timeline in full to find the frames where the filter isn't applied. You will need to select all of the frames to allow Photoshop to reprocess these, before you render your gif.+-+
What to do if you come across Neural Filters timeout error? This is caused by several incompatible Neural Filters e.g. Harmonisation (both the filter itself and as a setting in Landscape Mixer), Scratch Reduction in Photo Restoration, and trying to stack multiple Neural Filters with facial recognition features.
If the timeout error is caused by stacking multiple filters, a feasible workaround is to apply the Neural Filters that you want to use one by one over multiple rendering sessions, rather all of them in one go.
+-+This is a very common issue for Apple Silicon-based Macs. Flickering happens when a gif with Neural Filters is rendered without being previously played back in the timeline.
This issue is likely related to the memory bandwidth & the GPU cores of the chips, because not all Apple Silicon-based Macs exhibit this behaviour (i.e. devices equipped with Max / Ultra M-series chips are mostly unaffected).
-- As mentioned in the supplementary page, Landscape Mixer requires a lot of GPU horsepower to be fully rendered. For older systems (pre-2017 builds), there are no workarounds other than to avoid using this filter.
-+- For smaller dimensions, the size of the machine learning models powering the filters play an outsized role in the rendering time (i.e. marginal reduction in rendering time when downsizing 1080p file to Tumblr dimensions). If you use filters powered by larger models e.g. Landscape Mixer and Photo Restoration, you will need to be very patient when exporting your gif.
7. More useful resources on using Neural Filters
Creating animations with Neural Filters effects | Max Novak
Using Neural Filters to colour correct by @edteachs
I hope this is helpful! If you have any questions or need any help related to the tutorial, feel free to send me an ask 💖
371 notes
·
View notes
Photo
I’ve gotten a few questions on how I made this gifset, and I figured I would show you, since it’s really not that complicated if you choose the right scenes for it.
This tutorial includes 3 versions of color isolation for gifs and assumes you have basic knowledge of Photoshop and gifmaking.
Keep reading
940 notes
·
View notes
Note
hi laura would you mind sharing the fonts you used in your latest firstprince edit? it’s so gorg 🩵
of course, I am happy to share. please view the fonts on the images below (click to enlarge) and then see downloads under the cut.


Adelia
Amalfi Coast
Bargetta Script
Birch Std
California
Captain Blackjack
Chinese Rocks
Courage Road
Doctor Glitch
Grayson
Lost in Wild
Lovebeat
Preta
Tw Cen MT (this was a default font on my laptop that I use for all basic font work)
164 notes
·
View notes
Photo

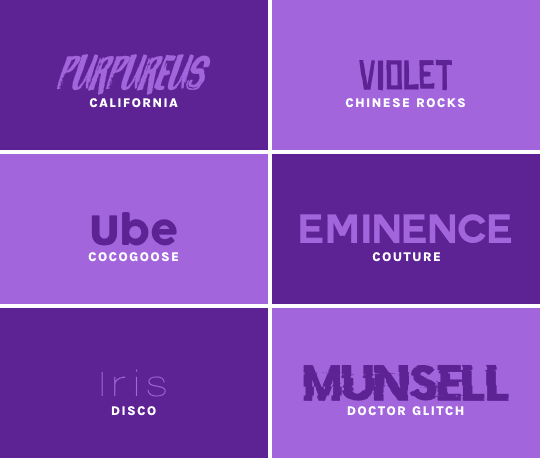

amethyst / indigo / grape / plum / lilac / mauve / purpureus / violet / ube / eminence / iris / munsell / royal / orchid / haze / fuschia / heliotrope / tyrian / wisteria / amaranth / periwinkle / thistle / eggplant / fandango / mulberry / lavender / hibiscus / raisin / byzantium / fig
i do not take ownership of any of these fonts, so there’s no need to credit me — but please reblog this post if you found it helpful at all! :)
346 notes
·
View notes
Text
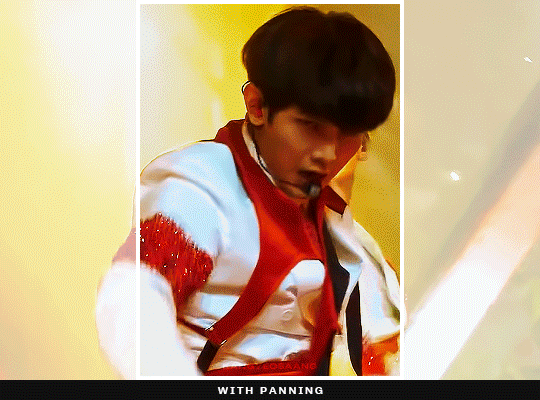
how to pan gifs
were u ever like gahd these camerapeople again making yet another stage ungiffable. yeah me too.
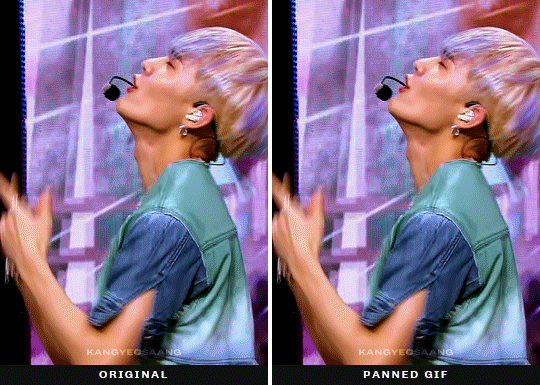
sooo here in this tutorial i'm gonna try to explain how to pan gifs so ur subject can remain centered or at least not be out of frame, sth like this:
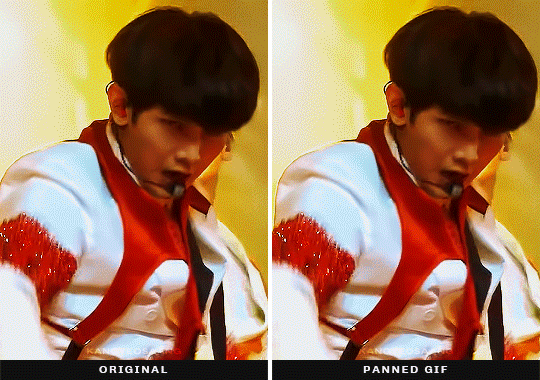
this is a more advanced tutorial, in a sense that i'll assume you know how to make gifs, not in a sense that this is complicated lmao, okay let's gooo:
essentially this is what's happening and what we gonna do:

before we dive into the how tho, it must be said that photoshop's timeline can only do linear movements so no easing. at times it can look unnatural or choppy or... frankly both. (if you want to know more about this look up ease-in-out animation curve, or easing curves)
part 01 · prepping gifs
as i wrote in my gif making process post i usually crop my gifs bigger than they usually will be. e.g. a 268px gif will be cropped to anything between 468-540px. sometimes because i want to have the opportunity to position the gif a bit differently but most of the time because i know 268px is a reeeaaalllyyy tight place and i need to make some movement adjustments especially for weekend music shows where the camerapeople seem to be on crack or just very into experimenting
part 02 · let the keyframe madness begin
whichever way you are making gifs just open up your gif and crop it to the final size, colour it and whatever else you fancy. once you have everything ready just open your video layer on your timeline (if you don't know where you will be able to see it in the video later)
you will see 3 tracks, transform, opacity and style. for this we will use the transform because it contains movements (but also resizing if that's what you fancy).
all we need to do is create keyframes which will define what is the position of the video layer at a certain time. so e.g. here we are moving this box to the right by 50px in 1 second.
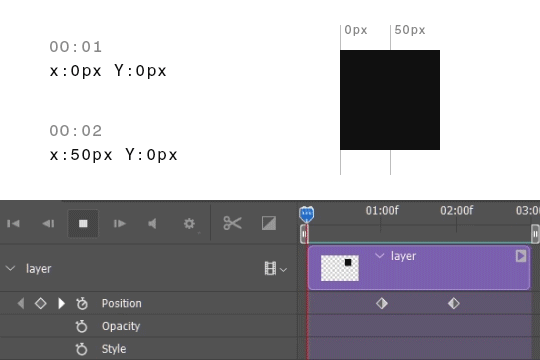
to create keyframes click on the timer icon in front of the position label and photoshop will create you one. the active one will always be yellow. if you move on the timeline with your playhead (that thing that is moving) and you resize/move your layer photoshop will create yet another keyframe for you without you needing to click on it, because it will recognise the change. so all you need to figure out is when the movement starts and which position your layer should be, and the same for the end and ps will take care of the rest.
part 03 · some things to consider when panning gifs
now this is the part where it gets subjective and less tutorial like. so all i can provide is some explanation how i go about it and what i pay attention to.
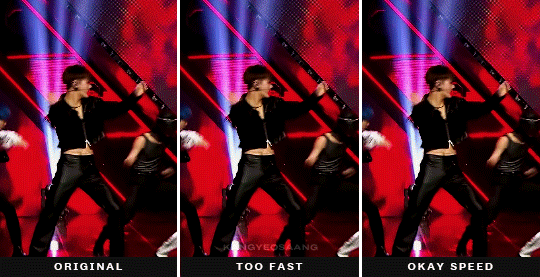
tip #1: match the movement speed to the gif
whenever you are panning a gif it may result in the gif being choppy bc the framerate and your movements are not matching up, so it's either too fast and photoshop needs to move your image by too many pixels frame by frame or it's too slow resulting in basically the same thing but kinda reversed, either way it won't look smooth. this mostly happens when the original footage is moving (there is a quick camera pan/movement) and you are trying to keep it in place, less when the original is kinda still and the subject is moving. this is kind of a trial and error process: try moving your keyframes closer to each other or maybe further, add more/less movement between two keyframes and just see which results in a smoother gif.
tip #2: try moving your gif once in one direction
there are times when your subject might go out of frame multiple times and you have the urge to keyframe the whole gif and keep them in center the whole time. however, as we do not have easing curves in photoshop the switch between moving something from one direction to the other one will be very visible. so try placing your subject in a way that you'll only need to make one movement and it's kinda okay all the way thru or pick the most annoying 'placement' you want to correct. here in this example it mostly bugged me that the gif was not centered at the end, but onda kinda remained in frame.
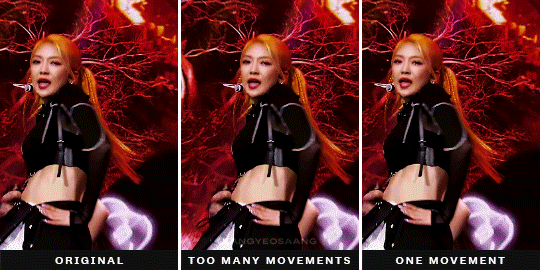
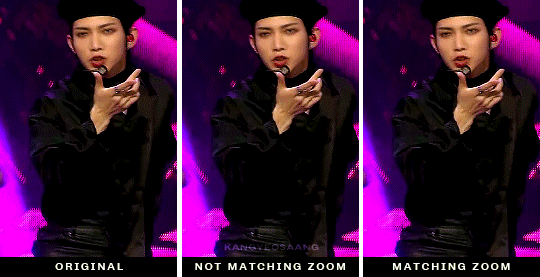
tip #3: pan your gifs when there is a quick zoom/movement
sometimes whatever i do the gif will look choppy regardless one movement or not. in these moments, and these moments ONLY we can be thankful for the sometimes unnecessary zooming that's happening and reposition our gifs while the zooming is happening. since there is already a drastic movement you can get away with basically anything, as long as you time the beginning and the end where the zoom begins and ends. also i must add that you can pan stage gifs way more and more drastically bc there is a lot of things happening in the background, so adding a bit of movement on top of all the other movements is less noticeable than... moving footage where e.g. the background is static.
✨something extra✨ · panning/moving other things
so what we looked at is moving the whole gif to fit into the frame we have, but with this technique obviously you can move all sorts of stuff, text, texture whatever you fancy. you can apply this process to the layer you wanna move and this is when you get these:
a sidenote: the fade effect is literally the same keyframe business but instead of playing with position keyframes you change the opacity keyframes.
aaand that is all, if you have any questions my askbox is always open so hmu <3
tagging @sanhwalynight bc of requesting reasons hehe
1K notes
·
View notes
Photo
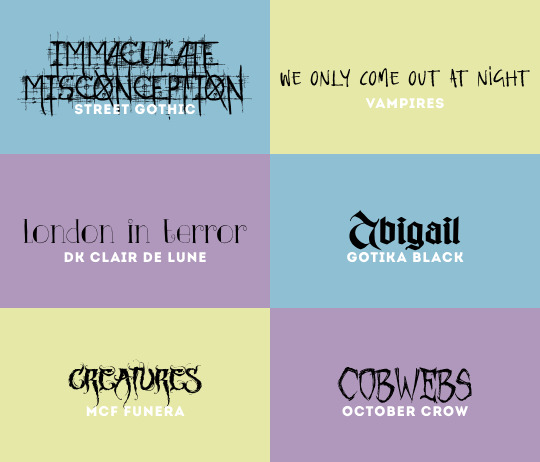

immaculate misconception / we only come out at night / london in terror / abigail / creatures / cobwebs / .com part ii / count choculitis / city lights / puppets / undead ahead / scissorhands
i do not take ownership of any of these fonts, so there’s no need to credit me — but please reblog this post if you found it helpful at all! :)
209 notes
·
View notes
Note
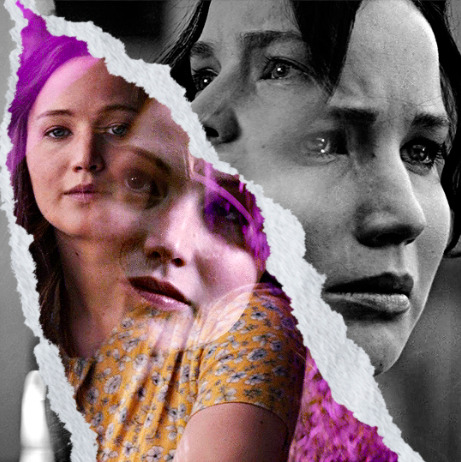
hi, your latest edit for thgweek24 is absulutely stunning and i thought if i can ask if you can make a tutorial about the ripped gifs/paper effect? if not, that's okay! have a nice day <3
RIPPED PAPER EFFECT TUTORIAL
hi! thank u :D (thgweek set referenced)
below the cut are the steps that i took to create this effect. this tutorial is very screenshot heavy and assumes some basic knowledge of photoshop and giffing.
i do my best to try and explain my process so hopefully this is helpful! if you have any questions, please don't hesitate to ask.
STEP 1: Choose and arrange your two gifs
with this specific use of the ripped paper effect, there's one gif on the "outside" of the rip and one on the "inside." in this example, the outside is the b&w and the inside gif is the colored:
for me, the outside gif determined the positioning of the inside gif and the position/direction of the rip. as can be seen, outside gif has a lot of space on the left. therefore, i knew i was going to position the subject of the inside gif more on the right so i could create the rip without hiding too much of the b&w gif.
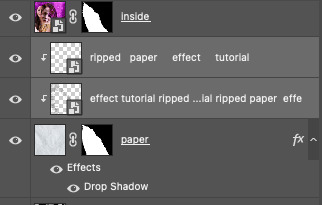
next, you want to arrange the inside gif on TOP of the outside gif. your layers panel should look like this:
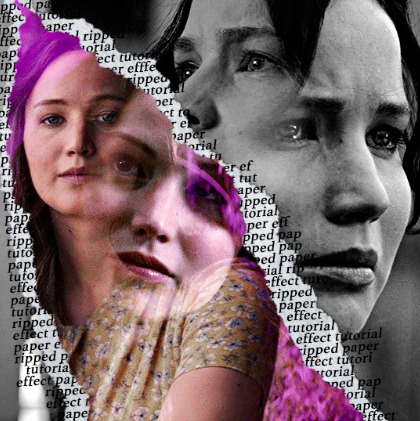
STEP 2: Creating the ripped effect
here comes the fun part! in order to create this effect, you're going to need torn paper brushes. here and here are some packs you can download (w credit to owner).
next, create a layer mask on your inside gif. you're going to use the brush of your choosing as an ERASER. then, you can play around with the size and angle of the eraser to create the look you want. this is what the gif and the layers panel now look like:
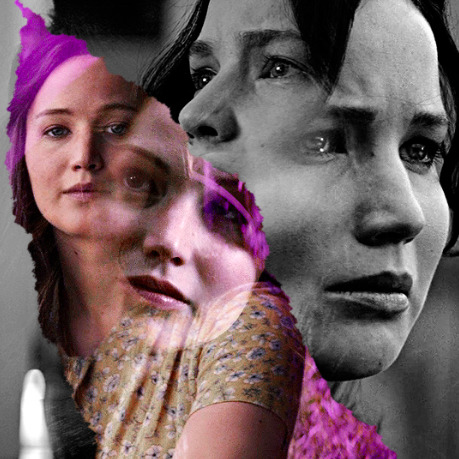
STEP 3: Adding the paper
in order to add the paper around the edges of the inside gif (where the text goes), you now need to download a paper texture. i found mine on google by searching "paper texture png."
place the paper png IN BETWEEN your outside and your inside gif. this is what everything should look like:
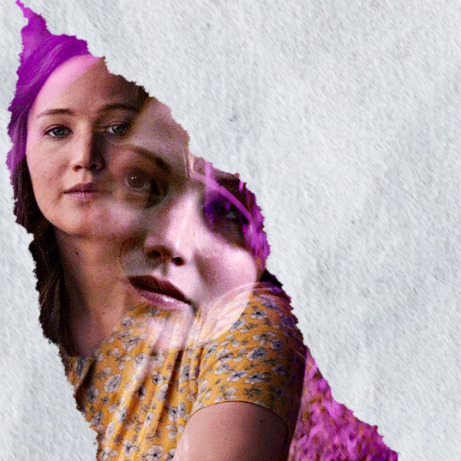
now, similarly to what you did in the previous step with the inside gif, you are going to create a layer mask on the paper layer. using an torn paper brush as an eraser, you will erase the paper, creating the shape you want.
be sure to leave enough room for whatever text you want to be on the paper. also, i suggest making the rips of the paper different from the rips of the inside gif so it looks more organic.
here is what my gif looks like after erasing the paper:
optional: add a drop shadow on the paper layer (right click -> blending options... -> drop shadow)
STEP 4: Adding the text
first, you want to identify the space where you will have room to place your full quote within the paper. if there are no spaces, you can always use your brush/eraser to modify the layer masks.

next, add a layer on top of the paper layer (and below the inside gif). select the text tool and start typing your repeated text!
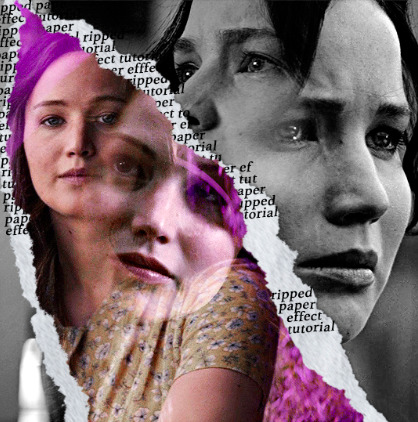
because you can see which text is hidden by the inside gif and what is on top of the paper, a shortcut i use is the "tab" button and only type words that will be seen.
type the repeated words around the quote you want highlighted:
now, in order to contain the text within the paper, convert the text layers into smart objects. then, create a clipping mask on both layers (right click –> create clipping mask). this is what your layer panels should look like:
with that, your gif should now look something like this, with the text contained inside the paper:
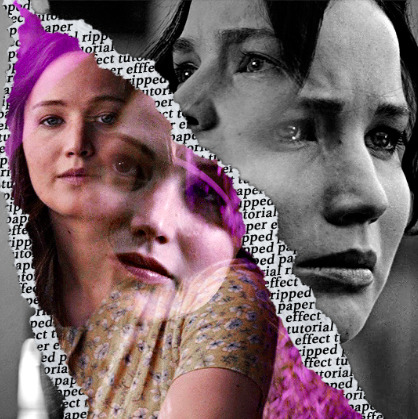
STEP 5: Highlighting the quote
as you can see, it just looked like a bunch of words. so, in order to highlight the quote you carved out in the previous step, add a new layer below the layer of the quote you want highlighted:
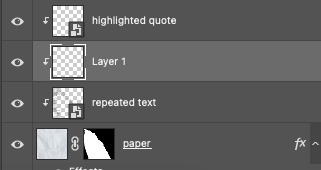
now, use a round brush (softness around 10-15% and opacity at 70-80%) with the color of your choice to highlight the words you want.
and there you have it!
i hope that this made sense and was helpful! if you have any questions or clarifications, please don't hesitate to ask :)
146 notes
·
View notes
Note
Hello! I was wondering if u wouldn’t mind sharing a tutorial on how u making ur gif boarders? post/714133310754979840
hiii, yeah of course!

there are multiple ways to do it i'm sure, i'll share the two methods that i use the most. first tho, you need to create your selection for that border. (rest of tutorial under the cut, i use photoshop cs5 for reference)
in that example gif, the border is 10px away from all sides, and my gif dimension is 540px wide (width) and 440px tall (height). if i want a border that's 10px away from all edges, i need to remove that number from the dimension numbers.
540 - (10 + 10) = 520px for the width
440 - (10 + 10) = 420px form the height.
once you have your numbers for your gif, select the rectangular marquee tool. under style choose "fixed size" and enter the width and height in pixels (don't forget to add the letters "px" if they're not there).

once you have the numbers, click wherever in the canvas. this will create a selection with the right dimension. you can then move the selection around (with the mouse or arrow keys) until it's centered.
you can definitely draw the shape by hand without bothering with numbers if you want, but i like knowing that the border is the same ratio as the gif.
(if your gif is quared, you don't have to bother with numbers, you can just select "fixed ratio" in the style and enter 1 in both width and height, for a perfect square ratio. and then you can draw a box with the marquee tool until you reach the desired size.)
FIRST METHOD: LAYER STROKE
with that selection still on, create a new empty layer. this is where the stroke will go.

then go to the top menu: Edit > Stroke...
a stroke settings window will pop out, where you can choose the thickness in pixels, as well as the color and blending mode (i usually leave it at normal and edit the layer's blending mode if i want, instead). you can't edit these settings later, so be sure of what you want (which is why i usually prefer the second way).

this is what a white 1px stroke border looks like:

SECOND METHOD: LAYER STYLES
i prefer this way, because you can later edit the color and thickness of the border if you want.
so, still with that selection activated from earlier, go to Layer > New Fill Layer > Color Fill. pick whatever color, this doesn't matter at all, we won't actually use that color fill. put the Fill of that new color fill layer at 0% opacity.

now that this layer is basically transparent at the moment, double click on it to enter the layer style options.
click on the Stroke option at the bottom and enter your desired values for size and color. you can change this later if you wish.
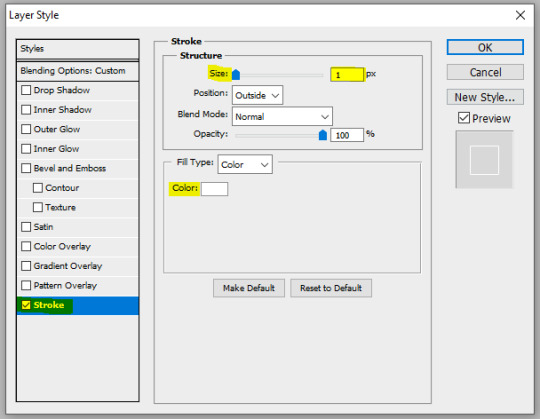
and this is what a white 1px stroke looks like with this method (looks basically the same yeah lol, but this method gives more flexibility)

CENTERING THE BORDER + FINAL TOUCHES
to make the border more interesting than just a white 1px stroke, you can change the layer's blending mode, as well as giving it more styles, such as: outer glow, inner glow, gradient overlay, color overlay. and don't hesitate to play with the blending modes for each of these layer styles too!
here's an example of settings with outer glow, inner glow, and a gradient 2px stroke:


to make sure the border is centered, here's a quick tip: select the stroke layer and the move tool. then with the keyboard, do Ctrl + A, it will make a selection of the canvas. then, click on these symbols at the top. it will center your layer horizontally and vertically.

and that's it :)
157 notes
·
View notes
Text
Playlist Template by @uservalerian
this is the template i used to create my robin playlist from this robin set. i've shared this with a few people, but i wanted to make it available for everyone that asked about it/was interested in using this template.
below is some basic info + download link.
the font used here is called figtree
all of the layers are labeled, some with basic info like blend modes
each song has it's own layer group
the headphones emoji is an image, not an emoji font
the playlist cover is 88px
the profile/user photo is 14px
i remade this template, so please let me know if anything is not working or gets confusing :)
all i ask is that you don’t claim as your own & you give proper credit if you end up using this template, as i made it myself.
the link to the template is here.
feel free to tag me in your edits! i would love to see them <3
588 notes
·
View notes
Note
Hii! Sorry to bother you, but I just saw your post about that one GoT scene with "camera raw filter" and *have* to ask...what is that?! That looks insanely good. I tried doing a quick google search, and it seems like it's a Photoshop pluggin, maybe? I'm not too sure... Would you mind sharing a bit more about it, pretty please?
the post anon is referring to:
this is by no means an adequate guide or even a comprehensible explanation, but i hope it helps out somewhat.
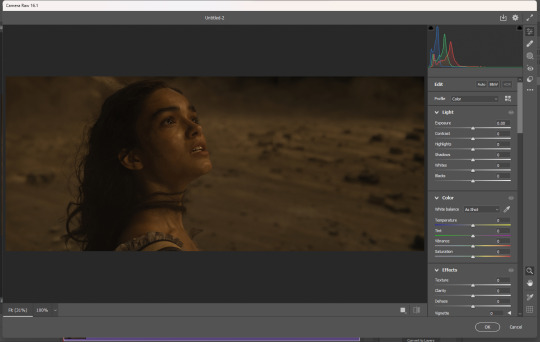
you are correct, camera raw filter is a photoshop plugin. you can download it from here (works with 🏴☠️d/portable versions too): the installation is pretty straight forward, just do it as you would with any program.
before you do anything, make sure your screencaps are a smart object (it will obviously be faster if you add a camera raw filter after you've resized and added whatever it is you need to add, but you can always just do it with the original sized screencaps). it's easier to edit the properties from a smart object than to go back and try to get it right again from scratch.
you will find it under filter > camera raw filter… this will bring up a new window:

you can add as many of them as you need to. if you want to edit it because you think you've made it too bright or too blue or something, just double click on camera raw filter under your smart object:

if you're editing one scene and you would like for everything to look uniform, you can also just bring over your settings because they're smart objects:

okay enough yapping, back to what you came here for. let's go through all that i use/have used and how they work. you can mix and match them however you want - what works for one scene might not work for another.
the 'Light' section you can use to fix the light of the scene but i basically only use it if i want to "strengthen"/darken the whites and highlights. if your files are too dark or lack contrast, you can fix that here.

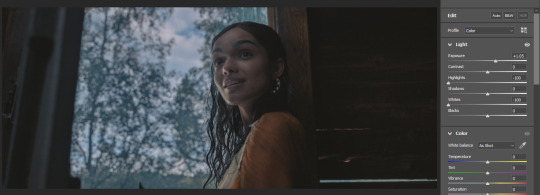

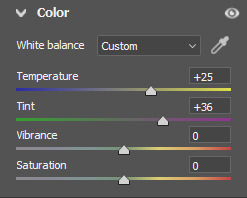
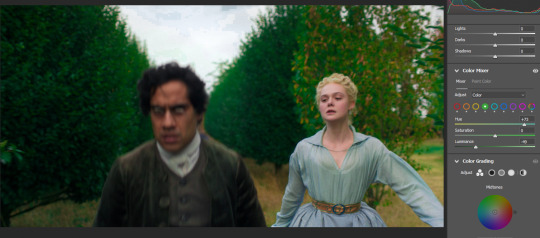
the 'Color' section!!! chef's kiss. this is what i used for the Sansa screencap. first you need to think about whether your screencap is too yellow or too blue, and then slide it towards the opposite direction. after i did that, it was way too green, so i used the tint feature to help out with that.


if you have handled today's media, you know that they haaaate color. so still in 'Color', in vibrance/saturation (i have never worked out the difference and atp i don't really care asdfghjkl) you can adjust that as well but it's for all the colors of the rainbow. you can enhance colors better in 'Caliberation' (see below).

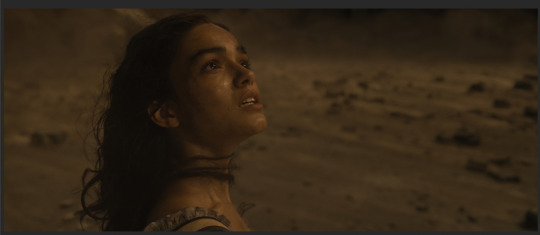
i don't really use 'Effects', but the Vignette feature is a lifesaver if you encounter those. an example:
i have never touched 'Curve' but i image it works just like curves.
'Color Mixer' is good to manipulate colors. it's basically hue/saturation but lowkey better. if you switch to 'Color' in Adjust, you can edit them more accurately (Capcut has a feature similar to this i think).
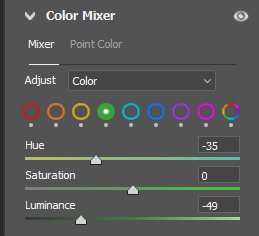
ngl i don't have a good example of this now so enjoy this cartoonish something:

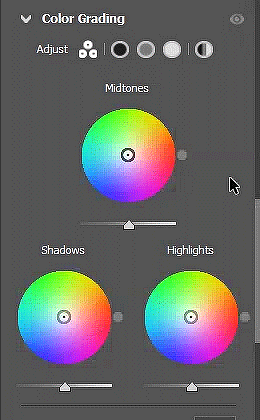
and we have arrived at my favorite!!! with 'Color Grading', you can fix almost anything: Midtones, Shadows and Highlights. it's basically a color wheel and you can try to find the black midtone and white points that will neutralize your screencaps. you can be more accurate with them if you click the circles in Adjust. basically a more freestyle curves i think.
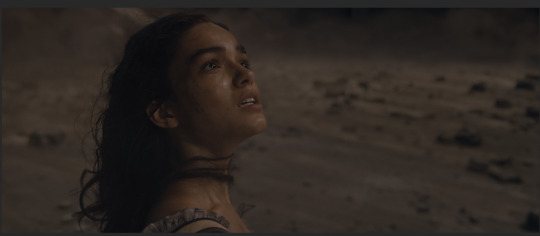
lastly, 'Calibration'. you can also enhance or diminish colors here based on whether they belong in the red, green or blue primary. eg if you have a scene that's way too yellow, you can try and bring down the saturation in Blue Primary and it will help tremendously.


if you have any further questions, feel free to send me another ask!
381 notes
·
View notes
Photo
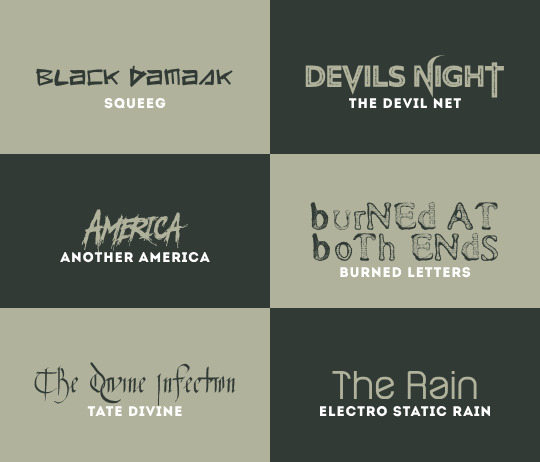
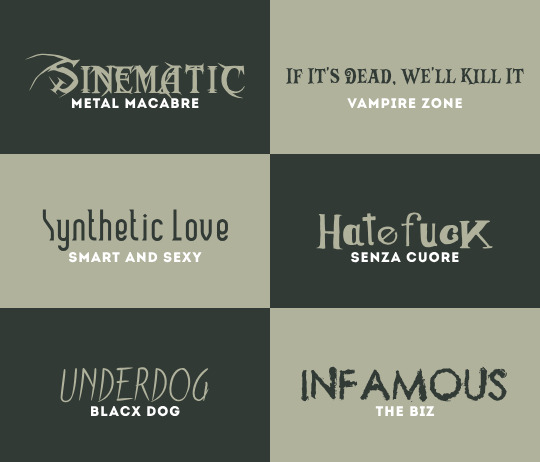
black damask / devils night / america / burned at both ends / the divine infection / the rain / sinematic / if it’s dead, we’ll kill it / synthetic love / hatefuck / underdog / infamous
i do not take ownership of any of these fonts, so there’s no need to credit me — but please reblog this postif you found it helpful at all! :)
352 notes
·
View notes
Photo

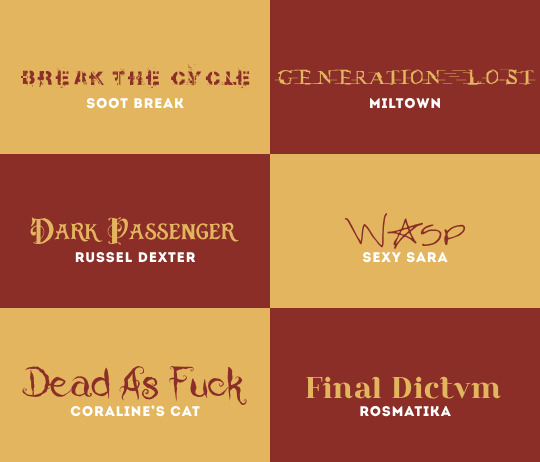

death march / reincarnate / the grand finale / unstoppable / everybody sells cocaine / contemptress / break the cycle / generation lost / dark passenger / wasp / dead as fuck / final dictvm / carry the torch
i do not take ownership of any of these fonts, so there’s no need to credit me — but please reblog this post if you found it helpful at all! :)
231 notes
·
View notes