sodadoodles
Soda's Doodle Help
References for when I draw and sometimes doodles
466 posts
Don't wanna be here? Send us removal request.
Last Seen Blogs

singsweetdisney
Sing Sweet Disney

coralblue-number3
//An Autobiography//

zingganusantara
Zingga Nusantara

fiorencepughs
natasha romanoffs wife

yawbuneyaw11-blog
şimdireklamlarr
Photo
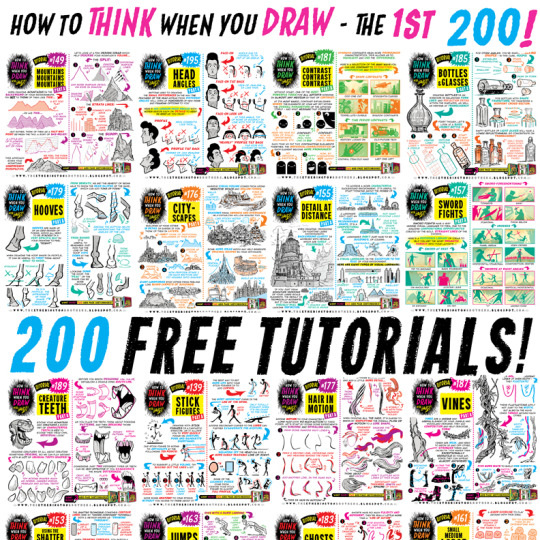
The ONLY WAY to combat the lack of funding in arts education is for professionals to take a few hours a week to share their skills for FREE, to empower and encourage the next generation of artists. THIS IS WHAT THE INTERNET IS FOR. Here’s 200 tutorials:
How to draw ANGRY EXPRESSIONS
How to draw BATTLE DAMAGE
How to draw BIRD HEADS
How to draw BOOKS
How to draw BOTTLES and GLASSES
How to draw BOXES
How to draw BREAKING GLASS
How to draw BRICKWORK
How to draw CABLES and WIRES
How to draw CAR CHASES
How to draw CATERPILLAR TRACKS
How to draw CAVES
How to draw CHARACTERS (3-SHAPES)
How to draw CHARACTERS (FLIPPED-SHAPES)
How to draw CHARACTER SHAPES
How to draw CITYSCAPES
How to draw COMIC COVERS
How to draw COMPOSITION
How to draw CONTRAST
How to draw CONVERSATIONS
How to draw CREATURE TEETH
How to draw CROSS-CONTOURS
How to draw DETAIL AT DISTANCE
How to draw EARS
How to draw FABRIC
How to draw FEET & SHOES
How to draw FEMALE HANDS PART ONE
How to draw FEMALE HANDS PART TWO
How to draw FLAGS
How to draw FOOD TRUCKS
How to draw FOREGROUND MIDGROUND BACKGROUND
How to draw GAME BUILDINGS
How to draw GEMS and CRYSTALS
How to draw GHOSTS
How to draw GIRL’S HAIR
How to draw GOLD
How to draw GRASS
How to draw HAIR (1940s styles)
How to draw HAIR IN MOTION
How to draw HAPPY EXPRESSIONS
How to draw HEAD ANGLES
How to draw HOOVES
How to draw HORNS
How to draw HORSE HEADS
How to draw IMPACT DEBRIS
How to draw IN 3D
How to draw INTEGRATING LOGOS
How to draw INTERIOR BASICS
How to draw IN-WORLD TYPOGRAPHY
How to draw JUMPS
How to draw JUNGLE PLANT CLUSTERS
How to draw JUNK HOUSES
How to draw LAMP POSTS
How to draw LAVA
How to draw LIGHTNING and ELECTRICITY
How to draw MECHANICAL DETAILS
How to draw MUSHROOMS and FUNGUS
How to draw MONSTER HEADS
How to draw MONSTER TENTACLES
How to draw MONSTER TRUCKS
How to draw MOUNTAINS
How to draw NEGATIVE SPACE
How to draw NEWSPAPERS
How to draw NOSES
How to draw OVERGROWN VEGETATION
How to draw PEBBLES AND GRAVEL
How to draw PERSPECTIVE BOXES
How to draw PIGS
How to draw PILLOWS and CUSHIONS
How to draw POD HOUSES
How to draw POURING LIQUID
How to draw ROBOT ARMS
How to draw ROCK FORMATIONS
How to draw RUNNING FIGURES
How to draw SAND
How to draw SAUSAGE DOGS
How to draw SEA WEED
How to draw SHADOW COMPOSITION
How to draw SHOULDER ARMOUR
How to draw SIEGE WEAPONS
How to draw SILHOUETTE THUMBNAILS
How to draw SMALL FLAMES
How to draw SMALL, MEDIUM, LARGE
How to draw SMOKE EFFECTS
How to draw SNOW
How to draw SPACE BIKES
How to draw SQUIRRELS
How to draw STICK FIGURES
How to draw SWORD FIGHTS
How to draw THE HORIZON
How to draw TIKI STATUES
How to draw TREASURE CHESTS
How to draw TREE BARK
How to draw TREE ROOTS
How to draw USING THE SHATTER TECHNIQUE
How to draw VEHICLE STANCE
How to draw VINES
How to draw VINTAGE PLANES
How to draw WATER
How to draw WOODEN HOUSES
46K notes
·
View notes
Photo
Hello friends, this is the long awaited tutorial on Line-Quality, Art-Style, and Same-Face-Syndrome.
Line-Quality is improved by building Muscle-Memory.
You build muscle memory through Drawing-Exercises.
Art-Style is developed over time through Observation and Routine.
Routines such as… Drawing-Exercises.
And now for… the Ultimate Drawing-Exercise-Routine!
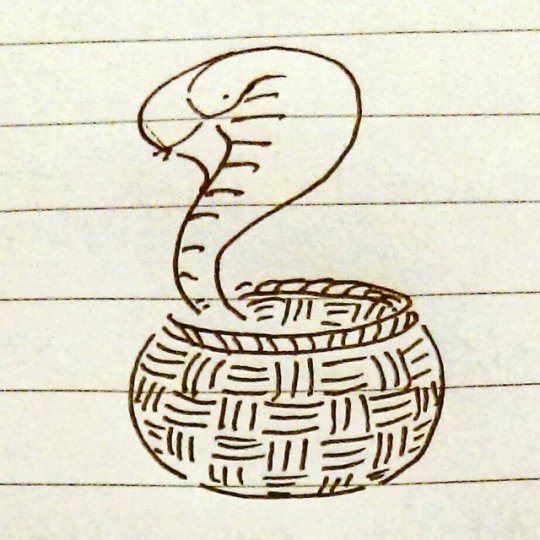
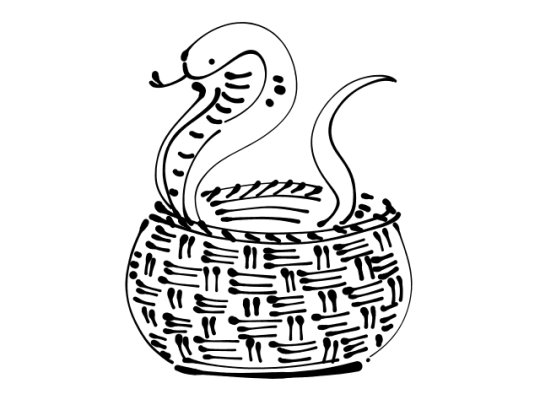
It’s called Snake-In-A-Basket!!
Draw any kind of snake inside of any kind of basket. You have 5 to 20 minutes to complete it before each/every Big-Serious-Illustration to tackle. No more, no less time!
Draw it… NOW!
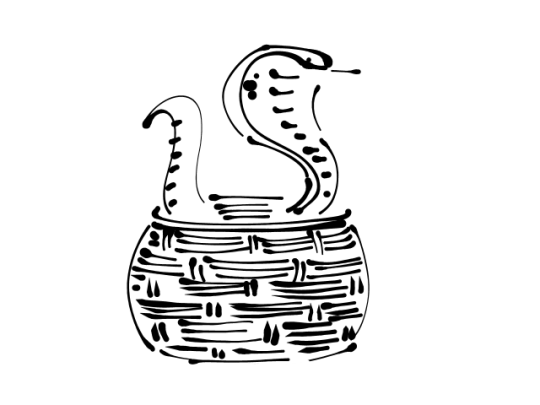
(my example that I drew in GIMP)
Art-Style is not necessarily what you think it is. A fairly common style issue discussed in artist circles is the inability to draw the same character twice while retaining their likeness or the lack of uniqueness which makes our art (recognizable) distinguishable from another’s “oh! YOU drew this!”.
Here are the fastest pathways to attaining the elusive Art-Style:
Repetition!!!!!
Recurrence-of-Thematic-Elements (everyone is sad, robots, someone is always shirtless, etc)
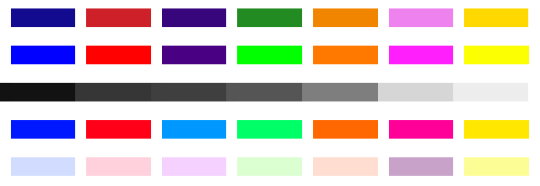
Same Color-Palette used for everything you draw
Same-Tools (line width, brush set, same paper, canvas size)
or Same-Program
(examples of palettes!! you can’t go wrong with having a rainbow)
Some Amount of Explanation:
If you draw on the same size or same scale (A6, A5, A4, A3 | B6, B5 | Letter) or in the same orientation (Landscape or Portrait), it helps you learn Composition intuitively by training you to make use of the space you have. Also it’s easier to print out and frame if you draw on common photo print sizes 4x6, 8x10, etc.
Even if you make a lot of use of Blend/Blur and you’re more of a Painter than a Cel-Shader– deciding to use a Set Personal-Default-Color-Palette instead of randomly choosing them on the Wheel/Triangle-Thing will still give you enough stable consistency.
Onto the next thing!
Same-Face-Syndrome is normally caused by one of two things. If it’s not one then it’s the other: Same Shapes or Same Details.
To make noticebly different characters you have to Exaggerate.


Circle, Square, Triangle, Rectangle?
Short, Wide, Tall, Thin?
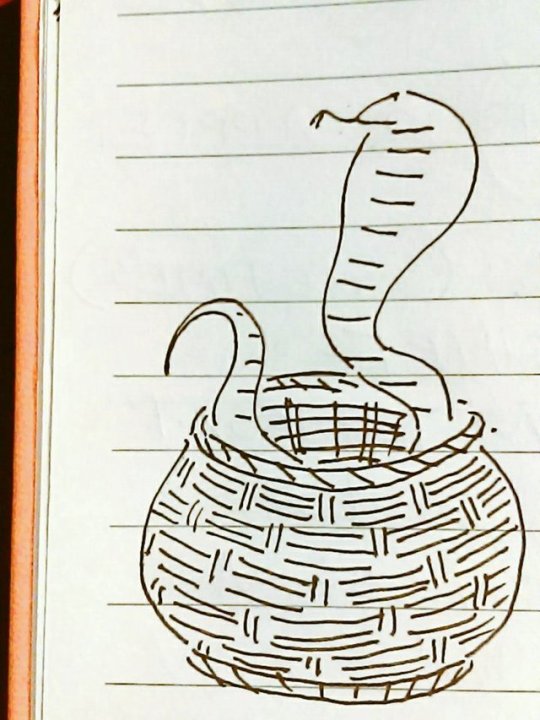
Before you try your hand at drawing any Face or Body Type, draw another Snake-In-A-Basket first.
You think I’m joking?
No. I’m not.

So to wrap up, you need to Warm Up to draw, you need to make a color palette and stick to it –or just use the same Crayola pencils, or the same kind of Bic pen, same kind of sharpie, .7 or .5, and have themes like “plaid flannels for everybody” or “hoodies and jeans”. Find those things you can execute consistently, like hatching or stippling, and if you like it, stick with it!
Hope this helps!
Now draw a SNAKE-IN-A-BASKET!
26K notes
·
View notes
Note
Hey, would it be possible for you to do, like, a tiny colouring tutorial? I just love the way you colour your art, all the colours stand out and make your art look really cool and vibrant (I especially love how you colour your Akiras akdhksjd) and I just wanna know how you do it :'D If you don't want to or anything that's perfectly fine! ^^
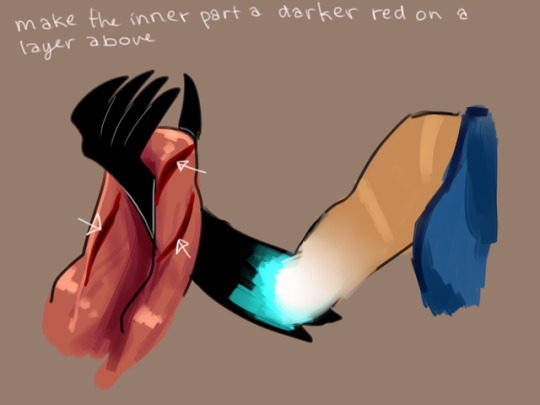
sure!!! i did something that covers the basics of my coloring, and i hope it makes sense!! i actually have a super simple coloring style with limited palettes (you might notice i’m particularly fond of black, white, red, and gold jdfgbf), but here’s a mini tutorial for you!

ALSO this is a little simplified since i went straight black with akira’s hair here, but usually i include a gradient in hair (for akira it’s a red at the bottom/bangs). in general, gradients and blushes help give some depth to flat colors, like i usually use. but that’s the basic idea of it! i hope this helped a little (or made any sense dkfgdjf)
35 notes
·
View notes
Photo
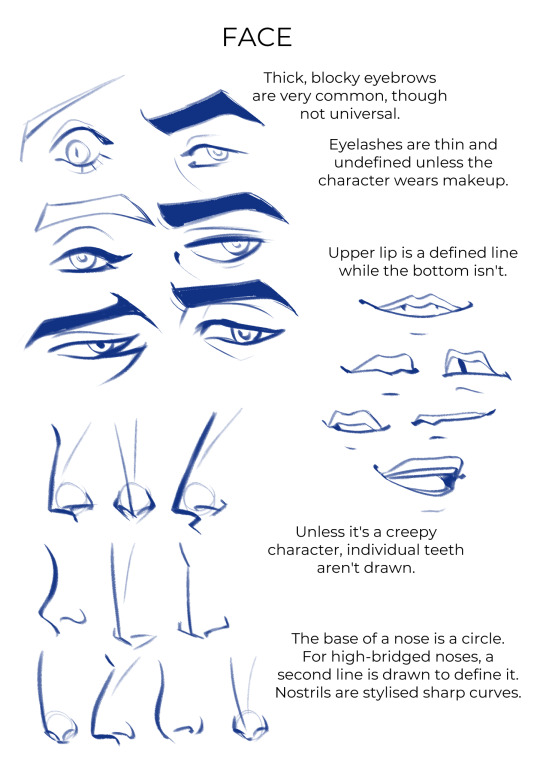

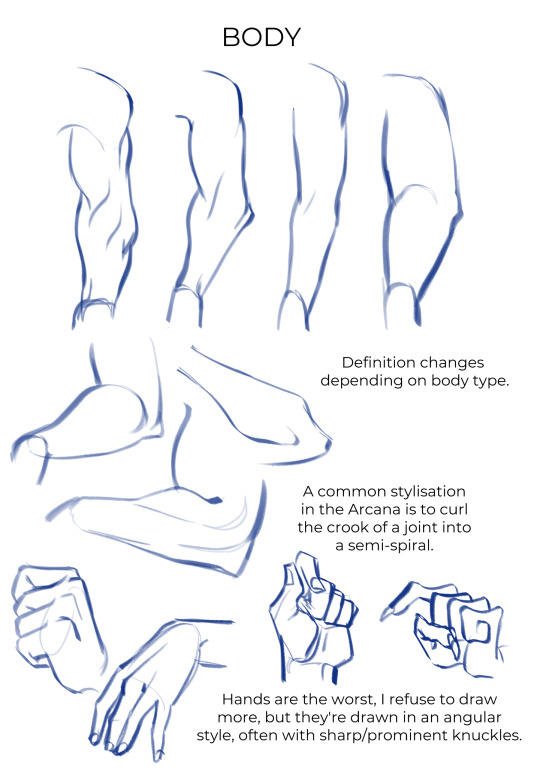
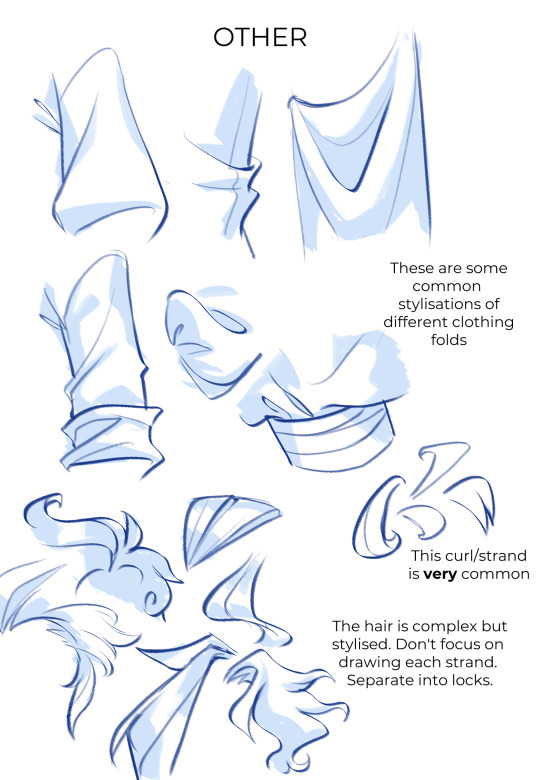

More of an Arcana style guide to go with my colouring guide.
I tried to cover key aspects that make the style distinct so I hope this can be useful :D
7K notes
·
View notes
Photo
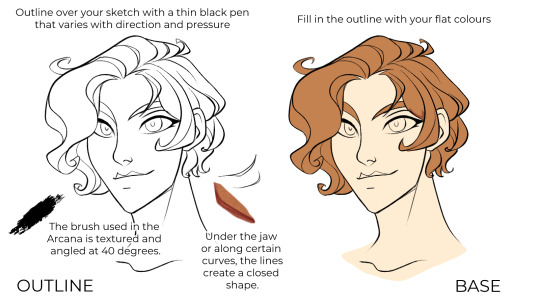

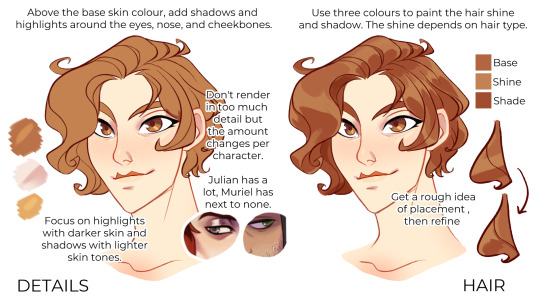

A guide on my process for colouring like in the Arcana which I developed through studying the style.
Now, this is just for sprites or for neutral lighting. In the case of most memories/CGs, you have more interesting colours to use, but the process is identical. There are just extra steps.
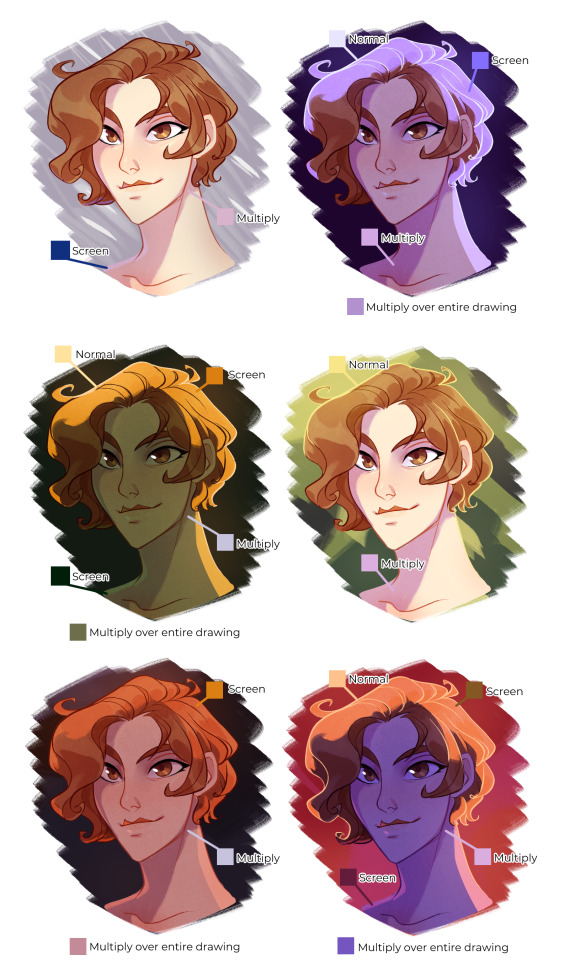
Using my favourite memories for each character as examples (hopefully, you can tell which ones) you can see this process. All of this happens on layers above the base drawing.
Usually, you set a colour-filled layer to the setting “multiply” over the entire drawing, then using a “screen”, “add”, or “hard light” layer, you add the lighting. Depending on the intensity of the lighting, the outline will be coloured to be lighter.
The shading colour rarely changes, aside from slight hue changes.
Misc advice/tips/tricks below. I may update it depending on if I get further questions.
Keep reading
13K notes
·
View notes


Photo

TONS of EXTRA TUTORIALS and REFERENCES going up EXCLUSIVELY on our Twitter RIGHT HERE today!
Lorenzo!
638 notes
·
View notes
Text
art tips post
for all the artist following me
Have two sketchbooks: One for finished and high-quality art (stuff made with Prismacolor or Copic if you use that or art for your portfolio) and the other sketchbook for more messy doodles. This way you have a place to try new things and mess up as much as you need. When I only had one sketchbook I was scared to draw in it because I didn't want to mess it up
Do studies. I cant tell you how much I've improved just by doing studies of shoes, hands, noses, and all that. This works for when you have art block too since you’re not really making stuff up and just learning how real things work.
Learn from others. I’ve never taken a real art class because 1. I can’t afford it and 2. there’s no good art classes/programs at my school. I’ve been following several artists and learning from them over the years and they’ve helped me tremendously. Just please do not steal art because that is never okay.
Break down concepts. If you notice there’s something wrong with your piece then figure out why. You can’t get better if you leave mistakes and don't try to understand whats going on. If the color is weird figure out if the values look right or maybe its the saturation of the color.
Watch youtube tutorials. Here are some youtubers I think are pretty good art teaching all things art:
Draw with Jazza | DrawingWiffWaffles | Proko | Baylee Jae
Have an inspiration folder/blog. Sometimes you just need a collection of starry nights or a misty forest or even a French bakery. All of those things can help you get inspired to draw. It could even be completely unrelated to what you plan to draw.
There are no dumb ideas in the creative process. If you want to draw a lizard in a dress go for it! If you want to draw various pastries with faces do it! Don’t let the thought of it being too dumb stop you because if I’ve learned anything in my several years of drawing it’s that an idea can lead to another and another and another and you may get a really good idea just from doodling dumb things.
Here’s a few things that can get you started on drawing better:
Dynamic poses | Dynamic clothes | Dynamic figure drawing
COMPOSITION | PERSPECTIVE | CONSTRUCTION
Anatomy:
Legs
Arms
Hands
Heads
Body (Female) (Male
Color Theory
Improving your sketchbook
Most importantly, don’t give up! You may not immediately get notes or followers but it’s more important you get better than to have popularity. How do you think those popular artists got to where they are now? To be good you’ve got to work at it.
60K notes
·
View notes
Photo


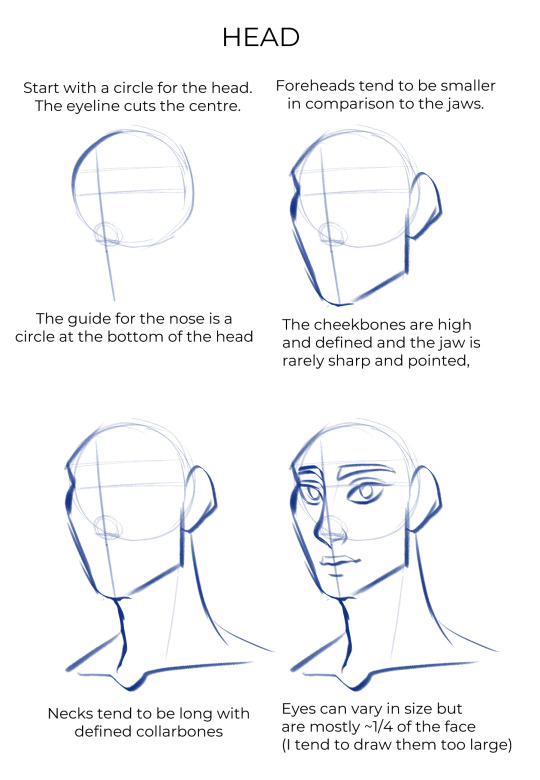
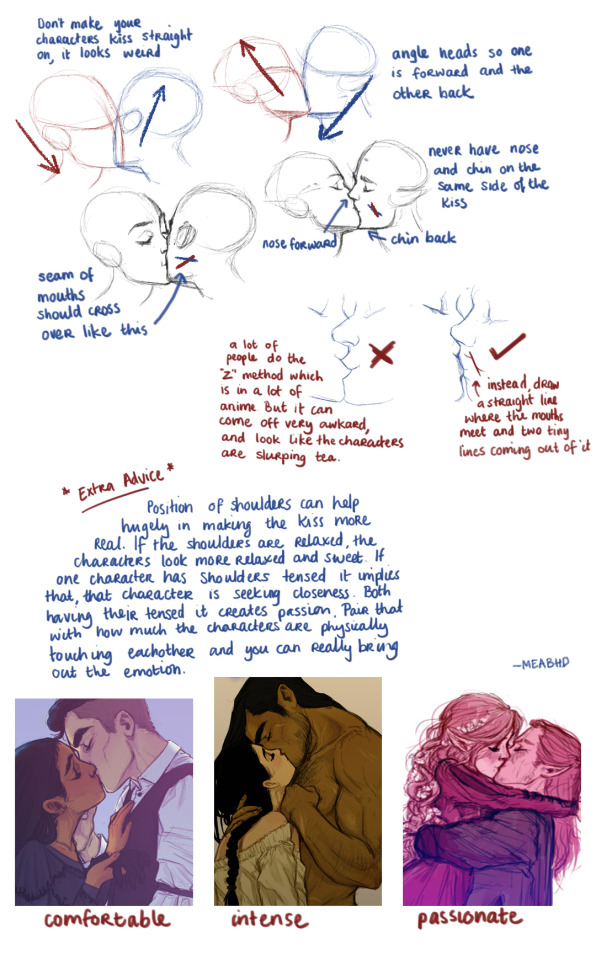
here’s a quick scribbled tutorial, but it covers the steps; just spend some time messing around!
[click on the pictures for captions! added some more text to supply what i’ve written on the pics]
174 notes
·
View notes
Link
26 notes
·
View notes
Note
Your sketches are the best! do you have any tips/tutorials for someone that want to start doing portraits? what was your process? thank you :)
Hullo there! Thank you so much! It’s difficult to explain in words, so here’s some basics of portrait drawing, and a brief outline of my process. We’ll use Hugh Laurie as House,just because here’s a nice front shot of his face.
First, proportions:
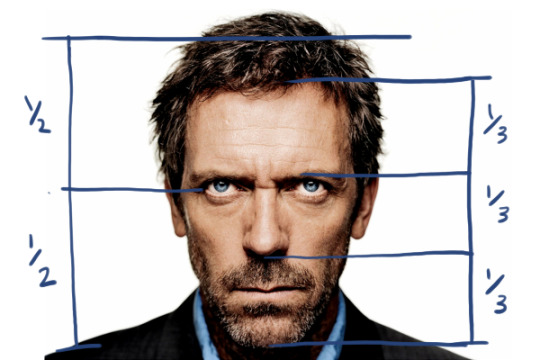
As you can see, eyes are half way down the head, given you press the hair right down flat on the head. The hairline, eyebrows, nose, and chin are spaced in thirds.

Generally, the width of the eye is one fifth the width of the face at the widest point. Make sure you take the width of the actual eyeball, not the outer eyelid. The nose is as wide as one eyeball’s width. The corners of the mouth are in line with the centre of the eyes. The ears are in line with the eyebrows (top) and nose (bottom).
(A thing to remember: use these proportions as guides, and not absolute rules. Everyone has a different face, and no one will measure to these exactly. Some people might have bigger eyes. Some people might have slightly longer noses. Foreheads will be larger with receding hairlines. These tiny differences are what make each face unique. So long as you’re not grotesquely disobeying these proportions, don’t feel restricted to follow them exactly if the photo reference tells you otherwise.)
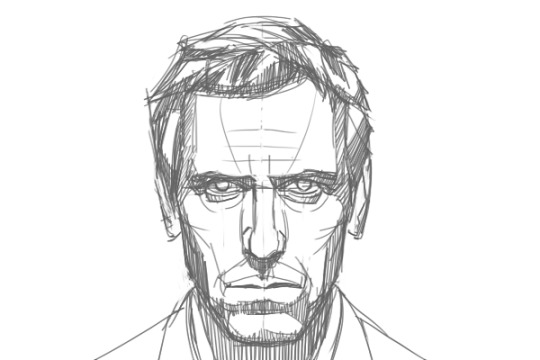
Now, to start drawing the outlines. I’ve done this digitally for the sake of speed, but I’ve drawn everything in lines so you can duplicate it all with a pencil and eraser.

First line in the general shape lightly. Also mark in important features such as the eyes and nose, but ONLY once your outlines are accurate. Always draw from big to small, from outside to inside, basic to complex. There’s no use spending time on smaller details if the outlines containing them aren’t right.

Draw in the details. Break hair down into chunks, as that makes it easier to deal with. Note the guidelines coming down from the eyes, as per proportions previously mentioned. They’re not necessary to draw in as you get more experienced, and you’ll find you can do them just by eye, but they help a lot when you start.
Shade in all the shadows in one grey tone. This gives you a general idea of how light hits the face and sets you up for the proper shading. Notice how the hair is still being dealt with in chunks.

Start with the blackest parts. This is because black is the easiest tone to get right, since it’s just black, and you don’t have to worry about the darkness/lightness of it.

Move onto the next darkest areas. Use the black you did at the start as a comparison, so that you’re getting the tone about right. Shading is all about comparisons and relativity. One tone will look light compared to a darker tone, but dark compared to a lighter tone. Constantly look at the picture as a whole so your comparisons are accurate, and you don’t exaggerate the darkness/lightness of the tone you’re working just because of the surrounding tones.

Keep shading lighter and lighter until you’re done! You may see some small changes you’ll need to make to the size/shape of the features as you shade, that’s only natural because the way we perceive things flat and the way we perceive things 3D (shaded) are a little bit different. Always keep looking back to the reference picture. Take a break if you’ve been at it for too long. Or stand back and look at your drawing from a distance. Fresh eyes do wonders in spotting mistakes.
This is a very very brief rundown of what I’ve learned over the years and by no means comprehensive of portrait drawing, but I hope this gives you somewhere to start. If you have any further questions feel free to ask me, and I’ll try to answer those as best I can from my experience. Hope this helped!
3K notes
·
View notes
Note
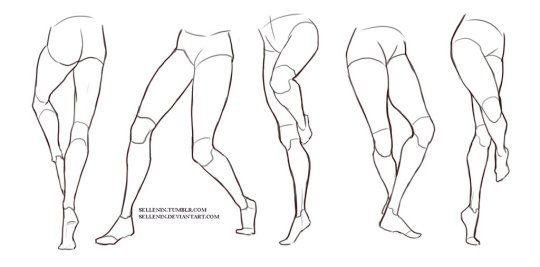
hi! i love your art, it's so pretty ♥ and you draw feet really well, do you have any tips?
thank you a lot anon!! ( /)w(\) here, i made a few notes about the steps i follow while drawing feet:

^ that’s assuming you’re not drawing from a low perspective, as if the camera was on the floor or something like that!
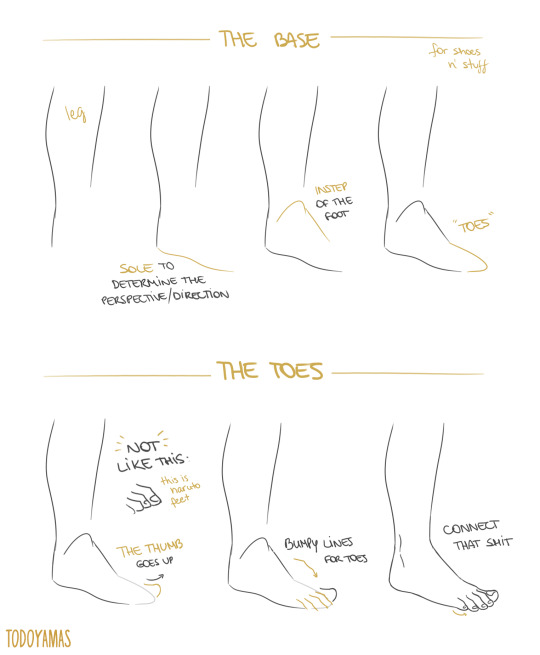
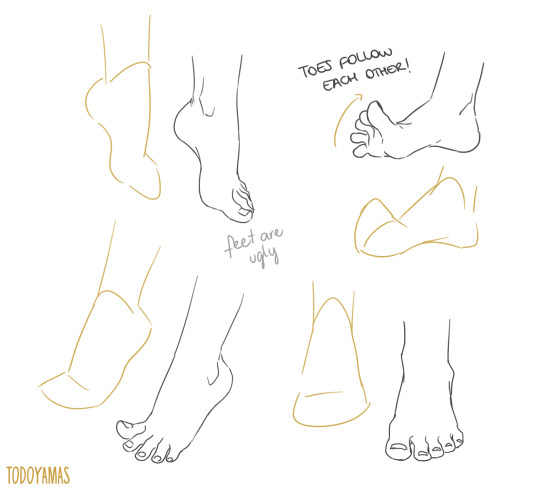
SORRY MY HANDWRITING SUCKS and i’m not really good at explaining things bc i don’t really follow a guide and stuff so yeah BUT I HOPE IT WAS HELPFUL TO YOU!!
92K notes
·
View notes
Text
Happy pride month to the tiny cowboy and tiny Trojan man from Night at the Museum
561K notes
·
View notes
Photo


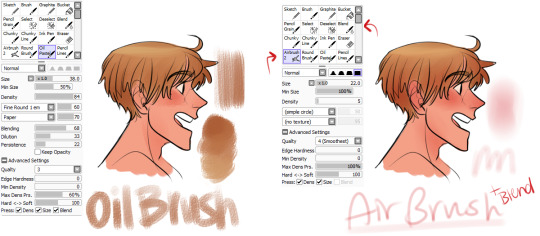

Thank You Anon, that’s such a nice thing to say about my art!! (my heart…)
As for my brush settings, the Paint Tool Sai I *cough* downloaded had a bunch of preset brushes, so I mainly use those and tweaked them a bit. These are definitely my main brushes, but I experiment a bit. I also tend to change the size/density/opacity/blending as I paint too, to make things extra complicated. I also use a lot, and I mean A LOT of color layers, which gives it that warmth feel, so go ahead and experiment with colors and layer modes!
965 notes
·
View notes