#(multiply over base color. overlay for the light and fringe. low opacity for scattered light. done.)
Note
Im so so so so sorry for the dm but I gotta do, how did you do the lighting for these two??
https://twitter.com/Licollis_a/status/1657703869068234754 https://twitter.com/Licollis_a/status/1657631596198125569
(dm wouldnt send on twitter so I'll send it here!)
Be not afraid, for I will reveal my secrets in rendering step by step.
1. After I'm finished with lineart, I added the base color. It's faint, but putting in gradient will make it pop.

2. In order for the whole thing to look harmonious with each other, on top of the base color I added a multiply and overlay layer. The color I use for multiply is usually desaturated, kinda pastel-y. The overlay one is more saturated (see alternative colors below).

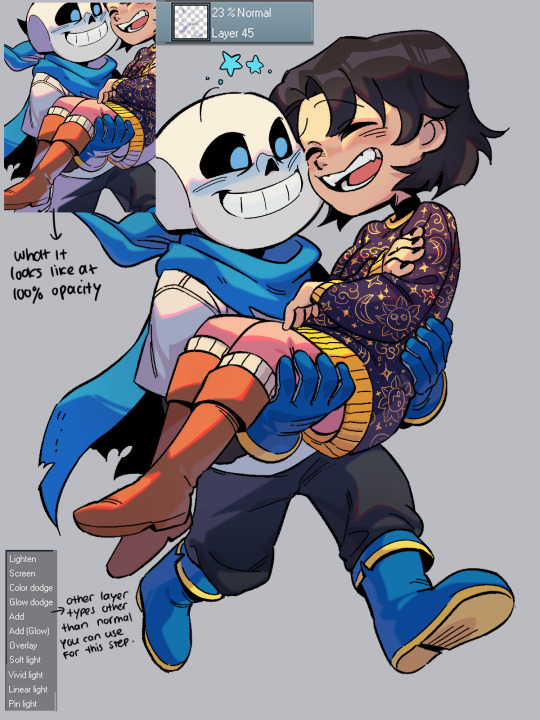
3. The result should be kind of dark. Which is what I'm after, because what you're seeing is already shadowed. So instead of adding the shadow to the base color, I'm adding the light.
On top of the multiply layer, I added an overlay layer. I keep in mind where the light source is coming from (see the blue arrows). The color of the overlay can be whatever -- it depends on the vibe you're trying to make (e.g if they're in waterfall, I'd use light cyan).
Also, see that normal layer clipped onto my overlay? It's how I added my "fringe" (aka subsurface scattering). I often use pink. Just line it on the edges of the light.

4. Now I added a multiply layer again, just to give the piece more depth and details (like the skin)

5. Now I'm adding what's called reflective light (google to see examples irl). Basically, I covered the darkest parts of the drawing with something lighter. For this one I just added pastel purple in the normal layer, but there are other layer types to lighten it up!
6. Now, I colored the lineart through clipping. I usually just matched the surrounding colors by adding a darker one (e.g dark red for skin).
Optional: I like to make 2 copies of the lineart, make one red and another cyan, and respectively slide it to left and to right. Sometimes it doesn't even look good tho....

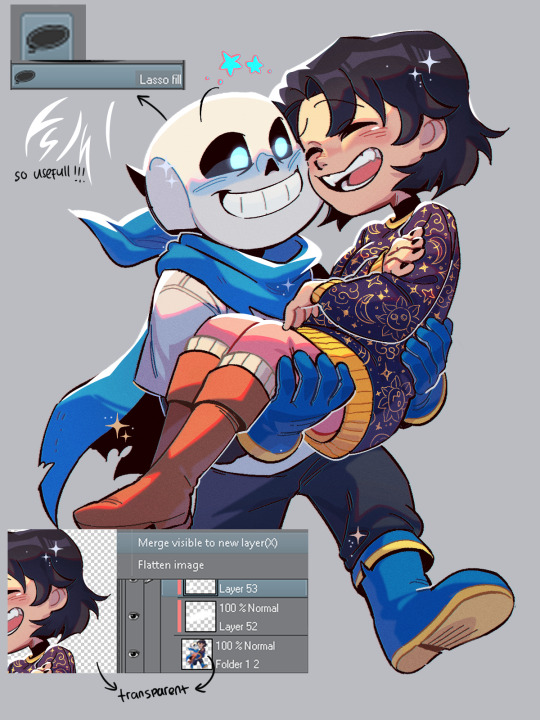
7. Highlights time! To do this I disable the background so it's transparent, click right and choose 'merge visible to new layer'. Which flattens the visible image onto a new layer. Now I can add in these white lights by clipping on top of it!
(It's a lil tricky to do this right with a brush, so I used the lasso fill tool.)
To top it off, I add some sparkes. My simp art is done <33
Edit: I forgot!! By the end of it all you can add a texture by setting said texture into overlay with low opacity (on top of the finished art). In CSP you can add a perlin noise, one of these:

You can use other kinds of textures for ur artwork, like watercolor etc.
#by the way the other art you linked also use similar steps. just simpler.#(multiply over base color. overlay for the light and fringe. low opacity for scattered light. done.)#i hope this helps you and other artists too!!!#happy rendering!!!#art tutorial#lico arting
670 notes
·
View notes
Last Seen Blogs


falconetlesoldatdelhiver1x6
[FINALE!!]-ᴴᴰ Falcon et le Soldat de l'hiver — 1x6 Serie

garethlove1
Graphic Design Year 1

sigfigscollective
Sig Figs Collective

thewpblog
thewpblog