#CollabBA2B
Text
Collab Project - Final Evaluation
youtube
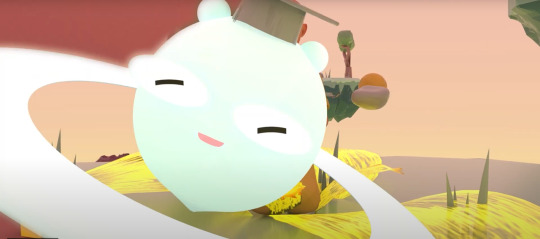
Looking back on the animation as a whole after submission, I’m really proud of what I’ve been able to create given some of the unfortunate circumstances I’ve had to face during the term like my tongue injury and constipation as I didn’t get around to fully finishing my model or rigging it either. If there were some things I would change with the piece, maybe the timing on the lighting when Anng is in the cave as it’s a little bit infrequent as well as the movement of the Spirit as he rises up to Anng during the at moment too. Other than those small changes, I’m really happy with not only this piece but also how the collaboration project has gone.
0 notes
Text
Collab Project - Reflecting on Week 11
Something that I greatly missing from my reflective journal was that i forgot to say I was the main editor in the group which was a bit of a shame but I’m hoping I can use this bit of the blog to document what I would of put down.
Week 11:
“In addition to completing the collaboration film and providing my voice to another group, I was also the main editor covering the main editing choices in the final submission film. All of the editing process was really fun to do as I loved every second of making our film much more epic at the start and sounding refreshing at the end as because of this project, being a video editor is something I would really like to pursue in the future in addition to everything else in Animation like animating and 3D modelling”.
0 notes
Text
Collab Project - Model in Blender - Final Re-works
With the model that I was planning to rig and offer a playblast of for the submission, I unfortunately didn’t have enough time to get everything I would like to done like the re-topology, the rigging and the skinning as it wasn’t very doable from the unexpected circumstances that came up in the project. But despite this, I still feel really proud of what I’ve been able to make given the limited amount of time I personally had especially since this is my second modelling project I’ve completed too and have a collaboration piece I’m really impressed with too.
0 notes
Text
Collab Project - Sound Design for Juan
To help Juan with the sound design for my piece (as he’s the sound designer) I complied my most desirable audio clips that I found on the internet and freesound.org and sent him a premiere file over to him. This wasn’t just for sounds I would like in my sequence but also for inspiration if there was a particular aura that Juan wanted my sequence to go for as well.
youtube
0 notes
Text
Collab Project - Editing for the Final Film
One of the very absolute last things I did for my collaboration group was working on the editing for the film where I edited essentially all of the opening credits, end credits and the transitions between peoples films that weren’t hard cuts. This whole process was so nice to do after animating and paitentially waiting to see when my animation would finish rendering as I love editing things together and building up suspense before something happens.
For instance, the opening of the film was something I really wanted to hype up before you started watching the collaboration film. The opening map that you see going past and at the end of the opening was made by Engy in our group as she requested from each of us a lil sketch of each of our sequences landmark to put on the map for me to experiment with. Ever since we discussed this idea, I’ve always love the opening idea as it was nice and simple and really effective as it proceeds events without completely telling you whats going to happen.
Looking at the map, it instantly reminded me of a treasure map and thus I wanted to make it slightly pirate/adventurous feeling when you watch the beginning of the film with the text hovering across the map's landmarks so you can’t quite make out whats there until the end of the opening. This was my intention when trying to get the text hovering over the map which I think succeeded really well.
Something about the opening that I wasn’t sure people were going to feel a bout was putting ‘13th Principle’ in time with the beat but immediately vanishes as to me, it helped to split the awkward darkness a bit when you coulden’’t see anything on the screen which I really liked.
Beginning of the Film/ Opening
The Title and Sub-Title
When the main title card appears on the screen, I wanted it to commence in like it was mighty and authority as you hear the music get louder and louder when the title pops up. I mostly just wanted the opening to be adventurous as if you have no idea where your going until your already in the deep of it. I made the title card appear, sub title and the map underneath through the use of opacity and timing it so it seemed like it would happen on the beat making the whole experience really smooth to watch.
The Map Appears
Similar to how I did the masking when I did the first edit of everyone's group animations together, I repeated the process for my sequence into Tom’s and for Juan’s sequence in a unique way to cutting to black.
Final Film
youtube
0 notes
Text
Collab Project - Waterfall
One experiment I tried to do in Maya for my floating islands was to create a really satisfying waterfall feature making the islands evaluate on a whole new level. I tired following two tutorials online using both nParticles and Bifrost Lquid but none of them seemed to of work so I unfortunately had to pass on making the waterfalls despite how cool and nice they looked in the tutorials.
Aftermath of Tutorial 1

Afteramth from Tutorial 2
Maya 2018 simple waterfall with particles tutorial
youtube
How to create a waterfall in autodesk maya 2020 using Bifrosts fluid tutorial for beginners
youtube
0 notes
Text
Collab Project - Second and Third Animatic and the copious amount of modelling and colouring for the Final Piece
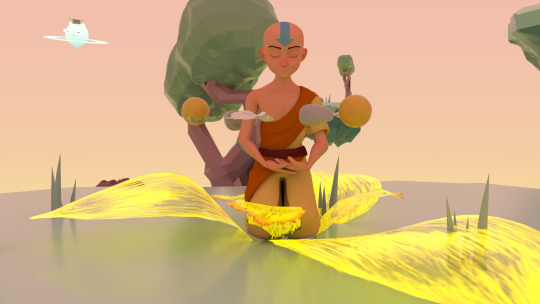
For the last week on the collaboration piece, I really went all out on trying to make this piece something fantastic to watch as I spent so much time trying to make everything as detailed as possible. That’s not to say that I didn’t do a lot of animation though as I felt I really refined the Spirit’s animation as well as Anng’s movement respectfully.
Starting with the modelling of the environment, I followed a few tutorials learning how to make tree's specifically low poly ones so I could stay on theme with the islands I’ve made around the world I’ve made. There were two types of trees I ended up making, I very low poly (which is the video tutorial here) and one a more complicated low poly that involved multiple types of faces. Between the two, the tutorial trees were so much easier to do and probaley easier to make as well. However, the more detailed low polygon trees were tricky but they were really worth it as I made some really interesting janky trees that help varied up the really easy to do trees in my scenery.
How To Create A Low Poly Tree In Maya | Ep. 4 A Simple Tree
youtube
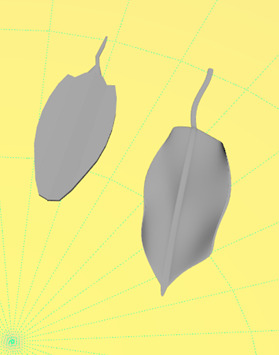
In addition to making trees in Maya, I also made some leaves to go around the Monk character as well as debris across the islands. Weirdly enough, this was the hardest thing to model due to how many creases you needed to make in the leaf as well as angling it just right so that it realistically looked like a leaf. The first time I made the leaf I made it way too thick to be counted as a leaf which is what led to me sticking to the tutorial so closely so I wouldn't stray off too much. Whilst the leaf was really tricky to model just right, the whole repetition process was still really fun to do which I can say the same for when I was modelling the trees too.
Alongside the leaves that I made as foliage across muy scene, i also made a couple of smooth rocks to differentiate the rocks that are keeping Anng in to help resent these rocks are very special. In addition to this, I also made patches of grass with sounds really easy to mold and make which you would be right. However, its’s the placement of these grass patches that are so important as this is an overlooked detail that’s just forgotten bout when looking at the environment. I felt like I was specifically putting patches of grass like I was individually placing the min a Plasticine collage with the amount of attention of detail I took. Sure people might overlook the grass patches when they watch my sequence. But i’m just happy that if someone was to look at one of my islands individually, they would see how much craft I’d put into the scenery which that in itself could be showing of ‘Passion’.
How to model a leaf in MAYA2017
youtube
Old Leaf vs New Leaf
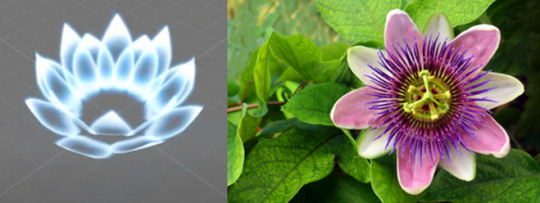
I think this next part was just in general the trickiest thing I had to this week due to how many steps was included to even try and make it let alone have the chance to animate. I am of course talking about the flower ornament that symbolises passion within the Monk as he emerges from the rock formation.
Before I get into the process on how I managed to make the flower animation, I realised at the time that I wasn’t using the right flower as a passion flower doesn't always technically symbolise passion. The flower that more symbolises passion is the yellow Iris flower. A three petal flora with 3 small little tendral petals inside of the flower. Once I realized this was the right flower that I needed to symbolise passion for my Principle Piece, I followed the tutorial online detailing how to create this flower petal design animation into Maya. Al;though on top of that, Jon was kind enough to make a special tutorial just for me to make the tutorial that I’ve been referencing since the start I saw that video.
The way I made the flower petal animation was through making the petal size and selection in Photohsop and then I painted over the selection in another layer creating my fresh layered petal almost ready for Maya. Before I could export them to Maya, I had to export both a colored version and a black and white version so that Maya could register how bright the image will be as well as evaluating the transparency of the image too.
Once they’re in Maya, you need to got to the Hypershade tool and create two texture files and connect it the same way its shown it to an a empty aistandardsurface plane. After all of these steps, you should be able to see the petal in Maya. Whats really cool now is that if you adjust the d point towards the center of the petal and move to the right most angle, you’ll be able to spin the petals around in a 360 degrees fashion.

Iris Flower Petal Colour and Black and White Design
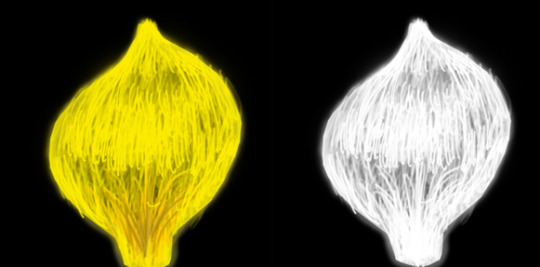
Tendrals Petal Colour and Black and White Design

Getting the petals into Maya wasn’t actually too bad in retrospec, I think for the animation side of things I seemed to really struggle due to the object plane really not wanting to behave itself as it just likes to either move its own way or just do it’s own thing when I’m not even touching the flower as some playbacks of the flower sprouting, it would glitch and gitter across the playback. Although despite theses problems, I think the sequence was really worth it as it allowed you to create some really pretty flower blooms which I wish could of explored more in the project.
Combining the Petals together to create the Flower

I think overall the flora I created for the scenery will most likely be overlooked from the everyday viewer when they watch my sequence but like I said before, even if there’s one person that takes interest into the work I’ve created, that would mean the world to me.
The Landscape of the Scene
With the sky lighting for the animation, I always imagined it to be a very autumn setting with a pink and yellow sky as it emits very warm feelings to me as well onto the character too. Plus I think there’s a range of coulours on offer atm that ‘s happening in the render scene and going through the colour palettes we already have, these choice of colours just seemed so perfect to me especially the kind of mood it gives off too.
One render I did want to talk about here was the 3rd render I produced as instead of ornage/yellow lighting inside of the cave, I’ve gone for a more purpley interior from the firefilies. This colour change was because of how too similar the colour inside would be to the outside and really wanted to go for something in contrast instead to make it feel you’ve been taken to a new world. Personally looking at the render, I feel it really achieves at that perspective a lot especially when Spirit peeps inside the rock and you see the dark purples everywhere with some of the fireflies illuminating you.
Rendered Image 1

Rendered Image 2
Rendered Image 3

First Animation Sequence
Watching back on the first animation sequence I did with this detailed scenery is an immediate step-up from the previous animation that I did in the last blog post as this is an immediate upgrade. I guess the things I feel critical about if that the flower bloom isn’t very natural and acts way too soft (but don’t get me wrong looked really cool), I’m not too sure of the fast spinning of the Spirit as I may cut that out to make it more suttle and less fast to watch. In addition to that, i plan to add in additional animation into the Spirit's face as it’s very static looking with its face always staring like a blank slate. But other than these changes and maybe a couple of small ones I say here, the sequence is looking really good so far which I can only improve from here personally.
youtube
Second Animation Sequence for Submission
This is a much updated and refined piece of animation I did also in the last week till hand-in. Here I involved a lot more character and emotion into the Spirit as he moves from scene to scene making him more alive and joyful to look at which I was really happy with in addition to improving the animation to Anng’s shoulders as he breathes in and out. Honestly there’s really not too many gripes I have with this animation compared to the previous one as this feels so good to watch in comparison.
youtube
0 notes
Text
Collab Project - First test for the Final Sequence
For this week’s development on the project, I finally got round to start modelling the sequence out for myself based off the idea that I discussed with Jon. To start, we first had to create the floating the islands but on a low poly scale which Brandon from the group was kind enough to share with me on how he created his low poly islands. Even though Brandon is also looking to a low poly look with following that tutorial, I want to make sure that my sequence is as different but still standout that it can
How To Create A Low Poly Floating Island In Maya | Ep. 3 Rocky Platform
youtube
Making the actual island itself was relatively easy as I just followed the tutorials above. However, I do plan to go back to the floating island generation as once the island is sorted with all the rocks and details added to the environmental space, I’m gonna try and attach as as many different shaped islands to the main body as I can.
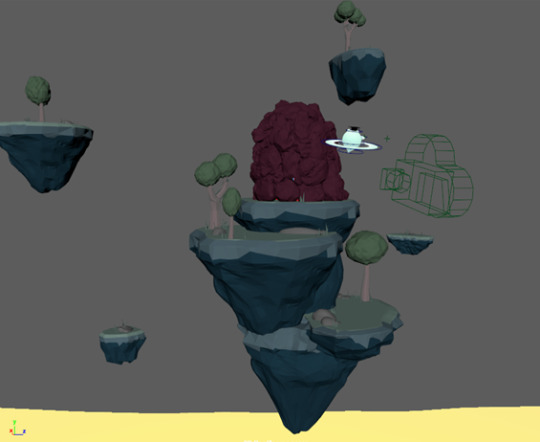
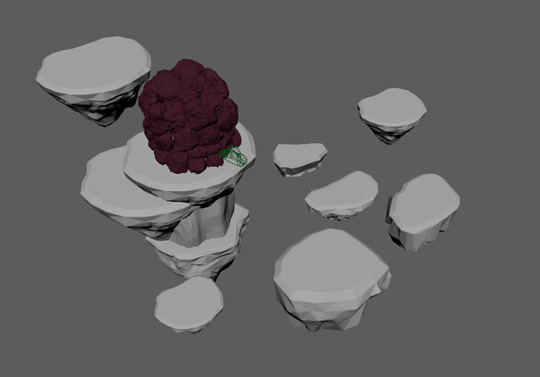
The Boulders and Rocks used to constuct the stone cave for the sequence
Rocks fully stacked and different to the first anaimtic as the different shaped islands and stacked island platofrom - Can be seen in the next Animatic later on
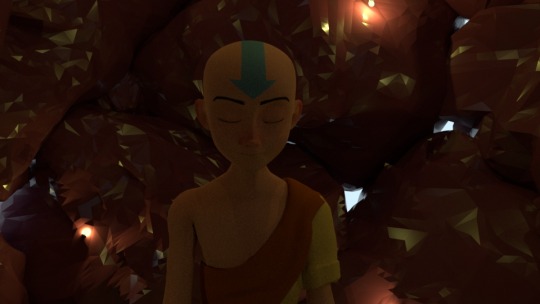
Once the islands were constructed and modeled as well as the large rocky cave, it was time for one of my favorite parts of a sequence that being the lighting of the sequence. But this wouldn't be any ordinary lighting that would been done in the sequence, this kind of lighting would be one, be inside of the cave and two, would be scattered all along inside of the cave as I wanted to get a bunch of fireflies and scatter them all across the inside of the cave. Once positioned and angled just right inside, I would add colored emission to each of the firefly’s mostly a yellow hue so they could give it a mystical vibe inside.
Once Inside, I was genuinely blown away from the result that I got when I rendered the scene in the software as I wan’t expecting the sequence to look so pretty inside. I this is largely thanks to the low poly objects that are inside the cave as if it wasn’t for them, we wouldn't have this really nice crystallized texture like their golden quartz growing on the side of the environment. I don’t think I’m joking when I say this but I could genuinely stare in this room for ages and I made this. In the second render of the film, it looks even better spirit is introduced into the picture as it creates it’s own source of lighting from the angle it’s chosen to render at. Overall, I’m so impressed by hoe nice these renders look as I would love to genuinely frame them up on a wall.
Test Render 1
Test Render 2 - My Favorite One

For the animation side of things, it’s very rough looking but I think that’s okay as I’m still kinda figuring out how the sequence should play out in front of the camera, To be honest, I feel i might need some opinions from my group to see what I should do to improve this sequence as there’s so many ideas I want to tackle but I know. I will say some area like when the Spirit goes into the crack of the rock as I feel it could of been at the perspective of the Spirit. In addition, definitely the area where the Spirit comes down as goes on for too long to absorb in. One last change I think I definite wanna sort out is definitely the animation of Anng as I think I went too ambitious and just need to go for something a bit simple in approach as much as I want to do character animation.
youtube
Group’s and Jon’s reaction
For the most part, everyone's reaction towards my animatic was proabley the best I received on my animatics so far which was such a fantastic sign to hear as it really did feel I was on right track with the project in a long while. Alongside this, people were very much recommending that I try and stack the islands together specifically the one in the middle to make it look great and fantastic compared to the rest of the islands. Jon pointed out with the stance for Anng when he’s still and is the first posre we see, the arms are far too cramp. This is something I still need to figure out with the rig as Anng rig is a mystery to work sometimes but very much determined to see how I can rectify the issuse.
0 notes
Text
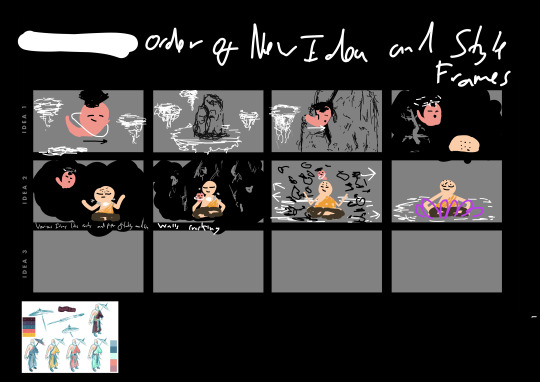
Collab Project - Opening Title Ideas and Past Forgotten Animatic
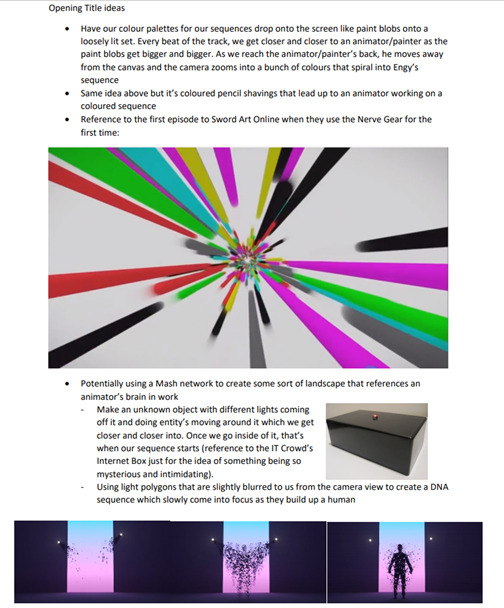
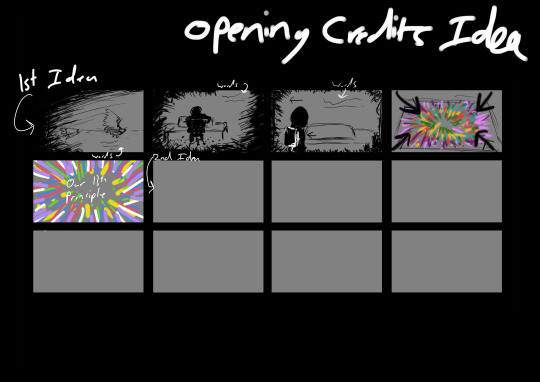
For this week, I looked into some potential ideas for what we could do for our opening of our sequence as it’s a bit hollow with it just being a black screen and the green text on top loosely. This is where in Wednesday’s session I researched online potential ideas spanning from Sword Art Online to the IT Crowd.
Starting off with the Sword Art Online inspired idea, it would begin with a animator sharpening his /her’s pencils and paintbrushes with a pencil sharpener but we would only see the pencil shavings at the beginning of the sequence, the closer and closer we get, the more we see and the animator hard at work. As we get really close, he moves away from his tablet and we are sucked into a fury of colours like the image below. Not only did I give a verbal description of this idea but i also made a sketch version below too.
The other idea was to be inspired by the I.T. Crowd as we could design our own Internet Box that is the gateway to an animator's brain once we see inside the mystery box. But the catch is, no one is allowed to see inside just an ominous light. The
I think I really like all of these ideas but unfortunately, they are all quite complicated to make or at least would take a while to create in time for the deadline not mention everyone collab pieces and other work we haven’t taken into consideration. This may be something I want to bring up the next time we all have a big group meeting together if we wanted to have an opening and potentially credits too.
Opening Sketch for First Idea
Something I forgot to talk about before I broke up for study week was the development of this animatic that I did before I came up with the new idea for the new sequence. This animatic for one, is animated a whole lot better as well as providing a real true narrative to the whole story with the Spirit coming into scene form the Cave’s entrance and interacting with not just the Monk but also the cave too with bringing down that humongous rock. I definitely like this idea a whole lot more now compared to the other attempt I did but this new idea I came up with over study week felt so special to me that I so needed to do it for this project.
Also today, I had a discussion with Jon about my tongue related injuries and said in regards to my work, I wouldn't have to use the rigged character at all and rig him separately and perform a playblast of him. To replace him I would just use the Anng rig instead being more viable for the collab piece atm. Whilst this is difentely reassuring to hear from my end, I sill feel a little bit concerned on my end as I‘ve had to change the idea for the collab piece as third time and I still need to animate and model all of it in time. I would definitely like to try my best to do this but I have literally no idea if it is enough time or not.
youtube
0 notes
Text
Collab Project - Study Week Re-Cap
Throughout study week, I caught myself to be very busy by the amount of work I happened to be doing during this period as one moment, I was developing my sketches for my model to then understanding what should be my sequence in the collab piece as I needed to re-think how to one, make its shorter and two, make it more about the principle as well as smaller due to how much render time it would of taken to compensate for the ginormous cave.
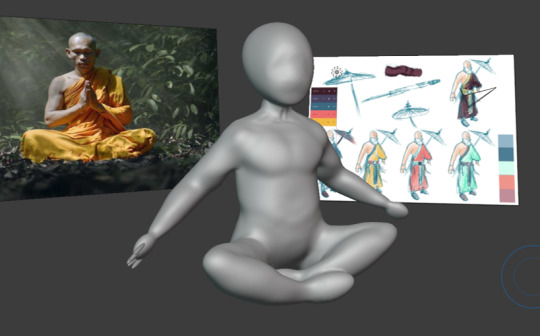
Starting off with the final sketches I did for the model of the character that I would be using for the modeled environment, I looked into the colour pallettes that were decided by the group and applied them to the my final character’s design to see how they would compare with each other. I think I was definitely right from the last observation I did in the last blog post that the blue costume looks the best colour wise as well as colouur range as the other colour choices I made are way too flashy and go away form the monk code to me.
After the design sheet, I then had to come up with a brand new idea for my collaboration piece with the rest of the group for the reasons mentioned above in the post. Disccusing with the ideas I did with Jon in last tutorial, I really like the two ideas to have the monk incased in a rocky tomb and for that rocky tomb to be floating on a floating island being surrounded by other floating islands as that visual imagery that I have at the moment would link in perfectly to Monk culture. Feeling really happy about this venture, I began to storyboard away in my own time on how this idea would potentially look like in a large scale CG scene.
It starts off with my spirit admiring the world around him (which is only natural since everywhere is floating around him) which he then sports a really odd looking rock structure on one of the floating structures. Curious, he goes into the rock to see what’’s inside only to see my character Anng Mediating but he’s struggling. As an act of encouragement by the Spirit, he spins around Anng for motivation which the causes the rocks to rubble everywhere. We then cut to a wide shot where the rocks all collapse and shoot outwards causing our character flourish like a flower which he blooms into a Passion flower at the end of the sequence which then cause the spirit to do an invisible cut to the camera. Not only do I feel like this ideas is so much more shorter than the other idea, but in retrospect feels this is the best idea now that I’ve come up in the project.
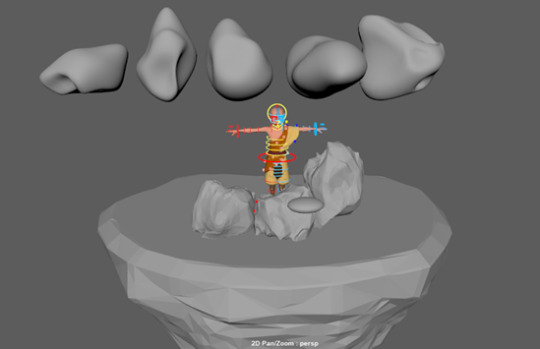
After establishing on hopefully the final collaboration piece idea that I plan to do for the final colllab piece, I unfortunately sustained a really nasty tongue injury causing me to be in-active for work due to how much pain it was to endure when trying to do work. Towards the end of the week, my tongue pain got a little better but still hurting quite a bit. Fortunately, I could work just a little bit because of the eased pain which allowed me to model my character in Blender for my Maya sequence.
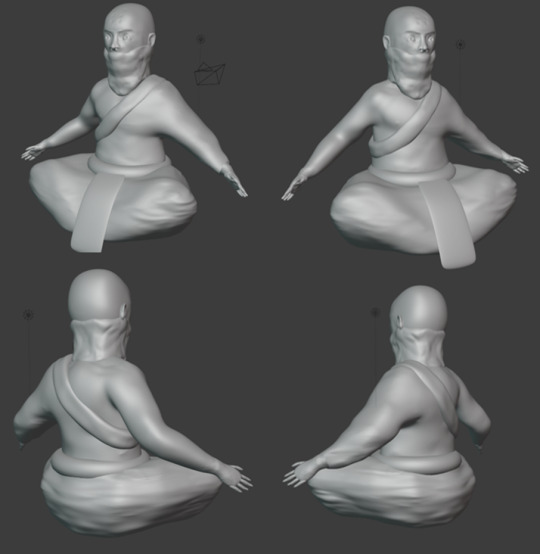
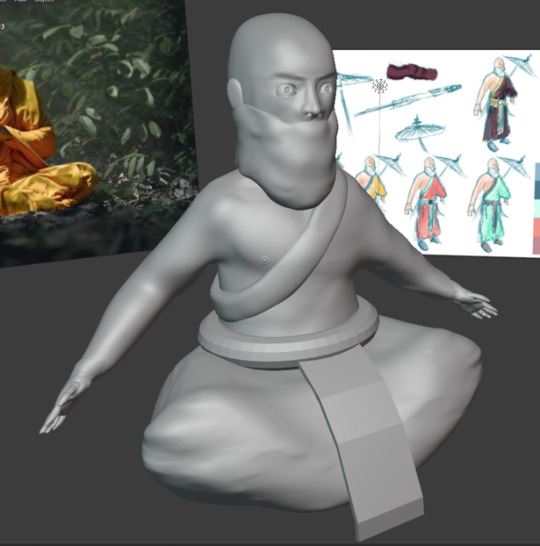
Modelling the actual character in Blender felt so much nicer compared to how I modeled my other character in the previous submission as that was a stage of modelling in Blender where I had no idea what everything was and I would have to constantly go back and foruth to figure out the most simplest of things. Meanwhile for this project, i felt so well-informed with myself which made modelling all the more enjoyable as it wasn’t strenuous having to search up everything again. I essentially followed the same sausages technique in creating a simple basic human mesh which I then re-meshed and then smoothen it.
Once done, I started with the eyes which were very simple enough as I created two eye holes using the grab tool and adding two sphere shapes where the eyes were and sculpt the body around the skin. This was definitely easier said than done which got me thinking about how I wished I prepared my model right before adding materiel to it. The problem was I already turned the model into a mediating pose which doesn't sound too bad but when it came to applying material, one half of the model revived material stronger on one side whilst the other didn’t or sometimes none at all. Strangely enough I did find a fix for this issue with a big but of course. That but being that the legs were smudged together as they weren't standing up but sitting down. Fortunately though, I came up with a very quick solution to help combat this error which was to model the clothing over the legs through box modelling. Having tired this on my character and applying the results, it worked more than perfectly than I was expecting it to be as it just look like he’s put on some trousers on.
Other than stuff I’d already covered in the last project, there’s honestly not too much else to say about my Blender character as a lot of the things I would say were re-iterated quite a few time in the last project. But Overall, I think my model is looking really good for now especially making something with a tongue injury at the same time.
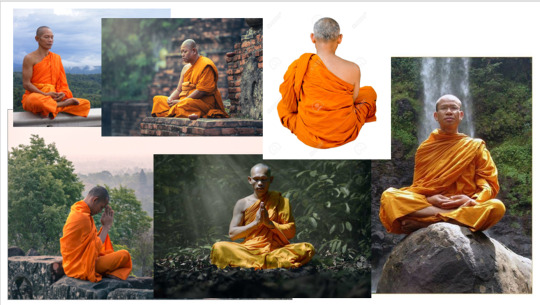
Reference Imagery for the Monks Meditating.
The creation of the eyes
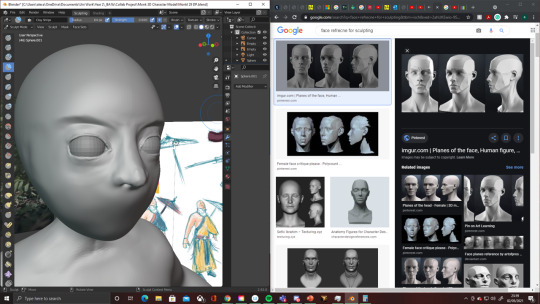
General Body Look
Trouser Making
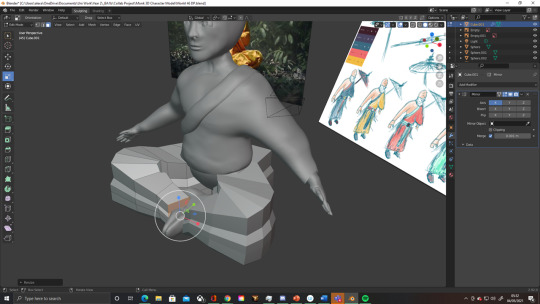
Final Model (WIP - Work in Porgress)
Group Reaction and Jon’s reaction
Everyone in the group seemed to be really excited with my progress as whislt its still early days, I’m very excited to how it’s going to turn out. My big worry however is how long my injury will last as I’m unable to talk and communicate with other people and struggle to do work still as I can’t let too much air tough my tongue otherwise it really hurts. Jon’s reaction to the model was definitely positive but really wanted to see it animated and rigged to truly see it’s colors although I have no idea if that’s going to be possible or not which is why I’m going to talk to Jon about it more.
0 notes
Text
Collab Project - Character Sketches, Editing and Brand New Animatic
For this week in my development on the collab project, I started on a lot of different developments for the collab project for both the modeled character and the animatic sequence which I made from the ground up.
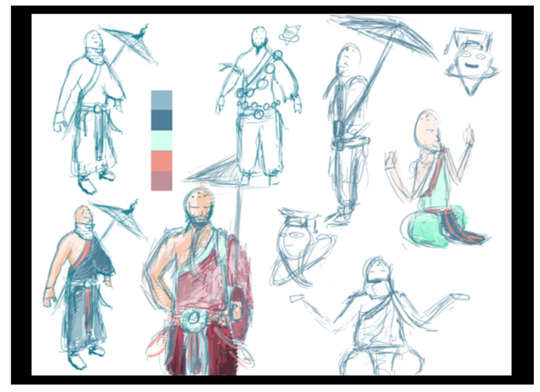
Starting off with my modeled character progress, I began to do a lot more sketches for the character as I went back to how I did the first sheet of sketches for the Monk character and acted very playful with my lines. Whilst I got the general form of the character from the first sheet of sketches, there were a couple of things I weren't sure about the design like the beard as one of the images I found as part of my research has really grown on me. This is because I really loved the idea of having a face mask or sheet in front of the character’s mouth. However, this does block the beard and essentially means there’s not really any point to sculpting it. But then again, I think the mask really helps to embrace the idea of passion within the character due to how reserve he must be to achieve true harmony and true flow in his body.
With the second sheet of sketches just below it, they’re mostly studies for the Monk character’s final design which happens to be the Monk coloured in blue in the bottom left of the pannel. I settled on this design being the final character design for the Monk due to how simple but also emitting of the idea of Passion as whilst he is a monk, the face mask and the umbrella paired with him help to create the perfect combination of the my principle as well as a combination of my previous work in the project too. In addition to coming up with the final design on the second page, I also experimented a bit with colour on some of the other sketches I did to see how the colour palette adjusted to the designs. So far, I think I really loving the blue colour scheme so far on the character but I do plan to look further into the colours of the character later down the project.
Sketches for the Character

Exploring Colour in the sketch
After the Monk development, it was time to fully revise my animatic/ scene for the sequence as based from the feedback I received from the last meeting. Not only from that, nut I also felt it needed changing too as it was a bit too safe for my liking whenever I watched it back. But before I could even start animating, I had to model the scene out.
Modelling the area started from watching a tutorial online on how to create rocks in maya which luckily made the exact kind of rocks that I wanted to for the sequence which was really handy. From here, I stretched and manipulated each rock piece to make it so it can look like a large looking cave with all the in-perfections in place inside to make it look more authentic and more cabe-looking. With the cave construction, I also wanted to give the cave an entrance for the spirit and the light come into the sequence to make it both realistic and dramatic as the Spirit comes into the the cave where it hasn’t been before.
How to model rocks and stones in Maya, fast and easy
youtube
Rocks being divided up from the Sphere

Entrance to the Cave

Cave from the outside

Once the cave was sorted and it was looking nice, it was time to try out a new technique that I had plan to do in the sequence which I had been planning ever since the idea of having to change the sequence up. I basically was looking up symbolism of passion and low and behold, I was introduced to the Passion flower which literally inspires Passion. It’s a bit on the nose but my idea is still very vague to watch anyway so it may be a point on the nose if anyone of the Ai would be able to read and a really small bit of dialogue. But going back to the flower tutorial, the effect would create a see-through based flower petal flower that would bloom out of the Monk character to show he’s successfully reach his flow and steps into ‘Passion’.
However when trying to replicate the tutorial there were two problems with it, one the tutorial was going super fast with no chance to breathe or tell you how to specifically do something in the tutorial and the other being that that the process didn't really work at all. Because the tutorial is both only one out there that does this effect and having no clue to solve this issue, I emailed Jon the problem I had with it which hopefully it wasn’t anything too complicated.
Anng showing off the principle with the spirits in either hand ( With temporary Flower)

ccc
Game Effect Tutorial - Flower Blossom - 3D Maya - After Effect
youtube
Never the less despite not being able to do the flower effect for the animatic, I came up with a replacement idea which involved my Monk character mediating silently in the cave which would cause the spirit to notice and fly over to him, This then causes him to split the animation spirit into two different spirits that the monk begins to manipulate around him similar to how it worked in the first animatic. Because this is increasing his flow and ‘Passion’, rocks come into contact with and begin to mold around him that makes the Monk become part of the Earth. This then later develops to him being cocooned inside when suddenly, a flash of the flower’s colour illuminate the cave as he pops out with both spirits on his hands with the word Passion behind him. The psirit then comes back to one spirit and he goes into the the next sequence.
Seeing the animation in action going through this storyline, I think it could have a bit more development to help sell the idea of passion as it looked a bit static to watch with the Monk sitting in the same place with no body animation. I think the group’s opinions on this idea will definitely be important.
youtube
Once the animatic was tuned and completed, I then created a group edit of everyone’s sequences from the group to see what it would look like if they were to be all put together. I didn’t necessarily worry too much on the story’telling side as it was really early stages still. My main focus was to experiment with different kinds off transitions that we could potentially use to travel to one sequence to another.
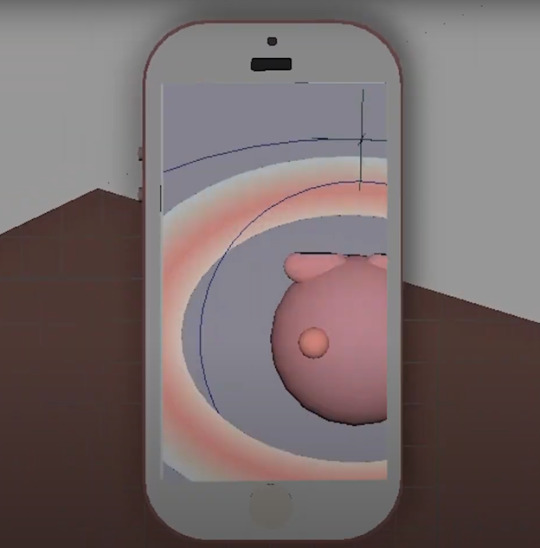
These transitions I experimented with were an invisible cut, a green screen transition and a explosion transition. The Invisible cut I was definitely the most prepared for as it involves the spirit in my scene moving from left to right of the screen causing a mapped wipe in the sequence. Testing it out in the animatic edit went surprisingly better than I thought as the mapping process was so much easier than I was expecting to do. I would say the green screen transition that I did on Brandon’s phone was definitely the hardest as I had to map out a green screen for every frame which wasn’t the funniest to do. The explosion transition was a bit smilliar but it more engulf the screen rather than a specific section which was a bit nicer to do.
With the overall cut of the film, I feel quite proud of it as whilst it may not be the final piece that i’m presenting, it feels really complete to me that we have some sort of narrative structure through our films even though it’s not finsilased what order everyone is. I just feel very energetic from watching it back as it just feels like the final piece even though there’s still a lot more work to do.
youtube
Invisible Cut

Green Screen inside the phone
Extra explosion that engulfs the screen to the next sequence

Group’s and Jon’s Reactions
The reactions towards the animatic were essentially the same towards the sequence as I was to it. However, they apparently missed the balls that my Monk character used to control around him to achieve his flow and passion. Since it was requested, I really want to try a new sequence with everyone’s requests for my sequence so I feel like I’m creating the very best piece I can.
0 notes
Text
Collab Project - Youtuber Suggestion
When I was showing my latest animatic to my group’s meeting as well in the Jon meeting, our other editor James suggested I should check out this Youtuber called ‘Ranton’ who used to be a monk before coming to Youtube and becoming a game reviewer. Watching his videos on why he left that life and what life was like was really eye-opening to watch as his passion to find meaning in himself is so present within these videos. Even when he discusses how much he wanted to train and prove himself at the temple, it shows how much drive and passion he really had to becoming the best person he could be before he sustain his leg/foot injury. I’m really glad I took the time to investigate him further as he’s definitely going to be in the back of my mind as I progress with the project and how I evaluate ‘Passion’.
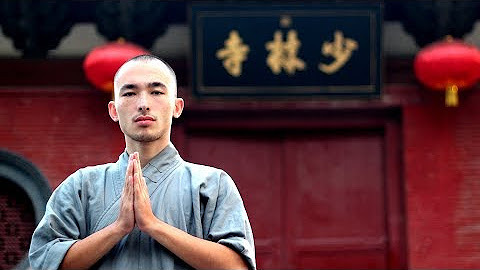
Why I Left The Shaolin Temple
youtube
My Life At Shaolin Temple
youtube
1 note
·
View note
Text
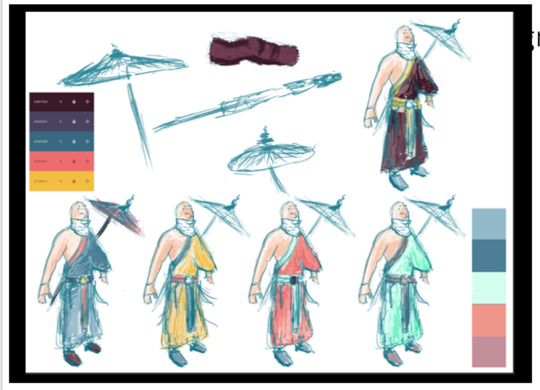
Collab Project - Third Animatic, Colour Research and Umbrella Modelling
Lately this week, I’d been looking at not just improving my animatic, but also looking at more ambitious techniques for the project like modelling an extra prop for the character.
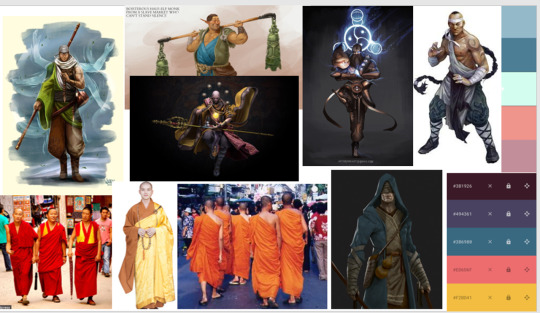
However for now, I started by compiling one of my last mood boards for the project looking at a collection of images that all reflect the application of colour for my Monk character. This isn’t necessarily looking at the different colours that all these different characters in the images have, it’s more looking at how they compliment each other compared to all of the clothing that they’re wearing. The images I’ve specfically chosen show that the colour choices are very subtle and aren’t very flashy and poppy to try and make a statement. I think this goes back by how monks from plains like to be reserved and not to stand out from the crowd and want to achieve that state of solidarity. This is something I really want to nail down when it comes to the colouring of my character and is something I will definitely make sure to consider. I think at the moment, I aim to go for a colour pallette that’s a little mute and not too out there to match the designs I found today.
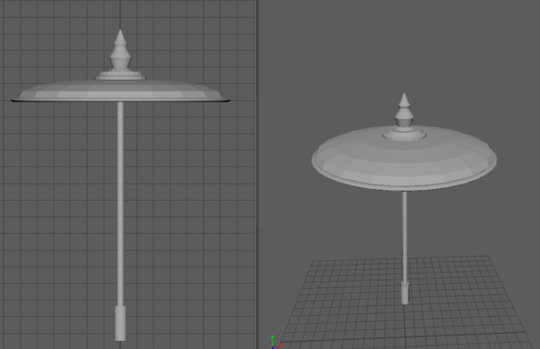
After the mood board, I thought I explore something new with modelling an umbrella based off the one that monks use to travel. Whilst the modelling process wasn’t too tricky in terms of trying to make it as it was a very quick build, I was quite impressed from how fast I was able to make the prop as it took me only 30 mins compared to the last prop I made in the last project despite being very detailed. I wanted to model this umbrella as I wanted another visual for the climatic and help embrace the feeling of ‘Passion’ and cultural references relating back to Monks is kept intact at the same time.
Speaking of the animatic, I incorporated both the Spirirt character that Juan had kindly modeled for us and the umbrella I made too to see what it looked like with the rest of the MASH network. My idea is when the monk is ascending into the MASH network, you’ll see the umbrellas raining down form above to emphasis that symbol of unity and individuality. Reviewing back the finished animation, I’m not sure if it’s too clear if it represents this as this the meaning may be a bit lost through how much is on screen. I think regardless what happens with the group meeting and Jon’s tutorial, I plan to do some sort of revised version of my idea to make my principle speak itself.
In terms of animation, the only new things I did was incorporating the spirit into my scene as well as the umbrellas falling down from the sky as there wasn’t too much in terms of development I really did for the animatic. However with the Spirit, I animated so it prepares to perform an invisible cut into Tom’s sequence to make it look seamless to watch which hopefully should work really well when it come to editing it.
youtube
Group’s response and Jon’s response
Whilst the group was interested to why I incorporated umbrellas into the sequence, Jon wasn’t too big fan of it as it looked very distracting. On top of that, the idea that I have at moment wasn't very clear that it was meant to be emulating passion due to me adding in so many different things to the sequence. This was definitely sad to hear but was more than deterimend to try and figure out how I should adapt this feedback into a new idea as I already was thinking of changing it up after this week’s tutorial.
0 notes
Text
Collab Project - Editing in the Industry
Due to being the editor of the group, I thought I make a small blog post looking into how I could become a video editor in the industry as it’s something I’m really invested in but don’t know too much knowledge on as a whole. To help with this, I watched this discussion talking about what are the important tips that you need to know to be a successful video editor. From watching the video,the main takeaway I took from watching it was that the best technique was to know as much as possible by yourself with the program as you become your own technician which people want. this is why people often pay for video editors as they know the more advanced stuff than the average editor.
The 5 Skills You Need to Be a Successful Video Editor
youtube
After looking at how you can stand out in the industry, I thought I look into my favorite edited scenes in film and how those sequences are put together so masterfully. Starting off to what I believe got my interest into editing in the first place was the Church Brawl Scene in ‘Kingsman: The Secret Service’. Why I love this scene so much isn’t just because of it being one continuous shot, it’s due to how it all looks like a continuous shot. This is done by using lots of different camera trickery to hide the camera behind something to make it seem like it took it all in one try as when someone’s back covers the camera, that’s when the cut takes place. It all happens so quickly that the audience member won’t even notice in amidst the high intense action.
Kingsman church fight clip
youtube
One other movie clip that inspires me to edit is anything that Edgar Wright touches, more specifically the opening scene from Baby Driver. Every transition, movement and sound is in time with the music which not only provides a fantastical watching experience as the audience, but the pacing of the film becomes buttery smooth as everything is a lovely rhythm that you don’t even realise is happening. I feel if i was to be a professional editor, this would be my major source of inspiration to reference by as music is something I would want to use in tandem with editing.
Baby Driver Opening Scene (2017) | Movieclips Coming Soon
youtube
0 notes
Text
Collab Project - Second Animatic and Extended Research
For today’s session, I worked on improving my animatic just a little bit to help showcase what kind of imagery I want to show as well as my research and development towards the model of the character too. I’m thinking for my Monk character that he’s going to be a combination of both realistic but also fictional design as whilst I like the basic nature of the clothing that traditional monks wear, I feel I would be missing out so much from looking at the designs of the more fictional designs like the Dungeons and Dragons depictions of a Monk.
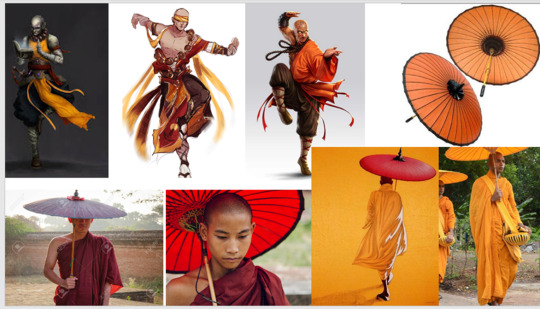
I first started researching into the potential accessories for the Monk to wear across his body or carrying with him on his body to vary up his design a bit rather than just looking like a basic monk. These were a belt, pouch and tenedrals that flail off the hips of the Monk. Whilst a lot of these detail;s are very fantasy styled, I researched into a more traditional accessory that Monk actually carry with them in real-life that being Chiang Mai Umbrellas/Parasols that they carry on their backs and lean on their shoulder. The umbrellas symbolised being connected and understanding your true self which enforces the idea of individuality that monks posses. In relation to my principle ‘Passion’, everyone’s passion is blinded to everyone differently which the umbrellas are more of a reminder to help you understand that you won’t find yourself or find your passion without working on yourself to find your true self.
Accessory Mood Board

Umbrealla Mood Board
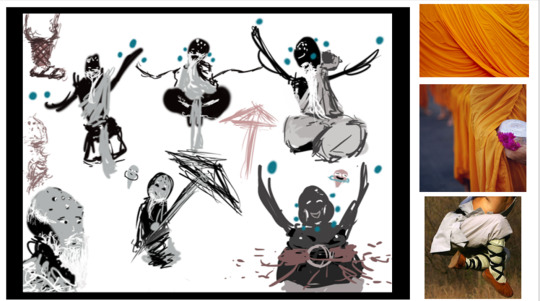
Once the mood boards were completed, I then began to do some very expressive drawings in Photoshop based off my feelings that I’ve gained from researching those mood boards and visulise them as quick as possible to get that flow across. Because these drawings were experimental, I was incredibly loose in what I did as I din’t go back to rub out mistakes and just kept on going with what I already had down on the page. Through doing this, I had so much fun quickly coming up with character ideas based off my research as my absolute favorite character as the man in the middle holding the umbrellas as the composition felt so nice in the image. I think that drawing and the one above it are very close for what kind of look I would like to achieve for the final character design.
In addition to completing some sketches, I also featured next to it a lil mood board of the types of drapery that I imagined the character to be wearing around his body as well as a little reference for when I was sketching out the characters on the page.
After I did some more research and development on my character, I went back to my first animatic and improved upon it by adding the MASH network to it to get a sense of how I plan to implement something like it into the sequence. Obviously this wouldn't be the final look of the MASH network as I plan to have it be a long energy stream that the monk will rise up into it once he’s achieved his flow and found his Passion. Going back to the exercises we did, I felt like the Dynamics exercise was most appropriate for the look I wanted to achieve or at the very least, a placeholder look for the animatic. Trying to get it the way I exactly wanted was a bit tricky as the more subdivision cubes I made, the laggier it was to do in Maya which I wasn’t too sure what the cause of it was per say but i still managed to make a workaround by having the camera bit closer into the scene. Other than painting these cubes black, that was all the changes I ended up doing for the sequence.
youtube
Group’s Thoughts and Jon’s feedback
Presenting the animatic to everyone, everyone was really impressed by the MASH network animation and how it filled up the screen which was really great to hear. On top of that, Jon really liked my perspective and camera shots of the sequence I created and the lead up to the MASH network which was really reassuring to hear. Looking back on it all, I think I want to experiment with it just a little bit more before I do any mass modeling just yet just so I know everything will come out as it should.
0 notes
Text
Collab Project - First Animatic Produced
Today, I decided I would work on my first animatic for my sequence based off the most recent sketch I had for the principle of ‘Passion’. Since this was an animatic, I thought I would keep it very simple by not worrying too much about movement like shoulder muscles flexing the way they should or making everything to realistic. In my animatic, I also used the free Anng Rig that we used in the last project to experiment with character movement as it was perfect for my sequence as a temporary placeholder character for my monk character once I’ve made him in Blender.
The animation process was really smooth to do and didn’t really have any problems with it when producing the animatic as I animated the sequence using ‘Auto’ instead of stepped as it allowed me to make something very quickly for something to show towards my group. In terms of challenges, I think they were pretty non-existent for the most part as I didn’t find any troubles with as I was making the sequence other than maybe not get the ball to flow just right on Anng’s arm.
Although because I was showing this sequence to the group and may of done this sequence a little too late as I ended up not being able to produce the MASH network I wanted at the end of the sequence in time for the tutorial. Never the less, this is something I’m definitely planning to explore once I come back to the sequence. For now, I simply just placed a placeholder text saying ‘MASH Netowrks’ to simulate it’s position.
youtube
Group Feedback and Notes
In the group meeting we had, I showcased my animatic to the rest of the group which everyone responded really well too for both the idea I was trying to show off as well as the animation as quite a few people from the group really liked how smooth I had the animation despite only being an animatic. I think for next time, I plan to involve the other part of the MASH network into the sequence as well as maybe offering some movement into it as well.
0 notes
Last Seen Blogs


theartofbeingtosha
The Art Of Being Tosha
tofunabia
syl.
justanaverageteenageheroine
what do people usually put here

vvondrland
Once Upon A Disney Dream