#OH AND THE POSE AND FIT. BASED HEAVILY ON A PHOTO FROM PINTEREST
Text
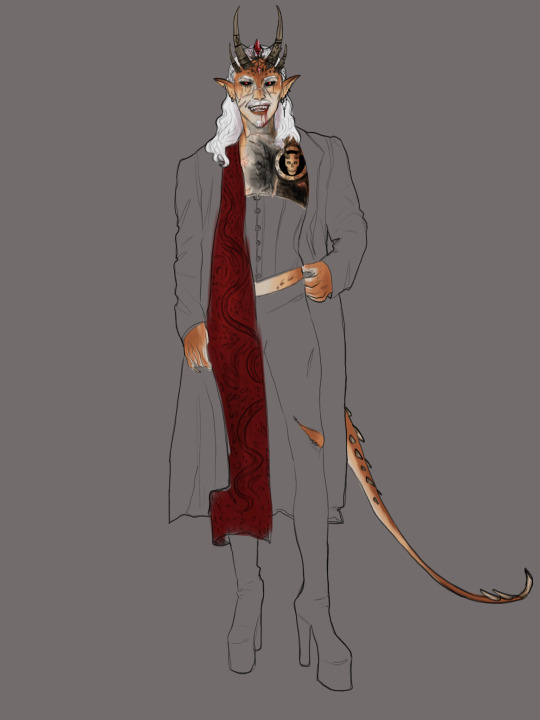
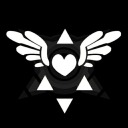
Gabriel- The Dark Urge
Primaster of the Bhaalist cult of Baldur's Gate
I wanted to redesign my dark urge to look like the slayer form but a tiefling
#OC Gabriel#Austinart#Bg3#baldur's gate 3#Tumblr killed the quality. okay#I thought his original design being kinda like the. Default dragonborn but a tiefling was a little bland ig.#Oh and this drawing is pre- tadpole#OH AND THE POSE AND FIT. BASED HEAVILY ON A PHOTO FROM PINTEREST
124 notes
·
View notes
Photo
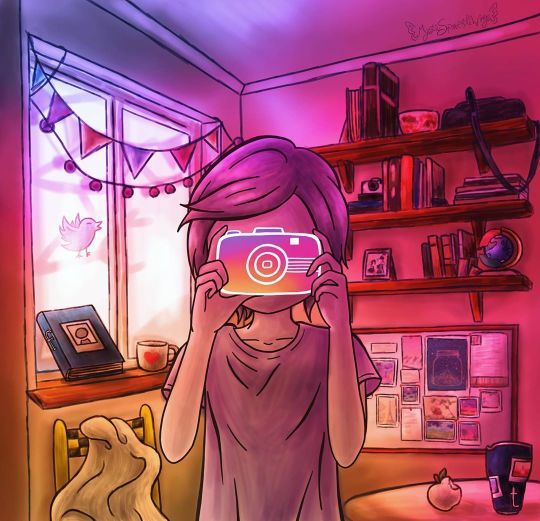
Behind the Screens
Oh, look, a reminder of why I don't do detailed backgrounds often!
Okay, okay, this is actually an entry for projecteducate's All Mediums Contest: From Logos To Art. It sounded like a fun challenge, so I thought I'd take a stab at it.
(Hopefully obviously) My primary logo choice/inspiration was the Instagram logo, largely because I had a strong visual idea for it in my mind right away. However, if you look closely there are logo inspirations hiding in there, too. Some of them I think are more obvious, while others are more subtle. In case you'd rather try to find them on your own, I'll list them in small text so you can skip to the next paragraph and not be spoiled.
Moving left to right, top to bottom: Outside the window is the Twitter bird, tweeting away; Then we have a literal FaceBook propped up against the window, and next to it a "Ko-Fi" Coffee cup; below the window we have a chair, the SnapChair, based off the SnapChat logo/ghost, which I am particularly proud of. On the right side of the art, we have a globe with some plastic bits that's inspired by the Google Chrome logo; then a PinBoard as a reference to Pinterest; and side-by-side on the table we have an Apple-apple and a Tumblr-tumbler. Fun fact: Because of that apple I now know there are in fact real apple species that have white skin, the most common among them seeming to be the "white transparent" variety.
You'll notice all the logos have something to do with the internet/computers/social media, and though I did think about sneaking in a couple of other logos like Dominos or the NBC Peacock (since those logos have good visuals), I ultimately decided it was better to stick to a more cohesive theme. This is also where the title came from, as the idea is this is the reality behind the screens of a perfectly poised Instagram photo.
And therein lies the further theme/message you can take away from this; Notice how the figure is holding the camera so that we can't see their face at all, like a mask. And how the other logos have crept into the rest of the scene, in a way that a lot of them you probably wouldn't notice as internet icons if it wasn't pointed out to you. Both of these are realities for a lot of people. On the internet, we put on a facade like a mask. We control the narrative of what people see of us. And our online presence and habits sneak into our lives in ways we might not notice right away. Both things happen for better or worse, and they can and do happen to anyone, regardless of who you are.
To that end, I consciously tried to make the person holding the camera little androgynous, so that it could be a boy or girl, but since this is me we're talking about I'm pretty sure it leans more notably on the feminine side. And it doesn't help that for the positioning of the hands I had to use reference photos of myself when I couldn't find quite what I was looking for online.
Speaking of which; to make the art I started out with a traditional sketch of the figure and the background bits that were inspired by logos, except for the Pinboard and Kofi/coffee cup. And it's kinda funny because I wanted to base the camera design off of one of the newer instant Polaroid cameras (as that seemed the most fitting to transform into the Instagram Logo camera), and fortunately when I was taking the reference photos my phone is sized just so that I could use it as more or less a stand-in or base. This worked out even better because it meant I could just take the photos in front of a mirror instead of having to set a timer and hope I could pose correctly from a distance.
I scanned the sketches in, and then came the trickier part: That background. Especially since a lot of the concept here relies pretty heavily on it.
I used a lot of reference photos I found online for this. I did have a basic, rudimentary sketch of my own that I made without any references, but I knew to get the lighting and perspective right I was going to need some actual photos to go off of, and I don't personally have a room that looks like what I had in mind for this.
Based on these photos, I did end up putting the shelves over the pinboard, as opposed to putting the pinboard higher on the wall, but other than that and some slight adjusts to the perspective, my general idea for the room stayed the same.
And, given my tablet situation, I gave myself a bit of break and decided not to do perfectly clean, solid linework for anything other than the human figure and the camera they're holding. The camera kinda had to have clean lines for this to work, and I thought the figure would stand out from the background better if they were done with clean lines. (And I'm pretty sure I was right about that.)
For once in my life, I mostly started in the back and moved my way forward. The walls and ceilings, then the window, then the shelves and the stuff on them, then the banners over the window.
And my process reminded largely the same throughout: Loosely line the object, give it a base layer of color, then go back and shade/lighten as necessary. And I was using semi-realistic colors, though I knew they were going to get largely disguised later on when I did the all-over overlay to really drive the Instagram logo inspiration home.
Naturally, all the stuff on the shelves was a largely more annoying undertaking than I'd anticipated, but it wasn't quite as bad as the multitude of books I had to do for World in a Book. It's not even that drawing in a bunch of objects like that is hard, necessarily, it just takes a while to get through if you want it to look right.
Anyway. Once all of that was done, I took a break to work on the figure and camera, getting the lines done and then moving on once again.
Then it was the other logo bits' turn. Once I had them all lined and properly arranged/placed (as they were drawn as separate, individual items from the rest of the scene), I colored each one using the actual logo colors first, then went back to shade them, and then fiddled with some adjustments to bring the saturation down a little and make them blend a bit better with the overall tone. I would end up having to undo some of this after I added the overlay, and as otherwise with that in place some of the logo-inspired things would've either blended in too well or stood out way too much, depending on which one it was. (The camera is a bit of an exception here as instead of getting proper shading, I opted to line it only and just use my home-made gradient inside of it.
Once those were taken care of, I back-tracked to color in the figure. Which went similarly to everything else, save for this time I'd use multiple layers for the shading/highlights until I was happy with it, then I merged all that onto a layer about the base color. And then, because I have one solid blue-gray base color for them, I then went back and separated the hair, skin, and shirt with their own unique colors.
That was all the coloring done, so I moved on to filling all the blank "photo" spaces I'd left everywhere; the pinboard, the tumbler, even a little picture on one of the shelves. For this, I simply used my own artworks as that seemed like the fastest and easiest way. I just went through my gallery, found pieces I thought would fit properly, then copy & pasted them in and adjusted them to size. A few I did a little perspective warping on just to be thorough, but nothing too crazy.
Finally, then I could move on to arguably the most important part: The overlay.
Actually, aside from the overlay making the whole image look a little bit too dark, a little too saturated, that went a lot smoother than I thought it would. I just had to turn the saturation down a bit and bring the lightness up to fix that.
Or, that's what I thought. I must've saved this thing 6 or 7 times thinking it was finished before spotting this, that, or the other thing (usually related to lighting or shading) that needed to be fixed.
First, it was just fiddling with the overlay layer because it still seemed too dark overall, then it was tinkering with shading in various places, and then I decided to drop the ko-fi cup in there because it felt like that spot on the windowsill needed something else and I really wanted just one more logo reference. And then the bottom left corner I thought I fixed earlier now seemed too dark, so I had to un-fix/re-fix that.
And of course, even after all that back-and-forth, I thought I was finally, finally done when I noticed the black checkerboard squares on the SnapChair were too dark of a black compared to the blacks/darks elsewhere in the photo, especially considering how light the area around the chair is. I'm sure I could've left it alone and it would've been okay, but my own brain wouldn't let me. So I fixed it! It's not even that noticeable of a difference, but it makes my brain feel so much better knowing it was indeed fixed.
Fortunately, after that (at least for now) I stopped noticing things to tweak/fix. It's still not completely perfect, but the things I could continue playing with are at least to my satisfaction to the point I'm comfortable calling it finished. Though, honestly, it already feels like this description should be a lot longer when I think about the 3-4 days I spent working on this.
It was a lot of work, but just like I thought it would be, it was fun and I'm really happy with how it turned out. It was a real challenge as far as shading and perspective go, and obviously, for as strong of an image I had in my head when I started, it wasn't exactly a cakewalk to get it there. A lot of the lines are rough up-close, but they don't look so bad when there's so much else going on in the picture to distract from them. Maybe I'll try the "softer" lines like this more often.
I do know one thing, though, I'm going to be avoiding detailed backgrounds for a while. They always take a lot out of me.
____
Artwork (c) me, MysticSparkleWings
I do not own any of the logos that inspired parts of this artwork
____
Where to find me & my artwork:
My Website | Commission Info + Prices | Ko-Fi | dA Print Shop | RedBubble | Twitter | Tumblr | Instagram
2 notes
·
View notes
Last Seen Blogs
kviatart
Natural craft supplies
larucheanimation
La ruche animation
ghosttaleau
GhostTale
peternoooooo
Its Easy Being Green
robertdownsphotographyblog-blog
My First Drum Set.