#but she had. a green powder product placement in the video.
Text
Homework Assignment #1: Transformation Photo Album - Critiques
Check out the students' work in their first assignment of TDR Charm School 4! For this assignment, the girls had to take a photo after each step of their makeup application process. Let’s see how they did! To view their transformation photo album, click their name!
Erica Strada
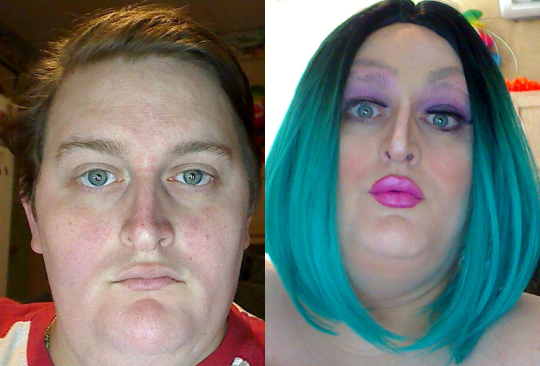
Analyse: Hi, Erica! First off, I just want to say that you were maybe the most thorough in talking to Letha and myself while you were painting, and I 100% think that elevated your submission, because you were able to get that live feedback. Keep doing that and working hard, and you'll see so much growth!
Brow coverage can be tricky, and it's something that just gets better with time. I think I've shared most of my brow coverage tips/crits in your sisters' critiques, so make sure you read those, but like I said, it's just something to practice and find out what process works best for you.
Looking at where you're placing your contour, I'd definitely suggest raising it up the face quite a bit. I know we talked about this in PM, but it caused you to run into the problem that your cheek contour was so low and angled down so much that it kind of collided with your jawline contour and it wasn't clear exactly what was going on. You went back in with your highlight cream to clean up that line, which helped to clarify the intent of everything, but I think that trying a higher placement will definitely help to avoid that problem.
I think for brows, this is a good start. I like the brow on the left side of the picture a lot more, and I know sometimes the brows just don't want to match. It happens, and you just roll with the punches, but I think the left side (your right, I guess?) brow is definitely a good starting point. You might also play with some different products. Pencils are good and creamy, and personally, I'm a big fan of a gel for brows. ELF has some good gel pots for like $3 that you can use and then set with a powder. My general brow technique is that I'll kind of sketch the shape light with a pencil (using the connect-the-dots technique where you put where you want the brow to start, arch, and end, and then you connect them in a smooth line), then I go in with a gel, and then set it with powders.
I like that blush, but I think you could go super over the top with it. You said that Mimi Bobeck was inspiration for this mug (and I still think she is such a great inspo! She's basically a drag queen already lol), and you look at pictured of Kathy Kinney in that role, and they were not afraid of slatheringggg blush on her. I'd love to see you try a big dramatic wing, and maybe look into a darker liner (either a marker or a gel, if you don't want to go liquid). Normally I would say something about not taking the color all the way up to the brow, but knowing that Mimi was an inspiration for this mug, I'm not mad at it. Just make sure when you're doing a look that isn't this, you leave some white between the brows and the shadows.
Bitch, I love this lip! It's such a fun color, works well with the eyes, and looks very clean. You might play with overdrawing the bottom a bit more, but I really have no complaints for this lip. Werq. Anyways, I think this is a great first submission! Something I think that will help you as we go on is just working on getting your time down. As somebody who also likes to take my time to paint (my record during CS3 was 6 hours), I know how stressful it can be, but as you do it more, eventually your time will go down. It can also be helpful (and weirdly fun) to practice and be like "ok, I'm gonna get this done in 2 hours," and it usually turns out better than expected. For now though, feel free to take your time and really find what works for you! Congrats, and I can't wait for your test!
Letha: Hey Erica! I want to start off by commending how communicative you were with us throughout your painting process. You talked to us and you really took your time, and doing that (along with practice) will really help you to improve! Now, on to da mug! Starting with the brow coverage, I think she started off covered pretty well (a few more coats and some smoothing/pressing might not be a bad idea though), but by blending the eyeshadow too roughly on top, it disturbed the glued-down hairs underneath, so be sure to be very gentle. Using shimmery eyeshadows, as those appear to be, also won’t serve you well in trying to hide underlying texture, so you will want to stay with more matte colors, at least when working over the brows. The eyeshadows could also have more POP, you said your inspiration was Mimi and her eyeshadow basically hit you over the face, and yours isn’t quite there yet With your redrawn brows, I like the overall shape, but they’re a bit muddy/patchy in texture. I think using a more pigmented product with a very small brush would be better, whether you go for an ombre brow, a brow with hair strokes, or even a solid shape. With regards to contour, I do agree with Ana that the cheeks got a bit low and correcting them was a good idea, so good on you for doing that. The blush is a pretty color, but could be more blended up so it’s not as stripey. The forehead contour is a nice shape but I think your powder made it look a bit patchy, so I would recomend going back through with a large powder brush and dusting off excess/blending edges. The nose contour started off a bit tilted but you were able to improve it, watch out with taking foundation off the nose though, you can go back and reapply if you take it off by accident. With your lashes, I personally think they could be bigger, as well as being closer to your real lashes. If I were you, I would practice placing them (without any glue) as close to your real lashes as possible, or at least the inner corner. Some more dramatic liner/tightlining could help to hide the lash band as well. That lip color is very well done and easily my favorite part of this paint, you have that part down pat for sure! Overall, you have some points to improve on, but your willingness to learn is showing!
Kushboo

Analyse: Hello, Kushboo! I'm just going to follow along in your album and give my crits step-by-step as I see things! Brow coverage looks pretty good (until the one comes up :\ ), so good job on that and on fixing the problem when it did happen. Something that will help with that is to think of anything on top of brow coverage more as dabbing and pressing motions than swiping or side-to-side motions. It might help to use a sponge for that part to apply the foundation on top of the brow coverage.
This blending on the contour already looks so much better than what we saw in your audition, so I'm so glad to see that you're already taking all these things into account. Keep this up and you'll have an entirely new mug by the end of CS4! ALSO, I LOVE THIS BLUSH. And I'm sure you might be one of the first times in Charm School that Letha doesn't say "more blush." You might want to play with laying down some blush at the forehead contour, too. It just helps to really liven up the forehead. I'm also a big fan of just a tiny little bit of blush on the chin, but that's a personal taste thing, but try it if you want.
I think this is such a pretty color on the eyes. As Charm School goes on, I'd recommend you just try out different eye makeup shapes and techniques, because right now (even though it is a pretty color), it does just all kind of scream that one color. Add interest to the eye with different colors to make it look more dimensional, and as with most makeup things, make sure it's blended. These brows are a good starting point, and honestly my biggest issue with them is that I think that they can taper more on the outside ends. Right now, they look kind of blocky, so a more tapered end will help to soften and feminize them.
I like this lip color! I think it was a smart choice to go with a more subdued color on the lip when you had such bold colors in the eye makeup and the blush, but it's still got an interesting metallic quality. Going forward, I would make sure you work on just having very defined lines. (Also, watch out in your pictures that you don't show off the line on the lip where the lipstick stops. Your second to last picture, I think you were going for a pouty kind of look, but that was the first thing my eye went to). Overall, I think this was a good submission and already such a great improvement from your audition! It's very clear you took what Letha said in the the video and put it to use. Keep that up and you'll do very well in this competition!
Letha: Heya Kushboo! So I know you had trouble with brow coverage, but I can see you have potential with keeping them down, so really make sure to flatten/press them down and be super delicate around them (applying your foundation to them in dabbing motions with a sponge might help, instead of rubbing with a pan stick). The contour is sitting pretty high on the cheeks, which can work, but it doesn’t give you as much blending room. Until you pile on ten pounds of BLUSH that is. Is that a lot of blush? Yes. Am I mad at it? Hell no. I think it helps to blend out your contour nicely. But if you’ll note, you blended the blush under the contour, which isn’t the best for restructuring the face. Where the bottom edge of your blush is, THAT’S where I would suggest drawing your contour (and blending up from there). The edges of the forehead could be a bit more blended as well. That eyeshadow color is gorgeous and matches the blush really well, but make sure to soften the edges, as they’re a bit harsh right now. Blending with a white, translucent, or even light flesh toned powder could help with those edges. The new brows aren’t bad, a bit high though, placing the front end a bit closer to your natural brow would help you get more of an arched shape. I usually do a smoky eye myself, so the Kajal on the lid isn’t a bad choice, just make sure it’s darkest right on the lid and blends into that green. I would really try getting some lashes, as they can elevate a look and add drama, as well as adjusting the exaggerated proportions that you created. That’s a gorgeous lip color, make sure your edges are crisp though (if it’s a pencil you can sketch small strokes in, if it’s a liquid lipstick, you have to really commit to the line/shape). All in all, I can already see improvement from where you started, and must say that I LOVE this color combo, so good job!
Luna
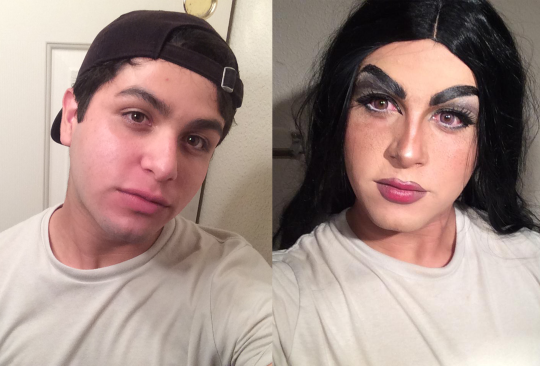
Analyse: I'm just going to kind of go through your album step-by-step and make any comments about anything I see along the way, but I want to start off by commending you for talking to me and Letha while you were working on your mug, because tbh it's so much better to get that live feedback. Not only does it help your submission look better, but it also helps you learn *how* to fix certain things and *where* they went wrong, so kudos to you for that.
Your brow coverage looks pretty good. It's a learning curve and it gets better with more practice, but my recommendation is to try different techniques and find out what works best for you and your process. Back when I had brows to cover, I was a big fan of the swirling method and then licking the glue stick to smooth them out. Some people use the back of a spoon to smooth it down. Ultimately, whatever works for you, go with that.
It's very clear that you have a good idea of where/how to lay your cheek contour, so keep doing that. We talked a little about brows in our PM, but just keep playing with shape and placement. Right now they read a little Angry Eyebrows™, but sometimes the look can call for that. For the eyes, just make sure that how blended out the shadows are is even between the eyes. You can see in your pictures that on one eye, the shadow is blended out a lot further than the other eye, and that's just a matter of going back in with a matte white and just kind of doing that back and forth until you find the right balance. Also, while we're up there on the face, be careful with your shimmery highlight placement, because putting that shimmery highlight there kind of undoes the restructuring of the face and makes your natural brow bone very prominent (and also draws attention to any texture left behind by the covered natural brow). That being said, I like the placement of your other highlights. The peach blush is very cute and reads very like, innocent natural woman to me. Letha will probably tell you more blush, and tbh I wouldn't be mad at that. Also, I'm a big fan of blush at the forehead contour too for the same reason that it adds some life back into the face. I can't really tell if you did that here which either means a) you didn't, or b) it could use some more.
Like your contour, you seem to have a good idea of what you like with your liner. As you said in your PM, you prefer a straight out dramatic liner, which is fine and can look great; just remember that Charm School is about growth and we want to see you learning and trying new things, so it might be worthwhile to step outside of your comfort zone. Your lips are a cute shape, and I like that you have multiple colors on there. Like, I recommended in PM, I think a lighter highlight shade in the middle of the lip would add more dimension (especially since you are going for a very pouty lip), because even with the cherry red, the lips do still read pretty dark.
I love that you've come up with this stippling sponge technique to do freckles, but I think the outcome of it falls a little flat for me. It kind of reads as like, maybe some fallout landed on your cheeks. I think if you want it to read more freckly, it could help to go in and make sure you have some more variation in sizes and maybe a few shades in the same range. If you look at natural freckles, they're not all the same shade and size. All in all, I think this is such a strong first submission, and I got super nitpicky with these critiques because it's clear that you already are comfortable with a lot of what you're doing makeup-wise. Congrats on a great first submission, and I look forward to your test!
Letha: Luna, this is such a cute look! Your brow coverage is pretty darn good, as well as you leaving out the front remnant to base your new brow off of, so props to ya on that. The eyeshadow on top is well blended, but does catch the light and draw some attention to hairs that are there by making them shine. Your contour placement is also overall pretty good, I would work on blending the top of the cheek contour a bit more, as well as the sides of your nose, as they read just a bit stripey at the moment. Blush is nice, as is highlight. Lashes are well placed, and I like the liner shape, it’s not a normal wing but it goes with the “cutesey” vibe you were angling toward. I would suggest putting a bit more mascara on the lower lashes, as they look pretty bare at the moment. Lastly, I’m not huge on the big freckle trend going on, but it can work depending on the look, and with the vibe you have going, it works here. Up close they’re very convincing freckles. From far away though, they look a little muddy and might just read as “texture” to someone in an audience. Just something to keep in mind. This is a well done look and you should be proud of yourself, Luna!
Marina Lumiere

Analyse: Hi, Marina! I'm just going to give my comments on your album kind of following your step-by-step process. Before that though, I just want to give you a shoutout for rolling with the punches after you lost your pictures from your first try at the homework. TBH, so much of being successful at Charm School and TDR (and drag and life, I guess) is being able to adjust and adapt, especially when things don't go as planned, so congrats on that. Now, onto makeup!
I don't know many queens that cover their brows with spirit gum, so you're braver than most. I'd be interested to know if you've experimented with other methods of covering them (like glue stick or Pros-Aide)? Either way, I think you'll be helped a lot by setting your adhesive with a powder! I think the color story you've chosen for the shadows is very nice. Be careful that you're not pulling up brow coverage when you're blending the eyeshadows. When you're going over your brow coverage, it's helpful to think more of dabbing with the brush than necessarily swiping, and that will help to not pull up that coverage and reveal the texture of your natural brows. I really like this graphic undereye, and it's very trendy. I'd just work on making it cleaner and really defining those lines. The brows are cute! You might try going in with a white underneath them to add that highlight there. It'll also really help in defining the shape of the brow.
Your contour sits very low on your face, so you might try placing that a bit higher next time. I'd also suggest you focus on blending the contour up more as well, just to really have that gradient from your contour shade to your foundation shade. You might also want to try contouring your jawline and forehead. Harper Valley talks a little about it in this makeup tutorial about faux queens not typically needing to contour the forehead as much as cismen drag queens do, but I think if you added that, it would help to make the face a more cohesive mug and make it draggier overall. Also on the topic of forehead, I would add some blush along the forehead contour if/when you do that, just to bring some life back to that part of the face as well.
I can't tell if the lips are a little fuzzy because of the picture or because of application, but just make sure that the definition of the lip shape is something you're keeping in mind. A darker liner might be something worth trying out next time. All in all, I see a lot of positive things going on here, and I'm excited to see your growth throughout Charm School!
Letha: Immediately what drew me in were the eyes, specifically the bottom lash line and the eyebrows. I think those were definitely your strongest elements here and really suit your face/style. I also like the colors on the eyes, but they got a bit muddy when mixed in with your brow coverage. To help cancel that out, I would suggest using a very pigmented concealer over top to cancel with a healthy dose of bright white powder (I sometimes even use a bit of my beard cover under all of that to help cancel out the tones). Same blending over covered brow tips apply here, and I would suggest going under your NEW brow and doing a stronger brow bone highlight, then blending down to make more of a gradient and having a better contrast in color. I like the bottom lashes but I think the top also needs a good dose of lash as well, as it would pull the eye together and be more balanced. Your cheek contour could be a bit higher, as it’s a bit low at the moment, but I like the blush color. I like your natural nose shape and I think it could work, especially in the context of this look, but a light dusting of contour on the nose helps to add some more dimension to the face and not appear as “mask-like”. The lips are an okay shape, but your lines could be cleaner, so be sure to take your time, and even try going for more dimension by adding some white to the middle of the lip or darkening the outer edges. All in all, I think you have a cool look here, and one you can really work with, so keep these notes in mind and keep up the good work!
Nikita Nox
Analyse: Hi, Nikita! I'm just gonna go through your album step-by-step and comment as I go. Brow coverage is definitely one of the things it's clear you've worked on. My only comment on that is that you can see the cooler tones of the hair a tiny little bit through the foundation. You might play with color correcting that until you can upgrade to a fuller coverage theatre-grade foundation.
I think it's great that you have ideas in your head of queens you want to emulate. As a baby queen, sometimes that can be a great way to learn certain skills. Just make sure you don't latch on to one idea of "this is what I want this to be," and give yourself the space to explore and work on other skills. For the white on the lids, I think it's great to prime to lids to make the colors pop more, but I don't quite see it in these pictures, so a different product might behoove that process. I love a good clown white. A lot of queens use the Ben Nye clown white, but I've become a disciple of the Kryolan Supracolor clown white since Gluttoni Sinn suggested it to me. It's just creamier and blends easier.
I think brow shape is definitely something you can play with. Adding a highlight underneath the brow can help to clean up the lines and make the brow look a lot sharper. You might also look into other products that will help give you a fuller brow look, because using shadows can cause them to be a bit patchy. A real cheap one is the ELF gel pots, and they have a few shades of brunettey colors. You can also look into pencils if that's more up your alley.
Wings can be so hard to do, let alone get them to match, so that's something that will just get better with time. An easy thing that I think will automatically bump up the polish of your mug is going over the liner with a black shadow. It'll make it look a lot darker and less patchy, which will add to the overall drama of the eye.
With the powder contour/blush/highlight, make sure you blend that out a little more so you don't rock that Neapolitan ice cream look. Good job cleaning up the bottom side of the contour with your cream highlight. That makes it look a lot crisper. The rounded bottom lip reads almost cartoony to me or maybe clown, and I think that's just a bit of a disconnect from the rest of the mug, so I think it's worth playing around with different shapes. I would also love to see some more dimension in the lip with more colors and highlight. For the most part though, this was a great first submission, and I look forward to seeing your growth in this competition!
Letha: Hi Nikita! So immeidately what I noticed while looking through your album is that your brow coverage/foundation game are pretty strong, and that you have a good base to work off of. The contour shapes are quite good, s far as placement goes, and the blending is pretty good too. Could diffuse a bit more, but it’s a great start. The blush/contour aren’t quite melding though, ad they look like very separate creatures. One of the best keys to blending, whether on the eyes or the cheeks, is overlapping. It helps to make a gradient of color and really sell the illusion. With the eyeshadow, the colors are pretty but it all runs a touch muddy on the eye, there could be more of a defined blend/gradient, and more contrast in your color choice could add dimension. I like the liner shape, but try setting the shape with a black shadow or something more pigmented to make the black more uniformed. Love the lashes, they’re a great shape, make sure to do some tight-lining and add mascara to blend your real lashes in more (same on bottom). For the lips, I don’t mind the color, but do find it a bit sloppy. Not necessarily the shape, but the lipstick being a fairly satin finish and it being the only product you used, the only dimension there is from the lipstick catching the light, which isn’t the best idea when overdrawing. I would go in more with a lighter color to highlight and a darker one on the edges for more dimension. This is still a very solid effort though, good job girl!
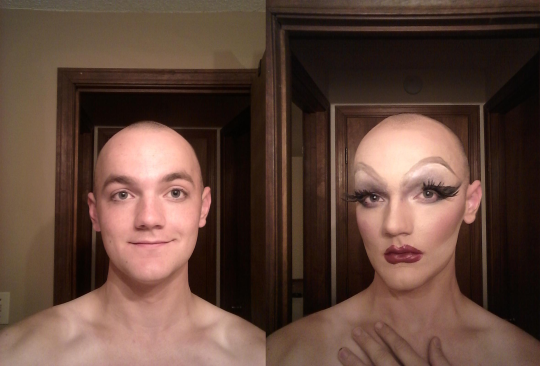
Ophelia Waters

Analyse: Oh, hello, Miss Waters! I'm just going to follow along your step-by-step and jot down any comments I have along the way. Right off the bat, I can see you are IN DETAIL with your descriptions, which I love, because it helps us help you more!
You already commented on it, but try to get as close a shave as possible. The smoother the surface to work on, the easier the application is going to be. Brow coverage and color correction look good and work for you. It looks like maybe a little later you had some brow popping issues (just a little bit), which happens.
A lot of the problems that I'm seeing, you've already addressed yourself with the same solutions I would give you (like the cakey-ness and maybe not pressing as much with the powders. You want her ~beat~ and *set*, but you don't want to dig the powders in so much that more sticks than is necessary. As for the muddiness, you can always go back in with more of whatever you need and clean it up in your "wet" stages before you set it all, and I think that would've helped here.
For the eyes, you said you're using clown white (I assume good ol' Ben Nye). That's already a cream (albeit pretty thick), so I don't think you need to be mixing that to make it more liquid. I know I've mentioned this in a couple other crits as well, but the Kryolan Supracolor clown white is quite a bit creamier, spreads like butter, and blends SO easily. I swear I'm not sponsored. I just love this product (especially compared with the Ben Nye, but like, the BN clown white has it's own merits, so, do with that what you will).
Next time you paint, I'd like to see you try doing your whole foundation/contour/highlight routine first before moving on to eyes. I think it'll just help to have some whole cohesion in the look. There are some queens who don't do any contouring of the cheekbone and just roll around in blush and call it a day, and if that's the look you're going for, I think there are some things you can do to move it in that direction, but I guess I see the cheek highlight and the blush and so I expect you to be going for a cheekbone contour, but then it's not there. That was basically just a long way of saying "make sure your intentions are clear," which is a huge part of what charm school is about, so I'm excited to see the direction your face takes!
I have similar critiques for brows and lips, and it's that they can be a bit cleaner and more defined. I'm a big fan of connect-the-dots brows, but make sure that when you're doing that, it's a smooth defined line. Next time, you might try going in and cleaning that up with a white cream, and for the lips, I would love to see you work on just making sure those lines are super defined.
Overall, I enjoyed this first submission from you! I look forward to seeing which direction your mug takes as you develop and refine your techniques!
Letha: Hello Ophelia! So what I first notice is the amount of product you’re using overall. It’s a lot. With makeup, even as much as we wear, you only want to use the MINIMUM amount to get the job done. This is most evident with your foundation. I would suggest dotting a little around the face, blending it in/out and adding more when you need it to get even coverage. It will make the setting process a lot easier too, as you will need less powder to set the wet foundation. The contour/highlight get a bit lost, so I would suggest amping them up next time you practice. I do see the blend though, it’s a good start. I see some blush, but it’s a bit low on the cheek. With the eye makeup, it’s very cartoony/dramatic, which I can get behind, but with that graphic style your lines/shapes need to be clean/graphic, so really take your time with a small detail brush to perfect those edges (and use less white, as too much will cause that cracking effect). Lashes and mascara are a must though, so remember them next time. The eyebrows have a good shape, just be sure to keep the shape crisper (small brush, confident brush strokes). The lips ran into some trouble, as well. I know you mentioned your shaving troubles, so work on that for next time, but also if that does happen, then paint with the grain of the hair so the stubble doesn’t mess up your line. The lips also got a bit cakey, so I would suggest taking some of that product off. Overall, you have an idea of what you want to do, but definitely keep the “less can be more” idea in mind for future paints. Keep it up!
Shillelagh

Analyse: Hey, girl! I'm just going to kind of critique along with your step-by-step, so that'll be how my thought (THOT) process is structured. As a real natural woman who use to have big ol' man brows, I understand your struggle. It's really just a trial and error game, figuring out what works for you. There are a million different techniques you can find on YouTube (and some I listed in Luna's crits). Just make sure you're getting them to lay as flat as possible and then getting powder in there to keep it that way. I've found that it's helpful to kind of go over the whole brow with a little bit of powder first and then you can really dig in with more on top of that and press it in so it's flattttt.
Set your foundation. Get that good Coty Airspun powder (there are a ton of other setting powders out there, too, but Coty is pretty readily available. Like, I get mine at Walgreen's). That will help to make the whole face look more matte and less shiny, it'll set the wet product, and will also help blending 1000%. (Also, back to brows for a hot second, if you're not pressing a powder onto the glue, that could be a HUGE contributor to why the brows are coming up). You've blended in your cream highlight pretty evenly. I would try with adding some highlight to the middle of the forehead. Contouring the forehead can definitely help with rounding it out and making it more feminine.
I know you ran into a problem with your brows popping and that kind of messes with the eye makeup, and so that will improve as you get better at covering your natural brows. Something you might want to try out is a white highlight under the brow you've painted on. It helps to define the new brow and restructure the face. I love a good wing, and I think it's cute with this look. Eyeliner is another thing that just gets better with time and practice.
The lips are a cute color! A single matte shade on the lips can be cute and can definitely be a good look, but I'd love to see you work on adding dimension and definition to the lips (especially since you're such a fierce lipsync artist and the lips are such a focal point of your performances). I understand that you run out of lash glue and stuff like that happens. In the future, it'll be helpful to do a check before you start painting to see if there's anything you might need, because nobody wants to make a 3am Walmart run with an unfinished beat. Congrats on your first submission, and I can't wait to see how you apply this feedback for your test!
Letha: Hey girl! SO, overall, you’ve got a good thing going. But it literally all comes down to one problem. SET YOUR FACE. You can’t blend powders, eyeshadows, much of ANYTHING over a wet face, except other creams. Once you set, a lot of things will be easier. Setting brow coverage will make shadows go over them a lot easier, so you shouldn’t have as much disturbed hairs. It makes drawing new brows a LOT easier, since you’re not drawing precise shapes on shifting sands. It makes the cheek contour easier to reinforce with powder (though I do love the cream shape you already did, but that will wipe right off easily). That being said, I really like your liner shape and it works well for you. Get some lashes/glue and thats a good start to an eye! The lip color is really prettyyyyyy, but the shape could be cleaner on the overdraw, and more dimension could be added. So, shopping list- setting powder, highlight powder, contour powder, lash glue, lashes. Add these and you could really be on your way, so keep it up and keep practicing!
#erica strada#kushboo#luna#marina lumiere#nikita nox#ophelia waters#shillelagh#tdr#tumblrs drag race#tdrcs4#charm school#drag#drag queen#baby queen
5 notes
·
View notes
Last Seen Blogs

silvermahogany
🐌Number 1 Webttore Misser🐜
nervouspearl
nervouspearl

lucassantostoons
Lucas Santos
yugyyexm
yyoung//rich
definetelynotavampire
GarlicLovesArt