#this bread was about seven hours from starter coming out of the fridge to bread coming out of the oven
Text
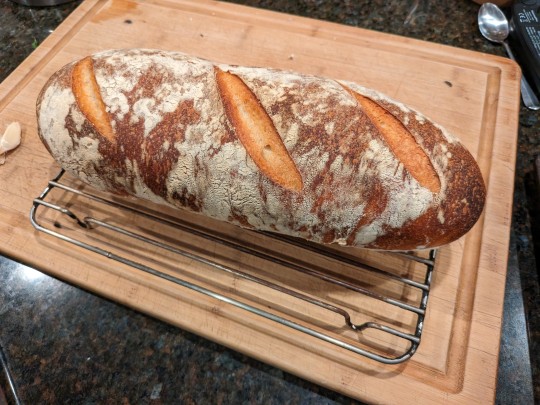
lately i've been doing an oil coat on the dough while it rises, allows for a wetter dough that doesn't stick to the paper i keep it in
but tonight i changed things up and tossed it in some flour instead
#sourdough bread#this bread was about seven hours from starter coming out of the fridge to bread coming out of the oven#push processing in the okeefe's pilot-warm oven it's the perfect proofing temp#only a hint of sour primarily wild yeast
5 notes
·
View notes
Text
Easy does it: seven simple new Yotam Ottolenghi recipes
One person’s idea of cooking simply is the next person’s culinary nightmare. For me, it’s about being able to stop at my greengrocer on the way home, pick up a couple of things that look good and make something within 20 or 30 minutes of getting in. My husband, Karl, on the other hand, has a completely different idea. If we’re having friends over at the weekend, he’ll want to spend a good amount of time prepping and cooking as much as he can beforehand, so that very little needs to be done when our guests are here.
There are other approaches, too. Esme, who tests my recipes, prefers to be in the garden at weekends. Her idea of simple cooking is to put something in the oven on a Saturday morning and leave it simmering away, ready to be eaten four or five hours later. My colleague Tara, on the other hand, can’t relax without knowing that a meal is ready a full day before it’s due to be eaten: sauces are in the fridge, stews in the freezer, vegetables are blanched or roasted and ready.
Cooking, for me, has always been about abundance, bounty, freshness and surprise
Whatever our take, it all looks effortless and easy when friends and family come to eat in our respective kitchens. But that’s only because we’ve worked out what makes cooking simple, relaxing and fun for us. This idea, then – that there’s more than one way to get a meal on the table – is what my new book Ottolenghi Simple is all about.
And, no, it’s not a contradiction in terms. I know: I’ve seen the raised eyebrows, I’ve heard the jokes. The one about the reader who thought there was part of a recipe missing because they had all the ingredients in their cupboard. Or the one about “just popping out to the local shop to buy the papers, milk, black garlic and sumac”.
I hold up my hands, absolutely. There have been lists to make and ingredients to find, but, truthfully, there’s not a recipe to my name that I feel sheepish about. Cooking, for me, has always been about abundance, bounty, freshness and surprise. Four big words to expect from a plate of food, so a single sprig of parsley was never going to cut the mustard. That’s the reason I’m so excited about these recipes: they’re still distinctly “Ottolenghi”, but simple in at least one way – and very often more than one.
Iranian herb fritters
Iranian herb fritters. Photograph: Jonathan Lovekin. Prop styling: Wei Tang
These can be snacked on at room temperature, or served with a green tahini sauce and some extra herbs. To make the tahini sauce, just blitz together 50g tahini, 30g parsley, half a crushed garlic clove, two tablespoons of lemon juice and an eighth of a teaspoon of salt in a blender, adding 125ml water at the end. (Holding back on the water allows the parsley to get really broken up, and turns the sauce as green as can be.) This is lovely spooned over grilled meat, fish and roast vegetables, so double or triple the batch: it will be fine in the fridge for up to five days. You might need to thin it with a little water or lemon juice.
These fritters are a bit of a fridge raid, using whatever herbs you have to hand. As long as you keep the total net weight the same and use a mixture, they’ll work wonderfully. The batter will keep, uncooked, for a day in the fridge.
Alternatively, pile the fritters into pitta bread with yoghurt, chilli sauce, pickled vegetables and tahini. If you go down that route, you’ll just need one fritter per person. The recipe makes eight fritters to serve four to eight.
40g dill, finely chopped
40g basil leaves, finely chopped
40g coriander leaves, finely chopped
1½ tsp ground cumin
50g fresh breadcrumbs (ie, from about 2 slices, crusts left on if soft)
3 tbsp barberries (or currants)
25g walnut halves, lightly toasted and roughly chopped
8 large eggs, beaten
Salt
60ml sunflower oil, for frying
Put everything bar the oil in a large bowl with half a teaspoon of salt, mix well and set aside.
Put two tablespoons of oil in a large, nonstick pan on a medium-high heat. Once hot, add a ladle of batter per fritter into the oil, cooking a few fritters at a time – you want each of them to be about 12cm wide. Fry for one to two minutes on each side, until crisp and golden brown, then transfer to a plate lined with kitchen paper and set aside while you repeat with the remaining batter and oil.
Serve warm or at room temperature.
Chickpeas and swiss chard with yoghurt
Chickpeas and swiss chard with yoghurt. Photograph: Jonathan Lovekin
Comfort food at its best, especially when served with steamed rice. Don’t worry if you don’t have coriander: it’s a nice little garnish, but the dish holds its own perfectly without. Make this up to six hours ahead, if you like, up to the point before you add the lemon juice and yoghurt. Assemble just before serving and serve at room temperature or just warmed through. Serves two.
2 carrots, peeled and chopped into 2cm pieces
45ml olive oil, plus extra to serve
Salt and black pepper
1 large onion, peeled and finely chopped
1 tsp caraway seeds
1½ tsp ground cumin
200g swiss chard leaves, cut into 1cm-thick strips
1 x 400g tin chickpeas, drained and rinsed (230g drained weight)
1 lemon – juice half of it, to get 1 tbsp, and cut the other half into 2 wedges, to serve
70g Greek-style yoghurt
5g coriander leaves (about 1¼ tbsp), roughly chopped
Heat the oven to 220C/425F/gas 7. Mix the carrots with a tablespoon of oil, a quarter-teaspoon of salt and a grind of pepper. Spread out on an oven tray lined with baking paper and roast for 20 minutes: they should still be a little crunchy.
Put the remaining two tablespoons of oil in a large frying pan on a medium heat, then fry the onion, caraway and cumin for 10 minutes, stirring occasionally, until golden brown. Stir in the chard, carrots, chickpeas, 75ml water, half a teaspoon of salt and a good grind of pepper, and cook for five minutes, until the chard is soft and hardly any liquid is left in the pan.
Turn off the heat, stir through the lemon juice, and serve with a generous spoonful of yoghurt, a sprinkle of coriander, a drizzle of oil and a wedge of lemon.
Whole roast celeriac with coriander-seed oil
Whole roast celeriac with coriander-seed oil. Photograph: Jonathan Lovekin
I’ve managed to achieve the seemingly impossible here, of taking a recipe from my Nopi cookbook and making it more complicated – by adding one more twist in the form of coriander seeds. I like to eat this as a starter, cut into wedges and served with a squeeze of lemon or a dollop of creme fraiche, but you can serve it as a side to a pork chop or steak. Serves four.
1 large celeriac, hairy roots discarded (no need to trim or peel), scrubbed clean (1.2kg net weight)
50ml olive oil, plus a little extra to drizzle
1½ tsp coriander seeds, lightly crushed
Flaked sea salt
1 lemon, cut into wedges, to serve
Heat the oven to 190C/375F/gas 5. Pierce the celeriac all over with a small sharp knife, about 20 times in total, then put it in a baking dish and rub generously with the oil, coriander seeds and two teaspoons of flaked salt. Roast for two and a half to three hours, basting every 30 minutes, until the celeriac is soft all the way through and golden brown on the outside.
Cut into wedges and serve with a wedge of lemon, a sprinkle of salt and a drizzle of oil.
Orzo with prawns, tomato and marinated feta
Orzo with prawns, tomato and marinated feta. Photograph: Louise Hagger/The Guardian. Food styling: Emily Kydd. Prop styling: Jennifer Kay. Food assistant: Katy Gilhooly.
I return to this time and again, for easy, one-pot suppers. Orzo is the little pasta in the shape of rice – easy to eat a lot of and widely available. If you start with prawns in their shells, keep a few heads on, just for the look. The marinated feta is lovely dotted over salads, so I tend to make a batch – it keeps in the fridge for up to a week. Serves four.
200g feta, broken into 1-2cm pieces
½ tsp chilli flakes
4 tsp fennel seeds, toasted and lightly crushed
75ml olive oil
250g orzo
Salt and black pepper
3 garlic cloves, peeled and crushed
3 strips finely shaved orange peel
1 x 400g tin chopped tomatoes
500ml vegetable stock
400g raw shelled prawns
30g basil leaves, roughly shredded
In a medium bowl, mix the feta with a quarter-teaspoon of the chilli flakes, two teaspoons of the fennel seeds and a tablespoon of oil. Set aside while you cook the orzo.
Put a large saute pan for which you have a lid on a medium-high heat. Add two tablespoons of oil, the orzo, an eighth of a teaspoon of salt and a good grind of pepper. Fry for three to four minutes, stirring frequently, until golden brown, then remove from the pan and set aside.
Return the pan to the same heat and add the remaining two tablespoons of oil, a quarter-teaspoon of chilli flakes, two teaspoons of fennel seeds, the garlic and the orange peel. Fry for a minute, until the garlic starts to brown lightly, then add the tomatoes, stock, 200ml water, three-quarters of a teaspoon of salt and plenty of pepper. Cook for two to three minutes, or until boiling, then stir in the fried orzo. Cover, then lower the heat to medium low and leave to simmer for 15 minutes, stirring once or twice, until the orzo is cooked. Remove the lid and cook for one to two minutes more, until the consistency is like a risotto. Stir in the prawns for two to three minutes, until they turn pink and are cooked. Stir in the basil and serve at once with the marinated feta sprinkled on top.
Beef sirloin and basil salad
This works as an impressive starter, as a lunch or light supper. All the elements can be prepared a day in advance and kept in the fridge; just don’t put the dish together until you’re about to serve. Serves four.
50g basil leaves
1 garlic clove, peeled and crushed
135ml olive oil
Salt and black pepper
2 x 200g beef sirloin steaks, each about 1.5cm thick
2 pitta breads, roughly torn into 3cm pieces
2 red chicory, leaves separated, then cut in half lengthways on the diagonal
40g rocket
3 tbsp lemon juice
60g parmesan, shaved
Photograph: Jay Brooks/The Guardian. Grooming: Dani Richardson at the Milton Agency using Chantecaille.
Put half the basil in the small bowl of a food processor with the garlic, 75ml oil and three teaspoons of salt, and blitz to make a thick dressing.
Season the beef well with a quarter-teaspoon of salt and a generous grind of black pepper. Pour a tablespoon of oil into a medium frying pan and put on a high heat. When the pan is very hot, sear the beef for three to four minutes (for medium-rare), turning once halfway through. Remove from the pan and leave to rest for 10 minutes.
Add the remaining three tablespoons of oil to the same pan and place on a high heat. When hot, add the pitta pieces and fry for two to three minutes in all, shaking the pan from time to time, until golden and crisp all over. Transfer to a plate lined with kitchen towel and sprinkle with a pinch of salt.
Put the chicory, rocket, lemon juice, parmesan, basil oil and remaining basil leaves in a large serving bowl.
To serve, cut the beef against the grain into ½cm-thick slices. Sprinkle with a pinch of salt and add to the salad bowl. Add the pitta pieces, toss gently and serve at once.
Bridget Jones’s pan-fried salmon with pine-nut salsa
Bridget Jones’s pan-fried salmon with pine-nut salsa. Photograph: Jonathan Lovekin. Prop styling: Wei Tang
This is the dish Patrick Dempsey’s character tells Renée Zellweger’s Bridget Jones that he would have brought her on their imaginary second date in Bridget Jones’s Baby. “From Ottolenghi,” Dempsey says, “delicious and healthy!” And easy, we might add. What sounded like a bit of product placement on our part was in fact no such thing: the recipe didn’t even exist on our menu, so this is a retrospective acknowledgement. Serves four.
100g currants
4 salmon fillets, skin on and pin-boned
100ml olive oil
Salt and black pepper
4 celery sticks, cut into 1cm dice, leaves removed but reserved to garnish
30g pine nuts, roughly chopped
40g capers, plus 2 tbsp of their brine
40g large green olives (about 8 in total), pitted and cut into 1cm dice
1 good pinch saffron threads (¼ tsp), mixed with 1 tbsp hot water
20g parsley leaves, roughly chopped
1 lemon – zest finely grated, to get 1 tsp, then juiced, to get 1 tsp
Cover the currants with boiling water and leave to soak for 20 minutes while you prep the salmon and make the salsa.
Mix the salmon with two teaspoons of oil, a third of a teaspoon of salt and a good grind of pepper.
Put 75ml olive oil in a large saute pan and place on a high heat. Add the celery and pine nuts, and fry for four to five minutes, stirring frequently, until the nuts begin to brown (don’t take your eyes off them, because they burn easily). Take the pan off the heat and stir in the capers and their brine, the olives, saffron and its water, and a pinch of salt. Drain the currants and add these with the parsley, lemon zest and lemon juice.
Put the remaining tablespoon of oil in a large frying pan and place on a medium-high heat. Once hot, lay in the salmon fillets skin side down and fry for three minutes, until the skin is crisp. Turn down the heat to medium, flip over the fillets and fry for two to four minutes more (timings will depend on how much you like the salmon cooked), then remove from the pan.
Arrange the cooked salmon on four plates and spoon over the salsa. If you have any, scatter the reserved celery leaves on top, and serve.
Nutella, sesame and hazelnut rolls
Nutella, sesame and hazelnut rolls. Photograph: Jonathan Lovekin. Prop styling: Wei Tang
Two assumptions here. One is that everyone has a jar of Nutella somewhere, and second that making your own dough and rolling it up into all sorts of deliciousness is easier than it looks. The result is somewhere between a cake and a biscuit, best enjoyed as a treat with a cup of tea or coffee. The dough is delicate, so it’s important you soften the Nutella until it’s nearly runny before spreading it. These are inspired by a similar pastry served at Landwer Cafe in Tel Aviv. Makes 10 rolls.
150g strong white bread flour, plus a little extra for dusting¾ tsp fast-action dried yeast1½ tsp caster sugar 3 tbsp olive oil, plus a little extra for greasing¼ tsp salt65ml lukewarm water 40g blanched hazelnuts, toasted and roughly chopped20g sesame seeds, lightly toasted150g Nutella, softened (in the microwave or gently on the stove, until easily spreadable)1 small orange – zest finely grated, to get 1 tsp2 tsp icing sugar
Put the flour, yeast, sugar, two tablespoons of oil and the salt in a large bowl and mix to combine. Gently pour in the water, then, using a spatula, bring the mixture together until combined into a dough. Transfer to a lightly oiled surface and, with lightly oiled hands, knead the dough for three minutes, until soft and elastic. (You may need to add a little more oil if it starts to stick to the surface or your hands.) Transfer to a lightly oiled bowl, cover with a clean, damp tea towel and leave to rise in a warm place for 40 minutes, until nearly doubled in size.
Heat the oven to 240C/465F/gas 9. Combine the hazelnuts and sesame seeds in a small bowl and set aside one tablespoon of the mix.
On a lightly floured surface, roll out the dough into a 40cm x 30cm rectangle, so that the longest side is towards you and parallel to the work surface. Using a spatula, spread the dough with the Nutella, leaving a 2cm border clear on the top edge. Sprinkle the orange zest evenly over the Nutella, then scatter over the sesame and hazelnut mix. With the longest side still towards you, roll the dough into a long sausage. Brush with the remaining tablespoon of oil, then sprinkle with the reserved tablespoon of sesame and hazelnuts (gently press these into the dough, so they stick). Trim the ends, cut the roll into 10 3cm-long segments and lay seam side down on an oven tray lined with baking paper.
Bake for about eight minutes, until golden brown, then dust with the icing sugar and leave to cool slightly before serving.
Fish sustainability varies by species, region and fishing or production method. For the best sources of salmon and prawns, check the Marine Conservation Society’s Good Fish Guide
Recipes taken from Ottolenghi Simple, published by Ebury Press at £25. To order a copy for £18, go to guardianbookshop.com or call 0330 333 6846.
• Commenting on this piece? If you would like your comment to be considered for inclusion on Weekend magazine’s letters page in print, please email [email protected], including your name and address (not for publication).
This article was edited on 4 September 2018, to correct the amount of salt used in the preparation of the salmon.
Source: https://www.theguardian.com/food/2018/sep/01/easy-does-it-seven-simple-yotam-ottolenghi-recipes

0 notes
Text
Yogurt makers to improve your snack time and microbiome
Declare your intent to ferment. (Joanna Kosinska via Unsplash/)
Fermented dairy has long been part of health fads, with the probiotic bacteria they contain marketed as active and happy cultures that valiantly wage war against digestive issues. In truth, there’s a lot of misinformation online about probiotics, their benefits, and their potential side effects. That doesn’t take away from the fact that many people enjoy eating yogurt as a source of dairy (or non-dairy) protein, calcium, and general yumminess. When you make your own at home, you can save money, control how much sugar you add, and reduce your consumption of single-use plastics. These four yogurt makers are an excellent addition to any kitchen.
Try your hand at food science. (Amazon/)
If four to five small, single-serving yogurts are on your weekly shopping list, this 32-ounce yogurt maker is a perfect tool to get you through the week with fresh dairy or dairy-free yogurt, just how you like it. With a footprint smaller than a sheet of paper, this machine can find a home right on your countertop for ease of use. A digital timer will alert you when your yogurt is ready, and you can set it for different lengths of time up to 19 hours, according to the recipe you are following and your personal preference.
Beautiful glass jars. (Amazon/)
If you want to inspire others with photos of the perfect breakfast, this cylindrical yogurt maker delivers both style and function. Instead of creating one large container of yogurt, you divide up your heated mixture of dairy (or non-dairy) milk and starter into seven six-ounce glass jars for culturing. Set the digital timer and gaze at your efforts through the clear lid of the machine while the liquid is turning into yogurt. The separate jars can be refrigerated with different flavor add-ins according to your tastes, and the BPA-free lids have rotary-date settings so you can be sure they’re fresh. On a hot day, try a swirl of frozen orange-juice concentrate for a unique citrus tang.
Essential for fans of Greek variety. (Amazon/)
When you strain yogurt to separate out whey and lactose, the remaining thick and creamy dish is known as Greek yogurt, or yogurt cheese. This strainer holds up to a half gallon of unstrained yogurt. Place it in your fridge over a period of 3-18 hours depending on how thick you want the finished product. Then level up your culinary skills by using the leftover whey in an assortment of recipes from bread to desserts.
Never run out of your favorite fermented treat. (Amazon/)
If you eat a lot of yogurt, this high-quality machine has a large production capacity and extra-convenient features. Make up to 50 ounces of yogurt in each batch, or about 9 small serving sizes. In addition to the usual heating cycle of a yogurt maker, this machine will also cool your yogurt when it’s been properly fermented. It also comes with a thermometer and a cloth strainer for Greek yogurt.
0 notes
Text
Adventures in Sourdough: The Starter
A renaissance is afoot. Social media is inundated with pictures of crusty loaves boasting burnished crackly tops, with cross-sections flaunting that well-sought-after ‘open crumb’. The millennial vice that is avocado toast has been given a makeover—avocados now sit on top of homemade, salt-of-the-earth-type fermented bread. In case you’ve been living under a rock, here is the TLDR: sourdough is the new black.
With seemingly nothing worthwhile to occupy our time with, humanity has turned to old-school bread making as the antidote to our collective boredom. Now that supermarket shelves are devoid of any form of active dry yeast, what better time to try your hand at making bread with the wild sort?
Sourdough might sound intimidating, slightly archaic even. If social media has not already won you over, I am here to make a case for it. There is a certain kind of magic that is found in building a rustic loaf out of nothing but flour, water, and time. Since we appear to have ample amounts of time on our hands (less true for flour, I’ll give you that), invest a fraction of it in some wild fermentation. You’re in for a wild time.
Over the next few weeks, we are going to get into the nitty-gritty of all things sourdough. But with all great adventures, we must begin with a disclaimer: you will develop an emotional attachment to your starter; other members of your household might resent you for keeping a jar of twangy, bubbly dough on the kitchen countertop; and it is going to take time. Sourdough involves saint-like volumes of patience, but I’ll make you a promise: it will be worth it. After all, Rome wasn’t built in a day.
Sourdough is a living thing. If you have ever made bread, you might have watched in rapturous wonder as your solid lump of dough balloons out into a pillowy mound. Modern-day bread-making often relies on those sachets of dried yeast (RIP) to inoculate your dough with the living organism that gives your bread that rise. But before yeast was domesticated, bakers relied on capturing wild yeast to bring life into the loaf.
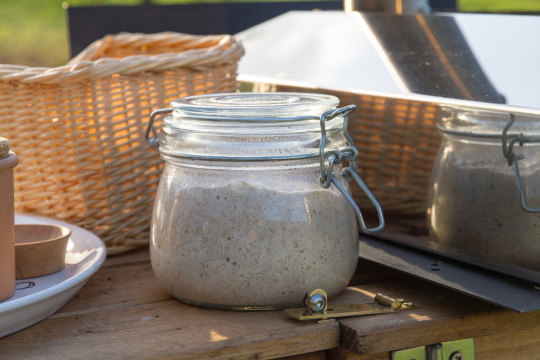
In order to harness the power of wild yeast and begin your sourdough journey, you will need to make a starter. This is simply a mixture of flour and water, left to languish somewhere warm, to let the wild yeast in the flour do its thing. The starter requires daily feeding, but it is an otherwise agreeable pet. It will take about five to seven days to get a truly bubbly, vibrant starter. And while that might seem like forever in our age of instant gratification, a starter is a gift that keeps on giving. Keep your starter happy and it might even outlive you. You could be cultivating your next family heirloom, and I will take the makings of a good loaf of bread over an old rusty bit of jewellery, any day.
Building blocks of a starter
The formula to a starter couldn’t be simpler: an equal weight of both flour and water. You can use any type of flour you have on hand, I tend to stick with the plain sort. Wild yeast, ever the hippies of the bread scene, prefer whole wheat. So, if you are looking to kick-start your fermentation, try a 50-50 mix of plain and whole wheat.
But yeast can be pickier when it comes to water. The chlorine in tap water can stunt its growth, or even kill it. Just use bottled or filtered water, and you’re golden. It is time to whip out that Brita filter.
You will need to find a good home for your starter: a clean jar that allows enough room for growth, and somewhere warm. I am writing this in the suffocating humidity of Singapore, so finding somewhere warm was a doddle for me. But if you are reading this from somewhere cooler (lucky you), I have always found that storing my starter on top of my fridge, where the surface of it feels the warmest, is enough for my starter to get going. But if you are partial to getting snuggly under a blanket in front of Netflix, I am sure the starter will welcome a cuddle.
Beginning a starter
Weigh out 50g of flour (25g each of plain and whole-wheat is great for getting a starter going) and 50g of filtered water at room temperature. Pour them out into your clean jar, and give it a stir until all the lumps disappear and a thick, shaggy paste forms. Loosely cover it with the lid. Do not screw it on, or the lid might ping off rather dramatically as your yeast lets out air. Leave it in a warm place for 24 hours.
After a day, you might notice little bubbles studded across the starter. The paste itself will have loosened, and might have even developed a thin striation of clear liquid. This liquid is the hooch that the yeast has produced, and yes, it is slightly alcoholic. But I trust that the alcohol-supply situation has not gotten so dire as to necessitate you drinking this. You can pour this off since hooch is ‘wasted energy’, but I like to keep it in when I stir to add an extra boost to flavour. For those who don’t drink, don’t worry, the final bread you make will not be alcoholic.
So, give it a stir, and pour out half of it. You could just chuck it down the bin, but in this time of making the most of what we’ve got, I recommend you find something to do with it. The internet is saturated with weird and wonderful ideas on how you can employ this excess starter, and we will discuss some of my favourite uses for this bit of spare dough in a later instalment.
Feed the starter again with 50g each of water and flour, stir, and let it rest. On the third day, you will likely see a lot more bubbles, and a whiff of it might invoke memories of yogurt or some twangy pickle. You’re on the way to flavour city. All the same, stir well, discard half, and refuel it with 50g of flour and water.
Feed, sleep, repeat. Keep this going every day and by the fifth to seventh day, your starter will be pockmarked with huge bubbles, nearly doubling in size with each feed. It is flourishing! It is thriving! It might take you slightly longer to get to this stage if your kitchen runs a little cooler, but with regular feeds and a warm enough environment, your starter will slowly come to life.
When your starter is regularly doubling in size about 12 hours after each feed, and is frothy and funky, it is ready for bread-making. Watch this space for part two, where we will discuss how to transform your starter into a truly magnificent sourdough.
Kick-starting a starter
For the slapdash cook, you have not been forgotten. If you feel you do not possess the diligence or patience required of a starter, there is a fast-track. I am not all too sure what sourdough purist will think so if you are a traditionalist: avert your eyes!
Wild yeast can also be found on the surface of fruit, fresh or dried. I have recently been made my starter out of about a quarter cup of raisins, left to steep in 50g of water. Give it a swirl, and you will notice the water turning cloudy. This, my friends, is the yeast. Scoop out the raisins (and chuck them into your morning porridge), and add in the 50g of flour. Continue feeding the starter as instructed, but you will find that the starter comes alive much sooner.
I haven’t tried this with other fruit, but I trust that it will yield similar results.
Name your starter
An unspoken rule of sourdough club is to name your starter. An unnamed starter feels neglected, and might not reward you as generously. This is a scientific fact.
You can go for the literal (‘Yeasty’, or ‘Sour Mama’), the endearing (‘Shirley’ or ‘Bartholomew’), or the plain ol’ weird and whacky. For me, it was a toss-up between Avril Levain and Clint Yeastwood. My affection for a good pun knows no bounds.
Go forth and have a go at rearing your very own sourdough starter. If you’re feeling terrifically lonely in social isolation, there is hope! A DMC with Avril Levain has always left me with a warm, fuzzy feeling. Check back in a week for the low down on how to work more sourdough alchemy.
Image Credit: The Pizza Bike, Flickr Creative Commons
0 notes
Link
Thanks to a growing interest in all things fermented, sourdough is more popular than ever—and for good reason. The perfect piece of sourdough is chewy and distinctively tangy, more complex in flavor than white bread, and healthier, too.
Raw sourdough is home to the same bacteria that are in yogurt, Lactobacilli, which consumes the flour in the same way as yeast, breaking down some of the gluten proteins while the bread rises. Because of this, some people who struggle to digest gluten find that they can tolerate sourdough bread. The longer the bread rises, the lower the gluten content will be. (That said, store-bought sourdough typically still contains plenty of gluten.)
Fermentation helps lower the bread’s phytic-acid content, explains Lori Nedescu, a registered dietitian and professional cyclist. Phytic acid is an antinutrient that inhibits the body’s ability to absorb minerals by bonding to them, and it’s present in most flours. Ultrarunner and registered dietitian Kylee Van Horn explains that phytic acid binds to iron, zinc, and calcium, which can be a concern for those eating a lot of seeds, grains, and legumes at each meal. “Lessening the phytic-acid content in a food can help increase absorption of these essential minerals,” she says. And athletes, especially those eating vegetarian or vegan diets, are particularly at risk for developing deficiencies.
Research also shows that the carbohydrates in sourdough digest slower, which means you won’t get a blood-sugar spike or the subsequent crash. “Keeping your blood sugar stable will not only help your energy levels and mood throughout the day, but it can help prevent cravings from happening,” says Van Horn. “ Simple carbohydrates—refined sugars, white flour, white rice—can cause a quick burst of energy for the body, but the body simultaneously releases a burst of insulin, which utilizes those sugars quickly. This causes a quick blood-sugar drop, which leads to hunger, jitteriness, trouble concentrating, and a drop in energy.”
“Good sourdough—which will be more rustic and less processed—is my first choice when it comes to bread,” Nedescu says. Opt for homemade or bakery-fresh loaves, Van Horn adds. “Commercial companies typically use a small amount of starter but then add commercial yeast and other flavors, like vinegar, to give it a sour taste,” she says. “The very short leavening process means it doesn’t have the same health benefits.”
Learning to bake sourdough is a great at-home project for athletes and foodies alike, but it does take time to perfect the process. It seems simple—all you need is a starter, flour, salt, and water—but the process is trickier than you might expect and requires patience to get right. Baking is a chemistry experiment, and sourdough is one of the hardest types of bread to perfect, since its yeast-free rising can be influenced by temperature, altitude, and the quality of ingredients, among other factors. Read on to learn how to start your own sourdough journey.
Find Your Starter
(Photo: Ina Peters/Stocksy)
The first thing you’ll need is a sourdough starter, which replaces the yeast you would add to typical bread dough. It looks a little like yogurt, but it’s just flour, water, and salt that has been left at the right temperature to encourage the wild yeast found naturally on flour to ferment. Precise measurements are key with sourdough baking, so you’ll also want to buy a food scale to measure your ingredients in grams. (You can find one for under $10 here.)
Most bakeries will give you a small sourdough starter if you ask—as will sourdough-baking friends—or you can buy one on Amazon. It’s easy to do it yourself, too. In a one-quart mason jar, combine 60 grams of whole-grain flour and 30 milliliters of warm water, and let it sit at room temperature, with the lid loose. After two days, stir in 40 milliliters of warm water and 40 grams of flour to feed it, says baker and bikepacker Karlee Gendron, who teaches a sourdough cooking class at Fort Whyte Farms in Alberta.
Then continue to feed it with 40 milliliters of water and 40 grams of flour daily, which is a standard feeding schedule for any starter kept at room temperature. You’ll notice it bubbling—that means it’s beginning to ferment! At around seven days (or by the time your starter is bubbling consistently), it’s ready to use in baking.
Outgrowing your mason jar? Skip to the sourdough pancake recipe below or discard some of the starter, but don’t stop feeding it. “Each day before feeding, I recommend discarding about two tablespoons of starter in the jar, or you will eventually run out of room,” Gendron warns. “Or you could take it out and use that for something like pancakes, or give it to a friend to start their starter.”
You can slow the fermentation process by storing your starter in the fridge and feeding it only once per week. But be sure to take your starter out of the fridge at least two days prior to baking. You’ll want to feed it twice a day and wait until it’s actively bubbling again before beginning the baking process, Gendron says.
Get Baking
Baking sourdough takes a couple of days, though your actual time in the kitchen will be minimal. You’ll need a Dutch oven: these heavy cast-iron pots hold in heat and trap steam for the perfect baking environment for bread. If you don’t have one, you can use any ovenproof heavy pot with a tight-fitting lid or a baking stone with an inverted roasting pan (as a makeshift lid), but cast-iron does make a difference.
Below, Gendron shares her favorite way to turn a sourdough starter into an edible loaf of bread. She has perfected her recipe after years of trial and error and emphasizes that baking sourdough is hard to get right. Expect a few imperfect loaves before you nail it.
Basic Sourdough Bread
Ingredients
A food scale
Sourdough starter
950 milliliters water
1,200 grams flour
20 grams salt
A Dutch oven
Directions
Day One:
Mix leaven: Add 200 milliliters warm water (roughly 80 degrees), 200 grams flour, and 50 grams starter to a container and stir. Cover with cling wrap or a tea towel, and let sit approximately 12 hours.
Day Two:
Add 250 grams of the leaven to a large mixing bowl. Pour in 700 milliliters of warm water, and mix with your hands until the leaven is dispersed. Add one kilo of flour and mix with your hands until combined and no dry flour is left. Cover your bowl with a towel or cling wrap, and let it sit for 45 minutes in a warm spot to rise. Mix 20 grams salt with 50 milliliters of warm water, dissolving the salt. Pour this over top of the dough, and squeeze the dough with your hands to incorporate the salt water throughout. Cover for 30 minutes, then fold the dough every 30 to 45 minutes, repeating four times (this step takes around three hours). Then let it rest one to two hours untouched and covered. Lightly sprinkle flour on the counter, and cut the dough into two equal halves. With lightly floured hands, shape each half into a loose boule, and let them rest on the counter, covered with a tea towel, for 30 minutes. Place into heavily floured bowls, and leave the dough covered in the fridge overnight.
Day Three:
Place the Dutch oven (lined with parchment paper if so desired) in the oven, and heat to 500 degrees. Place the bread into the Dutch oven by flipping the bowl over atop it, noting that the side of bread facing up in the bowl will be the bottom of the bread in your Dutch oven. Score the top of the bread in the Dutch oven by making two slashes, then cover it with the lid. Bake for 25 minutes with the lid on, then reduce the temperature to 475 degrees and bake for 20 minutes with the lid off. (If using a thermometer, the bread should reach 200 degrees.) Cool for one hour, and enjoy!
Sourdough Pizza
Use the same first steps in the bread recipe, but instead of putting the bread in the Dutch oven on day three, grab your favorite pizza sauce and toppings, then follow these steps:
Once the final shaping is finished, divide the dough into rounded one-pound pieces, cover, and let them rest on the counter for 30 minutes. Preheat the oven to 500 degrees, placing a pizza stone in the oven to heat up at the same time. Dust a cutting board with cornmeal and flour, and press the dough rounds flat until they’re a half-inch thick. Pick up the dough and stretch it using the back of your knuckles, rotating the disc around your hands. Once the dough is at your preferred thickness for a pizza crust, lay it back on the flour-and-cornmeal-dusted cutting board, and assemble your desired toppings. Slide the dough onto the hot pizza stone and bake for about eight minutes, turning the pizza 90 degrees about four minutes in. Cut and serve.
Sourdough Pancakes
That extra starter can make delicious pancakes, with the perfect amount of tartness to cut through the sweet berries or maple syrup that you put on top.
Ingredients
1 1/2 cups sourdough starter
1 egg
Optional: 1 tablespoon sweetener of choice (sugar, coconut sugar, etc.)
1/2 cup flour
1 tablespoon milk
Butter or oil for frying
Directions
Combine the starter, egg, and sweetener (if using). Add the flour and milk as needed to achieve your desired consistency—thicker batter makes thicker pancakes. Heat a griddle over medium heat, and pour the batter in three-inch circles, flipping them when they begin to bubble. Serve with berries, syrup, or Greek yogurt for a breakfast protein boost.
Common Sourdough Problems
As you prepare your first few loaves, you might make some common mistakes that lead to dough that doesn’t rise or bread that’s too dense. Here, Gendron explains some easy fixes for the most frequent sourdough mishaps:
The starter may not be active enough. Make sure you are double feeding it (twice a day) the couple days before you plan on baking if you’re having trouble.
Perhaps the period of folding your bread needs to be longer, so try doing one extra fold and letting it rest for an extra 30 to 45 minutes.
The moisture level of the bread might be off. Some flours absorb different amounts of water, and things like air temperature and altitude can have an effect as well. Try adding 50 milliliters more water to your initial mix. If scored properly, steam from the water will release from your bread, leaving a light and airy crumb.
via Outside Magazine: Nutrition
0 notes
Text
focaccia sandwiches for a crowd
Last year, Alexandra Stafford published a very good book about bread. It sprang from a recipe for the peasant bread her mother made often when she was growing up. When she shared it on her site, it went viral, which is no surprise given that it’s no-knead, comes together in under five minutes, rises in about an hour, and after a brief second rise, you bake it in buttered bowls that form it into a blond, buttery crusted bread that she boasts is “the antithesis of artisan.” Because there are no hidden tricks; no steam ovens, special flours, lames to score the crust, or bannetons to shape the loaves. Her central tenet is that “good bread can be made without a starter, without a slow or cold fermentation, without an understanding of bakers’ percentages, without being fluent in the baking vernacular: hydration, fermentation, biga, poolish, soaker, autolyse, barm.” (None of those words appear in the book.) She knows that there are a lot of no-knead breads out there, but this is the only one that can be started at 4pm and be on the dinner table at 7.
I realize you’re thinking, as I briefly worried before I read it, how does one write an entire cookbook based on one recipe? But Stafford is a gifted recipe developer, and there isn’t a thing in this book — one part breads (with all types of flours, grains, and shapes, including pizzas, flatbreads, rolls and buns), one part toasts (including sandwiches, tartines, stratas, panzanellas, soups, summer puddings and so much more), and one part crumbs (a celebration of crunchy gratin toppings, stuffing, burgers, eggplant parmesan, fish sticks, meatballs, and brown bettys) — that I didn’t want to make. (I suspect that having four kids to feed ensures that these recipes were vetted by the most finicky of reviewer classes.) It’s also a gorgeous book, with a focus and format that my inner, long-surrendered organized person finds deeply pleasing.
My favorite thing in the book, and the one that I come back to again and again, is using the core bread recipe to make a focaccia that can be split and filled to make a sheet pan’s worth of sandwiches.* File this under things I never thought about pre-kids but obsess over now: Picking up sandwiches to go to the beach/park/pool/wherever your summer weekend takes you for a family or group of friends can be staggeringly expensive. I might even forgive the price if the sandwiches were usually better, but I’m sorry-not-sorry, they’re usually not. Either the bread is lousy and processed to the hilt, or they just don’t make them the way I want them, which is heavy on the vegetables and with a good mix of fresh, salty, crunchy, and pickle-like ingredients. Let’s fix this.
Below is the recipe for the simplest, quickest focaccia you’ll ever need to make and several sandwich filling suggestions (many vegan, too) I hope you’ll find good jumping off points.
* If you have Smitten Kitchen Every Day at home (do you? I bet you’d love it, I’m just saying) you probably already know about my slab-sized sandwich fixation. In the book, I use roasted tomatoes and more to stuff a focaccia *before* it is baked, inspired by a foccia ripiena we ate in Rome several years ago. This is concept is similar, but there’s no need to pre-commit to fillings.
Previously
One year ago: Blackberry Blueberry Crumb Pie
Two years ago: Summer Squash Pizza and Peach Melba Popsicles
Three years ago: Raspberry Crushed Ice
Four years ago: Three-Ingredient Summertime Salsa and Blueberry Crumb Cake
Five years ago: Charred Corn Crepes and Burst Tomato Galette with Corn and Zucchini
Six years ago: Pink Lemonade Bars
Seven years ago: Tomato Salad with Crushed Croutons
Eight years ago: Nectarine Brown Butter Buckle and Sweet and Smoky Oven Spare Ribs
Nine years ago: Best Birthday Cake, Arugula Potato and Green Bean Salad and Peach and Creme Fraiche Pie
Ten years ago: Garlic Mustard Glazed Skewers and Huevos Rancheros
Eleven years ago: Quick Zucchini Saute
And for the other side of the world:
Six Months Ago: Chocolate Peanut Butter Cup Cookies and Slow-Roasted Sweet Potatoes
1.5 Years Ago: Broccoli Pizza
2.5 Years Ago: Spaghetti Pie with Pecorino and Black Pepper, Banana Puddings with Vanilla Bean Wafers, and Taco Torte
3.5 Years Ago: Caramelized Onion and Gruyere Biscuits and Charred Cauliflower Quesadillas
4.5 Years Ago: Garlicky Party Bread with Cheese and Herbs and Fennel and Blood Orange Salad
Focaccia Sandwiches for a Crowd
Servings: About 12 sandwiches
Time: 2 hours
Source: Bread Toast Crumbs
Print
Servings will vary by how you cut the focaccia, of course. Here I show 12 small/medium sandwiches. Depending on how hearty your fillings are, each person may eat 1 to 2 sandwiches.
You can choose your own schedule with this bread, by proving it for 1 to 1 1/2 hours at room temperature, overnight in fridge, or 10 hours at room temperature. For the last option, you want to make the bread with cold tap water.
To use active dry yeast instead of instant yeast, add it directly to the lukewarm water with a pinch of sugar to proof it for 10 minutes (it will get foamy) and then add it below where you will the water.
For more of a traditional focaccia flavor, you can sprinkle 1 tablespoon chopped or minced fresh rosemary over the top with the salt before baking it.
4 cups (520 grams) all-purpose flour
2 teaspoons kosher salt
1 teaspoon instant yeast
2 cups lukewarm water, made by mixing 1/2 cup boiling water with 1 1/2 cups cold water
4 tablespoons olive oil
Flaky sea salt
In a large bowl, whisk together the flour, salt, and instant yeast. Add the water. Using a rubber spatula, mix until the water is absorbed and the ingredients form a loose, sticky dough. Cover with a tea towel or plastic wrap and [choose your schedule]:
Quickest rise: Set aside in a warmish spot for 1 to 1 1/2 hours, until doubled.
Overnight in fridge: Set inside your refrigerator overnight, about 8 to 10 hours.
Overnight at room temperature: For this method, you will need to use only cold, no lukewarm, water. Leave the bowl on your counter at room temperature for 10 hours.
When you’re ready to make your focaccia: Pour 3 tablespoons oil onto a rimmed sheet pan (can use a 13×18, or half-sheet pan, but if you have something more 11×17-ish, as I use here, will make for slightly thicker loaf; you can line it first with parchment paper for maximum nonstick security).
Heat oven to 425°F.
Using two forks, deflate the dough by releasing it from the sides of the bowl and pulling it toward the center. Rotate the bowl in quarter turns as you deflate, turning the mass into a rough ball. Use the forks to lift the dough onto the prepared sheet pan. Roll the dough ball in the oil to coat it all over.
Let dough rest for 20 minutes (for Quickest rise or Overnight at room temperature) or 1 hour (if you used the Overnight in the fridge rise, so it warms up) without touching it. Then, drizzle last 1 tablespoon of olive oil over and use your fingertips to stretch and press the dough to the edges, leaving it intentionally dimply. If your dough resists being stretched all the way, get it as stretched as you can, wait 5 minutes, and return to stretch it the rest of the way, repeating this rest if needed.
Sprinkle with flaky sea salt all over and bake for 20 to 25 minutes, checking in on the earlier end, until lightly puffed on top and golden and crisp underneath. Remove from oven and let cool completely (this will go faster if you transfer the bread to a cooling rack) before assembling sandwiches.
To make sandwiches: If you’d like, you can trim off the very outer edges — this exposes the crumb and makes it a little easier to halve. (I didn’t do this because I like to make things hard, also I like edges.) Stafford recommends you begin the halving process by cutting through each corner, then running the serrated knife through the short end until you get to the midway point, then starting from the other short end until I get to the midway point. A sharp, serrated knife is helpful. Try to keep your knife as parallel to the bread as possible. She says she finds if she hugs the top layer as opposed to aiming for the center, she gets a more even cut.
Some ideas for sandwich fillings:
Avocado + Crispy Kale [Shown]: First, crisp your kale. I used a 5-ounce clamshell of curly kale leaves, tearing out and discarding any thick ribs. Rub/toss them with 1 tablespoon olive oil, spread them on a large baking sheet in one layer, seasoned them with salt and pepper, and baked them at 375°F for 10 to 15 minutes, until crispy and just barely brown at the edges (keep an eye on it). Then, scoop out and slice 4 avocados, fan the slices across the bread and mash/spread them smooth. Coat with olive oil, lemon juice, flaky salt, and red pepper flakes (like we do here). Spread crispy kale over avocado.
Hummus + Cucumber + Pickled Carrots [Shown]: First, coarsely grate 1 pound of carrots. Pour 1/2 cup apple cider vinegar, 1/2 cup cold water, 1 teaspoon kosher salt, and 1 to 2 teaspoons (to taste) of granulated sugar over it and stir to combine. (You could also add mustard or dill seeds or fresh chile peppers here.) Chill in the fridge for as long as you have — 30 minutes, an hour, and up to a few days. Carrots will get more pickled the longer it soaks. To make your sandwiches, schmear the bottom half of the bread with about 1 1/2 cups hummus (storebought or homemade). Squeeze out little handfuls of pickled carrot and sprinkle this on as your next layer. For you final layer, use a y-peeler to shave long ribbons off 1 large (1/2 to 3/4 pound) seedless cucumber. Tousel these on top; season them with salt and pepper.
Walnut pesto + grilled zucchini ribbons (skip the parmesan in the pesto to make it vegan)
This grilled pepper and torn mozzarella panzanella, minus the croutons
This crunchy asparagus and egg salad
Pickled vegetable sandwich slaw + anything else you love on sandwiches
This salsa verde + any grilled or roasted vegetables
This zucchini carpaccio salad, as a sandwich filling
Any of the sandwiches from the archives
Many of the salads from the archives, such as this egg salad, this chicken salad (not vegetarian, of course), that chicken salad, or even (I love this as a sandwich) this chicken caesar, with the dressing spread on both sides of the bread, the chicken thinly sliced, and the romaine cut into thin ribbons. I wouldn’t be sad to have a broccoli or cauliflower slaw between bread, either.
Or, of course, endless slices of peak-season tomatoes + mayo + salt, or the same plus sliced mozzarella + basil pesto
Source: https://smittenkitchen.com/2018/08/focaccia-sandwiches-for-a-crowd/
0 notes
Last Seen Blogs

professionalchaoticdumbass
pronoun reveal at 10k followers

breezybangtanbebe
Breezy Bangtan

alunasky-blog
Alunasky

yonch
lozy's zone of fuckery for lozy by lozy

falloutconfessions
Fallout Confessions