#this one was 700g the last time i weighed it but that was like??? at least a month ago so
Text

Phoenix with fun trousers...what more to say..
#and as a cat but yk#ok so the trousers are because i was doing fashion design for a competition and uhhhh I really liked drawing them so phoenix got them too#i also have no idea how you hold a cigar and i couldn't look it up so#hopefully that's. roughly it#i don't think it's a full hand grasp. idk I've never smoked#also i cannot keep a normal looking sketchbook at all ever#my last was was also a5 and i got it to weigh over a kilogram#this one was 700g the last time i weighed it but that was like??? at least a month ago so#im rambling#i expect you to die#ieytd#[agent moose's art]#agent phoenix
18 notes
·
View notes
Text
If you feel like you’ve sh*t a brick, you possibly have.
Not that it was ever my first concern!
The best time to weigh yourself is in the morning, before breakfast, preferably nude. You’re at your lightest. And sometimes you get up to take a dump. And sometimes you think Jeeez! What have I given birth to- or heavy thoughts to that effect. One day feeling the need for a particularly heavy dump and out of idle curiosity I weighed myself before and after and discovered
A TURD CAN WEIGH OVER A POUND AND A HALF (700g)
This is quite consistent, depending on diet.
You can also lose a good 1/4 stone ( 3.5Lbs, or one and a bit kg) just through sleeping. I’ve noticed this weighing myself last thing at night and first thing in the morning. I suppose it will depend on person and metabolism, but that’s quite true personally.
0 notes
Text
Adventures In Sourdough, Part 2: From Starter To Bread

This is part 2 in the sourdough series, for part 1: how to make a starter, click here.
Welcome back, young grasshopper. We meet again and you are now one bubbly, vibrant starter richer. But how to transform this beast into a humble, crackly chunk of sourdough?
Onwards!
There will be a bit of science involved in this, and feel free to skip ahead if you aren’t all too fussed about the mechanics of sourdough. But if you truly do understand why and how this bread is made, you will be better equipped to remedy any problems as they arise, and adapt it to suit your kitchen environment.
The starter
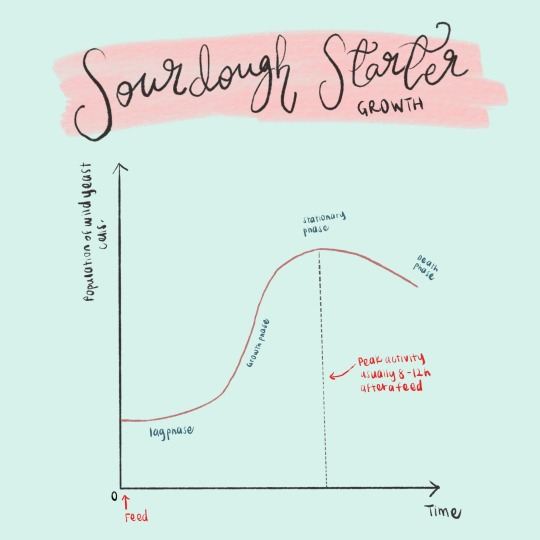
Each starter will have its own personality, its own sass. Over the past few days, you might have grown more accustomed to your starter’s behaviour. How soon after a feed does the starter climb up to the highest point in the jar?
In the cool of England, this usually takes anywhere between 8-12 hours, but if your kitchen or the weather is running warmer or cooler, it might take a shorter or longer period, respectively. A good way to figure out how much your starter has truly grown is to place a rubber band around the jar, or a bit of tape, to mark the level of your starter right after you have replenished it with a fresh feed. Take note of how long it takes for the level to reach a point furthest from the mark before sinking in on itself.
This article will work off the assumption that it takes about 12 hours to reach peak starter activity. If your starter deviates from this, just plan to feed your starter earlier than 9pm if it takes longer to grow, or later than 9pm if it grows rather rapidly. For example, if you notice the starter takes 14 hours to reach its largest size, prep to feed it at 7 p.m. If in only takes 10 hours, feed it at 11p.m.
Loaf Hydration

Sourdough varies in its hydration level. This is calculated as the ratio of water to the flour in a recipe. We will be making a 70% hydration loaf—so, 700g of water for every kg of flour—which is a great one for beginners as the dough is compliant and not too tacky. In sourdough, there is a trade-off between how easy a dough is to work, and how airy and loose its crumb will be.
You know those great artisanal loaves you get at bakeries, that harbour voluminous air bubbles which leak the molten butter you spread over it? Those loaves have a high hydration value. So, while they are terrifically pretty and a joy to eat, they can be a nightmare to work with if are just learning the ropes. As you make more loaves, you can slowly up the volume of water in this recipe to get closer to a 75-80% hydration level, in your quest for something to cure your Gail’s withdrawal.
Let’s get Cracking
I have drawn up a little checklist which you can print off, or refer to on your phone, as you work through the steps. The checklist has 2 columns so you can use it for two rounds of bread making, if you catch the sourdough bug. The full recipe, with all the measurements, can be found at the end of this article.

Day 1: Prepare your starter
Now that your starter is thriving, you need to give it a feed so that it is ripest when you are ready to make bread. As mentioned above, most starters are ready 8-12 hours after a feed, so logic follows that if you feed it at 9 p.m. on day one, it should be ready to party at 9 a.m. on day two. You may have to slide either way of 9 p.m. on the first day if your starter takes much longer or shorter to reach its peak.
To prepare your starter, discard all but a tablespoon or so of it, and top it up with 50g of flour, and 50g of purified water. Stir well, and rest in a warm place with a cover lightly on top of it.
When you have returned to it the following day, it will be frothy and alive.
A good way to check if your starter is ready is to drop a spoonful of it into a bowl of water. If the starter floats, all systems go. If it sinks, however, you might have to wait a few more hours for it to float, or feed it again if you suspect you have waited too long and missed its peak.,
Day 2:
Wake up fresh and early the next day. With the promise of sourdough coursing through your veins, it shouldn’t be too hard.
Autolyse
Many sourdough recipes call for a process called the autolyse, where all the flour and water is mixed into a shaggy dough, and left unattended for 20 minutes to a few hours. This allows the gluten in the flour to develop and for the starch in it to break down. The result? Better texture, flavour, and an all-round happier ball of dough. The starter and salt and left out at this stage, as they can retard this process.
This might seem like a faff and a lot of time wasted, but it works wonders in relaxing the dough, giving you a smoother and more elastic result. So, don’t skip it. It pretty much involves only a few minutes of active stirring before being left to its own devices.
To prepare the autolyse, mix all 500g of flour with 350g of water in a large bowl, and stir it until it comes together and no more dry patches of flour remain. Cover, and let it sit for an hour before you return to it.
Mix in Starter and Salt.
Weigh out 75g of starter (this should leave you with about 25g remaining, just continue feeding this extra bit as normal for future loaves), and 10g of salt. Pour these evenly across the surface of the autolysed dough, then use your hands to pick up the dough from the edge of the bowl, and pull it over and across to envelop the yeast and salt. Do this from different edges until the starter and salt have been roughly incorporated.
The dough at this stage will be uneven, with areas containing your starter/salt and others of pure dough, but don’t worry. As we continue to fold across the next few hours, the starter and salt will disperse themselves throughout the dough.
Cover this, and let it rest for another hour.
Four rounds of folding
After an hour, you are ready to fold! The aim of this part is to build tension with the gluten in the dough, so that the air that the yeast creates can get trapped and cause the dough to balloon out – the makings of a light and airy loaf of bread. I usually do this in 4 rounds of folding, in this manner:
First fold, 30-minute rest >
Second fold, 30-minute rest >
Third fold, 50-minute rest >
Final fold, 1h 30min rest (this last part is known as the bulk fermentation, and is where your loaf grows the most)
If you are in possession of a stand mixer, you might be tempted to stick it with a bread hook and knead away – please, don’t. The yeast in a sourdough is much weaker, slower. Any harsh kneading will eliminate the pockets of air you are trying so hard to build up.
To fold the dough, wet your hands to prevent sticking, and pick it up on the edge furthest from you, pull it up to stretch out the dough, then fold it over to the opposite side. Turn the bowl 45 degrees clockwise and repeat this. Do this four times in total. Here is a video of the technique. Be gentle as you fold, and try not to deflate it too much.
Once you have completed your final fold, you will notice the dough is looking much puffier. Leave it to rest for one and a half hours following the fourth fold to bulk ferment, where it will grow even more and its twangy flavour can intensify.
Shape the dough
Now we are ready to shape! Gently coax the dough out of the bowl and onto a well-floured countertop. A bench scraper (also known as a dough scraper) is a fantastic tool that can help make this part of the process a doddle, but if you don’t have one, any piece of flat rectangular plastic or metal can work; failing that, the largest, thinnest spatula you have.
Flour the top of your dough if you find it getting tacky, then run your bench scraper into the bottom of the dough to tuck its edges beneath it and turn it into a round, taunt lump of dough.
As always, it is much easier to watch than try to picture, so here is a handy dandy video using a bench scraper.
And here is one if you don’t have a scraper at your disposal, and need to use your hands.
The aim of this stage, again, is to build tension across the upper surface, so try to get it as tight as you can manage. Once you are happy, overturn your bowl over the dough to cover it, and left it rest for 30 minutes.
Proofing Basket
There are special proofing vessels—known as a banneton—meant to contain your loaf as it proofs, holding it in shape and imparting the striations of flour that are characteristic of a sourdough bread. They can be round or oval, and have a fabric lining which comes into contact with the proofing dough.
These are pretty cheap to order off Amazon, but I before I got one for myself, I just used a deep 8-inch bowl, lined it with a lint free tea towel, and generously dusted the inside of the towel (that will be kissing your dough as it rests) with a mixture of 50% flour and 50% rice flour. This coats the towel and prevents your dough from sticking to it.
Rice flour has great non-stick qualities, but if you don’t have any, using 100% plain flour works just as well. Just don’t be stingy – you can always brush off excess flour before the bake but saving a loaf that has adhered itself to the towel is far trickier.
Once you have floured your tea towel or banneton, shape the dough into an oval (if you have an oval banneton) or a circle. Tuck the edges into a seam at the bottom and pinch them together to form a seal, and a taut top.
Plop this globe of dough into the prepared and floured proofing vessel, with the seam side facing up towards you. Add more flour on the top of the dough to prevent sticking when it rises, and let it rest for another 30 minutes on the countertop.
This is where things deviate. Sourdough is a chose-you-own-adventure kind of situation. If you have time on your hands and want a better flavour, I highly recommend you place this in the refrigerator overnight, covered loosely in a plastic bag. Bake it the next morning: just in time for breakfast! This version also has the advantage of holding its shape better in the oven, as it flattens out less. Just don’t leave it for more than 24 hours or it runs the risk of becoming overproofed.
If you are impatient, you can leave this to rest a further 3-4 hours on the countertop at room temperature, until it is plump. The flavours don’t mature as much this way, but it is speedier.
TO tell when your dough is ready, give it a firm poke. If you make an indent that takes a few seconds to gently and gradually spring back, it’s ready. If you don’t make an indent at all, it is underproofed and needs more time. However, if it makes a dent that doesn’t spring back at all, it has been overproofed. This is almost impossible to rescue, so check often.
However way you chose to do it, baking it will be the same.
Baking
A hot oven is critical in sourdough making. Traditionally, steam ovens are used to make sourdough, which is why it has such a glorious, chewy crust. Home-bakers prefer to achieve this with a Dutch oven, which is made of cast iron and can withstand the high heat, but more importantly traps moisture around the loaf.
If you (or, more likely, your parents) have a Dutch oven, make sure it is oven safe up to 250C. These things cost a pretty penny, so I have found a way to get around this. A good method to introduce steam is to pour a cup of water into a preheated tray at the bottom of the oven. The following instructions are for using a Dutch oven, but will include instructions in italics for those of us not yet acquainted with the joys of being a Le Creuset owner.
Preheat the oven to 250C, as high as it can go, with the Dutch oven inside of it, for 30 minutes.
Preheat the oven to 250C and preheat 2 trays, one in the middle of the oven, and a smaller, deeper one on a bottom rack.
When the oven is hot and ready, remove your dough from the fridge, overturn it onto a piece of parchment and gently pry away the tea towel. Use a pastry brush or your fingers to dust off any excess flour, then use a sharp knife, or a baker’s Lame (essentially a razor blade skewered through a chopstick) to score a pattern on it to give the steam an escape route. When scoring, do it deftly with a firm, decisive stroke. You want to cut through the top-most layer of the dough surface, but only superficially. Here is a fun little chart of some of my favourite bread scoring patterns, but you are completely allowed to let your imagination run wild. I wouldn’t mind in the slightest.

Open the oven, uncover the hot dutch oven and lower the dough on the parchment (use the parchment as a hammock) into the preheated dutch oven. Use the best oven gloves you have for this step as the Dutch oven is wicked hot. Cover, and bake for 20 minutes.
Open the oven and lower the scored dough with the parchment onto the top preheated tray. Wear oven gloves, and slowly pour a cup of water into the lower tray, and it will sizzle and splutter. Close the door quickly to trap in the steam, and bake for 20 minutes.
After 20 minutes, lower the oven to 230C, and remove the cover on your Dutch oven (wearing gloves!). Continue to bake for 20 minutes to encourage the upper crust to bronze up nicely.
After 20 minutes, wear sturdy oven gloves and remove the tray of water. Since this loaf has not been covered, it should already be browning nicely. You might have to place a sheet of foil on top of it now, or in 10 minutes or so, to prevent it from charring too much – so keep an eye on it. Lower the heat to 230C and continue to bake for 20 minutes.
When the time is up, remove the loaf from the oven and cool it on a wire rack. Give it a little tap on the bottom to check if it is cooked—it should sound hollow. Summon all the willpower you have left to avoid slicing it open while it is searing hot. I know, it’s awfully tempting. You want to see if your efforts have paid off, you need to inspect that crumb. It goes against the laws of human nature to eschew fresh, warm bread. But, young grasshopper, wait. Slicing a loaf open before it has rested can leave it gluey and gummy, and you are so close to the finish line. I like to rest it for an absolute minimum of 40 minutes, but up to 2 hours is ideal. So, set a timer and try to distract yourself as best you can.
Once that timer has ding-ed, and your loaf is cool to the touch, use a sharp bread knife to slice the loaf into thick wedges. You might be dreaming of piling it high with an avalanche of mashed avocado and flaky salt, but I think it is skyscrapingly tasty just as is – this is as close as it gets to enduring bliss.
Now that you’re are a sourdough aficionado, and in possession of your very own sourdough starter – how do you keep it alive so that it can supply you with crusty loaves for years to come? Stay tuned for part 3 where we will chat about how to keep your starter thriving, and how to store it if you need to take a break from all this heavy-duty bread making.
Here is a condensed recipe:
The fool-proof sourdough loaf
I use a mix of bread, plain, and whole-wheat flour here, but you can alter it according to whatever you have on hand. I recommend always keeping about half of it bread flour, due to its high gluten content, but otherwise stick to 500g of flour all up.
Starter:
1 tablespoon active starter
50g plain flour
50g purified water
Loaf:
250g bread flour
200g plain flour
50g whole wheat flour
80g of the starter (reserve the rest to feed to keep your starter going)
10g salt
To flour the banneton or tea towel:
¼ cup plain flour
¼ cup rice flour
The night before, mix all the ingredients for the starter in a clean bowl, and leave it somewhere warm to grow.
The next morning, about 10-12 hours after feeding the starter, place the flours and water in a large bowl. Stir to combine, and then cover and let rest for 1 hour.
Measure our 80g of starter from the jar you have left fermenting overnight, and add it to the large bowl with the salt. Fold it in to incorporate and leave to rest for another hour.
For the first fold, fold the dough at 45 degree angles, building up tension on the underside. Rest 30 min
For the second fold, fold as in the previous step and rest 30 minutes
The dough should be looking plump now, gently fold it as normal, but this time let it rest for 50 minutes.
Fold the dough for the fourth and final time, then let it rest for 1h 30min-2h until it is plump and supple.
Overturn the dough onto a floured countertop, and use a bench scraper to gently coax it into a smooth ball. Cover and rest for 30 minutes.
Shape the dough into an oval or round depending on the shape of your proofing vessel. Dust the inside of the vessel or towel well with the plain and rice flour. Place the shaped loaf into the proofing vessel, seam side facing up. Rest for 30 min.
You can either place this in the fridge overnight (a max of 24 hours), or leave it to proof further on the countertop for 3-4 hours.
Use the poke test to determine when the loaf is ready to bake. A finger should leave an indentation that gradually springs back.
When the loaf is ready, preheat the oven with a Dutch oven within it to 250C. If you do not have a Dutch oven, you can preheat a tray at the bottom rack in which you need to pour a cup of water when you place in your loaf.
Unmould your dough and brush off excess flour, score with a knife or Lame, and place in the preheated Dutch oven. If you are using a tray of water to introduce steam, pour it in now. Bake for 20 minutes
After 20 minutes, uncover the Dutch oven, lower to 230C, and bake another 20 minutes. If you did not use a Dutch oven, you might need to cover the loaf loosely with some foil to prevent burning.
Remove the bread and cool on a wire rack for 40 minutes to an hour before slicing open.
0 notes
Text
How to motivate yourself to lose weight? 8 tips to motivate yourself to go on a diet

Lack of motivation is the main cause of failure in a diet. There are always false excuses not to start and push back to the next day ... See you next week. Coach Sebastien Leroux gives us his 8 tips to boost your motivation and finally start losing weight.
1. Think about why
Have you already listed all the motivations that drive you to want to lose weight? It can be very beneficial to put them on paper to increase your level of motivation. Take at least 15min to think about all aspects of your life that would be improved. Some examples :
Be more seductive / seductive
Take off from complexes in swimsuits
To be able to wear the clothes you want / to fit in old jeans
Being healthier
Participate in a running / physical challenge
Complete this list with goals that are unique to you. You can read it later when you have a desire to nibble or not want to go to your workout ... Guaranteed deterrent effect!
2. Define an action plan
No improvement occurs without a change in our habits. If you want results you will have to go through a certain number of changes (which do not necessarily mean sacrifices).
To lose weight, you need to focus your attention primarily on two things: nutrition and sports (to which we could add sleep). So, define in writing all the efforts you think you can make on these aspects, and turn them into concrete changes in your everyday life.
For example: If you feel like you do not have time to exercise, get up 30 minutes earlier every morning; Decrease the time spent on social networks / watch television for physical activities; Remove some harmful foods from your eating habits; Learn a new recipe for cooking a week; Any positive change in your daily life is good to take!
3. Do not look for easy options
More and more people are resting their hopes of weight loss on easy solutions, thinking to find in them a method to lose weight without effort. Be careful, diet programs and dietary supplements can be your ally as your worst enemy.
All is not to throw. Used properly, the active ingredients contained in the capsules to lose weight, including appetite suppressant, can actually help to give a feeling of fullness that reduces cravings snacking. You have already seen advertisements and reviews on Anaca3, the brand of slimming capsules, or on the program Like I like ... It's true that it's tempting!
But do not be fooled, only a rebalancing of food and regular physical activity will have lasting effects on the achievement of your goals. Having the line and being healthy requires efforts over time and not just on one-off periods. Choosing the easy options to motivate yourself is to back down to better jump because one day or the other the efforts will have to come from you.
4. Learn not to listen to each other
This advice is a bit counter-current to what we usually hear (you have to learn how to listen to yourself, how to listen to your body, etc.) but you will understand.
Efforts, our brain does not like that much. He prefers all that is usual and will generally encourage you to stay in your comfort zone. Therefore, when going to play sports it may give you a warning that you will vulgarly translate by: laziness. This is even more true at the very beginning, after a long period of inactivity.
So you must be able to overcome the indications that your brain can give by equating the fact that the beginning is always the most difficult. For example, it is common not to have the motivation to go to the gym, but once you are there this feeling has usually disappeared.
The good practice for those who lack motivation to exercise is to establish a weekly routine with slots dedicated to sports. If you feel lazy, tell yourself that once this 1st stage passed you will experience pleasure, and especially a great satisfaction once the session ended.
5. Do not focus on the scale
Your efforts and the management of your diet are not just a number on the scale. Many people are stressed about weighing themselves and seeing that they have lost nothing or "worse" that they have taken a few hundred grams. This is the best way to become demotivated when you feel like you're doing a lot of work.
In fact, different reasons may explain weight gain: stress, lack of sleep, menstruation, muscle gain, water retention, etc. This is not a drama, and weight gain is not necessarily a catch of fat ... Drink 2L of water and you will automatically take 2kg.
You must never be discouraged, efforts will always pay. Rather than taking the weigh-in as an indicator of physical progress, prefer the photos! Take a picture of yourself underwear before your diet, and repeat it every month. You will notice the physical changes before / after, whatever the number says on the scale.
6. Plan healthy snacks
Regular snacking is often responsible for weight gain. In fact, when we try to lose weight we concentrate most often on meals: we try to eat balanced, not too fat, not too sweet, etc.
But if you give your body fewer calories (= energy) during the meal, it may take a few hours after ... What drives you to nibble to get away from hunger. If you hold on, you will create repeated frustrations, and if you creak you will find something fast in your closets and set your sights on biscuits, breakfast cereals or chocolate.
By providing healthy snacks when you shop, you increase your level of motivation because you will not be afraid of snacking. You allow yourself to crack between meals, but a healthy crack! Here are some examples of snacks:
Vegetables (baby carrots, radishes, cherry tomatoes, etc.)
Fruits (apple, pear, banana, etc.)
Nuts (fines, nuts, etc.)
7. Fix challenges
Nothing is more challenging than setting challenges and rewarding yourself in return. There are hundreds of possible challenges depending on your specific goals and / or where you know in advance that you risk a decrease in motivation.
If sport is your weak point, challenge yourself in the short and medium term to maintain a good level of motivation. Some examples :
Do a little more each session: run 2 minutes more, increase the speed ...,
Test new sports,
To impose a minimum number of steps per day (download a pedometer application on smartphone),
Realize challenges with the same exercise to perform every day (squats, abs, board). Do not hesitate to train your friends in this type of challenge.
If you have the opportunity, make these challenges public, for example via your social networks or by talking to your loved ones. This will give you extra motivation to get results. Once the challenge is raised, reward yourself with a good meal, a new piece of clothing, etc.
8. Do not set your expectations too high
All work deserves pay ... When one makes efforts one hopes to see results in return, it is normal! In the case of a diet, the results are sometimes random. You may be going through periods of stagnation where you will feel like you are not going any further and all this work will have been useless. Remember that it's normal, do not be discouraged!
Setting goals in terms of lost pounds is not recommended (see tip 5), yet most women do. Goal 5kg in 1 week, 10kg in 1 month ... It's way too much! A healthy food rebalancing should allow to lose between 700g and 1kg per week. Beyond 5kg lost per month, there is a risk of deficiencies.
My recommendation: put in place all good practices of a healthy lifestyle and see the results without waiting for miracles. No effort is ever lost, even if the results on the scale or your physical change are disappointing, always tell yourself that at least you are in better health. You have eaten healthily, you have played sports ... In short, you have taken care of yourself!
Read the full article
0 notes
Last Seen Blogs

hyhymoru
The Madness Train

setsneedtofeed-hobbist
IT’S HOBBY TIME

toritumbled
Long Live

blazingtrails-world
Like that!

rekldusha
Без названия