#would i rather do it as an invisible closure somehow. what if i used hooks and eyes. or invisible snaps
Text
problem: hating baggy turtleneck collars because they suck and they are uncomfortable. wanting my turtleneck collars to fit snugly (but not tightly) around my neck, without gapping.
further problem: my neck is really fucking skinny. i am not kidding when i say that it is half of my skull circumference.
even further problem: most of my fabric does not in fact possess >2x stretch capability... especially not the fabric i got to make warm turtleneck shirts out of.
possible solution: button-up turtleneck collars...????
#stfu blue#sewing#fashion#reborking is prohibited#i could use like... glove buttons?? i could make the buttons go down into the shoulder seam maybe??? those seams DO meet up...#tbh this could be a really iconic Unique Blue Look TM if i can make it look good... but do i want to. do i actually like the idea#would i rather do it as an invisible closure somehow. what if i used hooks and eyes. or invisible snaps#i think i do not want to use a zipper simply because it would be an area with too much movement and the zipper would wear out pretty fast#but WHATEVER i do... what side should it even go on...#my instinct is to say it should go on the left because i do buttons (etc.) with my left hand#(yes i do right-handed button plackets with my left hand. i am more powerful than you can possibly imagine)#but like. would that just make it look weird if i wear it under something that has a front cross-over?#because i am absolutely 100% doing the left-over-right front cross for anything that does it#(with the one exception of Cosplaying A Japanese Character Who Is Dead)#but even IF it looks better... do i want to struggle to do up my collar buttons... my right hand is useless at buttons#being cross-dominant is a pain in the ass actually :/#ugh and trying to find visual examples of people with this style is impossible. am i really TOO original. is this really happening. gdi
1 note
·
View note
Text
Riju Production Post
So I’m mostly doing this for my own references (and as a reminder to take more pictures while working on costumes for proper progress posts/threads), but I just wanted to take the time and put together a post on my process and methods while working on my fave cosplay to date, Riju from Breath of the Wild!

This post will be really photo heavy. And text heavy. Just heavy overall, so watch out on mobile (sorry ahead of time) -
WARNING for hand closeup in the last image, scopophobia,
First things first, I gathered as many reference images as I possibly could. I went into the game itself and used nintendo’s handy dandy screen shot feature to take some pics. I also lurked around online in various boards and things to see if anyone else had taken some good detail shots of things I had missed. Here are some that i found the most useful:
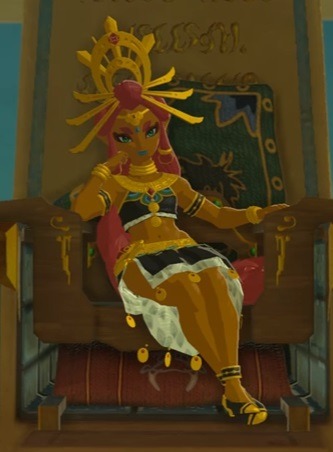
Full body shots are always necessary. This one also gave me the bonus of being able to estimate how many coins to put on her skirt as well as a reference for the print inside of the skit

Much needed detail shots of the armor she’s wearing. I wanted to nail down the shape and dimension of everything as much as i could
And, since I love a good Prop, I had to make the Thunder Helm. The construction seemed maybe not simple but not ridiculous enough that I felt I could confidently reproduce it

Then I decided to do something I had sort of done before, but not to the extent that I did with Riju. I needed to draw everything out, write what materials would be used and where, how much I would need, the techniques I would use, etc. To save space, I’ll link to the post where I uploaded the four pages of breakdown I did for her --> here
I started on her probably later than I should have, around late Feb, March of this year (the con I debuted her at was in May). And then I messed around and didn’t get started on her as soon as I could have even after all my materials were bought. Speaking of which, let’s do a quick materials breakdown and where I got stuff
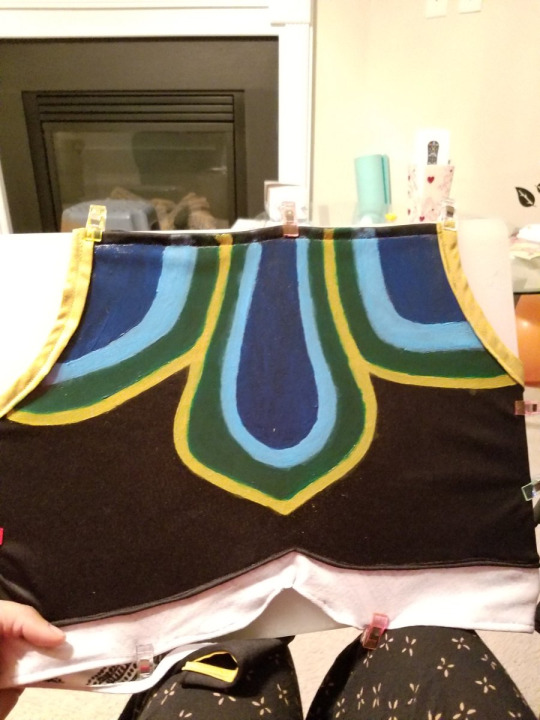
I bought about 3 yards of a slightly see-through, light weight black knit from Joanns. I was also able to find a heavier cotton blend printed fabric that, from the wrong side mimicked perfectly the pattern on Riju’s inner skirt.
I drafted my own patterns. The top was essentially a slightly bigger sports bra. The skirt I think I just kinda wrapped the fabric around myself and had my sister cut the angle I wanted. I used that piece to cut the inner lining of the skirt.
I hand painted the design on the top with 3d fabric paint. Some of the colors had to be mixed, particularly the gold. And i had to mix them multiple times bc I couldn’t finish it all at once lol. That was a pain.
JSYK, you can mix fabric paint with regular acrylic and it’ll still be just as flexible.
I stretched out the top on a cutting board I had and held it there with wonderclips lol. Bootleg, but it worked
This was also my first time working with bias tape! It’s kinda rough in some sections but it gave the top a really nice finish, i think. I also added some lil shoulder straps on with the rest of the tape I had, just for added support.
Jewelry, Belt, Armor, etc Everything not fabric was craft foam of varying thickness. Everything was either primed with glue/water or was coated with a few layers of plastidip. The detailing on the chest and belt pieces were done with 3D fabric paint

The only pieces not foam or fabric are air dry clay and hot glue casted gems. I made my own silicone mold with pure silicone + corn starch + a bit of baby oil. I think I used oven bake clay for the negatives and just filled those babies with hot glue. Sanded down the sides to get the defined lines I wanted and painted them with nail polish.
The air dry clay pieces coming off of the chest armor were strung together with more invisible thread and kinda shoddily held together with hot glue. But It Worked, Okay?
Everything that needed to be put on that wasn’t clothing (chest armor, jewelry pieces, belt, the petal sash looking thing) was strapped purely with velcro.
The shoes were just a thrifted pair of black heels and I painted the lines on with Angelus brand leather paint (this stuff is godly and a little goes a long way)

Here’s the base of the front of the helm unpainted.
I used 8mm eva sheet foam and 8mm dowels the from TNT Cosplay Supply as well as some basic 2-6mm foamie sheets from any store with a craft sections (I think i got mine from michaels? and some backup 2mm sheets from walmart)
The helm was a bit odd to pattern. I spent a lot of time doodling out shapes in my sketchbook. I made some v elementary templates out of poster board and had a Lot of re-working, especially with the slightly curved base of the front of the helm, the actual mask part. I knew it had to be two pieces because trying to make it one would make the curves at the top wrong potentially. It also gave me a good guideline for the midline of the helm itself for coloring.
Everything was held together with contact cement and shaped with a heat gun. I learned with this project just how pliable even 8mm thick craft foam can get when it’s hot. I reinforced some of the curves by scoring the curves and gluing the cut section back together.
I primed this all with glue/water mix and everything was spray painted that base gold.
I....completely freehanded the non gold sections. I painted the brown of the front of the helm first and then remembered the gold sections going down. I think I tried to sketch out the lines at first and then just went “fuck it” and free handed everything. Took a lot of careful brush strokes and correcting but I think it turned out well.
if you look closely at the pieces with the half question marks on them, you can see where I attempted to correct some lines with hand mixed acrylic and didn’t exactly get the color right lol whoops. It’s only noticable in closeups tho.
The front and back pieces of the helm were held together via velcro. I wanted them to be able to come apart, especially since I knew I was going to travel with it. The whole thing is rather Rigid so it needed some way to be more travel-with-able.

Close up of the Helm. It was extremely light weight, if only a lil awkward to tote around. I made it way too big so it couldn’t even be worn properly lol.
Weirdest snail I’ve ever seen
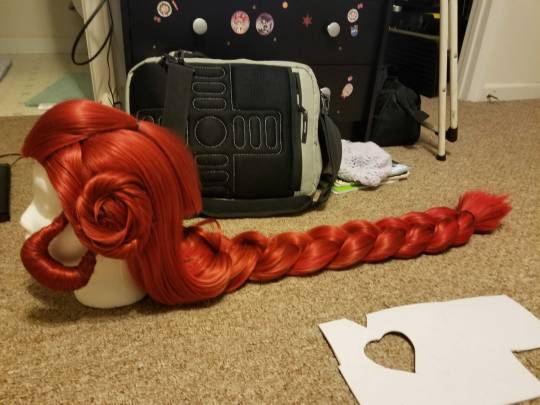
Base wig was Buttercup in Rust Red by Arda . I also got a bunch of their long wefts in the same color as well as their red jumbo braids. I used their tutorial on how to style a Rapunzel wig as the basis for how to do the braid.
I ruined my first pack of jumbo braid hair and had to order more last second. The wig was one of the last pieces to get done.
As in the rapunzel method, the braid is separate from the base wig and attached with hook/eye closures. It was still really dragging the back of the wig down, but I managed to braid in most of the base hair of the wig into the braid to hide the worst of it. It was so long, it reached all the way to my butt, i was so happy
The styling of the front of the wig was....mostly me winging it again. I knew theoretically what I needed to do -- tease the front bang a bit, add on wefts so that the hairline looked natural. But when I started doing so, I got impatient, like I normally do. To be fair the wig turned out way better than i thought it could given how much of a rush job the hair line and the bump + pinwheels were but hey
Everything got a generous helping of got 2 b glued spray
the side loops were completely separate pieces. I initially intended to sew them into the wig, but it was easier to put on and take off when they were separate
these were fabric hoops i stuffed lightly with pillow batting and, in another rush job, glued some wefts onto the loops. The gold rings were also just craft foam
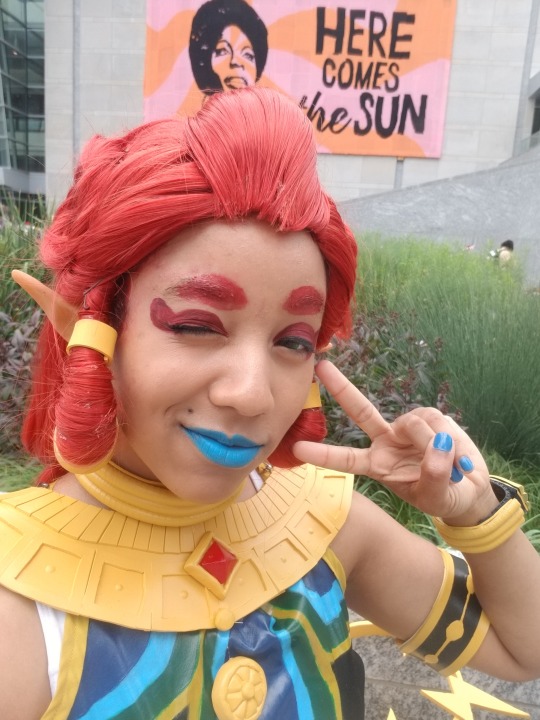
Aside from the lipstick, I didn’t do the best with my makeup as I could have lol
I didn’t properly plan out what to color my eyebrows with. And covering them up was a serious rush job -- I didn’t practice before hand like I should have so I didn’t get them as smooth as I wanted
I also used....regular lipstick as the color, not even a drying matte, so anytime my hands went near my face (which was often bc of the helm, I had to whip out my mirror to do a smear check
The eye makeup was lipstick as well, but a matte one! It’s colourpop, I can’t remember which shade. The lipstick actually on my lips was a cheap drugstore brand I found at a beauty store.
First pair of ears were i think from Aradani?? I can’t 100% remember; there was a booth at Katsu this year....
Second pair, bc i lost the first pair somehow, was borrowed from a good friend lol
Now I know how to make my own latex ears so that’ll be what I do in the future
Contacts were from Alice and Rabbit’s Shop
I’ve got a decent amount of (what I would/could have done betters)
I need to figure out a better strapping method for the jewelry. The velcro I used was pretty thick and i found multiple scratches where they rubbed against me all day (a couple of em briefly scarred lol)
I wasn’t able to isolate a good enough image for the sand seal emblum that’s actually printed on her skirt. I might just hand paint it on if I can draw a decent enough template
The back piece of the helm, the band that connected to the circle, was...a pain. Since I was in the heat, it lost its shape pretty quickly when not attached to the front part and having to reshape it caused it to crack quite badly.
The aforementioned circular piece also wasn’t as securely connected as it could have been (i’m still trying to figure out what I could have done better. Maybe pins or something through the foam?) and I had to rush to the cosplay repair booth when I got to the con to make sure it didn’t completely rip off.
I found two pairs of black heels and neither of them fit well enough to walk in all day! so I would up taking a bunch of photos in the wrong shoes bc I had switched them out and forgotten to put the actual shoes back on lol.
Practice the makeup!! Practice, practice practice. Especially eyebrow blocking bc mine are pretty thick and bushy and it Did Not work as well the first time lol.
And last but most importantly: GIVE YOURSELF ENOUGH DANG TIME TO NOT RUSH
i was so hesitant to cut into anything, especially the foam, that i wound up working on things down to the wire, aka friday night before I was set to wear Riju.
Take time,especially when doing new things you’ve never done before
don’t be afraid to think outside the box and even reach out to someone, even if they’re a non-cosplayer, for help and ideas because they will probably save your ass (thanks dad)
So here is my little love letter to my Riju cosplay. It’s...admittedly in shambles kind of now. Half of my armor pieces had some bumps or breaks that are repairable but not a priority. The wig is a mess because the back kept tangling on my armor pieces. The band/back of the Helm is also a wreck, cracked to hell and back.
But!! I want better pictures of her, so I want to try and fix her up so I can at least do a decent photoshoot somewhere. I also wanna make a patricia plush! Maybe enter her into a contest??
Only time, patience, and a Lotta Money will tell lol
7 notes
·
View notes
Last Seen Blogs

hoteltilundongputaiwan
Hotel Tilun Dongpu,Nantou,Taiwan帝綸
blanquitagb
Escritora desquiciada

savior-mills
Will I ever be over Swan Queen? Probably not.

softwaretestingclasses
Untitled

sinned0306
Untitled