
the-arthub
The ArtHub
Community classes for creatives
14 posts
Don't wanna be here? Send us removal request.
Last Seen Blogs

kailous-l
無標題

filmgifs
filmgifs
birilio
Biriliohead

raydiomoutdoor
Untitled
wstelndbaby
under construction
Photo

Articles about general art advice
Artist Mindset and Habits
Comeback Help for the Creative Slump
0 notes
Photo
Articles about the basics of drawing and guidance on where to start
Line Confidence
Figure Drawing
Pencil Techniques for Beginners
0 notes
Photo
Articles about the basics of Photoshop
Photoshop Interface
Photoshop Tools for Beginners
0 notes
Photo
Articles that talk about films and the basics of video editing
Finding Art Inspiration in Films
Video Editing Basics
Video Effects
0 notes
Text
Video Effects
In video editing, if you want to spice up the film you are making, you would want to add video effects, such as sci-fi stuff like making Star Wars or any Marvel movie effects from lightsabers and laser pistols or intense speed or flying effects. It can turn your film into something unique or incredible to see. Even memes are used for this from sound effects and editing certain parts of films or tv series or viral videos. Video effects have been key in many movies, especially sci-fi, action and horror films. Also a key part of TV shows. In many iconic moments of movies the video effects have been really top notch, like the Quicksilver scene in X-Men: Days of future past or the scene where Anakin betrays Obi-Wan at Star Wars Episode 3.
Program for Effects
To make these video effects, you need a program and an example is Adobe AfterEffects. When you finish up a film/project from video editing you might want to edit it more with video effects and Adobe AfterEffects is the program you would need. To make these video effects it's basically the same requirements with video editing, since it is essential to have a good computer as well and you would need video files and aftereffects would have the stuff you would be looking for in effects.
0 notes
Text
Video Editing Basics
Video Editing has been a bigger than usual in the modern era of media and technology, Due to the development of personal/home computers. The basic tools needed to make film or video commercials or even internet videos like from youtube or dailymotion etc., are a video editing program (like for example Adobe Premier Pro CC, Sony Vegas Pro and others.) and a video recorder like a video camera recorder or even a cellphone camera and a webcam. With these programs and devices you can create the following:
vlogs
documentaries
gaming videos(walkthroughs, highlights, funny moments)
movie parodies or even short films
video presentations for class projects.
The things you need to know for the basics are:
what is possible to do
what tools you really need to make it happen,
the concepts to use any of the editing packages.
Video Standards
If you have a camcorder, all you have to do is point and shoot, but if you play it back and see the shot you have taken then it would be really hard to do even when you have a really good camcorder. Even on how well you took the shot with extreme caution usually you would end up with junk then play it back to your surprise it still looks like a amatuer home movie.
Since we of the modern age have seen lots of movies and films we expect the following:
Title at the beginning
A set of shots that tells a story
A high number of shots
Nice and great transitions.
Great soundtrack
Static shots
Slow or fast motion to change the films tempo
Titles or legends of the shots to identify people places and things
A shot is a specific subject filmed in a specific angle.
If you want to make topnotch movies or films you need the following:
A digital camcorder that has a FireWire(IEEE 1394) connection
A desktop or laptop computer, also equipped with a FireWire connection
A piece of video editing software
Digital Camcorders
There are a ton of digital video cameras, or camcorders, on the market today from manufacturers like Sony, Panasonic, JVC and Canon. Just about every camcorder based on the MiniDV tape format includes a FireWire (IEEE 1394) port on the camera so that you can load the video onto your computer quickly and easily.
Video Editing Computers
You can use just about any desktop computer for video editing, as long as it has:
A FireWire port to connect the camera to
If your computer does not have a FireWire port, you can buy a FireWire card and install it for less than $100.
Enough CPU power, hard disk space and bus bandwidth to handle the data flowing in on the FireWire cable
Video processing in general uses lots of CPU power and moves tons of data on and off the hard disk. There are two different places where you will see the difference of a fast machine and the of a slow one:
When you render a movie that you have created or write it out to hard disk, you will definitely feel the speed of the machine. On a fast machine, rendering and writing can take minutes. On a slow machine it can take hours. You will learn more about rendering later in this article.
A more important issue comes when you are reading data from or writing data to the camera. When the video data stream is coming in from the camera through the FireWire cable, the computer and hard disk must be able to keep up with the camera or the computer will lose frames. When sending a completed movie back to the camera, the processor must be able to stream the data quickly enough or the camera will lose frames.
The main software to focus on the start is mainly Adobe Premier because of the following:
There is a free demo and easier to access. It can work with both PC and MAC.
It is full featured and a well respected video editing software that can do almost anything you want.
0 notes
Text
Finding Art Inspiration in Films
Akin to how director Quentin Tarantino references and gets inspiration from various sources from different time periods for his own films (Lee, 2020), artists can get inspiration from different media for their artworks as well. Film is one of the most complex forms of art. In a way, it is not just one medium, but rather a collection of different forms of art-- music, photography, writing, design-- all masterfully combined to effectively tell its story.
While the writing and music are crucial components in films, the most significant part of it is the imagery; the composition of shots, framing, and colors, all take part in how stories, ideas, and emotions are delivered. The art of Film heavily relies on imagery as its form of communication. In an interview about Akira Kurosawa’s “Rashomon” (1950), director Robert Altman comments "It's the visual stimulation that hits the audience. That's the reason for Film, otherwise we should just turn the light out and call it radio."
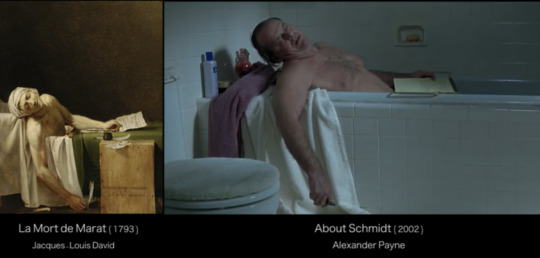
Film, Photography, and Drawing all make use of imagery and visuals to tell a story. They use almost the same elements, thus techniques and styles used in film can also be used for painting and drawing, and vice versa. In fact, many filmmakers get inspiration from paintings, like how a scene in “About Schmidt” (2002) is inspired by Jacques-Louis David’s painting titled “The Death of Marat”.
(from Vugar Efendi on youtube)
Artists can use films as references. The actions and emotions of actors could be used as anatomy and expression studies. The set designs and locations, whether real or not, could be references when drawing backgrounds and environments. Like in all fields of art, colors are used to convey and elicit emotions as well as to set the mood of a certain scene or entire film. They are also used to give emphasis on a subject or message, like the little girl’s red dress in the otherwise black and white film “Schindler’s List” (1993). Being the only subject with color in the film, the audience’s attention is purposely drawn towards her and so we see the full impact of the happenings in the story.

Visual symbolism is also prominent in films, and upon understanding how filmmakers do this, artists can do the same with their art pieces. The aforementioned girl in a red coat is an example of this. In Bong Joon-Ho’s “Parasite” (2019), lines are subtly used to divide the characters of differing social classes, which is the main theme of the film.

In Denis Villeneuve’s “Prisoners” (2013) and Stanley Kubrick’s “The Shining” (1980), mazes are used to symbolize the character’s psychological struggle and growing insanity (Storytellers, 2017) .


Symbolism through color and cinematography are often subtle and could not be noticed right away, but it adds layers to the work. Most of the time, symbolism in films are not explicitly explained and would require further reading to fully grasp the intention of the filmmaker. However, it is this added depth that makes some films masterpieces, and adds to the film’s rewatch value. Researching about the symbolisms used in films can spark interest about certain topics such as the history of objects or the meaning of symbols, thus giving an artist inspiration. Watching how filmmakers incorporate symbolism through objects, framing, positioning of subjects, or the environment in which the subjects are in can teach artists how to add symbolism in their work as well.
Watching films of different genres from different countries and time periods can allow artists to explore various visual styles and help them to train their eyes and develop a more creative perspective.
With all that being said, here are a few movie recommendations that could, in one way or another, give artists some inspiration because of their artistry and visual brilliance:

The Mirror (1974) directed by Andrei Tarkovsky

Spirited Away (2001) directed by Hayao Miyazaki

Amelie (2001) directed by Jean-Pierre Jeunet

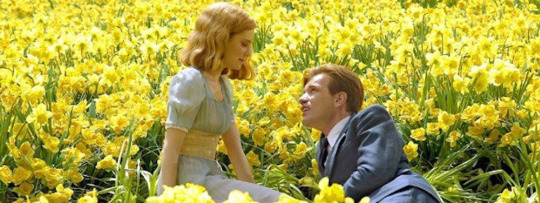
The Grand Budapest Hotel (2014) directed by Wes Anderson

In The Mood For Love (2000) directed by Wong Kar-wai

Blade Runner 2049 (2017) directed by Denis Villeneuve
Big Fish (2003) directed by Tim Burton

Parasite (2019) directed by Bong Joon-ho
If you are interested in knowing more about films and watching well made film analyses, some excellent Youtube channels are: CineFix, Indy Mogul, Now You See It, Every Frame A Painting, Lessons From The Screenplay
References
Lee, N. (2020). How golden globes winner quentin tarantino steals from other movies. Retrieved from https://www.businessinsider.com/quentin-tarantino-movies-steals-cinema-homage-reference-2019-7
Tihai. (2011, January 24). Robert altman on rashomon by kurosawa [Video file]. Retrieved from https://www.youtube.com/watch?v=oYWQa0GExt8
Vugar Efendi. (2016, September 20). Film meets art II [Video file]. Retrieved from https://www.youtube.com/watch?v=pfR8bH_Fe8Q
Storytellers. (2017, September 10). Prisners: symbolism done right [Video file]. Retrieved from https://www.youtube.com/watch?v=fekd6LcnSyw
0 notes
Text
Comeback Help for the Creative Slump
Sometimes, the hardest part of creating art is the starting of a new work. The blank canvas beckons you to create, yet you might not know what exactly it is that you want to do, or how to start off. You might feel uninspired, with no ideas coming to your mind. This is known as “art block”, which is also called “creative block”. This struggle is not only limited to the fields of drawing or painting. Writers, musicians, photographers, and artists in other fields of art undergo this dilemma as well. No artist is safe from experiencing this, even those who have been at their craft for years. This problem is frustrating, but there are ways to overcome this creative hurdle.
A few artists were asked about their experiences with art block, and they have also shared their personal methods on how to come back up from this slump.
Actively seek out inspiration
Don’t wait for inspiration to come to you, because it won’t happen that easily. You should actively seek it out. You can browse through the works of other artists. Indulge yourself in other forms of art such as video games, films, music, literature, and more. Inspiration can be found everywhere in different art forms and even in nature.
Start with random sketching and doodling
Sketch random things around you: objects, people, plants, anything. Lots of art prompts and art challenges can be found on the internet and can be used as a starting point as well. Random sketching and doodling may help you get back to your rhythm.
Take a short break from creating art
Art block can make artists lose their desire to create. Don’t lose hope and just keep in mind that this is a temporary state. Think of this as a natural part of being an artist, because it is. There is nothing wrong with taking a short break from content creation, so don’t be too harsh on yourself when you feel like you can’t start on a new project right away. Continuously making art may cause you to burnout, so it’s important to know your limits and let yourself get some well-deserved rest.
Take care of yourself
Some artists gain inspiration for their work when they’re feeling down or have intense emotions because they use art as their emotional outlet. However, there are also artists who lose inspiration and find it hard to do anything when they are not emotionally well. This is why it’s important to make sure you get ample physical and emotional rest. Get enough exercise, eat well, and maintain a healthy work-life balance. When you feel good about yourself, you might be able to be more inspired to work.
Clear and fix your work space
A messy work space can make your mind cluttered and tired as well, and might contribute to the art block. Clearing up your area may help you to think more freely and may get ideas flowing better.
While art block is a natural occurrence, there are some ways that may help prevent it from happening. These are not guaranteed, but these could help even for a bit.
Have a positive mindset regarding your art
Look at the good side of being able to finish a work. You would have another finished piece for your portfolio, and you would grow as an artist with every artwork you finish. An interviewed artist shares that you must make yourself feel comfortable with the idea of drawing because if you start your drawing session with negativity towards your art, then you would have a tough time working.
Experiment
Some artists experience art block when they’re doing repetitive things and methods. Try to do things you don't usually do, even if it’s not your style and even if it’s difficult. Letting yourself out of your comfort zone may help break the art block, and you might even discover new art techniques, styles, and subject matters that you would enjoy.
Surround yourself with things that inspire you, and fellow artists as well
The environment that you’re in greatly affects your wellbeing and state of mind. Surround yourself with things and people that inspire you. If you can, join art communities and mingle with others. Being in a community of artists who build each other up is a great environment to be in. There would be a solid support system among artists. You would be able to share and talk about different ideas with people who have the same interests.
0 notes
Text
Pencil Techniques for Beginners
It’s amazing how a simple drawing tool such as a pencil can be used by different artists and yield such different results. Still, all those artists use some of the same techniques, especially when it comes to shading. With these pencil shading techniques, you can explore all kinds of artistic expressions!
GRAPHITE GRADING SCALE
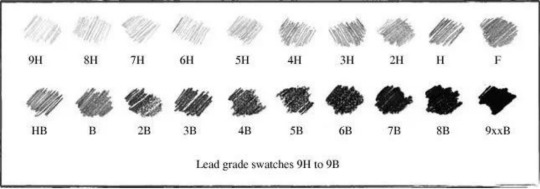
Before we head to the techniques, let’s first start on what kinds of graphite you’re using for shading. Basically there are two graphite grading scales used to measure the hardness of a pencil’s graphite core.
NUMERICAL GRAPHITE SCALE
The first graphite grading scale is a numeric scale. Using this scale, the hardness of the core is often marked on the pencil. Look for a number (such as “2” “2-1/2” or “3”). The higher the number the harder the writing core and the lighter the mark left on the paper. As the pencil core becomes softer, it leaves a darker mark as it deposits more graphite material on the paper. Softer pencils will dull faster than harder leads and require more frequent sharpening.
HB GRAPHITE SCALE
The second graphite grading scale is known as the HB scale. Most pencil manufacturers outside of the U.S. use this scale, using the letter “H” to indicate a hard pencil. Likewise, a pencil maker might use the letter “B” to designate the blackness of the pencil’s mark, indicating a softer lead. The letter “F” is also used to indicate that the pencil sharpens to a fine point. Historically, pencil makers also use combinations of letters to tell us about the graphite, a pencil marked “HB” is hard and black, a pencil marked “HH” is very hard, and a pencil marked “BBB” is really, really black! Today, however, most pencils using the HB system are designated by a number such as 2B, 4B or 2H to indicate the degree of hardness. For example, a 4B would be softer than a 2B and a 3H harder than an H.
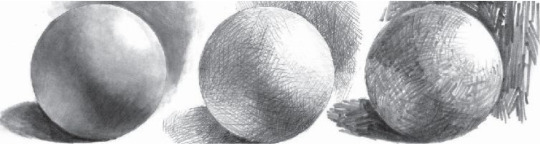
1. SMOOTH SHADING
Since we're done with the graphite scale, we can now head to our first shading technique! You can get a super smooth result by shading with a pencil if you simply avoid any patterns while shading.

HOW TO APPLY SMOOTH SHADING
The key to smooth shading is avoiding that back-and-forth motion we tend to use when shading in a hurry. While OK for a quick sketch, this back-and-forth motion yields striping not a smooth finish. If you slow down your pencil application and use a random circular motion, the pencil values will be very smooth.
PROS AND CONS OF SMOOTH SHADING
Because the process is slower, you have the chance to build up the pencil values through layering. This gives wonderful results and is a very safe way to shade because the values are built up slowly. Practicing this technique will reduce the amount of erasing necessary. It’s natural for the tiny pits of paper to show up, like you see in the photo above, in this style of shading. This is because the pencil skips over the lowest areas of paper. As long as you use a good, reasonably smooth paper, this paper texture should not take away from the quality of the drawing.
2. SMUDGING
Smudging pencil is a distinctly different style compared to “smooth shading” technique. It is not only different in its approach but in its overall look as well.
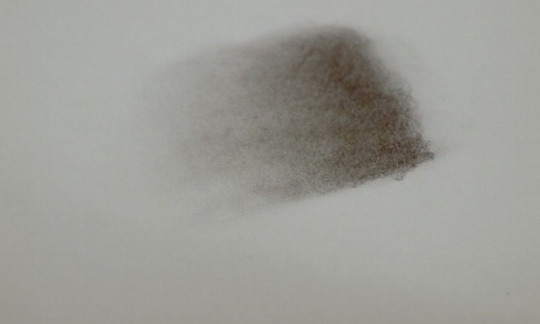
HOW TO APPLY SMUDGED SHADING
There are many tools to help smudge pencil, such as the dry bristles from a paintbrush or paper stumps. You can even use your fingers, but this gets messy quickly. It’s best to keep your actual hands clean and off your drawing surface as much as possible!
PROS AND CONS OF SMUDGED SHADING
Smudging pushes graphite into all parts of the paper, even into those lower pits of the paper I mentioned above. Notice how the smudged pencil above hides the subtle paper texture that was prominent in the smooth shading. Smudging is generally much faster to accomplish. You can push pencil around the paper and cover areas very quickly. However, beginners tend to gravitate toward smudging and abuse the technique altogether. Make sure smudging isn’t the only pencil shading technique you use.
3. TEXTURED SHADING
Sometimes your subject matter can dictate what type of shading you should be using. Drawing trees or foliage? Smooth shading will not be the best approach for this subject matter. Rather, you can let the individual lines and strokes build up in a way that yields a variety of tones and has a textured look.

HOW TO APPLY TEXTURED SHADING
You could spend plenty of time experimenting with various pencil textures. The drawing above was a kind of controlled scribble to yield the more obvious texture. Both pencil pressure and layering were used to vary the darkness and lightness of each area.
PROS AND CONS OF TEXTURED SHADING
Textured shading is a great way to break up the sameness of your drawings. When a texture is used for one object compared to a less textured or smooth area of other objects, you can really create a visual separation between the various objects. Just be careful not to dig the tip of the pencil into the paper or you may have trouble erasing or adjusting your subject matter as it develops!
4. CROSSHATCHING
No discussion on shading would be complete without mentioning my favorite shading technique, crosshatching!
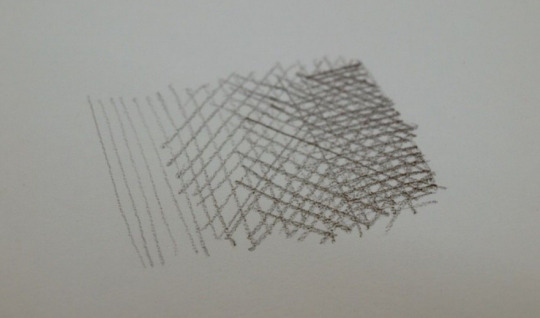
HOW TO APPLY CROSSHATCHING
Crosshatching is the art of creating values with layers of parallel lines. Think of each layer of pencil as a set of lines. Numerous sets of lines can be layered on top of each other, changing the overall perceived value of the pencil. Notice how more lines build up to create the darkest areas of pencil value.
PROS AND CONS OF CROSSHATCHING
One of the benefits of crosshatching is in the logic of the technique. As long as the lines are drawn with the same spacing and pressure it's a snap to control the values. More sets of lines will result in predictable value changes. There is a tendency to lose patience with crosshatching and to speed up over time. This results in the last few lines looking different and often messier when compared to the first few lines. It's best to stay patient and simply enjoy the process of building up layers!
After reading all of this, looks like you’re pretty much set for shading! It’s good to explore all of these shading techniques! You’ll find that some work better for certain subject matters. You’ll also develop your personal favorites due to your own personal drawing style. Just try to keep an open mind and see the benefit and beauty to using each technique. Enjoy and explore your artstyle!
0 notes
Text
Photoshop Tools for Beginners
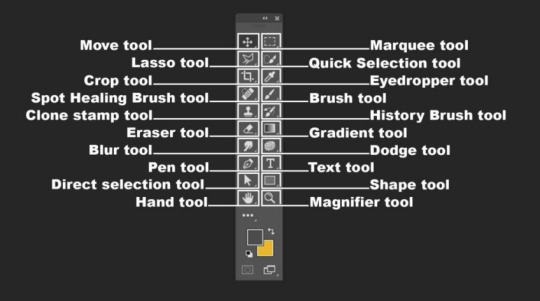
Photoshop is one of the most powerful softwares for designers and photo editors and of course what’s Photoshop without it’s tools right? In this short guide blog, you will come to know about the common Adobe Photoshop tools and it’s uses! Here, you will get a basic concept about the different tools present in the toolbar in Photoshop software and the contents in the menu.
CROP TOOL
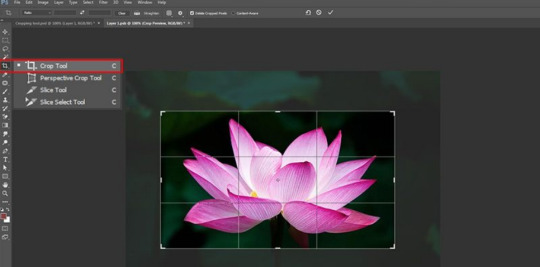
The cropping tool is a valuable feature of Photoshop, using which you can eliminate any unnecessary element from the image. You can simply leave out an element that you feel unnecessary in the picture. When you prepare an image for printing or posting online, you need to change its size, or remove the empty spaces from it. It comes handy in these cases. This is one of the most important photoshop editing tools that the editors should be using.
HEALING BRUSH
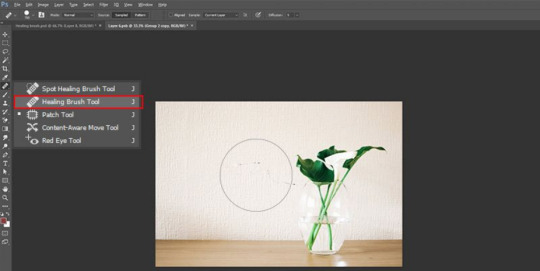
In order to remove small specs and scratches in the image, you can use the healing brush tool. It works like a paintbrush and allows the users to make the image more perfect. The healing brush comes useful while removing blemishes in Photoshop. You can copy a part of the image that seems to be perfect over the scratches and specs. As a result, these elements are eliminated from the image and blend the sections accurately. The areas that are replaced will look natural when you use this tool properly. Therefore, nothing in the image will look out of place or as if nothing happened!
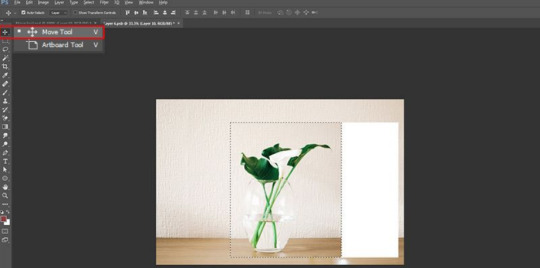
MOVE TOOL
Using this, you can simply move certain objects around the canvas in a given layer. This is one of the most important Photoshop functions. You need to drag after clicking on the canvas in order to use the tool. When you drag the layer in Photoshop will move along, according to the movement of your mouse.
MARQUEE TOOL

Considerably one of the most useful photo editing tools in photoshop, It comes with simple features, and can perform a number of tasks. You can select particular areas of any image using the tool, copy them, cut and crop the areas. You can choose four different shapes with the tool. These are ellipse, rectangle, single column and single row.
PENCIL & PAINTBRUSH
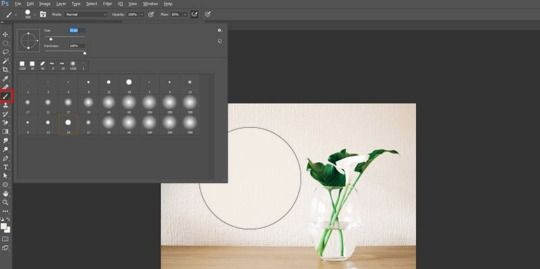
This is one of the extensively used photoshop elements editing tools. You can choose different types of paintbrushes in Photoshop. You may choose a standard paintbrush, or use airbrush styles in the process. The brush tool enables you to paint different types of shapes as well!
CLONE STAMP
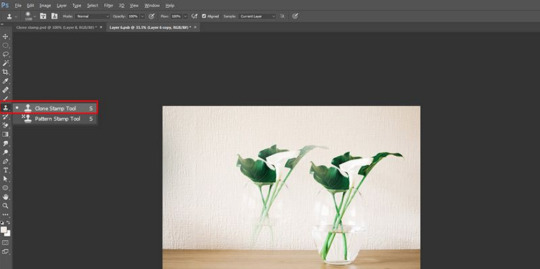
Using a clone stamp, you can create a sample part of a particular image and paint other areas using it. This is an important tool, used for image editing, more especially for blending backgrounds. You can simply select the colour from one area and use it to paint another area.
PEN TOOL

In case you are interested in drawing vector graphics like I am, you can use the pen tool! This is one of the most commonly used photoshop tools for beginners. You can also use this in creating various paths.
THE HIDDEN TOOL

The Toolbar hosts many tools, each of which is visually depicted through an icon. Apart from tools that meet the eyes, a number of other tools are also available. Using them you can further improve your image editing skills. It can be made apparent by clicking and holding on a given icon. Alternately, you can right click in Windows or Control click in Mac on the icon to view and access extra tools. A menu would fly out displaying the additional tools that you can work with. Some of these are being discussed below.
LASSO
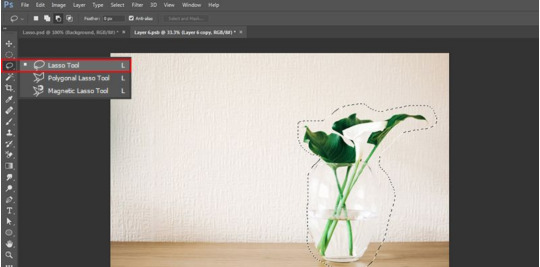
This free-form selection tool has to be dragged around the desired objects on the canvas for selecting them. Clicking on the tool icon will let you access other sub-tools. The polygonal lasso allows selecting objects on the canvas by clicking on strategic areas for creation of interlinked points in polygonal shape. The magnetic lasso behaves like regular lasso and additionally carries out edge detection for spontaneously snapping to them.
PATCH TOOL
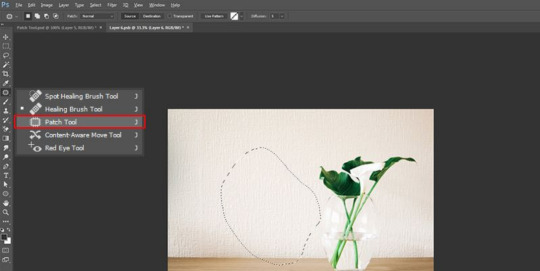
This facilitates drawing of a freeform outline around the defective region to select the same. The defect can be repaired subsequently by getting the selection outline dragged over the region whose texture you prefer.
EYEDROPPER
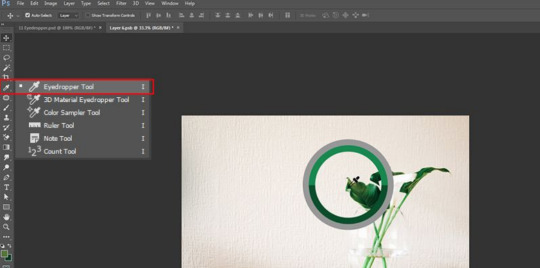
You have to click the desired area of the canvas with eyedropper tool for sampling the color on the clicked point. It would automatically convert the foreground color to the color which was sampled by clicking the canvas part.
ERASER TOOL
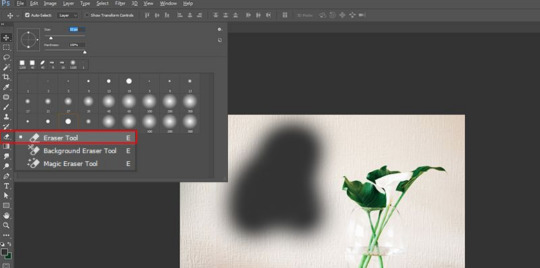
The functions exactly as the paintbrush. The difference lies in the fact that instead of painting, it erases the portion over which it is moved.
TYPE TOOL
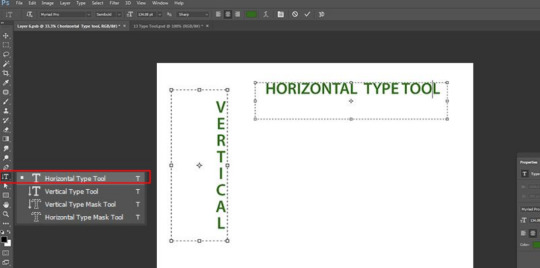
You can type in horizontal manner with this. The hidden tools under the ‘Type tool’ offer additional functionality of typing in vertical manner as well as creation of text masks in horizontal or vertical direction.
HAND TOOL
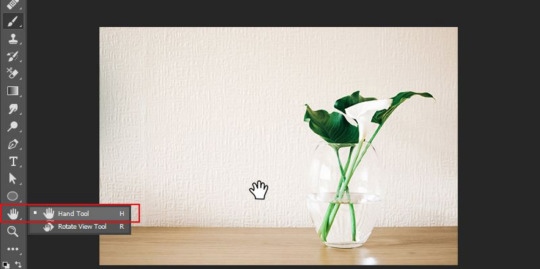
Clicking and dragging around the Photoshop canvas is facilitated by this. This would be ineffectual if the complete canvas sits flush with the screen. After zooming in, you can easily move around using this. It also proves handy when the image is so big that it fails in fitting the screen at normal level.
ROTATE VIEW TOOL

You can visualize and subsequently edit a picture from various angles by using the ‘Rotate View’ tool which actually reorients the canvas at desired angle.
ZOOM TOOL

Just click at a particular point on the Photoshop canvas and then zoom out or in using this. When you normally use this, it is programmed to zoom in only. For zooming out, you need to press down the option key and then start using the zoom tool in normal mode.
COLOR SELECTION
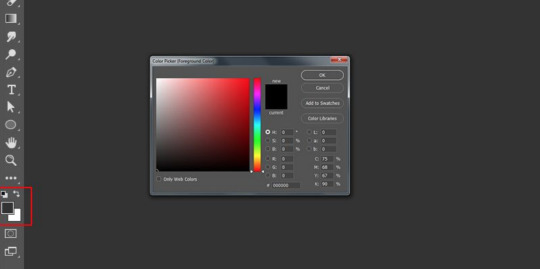
The colors that you have working with on Photoshop canvas can be managed using ‘Color selection’ tools. Foreground color is the color that sits on the top and would be used by brushes. Background color is in the back and is used when anything from the background is removed or extended. Shortcut functions can be accessed by clicking on any of the 2 smaller icons that sit on the top. One icon, that sits on the left, is represented by a black square atop a white square. Click on it would result in setting of the colors in background and foreground to defaults. Clicking on another icon in the shape of double headed curved arrow would result in swapping of the colors in background and foreground. When you click on any color in the background or foreground, a color picker would pop up which can be used for setting the color that you exactly need.
DODGE BURN, SPONGE
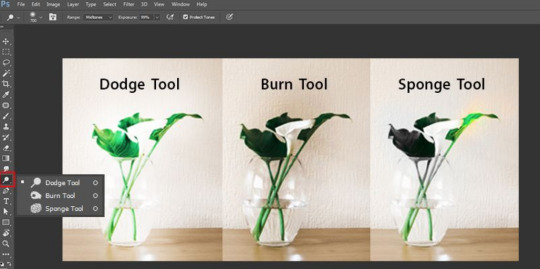
You can lighten the areas in the picture by retouching and painting over them with Dodge tool. You can darken the areas in the image by painting over them with Burn tool. Color saturation can be increased or decreased over selected regions of image by painting over with Sponge.
MAGIC WAND TOOL
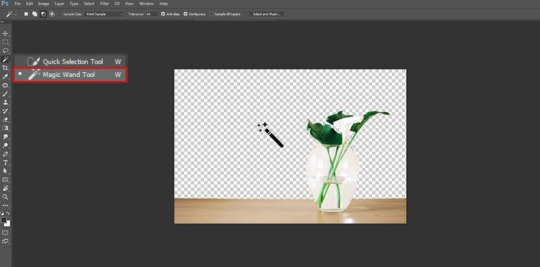
When you click on an area with this tool, the spot gets selected and other similar areas. Generally, it is used to eliminate backgrounds from the photos. In case you are willing to do photo clipping using photoshop, you will find this feature useful!
SHAPE TOOL
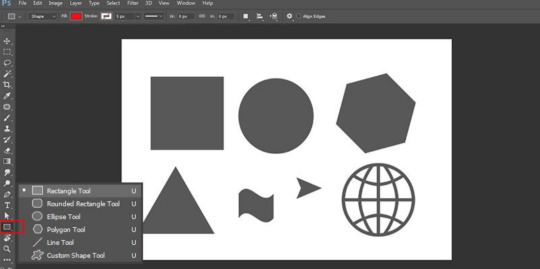
You can use the shape tool to create rounded triangles, circles, vector rectangles, polygons, circles, custom shapes and lines. When you design shape masks in your photos, you will find this tool handy.
3D MATERIAL DROP
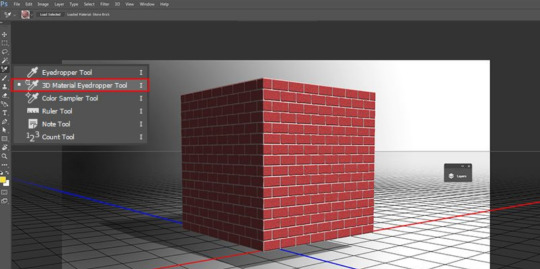
It is extensively used in 3D modeling. It is necessary to have knowledge on the photoshop editing techniques, which will enable you to integrate the necessary changes in the images. You can create a sample from one area of your image and use it in other areas to create similar features, like 3D layer or mesh.
SMUDGE, SHARPEN, & BLUR TOOLS
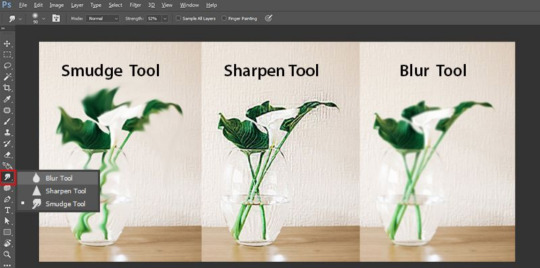
These are among the important photo retouching tools in photoshop, and all of them work like the paintbrush. However, they create different effects on your image. If you are willing to blur a particular area, you can use the blur tool. The sharpen tool can be used to sharpen the area, while you can use the smudge tool to smear the surrounding areas. In case you are integrating blended colours in your image, the smudge tool will come extremely beneficial.
HISTORY BRUSH
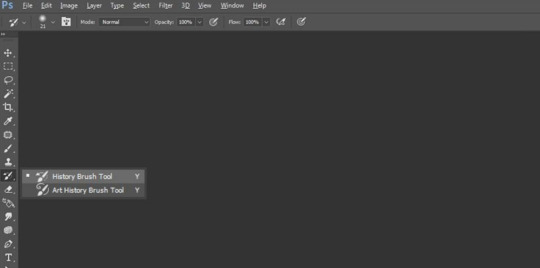
It allows you to paint back and keeps a record of all your activities. By default, the number of records is fixed at 50. Using the history brush, you can paint elements of the past in the present image.
Now that you are well aware of the different Photoshop tools and functions, it will be easier for you to incorporate them into your photo enhancement work to get outstanding and exceptional outcomes! Hoped this helped you guys!
0 notes
Text
Photoshop Interface
For my past years of experience in Photoshop, its been both fun and bizarre when I edited pictures out of it. Editing pictures has somehow been satisfying to me that’s why I enjoy using it so much. But I also figured that there are people, more especially those who are younger than me who also want to learn how to use editing softwares like Photoshop, so maybe through this blog I could give some basic tips on how to use Photoshop’s interface to begin your journey in photo editing. For this we’ll be using Photoshop CC but if you’re using an older version of it like Photoshop CS6 or earlier, some features may work a bit differently, but you should still be able to follow along!
THE TOOLS PANEL
The Tools panel, where you'll select different tools for editing images, is one of the most important features in Photoshop! Once you've chosen a tool, you'll be able to use it with the current file. Your cursor will change to reflect the currently selected tool.
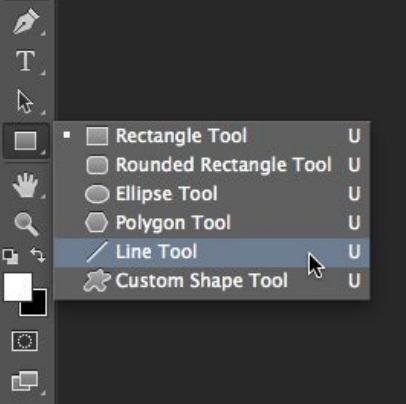
You can also click and hold to select a different tool. For example, you can click and hold the Rectangle tool to select different Shape tools, like the Ellipse Tool, Line Tool, and Custom Shape Tool.
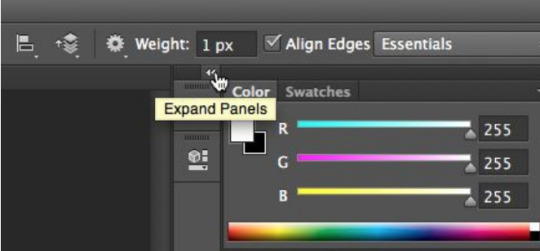
SHOWING AND HIDING PANELS
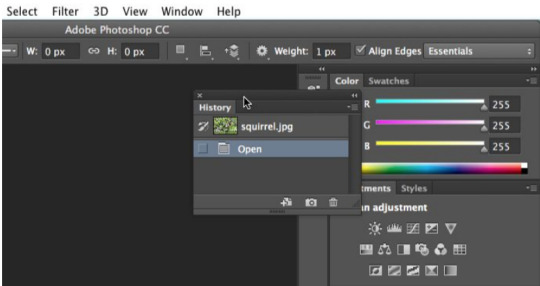
You'll also be able to view and modify information on the current file through the other panels in the workspace. For example, you can view the document's layers in the Layers panel. To show or hide any panel, click the Window menu, then select the desired panel (currently visible panels are indicated by a check mark). In the image below, we're using the Window menu to turn on the History panel.
You can use the double arrows to expand or collapse panels. This can be helpful if you want to temporarily hide a panel without removing it from the workspace.
You can also press the Tab key on your keyboard to show or hide all active panels.
MOVING PANELS
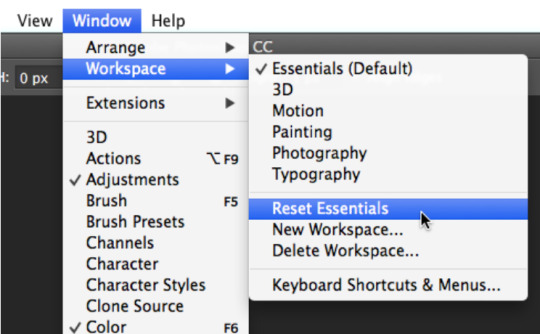
If you want to change a panel's location, you can move it by clicking and dragging the panel to a new part of the workspace.
However, if you're planning to follow along with our tutorial, we recommend keeping most panels in the default location for now. To reset the panels to their default positions, select Window > Workspace > Reset Essentials. Note that this process may vary depending on which version of Photoshop you're using. For example, in Photoshop Elements you'll select Window > Reset Panels.
Once you've become familiar with the Photoshop interface, you're ready to start editing images!
Hope it helped you guys give a head start in editing!
0 notes
Text
Figure Drawing
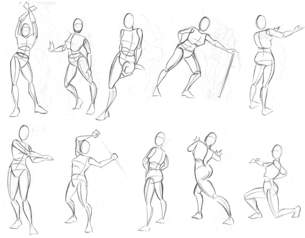
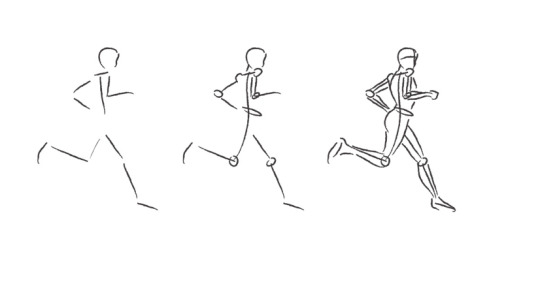
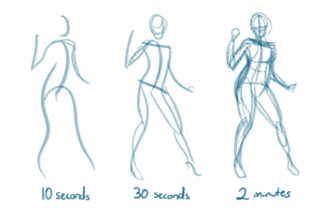
After drawing lines for god knows how long, you can finally level up and start doing actual drawings! We’re moving to figure drawing, this is where you can put what you learned from the previous lesson into practice. With the human figure we’re gonna have to learn the fundamentals of figure drawing and the basics of the basics would be the line of action and/or gesture.
Line of action / Gesture lines
(images from https://drawing-with-lena.tumblr.com/post/173248013380/ and
https://blog.schoolspecialty.com/gesture-drawing-101/)
“So I’m going to draw a stickman?” Well yes, but no. When we draw stickmen they’re usually made of stiff, rigid, and straight lines. With lines of action we’re going to draw a human figure using C S and I lines to make them more flowy. The purpose of learning this is to train your eye to find rhythm in your references. What helped me personally was thinking of it like a flowy line starting from the head all the way to the feet. I imagined what shape the spine would look like, how would it bend and how that movement of the spine would flow to the legs, and how the legs flow into the feet.
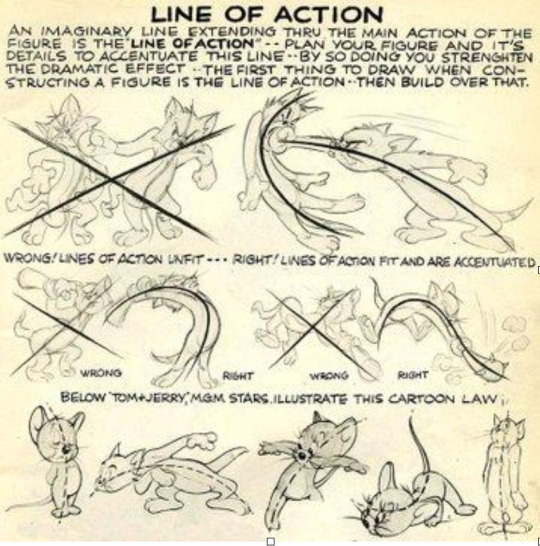
Learning and mastering the line of action can also give more impact in your drawings, like with the image we see above. If you’ve ever watched Tom & Jerry we can see how strong mastering gestures can be in the right hands. Below is a video more in depth on gesture and a drawing demonstration by Proko
How to Draw Gesture
How to Draw Gesture - Step by Step
The Torso
(image from: https://stanprokopenko.tumblr.com/post/124270894773/)
Once you nail the line of action down we can move on to giving our curvy figure more mass, and we’ll start with the torso. When drawing figures we’re going to have to be mindful of the human body, specifically the ribs and pelvis or if we’re going to count them as one identity, the torso. This is where a large portion of the body is highlighted and where we determine the line of action from. Learning this will help us determine where the body is facing, how far is it twisting, the arc of motion. Learning to draw with the ribs and pelvis in mind will help make your figures more dynamic and less stiff. Below is a video by Proko (He’s a great teacher for anatomy and that’s why we keep linking him here)
Deliberate Practice - The Secret of Getting Good Fast
Proportions
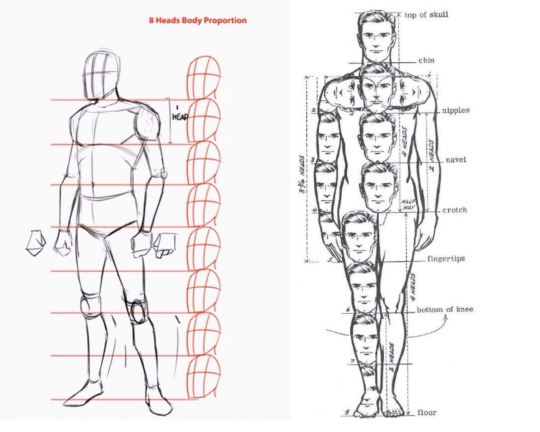
(image from:https://improveyourdrawings.com/2018/04/how-to-draw-the-human-body-in-a-3-4-view/)
By now you’re probably tired of drawing spaghetti, so we’re going to move on and add some meat to the bone. What’s important to learn first are the proportions of the body. Above we see the common 8 heads diagram that is mostly used when drawing figures. We don't have to follow this religiously but it will be a guide on how bodies should look like. It can also be used to determine length of body parts, for example if you look closely you can notice that the wrists are parallel to the crotch while the elbow is parallel to the belly button. Use it as a guide to always look back to when drawing people, but when drawing poses that aren’t just standing, use your knowledge from this with some observation skills. Below is a video on proportions
Human Figure Proportions - Anatomy Master Class
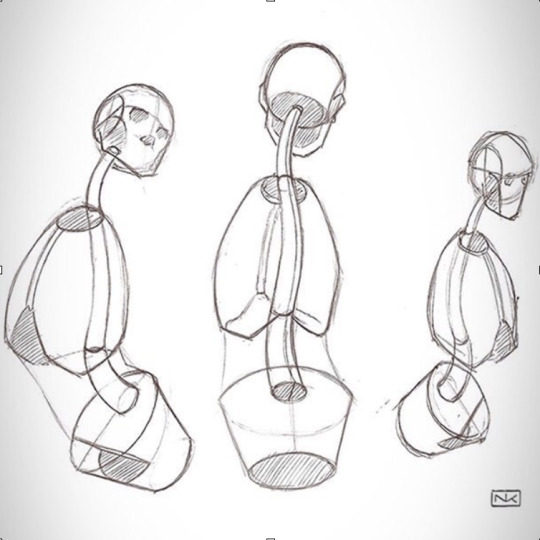
Mannequization
By AmyClark from Deviantart
Now we’re getting somewhere, we can finally do something more exciting. Now we will be drawing mannequins. The reason for this is beginners tend to focus on the details. There is a tendency to draw every muscle on the body but if you don't break the body in simpler shapes like a mannequin then those muscles are gonna look out of place. When drawing figures simplify it to the most basic shapes while still maintaining a sense of direction and flow with a technique called tapering. Below is an aggressive but educational video by Ethan Becker and another video by Proko.
DRAWING MORE WILL NEVER! EVER! MAKE YOU better
Mannequinization - Structure of the Human Body
Now what?
If you like reading books then I’ll suggest you give Andrew Loomis’ book “Figure Drawing for All it’s Worth” a try. It’s a very good book for artists who already have a decent amount of knowledge on figure drawing, which you already have at this point. If you want a challenge you can head over to Love Life Drawing’s channel and watch his Figuary series. It has 30 videos dedicated to teaching figure drawing and other techniques to help you not only with your hands but also with your eyes. It also gives you a link to Croquis Cafe, a vimeo channel filled with models and poses where you can apply the lessons taught.
Figuary 2020
2 notes
·
View notes
Text
Line Confidence
Drawing when you think about it, is just putting lines on paper and those lines are going to form shapes. So it's pretty important to have confidence in your lines to make your drawings ten times better.
Common Mistakes

(image from animeoutline)
When you look at the lines on the left side they’re wobbly and scratchy. This usually happens when you’re uncertain or when you’re too careful and you don't want to make any mistakes. There’s no shame there, all of us used to draw like that. When making lines they should look strong and flow continuously and smoothly like the line on the right.
"How do I do that?". The best way to get a quality like that is learning to draw with your arm. When you write your wrists do all the moving and that's fine if you're making really small lines. But when we're making big lines and curves learning to use your entire arm to pilot your pencil will work wonders. Hold your pencil, lock your wrists so it wont move, then use your shoulder to draw the entire line. Learning this skill can also prevent you from getting carpal tunnel as it usually happens when the nerves in your wrists are pinched by repetitive hand movement. I will tell you though, it’s hard and your arms are going to feel sore because they’re not used to that kind of motion. Think of it like exercise. When you work out your muscles will feel sore, that’s because they’re building up muscle to strengthen it. The same is happening to your arm so doing that movement won't feel as painful next time. Once you get used to it you’ll see a huge improvement in your drawings.
Grips
If you ever attended drawing classes you might notice people or teachers holding their pencils like this:
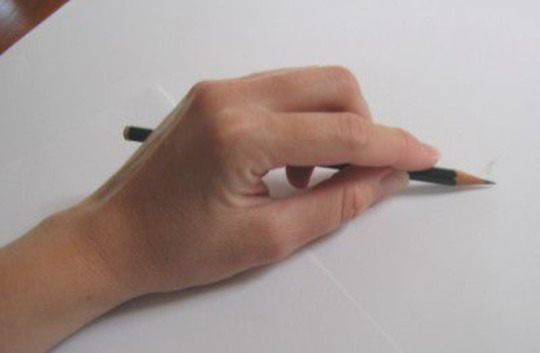
They do this because it makes them focus more on the movement of their arms which has a bigger arc of motion than what our wrists can provide. This grip also provides better control over our lines which solves the small scratchy line problem we saw earlier. The importance of learning a grip like this is dedication. When you draw you need to be sure and confident in your lines, this grip will help you be sure of the line you’ll make. You don't have to be drawing like this all the time but learning how to will help in making more confident lines.
Proko has an amazing video on this topic:
How to Hold and Control Your Pencil
What Now?
The link below will send you to a website called drawabox. Below you will find more information on line quality and arm movement:
Line quality - https://drawabox.com/lesson/1/2
Arm movement - https://drawabox.com/lesson/1/3
As the website name suggests, yes we will be drawing boxes as an exercise to improve your lines. Yes it’s tedious and boring but after doing the exercises myself I’ve seen myself making better lines, so why not give it a shot?
Homework - https://drawabox.com/lesson/1/4
1 note
·
View note
Text
Artist Mindset and Habits
Art is a very challenging but fun activity and with enough practice can be a skill you make money out of. Isn't it exciting to make money doing something you enjoy?
But here's the hard part, when you decide to work on art as a profession you're technically running a business. And a business needs to draw in customers. If you're going to run a business you need to be good at what you do. Realizing you need to be better is the first step to improving and that's what led you to this article, congrats! But when we starting we always have questions and these are some common questions and concerns that everyone has:
Where do I start?
First you need to learn the basics. when you're going to make a house you don't just start with the roof and build blindlessly. You need to find out if the ground is suitable for a house, plan out what room’s going to be what, setting up foundations, etc. You always start with the floors closest to the ground to make sure the building will be stable. Art’s the same, you need to know the fundamentals or the basics because it's going to be your frame. If you start with the roof without strengthening the frame, that roof’s just going to crash down.
But I don't wanna learn the basics
The basics are going to be your best friend when you experiment. All your favorite artists, whether its music, paintings, film, etc. they all started somewhere. Ilya Kushinov, studied Loomis' books for 2 hours every time he got home from work. Guitarists always learn the basic chords first before doing guitar solos. Bong Joon Ho has mastered the basics of cinematography and you can see it in his works especially in his latest movie “Parasite”.
But I don't want to look like everyone else, I have a unique artstyle
That's good, that's great, but think of it this way. Anime and cartoon art styles take inspiration from real life but they also look completely different. You still need to learn the basics because they're the rules. And you can't break the rules if you don't know the rules.
Other people are growing faster than I am
That's completely fine. Everyone has a different growth spurt and everyone starts somewhere. You just need the right attitude and the right practice to get better. Raikoart is a famous artist who only studied drawing and painting seriously for 2 years, look at where he is now
I want to do something but I don't feel like doing anything
Play around with it and do some warm ups. When you're drawing, do some scribbles and random sketches, when you're playing an instrument, do the basic chords and try to make a song out of it. Mindlessly do something for fun and after a while you'll find yourself in the mood to do it seriously. Or do some studies, observe from real life and use it as inspiration
I don't know what to do
That's a very common problem with an easy answer. Study then experiment. Combine things that people would never expect. No one has ever thought of making a superhero that's like a bat or a spider. But now we have Batman and Spiderman. Always remember it's your childlike curiosity that led you to love the arts, let that inner kid in you have fun while letting the adult in you learn something new so the kid can have more fun.
I'm not getting enough likes so i must be doing something wrong
Likes, followers, or subscribers don't always equal a good product. If your motivation for making art are imaginary numbers then you'll never improve. Your top priority should always be improving. The recognition you get should be something that accompanies your goal, not replace it.
I don't have any motivation to art anymore what do I do
If you feel this way, take a break. Don't overwork yourself. But don't use it as an excuse to always avoid something you don't feel like doing. If you want results you're the only person that can get those results.
Ok I'll learn the basics, I want to improve, what do I do?
That's great, finding motivation is the 1st step and you've already made it. What you need to do next is know what you need to study, research the basics of a skill you want to learn, afterwards make a schedule dedicated to learning one fundamental. Find the perfect balance between work, play and rest. If you keep working you're going to get burnt out, if you keep playing and resting you'll never improve. so the important keyword here is discipline. you need to devote the time doing perfect practice and you'll see results.
Here’s a video on how to improve your art, its focused on drawing but the lessons can be applied in every other practice:
How to QUICKLY IMPROVE Your ART
What's perfect practice
When you study something try to understand it, deconstruct it. If you look at a skull you can try to see how the facial features would look like. Once you've studied that try to redo it but this time to play around with it and make it a personal project. if you've see any mistakes on the outcome, then you'll know what to study next and be better at.
Do I just keep studying the basics over and over again? how long until I get better and actually make things I want to make?
That's the thing, it's a slow grind. Behind every piece of art you've seen and got inspired from are countless hours of self doubt and drive to be better, you too can make something beautiful with hours and hours of endless practice. Play around with what you’ve learned and use some creativity. You are an artist.
here's a great video on learning a skill and why patience is important :
The first 20 hours -- how to learn anything | Josh Kaufman | TEDxCSU
0 notes