
Last Seen Blogs

intheotherworld
questing for the perfect character

ghostlypest
' Ghostface '


macenthusiast
vaness

kyacharin
purple
Text
Unraveling the Secrets of the Best Miter Saws: Your Guide to Precision Cutting
Are you a woodworking enthusiast or a DIY aficionado looking to take your projects to the next level? Are you a professional carpenter seeking a tool that can make precision cuts with ease? Look no further than the best miter saws available in the market today. In this post, we'll unveil the secrets of these indispensable cutting companions and help you find the perfect miter saw that aligns with your needs and aspirations.

What Makes a Miter Saw the Best?
Before we delve into the top miter saws, let's understand the defining characteristics that set the best ones apart from the rest:
Cutting Accuracy:
The hallmark of a top-tier miter saw lies in its ability to deliver accurate cuts consistently. Look for models with clear and easy-to-read scales, laser guides, or LED work lights that aid in achieving precision cuts.
Power and Performance:
A robust motor is essential for smoothly slicing through various materials, whether it's wood, metal, or plastic. Opt for a miter saw with sufficient power (measured in amps) and RPM (revolutions per minute) to tackle your specific projects.
Cutting Capacity:
The best miter saws offer generous cutting capacities, allowing you to handle larger workpieces effortlessly. Consider the size of the materials you'll be working with to choose the appropriate cutting capacity.
Beveling and Mitering Features:
Miter saws with dual-bevel capabilities enable you to make bevel cuts in both directions without flipping the workpiece. This feature adds convenience and efficiency to your cutting tasks.
Sliding Feature:
Sliding compound miter saws extend the cutting range with their sliding rails, enabling you to tackle wider boards and achieve longer crosscuts.
Dust Collection System:
Sawdust can quickly accumulate, hindering visibility and creating a messy workspace. A reliable dust collection system helps keep your work area clean and minimizes health risks associated with dust inhalation
Top Miter Saws to Elevate Your Cutting Experience
DEWALT DWS780 12-Inch Double Bevel Sliding Compound Miter Saw
The DEWALT DWS780 tops the charts with its powerful 15-amp motor and smooth dual-bevel action, allowing you to create accurate bevel cuts on both sides. Its sliding feature extends the cutting capacity to 16 inches, making it a versatile option for various projects. The XPS cross-cut alignment system projects a shadow line onto the material, ensuring pinpoint accuracy without recalibration. With its efficient dust collection system, this miter saw keeps your workspace tidy and helps you focus on your craft.
Bosch GCM12SD 12-Inch Dual-Bevel Glide Miter Saw
The Bosch GCM12SD stands out for its innovative glide mechanism, which allows it to slide smoothly, requiring less space behind the saw. Its powerful motor and 12-inch blade ensure clean and precise cuts through a range of materials. The easy-to-read miter and bevel scales, along with the adjustable detents, simplify the setup for accurate cutting angles. The ergonomic design and soft-grip handle enhance comfort and control during prolonged use.
Makita LS1019L 10-Inch Dual-Bevel Sliding Compound Miter Saw
For those seeking a compact yet powerful miter saw, the Makita LS1019L is an excellent choice. The direct-drive motor system delivers consistent power, while the sliding rails increase the cutting capacity to 12 inches. The dual-laser system and LED work light ensure precise cuts and excellent visibility, even in low-light conditions. Its rugged build and efficient dust extraction system make it a reliable companion for professional and DIY projects alike.
Hitachi C10FCG 10-Inch Single Bevel Compound Miter Saw
If you're on a budget, the Hitachi C10FCG offers excellent value without compromising on performance. Its 15-amp motor provides ample power for cutting wood and other materials. Though lacking advanced features, this miter saw is a solid option for DIY enthusiasts and hobbyists who require a reliable cutting tool without breaking the bank.
Festool Kapex KS 120 REB Sliding Compound Miter Saw
The Festool Kapex KS 120 REB is a top-of-the-line miter saw designed for professionals who demand the best. Its 10-inch blade and powerful motor deliver unparalleled precision and cutting performance. The dual-laser system ensures exact alignment, while the Festool FastFix system allows for quick and easy blade changes. The exceptional dust extraction system keeps the work area clean and safe.
Conclusion
A miter saw is a game-changer in the world of woodworking and carpentry, providing precision and efficiency in cutting tasks. When searching for the best miter saw, prioritize features like cutting accuracy, power, cutting capacity, beveling capabilities, sliding functionality, and dust collection.
From the dependable DEWALT DWS780 and innovative Bosch GCM12SD to the compact Makita LS1019L and budget-friendly Hitachi C10FCG, there's a miter saw to suit every need and budget. For professionals seeking the ultimate cutting experience, the Festool Kapex KS 120 REB offers unrivaled precision and performance.
Unlock your cutting potential with the best miter saw that aligns with your needs, and watch your woodworking projects soar to new heights of excellence!
0 notes
Text
Choosing the Right Chainsaw Chain for Hardwood Cutting
Introduction:
When it comes to cutting hardwood, having the right chainsaw chain is essential for achieving efficient and effective results. Hardwood is known for its density and toughness, which can present challenges if you're not equipped with the appropriate chain. In this article, we will guide you through the key considerations for selecting the best chainsaw chain for hardwood cutting, ensuring optimal performance and safety.
Chain Design and Cutter Types:
Chainsaw chains designed for hardwood cutting come in various designs, each with its own advantages. Three common types are full-chisel, semi-chisel, and low-profile chains.
Full-chisel chains feature square-cornered cutters, providing excellent cutting performance but requiring precise handling and regular sharpening.
Semi-chisel chains have rounded-cornered cutters that offer better durability and can withstand contact with dirt and rocks, making them suitable for challenging cutting conditions.
Low-profile chains are ideal for occasional use in less demanding cutting tasks, as they prioritize ease of use and require less maintenance.
Chain Gauge and Pitch:
The chain gauge and pitch are critical factors to consider when selecting a chainsaw chain for hardwood cutting. The gauge refers to the thickness of the chain's drive links, while the pitch represents the distance between three consecutive rivets divided by two. For hardwood cutting, it is generally recommended to choose a chain with a larger gauge and pitch to ensure strength and stability while tackling dense hardwood fibers.
Depth Gauge Considerations:
The depth gauge, also known as the raker, plays a crucial role in controlling the depth of the cut. When cutting hardwood, it is beneficial to set the depth gauge slightly deeper. This allows for efficient chip removal and reduces the risk of the chain getting stuck during cutting. Proper depth gauge maintenance ensures optimal performance and prevents unnecessary strain on the chainsaw.
Maintenance and Sharpening:
Regular maintenance and sharpening are vital for prolonging the life and performance of your chainsaw chain when cutting hardwood. Hardwood can quickly dull a chain, so it's important to inspect the chain's sharpness frequently. Use a file or a sharpening tool to restore the chain's cutting edges to their optimal condition. A sharp chain not only improves cutting efficiency but also reduces the risk of accidents and kickback.
Lubrication and Cooling:
When cutting hardwood, the increased resistance generates more heat. Proper lubrication is crucial to minimize friction and prevent the chain from overheating. Always use the recommended bar and chain oil to ensure adequate lubrication during cutting. Additionally, take short breaks during extended cutting sessions to allow the chainsaw to cool down, maintaining its efficiency and preventing damage.
Safety Measures:
Safety should always be a top priority when operating a chainsaw, especially when cutting hardwood. Follow these essential safety measures:
Wear appropriate personal protective equipment (PPE) including a helmet, safety goggles, gloves, and hearing protection.
Familiarize yourself with the chainsaw's safety features and ensure they are in proper working condition.
Follow the manufacturer's guidelines for operating the chainsaw and cutting hardwood.
Maintain a secure footing and stable posture while cutting.
Conclusion:
Choosing the right chainsaw chain for cutting hardwood is crucial for achieving efficient and safe results. Consider the chain design, cutter types, gauge, and pitch that suit your cutting needs. Regular maintenance, sharpening, and proper lubrication are key to prolonging the chain's lifespan and optimizing its performance. Always prioritize safety by wearing the necessary protective equipment and adhering to safety guidelines. With the right chainsaw chain and proper care, you can tackle hardwood cutting tasks with confidence and precision.
0 notes
Text
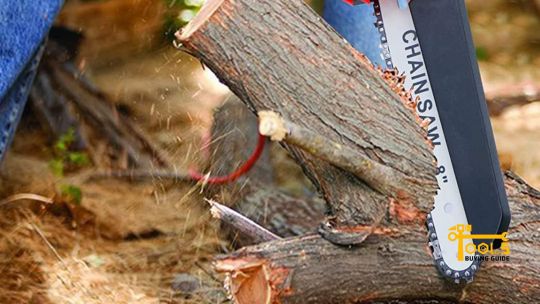
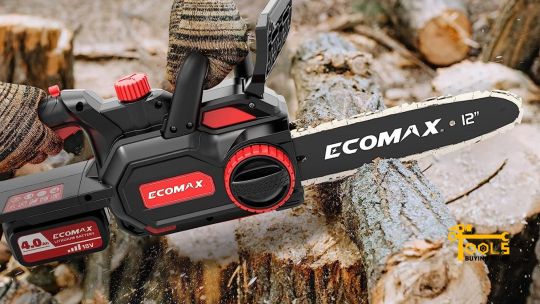
Unleash Your Cutting Power: The Best Chainsaws for Tree Cutting
Introduction:
When it comes to cutting trees, having a reliable chainsaw in your arsenal can make the task much more efficient and manageable. Whether you're a professional arborist or a homeowner with extensive tree maintenance needs, selecting the right chainsaw is essential. To help you make an informed decision, we have compiled a list of the best chainsaws for cutting trees. These exceptional tools combine power, precision, safety features, and durability, ensuring you have the perfect cutting companion by your side.
Husqvarna 455 Rancher:
The Husqvarna 455 Rancher is a true workhorse designed for heavy-duty tree cutting. With its robust 55.5cc engine, this chainsaw delivers impressive cutting power, allowing you to tackle even the most stubborn tree trunks. The 20-inch bar provides ample cutting capacity, making it a favorite among professionals and experienced homeowners. Equipped with an inertia-activated chain brake, it offers enhanced safety by quickly halting the chain in case of kickback. Additionally, its ergonomic design and low vibration ensure comfortable operation during long hours of cutting.
Stihl MS 271 Farm Boss:
Renowned for their superior quality and performance, Stihl chainsaws are trusted by professionals worldwide. The Stihl MS 271 Farm Boss lives up to this reputation, making it an excellent choice for tree cutting. Featuring a powerful 50.2cc engine and a 20-inch bar, this chainsaw excels in delivering precise cuts with optimal efficiency. The Easy2Start system reduces the effort required to start the chainsaw, making it user-friendly for both beginners and experienced users alike. Advanced anti-vibration technology further enhances operator comfort and reduces fatigue during extended cutting sessions.
Echo CS-590 Timber Wolf:
For those seeking uncompromising power and durability, the Echo CS-590 Timber Wolf is a top contender. With its robust 59.8cc engine, this chainsaw effortlessly handles demanding cutting tasks. The 20-inch bar allows for extended reach, while the automatic adjustable oiler ensures consistent lubrication for optimal performance. The Timber Wolf's decompression valve and ergonomic handle design enhance ease of use and operator comfort. If you require a professional-grade chainsaw that excels in heavy-duty cutting, the CS-590 Timber Wolf is a fantastic choice.
Makita XCU03PT1 Cordless Chainsaw:
For the convenience of cordless operation without compromising performance, the Makita XCU03PT1 is a standout option. Powered by two 18V LXT batteries, this chainsaw offers gas-like power and performance. Although equipped with a 14-inch bar, it doesn't compromise on cutting capacity. Its variable speed trigger and built-in lock-off lever enhance safety during operation. With minimal noise, zero emissions, and the ability to tackle tree cutting tasks with ease, this cordless chainsaw is an eco-friendly alternative that doesn't sacrifice power.
Black+Decker LCS1020 Cordless Chainsaw:
When it comes to lighter tree cutting tasks, the Black+Decker LCS1020 shines. Powered by a 20V MAX Lithium-Ion battery, this chainsaw combines portability with efficient cutting performance. The 10-inch bar is ideal for pruning branches and cutting smaller trees. Its wrap-around handle and low kickback bar design provide improved control and safety during operation. With tool-free chain tensioning, you can make quick adjustments on the go, ensuring a seamless cutting experience.
Conclusion:
Finding the best chainsaw for cutting trees can transform your tree maintenance endeavors. The Husqvarna 455 Rancher, Stihl MS 271 Farm Boss, Echo CS-590 Timber Wolf, Makita XCU03PT1, and Black+Decker LCS1020 are among the top chainsaws available that combine power, precision, safety features, and durability. Consider your specific cutting needs, whether it's heavy-duty work or lighter tasks, and choose a chainsaw that meets your requirements. With these exceptional tools in your hands, you'll unleash the cutting power necessary to tackle any tree-cutting endeavor with confidence and ease.
0 notes
Text
The Best Angle Grinder Blades for Tile Cutting: A Comprehensive Guide
Introduction:
When it comes to cutting tiles, having the right tools is essential. One of the most efficient and versatile tools for tile cutting is an angle grinder. However, to achieve precise and clean cuts, it's crucial to choose the best angle grinder blade for tile cutting. In this guide, we will explore some of the top options available on the market, ensuring you make an informed decision for your tile cutting projects.

DEWALT DW4725 Rim Diamond Blade:
The DEWALT DW4725 is a high-quality rim diamond blade designed specifically for tile cutting. Its continuous rim design ensures smooth cuts without chipping or damaging the tile's surface. The blade's diamond construction enhances durability and provides excellent cutting performance. DEWALT is a reputable brand known for producing reliable and long-lasting tools, making this blade a top choice for tile cutting applications.
Makita 2 Pack - 4.5" Turbo Diamond Blades:
Makita is another well-known name in the power tool industry, and their 4.5" Turbo Diamond Blades are a popular choice for cutting tiles. These blades feature a turbo rim design that facilitates fast and efficient cutting, making them ideal for both wet and dry cutting applications. With their high-quality diamond construction, these blades deliver clean and precise cuts while ensuring durability and longevity.
Bosch DB743S Continuous Rim Diamond Blade:
Bosch is synonymous with high-performance power tools, and their DB743S Continuous Rim Diamond Blade lives up to the brand's reputation. This blade offers exceptional cutting precision and speed, making it suitable for a wide range of tile materials. Its continuous rim design helps minimize chipping and ensures smooth cuts. The Bosch DB743S blade is designed to be compatible with various angle grinders, providing versatility for different tile cutting projects.
GoYonder 4.5 Inch Super Thin Diamond Saw Blade:
If you're looking for a super thin diamond blade for precise and delicate tile cutting, the GoYonder 4.5 Inch Super Thin Diamond Saw Blade is an excellent option. This blade is specifically designed for cutting porcelain tiles, ceramic tiles, and other delicate materials. Its ultra-thin kerf ensures minimal material waste while delivering clean and accurate cuts. The GoYonder blade is known for its durability and ability to handle high-speed cutting.
QEP 6-1008BW Black Widow Micro-Segmented Diamond Blade:
The QEP Black Widow Micro-Segmented Diamond Blade is a versatile blade suitable for various tile cutting tasks. It features a unique micro-segmented rim design that provides incredibly fast and efficient cutting performance. The blade's thin kerf helps reduce chipping, and its specially formulated diamond coating enhances longevity. Whether you're working on ceramic, porcelain, or marble tiles, the QEP Black Widow blade is a reliable choice.
Conclusion:
When it comes to tile cutting, selecting the right angle grinder blade can greatly impact the quality and precision of your cuts. The DEWALT DW4725, Makita Turbo Diamond Blades, Bosch DB743S, GoYonder Super Thin Diamond Saw Blade, and QEP Black Widow Micro-Segmented Diamond Blade are among the best options available on the market. Remember to choose a blade that matches your specific tile cutting needs, considering factors such as material type, blade design, and overall durability. With the right blade in hand, you'll be equipped to tackle your tile cutting projects with confidence and achieve professional-looking results.
0 notes
Text
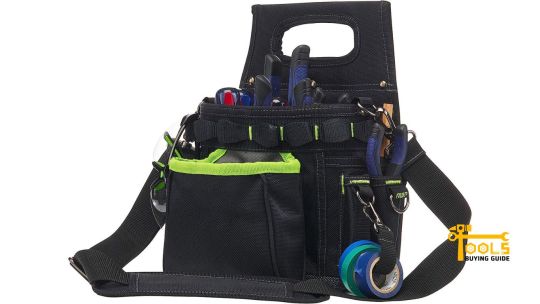
The Best Tool Bags for Plumbers: Stay Organized and Efficient
Introduction:
For plumbers, having a reliable tool bag is vital to ensure efficiency, organization, and productivity on the job. With numerous options available in the market, finding the perfect tool bag can be a daunting task. To simplify your search, we have compiled a list of the best tool bags for plumbers. These bags offer durability, ample storage space, and features that cater to the unique needs of plumbing professionals. Let's dive into the top tool bags that will revolutionize the way you carry and access your tools.
Veto Pro Pac Tech XL Tool Bag:
The Veto Pro Pac Tech XL Tool Bag is a top choice among plumbers due to its exceptional durability and organization features. Crafted with rugged waterproof materials, this bag can withstand the demands of the job site. With 67 pockets, including vertical storage options, it provides easy access to tools while maintaining optimal organization.
DEWALT DG5543 Tool Bag:
The DEWALT DG5543 Tool Bag combines durability and practicality, making it a favorite among plumbers. Its heavy-duty polyester fabric and reinforced bottom ensure long-lasting use. The bag features multiple pockets, a spacious main compartment, and a padded shoulder strap for comfortable transportation.
Custom LeatherCraft 1539 Tool Bag:
If you're searching for a tool bag with generous storage capacity, look no further than the Custom LeatherCraft 1539 Tool Bag. With 50 pockets, including a large central compartment, it offers ample room for tools of various sizes. The bag also features a comfortable carrying handle and an adjustable shoulder strap.
Klein Tools 55421BP-14 Tool Bag Backpack:
The Klein Tools 55421BP-14 Tool Bag Backpack combines versatility and convenience. Designed as a backpack, it allows plumbers to carry their tools hands-free, making it ideal for climbing ladders or navigating tight spaces. The bag boasts 39 pockets, including a hard molded front pocket for delicate items, ensuring excellent organization and protection.
CLC Custom LeatherCraft 1132 Tool Bag:
For plumbers on the move, the CLC Custom LeatherCraft 1132 Tool Bag is an excellent choice. Constructed with durable polyester, this bag features a remarkable 75 pockets for easy organization. Its collapsible handle and wheels make transportation effortless, especially when dealing with heavier tools.
Milwaukee 48-22-8200 Hardtop Rolling Bag:
The Milwaukee 48-22-8200 Hardtop Rolling Bag is designed for heavy-duty use. Its hardtop lid provides maximum protection for valuable tools, while the 6-inch wheels and telescoping handle ensure easy transportation. With 24 pockets and a capacity of up to 200 pounds, this bag is perfect for plumbers carrying a substantial load.
Occidental Leather 5589 Commercial Electrician's Tool Bag:
While primarily designed for electricians, the Occidental Leather 5589 Tool Bag is a versatile option for plumbers as well. Made from high-quality leather, it offers durability and a plethora of pockets for efficient organization. Its robust construction and versatility make it suitable for demanding plumbing tasks.
Husky GP-44316AN13 Tool Bag:
The Husky GP-44316AN13 Tool Bag is an affordable yet reliable option. Constructed with durable and water-resistant fabric, it features multiple pockets for tool organization. The bag's reinforced handle and padded shoulder strap ensure comfortable carrying, making it a dependable choice for plumbers.
Gatorback B145 Carpenters Triple Combo Belt:
For plumbers who prefer a belt system, the Gatorback B145 Carpenters Triple Combo Belt is an excellent choice. It includes a tool belt, suspenders, and a carrying bag capable of holding various tools. The ergonomic design and customizable fit provide comfort during long working hours.
Bucket Boss Gatemouth Tool Bag:
The Bucket Boss Gatemouth Tool Bag stands out with its wide-mouth opening, allowing for easy access to tools. It offers a durable construction, multiple pockets, and a reinforced bottom for enhanced longevity. The bag's compact size and comfortable handle make it a convenient choice for small plumbing projects.
Conclusion:
Investing in a high-quality tool bag for plumbers looking to stay organized, efficient, and productive on the job. The Veto Pro Pac Tech XL Tool Bag, DEWALT DG5543 Tool Bag, and Custom LeatherCraft 1539 Tool Bag are top recommendations due to their durability, storage capacity, and organization features. The other bags on our list, such as the Klein Tools 55421BP-14 Tool Bag Backpack and Milwaukee 48-22-8200 Hardtop Rolling Bag, offer unique features catering to specific needs. Choose a tool bag that suits your requirements, and experience the convenience and functionality that these top-rated tool bags for plumbers. Stay organized, work efficiently, and excel in your plumbing endeavors with the best tool bag by your side.
0 notes
Text
Unleash Your Creativity with the Best Cordless Rotary Tools
Introduction:
In the world of DIY projects, craftsmanship, and repairs, having the right tools at your disposal is paramount. When it comes to versatility, convenience, and precision, cordless rotary tools reign supreme. These handheld power tools have revolutionized the way we approach tasks such as cutting, grinding, sanding, polishing, and engraving. In this post, we'll delve into the world of cordless rotary tools and explore some of the best options available in the market today. Whether you're a DIY enthusiast, hobbyist, or professional, these tools will elevate your projects to new heights.

Dremel 8220-1/28 Rotary Tool Kit:
The Dremel 8220-1/28 Rotary Tool Kit is a true powerhouse when it comes to cordless rotary tools. With its variable-speed motor ranging from 5,000 to 30,000 RPM, it offers exceptional versatility for various applications. The kit comes complete with a range of attachments and accessories, allowing you to tackle any project with ease. The long-lasting lithium-ion battery ensures extended usage, while the ergonomic design guarantees comfort during prolonged periods of use. Whether you're a seasoned professional or a DIY beginner, the Dremel 8220-1/28 is a reliable and versatile tool to have in your arsenal.
Makita XMT03Z 18V LXT Lithium-Ion Cordless Multi-Tool:
For those who value durability and efficiency, the Makita XMT03Z Cordless Multi-Tool is a top contender. Featuring a powerful 18V motor and a 3.2-degree oscillation angle, this tool excels in rapid cutting and sanding tasks. Its quick-release system allows for easy and swift accessory changes, saving you valuable time on the job. With its ergonomic design and lightweight construction, the Makita XMT03Z offers superior control and maneuverability. Whether you're working on intricate woodwork or tackling heavy-duty projects, this tool is built to impress.
Milwaukee 2460-20 M12 Cordless Rotary Tool:
Milwaukee is known for its reliable and high-performing power tools, and the Milwaukee 2460-20 M12 Cordless Rotary Tool is no exception. This compact and versatile tool packs a punch with its powerful motor and variable speed control. The unique speed dial feature allows precise adjustments for different materials and applications. The REDLITHIUM battery technology ensures consistent power delivery and prolonged runtimes, making it perfect for long projects. With its durability, maneuverability, and excellent performance, the Milwaukee 2460-20 M12 is a go-to choice for professionals and DIY enthusiasts alike.
Black & Decker RTX-B 3-Speed Rotary Tool:
If affordability is a priority, the Black & Decker RTX-B Rotary Tool offers excellent value for your money. Despite its budget-friendly price, this tool does not compromise on quality or performance. Equipped with three-speed settings, it provides versatility for various projects. The ergonomic design and soft grip handle enhance comfort and control during extended use. With its reliability and wide range of compatible accessories, the Black & Decker RTX-B is an ideal choice for beginners or those looking for a reliable backup tool.
Bosch Gro10.8V-Li Cordless Rotary Tool:
For those seeking a compact and portable option, the Bosch Gro10.8V-Li Cordless Rotary Tool is a fantastic choice. Its small size and lightweight design make it easy to carry and maneuver in tight spaces. Despite its compactness, this tool boasts a powerful motor and variable-speed control, allowing for precise and controlled operation. The lithium-ion battery provides long-lasting performance, ensuring uninterrupted usage. Whether you're a DIY hobbyist or a professional on the go, the Bosch Gro10.8V-Li delivers exceptional versatility and convenience.
Conclusion:
Cordless rotary tools have become an indispensable part of any toolkit, offering versatility, convenience, and precise control for a wide range of tasks. The Dremel 8220-1/28, Makita XMT03Z, Milwaukee 2460-20 M12, Black & Decker RTX-B, and Bosch Gro10.8V-Li are among the best cordless rotary tools available today, each with its own unique features and strengths. By selecting the right tool for your specific needs and preferences, you can unlock a world of creativity and achieve outstanding results in your DIY projects or professional endeavors. Embrace the power of cordless rotary tools and watch your craftsmanship soar to new heights.
0 notes
Text
How to Change a Drill Bit: A Step-by-Step Guide
Introduction:
Changing a drill bit is a fundamental skill that every DIY enthusiast or homeowner should learn. Whether you're working on a simple home improvement project or tackling more complex tasks, knowing how to change a drill bit is essential. In this guide, we'll take you through the step-by-step process of changing a drill bit efficiently and safely.

Step 1: Prepare Your Workspace Before beginning any work, it's important to set up a clean and organized workspace. Clear the area of any clutter and ensure there is sufficient lighting. Gather all the necessary tools for the task, including the new drill bit, chuck key, and safety glasses.
Step 2: Unplug the Drill or Remove the Battery To prevent any accidents or unintentional activation, always disconnect the drill from its power source. If you're using a corded drill, unplug it from the power outlet. For cordless drills, remove the battery pack.
Step 3: Release the Chuck The chuck is the part of the drill that holds the drill bit in place. Locate the chuck and identify the method for releasing it. Depending on your drill, this can be done in a few ways:
Keyless Chuck: Many modern drills feature a keyless chuck that can be loosened by hand. Simply twist the chuck counterclockwise to release the current bit.
Keyed Chuck: If your drill has a keyed chuck, insert the chuck key into the hole located on the side of the chuck. Rotate the key clockwise to loosen the chuck and release the bit.
Step 4: Remove the Old Drill Bit Once the chuck is loose, gently pull the old drill bit out of the chuck. Be careful not to touch the sharp edges. If the bit is stuck, hold the drill upside down and tap the chuck lightly with a rubber mallet to dislodge it.
Step 5: Select and Insert the New Drill Bit Choose the appropriate drill bit for your specific task. Different materials and applications may require different types of drill bits. Align the shank of the new drill bit with the jaws of the chuck and insert it. Make sure the bit is fully inserted and seated securely.
Step 6: Tighten the Chuck Using the appropriate method for your drill, tighten the chuck to secure the new drill bit in place. If you have a keyless chuck, twist it clockwise by hand until it is firmly tightened. For a keyed chuck, insert the chuck key and rotate it counterclockwise to tighten the jaws around the bit.
Step 7: Test the Bit's Stability Before proceeding with your drilling task, give the new drill bit a gentle tug to ensure it is properly secured. If it feels loose, repeat the tightening process.
Step 8: Reconnect the Power Source If you unplugged the drill or removed the battery earlier, now is the time to reconnect the power source. Double-check that everything is properly connected and that the drill is functioning correctly.
Conclusion:
Knowing how to change a drill bit is an essential skill for any DIY enthusiast or homeowner. By following these step-by-step instructions, you can safely and efficiently change drill bits to tackle a variety of tasks. Remember to always prioritize safety by wearing protective gear, disconnecting the power source, and handling drill bits with care. With practice, you'll become proficient at changing drill bits and expand your capabilities for all your future drilling needs.
0 notes
Text
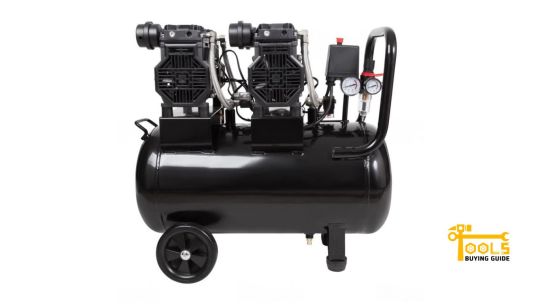
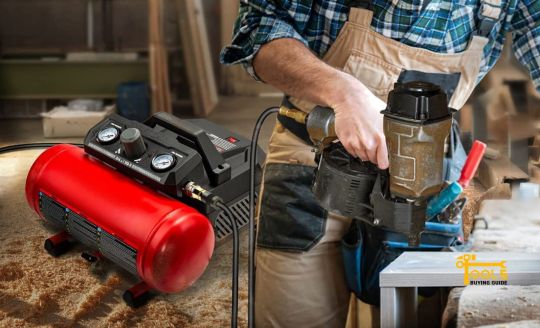
The Best Air Compressors for All Your Needs
Introduction:
Air compressors have become indispensable tools for a wide range of applications, from powering pneumatic tools and inflating tires to operating airbrushes and spray guns. Choosing the right air compressor can significantly enhance efficiency and productivity. In this post, we will explore some of the best air compressors available on the market today.
California Air Tools 8010 Ultra Quiet & Oil-Free Air Compressor:
If noise level is a concern for you, the California Air Tools 8010 is an excellent choice. With a noise level of only 60 decibels, it is one of the quietest air compressors available. This portable compressor delivers 2.20 CFM at 90 PSI, making it suitable for various tasks. Its oil-free design ensures clean and maintenance-free operation.
Porter-Cable C2002 Pancake Compressor:
The Porter-Cable C2002 is a popular choice among DIY enthusiasts and professionals alike. Its compact and lightweight design, combined with a 6-gallon pancake-style tank, makes it highly portable. With a maximum pressure of 150 PSI, it can handle a variety of tasks such as nailing, stapling, and inflation. The oil-free pump eliminates the need for regular maintenance.
Makita MAC5200 Big Bore 3.0 HP Air Compressor:
For heavy-duty applications, the Makita MAC5200 offers exceptional power and performance. Equipped with a 3.0 HP motor and a large 5.2-gallon tank, it delivers 6.5 CFM at 90 PSI and can handle demanding tasks with ease. The cast iron pump with a Big Bore cylinder ensures faster recovery time and increased durability.
DEWALT DWFP55126 Pancake Compressor:
The DEWALT DWFP55126 is another highly regarded pancake-style air compressor. With a 6-gallon tank and a maximum pressure of 165 PSI, it provides ample power for various applications. The low-amp motor starts easily in cold weather conditions, and its high-flow regulator ensures consistent performance. The compact design and convenient cord wrap make it easy to transport and store.
Bostitch BTFP02012 Oil-Free Pancake Compressor:
The Bostitch BTFP02012 is a reliable and budget-friendly option for light to medium-duty tasks. Its 6-gallon tank and maximum pressure of 150 PSI offer sufficient power for most home improvement projects. The oil-free pump requires minimal maintenance, and the high-efficiency motor provides quick recovery time.
Conclusion:
When choosing the best air compressor for your needs, it's essential to consider factors such as portability, noise level, power, and tank capacity. The California Air Tools 8010, Porter-Cable C2002, Makita MAC5200, DEWALT DWFP55126, and Bostitch BTFP02012 are all excellent options to consider, depending on your specific requirements. Remember to assess your intended applications and choose an air compressor that provides the right combination of power, durability, and convenience to maximize productivity.
0 notes
Text
🏢 Ladders for High Ceilings: Reaching New Heights with Ease! 🚀
Are you faced with the challenge of reaching high ceilings in your home or workplace? Whether it's changing a light bulb, conducting maintenance work, or accessing storage spaces, ladders are essential tools that can help you get the job done efficiently and safely. However, when it comes to high ceilings, ordinary ladders may fall short. That's where ladders for high ceilings come into play.

Ladders for high ceilings are designed to provide the extra height and stability necessary to tackle elevated tasks with confidence. These specialized ladders are equipped with unique features that make them ideal for reaching heights that regular ladders cannot accommodate. Let's explore some of the key benefits and considerations when it comes to choosing the right ladder for high ceilings.
1️⃣ Extended Height: One of the primary advantages of high-ceiling ladders is their extended height range. They are typically designed to reach heights of 12 feet or more, allowing you to access elevated areas without the need for additional support or scaffolding. This feature alone makes them indispensable for tall ceilings, lofts, commercial spaces, or areas with elevated storage.
2️⃣ Sturdy Construction: Safety should always be a top priority when working at heights. Ladders for high ceilings are constructed with durable materials such as aluminum or fiberglass, ensuring stability and durability. Look for ladders that meet industry standards and have appropriate weight capacities to support your needs.
3️⃣ Adjustable Height: Some high-ceiling ladders come with telescoping or extendable features that allow you to adjust the ladder's height according to your requirements. This versatility enables you to adapt to various ceiling heights within a single ladder, eliminating the need to purchase multiple ladders for different tasks.
4️⃣ Non-Slip Features: To prevent accidents and provide a secure footing, ladders for high ceilings often feature anti-slip rungs or steps. These anti-slip surfaces offer better traction, even when you're wearing work boots or carrying tools. Safety features like grip handles and stabilizing feet further enhance stability and balance.
5️⃣ Portability and Storage: Despite their extended height capabilities, high-ceiling ladders are designed to be lightweight and portable. Look for ladders that are foldable or have a compact design for easy transportation and storage. This feature is especially valuable for homeowners or professionals who need to move the ladder between different locations.
6️⃣ Multi-Functional Designs: High-ceiling ladders often come with additional features that enhance their functionality. Some models include built-in tool trays or hooks for holding tools, paint cans, or other materials. These convenient extras can make your tasks more efficient by keeping everything you need within reach.
When considering a ladder for high ceilings, it's crucial to assess your specific requirements and the nature of the tasks you'll be performing. Always prioritize safety, stability, and the ladder's weight capacity to ensure a secure working environment.
In conclusion, ladders for high ceilings are indispensable tools for anyone dealing with tall spaces. Their extended height range, sturdy construction, and safety features provide the confidence and convenience needed to perform tasks efficiently and securely. By investing in the right ladder for high ceilings, you'll reach new heights with ease and unlock a world of possibilities in your home or workplace! 🌟
0 notes
Text
How to Sort Scrap Metal: A Comprehensive Guide to Maximize Recycling Efforts
Introduction:
Sorting scrap metal is an essential step in the recycling process, enabling efficient recycling and maximizing the value of the materials. By properly categorizing and separating different types of metal, you can ensure that they are recycled appropriately. In this guide, we'll walk you through the steps of sorting scrap metal effectively to optimize your recycling efforts and contribute to a more sustainable future.

Step 1: Gather Your Scrap Metal:
Collect all the scrap metal items you have, including old appliances, machinery parts, discarded metal objects, and more. Ensure that the items are free of any non-metallic materials like plastic, rubber, or wood.
Step 2: Separate Ferrous and Non-Ferrous Metals:
Use a magnet to determine whether the metal is ferrous or non-ferrous. Ferrous metals contain iron and are attracted to magnets, while non-ferrous metals do not have magnetic properties. Separate the two categories into different piles.
Step 3: Categorize Non-Ferrous Metals:
Focus on the non-ferrous metals pile and further categorize them based on their types. Common non-ferrous metals include aluminum, copper, brass, stainless steel, lead, zinc, and more. Consult identification guides or seek professional advice to help identify specific metal types accurately.
Step 4: Remove Contaminants:
Inspect the sorted non-ferrous metals for any contaminants like paint, plastic, or other non-metallic materials. Remove these contaminants carefully to enhance the quality and value of the scrap metal.
Step 5: Sort by Grade and Quality:
Within each category of non-ferrous metal, sort the items by grade and quality. Separate clean and shiny metals from those with corrosion, coatings, or other imperfections. This sorting process helps to ensure accurate pricing and efficient recycling.
Step 6: Organize and Store:
Organize the sorted scrap metal into separate containers, bins, or designated areas for each metal type. Label them accordingly for easy identification and transportation. Ensure that the containers are properly sealed to prevent any potential environmental contamination.
Step 7: Sell or Recycle:
Once your scrap metal is sorted and organized, you have the option to sell it to scrap yards or recycling facilities. Research local options and choose a reputable buyer who offers fair prices for your metals.
How to Sort Scrap Metal: A Comprehensive Guide to Maximize Recycling Efforts
Sorting scrap metal is a vital part of the recycling process, allowing for efficient recycling and maximizing the value of the materials. By following these steps, you can effectively categorize and separate different types of scrap metal, enhancing your recycling efforts and contributing to a sustainable future. Play your part in conserving resources and reducing waste by implementing proper scrap metal sorting techniques today.
0 notes
Text
How to Fix an Underground Leaking Water Pipe
Introduction:
Discovering an underground leaking water pipe on your property can be a worrisome situation. Besides the potential water wastage and utility bill spikes, it can also lead to damage to your property's foundation, erosion of soil, and pose a safety hazard. While fixing an underground leaking water pipe might seem daunting, with the right approach and some basic tools, you can tackle the issue effectively. This guide will walk you through the steps to identify, locate, and fix the leaking pipe, helping you restore your water system and avoid further complications.

Step 1: Confirm the Leak Before diving into the repair process, ensure that there is indeed a leak in your water pipe. Look for visible signs of water pooling or damp areas in your yard, even when there has been no recent rain. Monitor your water meter to check for continuous movement when no water is being used inside your property. If you suspect a leak, it's time to proceed to the next step.
Step 2: Turn Off the Water Supply Before attempting any repair work, shut off the water supply to your property. Locate the main water shut-off valve, which is usually found near the water meter or where the main water line enters your property. Turn the valve clockwise until it is fully closed. This step prevents any water flow while you work on the pipe.
Step 3: Identify the Leak Location Once the water supply is turned off, mark the area where you suspect the leak is located. Use a shovel or any other appropriate digging tool to carefully excavate the soil around the marked area. Be cautious not to damage the pipe further during this process.
Step 4: Expose the Pipe Continue digging until you have fully exposed the leaking pipe. Clear away enough soil to provide ample working space around the damaged area. Depending on the type of pipe, you might need to remove some concrete or other obstructions to access the leaking portion.
Step 5: Assess the Damage Inspect the exposed pipe for the cause of the leak. Common reasons include cracks, holes, loose joints, or corroded sections. The pipe material (PVC, copper, or galvanized steel) will influence the type of repair you need to perform.
Step 6: Repair the Leak The repair method will depend on the extent of the damage and the pipe material. For minor cracks or small holes in PVC pipes, you can use a pipe repair clamp or epoxy putty designed for fixing water pipes. For copper or galvanized steel pipes, consider using pipe sleeves or replacement fittings. If the damage is significant, it might be best to consult a professional plumber to assess the situation and recommend the appropriate repair approach.
Step 7: Test the Repair Once the repair is complete, turn the water supply back on and test the repaired section. Check for any signs of leakage or other issues. If the leak persists or worsens, immediately turn off the water supply and consider seeking professional help.
Step 8: Backfill the Trench After confirming the repair's success, carefully backfill the trench with the excavated soil. Tamp down the soil gently to provide stability and prevent future soil settling.
Step 9: Monitor the Repaired Area Keep an eye on the repaired area for a few days to ensure there are no further leaks or other problems. Verify that your water meter readings are normal, indicating no hidden leaks.
Conclusion:
Fixing an underground leaking water pipe can be a demanding task, but with proper preparation and caution, you can successfully resolve the issue and prevent further damage. Always prioritize safety, and if you encounter difficulties during the repair process, don't hesitate to seek help from a licensed plumber. By taking prompt action and addressing the problem effectively, you can restore your water system and maintain the integrity of your property's foundation.
0 notes
Text
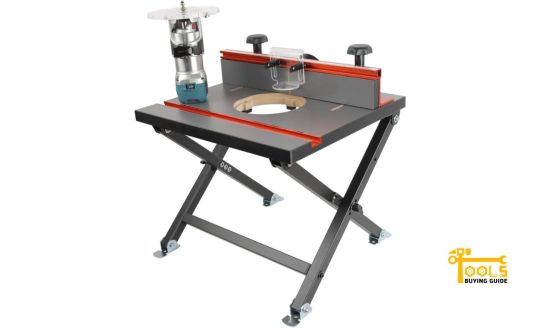
The 10 Best Router Tables for Woodworking Enthusiasts
Introduction:
A router table is an essential tool for woodworking enthusiasts, providing stability, precision, and versatility for a wide range of projects. With numerous options available on the market, finding the best router table can be a challenge. To help you make an informed decision, we have compiled a list of the top 10 router tables that combine durability, functionality, and value for money.
Kreg PRS1045 Precision Router Table System: The Kreg PRS1045 is a high-quality, heavy-duty router table system. It features a durable steel stand, a large tabletop, and an easy-to-use fence system. The precision insert plate allows for quick and accurate bit changes, while the built-in dust collection system keeps your workspace clean.
Bosch RA1181 Benchtop Router Table: Ideal for small workshops, the Bosch RA1181 offers a compact yet sturdy design. It features a laminated MDF tabletop, an adjustable fence, and a dust collection port. The aluminum fence is adjustable and works well for precision cutting, making it suitable for both beginners and experienced woodworkers.
Bench Dog Tools 40-102 ProMax Cast Iron Router Table: Crafted from cast iron, the Bench Dog Tools ProMax offers excellent stability and reduced vibration. The large tabletop provides ample space for various woodworking tasks. It includes a fence with a dual-track and a dust collection port for efficient cleanup.
Kreg PRS2100 Bench Top Router Table: The Kreg PRS2100 is a portable and versatile router table. It features a heavy-duty steel stand, a precision insert plate, and a T-square style fence for accurate cuts. The high-quality construction and easy setup make it a popular choice among woodworking enthusiasts.
JessEm 06001 Mite-R-Slide II Router Table Accessory: The JessEm 06001 Mite-R-Slide II is an innovative router table accessory that enhances the functionality of your existing table. It provides adjustable miter gauge support, allowing for precise crosscuts and angled cuts. This accessory is compatible with most router tables and is a great addition for those seeking greater versatility.
Grizzly Industrial T10432 Router Table with Stand: The Grizzly Industrial T10432 offers a sturdy and affordable solution for woodworkers. It features a laminated MDF tabletop, a fence system with adjustable faces, and a dust collection port. The included stand provides stability and convenience.
Bench Dog Tools 40-001 ProTop Contractor Benchtop Router Table: The Bench Dog Tools ProTop is a compact and portable router table that doesn't compromise on performance. It has a phenolic resin tabletop with a miter gauge slot, a fence system with a dust collection port, and an easy-to-use insert plate.
Woodpeckers Precision Router Table System: The Woodpeckers Precision Router Table System is renowned for its precision and attention to detail. It features a durable laminated MDF top, a micro-adjustable fence, and a split fence design for versatility. The high-quality components and meticulous engineering make it a top choice for professional woodworkers.
SawStop RT-AC27 Router Table Attachment: For owners of SawStop table saws, the SawStop RT-AC27 router table attachment is an excellent option. It attaches seamlessly to the table saw, providing a sturdy and integrated router table. It includes a precision fence and a dust collection port, making it a convenient addition to the workshop.
MLCS 9767 The Flatbed Horizontal Router Table: The MLCS 9767 offers a unique horizontal design that allows for easy and controlled edge routing. It features an adjustable fence and a large working surface. This router table is especially useful for edge and end grain routing tasks.
Conclusion:
Choosing the best router table depends on your specific woodworking needs and budget. The listed options provide a range of choices suitable for different workshop sizes and project requirements. Whether you prioritize stability, precision, portability, or additional features, investing in a high-quality router table will undoubtedly enhance your woodworking experience and help you achieve exceptional results.
0 notes
Text
How to Cut Copper Pipe with Ease: A Step-by-Step Guide
Introduction:
Copper pipes are a common choice for plumbing projects due to their durability and resistance to corrosion. However, cutting copper pipe accurately is crucial to ensure secure connections and prevent leaks. With the right tools and techniques, cutting copper pipe can be a straightforward process. In this post, we will provide you with a step-by-step guide on how to cut copper pipe with ease.

Gather the Required Tools and Materials: Before you start cutting copper pipe, make sure you have the necessary tools and materials at hand:
Pipe cutter
Hacksaw
Tubing cutter
Pipe cutting wheel
Measuring tape or ruler
Permanent marker or pencil
Deburring tool or file
Safety gloves and protective eyewear
Measure and Mark the Pipe: Accurate measurements are essential for a precise cut. Use a measuring tape or ruler to measure the desired length of the copper pipe. Mark the cutting point clearly with a permanent marker or pencil. Double-check your measurements to avoid any errors.
Choose the Cutting Method: Depending on the available tools and the thickness of the pipe, you can choose one of the following methods to cut copper pipe:
a. Pipe Cutter:
Open the pipe cutter and position it on the marked spot.
Tighten the cutter's screw or handle until the cutting wheel touches the pipe's surface.
Rotate the cutter around the pipe, tightening the screw or handle after each rotation until the pipe is cut through.
Inspect the cut end for a clean and accurate cut.
b. Hacksaw:
Wrap a piece of masking tape around the pipe at the cutting mark to prevent slipping.
Secure the pipe in a vise or use a pipe clamp to keep it stable.
Position the hacksaw blade perpendicular to the pipe, with the teeth pointing away from you.
Apply firm and steady pressure, using a smooth back-and-forth motion to saw through the pipe.
Remove the tape and inspect the cut end for accuracy.
c. Tubing Cutter:
Adjust the tubing cutter to fit the diameter of the copper pipe.
Position the cutter's cutting wheel on the marked spot.
Tighten the adjustment screw until the cutting wheel touches the pipe's surface.
Rotate the cutter around the pipe, gradually tightening the screw after each rotation until the pipe is cut through.
Examine the cut end for a clean and accurate cut.
d. Pipe Cutting Wheel:
Place the pipe cutting wheel around the copper pipe, aligning it with the cutting mark.
Secure the cutting wheel by tightening the handle or screw.
Apply slight pressure while rotating the cutting wheel around the pipe.
Increase the pressure gradually as the groove becomes deeper, until the pipe is cut through.
Inspect the cut end for cleanliness and accuracy.
Remove Burrs and Deburr: After cutting the copper pipe, sharp edges and burrs may be present. To ensure a proper connection, remove them using a deburring tool or file. Run the tool or file in a circular motion around the cut end, applying gentle pressure. Inspect the cut end to ensure it is smooth and free from any sharp edges.
Conclusion:
Cutting copper pipe with ease is achievable with the right tools, proper measurements, and careful execution. By following this step-by-step guide, you can ensure accurate and clean cuts for your plumbing projects. Remember to prioritize safety by wearing protective gear and double-checking your measurements. With practice, you'll become proficient in cutting copper pipe and be able to tackle various plumbing tasks with confidence.
0 notes
Text
Mastering the Art of Joinery: A Step-by-Step Guide on How to Use a Dowel Jig
Introduction:
If you're passionate about woodworking and desire strong and seamless connections in your projects, using a dowel jig is a game-changer. A dowel jig enables you to create precise dowel holes, allowing you to join pieces of wood securely. In this post, we'll provide you with a step-by-step guide on how to use a dowel jig effectively and master the art of joinery.

Step 1: Gather the Necessary Tools and Materials: Before you begin, gather the following tools and materials:
Dowel jig
Drill
Drill bits (matching the size of the dowels)
Measuring tape, pencil, and square for marking
Wood pieces to be joined
Dowels
Clamps (if necessary)
Step 2: Mark and Prepare the Wood Pieces: Start by marking the locations on the wood pieces where you want the dowel holes to be drilled. Use a measuring tape, pencil, and square to ensure precise and accurate placement.
Step 3: Set Up the Dowel Jig: Place the dowel jig on the wood piece, aligning it with the marked locations for the dowel holes. Ensure that the jig is securely positioned and won't move during drilling. If necessary, use clamps to hold the jig in place.
Step 4: Adjust the Dowel Jig: Most dowel jigs have an adjustment mechanism that allows you to set the drilling depth and spacing between dowel holes. Consult the manufacturer's instructions for your specific dowel jig and make the necessary adjustments. Typically, you can adjust the depth by moving the drill bit guide up or down, and the spacing by moving the jig guide along the jig body.
Step 5: Drill the Dowel Holes: With the dowel jig properly adjusted, it's time to drill the dowel holes. Insert the appropriate drill bit into your drill and set it to the desired drilling depth. Place the drill bit into the guide hole of the dowel jig and position it over the marked location for the dowel hole. Hold the drill firmly and drill straight down, ensuring that the drill bit is perpendicular to the wood surface. Repeat this process for all the dowel holes needed.
Step 6: Prepare the Dowels: After drilling the dowel holes, prepare the dowels by cutting them to the appropriate length. Ensure that the dowels fit snugly into the holes without forcing them.
Step 7: Apply Glue and Assemble the Wood Pieces: Apply a small amount of wood glue inside each dowel hole. Insert the dowels into the holes, ensuring that they are fully seated. Join the wood pieces together, aligning the dowels and applying gentle pressure to create a tight fit. Wipe off any excess glue with a damp cloth.
Step 8: Allow the Glue to Dry: Give the glue sufficient time to dry according to the manufacturer's instructions. It is crucial to let the glue fully cure before applying any stress or load to the joined wood pieces.
Step 9: Sand and Finish: Once the glue has dried, sand the joined area to achieve a smooth and even surface. Apply your desired finish or stain to enhance the appearance of the project.
Conclusion:
Using a dowel jig is a valuable technique in woodworking that allows for precise and durable joinery. By following this step-by-step guide, you can harness the power of a dowel jig to create strong and seamless connections in your projects. Remember to gather the necessary tools, mark and set up the jig accurately, drill the dowel holes with care, and assemble the wood pieces using glue and pressure. With practice, you'll become proficient in using a dowel jig and unlock endless possibilities for your woodworking creations.
0 notes
Text
🔥 Stay Cool and Safe on the Job! Discover the Best Work Boots for Hot Weather 🔥
Working in scorching temperatures? We've got you covered! Introducing the ultimate guide to the best work boots for hot weather. 🌞

👉 Don't let the heat slow you down! These work boots are designed with your comfort and safety in mind. Made from breathable materials, they allow air to circulate, keeping your feet cool and dry throughout the day.
👉 Lightweight construction is key! These boots won't weigh you down, allowing you to move freely and stay productive in even the hottest conditions. Say goodbye to fatigue and discomfort!
👉 Moisture management is a top priority. With moisture-wicking linings and advanced ventilation systems, these boots keep sweat at bay, reducing the risk of blisters and odors. Fresh and comfortable all day long!
👉 Safety first, always! These work boots come equipped with features like slip resistance, toe protection, and electrical hazard protection. You can focus on your work with peace of mind, knowing you're well-protected.
👉 Top brands such as Timberland, Keen Utility, Ariat, Carhartt, and Reebok Work have got your back. Choose from a range of styles and find the perfect pair that suits your needs and work environment.
🔎 Ready to beat the heat? Explore the best work boots for hot weather and elevate your comfort and performance on the job. Don't let the temperature hold you back—step up your game! 💪
5 notes
·
View notes
Text
Exploring the Top Choices for the Best Screw Compressor
Introduction:
When it comes to industrial air compression, screw compressors have become the preferred choice for many businesses. Their efficiency, reliability, and consistent performance make them indispensable in a wide range of industries, from manufacturing and construction to automotive and pharmaceuticals. In this post, we will delve into the top choices for the best screw compressor available in the market today, focusing on their features, benefits, and why they stand out from the competition.
Atlas Copco GA Series:
The Atlas Copco GA series is renowned for its robust design, energy efficiency, and superior performance. Featuring advanced technology such as asymmetric rotors and low-pressure drops, these compressors reduce energy consumption while increasing productivity. With a wide range of models available, businesses can select the most suitable compressor based on their specific power capacity requirements. Additionally, Atlas Copco's commitment to customer support and a comprehensive service network ensures minimal downtime and maximum uptime for their customers.
Ingersoll Rand UP6 Series:
The Ingersoll Rand UP6 series is a popular choice known for its durability and efficient compressed air solutions. These compressors boast robust construction and high-quality components, ensuring long-lasting performance. With innovative features like air-end design optimization, the UP6 series maximizes efficiency and reduces operating costs. Ingersoll Rand also offers intelligent control systems that optimize performance and provide real-time monitoring, enhancing productivity and energy savings.
Kaeser Sigma Series:
Kaeser's Sigma series is highly regarded for its efficiency, durability, and advanced control features. By utilizing optimized rotor profiles and superior cooling systems, these compressors deliver exceptional performance with low energy consumption. The Sigma control system offers intuitive operation, extensive monitoring capabilities, and seamless integration into existing networks, making it an ideal choice for businesses seeking reliability and ease of use.
Sullair ES Series:
Sullair's ES series screw compressors are known for their energy efficiency, reliability, and compact design. Equipped with variable-speed drive technology, these compressors automatically adjust their speed to match the air demand, resulting in significant energy savings. The ES series also features a reliable air-end design and intelligent controls that enable remote monitoring and troubleshooting. Sullair's commitment to customer support and comprehensive service offerings further enhances the reliability and longevity of their compressors.
Gardner Denver Electra Saver II Series:
The Gardner Denver Electra Saver II series combines power, efficiency, and durability to meet the demanding requirements of industrial applications. These compressors feature advanced rotor profiles and high-efficiency motors, maximizing performance while minimizing energy consumption. The intelligent control system provides precise monitoring and diagnostics, allowing for proactive maintenance and minimizing downtime. With a reputation for reliability and longevity, Gardner Denver compressors are trusted by industries worldwide.
Conclusion:
Investing in the best screw compressor is essential for achieving efficient and reliable compressed air solutions. The Atlas Copco GA series, Ingersoll Rand UP6 series, Kaeser Sigma series, Sullair ES series, and Gardner Denver Electra Saver II series are all top contenders, offering exceptional power, efficiency, and reliability. By considering your specific needs, consulting experts, and evaluating customer reviews, you can make an informed decision and select the screw compressor that best suits your industrial requirements. With the right screw compressor by your side, you can enhance productivity, reduce operating costs, and ensure a continuous supply of high-quality compressed air for your business.
0 notes
Text
The Ultimate Guide to Finding the Best Boots for Heavy Guys
Introduction:
When you're a heavy guy, finding the perfect pair of boots that offer both durability and comfort is essential. Heavy individuals require footwear that can withstand their weight while providing optimal support throughout the day. In this comprehensive guide, we will explore the best boots for heavy guys. Whether you're looking for work boots, hiking boots, or stylish everyday boots, we've got you covered. Let's dive in!

Durability and Construction:
When searching for boots as a heavy guy, prioritize durability and construction. Look for boots made from high-quality materials such as full-grain leather, which offers excellent strength and longevity. Reinforced stitching and solid construction techniques ensure that the boots can withstand heavy use and maintain their integrity over time.
Support and Stability:
Support and stability are crucial for heavy guys to prevent foot fatigue and discomfort. Seek boots with proper arch support and cushioning to provide optimal shock absorption. Features like contoured footbeds, EVA midsoles, and supportive shanks contribute to a stable and comfortable footwear experience.
Safety Features:
For heavy guys working in hazardous environments, safety features are paramount. Boots with steel toe caps offer extra protection against impact and compression hazards. Slip-resistant outsoles provide reliable traction on various surfaces, minimizing the risk of slips and falls.
Fit and Sizing:
Ensuring a proper fit is vital for comfort and support. Measure your feet accurately and refer to the manufacturer's size chart when selecting boots. Consider wide or extra-wide options if you have broader feet. Pay attention to customer reviews for insights on sizing and fit, as this can vary between brands and models.
Brand Reputation:
Choose reputable brands known for their commitment to quality and durability. Brands like Timberland, Caterpillar, Red Wing Heritage, and Keen are often preferred by heavy guys due to their focus on creating sturdy and reliable footwear.
Style and Versatility:
Who says you can't have style and functionality together? Many brands offer boots that combine durability with stylish designs. Look for versatile options that can be worn for both work and casual occasions, allowing you to express your personal style without compromising on comfort and support.
Conclusion:
Finding the best boots for heavy guys is all about striking the perfect balance between durability, comfort, and style. Prioritize boots that are built to withstand heavy use, offer ample support, and incorporate safety features if needed. Remember to focus on fit and sizing, and choose reputable brands with a track record of delivering high-quality footwear. By following these guidelines, you can find boots that will accompany you through your daily activities, providing the durability, comfort, and support you deserve. Invest in the right pair of boots, and step forward with confidence!
0 notes