
transistorsex
TRANSISTOR SEX
Emerson Vella's blog, which is actually just a list of audio related stuff he doesn't want to forget.
119 posts
Don't wanna be here? Send us removal request.
Last Seen Blogs

themojomustbedope
Untitled

oliziii
oliziii

mogrady3-blog
Untitled

alewgentlyweeps
Alew

antcnivs-blog
licorice drops.
Link
0 notes
Link
0 notes
Text
Project Boxes/Cases/19in Racks
https://modushop.biz/site
https://www.protocase.com
https://www.hammfg.com
https://www.lansing-enclosures.com
https://www.tekoenclosures.com
http://www.par-metal.com/index.php
https://www.frontpanelexpress.com
0 notes
Text
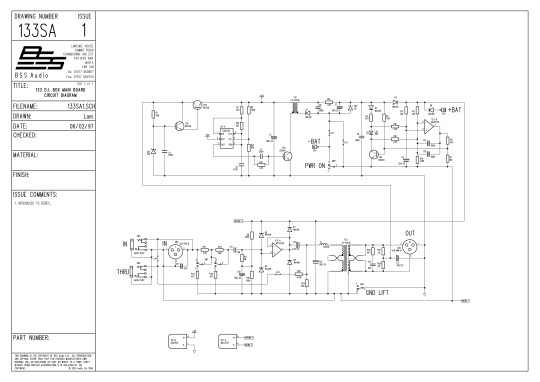
Modify a classic: BSS AR-133 DI Box!
Power switch & Link Buffer (dealer options)

Below is the schematic of the AR-133 . . . if you look at the bottom left corner, you'll see "LK4", which represents the factory-equipped link directly paralleling the output jack to the input jack. Directly below the opamp IC2A you'll see "LK3", which is open from the factory. These points can be found as pairs of solder pads on the PC board, labelled as LK3 and LK4.
If you remove LK4 (cut the trace on the PC board with an X-Acto knife) and solder a jumper across LK3, the "thru" jack (actually labeled "link" on my AR-133s) takes its signal from the output of the buffer opamp IC2A, rather than directly from the input jack. The result is that the guitar's pickup is isolated from the effects of any cables or equipment connected to the "link" output jack . . . so if you use the DI directly off the guitar (and keep the guitar cable a reasonable length), you'll have as little capacitance as possible loading the guitar's pickup.
There are two tradeoffs - first, if you have a failure of the DI itself or its power source (either battery or P48), the link output goes dead as well . . . but I don't personally think this is any more of a liability than any one of hundreds of other points of failure in a typical live-sound signal chain. The second is that if you use the -20dB pad (for i.e. a hot keyboard output), the link output is also affected (lowered by 20dB), and you might have to raise the gain of an on-stage amp to compensate.
In the upper-right area of the schematic you'll also see "LK1" and "LK2" . . . these jumpers determine whether or not the power switch has any effect when running from phantom. As shipped, turning off the power switch ALWAYS turns off the DI . . . but if you cut LK2 and solder LK1, then the power switch only turns it off when running from the battery. With phantom power it'll remain on no matter the position of the power switch, and this is how I prefer to use them.
Source: Posted by kirkus on Gearspace.com, 7th April 2018 (link)
#BSS#AR133#AR-133#DI Box#Sound#SoundEngineering#SoundEngineer#LiveSound#FOH#Monitors#Mixing#Recording#Studio#Live#Microphone#bass#condenser#dynamic#microphone#mods#modification#factory
0 notes


Link
0 notes
Text
List of Korg Triton EXB-PCM
EXB-PCM01: Pianos/Classic Keyboards
EXB-PCM02: Studio Essential
EXB-PCM03: Future Loop Construction
EXB-PCM04: Dance Extreme
EXB-PCM05: Vintage Archives
EXB-PCM06/07: Orchestral Collection
EXB-PCM08: Concert Grand Piano
EXB-PCM09: Trance Attack
1 note
·
View note


Photo

Lars Eilert
By the way, here's the schematic of my build. It differs to most voltage reducing approaches as it contains a charge pump and puts out about 2V to 15V. The reducing part is comes from RG Keens article here (good reading about what makes a battery a good dead battery: http://www.geofex.com/article_folders/pedalbdpwr/pedalbd.htm)
0 notes
Text
PZM!: The inexpensive mic that can do a lot!
BY LARRY CRANE
The PZM microphone is weird. It's a 5 by 5.5 inch piece of black flat metal that somehow picks up sound in a really different way. All the sound around it is received in a large hemispherical pattern and it pretty much hears everything equally. And it sounds decent. And you can get it cheap at Radio Shack!
The first time I had to seriously consider the PZM microphone, I was recording with a band at my friend John Baccigaluppi's Enharmonik studios in Sacramento, CA. He had a couple of PZMs mounted up in the air above the drums for left and right overhead mics. I had previously seen these odd looking gizmos at Radio Shack and had assumed they were as useless as most Radio Shack junk. Instead, the sound these mics picked up on the cymbals was crisp and clear and a nice complement to the overall drum sound. Not long later, I saw a band place a pair of these mics on each side of a stage, flat on the floor, and plug them into a recording walkman. I asked them how these tapes sounded and they were very positive about the results. I was curious, to say the least.
Radio Shack, under the imprint Realistic, sells the Pressure Zone Microphone (PZM) at all their weird, little stores for $59.95. I believe they are actually manufactured by Crown, as they own the name PZM. Don't bother looking for the higher priced Crown versions though, there's a lot you can do with these little buggers!
First, if you have XLR inputs, you'll want to snip off the molded 1/4" plugs and wire up a male XLR plug. Amazingly, there's a three conductor wire in these thin cables and the rewiring for low impedance makes a big difference in sound clarity. See illustration 1 for wiring information.
The next change I made to the PZMs was to do away with the need for batteries. I opened up the battery compartments and soldered the two units together, parallel (+ to + and — to -), and then hooked up a 6 volt wall wart power supply to them. This seemed to give a higher output level as well as eliminating my fear of batteries running down during a session!
The little manual that comes with the PZM recommends mounting the mics "on a hard, flat surface at least four foot square." I mounted them on some pieces of 1/2" particle board that are 2 by 3 foot (4 by 4 foot seems a bit too large to move around!) and then nailed the boards up above the drums, as in illustration 2. These work great as overhead mics, and I build the sound up from these when setting up a drum mix.
Luckily, I set up one of the mics so I could easily pull it down and try it on other instruments. I tried a PZM (on the 2 by 3 particle board) and a Shure 57 on a guitar amp set to a loud, but clean setting. The PZM had a warmer, more defined low-midrange sound than the 57 and both had the same characteristics in the mid's to hi's. (Although at super loud volumes the PZMs do distort much earlier than the 57s.) When I tried the same mics on a moderately loud bass amp there was a much better overall sound from the PZM than the 57. It's probably the same effect that you get when using a large diaphragm mic, where the larger surface area picks up the lower pitched sounds with more clarity. What's amazing, though, is that all the treble is still intact, giving you a nice, sharp sound.
Another trick I tried before was leaving one of the mic setups on the wall and placing a vocal mic in front of it so that while doing vocal overdubs, both the mics are picking up the singer. The mix of the two mics gave a really interesting effect, partially due to the sound reflecting off the backing board and into the vocal mic, but also a slight phase cancellation that lent an eerie sound to the vocals.
Recently, John, who I mentioned earlier, sent me some schematics for upgrading the preamp and transformer stages for the PZM. You will need a bit of electronic knowledge and experience, but apparently the sound is even better and cleaner with these new circuits. See illustration 3 for the schematic diagram.
Hopefully, this article will encourage everyone, from a band trying to tape their practices to cassette, four-trackers, and full on studio set ups, to pick up one or two of these unique little mics, save some money and try them out. I'm sure there's tons of room for experimentation with these ideas and please write and tell me of any you come up with.
Do not attempt this modification if you've never done this kind of work before, since you could ruin the microphone, okay? This work will void any kind of warranty that Radio shack offers on this mic. Using this circuit will do away with the battery/transformer in-line box and most of the cable. You can salvage the cable running from the box to the molded 1/4" plug since it is 3 conductor. The rest of the parts can be tossed. The power can be from a wall wart and the circuit should clean it up a bit. Be careful when soldering to the mic element as it is sensitive to static electricity! You can install this setup in a small project box with XLR connectors on it for adaptability if you want.
0 notes
Photo


Chrispop Christian Beermann
“first attempts at etching enclosures...i don't have a laser printer at the moment, so i covered the enclosures with electrical tape and cut out the stripes and patterns with a scalpel. i really dig this grungy and rough look, feels to me a bit like old scifi parts, if that makes sense...
i used drain cleaner/naoh for the etching, works surprisingly well and controllable, as long as it's done outside.”
https://www.facebook.com/groups/1126329537466917/permalink/1491906360909231/
0 notes