
wickedhandy1
Wicked Handy
From home garden to home-made table to stove, Wicked Handy specializes in home gardening, DIY woodworking crafts and projects, and cooking tips, tricks, and recipes.
Our Website
374 posts
Don't wanna be here? Send us removal request.
Last Seen Blogs


calceusvitreus-blog
Dreams Do Come True

peachykaee
searching

gatosenpaii
GATOSENPAI

finoallafine97
There ain't no me if there ain't no you
Text
German Chocolate Cake Recipe
Sometimes the best recipes come from special requests, like this amazing German Chocolate Cake! My husband’s Grandfather was celebrating his 88th birthday earlier this year and had asked for a German Chocolate Cake. Not wanting to disappoint, this cake pulls out all the stops! Rich moist cake, fluffy chocolate buttercream icing, toasted crunchy coconut, and of course – that AMAZING rich coconut pecan frosting that ties it all together!
Let’s Talk Cake!
So let’s breakdown this cake so you know exactly why this cake is THE CAKE RECIPE you want to spend your afternoon making. We all know German Chocolate Cake is the least chocolatey cake in the chocolate cake family – perfect for both chocolate and not so much chocolate lovers. The layers of chocolate cake are rich and moist, adding espresso to bring out the delicate chocolate flavor. I’ve opted to separated the egg whites and incorporated them at the end of making the batter to give you a light, fluffy batter that more resembles chocolate mousse than batter. Can you say velvety end result?
Next is the chocolate buttercream frosting. I’ve cut way back on the normal amount of cocoa powder because this frosting is to keep the cake together and give a little texture – not to overpower the cake with a strong chocolate taste. I’ve used heavy whipping cream and the end result is a delicious light and airy frosting that compliments the cake without overtaking it. If you absolutely love chocolate and want it to come through a little stronger – this is the place to add it. If you add it to the batter the cocoa will absorb all the moisture and give you a really crumbly and dry cake. You can add ⅓ cup of cocoa powder without drastically changing anything else in the frosting recipe (you may have to add a little more whipping cream) but giving you a little more chocolate flavor. You can always tweak the recipe as you are going, adjusting the cocoa powder and cream until you get the taste and consistency that you like.
Let’s talk about the real star of all German Chocolate Cakes – the unbelievably delicious coconut pecan frosting. Honestly, is there anyone out there that wouldn’t just sit down with a bowl of it and eat it with a spoon. It really is that good! The key to this frosting is time and patience, making sure it’s being stirred continuously so that the sugar can caramelize just enough to make it come together for that rich taste this cake is known for.
Worried about decorating the cake? Don’t be! I’m am not an expert at cake decorating at all (I might be a cake eating expert though) so take your time and make it your own. I’ve opted to add a layer of toasted coconut around the cake because I love the crunchy texture it provides but also because it hides so many flaws! Icing not completely smooth? No problem! Got a little icing on the cake plate? Hidden! Just take your time and enjoy the process because I promise your family and friends will be enjoying this INCREDIBLE cake.
While this cake may seem a little overwhelming – don’t let that hold you back! This cake comes together fairly quickly and can be done in segments if you are lacking in time. I’ve made both the frostings ahead of time and I’ve baked the cake a day ahead as well depending on what my schedule looks like. Simply let the frosting warm up on the counter for about an hour if you make ahead of time to make it both spreadable and pipe-able when putting the cake together.
Print
German Chocolate Cake Recipe
.wprm-recipe-rating .wprm-rating-star.wprm-rating-star-full svg * { fill: #343434; }
Course Dessert
Prep Time 1 hour
Cook Time 45 minutes
Cooling/Decorating 1 hour
Total Time 2 hours 45 minutes
Servings 12 Slices
Calories 1103kcal
Ingredients
German Chocolate Cake
4 oz Baker's German's sweet chocolate finely chopped
½ cup hot espresso or bold coffee
2¼ cup all purpose flour
4 tsp unsweetened cocoa powder
½ tsp baking powder
1 tsp baking soda
½ tsp salt
1 cup buttermilk room temperature
⅔ cup vegetable oil
1 cup granulated sugar reserve 1 tbsp for egg whites
1 cup light brown sugar
4 large eggs room temperature, separated *SEE NOTES
2 tsp vanilla extract
Coconut Pecan Frosting
1 cup pecans chopped or buy "cookie pieces" size
1½ cup light brown sugar
12 oz evaporated milk
4 large egg yolks lightly beaten
¾ cup unsalted butter cut into 1 tbsp chunks
⅛ tsp salt
1½ cup shredded coconut flakes
1 tsp vanilla extract
Chocolate Frosting
½ cup unsalted butter room temperature
½ cup unsweetened cocoa powder
3 cups powdered sugar
½ cup heavy whipping cream
1 tsp vanilla extract
⅛ tsp salt
Toppings
1½ cup shredded coconut flakes (optional) *SEE NOTES
Instructions
Preheat oven to 350°F and make sure your oven racks are in the middle of the oven. Spray 3 8" x 2" cake pans with baking spray (or lightly butter and flour), then line the bottom of the pan with parchment paper, then spray parchment paper with baking spray. Set aside.
In a large bowl, take chopped chocolate and mix with hot espresso until the chocolate is fully dissolved. Set aside and let cool to room temperature.
In a different large bowl, sift flour, cocoa powder, salt, baking soda, and baking powder. Stir all ingredients together and set aside.
In a separate bowl, beat egg whites at a medium speed until they appear foamy. Then increase speed to high until the egg whites are firm enough that if you run the beaters through them they leave a line and egg whites will cling onto your beaters. Slowly beat in 1 tbsp of reserved white sugar until well incorporated.
In a large mixing bowl (preferably a stand mixer) beat egg yolks, white sugar, brown sugar, and vanilla extract together until well combined and fluffy. Slowly drizzle in vegetable oil on medium speed to emulsify the oil into the egg mixture. Add espresso chocolate mixture and combine well.
Switch to a paddle attachment (spatula if hand mixing) and add ⅓ dry ingredients and combine well, then add ½ buttermilk, alternating until all ingredients are mixed into the batter. Make sure to only mix until combined and no more or your cake will get tough and chewy. Fold in ⅓ egg whites at a time into cake batter until well incorporated but still fluffy. Do not mix as this will break the air of the egg whites and leave your cake dense instead of light and fluffy. Your batter should resemble chocolate mousse in terms of airiness when the egg whites are all folded in.
Separate cake batter equally between the 3 cake pans, gently tapping the pans on the counter to remove any air bubbles. Bake for 30-35 minutes, until a toothpick or cake tester inserted into the center of the cake comes out clean. Make sure to rotate your cakes about half way through baking time for even baking. Let cool on baking rack for 15 minutes, then invert onto the baking rack to finish cooling completely before frosting.
Coconut Pecan Frosting
Preheat oven to 350°F. Spread pecans onto a single layer on a baking sheet and bake for 6-8 minutes, until the pecans are light brown and fragrant. Stir occasionally to ensure even browning. Let cool.
In a medium saucepan, combine brown sugar and egg yolks until the egg yolks are combined into the sugar, this will help prevent accidental strings of egg yolk in the end result. Then add evaporated milk, butter chunks, and salt and turn the burner on to medium heat. Bring to a gently boil, stirring constantly, until the mixture thickens and turns golden brown, about 6-8 minutes. Take off the heat and stir in toasted pecans, coconut flakes, and vanilla and let cool until it has a spreadable texture, about 45-60 minutes.
Chocolate Frosting
Sift cocoa powder and powdered sugar together to make sure you have no lumps. Using your stand and hand mixer, cream butter and ⅓ of the cocoa/sugar mixture together. Once well combined slowly drizzle ½ whipping cream, mixing well. Alternate with remaining sugar mixture and whipping cream until both ingredients are completely used. Mix in vanilla extract and sugar. You may need to add more cream to get your desired texture, making sure it's firm enough to hold it's shape while still easy to push through a piping nozzle.
Assembly
Add ⅓ of the chocolate frosting to a piping bag (if you want a decorative piped edge on top of your cake use that nozzle now do you don't have to worry about switching it out). Put a small dollop of chocolate frosting in the center of your cake stand and gently place the first layer of cake. Pipe icing around the top edge of the cake in a smooth line, this will allow you to add the coconut pecan frosting without having it spill over when you add the additional layers. Add ⅓ of the coconut frosting to the first layer, smoothing it out to the chocolate frosting. Repeat with the second and third layer.
Now use the chocolate icing that's not in the piping bag to ice the sides of the cake. I like to use a long icing spatula for this to make it quick. Once smoothed out over the whole cake, then use the rest of the icing in the piping bag to pipe a decorative edge on the top border of the cake. Finish by pressing toasted coconut around the bottom sides of the cake. Now, dig in and enjoy your amazing creation!
Notes
Separating Eggs: separating eggs is much easier when the eggs are cold so I would highly recommend separating them when you remove them from the refrigerator then let them come up to room temperature for the recipe.
Toasted Coconut for Decorating:
If you’ve decided to add toasted coconut for decorating your cake simply add to a baking sheet in a single layer and bake at 350°F for 8-10 minutes. Stir every few minutes to allow for even toasting. This is a great step to do right after you toast the pecans since you can reuse the baking sheet (YAY! Less dishes!) and the oven is already at the right temperature. Just make sure coconut is completely cooled before using or it will melt your icing and make a mess.
Nutrition
Serving: 1Slice | Calories: 1103kcal | Carbohydrates: 129g | Protein: 11g | Fat: 64g | Saturated Fat: 42g | Polyunsaturated Fat: 4g | Monounsaturated Fat: 14g | Trans Fat: 1g | Cholesterol: 191mg | Sodium: 342mg | Potassium: 478mg | Fiber: 6g | Sugar: 101g | Vitamin A: 1003IU | Vitamin C: 1mg | Calcium: 191mg | Iron: 4mg
source https://wickedhandy.net/german-chocolate-cake-recipe/
0 notes
Text
Cinnamon Swirl Banana Bread
What happens when you take the amazing cinnamon goodness from traditional coffee cake and combine that with banana bread? You get this delicious Cinnamon Swirl Banana Bread! Layers of banana breads with swirls of cinnamon filling topped with crunchy cinnamon crumble, there is no way that you can only have one slice. Perfect for those busy weekends, bake sales, holiday breakfasts, and so much more!
Print
Cinnamon Swirl Banana Bread
.wprm-recipe-rating .wprm-rating-star.wprm-rating-star-full svg * { fill: #343434; }
Course Bread, Breakfast
Prep Time 25 minutes
Cook Time 55 minutes
Cooling Time 10 minutes
Total Time 1 hour 30 minutes
Servings 12 Slices
Calories 362kcal
Ingredients
Banana Bread – Dry Ingredients
2 cups all purpose flour sifted
2 tsp baking powder
1½ tsp cinnamon
1 tsp salt
½ tsp baking soda
¼ tsp nutmeg
Banana Bread – Wet Ingredients
3 large bananas mashed
¾ cup brown sugar packed
2 egg lightly beaten
1½ tsp vanilla extract
½ cup unsalted butter melted
Filling
½ tsp unsweetened cocoa
1 tbsp cinnamon
⅔ cup brown sugar packed
⅛ tsp ground nutmeg
Topping
¼ cup granulated sugar
¼ cup brown sugar packed
⅛ tsp salt
½ cup all purpose flour
½ tbsp cinnamon
⅛ tsp ground nutmeg
3 tbs unsalted butter melted
Instructions
Preheat oven to 375°F. Cut a piece of parchment paper the width of your loaf pan and a few inches longer than the inside of your pan. Lightly grease loaf pan and line the inside of the loaf pan with the parchment paper (this will make is easy to remove the whole loaf of banana bread without losing any of the amazing topping).
In a small bowl, mix all filling ingredients and set aside.
In a large bowl, sift together all dry banana bread ingredients. In another bowl, mix all banana bread wet ingredients together.
Slowly mix wet ingredient mixture into dry ingredient mixture until well combined.
In the loaf pan, add ⅓ of the batter, then sprinkle ½ the filling evenly, then repeat. Add final ⅓ batter on top.
In a different bowl, mix all dry topping ingredients together, then add the melted butter until well combined and crumbly. Sprinkle evenly over the on top of the loaf and slightly press down.
Bake for 45-55 minutes. You will know when the bread done when you can insert a toothpick in the center and it will comes out clean. If loaf is becoming too dark, cover with foil for the last 15 minutes of baking. Let cool for 10 minutes, then using the edges of the parchment paper, slowly lift out of the pan and put on a cooling rack to completely cool, this will prevent the bottom of the loaf from getting soggy. Enjoy!
Notes
Want to make this into muffins instead? No problem, simply reduce the filling and topping amounts by 1/3 when making the recipe. Then line your muffin tin and add 1 oz batter (a cookie scoop is amazing for this), lightly tap the tin on the counter to spread out the batter evenly in the tin, and then sprinkle with 1 tsp cinnamon filling. Repeat then top with 1 more oz of batter, then add about 1-2 tbsp of topping. You should be able to make 13-14 muffins with the amount of batter, depending on how large your bananas are. Bake for 22-24 minutes at 375°F, let cool, then enjoy!
Nutrition
Serving: 1each | Calories: 362kcal | Carbohydrates: 62g | Protein: 4g | Fat: 12g | Saturated Fat: 7g | Trans Fat: 1g | Cholesterol: 55mg | Sodium: 292mg | Potassium: 262mg | Fiber: 2g | Sugar: 38g | Vitamin A: 386IU | Vitamin C: 3mg | Calcium: 80mg | Iron: 2mg
source https://wickedhandy.net/cinnamon-swirl-banana-bread/
0 notes
Text
Quick Pickled Red Onion & Jalapeno Sandwich Topper
It has always amazed me in cooking how you can use the same ingredients and depending on what you do with them you can have wildly different results. This recipe is the perfect example of that! Take the simple onion and jalapeno which I use in almost all my recipes. Add it to a little vinegar, salt, and sugar and you have a wonderful soft but flavorful addition to any sandwich and more! The quick pickling on the onion and jalapeno soften the texture of the vegetables but also take away the sharp bite of each, leaving you with something amazing! Plus, it only takes a few minutes of active time so you’ll be making this all the time!
This method works with all sorts of veggies you might want to try this on. It’s really up to you and you’re favorite sandwich toppings. Just make sure that you are slicing your vegetables thinly (I like to use a mandoline for this for both ease and uniformity) and that you are storing any leftovers in an airtight container once it cools. Enjoy!
Print
Quick Pickled Red Onion and Jalapenos
.wprm-recipe-rating .wprm-rating-star.wprm-rating-star-full svg * { fill: #343434; }
Course Miscellaneous
Prep Time 5 minutes
Cook Time 12 minutes
Total Time 17 minutes
Servings 5
Calories 31kcal
Ingredients
1 cup white vinegar
1 cup water
3 cloves garlic peeled and crushed
1 tbsp salt
1 tbsp sugar
3 oz red onion about ½ onion
2 oz jalapeno about 2 medium peppers
Instructions
Using a mandoline or knife, slice peppers and onions thinly. For the peppers, you can choose to keep or remove the seeds. Keeping the seeds will add more heat to the end result.
In a small sauce pan, combine vinegar, water, garlic, salt, and sugar and bring to a soft boil. Add jalapenos and onions, stir once, and remove from heat. Let sit for about 12 minutes in the hot liquid.
Use on sandwiches, subs, hot dogs, tacos, quesadillas, and more! If you have any leftovers, let the onions and peppers cool and store in an airtight container with the liquid. Enjoy!
Nutrition
Serving: 1Oz | Calories: 31kcal | Carbohydrates: 5g | Protein: 1g | Fat: 1g | Saturated Fat: 1g | Sodium: 1400mg | Potassium: 62mg | Fiber: 1g | Sugar: 4g | Vitamin A: 123IU | Vitamin C: 15mg | Calcium: 14mg | Iron: 1mg
source https://wickedhandy.net/quick-pickled-red-onion-jalapeno-sandwich-topper/
0 notes
Text
Roasted Jalapeno and Ham Split Pea Soup
Who doesn’t love a big hearty bowl of pea soup when it’s cold outside? This is one of my favorites and a must make when I bake a ham and don’t want to waste that delicious ham bone. So why do I prefer this recipe over a traditional split pea soup? It’s the small details that make all the difference and will have you cooking this recipe over and over!
I start this soup when I’m baking the ham. I always prepare my ham with ½ – 1 inch of water at the bottom. This creates the perfect base for any ham soup (like my other favorite 15 Bean and Ham Soup) because that water is flavored by the ham bone and drippings while it’s baking (plus it keeps the ham from drying out). Once the ham is done I simply let that liquid cool, skim off the fat that collected at the top, and use it to flavor my soups.
I roast off a handful of jalapenos and add them to the soup at the end, giving it a slight hint of heat and extra smokiness that pairs perfectly with the peas.
I like to blend this soup so it’s thick and creamy, then add finely chopped ham at the end. That gives you the perfect texture to this delicious soup!
Print
Roasted Jalapeno and Ham Split Pea Soup
.wprm-recipe-rating .wprm-rating-star.wprm-rating-star-full svg * { fill: #343434; }
Course Main Course, Soup
Prep Time 20 minutes
Cook Time 2 hours 10 minutes
Total Time 2 hours 30 minutes
Servings 12 Bowls
Ingredients
1 tbsp olive oil
1 cup yellow onion chopped small
1 cup carrot peeled and diced ¼ inch cubes
1½ cup celery diced ¼ inch cubes
¼ tsp salt
½ tsp pepper
½ tsp ground cumin
8 cloves garlic minced
⅔ cup leek about 1 leek, sliced thin
2 lb meaty ham bone
2 bay leaves
1 fresh rosemary 6" branch (see notes)
3 bunches fresh thyme leaf about 12-15 individual stems (see notes)
2 cups ham stock see notes
6 cups water
1 lb dried split peas stones removed and rinsed
6 large jalapenos
Instructions
Over medium high heat, add oil to large pot. Add onions, carrots, celery, ground cumin, salt and pepper and cook for 7-9 minutes, stirring often until vegetables start to soften. Add garlic and leeks and cook for an additional 2 minutes, stirring frequently to avoid burning the vegetables. Add ham bone, ham stock, water, thyme, rosemary, and bay leaves and bring to a simmer. Cover and let simmer for 1 hour.
While ham bone is cooking, preheat oven to 425°F and lightly grease a baking sheet with cooking spray. Wash and dry jalapenos, then cut in half and de-seed. Place on baking sheet with inside of pepper facing up spaced about 1 inch apart. Lightly spray with cooking oil and salt and pepper to taste. Flip over and lightly spray with cooking oil. Bake for 16-19 minutes or until skin start to lightly brown on the edges. Set aside and let cool.
Add peas and continue to simmer covered for 30 minutes. Remove ham bone from pot and add roasted jalapenos (you can roughly chop them if desired). Continue to simmer for an additional 20-30 minutes, until peas are cooked through and soft.
While the soup is finishing up, remove ham meat from the bone and finely chop. Set aside.
Once peas are cooked through, remove from heat. Discard bay leaves and the herb bouquet. Using a hand blender or standard blender, blend soup until smooth. Add ham and mix in well. Salt and pepper to taste and enjoy!
Notes
Ham Stock:
When baking a ham, add ½ – 1 inch of water at the bottom. This creates a “ham stock” that will flavor your soup instead of water, vegetable stock, or chicken stock. Simply bake the ham, then let the liquid cool. It will congeal and the fat will rise to the top, making it easy to skim the fat off. Reserve the liquid to add to your soup.
If you haven’t baked a ham you can replace the stock with chicken or vegetable stock and the ham bone with a ham hock. I would suggest increasing the cook time to 1½ to get the same level of tenderness. Alternatively, you could just add the ham (about 1 lb) at the end but the result will not give you as much depth of flavor as following the initial recipe.
Fresh Herbs:
I like to prepare my herbs in a bouquet (simply tie together with string) to make it easy to remove the stems at the end of cooking. You can also remove the herbs from the stem and add to the soup at the same time. If you don’t have fresh herbs you can substitute dried herbs, about 1 tsp of thyme and 1½ of rosemary.
Storage & Reheating:
Let soup cool then in a tightly covered container refrigerate up to 3 days. This soup is great for freezing and can be stored for 2-3 months. When reheating, you may need to add little water as this soup thickens when it cools. Simply add until you get the desired consistency and enjoy!
Nutrition
Serving: 8oz
Looking for some more soup ideas? Here are a few more of my favorites!
Roasted Turmeric Cauliflower Soup
Clam Chowder
Roasted Tomato Basil Bisque
Kale & Chicken Soup
Beef Barley Mushroom Soup
source https://wickedhandy.net/roasted-jalapeno-and-ham-split-pea-soup/
0 notes
Text
Cranberry Orange Muffins
Growing up in New England, it’s only natural that my all time favorite muffin would be cranberry orange (with cinnamon apple as a close second). Unfortunately, the older I got the harder it seemed to be to find a delicious cranberry orange muffin. This could be because I moved to Texas and they may be less popular, or maybe they weren’t great sellers so my favorite coffee chain stopped selling them. Either way, I’ve finally put my foot down and decided to make my own Cranberry Orange Muffin Recipe.
This muffin is packed with bold flavors between the fresh tart cranberries and sweet and sour oranges. We use the juice and zest of the orange to get a ton of taste without the calories in this delicious but surprisingly low calorie recipe (only 162 calories per muffin!!!) and using fresh cranberries instead of dried gives the muffin extra tartness and lightness that will have you wanted to come back for seconds.
Here’s How to Make the Perfect Cranberry Orange Muffin:
The Muffin Batter: Mix with restraint. The key to a perfect muffin batter is just getting it moist, lumps are ok (think pancake or waffle batter). When mixing, try to stay under 12 turns with the spoon. This will help give you a light fluffy muffin instead of a dense (but delicious) muffin.
Timing: Don’t make the batter ahead of time. Make the batter when you are ready to make it.
The Add Ins: Lightly coat the cranberries with 1 tbsp flour to help them stay suspended in the batter instead of falling to the bottom. This also works if you decide to add nuts to the batter.
Change It Up: Recipes are all about being a guideline for you. Love nuts? Add some! Like orange but not a ton? Reduce the zest amount in half. This recipe is pretty forgiving for you to modify it as you like so you get your perfect muffin. Crazy for Cranberries? Add more. In terms of guidelines, this is what I recommend: For a very subtle orange flavor, the zest can be omitted completely but don’t modify the amount of orange juice, you can add up to a cup of walnuts without modifying anything else, and you can increase the cranberries to 1½ cups before it becomes too much.
Start with the oven at a slightly lower temperature at 375°F and when you put the muffins in increase it to 400°F. This will help your muffins rise and give you a nice crispy muffin top.
Print
Cranberry Orange Muffins
.wprm-recipe-rating .wprm-rating-star.wprm-rating-star-full svg * { fill: #343434; }
Course Bread, Breakfast, Snack
Prep Time 10 minutes
Cook Time 20 minutes
Total Time 30 minutes
Servings 12 Muffins
Calories 162kcal
Ingredients
2 cups all purpose flour plus 1 tbsp
½ cup sugar
2 tsp baking powder
½ tsp baking soda
½ tsp salt
1 cup fresh cranberries coarsely chopped
1 egg
¼ cup vegetable oil
2 large oranges
1 tbsp course sugar Turbinado or Demerara (optional)
Instructions
Preheat oven to 375°F and line your muffin tins.
In a smaller bowl, zest 1 orange with a fine grater, then juice the oranges until you have ¾ cups of orange juice. Whisk in egg and oil. In a larger bowl sift together the flour, sugar, baking powder, baking soda, and salt. Add wet ingredients to dry ingredients and mix just to moisten (keep it to no more than 12 turns with your spoon otherwise your batter will get tough). In a separate bowl mix cranberries with 1 tbsp flour then fold into the muffin batter.
Fill muffin liners until about ¾ full. Sprinkle with course sugar if desired. Put muffins in the oven and increase temperature to 400°F. Bake for 15-20 minutes, until tops are lightly browned and an inserted toothpick comes out clean. Let cool for 5 minutes in tin then remove from tin to continue cooling. Enjoy!
Nutrition
Serving: 1muffin | Calories: 162kcal | Carbohydrates: 27g | Protein: 3g | Fat: 5g | Saturated Fat: 4g | Cholesterol: 14mg | Sodium: 156mg | Potassium: 122mg | Fiber: 1g | Sugar: 10g | Vitamin A: 49IU | Vitamin C: 7mg | Calcium: 38mg | Iron: 1mg
Love this muffin recipe? Try out our Walnut Banana Bread Muffins next!
source https://wickedhandy.net/cranberry-orange-muffins/
0 notes
Text
Simple Homemade Cranberry Sauce
I absolutely love cranberries – they are tart, packed with flavor, and easy to cook with! What’s not to like? This cranberry sauce recipe only takes about 10 minutes of active time to make and with only 4 ingredients, there is no reason to grab a can of cranberry sauce this holiday season. What makes this recipe even better? It can be made a day ahead (I even recommend it since it helps allow the flavors to really meld together) so it’s one less thing to think about on Thanksgiving!
Trust me, you’ll never buy cranberry sauce again for your Thanksgiving dinner! This cranberry sauce recipe produces a tart, slightly sweet sauce that is on the thicker side. It also gives you an interesting punch of flavor from the Grand Marnier for a satisfying adult twist! If you like your cranberry sauce a little sweeter, simply add 1/3 cup sugar or if you like it thinner add more orange juice to the mixture. Both these items can be done towards the end so you can suit it to your family’s tastes. I’ve calculated that a serving is 1/2 cup for this recipe, so scale up or down based on how much you would like, this recipe in total makes about 2 cups of finished cranberry sauce.
Print
Simple Cranberry Sauce
.wprm-recipe-rating .wprm-rating-star.wprm-rating-star-full svg * { fill: #343434; }
Course Side Dish
Prep Time 5 minutes
Cook Time 10 minutes
Cooling 10 minutes
Total Time 25 minutes
Servings 4 servings
Calories 191kcal
Ingredients
1 lg orange
12 oz cranberries
⅔ cup white sugar
2 tbsp Grand Marnier
Instructions
Zest orange with a fine cheese grater (a zester can be used but it leaves unpleasant long strings of zest) until you have about ½ tsp of zest. Then juice the orange until you have ½ cup orange juice. Put orange juice, sugar, and Grand Marnier in sauce pan over medium-low heat and stir until sugar has dissolved.
Add cranberries and let simmer for 8-10 minutes, until all the cranberries have popped and softened. Stir frequently to ensure even cooking and to prevent the sauce from boiling over. Using the back of your spatula or wooden spoon, mash the cranberries to break them up. You can decide how much you want to mash based on how you like the consistency of your cranberry sauce. If you are doing a large batch of this sauce, I would recommend using a potato masher for quicker mashing.
Remove from burner and let cool down. You can either serve or store in the refrigerator for up to 1 week.
Notes
Want to make it easier to juice your orange? After you zest it microwave it for 10-20 seconds!
You can also just use orange juice for this recipe instead of an orange with the zest if you are in a rush. I would recommend only using 1/2 cup sugar and adding more at the end if it’s not sweet enough as the bottled orange juice tends to be higher in sugar. Be aware though skipping the zest will give you a little less orange flavor in the end result.
If you aren’t interested in using Grand Marnier in your cranberry sauce or you simply don’t have it on hand, simply swap out for either more oj or water.
Nutrition
Calories: 191kcal | Carbohydrates: 46g | Protein: 1g | Fat: 1g | Saturated Fat: 1g | Sodium: 3mg | Potassium: 72mg | Fiber: 4g | Sugar: 39g | Vitamin A: 51IU | Vitamin C: 11mg | Calcium: 7mg | Iron: 1mg
source https://wickedhandy.net/simple-cranberry-sauce/
0 notes
Text
Pulled Pork Sandwich with Spicy Pickled Jalapenos
Pulled pork sandwiches are such a deliciously filling meal that it’s perfect for lunch, dinner, or even on sliders for an appetizer or finger food for a party! With so many recipes out there, what makes this one so special? First off, the amazingly flavorful shredded pork butt comes together easily in a slow cooker and freezes so well that you’ll be making a double batch for those weeknight dinners where you want something satisfying without spending hours in the kitchen. Then you smother the pork in your favorite BBQ sauce (we love Sweet Baby Rays but we won’t judge if you pick something else) and top with sweet and spicy quick pickled red onions and jalapenos for a taste that is out of this world! Like that isn’t enough, we like to toast our buns with olive oil and spices for a nice hit of heat and crunch to add the perfect texture to your sandwich.
Print
Pulled Pork Sandwich with Spicy Pickled Jalapenos
.wprm-recipe-rating .wprm-rating-star.wprm-rating-star-full svg * { fill: #343434; }
Course Main Course, sandwich
Prep Time 10 minutes
Cook Time 15 minutes
Total Time 25 minutes
Servings 4 Sandwiches
Calories 543kcal
Ingredients
Pickled Condiments
1 cup white vinegar
1 cup water
3 cloves garlic peeled and crushed
1 tbsp salt
1 tbsp sugar
3 oz red onion sliced thin
2 oz jalapeno sliced thin
Pork Filling
16 oz Slow Cooker Shredded Pork
½ cup BBQ Sauce
Bun
4 Brioche Buns
2 tsp olive oil
¼ tsp salt
¼ tsp black pepper
¼ tsp granulated garlic
¼ tsp ground cayenne pepper
Instructions
Pickled Condiments
In a small sauce pan, combine vinegar, water, garlic, salt, and sugar and bring to a soft boil. Add jalapenos and onions, stir once, and remove from heat. Let sit for about 12 minutes in the hot liquid before adding it to your sandwich.
Pork Filling
Combine pork and BBQ sauce and heat on medium until well coated and heated through. I recommend making sure your pork has a little of the cooking liquid from the crock pot in the original recipe as it helps thin the sauce and gives your pork another boost of amazing flavor!
Bun
Cut buns in half and brush inside with olive oil. Sprinkle evenly with spices. I like to lightly press the buns back together to make sure spices stick nicely to the bread. Toast buns seasoned side down in a warmed pan until golden brown.
Once buns are done, spread BBQ pork evenly over the bottom bun and top with pickled onion and jalapenos. Serve with your favorite side and enjoy!
Notes
If you have left over pickled condiments, put in an airtight container like a mason jar once cooled and refrigerate.
Nutrition
Serving: 1Sandwich | Calories: 543kcal | Carbohydrates: 64g | Protein: 16g | Fat: 24g | Saturated Fat: 12g | Cholesterol: 144mg | Sodium: 2989mg | Potassium: 276mg | Fiber: 3g | Sugar: 18g | Vitamin A: 2034IU | Vitamin C: 20mg | Calcium: 81mg | Iron: 2mg
source https://wickedhandy.net/pulled-pork-sandwich-with-spicy-pickled-jalapenos/
1 note
·
View note
Text
Slow Cooker Pork Taco Meat
Looking for a flavor packed shredded pork recipe that is not only easy, but also is perfect for everything from tacos to rice and beans, nachos to pulled pork sandwiches? This is it. The combination of spices gives you a deep, rich flavor is wonderful on it’s own but also pairs perfectly with salsas and BBQ sauces. Have a busy lifestyle? No worries, this pork is perfect for making and freezing in individual portions so even on those hectic days you can come home, reheat, and make yourself a stress free delicious meal in no time. I love using this pork in beans and rice or quesadillas when I need something satisfying and easy for a quick meal.
I also enjoy that this recipe makes a delicious sauce to go with the pork. I like portioning the pork to make sure each is stored with the cooking liquid to not only keep the pork moist, but it also flavors the overall dish. I love making taco bowls with this pork and the liquid is incredible over rice! It takes a delicious meal to a whole new level of amazing.
The slow cooker is the hero in this recipe, taking a normally tough piece of pork butt (but don’t we love the price point?) and making it so full of flavor and fork tender. There are a few steps before adding everything to the slow cooker that I would strongly suggest following because they will help add to the depth of flavor that your pork will have. I brown the pork well first before adding to the slow cooker as this adds flavor to the pork and the sauce and also helps enhance the flavor of the spice rub. I also blend the sauce ingredients well, then cook for just a few minutes to make sure everything is well incorporated. I’ve made this dish several times without these steps and while it’s still delicious, it simply does not compare to the final taste of this pork. So while it may seem like a lot of unnecessary steps, I would highly recommend giving it a try.
Shredded Pork Meal Ideas:
So now that we have the perfect slow cooker pork butt recipe, how can you use it? This pork comes out of the slow cooker perfect to use right away but if your dish needs a little extra texture, you can use 1 tsp oil per portion of pork to crisp it up for tostadas or to give some texture on nachos. Simply heat the oil and add the pork, cooking until liquid evaporates and the edges of the pork crisp up, about 5 minutes. So so good!
Here’s a few ideas of our favorite way to use this amazing shredded pork:
BBQ Pulled Pork Sandwich with Pickled Onions & Jalapenos
Pork with Black Beans & Rice
Pork Egg Rolls
Pork Burritos
Pork Mac n’ Cheese
Pork Nachos
Pork Lettuce Wraps
Pork Tostada
Spicy Pork Grilled Cheese Sandwiches
Pork Ragu
BBQ Pork or Pork & Pineapple Pizza
Pork Fajitas
Pork Taquitos
Pork Shepherd’s Pie
Pork Tamales
Pork Stuffed Avocados
Pork Stuffed Peppers or Tomatoes with Rice
Pork & Caramelized Onion Quesadilla
You are really only limited by your imagination! This pork is perfect to pair with leftovers or when your trying to make a great meal with items in your pantry when you haven’t had time to go grocery shopping. Enjoy everyone!
Print
Slow Cooker Pork Taco Meat
.wprm-recipe-rating .wprm-rating-star.wprm-rating-star-full svg * { fill: #343434; }
Prep Time 15 minutes
Cook Time 5 hours
Cooling 15 minutes
Total Time 5 hours 30 minutes
Servings 18 Servings
Calories 242kcal
Ingredients
Pork & Spice Rub
1 tbsp black pepper
2 tsp ground cumin
1 tbsp dried thyme
1½ tsp salt
½ tsp ground allspice
5 lbs Boston pork butt boneless
1 tbsp olive oil
Slow Cooker Sauce
8 cloves garlic
7.5 can chipotle chiles in adobo sauce any stems removed
8 oz white onion about 1 medium onion, coarsely chopped
1½ tbsp brown sugar
1 cup chicken stock
2 tsp red wine vinegar
1 ind cinnamon stick
Instructions
Pork & Spice Rub
In a small bowl, mix pepper, thyme, cumin, salt, and allspice together and set aside.
Clean any excess fat off of pork butt. Pork butt is a high fat cut of pork so you don't need to get it all, just large pockets of fat off the outside of the pork. Then cut pork into quarters and rub spice mix evenly into the pork pieces.
Heat olive oil in a medium sized fry pain and brown all sides of the meat, about 3-4 minutes per side. Remove pork and place in slow cooker.
Slow Cooker Sauce
Add garlic and onion into fry pan and cook in leftover oil from the pork. Let soften and brown slightly. Add brown sugar and let it coat the vegetables, cooking for an addition 5-6 minutes, stirring frequently so the sugar doesn't burn. De-glaze the pan with the chicken stock, gently scraping the sides to get any bits off the sides of the pan then turn off the heat.
Add vegetable mixture with broth into a blender and add chipotle peppers. Blend until a smooth sauce. Add sauce back into fry pan and heat until it starts gently simmering. Let simmer, stirring constantly, for 3 minutes, then remove from heat and pour over pork.
Add cinnamon stick to slow cooker and cook over high heat for 3½-4 hours, until pork is tender and falls apart easily. Transfer to a large plate or bowl to cool for about 15 minutes so you can easily handle the pork.
While the pork was cooking, it rendered fat into the sauce, leaving a layer of excess fat on the top of the sauce. Using a ladle, carefully remove as much as you can from the surface of the sauce until there is only about ⅛ inch left on the surface (this small amount adds flavor without the sauce becoming greasy). Shred pork and add back into the sauce. Add red wine vinegar and mix well. Enjoy!
Notes
I love making big batches of this when pork is on sale, then freeze it in individual portions with the sauce for quick and easy meals. The sauce keeps the pork moist and adds flavor to any dish you put it in. This holds well in the freezer for up to 3 months.
If you don’t have any cinnamon sticks handy, you can add ½ tsp of cinnamon to the pork spice rub instead.
While I love using fresh herbs in the majority of my dishes, they are not slow cooker friendly. I would not recommend substituting fresh thyme for the dried.
Nutrition
Serving: 4oz | Calories: 242kcal | Carbohydrates: 17g | Protein: 24g | Fat: 8g | Saturated Fat: 3g | Cholesterol: 76mg | Sodium: 1370mg | Potassium: 470mg | Fiber: 9g | Sugar: 7g | Vitamin A: 4136IU | Vitamin C: 2mg | Calcium: 32mg | Iron: 4mg
source https://wickedhandy.net/slow-cooker-pork-taco-meat/
0 notes
Text
Simple Hash Brown Quiche
I love having breakfast for any meal of the day. The first thing I ever cooked for my husband when we first started dating was breakfast burritos for dinner. Who doesn’t love breakfast for dinner? Especially a quiche that has a crispy flavorful hash brown crust.
This recipe is absolutely perfect for any time of the day and completely customizable which is why the recipe has options for some of the filling ingredients. While the key ingredients like the amazing potato crust and the egg base for the filling stays the same, you can choose any kind of cheese, meats, fresh herbs, and vegetables for the filling. The key is to stay to about 2 cups total for all those specific ingredients together, otherwise it wont fit in the pie plate or hold together very well. Perfect for leftovers? Absolutely!
For the meats and veggies, make sure to cook them first as the quiche isn’t in the oven long enough to cook the ingredients all the way. Also keep moisture in mind, drying ingredients like tomatoes first or using something like a sun-dried tomato instead of a fresh one. Fresh tomatoes will work but I highly recommend removing the seeds and resting them on a paper towel to get rid of excess moisture before adding to the eggs.
Hash Brown Quiche Filling Ideas:
Looking for some great ideas for what will work in your quiche? Here are some great options to test out!
CheesesHerbs/SpicesVegetablesMeatsCheddarChivesMushroomsHamFetaParsleyOnions BaconFontinaBasilSpinachPancettaParmesanDillArtichoke HeartsBreakfast SausageMozzarellaThymeAsparagusSteakGruyereCilantroLeeksChorizoPepper JackOreganoScallionsSmoked SalmonBoursinCrushed Red PepperBell PeppersTurkey BaconGruyereTarragonHot Peppers like JalapenosProsciuttoGoat CheeseChervilBroccoli
The key to getting the perfect quiche is to make sure ingredients are well dried (like the artichoke hearts or or if you use something like roasted peppers) and that if you are using a soft cheese like goat cheese to either get the crumbled variety or to cut in small cubes and mix in well so you get delightful little pockets of cheese in your quiche. The possibilities are endless to how you can make your quiche so go crazy and mix and match until you find your perfect quiche.
Since this quiche holds up and reheats well, it’s the perfect breakfast to make for a long weekend or while you are entertaining over the holidays. It’s also so easy to make that it’s one of my favorite dishes to make during Thanksgiving or Christmas for people to enjoy while our main meal is roasting in the oven. This is also the perfect way to use up leftovers so really there is no excuse for this not to go into your regular rotation.
Print
Simple Hash Brown Quiche
.wprm-recipe-rating .wprm-rating-star.wprm-rating-star-full svg * { fill: #343434; }
Course Breakfast, Brunch
Servings 8 Slices
Calories 226kcal
Ingredients
Quiche Crust
3½ cups shredded hash browns thawed if frozen
2 tbsp butter melted
1 tbsp olive oil
2 cloves garlic finely minced
½ tsp onion powder
¼ tsp salt
½ tsp ground pepper
¼ tsp ground cayenne pepper optional
Quiche Filling
4 lg eggs
½ cup milk
1 cup your choice of cooked meats, fresh herbs, & veggies diced small
1 cup your choice of cheese
¼ tsp salt
¼ tsp ground pepper
Instructions
Quiche Crust
Preheat oven to 425°F. Lay out hash browns on paper towels and gently press until no more water is released. The drier the hash browns, the crispier they will be at the end.
In a medium sized bowl, mix all crust ingredients together. Press into a 9" pie plate, pressing them firmly into the bottom or the pie pan and up the sides. Bake for 20-25 minutes, until potatoes are golden brown and crispy. Set aside and lower oven temperature to 400°F.
Quiche Filling
While crust is baking work on the filling. For this recipe, you can use a variety of your favorite meats, fresh herbs, and veggies to flavor the filling. Dice small and cook through as the quiche doesn't bake long enough for them to cook while in the oven, then set aside (note: cooking spinach prior to adding into the filling is optional). If you want a plain cheese quiche, use a total of 6 eggs and ¾ cups of milk for the filling.
Beat eggs, milk, salt, and pepper together until well combined. Mix in cheese and desired filling ingredients. Pour into pie plate and bake for 20-25 minutes, until the top has turned golden brown and center is firm. Let cool for 5 minutes before serving. Enjoy!
Notes
Leftover hold up well in the refrigerator, just cover cooled quiche and reheat in the microwave for about 30 seconds or heat in the oven at 350°F for about 5-7 minutes.
Please note nutritional information is based on using 1 cup shredded cheddar cheese and 1 cup of diced ham.
Nutrition
Calories: 226kcal | Carbohydrates: 18g | Protein: 10g | Fat: 13g | Saturated Fat: 6g | Cholesterol: 36mg | Sodium: 494mg | Potassium: 346mg | Fiber: 1g | Sugar: 1g | Vitamin A: 269IU | Vitamin C: 8mg | Calcium: 130mg | Iron: 1mg
source https://wickedhandy.net/simple-hash-brown-quiche/
0 notes
Text
Caramel Pecan Pie
I absolutely love pie and will gladly enjoy it year round. With us just entering the fall season, I thought it would be a great time to make a Caramel Pecan Pie that is not only absolutely delicious, but so simple to make you’ll be enjoying it year round. What what makes this pie stand above the rest? For me, it’s the great flavor without the excessive sweetness that you find with most pecan pies. The filling is made with brown sugar and caramel bits that give it a smooth texture without that sickly sweetness that you get from corn syrup. Add that to a flaky crust and you have an amazing pie that everyone will want seconds of.
For this pie, I recommend making your own pie crust. While store bought can save a little time, the results aren’t nearly as good because store dough lacks in flavor and won’t produce that light flaky texture that a homemade pie crust will. Most use store bought because they think the crust is overly complicated but it only take 5 simple ingredients and a few minutes to make your own and the flavor can not be beat. Check out our Homemade Pie Dough Recipe to see how easy it really is. Plus, if you are feeding a crowd or prepping for the holidays, you can make the pie dough the day before, wrap it in plastic wrap, and leave it in the refrigerator until ready to use.
Here are a few simple tips to making the perfect pie that will make everyone think you are a pro:
Keep it cold: Make sure all your ingredients are cold, this is the key to a flaky crust. I would even go so far as chilling your equipment to help keep the ingredients cold.
Work the dough as little as possible, you don’t want the butter or shortening to melt into the flour until it starts baking, again the key to flaky crust.
Use as little water as possible, just enough so that when you pinch the dough it comes together.
Add a splash of vinegar (apple cider or white) to your crust. That helps prevent a tough dough by preventing the gluten from forming.
Let the dough rest in the refrigerator before rolling it out. This will help the gluten in the flour to relax and for the butter/shortening to solidify, giving you an amazing light and flaky crust.
Once dough is rolled out, refrigerate for 15-20 minutes. This will help reduce the dough from shrinking when it’s baking, which is extremely important to avoid on one crust pies like this one or pumpkin pie. It’s heartbreaking to make a pie and see the crust fell into the filling in the oven.
Brush the dough with egg wash prior to adding the filling (I do this when I roll it out before I put it in the refrigerator) as this will act like a seal, preventing the dough from getting soggy while giving your crust that nice golden brown color.
Print
Caramel Pecan Pie Recipe
.wprm-recipe-rating .wprm-rating-star.wprm-rating-star-full svg * { fill: #343434; }
Course Dessert
Prep Time 20 minutes
Cook Time 1 hour
Chilling Time 1 hour 30 minutes
Total Time 2 hours 50 minutes
Servings 8
Calories 381kcal
Ingredients
Pie Dough
1 single prepared pie crust
1 whole egg
Pecan Pie Filling
1 cup caramel
¼ cup butter
¼ cup milk
½ cup brown sugar
3 whole eggs room temperature
½ tsp vanilla extract
¼ tsp salt
1½ cup pecan halves
Instructions
Pie Crust
Roll out your pie dough and transfer to your standard sized pie pan, crimping the edges. Whisk together 2 tsp water and 1 egg in a small bowl. Lightly brush mixture on the pie dough, including the bottom and sides where the filling will go. This will help seal the dough so it doesn't get soggy during baking. Refrigerate for 15-20 minutes while you are making the filling.
Pecan Pie Filling
Preheat oven to 350°F. Place pecans on a rimmed baking sheet in a single layer and bake for 5-6 minutes until the pecans are lightly toasted. Set aside to cool.
In a saucepan over low heat, combine caramels, butter and milk, then stir frequently until smooth. Remove from heat and set aside.
In a large bowl, beat sugar, eggs, vanilla and salt together until it's about doubled in size. Gradually mix in the melted caramel mixture (make sure mixture has slightly cooled, about 5 minutes, so you aren't cooking the eggs). Stir in pecans and pour filling into prepared pie crust.
Bake in the preheated oven for 45-55 minutes, or until pastry is golden brown and the filling has set. Allow to cool until filling is firm.
Nutrition
Serving: 1Slice | Calories: 381kcal | Carbohydrates: 39g | Protein: 6g | Fat: 24g | Saturated Fat: 6g | Cholesterol: 100mg | Sodium: 235mg | Potassium: 198mg | Fiber: 2g | Sugar: 34g | Vitamin A: 326IU | Vitamin C: 1mg | Calcium: 88mg | Iron: 1mg
source https://wickedhandy.net/caramel-pecan-pie/
0 notes
Text
Easy Bourbon Chicken with Rice
Doesn’t Bourbon Chicken just seem like one of those meals that is only good when you get it at a restaurant? Plus, it also tastes like one of those meals that you have to be good about eating all week to be able to enjoy without packing on the pounds. Luckily, both of those assumptions are wrong and once you try this simple and low calorie recipe you’ll be hooked and adding this to your weekly rotation. This recipe will give you that lightly breaded chicken that holds the sauce without getting soggy, enough sauce to coat your rice so you get flavor in every bite, and a hint of heat that will have you going back for seconds. Did I mention that the chicken and sauce is all cooked in 1 pot so you don’t have to worry about washing dishes for days after making this like a lot of other meals.
Since I try to make all the meals in my house on the healthy side (without compromising flavor) I’ve opted to make this dish with chicken breasts instead of chicken thighs. While thighs are a little more flavorful and tender, the breast holds up well since it’s simmered in sauce, preventing it from drying out. Feel free to use thighs if you like as they would be amazing in this recipe. I’ve also swapped out low sugar apple juice for the regular apple juice as listed in the recipe to save some calories and you really can’t tell the difference. All together, you get a delicious filling Bourbon Chicken that is just slightly over 600 calories per serving.
This recipe also holds up well if you have extra for leftovers. I typically will make this in a larger batch for my husband’s dinners so it will last 3 nights. Simply microwave and enjoy (making this so perfect for a filling and guiltless lunch to take to work)! How could you go wrong?
Print
Easy Bourbon Chicken with Rice
.wprm-recipe-rating .wprm-rating-star.wprm-rating-star-full svg * { fill: #343434; }
Course Main Course
Prep Time 10 minutes
Cook Time 25 minutes
Total Time 35 minutes
Servings 4 Servings
Calories 604kcal
Ingredients
1½ lb chicken breast
4 tbsp cornstarch
¼ salt
½ black pepper
3 tbsp olive oil
12 cloves garlic minced
1 bunch green onions sliced thin
2 tsp crushed red pepper flakes
1 cup water
⅔ cup soy sauce
¾ cup apple juice
2 tbsp cider vinegar
½ cup brown sugar
½ tsp ground ginger
¼ cup ketchup
2 cups cooked rice
Instructions
Cut the chicken into 1" cubes and lightly season with salt and pepper. Sprinkle ⅓ corn starch over the chicken and coat well. Slowly add remaining corn starch and mix until there are no wet spots on the chicken.
Heat ½ tbsp olive oil in a large skillet over medium high heat and add chicken. Do not crowd the chicken or it wont crisp up. It is ok to do it in batches and set chicken to the side when it's done. If you are cooking in batches, add up to 2 tbsp of more oil to pan to avoid sticking. Allow the chicken to cook for 2-3 minutes on each side then flip it over and repeat, making sure not to stir the chicken while it's cooking. Once chicken is golden brown on each side set it aside in a single layer on a paper towel. Don't worry if it's not cooked all the way through as it will continue to cook in the sauce.
Add garlic, green onions, and crushed red pepper to the pan, reserving a few slices of the tops of the green onion for garnishing later. Let sautee about 1 minute, stirring often so the garlic doesn't brown, then stir in all remaining ingredients except for the rice. Bring to a boil, then add chicken. Reduce heat to a simmer and let cook until the sauce has reduced by half, about 10-15 minutes. Serve over rice, garnish with the green onion tops, and enjoy!
Notes
The Rice: For the rice I like to use either Basmati or Jasmine rice because of it’s amazing flavor and firmer texture that holds well when reheated. When cooking the rice, I like to rinse the rice off first (this removes the extra starch, helping your rice stay fluffy instead of sticky), then cook it with a 1 part rice to 1.5 parts liquid ratio (Ex. 1 cup raw rice with 1.5 cups liquid). I also like to cook my rice with chicken stock instead of water to give it a little more flavor, along with salt, pepper, and crushed red pepper.
If you want less spice in your food but still want the flavor, reduce the crushed red peppers from 2 tsp to 1 tsp in the recipe.
Nutrition
Serving: 4g | Calories: 604kcal | Carbohydrates: 72g | Protein: 43g | Fat: 15g | Saturated Fat: 3g | Cholesterol: 109mg | Sodium: 2510mg | Potassium: 922mg | Fiber: 1g | Sugar: 35g | Vitamin A: 188IU | Vitamin C: 7mg | Calcium: 71mg | Iron: 2mg
source https://wickedhandy.net/easy-bourbon-chicken/
0 notes
Text
In Our Garden: 2020 Fall Season
I’m so excited to be starting the Fall season of our garden. We have a new trellis to test out, new plants to grow, we are experimenting with a 3 sisters bed, and so much more! Stay tuned for updates of our San Antonio, Texas Back Yard Garden!
New PVC Garden Trellis
Spring 2020 Garden Trellis
Fall 2020 Garden Trellis
I absolutely loved the Spring trellis I experimented with for our cucumbers, squash, and green beans but it definitely had some areas of improvement that I’m hoping to solve with this updated design. While I got over 63 pounds of produce off of the last one, I had trouble with it breaking apart often (thankfully it was only PVC couplers that had to be pushed back together so it was an easy fix), I couldn’t reach the top of the trellis for harvesting/maintenance, and the plants were getting caught in the wire since the holes were so small (about .5 inches). So time to improve for the Fall!
For the Fall I’m constructing the trellis out of .75 inch PVC piping but adding additional supports so it’s a little more sturdy. I’ve also bought some new wire panels that have much larger holes so the plants can grow without having to get caught in the wire gaps. I’ve also decided to make the trellis for only 1 bed instead of spanning 2 beds. I’m hoping this help with making sure the plants get more sunlight while casting shade under the trellis for some less sun loving plants I want to grow. I’m also attaching the wire to the frame with zip ties because it took forever to attach the wire with screws/washers for the last trellis and I don’t think it made that much of a difference. Zip ties are quick and inexpensive.
source https://wickedhandy.net/in-our-garden-2020-fall-season/
0 notes
Text
White Chocolate Peanut Butter Oatmeal Cookies
This recipe has been on my to do list for a long time as a special treat for my husband. He doesn’t love a lot of your typical sweet treats like milk chocolate (shocking, I know), but he absolutely loves white chocolate, peanut butter, and oatmeal cookies. He loved the results and I hope you will to with this simple but delicious combination of flavors!
This cookie uses peanut butter as it’s base, then adds oats to help give it some substance and makes it more filling then a standard cookie. I like to use chunky peanut butter to give it even more texture and interest, but smooth peanut butter would work just as well. You can also use old fashioned oats instead of quick cook if you want more of an oatmeal cookie texture. Lastly, have fun with the chocolate chips, you can replace with peanut butter chips, milk chocolate chips, or completely omit them based on personal preference.
Print
White Chocolate Peanut Butter Oatmeal Cookies
.wprm-recipe-rating .wprm-rating-star.wprm-rating-star-full svg * { fill: #343434; }
Course Dessert, Snack
Keyword cookies
Prep Time 10 minutes
Cook Time 14 minutes
Cooling Time 15 minutes
Total Time 39 minutes
Servings 36 cookie
Calories 94kcal
Ingredients
½ cup unsalted butter softened
½ cup brown sugar firmly packed
⅓ cup granulated sugar
½ cup peanut butter chunky or smooth
2 lg eggs
¾ tsp vanilla
¾ cup all purpose flour
1 tsp baking soda
¼ ground cinnamon
⅛ salt
1 cup uncooked quick or old fashioned oats
½ cup white chocolate chips
Instructions
Preheat oven to 350°F.
In a large mixing bowl, add softened butter, sugars, and peanut butter beating until well combined and fluffy. Add eggs one at a time, then add vanilla and mix well.
In a separate bowl mix flour, baking soda, cinnamon, and salt. Add to butter/sugar mixture.
Once well incoporated add oatmeal and white chocolate chips.
On an ungreased cookie sheet, drop tablespoon sized dough about 2-3 inches apart. I use a small ice cream style scoop to measure the dough.
Bake for 13-15 minutes, until the bottom edges of the cookie are starting to turn light brown. Let cool for 2-3 minutes on the cookie sheet, then move to a wire rack to finish cooling.
Store any leftover cookies in a sealed container. Enjoy!
Nutrition
Serving: 1Cookies | Calories: 94kcal | Carbohydrates: 11g | Protein: 2g | Fat: 5g | Saturated Fat: 3g | Cholesterol: 8mg | Sodium: 51mg | Potassium: 45mg | Fiber: 1g | Sugar: 7g | Vitamin A: 79IU | Calcium: 11mg | Iron: 1mg
source https://wickedhandy.net/white-chocolate-peanut-butter-oatmeal-cookies/
0 notes
Text
Simple Oven Roasted Jalapenos
Sometimes it’s the little changes to a dish that make a world of difference. One example of this is switching out raw jalapenos with roasted ones. While you still get a kick, it’s mellowed out and gives a nice smoky flavor and a completely different texture. I love both raw and roasted jalapenos, but there are certain times that the raw version just doesn’t work. I love using these roasted jalapenos in soups and salsas, on sandwiches, in our Roasted Jalapeno Pesto, on tacos and quesadillas, and so much more. I mean really, anywhere you would use a jalapeno this will work and give your food an elevated, more sophisticated taste. I also like using them whenever possible because you get a lot of flavor for less than 10 calories, always a positive when trying to have a healthier lifestyle.
This method also makes it easy to skin your jalapenos if necessary for your recipe or for personal preference. I usually don’t skin mine but sometimes it just makes more sense. For example, if I’m adding this to my burgers I don’t want the skin making the burger difficult to eat, but if I’m adding this to black bean soup where it will be blended, no need to remove the skins.
Print
Simple Oven Roasted Jalapenos
.wprm-recipe-rating .wprm-rating-star.wprm-rating-star-full svg * { fill: #343434; }
Course Miscellaneous
Prep Time 5 minutes
Cook Time 19 minutes
Total Time 24 minutes
Servings 5 Servings
Calories 8kcal
Ingredients
10 lg jalapenos
cooking spray
salt optional
pepper optional
Instructions
Preheat oven to 425°F and lightly grease a baking sheet with cooking spray.
Wash and dry jalapenos, then cut in half and de-seed. Place on baking sheet with inside of pepper facing up spaced about 1 inch apart. Lightly spray with cooking oil and salt and pepper to taste. Flip over and lightly spray with cooking oil.
Bake for 16-19 minutes, until edges of jalapeno start to brown and skin starts to separate. Put in an air proof container (I prefer glass due to high temperature) and cover for 10-15 minutes if peeling off skins. This will help loosen the skins so they come off easily.
Once cooled, store in covered in the refrigerator. Enjoy!
Notes
For more heat, don’t remove the seeds in the jalapeno.
Proper spacing is important to make sure the peppers roast properly. If the sheet pan is crowded, the peppers will steam instead of roast.
Nutrition
Serving: 2Peppers | Calories: 8kcal | Carbohydrates: 1.8g | Protein: 0.02g | Fat: 0.05g | Sodium: 1mg | Sugar: 1g | Vitamin A: 19IU | Vitamin C: 3mg
source https://wickedhandy.net/simple-oven-roasted-jalapenos/
0 notes
Text
5 Ingredient Coffee Oatmeal Breakfast Smoothie
I’ve never been a huge fan of eating breakfast because I feel like it makes me hungry the rest of the day. While I still don’t love having breakfast, with the amount I work out in the morning I know it’s important to have something that is not only healthy but also filling. Hence, this amazing breakfast smoothie that also helps get you a little caffeine boost too while being under 250 calories.
I know what you are thinking, I’ve tried this all before and it’s just not my thing. I know, I was the same way. I wanted to love breakfast smoothie, especially oatmeal based ones, but I just couldn’t find one that had the right flavor or texture to make me want to have it more than once (and usually just finishing it was a struggle). This smoothie is not like that at all.
This smoothie starts with cold brew coffee that will help keep you energized all morning long, add a frozen banana to give you not only loads of nutritional value, but also that creamy smooth texture that makes this smoothie amazing. Add some cashew milk (or any other milk you like, I choose cashew for the low flavor profile and ridiculous low calorie count), and blend with oatmeal and chia seeds to keep you full all morning long. What else could you ask for in a smoothie?
Print
5 Ingredient Coffee Oatmeal Breakfast Smoothie
.wprm-recipe-rating .wprm-rating-star.wprm-rating-star-full svg * { fill: #343434; }
Course Breakfast, Drinks
Prep Time 3 minutes
Total Time 3 minutes
Servings 1 Smoothie
Calories 218kcal
Ingredients
1 lg banana frozen
4 oz cold brew coffee
4 oz cashew milk unsweetened
¼ cup oatmeal quick cook or old fashioned
1 tbsp chia seeds
Instructions
In a blend-ble container, add banana, coffee, cashew milk, oatmeal, and chia seeds. Make sure to add chia seeds last or they will stick to the container and not blend properly, giving you a grainy texture in your smoothie. Blend well and enjoy!
Notes
You can make this smoothie the night before so all you have to do is blend it in the morning. I prefer to make it right before consuming because the frozen bananas give it a thick, shake like texture that I really enjoy.
Nutrition
Serving: 1Smoothie | Calories: 218kcal | Carbohydrates: 40g | Protein: 5g | Fat: 6g | Saturated Fat: 1g | Sodium: 85mg | Potassium: 568mg | Fiber: 8g | Sugar: 15g | Vitamin A: 76IU | Vitamin C: 10mg | Calcium: 76mg | Iron: 2mg
source https://wickedhandy.net/5-ingredient-coffee-oatmeal-breakfast-smoothie/
0 notes
Text
Low Calorie Baked Cod
When it comes to cooking for myself, I try to stick to a low fat, low calorie diet. I don’t, however, want to sacrifice taste while I’m trying to be healthy. So while I pack my plate with veggies from my garden, I want the rest of my meal to be something I can look forward to. This is the key to healthy eating for me; the challenge to turn my favorite foods into something healthy enough to fit in my diet while still being delicious. This way I’m excited to eat instead of wishing I could eat something else because honestly who wants to live like that? I know I don’t, I just love food too much.
It’s with this motivation that I came up with this baked cod recipe, though you could use haddock as well, it’s just hard to find down here in Texas. It’s not only easy to make (the topping can be made in minutes but if you want to save time you can make it in advance as well, just add the butter right before using) but it’s packed with delicious flavor! The crispy topping blends perfectly with the soft, flaky fish, giving you the perfect combination of textures. The only thing to dread with this meal is taking the last bite and wishing it wasn’t over.
Looking for the perfect under 500 calorie dinner that can be done completely in the oven and still impress? How about pairing this with a side of Roasted Green Beans and Oven Roasted Potatoes? Just cook the potatoes at 425°F for the first 25 minutes, then reduce the temperature to 400°F. Add the green beans (you could even use the same sheet pan and save on clean up!) and fish, cook for an additional 20 minutes, and dinner is served! So easy but oh so good and only 462 calories! Trust me, this will become part of your weekly rotation and you’ll love it every time!
Print
Low Calorie Baked Cod
.wprm-recipe-rating .wprm-rating-star.wprm-rating-star-full svg * { fill: #343434; }
Course Main Course
Prep Time 5 minutes
Cook Time 20 minutes
Total Time 25 minutes
Servings 2
Calories 190kcal
Ingredients
8 oz cod thick cut if possible, 4 oz portions
8 ind butter crackers like Ritz
¼ tsp salt
¼ tsp black pepper
¼ tsp onion powder
¼ tsp ground cayenne pepper
¼ tsp dried oregano
¼ tsp dried parsley
½ tsp garlic powder
1 lemon
1 tbsp unsalted butter softened
1 tbsp chardonnay
Instructions
In a small bowl, crush crackers and add spices. Mix well and add butter, mixing it in well. I usually crumble the crackers into the butter with my fingertips until well combined.
Lightly spray a shallow glass dish with cooking spray and add fish. Drizzle with chardonnay and squeeze half a lemon over the fish.
Gently add the cracker topping onto the fish, slightly pressing it down evenly over the top.
Bake for 20 minutes, or until the fish is opaque and flakes easily. If you have a thinner cut of fish you want to test it around 15 minutes.
Serve with lemon wedges and enjoy!
Notes
Typically my recipes call for fresh herbs but I would recommend dried in this recipe for the concentration of flavors. The amount of fresh herbs necessary would make the topping less likely to hold together while it is cooking.
You can use this topping on any kind of seafood like shrimp, scallops, other types of fish, or chicken. For chicken just make sure to pound it out to a thinner piece so it cooks in time before the topping gets too dark.
I like to keep the small bottles of wine in my pantry for recipes like this so I’m not running out to get wine every time I need a small amount in a recipe. While you only need a tablespoon for this recipe, it adds a lot of flavor to the fish while keeping it moist so I would recommend not cutting it out.
Nutrition
Serving: 1piece | Calories: 190kcal | Carbohydrates: 9g | Protein: 21g | Fat: 8g | Saturated Fat: 4g | Cholesterol: 64mg | Sodium: 390mg | Potassium: 543mg | Fiber: 2g | Sugar: 2g | Vitamin A: 324IU | Vitamin C: 30mg | Calcium: 38mg | Iron: 1mg
source https://wickedhandy.net/low-calorie-baked-cod/
0 notes
Text
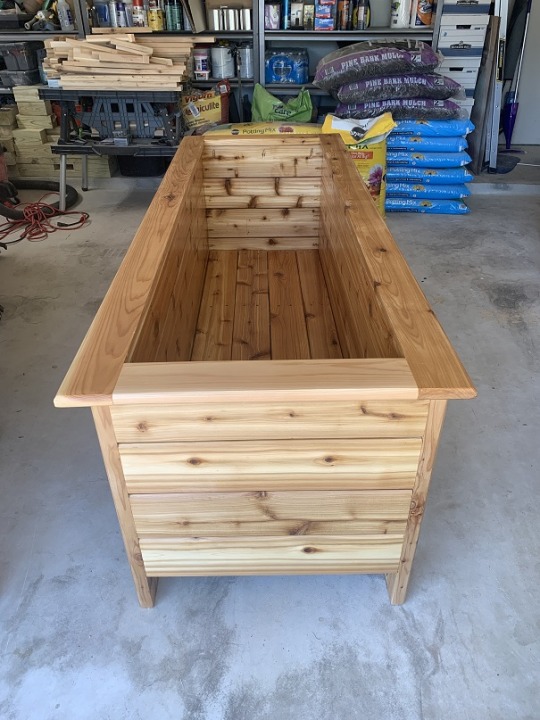
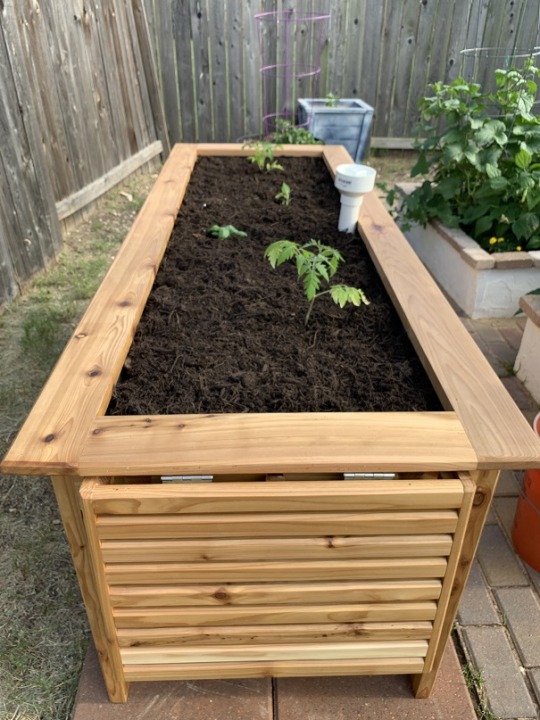
DIY Sub-Irrigated (Self Watering) Raised Cedar Garden Planter Woodworking Plan
This has been by far my favorite build to date and is going to completely transform the way I garden moving forward. This Do It Yourself Sub Irrigated (or Self Watering) Raised Cedar Garden Bed is designed to not only be functional but absolutely gorgeous to look at! And who doesn’t love when style and function come together perfectly?
What is a SIP & How Does This Garden Bed Work?
SIP stands for Sub-Irrigated Planter. This is a generic term that covers container gardening where the water is given to your plants from underneath instead of above. This allows your plant to gain their water needs through capillary action. While there are many commercial uses for SIP systems, home gardeners can also enjoy the benefits of lower maintenance gardening! Since water is being stored underneath the plant, not only are you watering less (by simply filling the water reservoir) but less water is getting wasted trying to ensure your plant’s soil is evenly moist1. Some cal it self watering because the rain water is collected into the reservoir to reduce needing to hand fill it.
There are 3 main ways a SIP system can work to deliver the necessary water to your plants. Some systems use battery operated drip systems that pull from a water reservoir, wicking where water is pulled through some type of “wick”, commonly a cotton rope, to deliver the necessary water, or through air & water2. This bed uses air and water to make sure the plants get the water they need. The overflow tubes are installed to leave about 1″ of air in the drain pipes, allowing a barrier between the water and the soil. Just surrounding the drain pipes there is a special soil mixture that allows extra water absorption that allows the water to easily be absorbed up to the plants. This will provide a consistent level of moisture to the plants, which honestly is impossible to achieve when watering by hand. Pretty cool, right?
So Why Make This Bed?
So what makes me love this specific elevated planter so much compared to other beds? Here’s just a couple reasons:
It’s made of cedar boards and sealed with spar-urethane, making it have the potential to last for 20 or more years. So while you will be spending a little more upfront for materials compared to pine or white-wood, the finished product will last you years and years, making the annual cost minimal.
It is build with a sub-irrigated system that you refill with a hands free PVC fill tube. What does this mean? Instead of watering your garden constantly, this bed holds about 3.5″ of water at the bottom that gets pulled up into the soil as the plants need it. So if it rains in your area, the water reservoir will collect that water since the top isn’t sealed and if not then all you need to do is put the hose in the fill tube and let it run while you admire your garden or spend some time pruning and weeding. This bed also has 2 drain tubes so if you do get heavy rain or distracted while filling up the reservoir, you don’t need to worry about your plants getting root rot because the excess water will drain out!
This bed is the perfect height not not have to bend down to plant or weed (though weeds will be minimal since it is raised) or strain to prune taller plants. It’s also raised off the ground enough that you don’t need to worry about animals interfering with your crops (here I have terrible problems with rabbits in my garden but they are too cute to get upset with).
I’ve designed the perfect fold down side shelf for this bed to use while harvesting or planting, or just to put your coffee down while you work on your garden. The perfect way to save space but still have a resting place for all your tools when you need them.
This plan is completely customizable for you! I built a 2’x6′ bed for my tomatoes, but you can easily modify this to your liking.
You don’t need a ton of tools to complete this bed or a professional workspace. In this plan I will walk you through the tools I used to build mine but also give you alternatives where applicable so you aren’t breaking the bank on this build. So in the tools section if you see the word optional next to it, make sure to check the instructions before running out to buy anything.
The DIY Sub-Irrigated (Self Watering) Raised Cedar Garden Planter Woodworking Plan:
At first glance this woodworking plan may seem a little overwhelming but I promise it will come together quickly and you will love the end result. This bed is broken into 3 main components: building the bed, installing the sub-irrigation system, and adding the soil/planting. The first component by far takes the longest, but once it’s done you’ll be so happy you invested the time up front for years of low maintenance gardening!
Download Your Free Woodworking Plan:
DIY SIP Planter Woodworking Plan
Please note this is a large file so it may take a little bit to download (I promise it’s worth it!

)
Self Watering Bed Soil Mixture:
This bed uses 2 different soil mixtures to make it work: 1 for around the drain pipes for wicking power and 1 for above the drain pipes. While I give exact amounts in the woodworking plan, I think it’s important to know the ratios and rational to each soil component so you can build a bed with different dimensions3.
Drain Pipe Soil Mixture:
3 Parts Peat Moss: Highly absorbent material that can hold it’s weight in moisture several times over. Be careful not to overdue it with this since it does have an acidic pH.
1 Part Vermiculite: The perfect soil amendment to help with aeration. It is light weight, non-toxic, and will not rot or deteriorate. Vermiculite helps increase water and nutrient retention.
1 Part Perlite: Allows water retention like vermiculite, but also allows water to drain more easily. It helps with improving soil aeration and prevents soil compaction4.
Above Drain Pipe:
2 cu ft Moisture Control Potting Soil
2 cu ft Potting Soil
1 1/2 cu ft Pine Bark Mulch (plus extra for top of garden bed if wanted)
2 gallons Perlite
Fertilizer if desired
Huge shout out to Albopepper for their insane knowledge of SIP raised beds. I went through hours and hours of videos and articles when designing this bed and I found their information not only informative, but also easy to understand. Al was great at helping me get the perfect combination of soils for around the drain pipes to make this bed a huge success! Check them out if you want some more in depth knowledge of SIP beds prior to building this one: http://albopepper.com
References:
Sub-irrigated planter. (2019, July 20). Retrieved from https://en.wikipedia.org/wiki/Sub-irrigated_planter
Clayton, T. (2019, July 9). S.I.P. Gardening: Self Irrigating Planters. Retrieved from https://gardenculturemagazine.com/s-p-gardening-self-irrigating-planters/
Self-watering SIP Sub-irrigated Raised Bed Construction. Retrieved from http://albopepper.com/SIP-raised-bed.php
Information About Soil, Fixes & Fertilizers. (n.d.). Retrieved from https://www.gardeningknowhow.com/garden-how-to/soil-fertilizers
source https://wickedhandy.net/diy-sub-irrigated-self-watering-raised-cedar-garden-planter-woodworking-plan/
0 notes