sideblog where i collect photoshop resources and tutorials (main: usermarquez)
61 posts
Don't wanna be here? Send us removal request.
Last Seen Blogs
taymour13
mia ♡
hairmakepoissonrouge
ヘアメイクポワソンルージュ

kornnfield
Untitled

slowmixzero
To be remembered as a 'good being'.
olissotstudio
Olissotstudio
Note
hey! your gifsets are absolutely beautiful and i'm always so impressed by them, especially your choice of fonts. so i was wondering if you might wanna share the fonts you've used in your pinned post (your green ray pakorn gifset), because they're so gorgeous!
hey there! thank you so much! 💚💚💚 always happy to share with my fellow font hoarders!
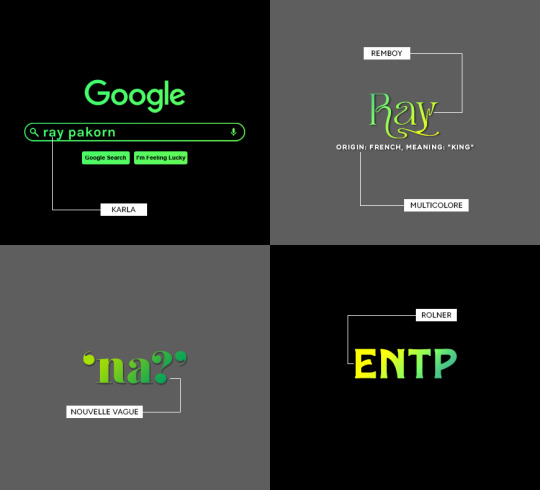
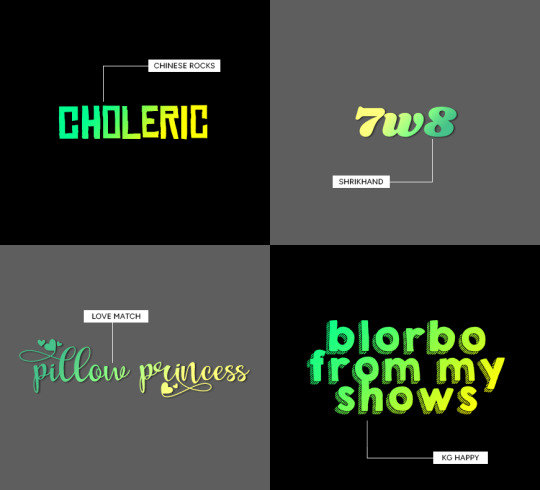
(click for larger image)
links to fonts under the cut!
karla (comes baked in with @cal-kestis' google overlay template! this is the same font used for 'chronic babygirlism')
multicolore (this is the font used for all of the white sans serif typo)
remboy
nouvelle vague
rolner
chinese rocks
shrikhand
love match
kg happy
hope this helps! happy creating!

313 notes
·
View notes
Photo
HOW TO: Make a Pantone “Color of the Year” Gif
A few people have asked about my Pantone sets which use the “Color of the Year” swatch design. So, here’s a full tutorial with a downloadable template of my exact overlay! Disclaimer: This tutorial assumes you have a basic understanding of gif-making in Photoshop.
Keep reading
960 notes
·
View notes
Note
Hi!
I sent this ask to the UserGif blog and they directed me to you. I was wondering how you created this black widow layout set:
https://www.tumblr.com/usergif/709701351905624064/black-widow-2021-dir-cate-shortland-insp
The layout is so cool and creative, I love it so much.
Thanks in advance!
hey! first off, thank you so much i really appreciate it.
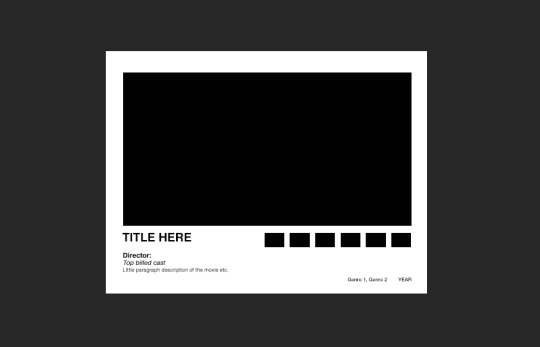
now i will attempt to explain it, but i am never the best at these things so if you have any questions, feel free to ask! (all this is assuming everyone has a basic knowledge of gifmaking etc.) we're going to recreate a gif from my original set here.
FIRSTLY, you need your basic layout, now i used the rectangle shape tool to create the space for the big gif, and the little palette boxes, and fill them black so you can see them easily and move them around until i'm happy with the layout. and then move onto my text, the posters i was originally inspired by on etsy no longer seem to be there but the font i used which i *think* is what was used on those (as i wanted to get as close to my insp source as possible) is Nimbus Sans L for the title in bold, and Nimbus Sans Rounded for the rest (semi bold for the director and the genre/date and italic for the starring actors) and once i perfected the layout, and added a white layer for the background i saved that as a psd for future use. (make sure you're in timeline mode, and that the frame rate of this canvas is 23.976 fps - as that'll stop any issues when creating the whole gif.)
from here, you're free to gif make your first gif as normal, colouring it and putting it all together in a smart object so then you're ready to just paste it into this canvas, clipping it over the big rectangle, resizing as needed and then sharpening. (if you're unsure about clipping masks - this gifset relies on them - there's a handy tutorial here!)
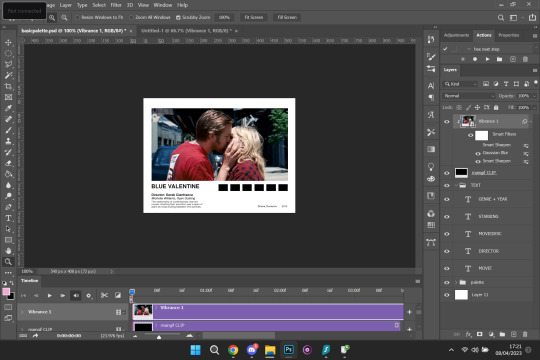
so, here's how it looks with the main gif in place, and i've filled in my movie details for the film i've picked (i try to keep my layers as organised as possible so i recommend labelling things so you know exactly which text layer is which) i put all the text layers in a folder, and make a folder for all the palette rectangle boxes too.
next is the fun bit, or at least it is for me (personally i like to zoom in for this bit) but it's time to colour pick for the palette. before you do this make a new layer for each palette and clip one to each of the palette boxes like below.

like i said, i like to zoom in for this, but select the eyedropper tool, and start picking your colours, i try to do it in a gradient, usually starting with either the brightest or darkest colour etc. for this gif i want to go from browny red to blue. once you pick your first colour, go to the layer clipped to the rectangle you want that colour and fill it with your colour. keep repeating this process until all your colours are picked and you're happy with your palette.

and here is what you're left with. so now, just do what you'd usually do when saving your gifs, i personally put everything back into frames, so i can save with a timing of 0.05. and then repeat for each gif until you've got a beautiful gifset that you love!


i hope this made sense, and is easy enough to follow! sorry if it's a bit rambling and ridiculous, me and explaining things are not compatible.
219 notes
·
View notes
Text
gif tutorial: how to blend images together using layer vector masks
@molinajules asked how to blend images together using a torn paper effect. This tutorial will show you how to do this using layer masks. There are two different methods i use depending on the set i wanna make. i either use a brush or png images from mask packs i’ve found. since tumblr has a thing about links in posts, links for the resources i use will be provided in a reblog right after this tutorial.
this tutorial is made assuming you already know how to make gifs and will be done using photoshop on a mac. i’ll be showing you how to make these two edits:
the first one will be done using a png:

the second one will be done using a brush:
note: these gifs were ones i made for @dailytvwomen i did not steal them to use in this tutorial. they are mine! i was too lazy to make new ones :’)
Keep reading
945 notes
·
View notes
Note
hello. it’s me again who asked for the ripped paper tutorial. i can’t wait to try it out later!! are you able to make a tutorial on how you put the text on the ripped paper? thank you so much ☺️
hello! sure! i'll explain how i made the ripped paper effect from this gifset in more details under the cut 😊 (it’s a different method than what i did on my previous tutorial here)
i apologize in advance for my lack of coherence, i’m not always the best at explaining stuff, especially not in english haha
first things first: make your gif, color it, sharpen it etc etc, and put all of it's layers in a group. i called mine “blended gifs”. oh and make sure you are in timeline mode, not frame animation!

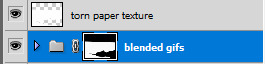
then you want to import the ripped paper texture(s) you want to use onto your canvas and position them the way you want them to be on top of your gif, like this:
(i am using these textures for most of this gifset)

what you want to do next is create a mask of this torn up area so the gif layers only show up around the "hole". to do that, select the texture layer and press "ctrl" while clicking on the texture's thumbnail. this will create a selection of your ripped paper texture (you'll see a flashing dotted line showing your selection).

btw: the ctrl + click method works only if the image/texture has transparency like this texture does.
[if you want yo create your own torn/ripped shape with 2 or more textures, you can place them on top of each other and create a mask by doing ctrl + selecting the thumbnail of the first one, then while still holding ctrl, also hold the shift key and click on the second texture’s thumbnail (and the third, fourth, etc). this will add the shapes to the same selection and then you can create one layer mask with all of the shapes selected together.]
with that selection still active, you want to select your gif's folder you created earlier and click on the add layer mask button.
this will create a mask for the ripped paper edges on your gif, the group layer should look like this:
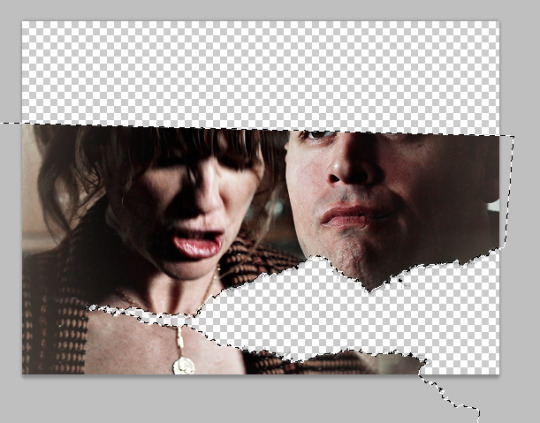
now disable the torn paper texture (by clicking on the eye next to it, you won’t need that torn paper texture layer again), and your gif should look like this so far:
as you can see, there's a transparency issue, and we're losing the top part of the gif. to fix that, you need to brush some white color onto the mask.
to do that, hit ctrl and select the group's mask thumbnail again, you will see the same selection as earlier show up. with the selection ready, select the brush tool in the color white (and 100% opacity), and go brush/paint some white over the whole layer mask. this should fix the transparency issue and the gif should look like this:
once you're done, hit ctrl + D to make the selection disappear, and still with the layer mask selected on the gif's group, with the brush tool paint some white at the top so we get the top of the image back. it should look like this:


(you can also brush more white or black to add/remove parts to this layer mask if you want to, it’s what i did for the original gif, actually.)
now you should be ready to put whatever you want in that ripped edges “hole” you’ve created.
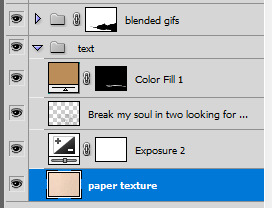
what i did for this gifset is i found a random paper texture on google and used it as a background for my text. make sure you put this background texture under the gif folder, so it will only show up in the “hole”. (i put my texture in a group i renamed “text” because i love my psd compositions to be tidy lol)


then i just typed the text i wanted and positioned it the way i wanted it to look. the text layer should be over the paper texture but still under the gif folder:


to finalize the look I color corrected the paper to be a bit more bright and added some highlight on the text, here you can do whatever you want to make the text look the way you want it to look.
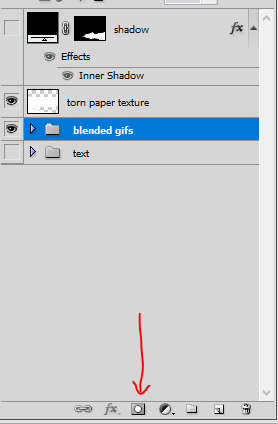
i also added a bit of dropped shadow on the edges of the ripped paper. to do that I selected the mask (ctrl + click the smart mask thumbnail), created a new color fill layer (the color is not important). this will create a layer with a layer mask of the selection. i then selected the smart mask thumbnail and hit ctrl + i to invert it, so my mask is not only the inside of the “hole”. then i put this layer on top of everything, and the fill at 0%. finally i added an inner shadow in the layer style options (by double clicking on that color fill layer).


and that is the final result!
i hope that wasn’t all too over the place or not too detailed? i wasn’t sure how familiar with photoshop you are 😊
@nightmaarebeforechristmas here u go!
657 notes
·
View notes
Text


2021 NETFLIX PSD TEMPLATE BY SEUNGNM
i haven't seen a 2021 netflix template so i made one myself lol
please reblog if downloading
fonts used: helvetica neue regular, bold, and italic
everything highlighted in red is optional/deletable
please credit me if you use my templates!
feel free to ask me any questions
i might make additional add ons to this :)
download
3K notes
·
View notes
Photo


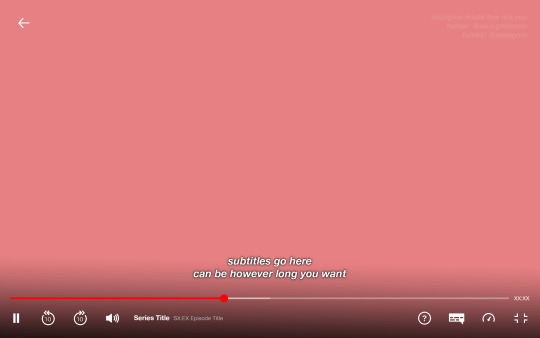
*:・゚✧*:・゚✧ 2021 Netflix Templates, by @sehyune !
felt like making something kinda easy & to my taste to share with everyone
includes login screen, home screen, show preview popup, paused show screen & playing show screen. does not include a colouring psd.
basic knowledge of photoshop, including clipping masks, will be needed to use this template
please like & reblog if downloading / using !
main font: san francisco pro ( light, medium, regular, semibold, bold, heavy )
font used in show logo is golden hopes
please credit me if you use this template anywhere online. feel free to tag me in edits you use it for ( i’d love to see ! )
please let me know if there are any errors, or if you have any questions about how to use the psds !
download
662 notes
·
View notes
Text
warped text animation
today in ‘i can’t actually believe this works and it’s easy’ we’re learning to make a warped text animation like this one i made for @jatpwomen as per request of the members on the discord server <3
what do we need:
basic gif making skills <3
photoshop with timeline option
i’m working on photoshop cs6, i can’t remember if the option i’m using is available in earlier versions but from cs6 onwards you should be fine to make this.
Tutorial will be image heavy so i’ll put it under the cut!
Keep reading
495 notes
·
View notes
Photo

BEATING HEART EFFECT TUTORIAL:
I was asked by the amazing Samantha @shegos how I made the animated beating heart effect on my Witcher gifset so I thought I would make a tutorial about it! I’ve used this same effect before on this Merlin gifset. This tutorial assumes you have basic giffing skills and work on Photoshop with a timeline.
Keep reading
385 notes
·
View notes
Text
How to create custom photoset/gifset templates from scratch in photoshop
Hey all! I’ve seen many tutorials about how to use pre-made templates, but I never seen an actual tutorial on what to do if you want to create your own templates in case everything you find doesn’t fit your needs, here is one of the cases in which it can be used (no offense to the people that made these kind of tutorials, that simply means that I’m blind lol). I hope it’ll be useful and feel free to write me if you have any questions. Let’s get started!

Pick your scenes. That’s simple. Just decide how many gifs you want to include in your template and pick your favorite scenes.
Create a new document. In my case, I created 540x540 document.
Time to create the grid. That’ll probably sound dumb af (and it is dumb af 💀), but I never made grid gifs before bc I always thought that it's like.. manually measuring the gaps between each gif, then figuring out what size you actually want the gifs to be, making a new layer, filling it with a shape of the required size (and man am I bad at math), blah-blah-blah.. guess what? WRONG! All you have to do is go to view > new grid layout and you’ll see this window:
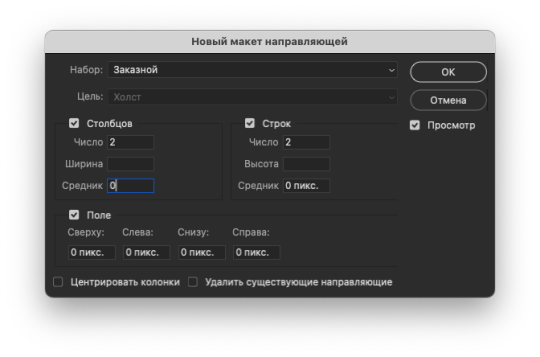
Here you can enter your number of rows, columns, and gutter (the number of space between each gif in pixels). Margin can evenly divide your whole document, we’ll get to that later. For this tutorial, I’ll keep things simple. I made my basic 4 gifs layout, gutter between each gif is set to 3 px for both rows and columns. After I click ok, my canvas looks like this
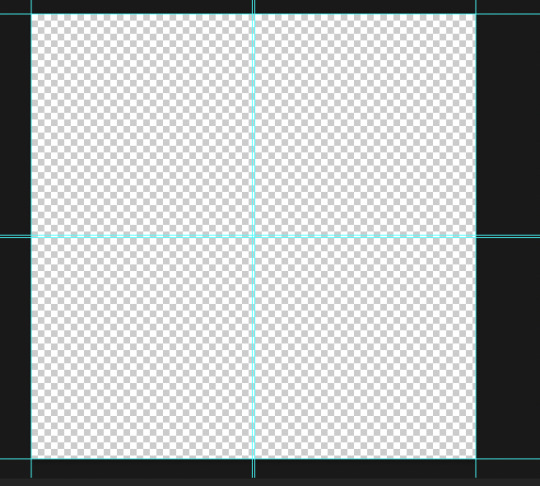
Pretty neat for a couple of clicks right? Now, let’s insert some gifs. Before doing that, go to view and make sure overall snapping and snapping to guides, grids, layers and document bounds is check bc we’ll need that. Now take your regular selection tool, and drag it across one part of the document until it snaps to the guides we created

Here's my finished template (i just duplicated the same layer 3 more times and positioned it accordingly)
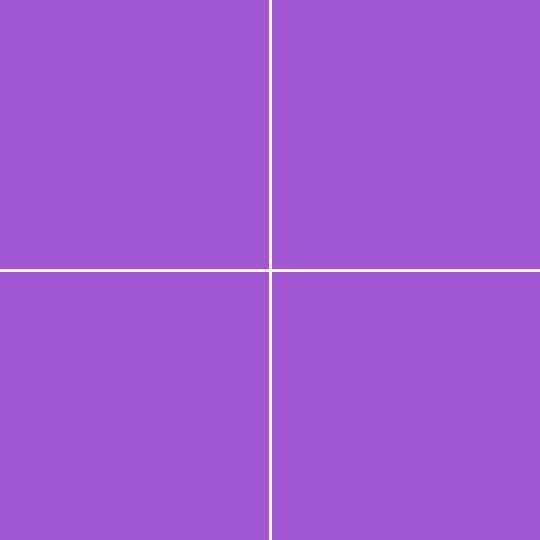
the actual size of the gifs doesn't really matter because we'll use clipping mask and resize them to fit our shapes better
How to use "Margin" section
That section is useful when you already have something in your template, and want to fill the left off space. For example:
I made this

But it's completely empty on the right side, so i go to view > new grid layout, and here's what i do

it adds a divider between gifs that are ready so i don't have to measure anything again and guessing how far or close these new gifs should be to/from each other. If i want, i can also change the top, bottom or left number to split this part of the document in half and add another gif. So i end up having 7 gifs on my canvas in total.
New guide from shape function
This function tries to follow whatever shapes you have on your canvas and create new guides according to those shapes (not very good with complex shapes tho, usually you'll end up with many guides chaoticly placed all over your document, so it's all trial and error). Here's another example of custom layout i made (still epirimenting with these).
And that's it folks! That was pretty short huh. Feel free to write me any questions of ypu have them and happy creating :)
506 notes
·
View notes
Photo
Some anons asked me how to make the transitions in the middle gif of this set, so in this tutorial I’ll show you how I did it. This tutorial assumes that you know the basics of gif making, so let’s begin, tutorial under the cut:
Keep reading
689 notes
·
View notes


Photo
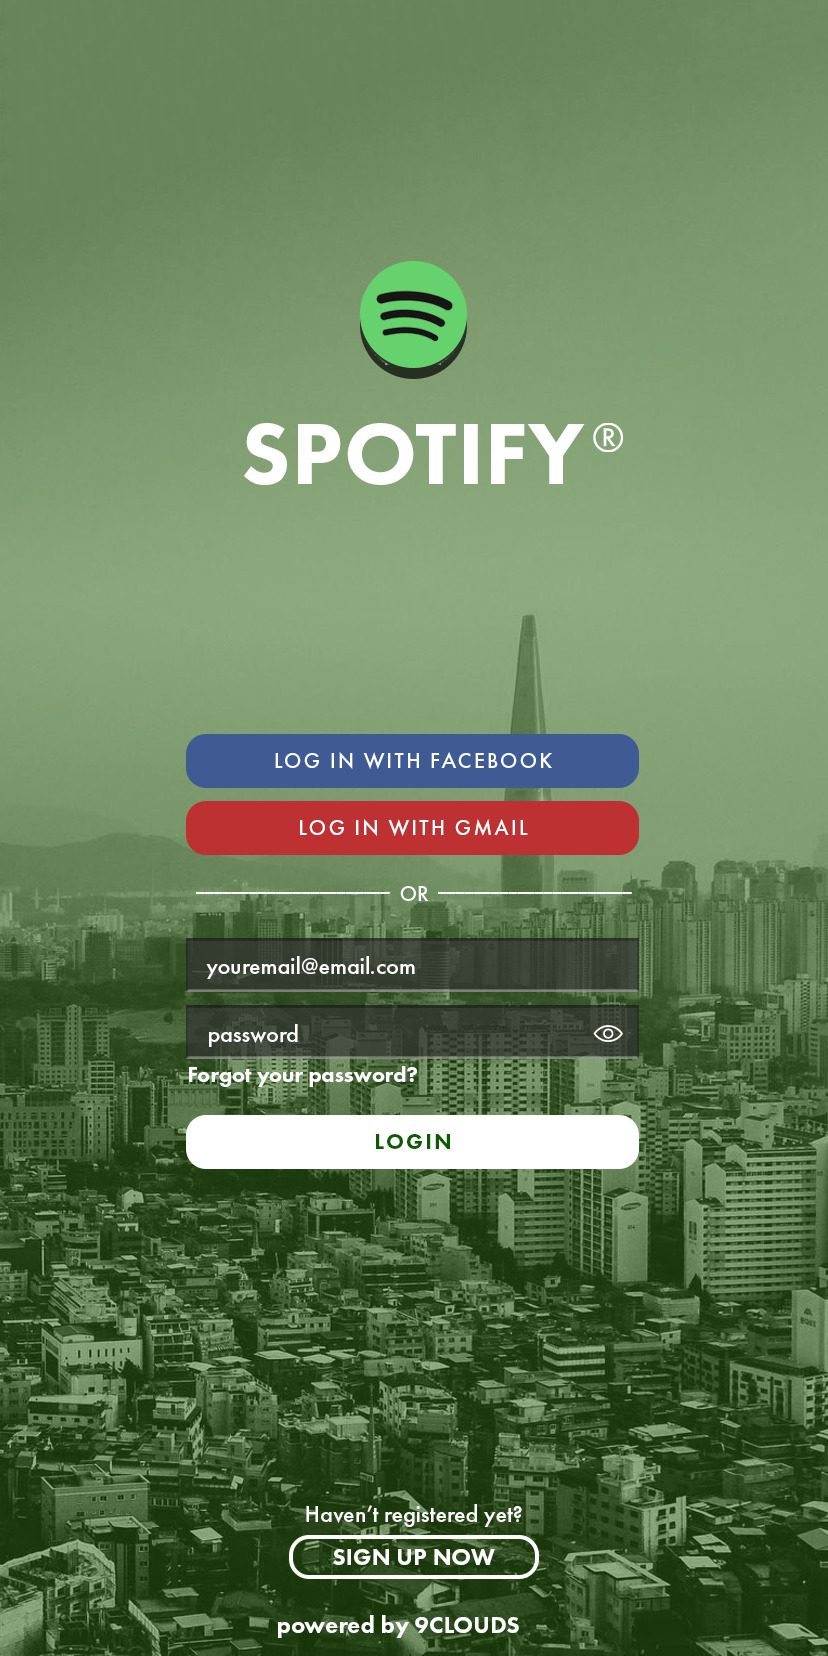
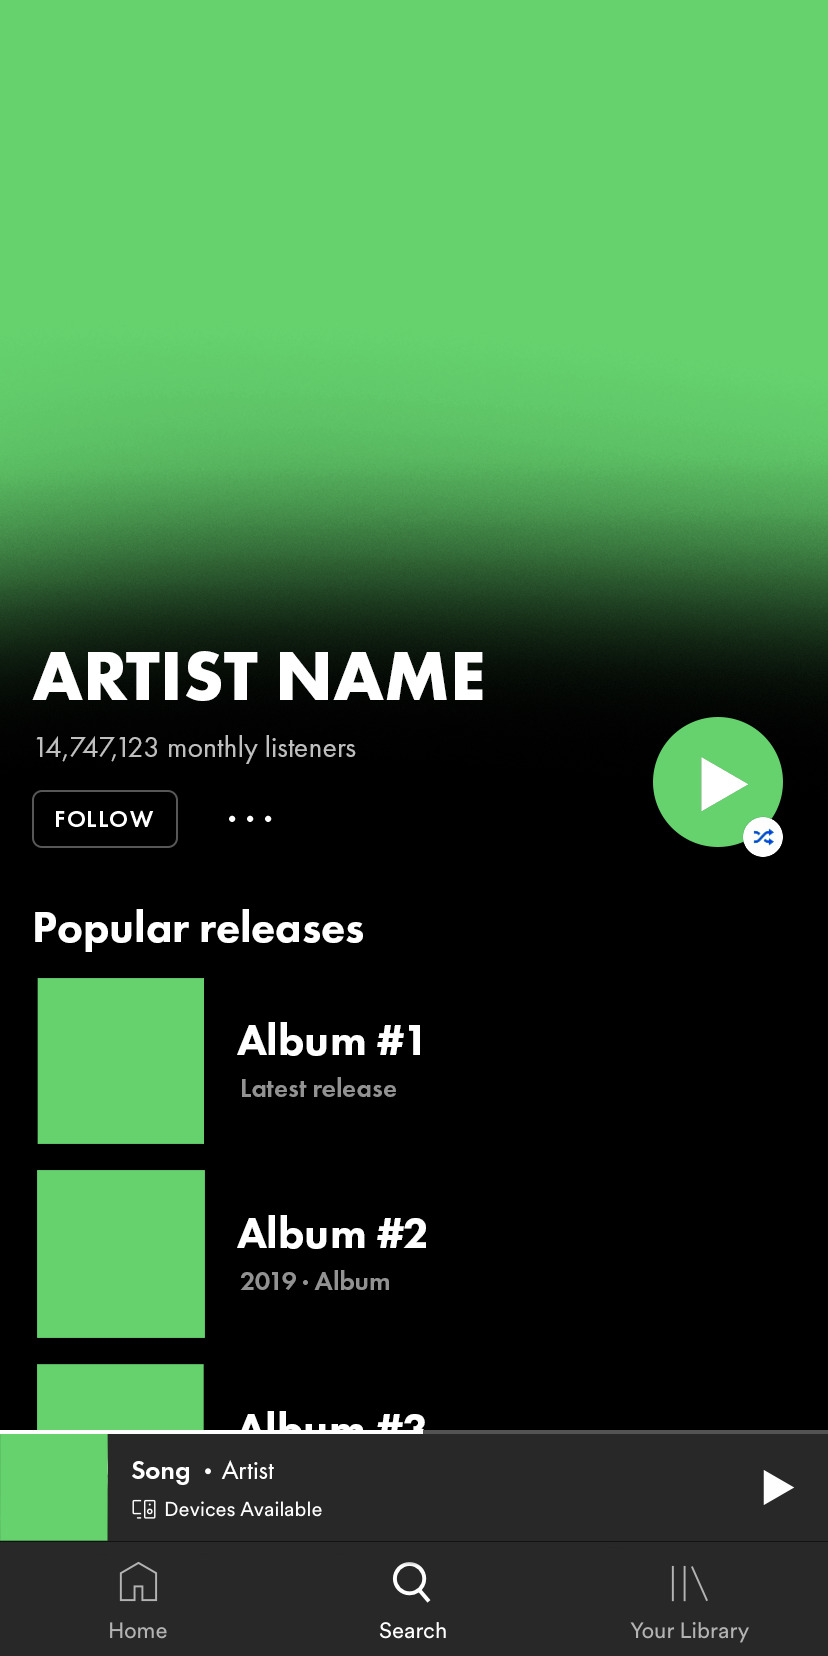


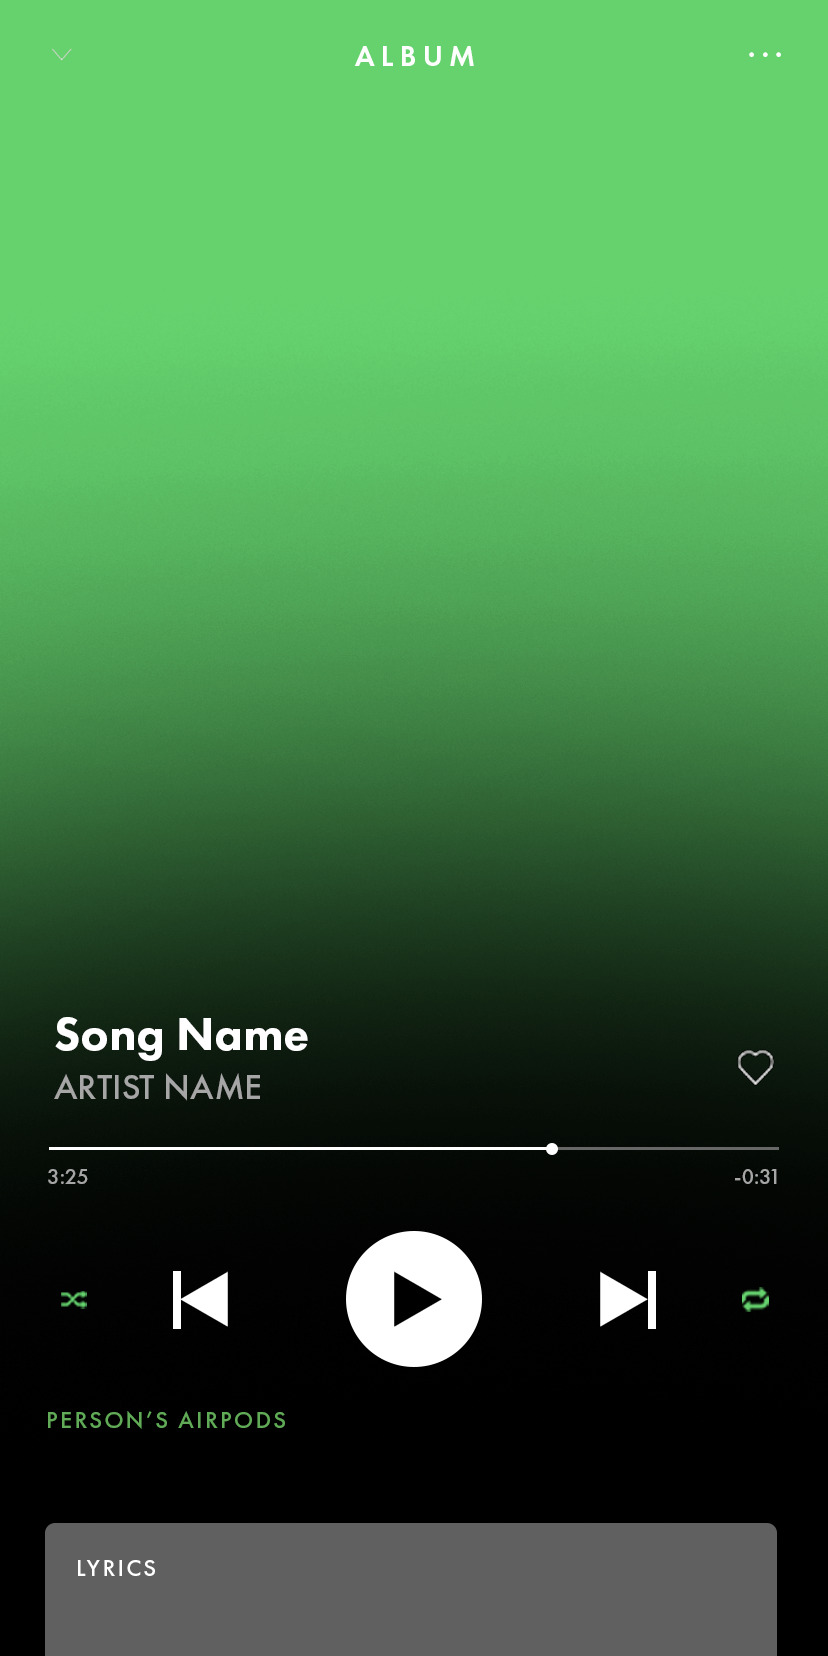

✧ SPOTIFY PSD — BY 9CLOUDS ✧
this spotify ps template is completely editable, but it may require some knowledge of photoshop (clipping masks especially). if you have any questions you can send me an ask here or on my main @sangyus
please reblog if you use it (or if you want to boost it).
includes the app’s log in screen, a complete artist profile and two player options: one for gifs and one for album covers.
the font used is Futura PT. you can get it here or here.
check out this edit sample.
download here
(although this is a free resource, if you feel so inclined you can buy me a ko-fi here ☕️)
5K notes
·
View notes
Photo

i decided to make a masterlist of photoshop resources, for those who want to start making graphics or are looking for new ways to create graphics! there’s download links, tutorials, textures, psds, and other helpful resources.
DOWNLOADS (PLEASE MESSAGE ME IF LINKS ARE BROKEN)
for windows:
photoshop cs5 (malikmanips)
photoshop cs5 extended (birdysources)
masterpost with tons of ps links/resources (sistaroundpsds)
TUTORIALS
getting started with photoshop (sorrydearie)
learning photoshop’s interface
the ultimate photoshop tutorial (rresources)
how to color without whitewashing
how to make a coloring psd (yeahps)
guide to gradient maps
texture tutorial
how to use textures
a guide to textures
sharpening workshop
how to add makeup to a picture
lenaofrp’s graphic tutorial
masterlist of gif tutorials
moving pattern tutorial
how to make gifs
how to isolate a color
coloring black and white pictures
colorful gifs tutorial
pixelated effect tutorial
overlay gif tutorial
how to clip mask an image
border tutorial
how to make flower crown edits
how to make manips
how to make hq pictures
sharpness & grain tutorial
moving text tutorial
typing effect tutorial
how to make a circle edit
how to use actions
what are templates and do you use them?
how to make icons
more tutorials in this tag
TEXTURES
25 textures by plaschka
daenso’s texture pack
18 textures by plaschka
watercolor textures
polaroid texture pack
flicker & fade: 50 textures by plaschka
retro feel textures
daenso’s texture pack 3
watercolor textures
20 large textures by talbots
light leaks texture pack
25 textures by dartagnans
60 nature textures by queencoloring
texture pack by jhnwattson
moonofrp’s texture pack
hayleyofrph’s mega texture pack
texture pack by myungin
all emojis download
this and that textures by plaschka
PSDS
gif psd pack by shycolors
psd by prettycolorspsds
psd 422 by lawynterpsds
jasperhelps manip psd #1
animated movies psd by addictionps
psd 42 gallifreypsd
psd for candids by sistaroundpsds
psd 28 by hipstaps
icon psd by baepreviews
psd 4 by psalpha
psd 33 by gallifreypsd
psd 006 by kwonbaes
psd 1645 by wasirauhlpsds
psd 325 by lawynterpsds
adorkablelena’s psd 3
pswonderland’s tag
psd 10 by quinncoloring
psd 151 by pridecoloring
dirrtylady psds
OTHER RESOURCES
resource pack by whatphotoshop
screencap gallery masterlist
photoshop reference
cs6 shortcuts
photos to use in roleplay graphics
color blender
gryffnsdor resource pack
psbright resource pack
landofmerlin resource pack
psd for text on gifs
font pack by yeahps
font pack by aladdin-s
font pack by whatphotoshop
cursive font pack by yeahps
gallifreypsds favorite fonts
78 different font styles download
pack of 530 pngs
png & brush pack by twiangelz
png pack by daretochase
resource pack by editslovers
template 02 by awfulpsds
template by mixsoucers
simple smart sharpen action by lovotopsds
action #3 by flatinepsds
action #2 by louderps
action #4 by hollypsds
celebrity hq galleries masterpost by fassyy
resource pack by championselenapsds
30 striped pattern overlays from cyrusassists
82K notes
·
View notes
Photo


katara | theme by sage
get the code: live preview / static preview / static preview v.2
the song in the preview is Dear Katara by L.Dre
this theme was made to celebrate 1k followers milestone :) thank you to everyone who’s supported me and joined me on this journey!! featuring an (optional) music player and inspired by katara from avatar the last airbender ♡
features:
toggle: music player, tags on click, updates tab
customizable description, colors & color gradient, body & title fonts, font size, and post margin
drop down menu for up to 6 extra links & search bar that slides in
up to 6 updates each with an icon and text
540px posts, scroll to top button, responsive design, & optional glow effect
nothing needs to be changed in the code, everything can be changed in the customize panel! instructions for how to upload your song below the cut
terms:
reblog if using
do not touch the credit
view all terms
credits listed in the code / credits page
please consider supporting me ♡
make sure you read through this post and check the additional links provided before asking questions!!
Keep reading
2K notes
·
View notes
Photo


[ Breach ] - preview | code [alt]
What better way to bring in the New Year than with a new theme release! This is a sidebar theme to bring commemorate the new year and to hopefully to spark that much needed inspiration and motivation to bring about more theme and page released this year.
Features
Up to 6 custom links
Night mode option
47 total color options (27 for light theme | 20 for night theme
9 post types between 300px and 540px
6 photoset gutter options
6 post padding options
8 font options and 5 font size options
Center & justify description text align / left & justify post text align option
Option for small cursor
Grayscale and fading image option
Option to show/hide captions
Option to show tags on hover
Extra notes
Remember that by using my themes you have agreed to the terms of use
Sidebar image is 180px width and 330px height
Dashboard style blockquotes are from undocs [ x ]
Font icons are from lineawesome
Sidebar image credit: Water vector created by upklyak - www.freepik.com
If you run into any bugs while using this theme, please do not hesitate to contact me here and I will help the best way I can.
849 notes
·
View notes