
forza-cam
I run on coffee and ink
Cam | Art Blog | I post my art and reblog tutorials. BNHA, JJBA, game art. Ask before repost/use.
54 posts
Don't wanna be here? Send us removal request.
Last Seen Blogs


quiixs
Sin - Misericordia

speed-limit25
Oliver

johnshon74
Himed Pills Erectile Dysfunction

lablikes
LAB STYLE LIKES
Photo

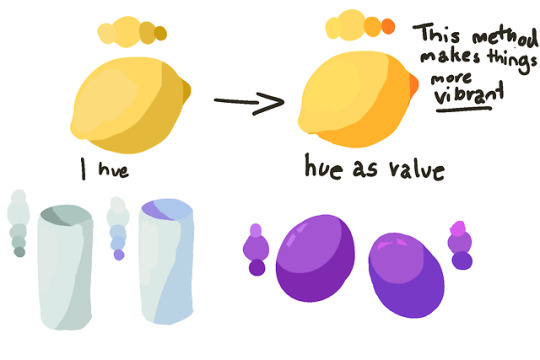

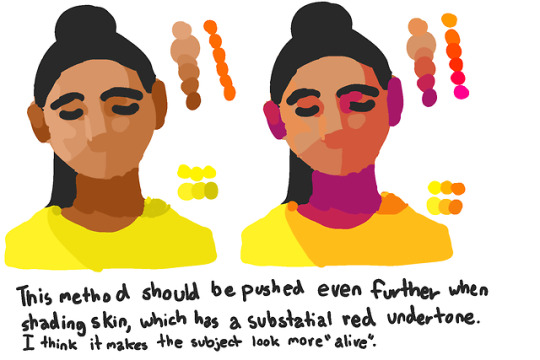
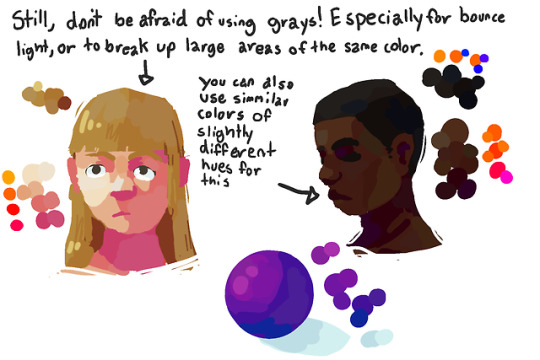
I made a color tutorial! i think the main thing is still to experiment a lot and to not be afraid of pushing it, but i hope this is helpful! i also hope my writings legible
35K notes
·
View notes
Photo


Some drawing tips previously posted on twitter.
More drawing tips on my patreon.
Hope some of these can be helpful.
81K notes
·
View notes
Text
HEY ARTISTS!
Do you design a lot of characters living in not-modern eras and you’re tired of combing through google for the perfect outfit references? Well I got good news for you kiddo, this website has you covered! Originally @modmad made a post about it, but her link stopped working and I managed to fix it, so here’s a new post. Basically, this is a costume rental website for plays and stage shows and what not, they have outfits for several different decades from medieval to the 1980s. LOOK AT THIS SELECTION:

OPEN ANY CATEGORY AND OH LORDY–
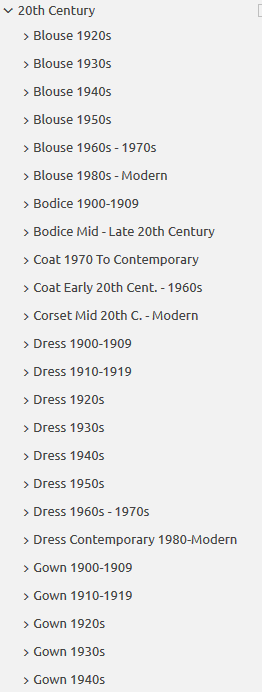
There’s a lot of really specific stuff in here, I design a lot of 1930s characters for my ask blog and with more chapters on the way for the game it belongs to I’m gonna be designing more, and this website is going to be an invaluable reference. I hope this can be useful to my other fellow artists as well! :)
296K notes
·
View notes
Photo

Pose to Pose and Straight Ahead explanation, along with combo. Material coming soon for my upcoming 2D animation tutorial package.
35K notes
·
View notes
Text
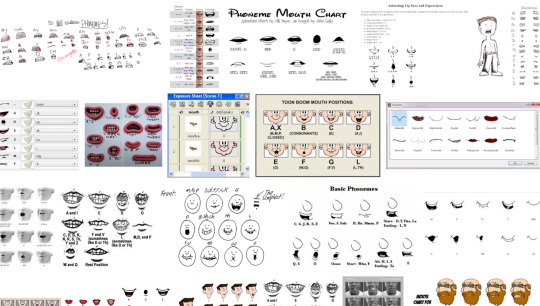
The lip sync tutorial they DON’T give you
I mentioned on twitter that I wanted to do a lip sync tutorial and immediately got some people who were interested so I put one together real quick!
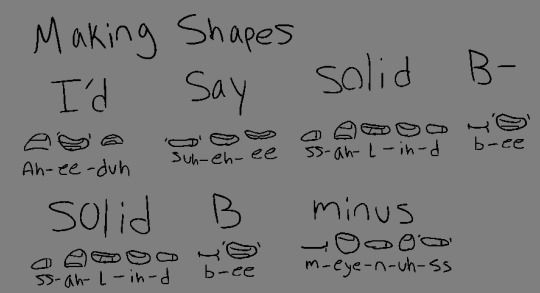
I’m going to use a bit of unfinished lip sync from my taz animated part as reference. They’re just gifs so no sound, but you should still be able to tell that he’s saying “I’d say a solid B… Solid B minus.”
Anyone who’s looked up how to do lip sync has seen phoneme charts. Phonemes are just the shape your mouth makes when you make certain sounds.
When you do lip sync, you want some kind of reference to make sure it’s right
What’s easiest is to say it yourself and pay attention to the shapes your mouth is making. Since you’re going frame by frame, your audio is slow enough that you can make each shape slowly and distinctly and you can get each individual phoneme down in the animation.

Don’t do this.^
An easy way to tell if you’re animating lip sync wrong is if you run out of frames to make each shape. You don’t need them! Making each shape is unnatural. People talk quickly and the mouth doesn’t have the time to get into each shape. They blend together, sometimes to the point where the shape doesn’t change at all!

Not only does the 2nd gif take less frames and energy to make, it’s more relaxed, it looks less distracting, and his lips are much easier to read!
These are reference charts to show the differences more clearly
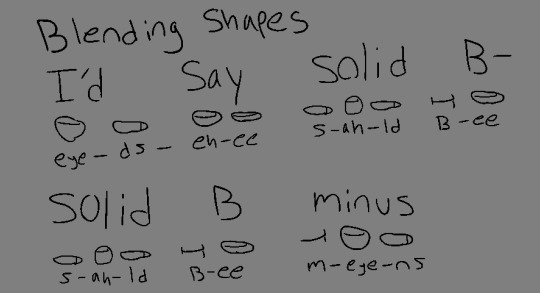
This is the difference between getting swallowed up in every last detail and paying attention to reality.
What matters more than hitting every syllable is making it look natural and flow with the acting. That’s why anime mouth flaps can work so well. A strong pose through the whole body matters more than one mouth shape.
42K notes
·
View notes
Text
Reblog if your going to choose Sobble as you’re starter in Pokémon sword and Shield!

6K notes
·
View notes
Text
Thank you anon! l made some small examples of how l do folds and I’m going to try my best to explain it as best as l could.
When drawing clothing, it’s best to use a cylinder as a guide on how the fabric would look being wrapped around it. The folds of the fabric should be following the same direction of the cylinder’s form with round strokes. The first mistake from the example below, straight lines can takes away the form and leaves a flat unnatural feeling. Remember to think 3D!

Creases and folds should be drawn on tension areas, as in when the fabric gets tighten or fold together. Think of the direction on where the tension is going or coming from. The more tension there are, the longer and straighter the crease is. When the object bends, fabric tends to make a oval-ish looking hoops with overlapping folds (Do not over do them or it will look tedious).

There are more to it for drapery, this is just the basic idea of what to look out for when drawing clothing. BUT most important of all is USE REFERENCE!! I know it’s the most used excuse, but for sure use it because it will be super super helpful!
3K notes
·
View notes
Text
hello! hey! quick psa!
when mixing skin tones, always mix in lighter and darker complimentary or analogous colors (such as pinks, reds, and purples) to change value, don’t just add black or white to change a value
this way you get a real nice looking palette like

instead of a dead looking palette like

unless you’re going for dead, in which case carry on
46K notes
·
View notes
Photo

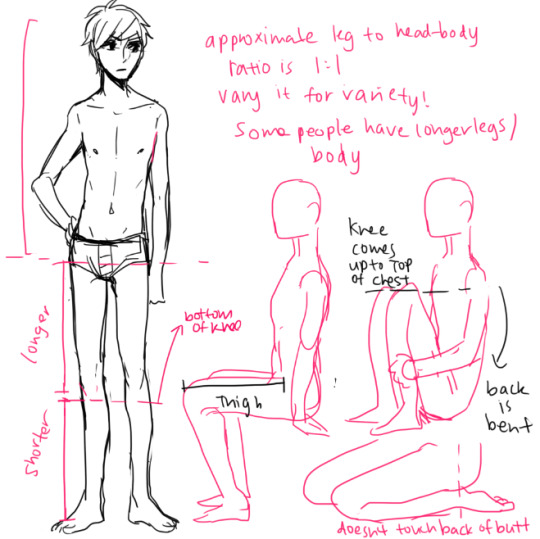
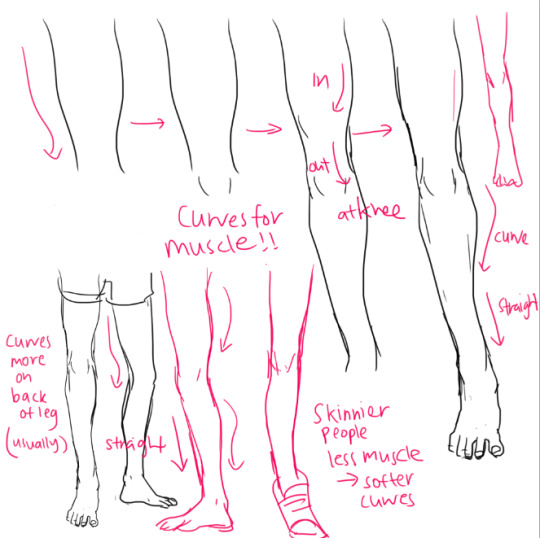

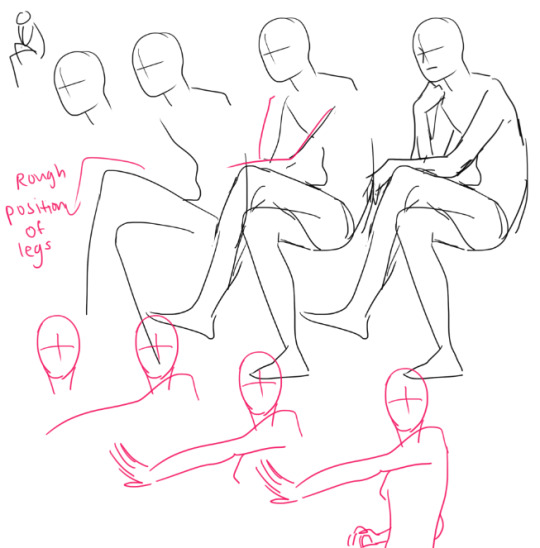
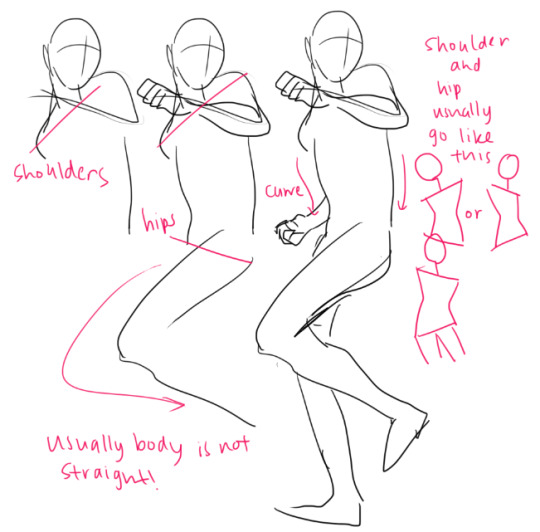
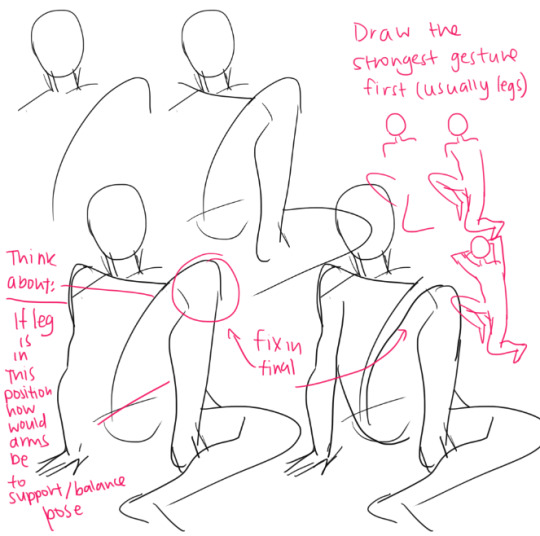
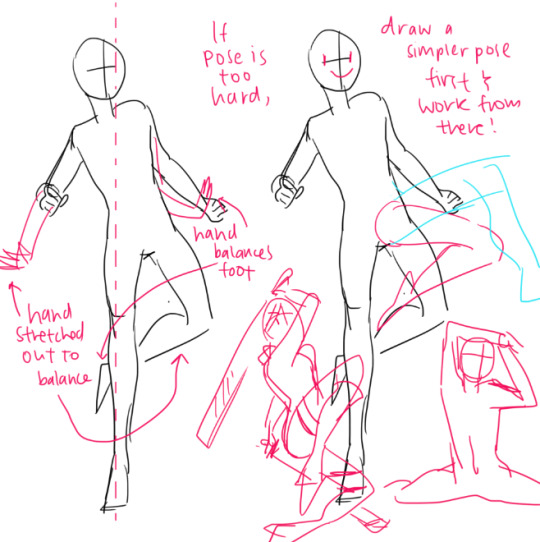
YEAH lots of people asked about bodies and poses SO
UMM THERE”S not much i can cover on full bodies idk every cahracter is different so there are noEAXCT proportions for anythign REALLY
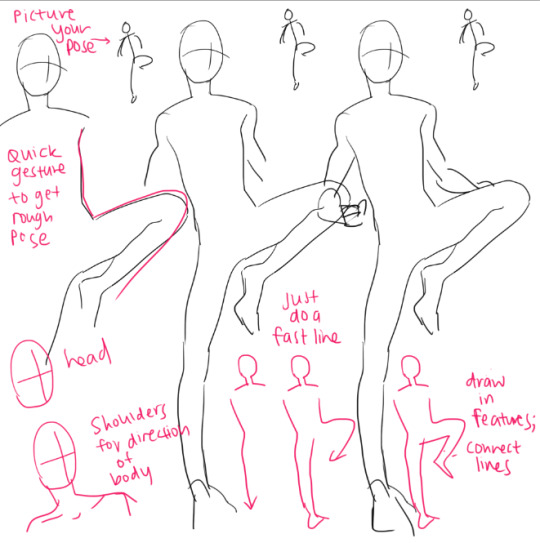
IF YOU”RE NOT SURE WHAT POSE TO DO jsut draw a random gesture line that fits the direction of movement and sometimes u end up with really ENERGETIC POSES!! I DUNNO THIS METHOD MIGHT NOT BE FOR EVEYRONE SOBS i dont reallly know
59K notes
·
View notes
Text
some resources for people who want to start animating
free animation programs
the 12 principles of animation
51 animation exercises (from beginner to expert)
glen keane animates a scene
my advice: have fun and play–play is learning | always be watching real life to see how things move | also be watching cool animations to learn from them | it’s hard but so worth it when things turn out well, good luck!
65K notes
·
View notes
Photo

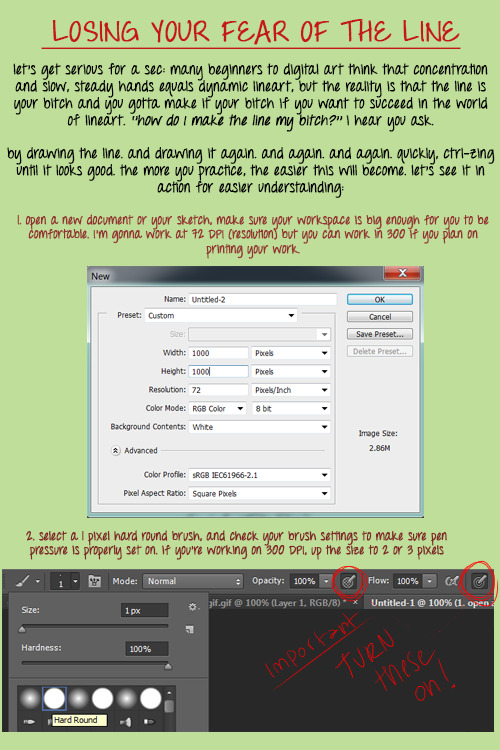


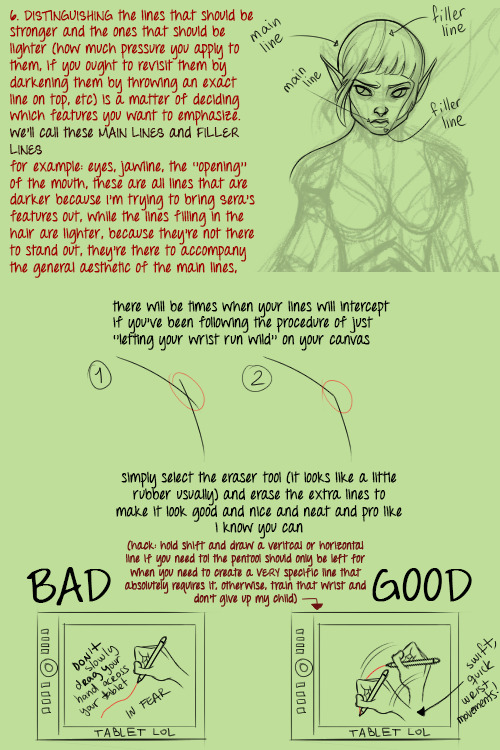

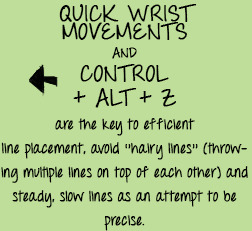


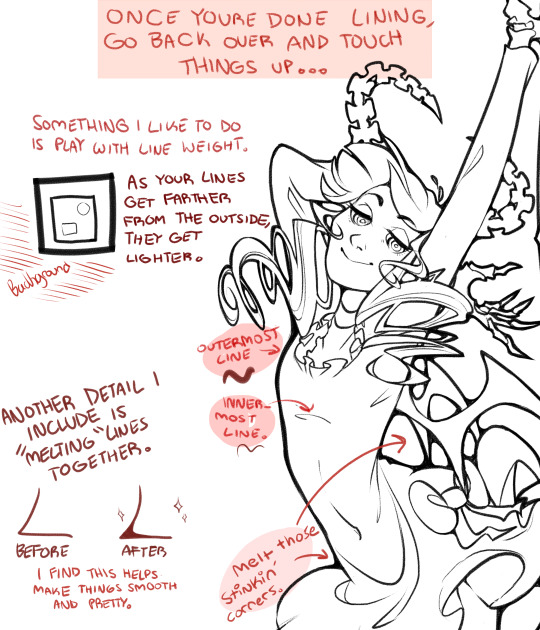
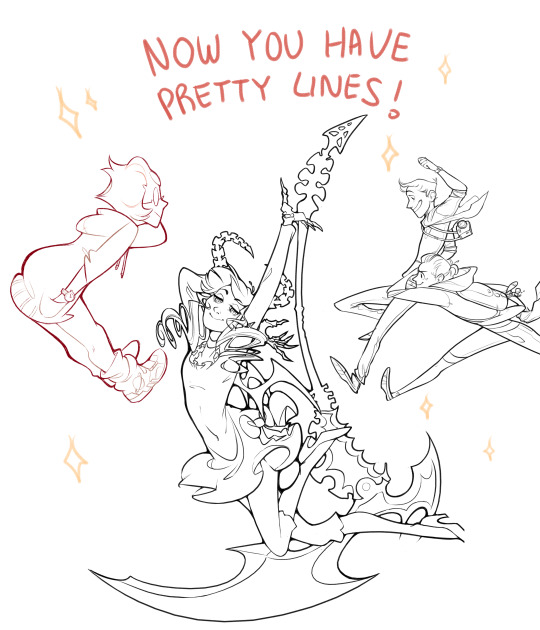
okay I think this covers the basics of the way I do my lineart, hopefully it’ll be helpful enough! if something’s unclear don’t be afraid to shoot me an ask about it.
enjoy and dON’T GIVE UP it might get really frustrating at times with all the control z-ing and re-drawing lines but the more you do it, the quicker it’ll get to get them right the first time around and the better you’ll become at it so yes, good luck friends.
59K notes
·
View notes
Text
art cheats
hello i am here today to not lose track of the art cheats i have discovered over the years. what i call art cheat is actually a cool filter/coloring style/way to shade/etc. that singlehandedly makes art like 20 times better
80’s anime style
glitch effect
glow effects
adding colors to grayscale paintings
foreshortening ( coil )
foreshortening ( perspective )
clipping group (lines)
clipping group (colors)
dramatic lighting ( GOOD )
shading metal
lighting faces
that is all for today, do stay tuned as i am always hunting for cool shit like this
318K notes
·
View notes
Photo
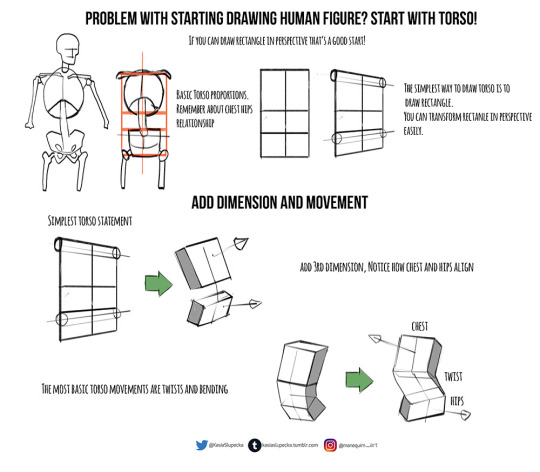

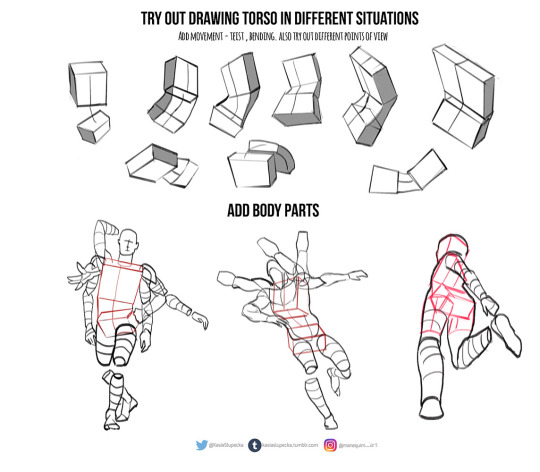
Anatomy tip weekly! :)
This week I’ve prepared something for people who sometimes are confused how to start drawing. Instead of starting with head, start with torso.
I guess most problems can be solved while designing torso. Every body part needs to follow torso.
16K notes
·
View notes
Photo
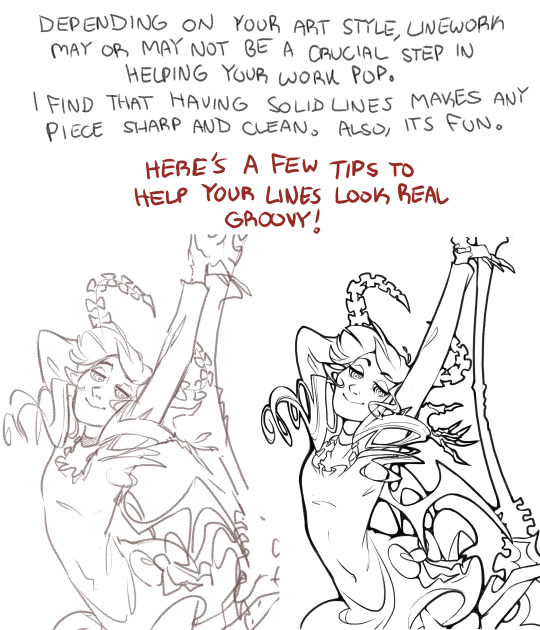

a bunch of people have asked me questions regarding my linework, so i figured i’d make a more complete reference instead of a brief explanation. all of this, of course, is based off of my own personal experience - everyone has a different way of doing things, and my way is certainly not perfect! i just wanted to share my process for those who were interested.
thank you for your support and asks! you are all really wonderful.
14K notes
·
View notes
Photo

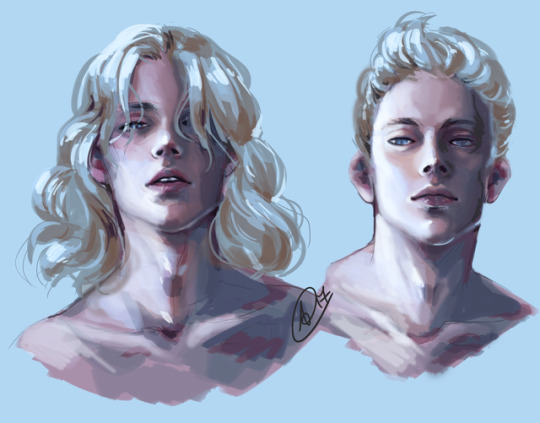
Swann and Carroll from our project “Avanemna”
2K notes
·
View notes
Note
How do you get such smooth blending when drawing? Any tips?
the way i blend is by using a brush with around 30% or less opacity and laying down a thin layer of one color over another. then, i colorpick the in-between shade it makes and repeat the process until its smooth

with that technique you can still see the brush strokes, but for sai users if you wanna go a step further and get REAL smooth use this brush afterward
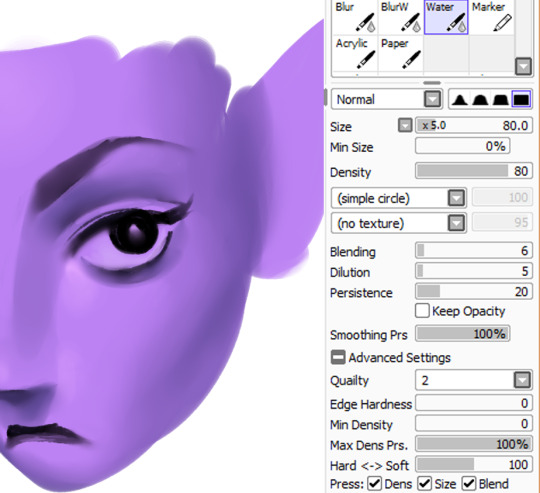
1K notes
·
View notes
