
larpgourmet
The LARP Gourmet
A place to find recipes and ideas for eating while at your favorite LARP.
49 posts
Don't wanna be here? Send us removal request.
Last Seen Blogs

activgenixcbdgummiesusa
Activgenix CBD Gummies

snigglotts
Go Down To Snoozle Town

puppereno
puppereno

i-fell-asleep-again
I should be doing a lot of things... but here I am

flr-k
Le Sang Du Ciel
Text
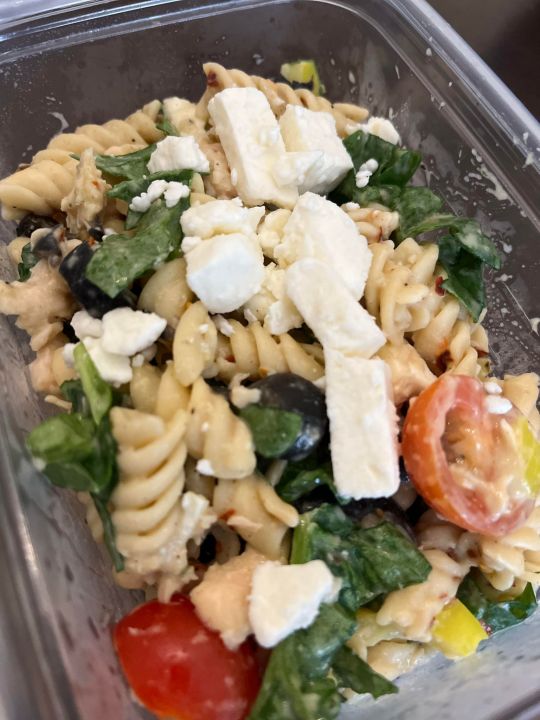
Chicken and Spinach Pasta Salad
I was away for a bit! LARP took a hiatus cause of Covid, and when I got back, I really just leaned on making my old recipes. Since going back, I've been going with my bestie -- so I've been making for two! That does slow down trying new recipes for a bit, as I need to make sure I'm making something we'll both like -- but it also opens up new possibilities!
For instance -- she makes a killer cucumber salad, which we'll totally include here the next time we make it for game.
Until then! We have a new recipe, I got this online somewhere ages ago -- but it's undergone some changes after coming into my care. The original recipe, while pretty good, was also pretty bland. And it was more made to be a bring to a bbq kind of thing instead of being something that could stand alone. We also decided on a higher protein chickpea pasta instead of regular pasta, just to give it a little extra oomph in the healthy department.
Now to the stats!
Ease to Transport: 5 of 5 Mason jars or tupperware is all you need! I think what you choose to use will more be dictated by how much your yield is and how many veggies you add.
Ease of Cleanup at Game: 5 of 5 This is one of those things that's best dealt with when you get home. Just close up the jar/tupperware so it doesn't dry out, and wash it when you get home. If you're going to be waiting a lot of days, or don't want to deal with couple-day-old food scraps, feel free to run a paper towel over it or something similar on site.
Taste: 4 of 5 This is a recipe with a lot of room. My bestie and I recommend leaning toward bold flavors as much as possible. Extra spices, extra flavored veggies, anything will help. We're still dialing it in, and I can see this being a recipe I do an update for as soon as I really nail it down hard.
Healthiness: 5 of 5 This is a good mix of carbs, fats, and protein. It's a good boost of energy, with some healthy salts to make sure you're retaining water. If you need more calories, consider adding some antipasta or charcuterie sides, or serve with veggies!
Recipe taken from the following link: Taste of Home Chicken and Spinach Pasta Salad
Ingredients: (Makes anywhere from 3 - 6 servings, I tend to get 4)
4 cups baby spinach (pull the stems and chop)
8 ounces rotini (measured while uncooked)
1/2 cup hummus (spicy or herby preferred)
4 tbsp Greek dressing
1 cup chicken cooked and shredded
2 cups cherry tomatoes, halved
1 (2.25 oz) can of sliced olives, drained
1/2 cup hot banana peppers, minced (use jarred or canned)
1/4 - 1 cup crumbled feta
1/2 - 1 tbsp Greek seasoning
dried red pepper flakes to taste
Directions
This is a relatively easy recipe! There's only a couple of special steps to make sure that you get the best results.
Cook your pasta to al dente, then rinse it in cold water, set it aside to let it cool a bit more.
Combine the hummus, Greek dressing (I like a feta/olive dressing, but something like Green Goddess would be good, too), greek seasoning, and red pepper flakes. Get them mixed well enough that the hummus has thinned out a bit, it should have kind of a loose but creamy consistency. Keep the dressing on hand, in case you need a little extra.
Add the pasta, toss the dressing to make sure it coats the pasta well, then stir in the olives, peppers, spinach, tomatoes, chicken, and half of the feta. I like to add them one or two ingredients at a time, mix, and then add the next, just to make sure everything gets distributed well.
Portion the salad out into your desired number of containers, and top with the rest of the feta cheese, and a sprinkle of red pepper flakes.
Notes: Make this ahead of time -- at least one or two days before your game. The flavors need a chance to really meld, and the pasta only gets better with a couple days in the fridge. We found extra dressing in with the hummus was necessary -- especially on account of the fact that we live in a very dry climate. Testing different hummus flavors is encouraged!
ProTip: If you need some short cuts, feel free to get canned or packet chicken. And you can go with whole leaf spinach and not mincing your banana peppers, but I like the smaller bites to prevent any costume stain emergencies!
Nutrition (per serving):
This assumes the way I made it, herb hummus, chickpea pasta, a full cup of feta, and full fat salad dressing.
Calories: 594 Fat: 29g Carbohydrates: 57g Protein: 38g
1 note
·
View note
Text
Recipe Update, Mason Jar Ramen
Hey all!
One of the first recipes I posted for the DIY Mason Jar Ramen is getting a hair of an update from me. If you’d like to see the original recipe, you can find it here:
https://larpgourmet.tumblr.com/post/186236575425/diy-mason-jar-ramen
I decided to try this out with Orzo instead of a string pasta. Largely, I found the string pasta was hard to eat around for the soup within the Mason Jar, and since Alton Brown recommends Orzo for soups, I figured I’d give it a go.
I ended up halving the pasta in the recipe, so I only used 1 ounce dry orzo (cooked and cooled) per mason jar. The pasta is largely filler anyway (at least to me) the main reason for the dish is really in the meat and vegetables you add in.
The use of Orzo, and everything else being bite sized, makes this easier to eat with a spoon, and way less messy for your costume (no soup splashes from noodles!)
4 notes
·
View notes
Text
Tuna Salad Wraps
I forgot to take a picture when I made these! But the picture would have been largely unsurprising. They’re wraps.
I was trying to find new recipes for the last game that would be easy for me to make, I had been on vacation prior to game and I was so behind on pretty much everything that I was stressing -- thus, I started looking for wraps and sandwiches.
Ease to Make: 5 of 5
I mean, honestly. It’s a wrap. The hardest part is learning to actually do the wrapping -- but as long as you don’t overstuff your tortilla, you can watch a video on youtube and get the hang of it pretty fast.
Ease to Transport: 3 of 5
So, I tried to make the whole wrap at home, and then take it with me complete -- which was a mistake. You’ll need to transport this in basically four parts. Lettuce, tomato, tortillas, and tuna salad mix. That makes it a bit of a bear for packing purposes.
Ease of Cleanup at Game: 4 of 5
I’m docking it a point for cleanup since you will have to wrap your wraps on site, meaning you’ll probably need a semi-clean place to work, and a flat surface. I just think it’s going to be a bit crazier. And then you probably want to at least rinse out your tuna container, that smell can be pervasive if you let it linger.
Taste: 5 of 5
Honestly, I expected this to taste far healthier than it did. I went with the Greek yogurt instead of the mayo to reduce the fat in the recipe. It was really good, surprisingly so! I guess I shouldn’t be shocked because I do love sriracha, and if you do too -- you’ll like this one. Honestly, if you like tuna salad sandwiches, give this a try, you’ll be pleasantly surprised.
Healthiness: 5 of 5
If you go with the Greek yogurt, and tuna in water, there’s really nothing here to dock points on. It’s a solid, high protein, low fat recipe. I also tend to use low carb wraps just to reduce the calories there, which means you could just eat this for days.
Recipe taken from the following link:
https://gimmedelicious.com/spicy-sriracha-tuna-wraps/
Ingredients:
(*Makes two wraps*)
1 can Tuna (in oil or water, your taste) drained
2 tbsp Sriracha
2 tbsp mayo (or plain Greek yogurt, sour cream, or mashed avocado)
¼ cup onion, diced
¼ cup celery, diced
Optional: Spices of your choice, try a little salt, pepper, dill, or tarragon
2 medium tortillas
Baby lettuce of your choice
1 tomato, sliced
Directions
This one is super easy, just mix the tuna, sriracha, mayo (I went with the greek yogurt, it was delicious), onion, and celery together. I ended up adding a little salt and pepper, and some dried dill to my mix as well. Store in a tupperware container to take with you.
Slice your tomato at home as close to the last minute as possible and pack separately of your tortillas and your baby lettuce (I prefer arugula).
When you’re ready to eat, make your wraps, and you’re good to go!
Tip: I ended up doubling the tuna mix and eating two wraps per meal. I use a low carb spinach wrap so the wraps were really low in calorie! (Too low!)
Notes:
I made the mistake of making the wraps at home and packing them pre-wrapped. I’m going to go ahead and just say not to do this. The wraps get soggy, though they still taste good. Absolutely just make the wraps on site, do yourself that favor!
I served this with potato chips, just for something nice and easy, but if you’re gunning something healthier, then go for fresh vegetables, and use the rest of your plain greek yogurt (if you went that direction) and sriracha to make a dip for the veggies!
Nutrition (per wrap): This assumes tuna in water, and greek yogurt
Calories: 268
Fat: 6g
Carbohydrates: 27g
Protein: 27g
1 note
·
View note
Text
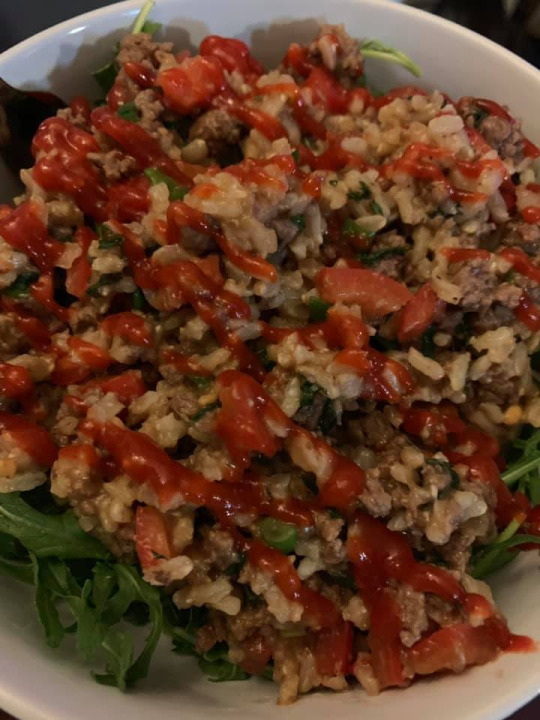
Chili-Garlic Asian Lettuce Wraps
Ease to Make: 4 of 5
Light chopping, and the need to pre-cook rice before finishing the dish are what dock this dish points. It’s not a difficult recipe to make my any real estimation, but it does take time! And if you don’t start your rice early, you will be eating late.
Ease to Transport: 4 of 5
The necessity for lettuce in this recipe is what makes it lose a transport point. Lettuce is always rough to take to game. If I ever come up with a non-lettuce option that I like just as much, I’ll be sure to publish an errata.
Ease of Cleanup at Game: 4 of 5
This one gets a little sticky in bowls, because of the rice. Be sure to rinse or wash your dishes immediately, or you will hate yourself by the time you get home!
If you are taking this to game, there’s really no need to reheat this dish -- it tastes great cold, or hot. So save yourself some cleanup, make it for a hot game, and eat it cold!
Taste: 5 of 5
No complaints here! This is a flavorful dish that’s good either hot or cold. The fresh mint that I use (instead of cilantro) adds a bright flavor, and is really well complimented with the ginger, and flavorful sauce.
Healthiness: 5 of 5
With a good amount of protein, and good complex carbs, this is a dish that will keep you moving for a long time. It’s really low calories too, especially for what you get out of it.
Recipe taken from the magazine Best-Ever Recipes for Two, published June 2019. It was originally a vegetarian recipe, using soy crumbles instead of beef. And I’ve switched out a few ingredients for ease (and because cilantro tastes like soap to me.)
Ingredients (Serves 2):
Sauce:
1/4 cup vegetable broth (or I tend to use 1/4 cup water, and 1/4 tsp Better than Bouillon).
1 1/2 tsp Asian chili-garlic sauce
1 1/2 tsp soy sauce
1 1/2 tsp packed brown sugar
1/4 tsp cornstarch
Dish:
Oil or Cooking Spray
1 small red bell pepper, stemmed, seeded, and cut into 1/4 inch pieces.
8 ounces ground beef (I use 93% lean)
2 servings brown rice (that’s about 1/2 cup for me, uncooked) -- cooked
1 tbsp minced ginger (I use the stuff in the tube from the store)
2 - 4 scallions, sliced thin
1 package mint, minced
Lettuce of your choice -- more in the notes.
Directions:
Get your rice started before you do anything else. Brown rice takes a little longer than white rice to cook!
Put all of the sauce ingredients together in a bowl, and whisk. Let it sit and combine while you do the rest. While you’re waiting for the rice to finish cooking, chop the rest of your ingredients, and set them aside.
Once the rice is about 10 minutes from done, set a medium skillet on medium high heat. Either use cooking spray or a little oil and toss in your beef and red bell pepper to cook together until the beef is cooked through and the peppers are soft, (5 - 7 minutes). Add the ginger, and give it about a minute to cook with the beef and peppers, you’ll know it’s ready when you can smell the ginger.
Add the rice (once done), and the sauce, stir to combine, and take off the heat.
Finally stir in the scallions and mint.
Serve as a lettuce wrap with the lettuce of your choice, or over a bed of lettuce to be eaten with a fork if you prefer.
Notes:
I used to make this dish solely as a lettuce wrap, but I found that I always had extra arugula in the house because of some other dishes I love. And I never went through the arugula fast enough! So I started tossing this mix over a bed of arugula instead of serving in a lettuce wrap, and I love it. Arugula is such a spicy lettuce that it adds a nice flavor to the dish!
There’s a lot of wiggle room in this dish. If you don’t like things spicy, you can omit the chili-garlic sauce (which is, broadly speaking, just sriracha with garlic). Just add garlic instead! Or, if you’re allergic to garlic, as a friend of mine is, then just add sriracha.
The original recipe called for cilantro. I initially used parsley instead of cilantro (as parsley is my go-to cilantro replacement), but I had some mint that was about to go bad in my fridge one week, and gave that a shot instead. I ended up liking the mint way more than the parsley, as it adds a lot of flavor to this dish. The original recipe called for only a tablespoon, but I just cut up a whole package and toss it in. It ends up being like a quarter of a cup, and I don’t mind at all.
Ultimately, this dish can serve as a bit of a template for all sorts of different things. What’s important really is that there’s rice, protein, and some sort of flavorful herbs mixed in. So feel free to experiment with the sorts of things that you prefer!
Nutrition (per serving):
Calories: 432
Fat: 12.9g
Carbohydrates: 49.7g
Protein: 29.2g
0 notes
Text
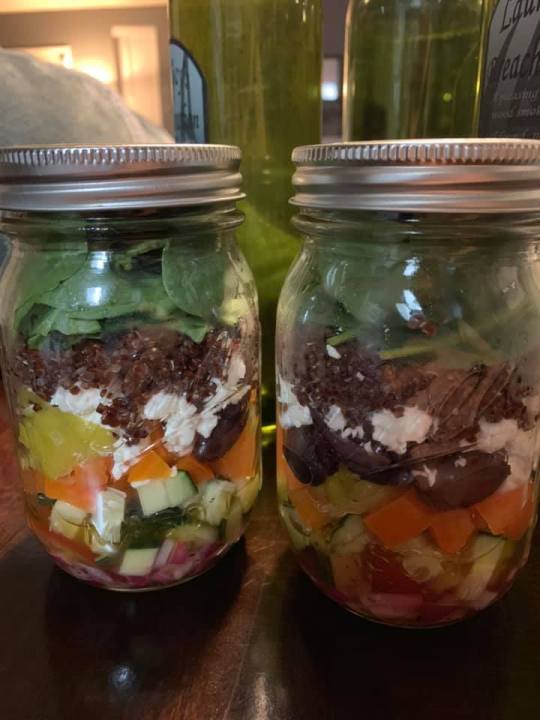
Mason Jar Quinoa Greek Salad
Ease to Make: 4 of 5
This one isn’t bad, but it’s getting docked a point for the amount of chopping necessary for the various ingredients. It takes a hot minute to get everything prepared for the jars, but as there’s no real cooking involved, I would still consider this one pretty easy.
Ease to Transport: 5 of 5
As with all of the Mason Jar recipes on LARP Gourmet, this is super easy to transport, just throw the Mason Jar in your cooler, and you’re good to go.
Ease of Cleanup at Game: 3 of 5
This one gets docked points, as I ultimately decided this salad was no fun to eat while in the Mason Jar. I ended up dumping it into a bowl so I could get a bite of different ingredients. Then, because of the salad dressing, it was necessary to give the bowl a once over before I stashed it away. I got attacked the second night, and now I have Quinoa Spackle in my bowl, which is being soaked in my sink at the time of this writing.
Taste: 5 of 5
Once I got done screwing with this recipe, it was amazing. I really liked the flavor, and it was really refreshing. Also, the amount of salty things in here (olives, feta, and pepperoncini) it’s great for helping to keep you hydrated.
Healthiness: 5 of 5
I really think this recipe has it all. It’s got a good variety of vegetables, a little dairy, and I served it with bread and Genoa salami. You could easily add any other protein you like, and the quinoa adds a good healthy bite to this recipe as well.
Recipe taken from the following link:
This one is a bit more of an amalgamation of about four recipes. I wasn’t crazy with the first one, but the starting point for the process was here:
https://www.simplyrecipes.com/recipes/greek_salad_in_jars/
Ingredients: (Makes 2)
Dressing:
1.5 tbsp red wine vinegar
1/8 tsp salt
black pepper
1/8 tsp dried oregano
½ tsp honey
2.5 tbsp olive oil
Salad:
¼ cup diced red onion
½ cup cherry tomatoes, halved
¼ cucumber, diced
½ orange bell pepper, diced
½ cup chopped Kalamata olives
½ cup cooked quinoa
2 pepperoncini, sliced
¼ cup feta (2 ounces) (crumbled)
baby spinach (to the top of the jar, about a cup)
Serve With:
Pita or Naan Bread (1 serving)
Genoa Salami (1 - 1.5 servings)
Directions
Cook quinoa according to package instructions (I find for smaller amounts of quinoa, it’s good to double the water, as it boils off so much faster). Let the Quinoa cool before adding it to the jar.
Put onions in salad dressing to let them marinate in bottom of jar, so their flavor mellows and mingles a bit with the dressing. Top onions with layers of tomato, cucumber, orange bell pepper, pepperoncini, olives, and feta. Over the feta, add the cooled quinoa, and then top with spinach. I ended up tearing the spinach in half before adding it to the jar so it’d fit a little better.
Serve with Naan/pita and Genoa salami on side.
Notes:
When I started with this idea, the original recipes I found were lacking some of my favorite salad additions, like pepperonici, and some sort of protein. This recipe came out of additions I enjoy, for the most part, and to maximize flavor.
I could take or leave the bread as an addition for this recipe. It was nice filler, but I didn’t find it to add to my enjoyment of this meal. I think the salami is 100% necessary however. Some sort of thin sliced, salty meat -- take your pick on what that is. The cold protein was welcome, and helped me feel as though the meal was much more complete. For that reason, I only included the salad calories below, as you can pick your sides and add your calories as necessary.
Nutrition (per serving, salad only):
Calories 404
Total Fat 27.3g
Carbs: 35.2g
Protein: 9.1g
1 note
·
View note
Text
The Anatomy of a Cooler

This is a photo of what my cooler looked like on the way to game last gathering! Everything stayed pretty good -- I only had a problem when I got stuck on the road for 7 hours on the way back from game. That in mind, I wanted to give you some tips on keeping your food cold in a cooler, and what that actually looked like.
Tip One: Cool Before You Pack
The first thing to do is make sure that all of the stuff you’re pulling in the cooler is cold. I know that sounds a bit like a no brainer, but you’d be surprised how many people stick warm drinks in their cooler.
You’re fighting time when it comes to a cooler packed for LARP, your stuff needs to stay good for about 3 days with minimal fuss, so you want to give it the best possible start. For that to work, you need to make sure that none of the ice in your cooler has the job of cooling items immediately on entry. Stick all of the food that’s going in your cooler in the fridge or freezer overnight as necessary, so it’s as cold as it can be before you pack it.
Protip: If you store your cooler outside (as I do), then this tip also extends to the cooler itself! Bring the cooler inside for at least an hour, and let it come up to room temperature. You don’t want the ice you put in the cooler to have the job of cooling the cooler.
Tip Two: Ice Packs are Superior to Ice
For the purposes of using a cooler, there’s a ton of reasons to go with an ice pack. Smaller surface area means that your ice packs will melt more slowly than straight ice, with the added bonus that the chemical in ice packs is designed to facilitate with that. Additionally, you don’t end up with a giant amount of water in the bottom of your cooler that you then need to deal with and gets in everything. Invest in ice packs. You will not regret it.
Tip Three: Freeze a Bottle of Water
Grab yourself a gallon of water, pour out about a quarter of it (drink it please, you probably need the hydration before game), and freeze the rest. You want to pour out a bit so the bottle doesn’t burst, I’ve had that happen before, and it sucks. The frozen bottle of water acts as a giant ice pack, with the added bonus that you can drink it while you’re striking your camp site on Sunday morning, and it’ll still be wonderfully cold (and welcome while you’re sweating buckets trying to get your tent taken down and thrown in your car).
Tip Four: Make a Non-Iced Section
You may notice on the right hand side of the cooler, I don’t have any ice packs. This is because the stuff on that side of the cooler would be damaged by sitting directly on ice. I make sure my drinks are super cold (there’s nothing wrong with vaguely slushy sodas or electrolyte drinks) but I make a small barrier to the ice with my mason jars, and put anything that’d be hurt on the other side. So my quesadillas, any breads I’m throwing in the cooler, the salami you see there, and the small creamer packets, which might freeze and be difficult to use are all in the non-ice section. This is a good place to store lettuce if you’re bringing any -- or really anything that will be hurt by ice cold, or moisture.
Tip Five: Limit Open Cooler Time
As I said, the biggest threat you face at game is time. So make sure that you (and whoever else might be going into the cooler) limit the time the cooler is open. Know where your items are, or have a light nearby so you can find them quickly. Get in, get out. Don’t stare in there like you do in the fridge! Do a periodic check to make sure your cooler is closing properly and isn’t leaking too much cold.
Tip Six: Shade is your Friend
Make sure, wherever you store your cooler, that it’s out of direct sunlight. I stash mine under a small table that has a floor length tablecloth made for it. The direct sunlight will heat the sides of the cooler, forcing the ice to work double time. Any time I’ve had an issue with coolers getting too hot, it’s because they’re exposed to sunlight.
Tip Seven: More Stuff is More Better
The more items you have in there at the start, the easier it will be for your stuff to stay cool. The items themselves will be cold (if you follow tip one!) and each item will then serve to keep everything else in the cooler cold. If you know you’re only bringing a 12 pack of drinks with you, for instance, consider getting a smaller cooler which fits only the drinks and a couple of ice packs, instead of having to dump a lot of ice into a larger cooler. It’ll be much easier on you in the long run.
13 notes
·
View notes
Text
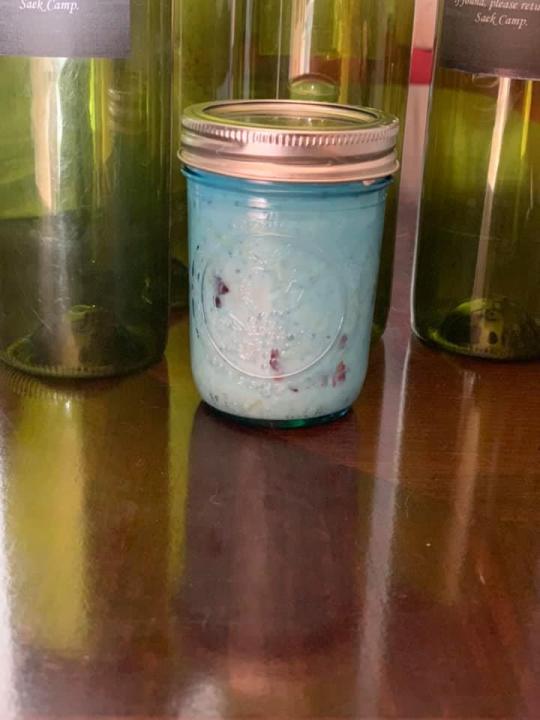
Raspberry Vanilla Summer Porridge
Ease to Make: 5 of 5
All of the Summer Porridge recipes are super easy to make. Just throw everything together and let it sit for at least 8 - 12 hours (though overnight is best.) I make all of my Summer Porridge recipes the Friday morning before I drive out to game (I’ve been bringing four with me, two breakfasts, two snacks) and it works out great.
Ease to Transport: 5 of 5
This is one of the easiest to bring. Just throw the Mason Jar in your cooler, and you’re good to go!
Ease of Cleanup at Game: 5 of 5
Another place where it wins for ‘easy’! Seal the jar back up when you’re done eating, and you can wash it out when you get back home. As I’ve said before -- don’t put off cleaning the jar too long when you get home, or it will get pretty slimy.
Taste: 3 of 5
Of all of the Summer Porridge recipes I’ve played with, I have to admit, this was my least favorite. It was a little too “safe”. In a lot of ways, it was kind of the blank slate of Porridge recipes. With honey and vanilla extract as the only flavors in the oatmeal (I didn’t think the raspberry preserves added any flavor, but they kind of added color). It wasn’t bad per se, but it also didn’t wow me.
Healthiness: 4 of 5
Major points for the protein in Greek Yogurt, the general healthiness of Chia Seeds, and the good fiber of the Oatmeal. But at only a ¼ - 1.2 cup of fruit, it’s not a lot of added plant matter. That said, I’d supplement with more fruit on the side and if you want a few extra calories I recommend maybe a hard boiled egg or two. (Or pre-cooked bacon if you’re looking for some fats and protein.)
Recipe taken from the following link:
https://www.theyummylife.com/recipes/224
Ingredients:
1/4 cup uncooked old fashioned rolled oats
1/3 cup skim milk
1/4 cup low-fat Greek yogurt (I recommend vanilla)
1-1/2 teaspoons dried chia seeds
1/4 tsp vanilla extract
1 tbsp raspberry jam, preserves, or spread
1/4 cup raspberries (or enough to fill jar)
Directions:
If you have time, get the preserves out of the fridge and let them warm up a bit. I found the cold preserves didn’t mix in easily at first, they might be a bit easier if they’re warm.
Add the oats, milk, yogurt, chia seeds, vanilla extract, and jam into the jar first. Lid the jar, and give it a good shake until it’s well combined. Cut the raspberries in half and then add them in, and give it another stir (let the raspberries break up as you’re stirring them. Let sit overnight, and eat chilled.
Notes:
This recipe benefits from good quality ingredients. Do yourself a favor and get decent preserves, good raspberries, and quality vanilla extract (none of the super cheap stuff, please!) I feel like this recipe needs something. If I were to make it in the future I might throw in fresh mint or switch to orange extract just to give it a little something more (treat it a bit like a cocktail). Some experimentation may be necessary in the future!
As I said up top, this recipe isn’t bad. I didn’t actively dislike the flavor, but I’m always a fan of things that will leap up and slap me in the face (flavor wise), and this recipe lacked that quality. Vanilla can sometimes be just so... vanilla. But if you’re more into less flavor, especially in the morning before your brain and your stomach has woken up, this might be a better recipe for you!
Nutrition:
Calories: 230
Fat: 4g
Carbohydrates: 51g
Protein:11g
4 notes
·
View notes
Text
Creative Problem Solving, the Leather Hip Bottle Edition
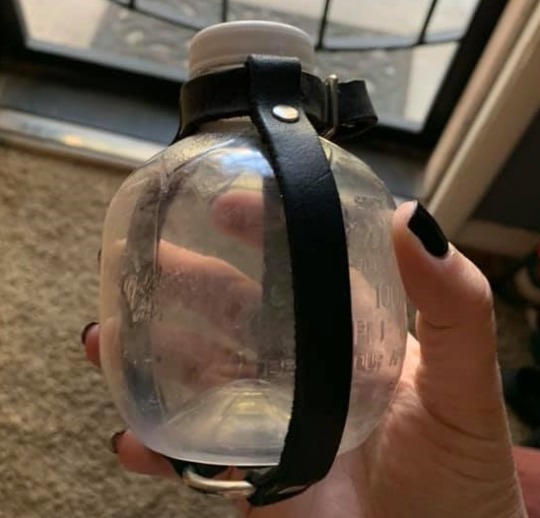
I think almost everyone I know has purchased one of these from Ren Faire, the leather straps that go around the glass vial, with a buckled leather strap around the neck.
Thing is, almost as many people I know have managed to break theirs at LARP.
I kept the leather straps for awhile, trying to find something that would fit into the straps to use -- and found my salvation in a plastic apple juice bottle. The bottle here is from Martinelli’s, my store sells them for $1 with the other single serving (10 oz) juice bottles. I had to punch a new hole in the neck leather (the neck of the Martinelli’s bottle is wider than the glass one that was previously in this). But otherwise it fits pretty well for water, or other potions.
The lid will need a coat of paint before I’m happy using it in character, it’s printed with the logo for the company. I might try a run with some goof off, or other paint remover first, just to see if I can get the logo off -- but barring that, silver or black paint is going on, and I’m calling it good.
Not bad for $1 solution!
3 notes
·
View notes
Text
Back in the Swing!
Hey all!
So, I caught a pretty good cold a few weeks back, and then LARP was last weekend -- and long story short, I ran out of queued posts. And when I got back to work it was insanely busy so I didn’t even want to look at a computer when I got home. But I have a few moments to myself, so I’m going to get my fingers back at it and queue up a few more posts from this past weekend’s LARP!
In the meantime, please accept a picture of my baby boys from when they were under 8 weeks old, and still with their foster parents!
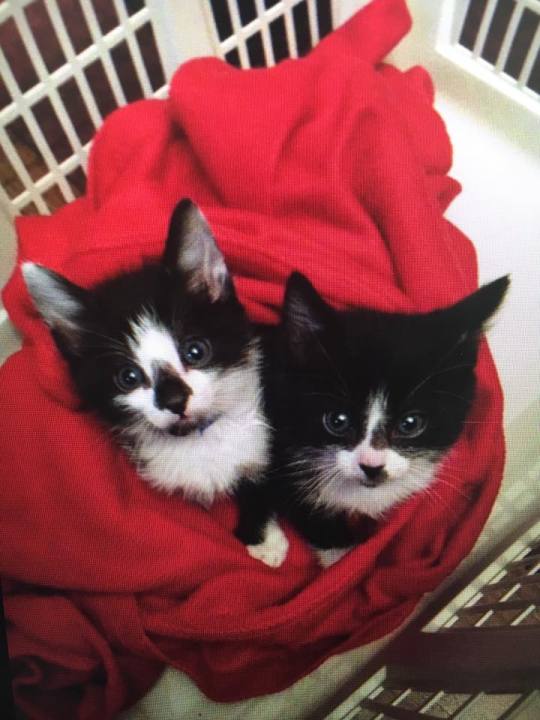
The boys hope you had a wonderful week, and hope you enjoy the posts I’ve got scheduled!
1 note
·
View note
Text
Scheduling Your Pre-LARP Cooking
I don’t like to wait until the Thursday before game to do everything. Thursdays are busy days full of packing, double checking my lists, making sure my work is cleared out so no one needs me all weekend, doing any last minute prep for anything I’ve discovered that might need cleaning or fixing -- the list goes on.
I try not to craft at all the week of LARP. I find it to be too stressful. Instead, I set aside time every night before LARP to relax, play a video game or something similar, just to make sure I feel refreshed before I get to game. That means I have to be pretty diligent in how I schedule my cooking, however, so I’m not cramming it all in to Wednesday and Thursday.
Start Early
For things like cold brew coffee, you can start pretty early. Cold brew keeps in your fridge for two weeks, so you can make it the weekend ahead of time, or early in the week and it’ll still be just fine by the time you get to game. I also tend toward doing my shopping about a week in advance. The big shop will be on Sunday afternoon (while I’m off work) and any pickup shopping will go to Monday or Tuesday night, freeing me up to work on the actual cooking later in the week.
Prioritize Based on Food Degradation
When it comes to food that might get soft or mushy if left too long, I try to do that as late as possible. Some stuff, like cold salads (tabbouleh, cole slaw, potato salad, etc) only improve with age, so they can be made earlier in the week and just left to sit. Things like the summer porridge can get a little too mushy if left too long, so I prefer to make them the Friday morning of game, as they’ll be fine to just sit and combine in my cooler.
Try to Have the Bulk Done Before Thursday
Do what you can before Thursday night in case you’ve accidentally forgotten something from your shopping list and need to do an emergency grocery store run. This is a good opportunity to check all of your packing, including your batteries, hygiene items, and a quick check of your camping gear to make sure nothing needs to be replaced on the fly. If you need to do an emergency Walmart run, you want to know that before you pack the car.
Keep a Bag in your Cupboard
For things that you take with you to every game (half and half packets, coffee pods, protein bars, etc) consider having a small bag that you leave in your cupboard that you can throw everything in so you know where to find it before every game. This will cut down on the necessity to look for it, and ensure that all of your perishable food items are still stored in an appropriate place so you don’t end up with spoiled half and half in the bottom of your camping gear or closet.
Tetris Your Car Intelligently
I like to pack the majority of my car on Thursday night, but of course I’m not going to put the cooler out there until Friday morning. I have a space at the edge of the trunk that I leave free so the cooler can go in right before I leave. I stack up the stuff that goes on top of the cooler right by the front door so I don’t have to think about it. When I wake up Friday, it’s then a matter of getting the last few cooking items done, and taking my final video game breather before packing the car, taking a shower, and hitting the road.
Trust your System
Build a system for yourself. Same as any flow you might have for work or school. Develop a process, and then trust in it. Figure out how much time you can dedicate every night without overwhelming yourself, and vow that you will spend that time each day to get a little bit of work done. Then, just trust it will all work! If you get comfortable with your system, it will make your whole pre-game process that much smoother and less stressful.
5 notes
·
View notes
Text
Setting up a Shopping List
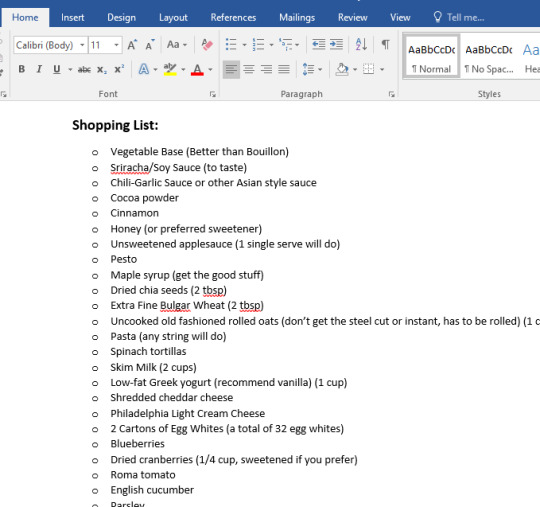
A shopping list can be daunting for LARP! In a lot of cases you’re probably not eating a bunch of stuff that you usually eat, so you’re having to buy or round out your collection with different foods, and you’re trying not to forget anything!
I have a process for setting up a shopping list, and it’s a little step intensive, but it’s always worked for me so I don’t forget anything:
Step One: Put all of your Recipes in a Word Doc
I’ll type (or copy+paste) all of my recipes into one Word Doc, even if I don’t intend to print it out. At least then I know exactly where they’re all listed, and I can reach them easily when I start the process of cooking for gathering. This also means that I have the full ingredient lists on the word doc already, which is important for step two!
Step Two: Copy the Ingredients List All Together Below the Recipes
Don’t worry yet about organization of them, just get all of the ingredients in one place. I usually toss in a page break so I can easily print the list by itself for when I go to the grocery store. (I like having paper so I can make scribbled notes as needed.)
Step Three: Reorganize the List
Think about your grocery store, and put your list in the order you usually shop. For me that looks like:
Fruits and Veggies
Bulk Goods
Canned Goods
Spices/Oils/Vinegars
Pasta
Baking Goods
Fresh Meats
Dairy/Eggs
Snack Foods
Drinks
Combine any duplicates, and their amounts and put a total down for yourself. For instance -- when I made four servings of summer porridge for game in July, I knew I needed 1 cup of oats total. I purchased it in bulk, and that meant I didn’t have to try and remember what was in my recipes when I got to the store.
If you have options of things, like “fresh herbs” as opposed to listing a specific herb, see if you have any herbs you’re already buying that you can just use in the recipe you have -- just to save money and reduce waste. Where possible, feel free to adjust recipes to make them easier on yourself.
Step Four: Separate by Store if Needed
I always get my coffee from Sprouts. My usual grocery store doesn’t sell bulk coffee anymore (which is obnoxious). Meaning whenever I make myself cold-brew coffee, I have to hit up Sprouts for the bulk beans. Since I have to go there anyway, I sometimes pick up a few of the veggies at Sprouts (there’s some that are just objectively tastier there than at my usual store). So I’ll divide my list into the Smith’s list (my usual store) and the Sprouts list.
When I used to make for meal plan, I would also have a list for Walmart (there is one in my area attached to a Sam’s Club, so I could usually get Sam’s Club bulk items without needing to have the card) and a Party Store list for serving ware and other things that I thought I would need (sometimes I’d make allergy signs, or something similar.)
Final Thoughts
I find that being hyper organized before I go shopping helps with my anxiety. I like to know exactly where I’m going and what I need. It helps to plan my attack, and I rarely end up forgetting something and needing to go back. It also helps me decide what night is going to be a meal prep night and what night is going to be a shopping night so I can space everything out and give myself time to relax.
I start my organization about a week in advance, in the hopes that nothing will surprise me! This includes both cooking organization and packing organization. I admit, I have lists for my lists -- but I usually end up having an easy game because of it.
7 notes
·
View notes
Text
Inside out Pork Spring Rolls
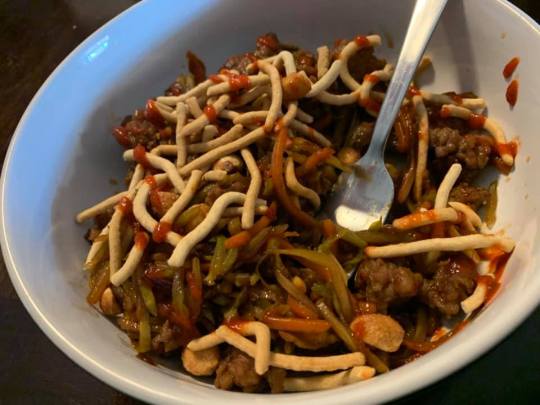
This is one of my favorite quick recipes to make. I have a cold this week, so I prioritized fast cooking over some of my more complicated recipes. This recipe uses the broccoli slaw that I mentioned yesterday. (You’ll find I use it a lot.) It’s really simple, and can be reheated quickly at game.
Ease to Make: 5 of 5
This is one of the easiest dishes to put together. Everything goes into one pan, and then just gets spooned into a bowl. If you make it ahead of time for game, then just dish it out in servings into tupperware, and heat it up in a pot or pan at game when you’re ready.
Ease to Transport: 4 of 5
As with many one-pot dishes like this, it’s a simple matter of throwing it into tupperware, and heating it up when you get to site. The only reason this one gets a minus in the ease category is the toppings (which you want to put on after you’ve reheated the pork and broccoli). You may just want to carry the peanuts and the crispies in your dry pack (probably in zip top sandwich bags), and don’t forget a little sriracha!
Ease of Cleanup at Game: 4 of 5
Because you will need a pan, you’ll also need to clean it. If you don’t have non-stick pans at your site, clean it fast, or you will be trying to chisel it out later with a hammer. This one has some sugar and fats in it -- which means it gets sticky!
Taste: 5 of 5
I have to admit, I love this one. It’s spicy, salty, and sweet. It’s super comforting. That’s part of the reason I wanted to make it while I had a cold! The sauce can be played with a bit to add your favorite stuff.
Healthiness: 3 of 5
Though it’s relatively good for you -- it’s also got a good amount of fats, and sugar in it. But, I don’t think that’s necessarily a turn off in this instance. Sometimes comfort food is what you’re after.
Recipe adapted from a Home Chef Express Meal Kit.
Ingredients: (Makes 2 servings)
8 ounces ground pork
8 ounces broccoli slaw mix
1 tbsp soy sauce (or more to taste)
1/4 cup Ma Ploy (or other sweet chili sauce)
.5 ounce honey roasted peanuts
1 ounce wonton strips (or crispy chow mein noodles)
sriracha to taste
Garlic or Chili-Garlic sauce (to taste)
Directions
Start by browning the ground pork over a little oil. Once it has a good browned crust, throw in your soy sauce to let it soak into the meat. At this point, add your garlic or chili-garlic sauce if you want, to taste, just for extra flavor.
Add your broccoli slaw, and the sweet chili sauce. Mix it well, and cook until the slaw mix is nice and soft, and your pork is cooked all the way through.
Divide into two bowls, and top with the honey roasted peanuts, wonton strips, and sriracha.
Alternately: Stash the pork/broccoli mix in a tupperware container to be reheated at game, then top once you’re ready to serve.
Notes:
This is one of the few recipes where I don’t add any regular salt. I let the soy sauce be my salt. I’ve added pepper before, but never found that it added a noticeable difference to the dish, so these days I leave it out. But feel free to experiment.
I have found that I have the worst time finding wonton strips at my normal grocery store -- and I’m not that willing to make a special trip for them -- which is why I end up using chow mein. I feel like the wonton strips are a bit more accurate to the flavor you’re going for, but the chow mein is fine, and really all I want is the crunch.
One last note -- if you have a good small food processor (that won’t turn your peanuts into peanut butter), or one of those slap chops or something similar, consider chopping the peanuts before throwing them over the dish. I like having the smaller peanut pieces so they mix in to more of the bites. It’s not necessary, but it’s a nice touch.
Nutrition (per serving):
Calories: 531
Fat: 55.3g
Carbohydrates: 38.3g
Protein: 25.1g
7 notes
·
View notes
Text
Healthy Cole Slaw

I was fighting for a coleslaw recipe that would be a lot healthier than it’s mayo-soaked counterpart. My first attempt at this recipe went a little south. I over doctored it, and it was a HUGE pain to make. I’ve simplified it down to something that can be made in a few minutes.
It’s made with plain Greek yogurt and dijon mustard -- so it has plenty of flavor and punch! And if you use pre-made broccoli slaw, it’s an easy recipe.
Ease to Make: 5 of 5
You could shred your own veggies for this, but honestly -- I think it’s a lot of trouble when you can get a bag pre-shredded at the store. You won’t need the whole bag for this recipe, but I use broccoli slaw for everything. It’s just a matter of mix and serve (save the onions, which will need to be chopped!)
Ease to Transport: 5 of 5
This side salad will be great with any sort of dish. It’s the kind of thing that will sit well in some tupperware in your cooler, and mature nicely. The recipe below makes two servings, but can be easily sized up for a bigger group.
Ease of Cleanup at Game: 5 of 5
You don’t have to worry too much about cleaning the tupperware on site (though sealing it at game will make sure it’s a bit easier to clean when you get home). Dried Greek yogurt just flakes off of dishes, so it’s much easier to clean than most higher fat sauces.
Taste: 5 of 5
This one was the round two recipe. I messed it up the first time (and I wasn’t crazy about the prep-work needed for it). The first go I found that it needed a little more mustard -- but I would say at most it needs a heaping tablespoon. Any more than that, and it throws off the flavor. Keep the spices simple for this dish, just some salt and pepper. If you like raisins, a second box wouldn’t be amiss.
Healthiness: 5 of 5
As there’s no mayo in this dish, it’s basically all veggies and protein, and a little bit of dried fruit! It doesn’t really get much healthier than that. The Greek yogurt and mustard still makes it a tasty, and satisfying coleslaw!
Recipe taken from the following link:
https://inspiralized.com/summer-broccoli-carrot-slaw-salad/
Ingredients: (Makes 2 servings)
8 ounces bagged broccoli slaw
1/4 cup chopped red onion
1 box raisins (the 100 calorie size)
1/2 cup plain Greek yogurt
1 tbsp dijon mustard
1/2 tbsp lemon juice
1/2 tbsp apple cider vinegar (if needed for the sauce, taste it first.)
salt and pepper to taste
Directions
This is a simple mix and stir recipe. Toss everything into a bowl and give it a good stir. I didn’t even bother to mix the sauce first or anything.
Notes:
The apple cider vinegar is totally optional, but I found that there was an upper limit to how good the lemon juice tasted. If you want the sauce a little runnier, then I recommend switching to apple cider vinegar once you’ve gotten to about a half a tablespoon of lemon juice.
I think a second box of raisins in this dish would be good. The parent recipe called for the raisins to be soaked, and I found that posed absolutely no benefit to the taste or texture of the raisins or the dish. In fact, I liked the raisins soaking in the liquids of the sauce instead of just plain old water.
I did actually go to all the trouble of shredding my own veggies for the first try of this recipe. Though I liked having the broccoli florets in the dish, I don’t think it’s worth the trouble (to be frank). Maybe if you do have one of those spiral cutters in the home, it might be alright -- but I live in the Alton Brown theory of not having too many gadgets that only do one thing.
For my money, the ease of making this dish off bagged broccoli slaw can��t be overstated. And the Greek yogurt gives it a nice kick of protein, so it’s got extra health benefits!
Nutrition (per serving):
Calories: 163
Fat: 3.1g
Carbohydrates: 28.7g
Protein: 9.4g
1 note
·
View note
Text
Blog Activity!

Hi everyone! I just wanted to take a quick pause from posting tips and recipes to say hello to everyone who’s been following, reblogging, and liking my posts!
I screwed up the recipe for the post I had planned for today, so I’m going to give it a round two before I post it (at least I didn’t screw it up for taking to game!) In the meantime, please enjoy a picture of my baby boys.
The one with the jack-o-lantern nose is Castor, and the one with the stripe up his face is Pollux. They’re the light of my life.
If you have any recipes you want me to try and make, or any questions that I can help with for your LARPing experience, send them on over! My list of suggested topics that my friends gave me is getting a little lean!
For a little about me, I’ve been LARPing since 2000, I started in parlor LARPs (Vampire and the like) and moved over to boffer LARPs about 6 or 7 years ago. I ran the meal plan at my game for about a year until I bought my house and someone else took over for me.
I’m glad my posts have been resonating with you all! (I’ll have to do another non-alcoholic mixed drink post, no?) This blog started as a way for me to compile my favorite recipes and I figured I’d just throw out advice while I was at it and see where it lead.
Thanks again for reading, sharing, liking, and following! It makes me smile to see the notifications pop up on my phone. Once again, let me know if you have a topic or recipe you’d like me to cover! Happy LARPing!
1 note
·
View note
Text
The Purchase and Care of Cast Iron
It occurs to me that I’ve talked a couple of times about my cast iron silverware (ironware?) There’s a ton of places that a LARPer can grab their own, and you may be itching to do so! Cast iron always looks cool, no matter the genre. There’s some pros and cons to keep in mind though, and remember that cast iron can be far more interesting to keep care of than good old stainless steel.
Pros:
1. Cast Iron is generally indestructible. Even if you screw up and rust it, you can sand it down, re-season it, and keep right on moving. You’ll never bend it, break it, or destroy it in any real way. So whatever you buy in the cast iron department, you’ll have forever.
2. It looks cool. I mean. Let’s just all be there for a second. It looks really cool.
Cons:
1. Cast iron will rust if not properly cared for, and rust pretty quickly. If you get some for game, make sure that everyone who goes near your camp knows not to wash it with soap and water. And especially not to just let it air dry if they do!
2. It can be expensive. You can get a cheap set of stainless silverware for only a couple of bucks, but your iron silverware will set you back a bit more.
3. Taste. Now -- if you’re using cast iron as a pot or pan, ignore this. The taste of a well seasoned cast iron pot is amazing. What I’m talking about is having a cast iron spoon. You have never lived, nor do you want to live, to taste iron flavored oatmeal.
The Care and Cleaning:
The first time you get any cast iron equipment, you get to break the rules. Wash it in warm, soapy water, and be sure to dry it *thoroughly*. It needs to be bone dry as quickly as possible. You’ll then want to season your pot or pan (if you have one) or rub oil onto your flatware kit.
The oil provides an oxygen and moisture barrier so that your iron doesn’t rust when you store it. (On top of other things -- I’ll post a blog here on the science of seasoning a cast iron pot or pan.) The best oil for the job of seasoning is flaxseed oil -- but when it comes to my flatware, I go for something simple, inexpensive, and low flavor, like canola oil.
For a great post on seasoning cast iron that’s a hell of a lot better than what I can write, check this out:
http://sherylcanter.com/wordpress/2010/01/a-science-based-technique-for-seasoning-cast-iron/
For every additional cleaning, after you use your cast iron -- the best thing to scrub your kit is a mix of salt and oil. The salt will help kill anything on your iron, and also provides a nice grit that won’t scratch or pit the iron. Once your salt and oil scrubs pretty clean, you know you’re good to go. You then just wipe out the salt and oil (you can rise with plain water, if you need, and dry it immediately), then wipe down or season the pan again with your oil as necessary.
Storage and Considerations:
Be sure to store your iron somewhere dry. Keep it in a cupboard or closet away from plumbing, hot water heaters, and other things that generate moisture.
Also -- though my iron kit came with a pouch so I could wear it on my belt, I ultimately decided it was too problematic to wear at game. Falling on the fork or knife just right could impale me, or someone else, even though (when properly stored) the sharp stuff was encased in leather. It also collected A LOT of dirt while I was running around. It also just hurts to land on if it gets under your hip just right.
Final Notes:
Iron is cool. It looks amazing for Ren Faires, fantasy games, and even post-apoc. It’s fun, and functional. I picked up my set from a maker at a ren faire, and I have loved it for years. I’m just finding in general that the fuss is too much for me these days.
If you’re not sure if you want a set of iron flatware -- start with something functional and iron for your home kitchen. A cast iron dutch oven, or a cast iron skillet -- something that will give you a taste of the care of cast iron. If you decide it’s fine, and you don’t mind keeping track of your iron, then go ahead and given the flatware a go! Just be realistic with yourself on how fast you’ll be able to get to a proper cleaning of your flatware when you get home. I’ve spent many Sundays nearly dead on my feet grumbling obscenities at my spoon.
I would honestly not advocate for bringing a cast iron pot or skillet to game literally ever. If you do -- bring the oil and salt to game to clean it. You will absolutely need to clean it right after cooking. Do not get involved in a fight. Do not let it sit. You run too much risk of rusting the skillet/pot or ruining your hard earned seasoning. Additionally, cast iron keeps heat for a LONG time. Finding a safe spot to put it while you wait for it to cool down can be a problem.
You don’t want to accidentally ruin one of your favorite skillets for game cooking!
3 notes
·
View notes
Text
The Essential LARP Cooking Camp Gear List

Figuring out what to bring to game is always stress inducing. I have packing lists for my packing lists just to make sure I don’t miss anything (it doesn’t help that I drive four hours to get to my game. Forgetting something means I’m SOL all weekend, unless I feel like stopping by a Walmart to pickup whatever I left at home.)
If you’re a new LARPer, this can be doubly stressful. You may not even know where to begin to pack for what you need. I’m pretty focused on only food needs on this blog, but to sidetrack for just a moment -- my advice is always to break it down from a meta level first. By that I mean, start with the big picture stuff:
- Camping Gear (tent, sleeping bag, etc.)
- Food and Drink
- Costume
- Weapons
- Decorative
- Mundane Needs (medicine, first aid kit, hygiene needs)
Once you have that list together, then you can start listing things by specific, and that’ll help you organize your head a little bit when things start to get crazy. Make a list on a word doc somewhere you can access it all the time, and keep the same list game after game, that way you have it on hand in case you run out of spell slots to think about it the Thursday night before you travel.
My list below will operate similarly, giving kind of a broad list, and then breaking it down, with only a few major items getting specific call-outs.
That said -- back to the food stuff!
If you want to cook at game, you’ll need a handful of things to make this possible. Listed below is a short list of what you’ll need, and what to look for in those items. Some of these were also referenced on the 20 Items under $20 post, found here (https://larpgourmet.tumblr.com/post/186401312414/20-things-under-20-for-eating-at-larp)
- A Decent Cooler
Look for one that will easily fit in your car with the rest of your stuff, but has enough room to work with. Also be aware that you’re going to have to move your cooler in and out of your car -- while it’s full of stuff. Too big, and you risk it being exceptionally heavy.
I bought mine eons ago, but I want to say it’s somewhere in the 48 - 50 quart range. I generally want to be able to fit my cold brew coffee, a frozen gallon bottle of water, my food, at least half of my drinks, and my icepacks into the cooler easily.
I’ve said it before, but it’s worth repeating -- of all of the items to shell a little extra for, this is the one. Good insulation, a tight fitting lid, and well made handles will go a long way to ensuring your food stays cold, and you have a better time maneuvering it. Coolers are also just generally handy things to have around, even when you’re not LARPing, so there’s little chance this purchase will go to waste.
One side note on this -- I think wheels are a bit of a waste when it comes to coolers in a camping setting. The wheels do just about nothing over dirt and sticks, and are barely better than dragging the cooler on it’s edge -- at least in my experience.
- A Sturdy Table
If no tables are readily available, OR those tables are wobbly -- pick up a good, sturdy table of your own, and be ready to throw a tablecloth over it. I like 6 foot hard plastic folding tables available at any hardware store. They are generally easy to pack and move, and give you plenty of room to work with.
Prepare to store your plastic bin of stuff, and your cooler underneath the table. The cooler being in the perpetual shade of the tablecloth, and the breeze of the outside means that your ice will melt a bit slower. I’ve managed July games in over 100 degree heat in southern California without needing to make an ice run, just because my cooler is stored under a table with a good tablecloth.
- Camp Stove
This is another topic I’ve covered in some detail on this post: https://larpgourmet.tumblr.com/post/186746785742/what-to-look-for-in-a-camp-stove
Long and short -- though there’s many ways to heat up food at game, including campfires and the hope of a decent kitchen on site, I feel like Camp Stoves are the old reliable. They’re safe (you’re not likely to accidentally start a forest fire), easy to use and keep with you, and if you have your own, you’re not waiting in line to use it -- so you can just heat n’ eat at your leisure!
- A Trash Bin
Get a collapsible trash container made for camping, and the appropriately sized trash bags. Invest in something big and flat that you can put over the trash bag to keep stuff out, or prepare to take it to a larger trash receptacle every so often.
- Dutch Oven
If you’ve never looked at a dutch oven before, it’s basically a big soup pot with a good lid. Generally speaking, dutch ovens are thick walled and made of cast iron -- but for our purposes, any large pot with a decent lid will fit your needs.
I like these, especially if you plan to make any meals for a larger group. Big vats of soup or even cold salads can be served in a dutch oven, and automatically look more interesting as a result. The lid means you can close in your food to keep dust out, and even if you’re not using it to cook directly, you can fill it with water and cook sous vide style.
ProTip: If you get one big enough, you can fit a lot of your other gear inside of it, making it an excellent storage container for packing purposes as well.
- Frying Pan / Skillet / Griddle
What we need is a large, flat surface to toast bread, pan fry food, or set stovetop coffee pots on top of to make sure they’re stable. A frying pan or skillet is probably best (as the walls give them a bit more utility -- but a griddle or flat top surface can be great in the long haul, if you don’t mind buying both options!
- Food Prep Items
A cutting board, a good knife, bowls to collect items you’ve cut and prepared, and some bowls or covers to keep everything clean while you work. As with the below, this is really a situational need. If you plan to do any food prep actually at game, make sure you consider what you’ll need to bring!
- Servingware
Wooden bowls, spoons, charcuterie boards, and other things are great to lay out your food for eating. You only really need these if you plan on serving multiple people, and will need to leave the food somewhere that photographers might find it. Honestly, source as much of this out of thrift stores as you can, big wooden bowls and big wooden spoons are silly cheap there. You can also get some fairly inexpensive slabs of marble and other easy to keep and clean stone from any home improvement store -- more on that in a future post!
- Flatware / Dishes
You will want something to eat your food out of that looks good for the photographers! The 20 Items under $20 has a few links for things to look for on this front, but expect to need at least one of each of the basics -- a cup, bowl, plate, fork, knife, and spoon. I’ve tested my way through a lot of the disposables in this arena, and I find them to be both flimsy, and expensive. Set aside the scratch for one decent set that will last, and you’ll be much happier.
- Cleaning Station
Here’s where I admit that I don’t do a full soap and water wash most of the time at game. I’m the only one who uses my own stuff, so most of the time I just wipe down my gear to get any food off, dry it, and wait to give it a good cleaning when I get home. Most of my cooking for game is tailored to this idea, meaning that I generally make a lot of things where I won’t leave a lot of food behind, and if I do, it’s in a mason jar where I’m just going to seal the jar and not worry about it.
I also (currently) use real cast iron for my fork, knife, and spoon -- so getting them in soap and water is really just a great way for them to rust. (I’m thinking of switching over to stainless steel. Cast iron has a taste, and I’m not particularly fond... additionally, it’s a HUGE pain to keep care of, especially at game if someone decides to be nice and wash your stuff for you, so I’m just kind of over it.)
If you’re eating anything that will get sticky or sugary, or where you’re leaving a larger amount of food (not just sandwich crumbs), you will want a way to clean it so you don’t get pests. This set should consist of at least a couple of things; a smallish plastic bin for you to catch your soapy water, a sponge, some dish soap, a drying towel, and clean water to rinse your soap off your dishes.
If you’re a knitter at all, consider making knitted towels out of yarn tailor made to the purpose. Knitted towels will always look great, and they dry up a lot of water! They do just take a little longer to dry, so prepare a spot to hang them up with clothespins, if you can! (I’m not a knitter, but my mom makes me knitted stuff all the time.)
- Plastic Bin with a Good Lid
The reason I advocate for this is to carry all of your camping gear in one place, and make sure it stays clean and pest free until you can use it. Get all your stuff first, then decide what size you need -- but one of these goes a long way toward good organization, and ease of moving your stuff!
- Sundries
This can be any sort of smaller items that I just catch all into one category. My current list for this is:
Matches
Paper towels
First aid kit
Propane
Camp lantern
Apron (to keep your costume clean)
Spare water
Trivets (if you’re going to have any hot pans on site)
If you’re worried about forgetting something, set your setup up at home, and mock going through everything. Think about what you’ll need to do for all of your meals, and make sure you have everything you need to that end.
Plan for emergencies! Plan for spills, plan to get cut, or burned on your stove! Make sure everything you need is close by (in your plastic bin) when you’re actually on site, so you always know how to find your stuff if something comes up.
11 notes
·
View notes
Text
The Joys of Mise en Place
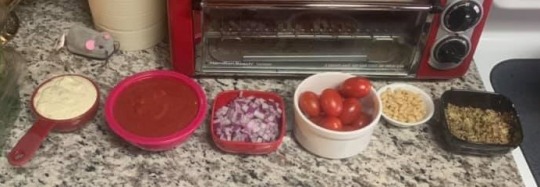
From Wikipedia; Mise en place (French pronunciation: [mi zɑ̃ ˈplas]) is a French culinary phrase which means "putting in place" or "everything in its place". It refers to the set up required before cooking, and is often used in professional kitchens to refer to organizing and arranging the ingredients (e.g., cuts of meat, relishes, sauces, par-cooked items, spices, freshly chopped vegetables, and other components) that a cook will require for the menu items that are expected to be prepared during a shift. (https://en.wikipedia.org/wiki/Mise_en_place)
I love Mise en place, I use it for almost all of the recipes I make. I can’t begin to tell you how much easier it makes your life. If you’re cooking at game, or cooking at home before game, consider using Mise en place to make your time in the kitchen that much more enjoyable.
Yes -- you will end up using a lot more little bowls (and needing to clean them). That’s fair. But -- you will find it to be a much easier experience while you’re cooking. There comes a point in every recipe where things are starting to come together quickly, and if you turn around and realize you haven’t yet chopped your onions, you run the risk of burning something else in your recipe while you stop to amend your onion situation.
This method works out for me quite well, as I cook most every night when I get home. I go from work to the gym, work out, come home and prepare all of my ingredients for cooking while I talk to my mom on the phone, then take a shower, and cook when I get out of the shower. It’s a good division of labor that means I don’t take too long after my shower before I can eat.
The method is basically this -- you cut, measure, and otherwise prepare all of your ingredients into bowls, ready to be used. I put things in the same bowl if they’re going in at the same time in the recipe (to cut down on bowls, and make my life easier.) The only time I won’t do that is if I think the two ingredients might hurt each other in the bowl (like lemon juice and milk for instance, that might curdle while they sit together.)
Line them all up so you can find everything easily, and then away you go!
If you’re cooking at game, this can be a good way to divide time in case you get interrupted while you’re cooking, or have enlisted people to help you. It can also be a way to minimize dangers on site. By that I mean, you’ll be able to focus your attention while you have sharp knives out and your attention while you’re using the camp stove or other source of heat.
At home (even though there’s no chance of random mods finding you!) this is still a good method to prepare yourself for any recipe you’re making, and minimize the risk of other distractions ruining your dish. Phone calls, kid/roommate aggro, or random knocks on the door have all been the bane of home chefs at one time or another.
If you’ve never heard of (or tried) this method before, I hope it works out for you! I mean, the French are one of the top authorities on good cooking, and good cooking habits. It’s a little outside of my usual LARP centric tips, but I figured it was worth sharing all the same. LARP isn’t the only time we all cook, after all!
0 notes