
mauvemorn
The Sims 4 Custom content and Tutorials
DOWNLOADS
80 posts
Don't wanna be here? Send us removal request.
Last Seen Blogs

kigallvillenews-blog
Kigallville News

luckylectio
LuckyLectio


the-alan-price-combo
· Bright Lights, Big City 🐾
damagedxsoul
Inexperienced Hunter
Text
Big news, everybody! 🥳
Sims 4 Studio now supports Blender 3.3 and is 64-bit compatible, among other things!
If you will encounter any problems while using it, please take a moment to report them in Creator help.
Endless gratitude to the s4s developer team for their hard work🙇♂️
Studio updates with new beta versions (Windows & Mac)
Hi all, today Studio updates with new beta versions for Windows (Star) and Mac (Aurora). Wishes and Apple Blossom will be retained as Community Tested versions, but no new features will be added to them going forward.
Star (Windows) includes a new color palette feature that allows you to customize your Studio’s palette & the ability to clone/recolor platforms. This version is able to work with the latest Blender (3.3), it is 64-bit, and it has a tuning editor for CAS and object tuning modding. There are other changes necessitated by the inclusion of palette theming and an effort to reduce anti-virus flagging. Please read the full download post for more details.


Aurora (Mac) is compatible with Apple Silicon Chips and Blender 3.3, it can clone platforms for recoloring, and it has a tuning editor for CAS and object tuning modding.
Please note, the tuning editor is a beta feature, and Sims 4 contains far too many tuning elements for us to test them all. Thus, you may encounter issues using the tuning editor. If an unexpected or unwanted outcome occurs, please report this with as many details as you can (including the affected .package), so the editor can be perfected.
Thank you to Brujah, Feyona, and Mauvemorn for alpha testing the new version and to our lovely community for keeping us inspired with your amazing creations!
Choose your version to download HERE. Please be sure to read the full download post to learn the details of each Studio beta.
916 notes
·
View notes
Note
hi there! do you have any tips for lowering the polycounts of accessories like buttons and grommets without completely destroying the mesh and making texturing difficult? i’ve been wanting to make more complex items but the polys of the details add up so fast!
Do you mean MD's buttons? If yes, you can either use custom ones (made from a cylinder in Blender) or retopologize MD's ones like this:
In UV editor enable Keep UVs and edit mode mesh selection in sync, switch to Face select;
select the uv islands of the back of buttons, threads, inner sides of holes. In 2d view press Delete, choose Faces;
switch to Vertex select, select the uvs of the holes. In 3d view press Alt M, choose Collapse.

These steps alone will reduce the polycount dramatically. However, the buttons will still be unnecessary high poly around the edges to ensure smoothness that you will not even be able to appreciate from afar, so you can go further. For everything to work, you need to quadrangulate the mesh first ( select the remaining uvs of buttons, Mesh - Faces - Tris to quads). The image below shows the stages of the process(bigger pic if needed):

Holding Ctrl, click and drag to select one edge on all buttons;
Select - Edge rings;
Select - Checker Deselect;
Select - Edge loops;
in 3d view Delete - Dissolve edges;
select two edges on every edge loop you'd like to remove, Select - Edge loops;
Dissolve them
31 notes
·
View notes
Note
Hi, Hope you're well? I'm writing some blog posts on sims 4 Custom Content. I was wondering with a link back to you CC in my posts, if you'd allow me to use image from your CC in my post. Thanks Lexie
Sure, no problem. Thank you :)
1 note
·
View note
Note
May I ask which feet mod you use please?
Hi. They are custom made and not yet ready to be shared for others to use (sorry, been very busy).
If you are looking for detailed feet to use in your game or as a base for your projects, magic-bot has beautiful ones and allows people to include them in their packages.
11 notes
·
View notes
Note
Hi, I'm trying to download the saint laurent dress but the download link isn't working (it says I don't have access) Is there another way for me to access it? Thank you!
I’ve been getting notifications of people asking for access to my older cc but the strange thing is, the access is not restricted, anyone with a link should be able to download 🤨 I restricted and allowed it again just now, could you try again and notify me if it will work out? If not, I’ll just re-upload the packages
EDIT: RE-UPLOADED ALL INACCESSIBLE FILES
5 notes
·
View notes
Note
Why does cc clothing (not only yours in particular) glitches so often, garmets mix textures from each other or have dents? it's such a pain, why is it like that? why can't it be easy :(
Could you please specify which one(s) of my cc is causing problems? Paired with my cc or other people’s?
Generally, texture overlapping happens because of overlapping uvs. People tend to put uvs in the bottom right corner of the uv space regardless of what they are making because there are a lot of start-to-finish tutorials where the authors do that for various wrong reasons. I disregard the possibility of overlapping only with full-body outfits or items that are not meant to be worn together ( boots and floor length gowns, a top and a dress, etc). However, for example, if someone put the uvs for eyelashes in the area meant for shoes (as it happened once), there is nothing that I, the creator of shoes, can do about it.
As for dents, I would need to see pics or files to know for sure. Can be bad topology (crumpled paper look), can be the introduction of bones that the cloned item was not affected by ( distortions in the leg area), can be mismatched number of meshgroups. If you want to fix those files, please create a thread here and include download links
15 notes
·
View notes
Photo
Ann Demeulemeester Lace-Up Heeled Sandals
1 item: 6 swatches;
part type: shoes;
physical frame / clothing preference: all / feminine;
age: teen to elder;
Color Sliders compatible ( optionally );
HQ compatible ( the previews are made using HQ textures ).
Credits:
skin: skin N4 by @obscurus-sims ;
reference: Ann Demeulemeester SS09.
Note:
May clip into some pants.
Polycount: 14896.
Version 1 - regular textures;
Version 2 - requires / compatible with Color Sliders Mod.
Download only one version.
Please respect my TOU.
DOWNLOAD ( DIRECT LINKS):
Version 1
Version 2
#the sims 4 download#the sims 4 cc#the sims 4 shoes#the sims 4 custom content#Ann Demeulemeester#shoes#Downloads
1K notes
·
View notes
Photo

Hermès Aura Sandals
1 item: 7 swatches;
part type: shoes;
physical frame / clothing preference: all;
age: toddler to elder;
HQ compatible ( the preview is made with HQ textures ).
Credits:
skin: skin N4 by @obscurus-sims ;
reference: Hermès SS 2020.
Please respect my TOU.
DOWNLOAD ( DIRECT LINK )
546 notes
·
View notes
Photo

Saint Laurent Edwige Peep-Toe Pumps
1 item: 12 swatches;
part type: shoes;
physical frame / clothing preference: all / feminine;
age: teen to elder;
HQ compatible ( the previews are made using HQ textures ).
Credits:
skin: skin N13 by @obscurus-sims ;
reference: Saint Laurent Edwige Peep-Toe Pumps.
Note:
The crystals at the tips are present only on the first two swatches.
Toenail polish is not included, but these feet should work with any texture-based toenail polish from other creators.
If you play on the default lowest graphics settings, you will see this black piece of geometry in-world ( meant for sheer tights that are yet to come ). To remove it, just uncheck Laptop mode ( Game Options - Graphics ), apply changes and restart the game. It shouldn’t noticeably affect the performance but if it will, message me and I’ll give you a version without that piece.

Please respect my TOU.
DOWNLOAD ( DIRECT LINK )
#The Sims 4 Download#The Sims 4 CC#The Sims 4 Custom Content#The Sims 4 Shoes#Saint Laurent#Shoes#downloads
247 notes
·
View notes
Photo

Hermès Vadrouille Ankle Boots
1 item: 18 swatches ( 9 in polished leather, 9 in suede ) ;
part type: shoes;
physical frame / clothing preference: all;
age: toddler to elder;
HQ compatible ( the previews are made using HQ textures ).
Credits:
reference: from hermes.com
Note:
I decided to reshape the mesh a little bit to clip into less pants at the last minute, so the end product slightly differs from the thumbnail previews. Unfortunately, they still clip into some.
Please respect my TOU.
DOWNLOAD ( DIRECT LINK )
#timbs but make it fashion#the sims 4 custom content#the sims 4 download#the sims 4 shoes#the sims 4 cc#Hermes#shoes#downloads
2K notes
·
View notes
Note
Hello sensei! I hope you're safe and well!!! I wanted to ask, I'm trying to make a little acc for the head, and I want to use the hat part buuuuuuut is there an option for the hair not dissapearing xD? Thank you!
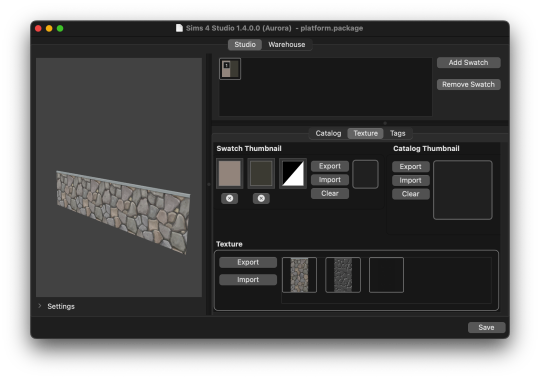
Hi. You just need to edit Region map

switch to Warehouse tab, click on Region map, then on Edit Entries or something like this;
select the first entry, change Layer to 0, RegionType to Base;
select the second entry and just Remove it;
save
69 notes
·
View notes
Note
Hi! I am trying to recolor a pair of cat ears. I want each ear to be a different color, but the ears both use the same texture. Is it possible to make them different colors? If it helps, they're the Betty Boop Cat Ears by Nyamisims. Sorry if that was hard to understand, I'm bad at explaining things.
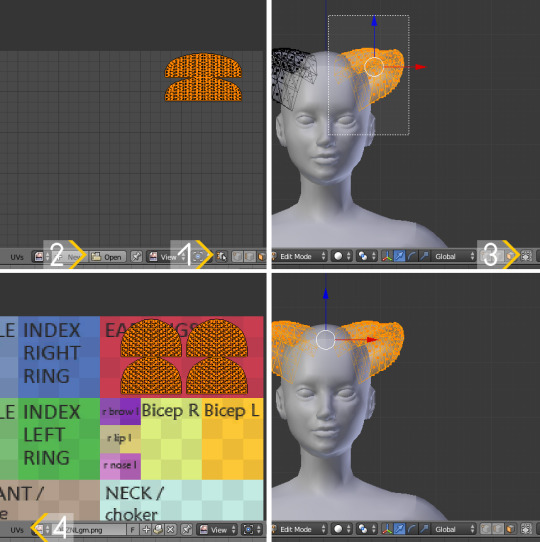
Hi. You need to move UVs of one ear away from another.
open a package file, switch to Mesh tab, choose LOD0, export. Do the same for other LODs;
open LOD0 file, select s4studio_mesh_1, press TAB to switch to Edit mode;
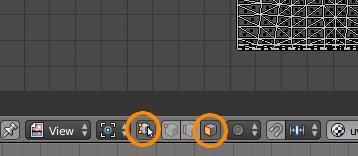
in UV editor enable sync ( 1 ), press A to select everything, click on Open ( 2 ) and choose this image;
in 3d view disable Limit selection to visible ( 3 ). Press B and, holding and dragging LMB, select one ear;
in UV editor press G X and move one ear’s UVs away from another;
select both again and scale them down a bit, they should fit in the space meant for earring;
UVs - Export UV layout ( 4 ). Use this texture to edit the diffuse and other maps;
save, re-import;
Do the same for other LODs;
it seems that the author removed shadow and normals maps by clicking on Make blank, which is something you should never do ( it does not actually make them blank, just removes the file, as I understand, it causes rendering issues). Replace them with these maps.
Also, while we’re at it, there seems to be a new issue related to the format in which you import a shadow map. If it’s .png, there will be black lines along the border. In the past this would happen only when the shadow map had transparency. Now even if you export a shadow map from a maxis item in .png and re-import right away without editing anything, this issue will appear. So always save you shadow maps in .dds.

28 notes
·
View notes
Note
Hello! Hope you're having a safe life! I wanted to ask you if you know if it's possible to create morphed for toddlers? I just want a chubby toddler in my game but I don't even know if is possible 😭
Hi. To make body presets and sliders you’ll need TS4 Morphmaker. I have never used it before, but there is “Toddler” option in the preview, so it should be possible. You can find tutorials in the description. Also, RedheadSims made a mod that unlocks all body sliders for toddlers, just in case that would be enough.
10 notes
·
View notes
Note
Hello mauve-sensei. Hope you're ok! I wanted to ask you if you know how people take preview of the jewelry, like with those satin napkins and everything behind! They look soooooooo goooooood!! Do you know any tutorial or something! I would love to make previews like that 😍.
I actually make previews (and model) in a different software solemnly because I know it better, so I cannot help you with that yet, but all you need to do is watch introductory tutorials on rendering, cloth simulation and materials on youtube. Just make sure to specify that you're looking for introductory or beginner tutorials
7 notes
·
View notes
Note
hello! since for me you're the default *cc creator sensei* I wanted to ask you if there's a way to make a "tan map" yourself, I want my sims to get good tans while playing island paradise, but with my cc the uv is not always like ea's and I know the game generates it itself but I wanted to know if you can create one. Thank u
Sorry for the wait and thank you for asking this for I’ve never even thought about it before ( very cc-creator-sensei of me lmao ). I tried a few approaches but decided that baking ambient occlusion and adding it to the diffuse map is the easiest one since we’re doing this for a shadow map anyway. Here’s how
8 notes
·
View notes
Text
Tan lines
youtube
( turn on English subtitles )
Hi. In this tutorial, I will show how to fix tan / burn lines a sim gets after sunbathing in your CC.
ENG | ВЕРСИЯ НА РУССКОМ
WRITTEN TUTORIAL:
PLEASE DO NOT REPOST
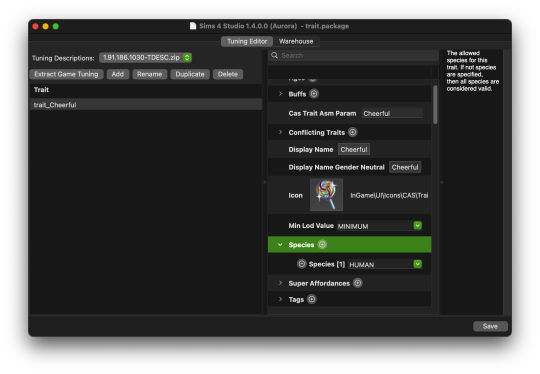
According to SimGuruMorgan, a tan is applied according to the alpha channel of the clothing worn during sunbathing. For it to look right, either map your garment’s UVs over the appropriate area of the body’s UVs like Maxis does ( 1 ) or just make the area opaque, the whole area ( 2 ), not just where UV islands are ( 3 ).

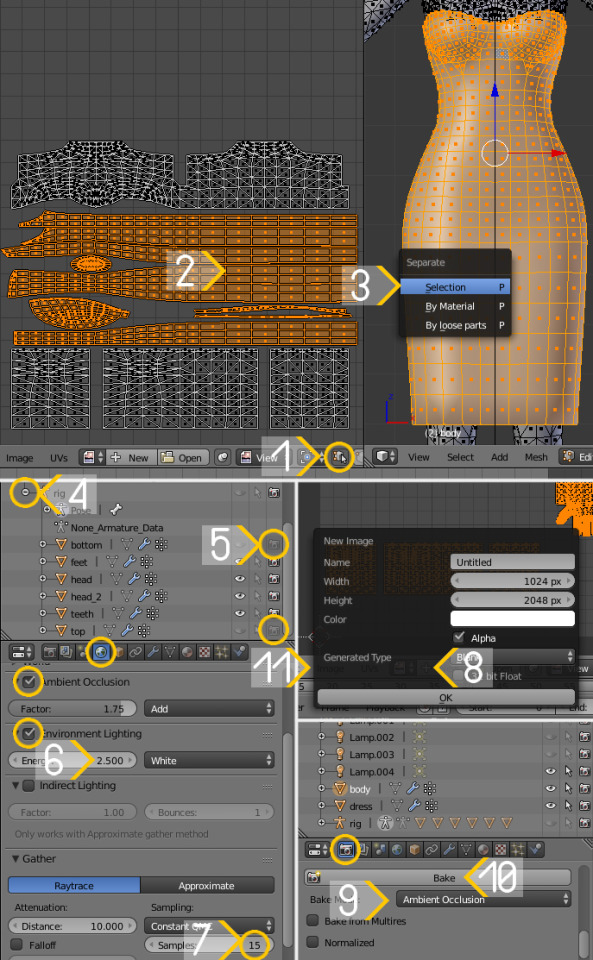
Start by baking ambient occlusion like you would for a shadow map. For this, the garment and the body should be separated. If they are not yet, select the joined meshgroup, enter Edit mode, enable sync in UV Editor ( 1 ), press B to activate Box selection or hold Ctrl for Lasso selection, LMB-click and drag to select all UV islands ( 2 ). In 3d view click P and choose Selection ( 3 ) to separate. Do not forget to Restrict rendering ( 5 ) for all body parts in the rig ( 4 ) that overlap with your body mesh.
Select the body, switch to World tab and make sure Ambient Occlusion and Environment Lighting are enabled. Change the later to 2,500 ( 6 ). Leave Samples at 15 ( 7 ). Switch to Render tab, but before baking, enter Edit mode, select everything with A, add a new 1024 x 2048 texture ( 8 ). Set Bake Mode to Ambient Occlusion ( 9 ) and hit Bake button ( 10 ). Once the loading bar on top disappears, save the result with Image – Save as Image as .png ( 11 ).

Open the image in the image editing software of your choice. Remove unwanted parts by selecting and deleting them and using contrast-altering tools like Levels ( 1 ) in Photoshop. Then select the rest of the area covered by clothing and fill it with Black ( RMB-click - Fill – Black ( 2 ) ). Optionally smooth the outline with filters like Median ( 3 ) and Gaussian Blur ( 4 ).
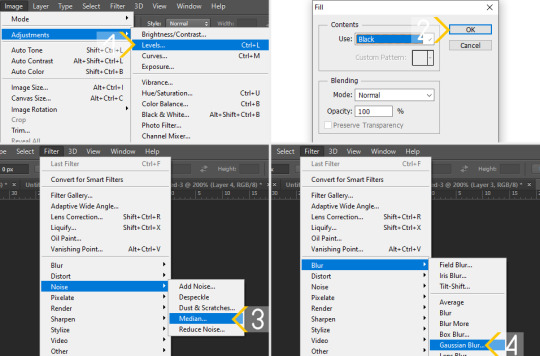
Once done, invert the colors ( Ctrl I ) and fill the background with black ( 1 ). Merge the layers, select everything ( Ctrl A ) and copy ( Ctrl C ). Open your diffuse texture, create a new fill layer, Alt-LMB-click on the mask to edit it, paste ( Ctrl V ) the copied texture.
If there is a significant gap between the garment and the body, you may encounter this issue ( 2 ). It can be fixed by editing the texture or the mesh.
Enable Proportional Editing ( 3 ), press G, scroll up the mouse wheel until you can see the radius.

39 notes
·
View notes
Text
Линии загара
youtube
( включите русские субтитры )
Здравствуйте. В этом уроке я покажу, как изменить линии загара/ожогов, получаемые после пребывания на солнце в созданной Вами одежде.
РУ | ENGLISH VERSION
УРОК В ПИСЬМЕННОЙ ФОРМЕ:
ПОЖАЛУЙСТА, НЕ РЕПОСТИТЕ.
Согласно SimGuruMorgan, загар применяется в соответствии с альфа каналом диффузной карты одежды, которая была надета во время загара. Для того, чтобы он выглядел подобающим образом, либо поместите развертку одежды поверх развертки тела в нужном месте, как поступает Maxis ( 1 ), либо сделайте всю спрятанную под одеждой поверхность тела непрозрачной ( всю ( 2 ), не только те места, где находятся UV острова ( 3 ) ).

Начните с “запекания” окклюзии окружающей среды ( Ambient occlusion ), как это делаете при создании карты тени ( Shadow map ). Для этого тело и одежда должны быть разделены. Выберите совмещенную мешгруппу, перейдите в Режим редактирования, включите синхронизацию в Редакторе развертки ( UV Editor ) ( 1 ), нажмите B ( латиница ) или задержите Ctrl для активизации режима выделения, зажмите ЛКМ и тяните, чтобы выделить все UV острова одежды ( 2 ). В 3D окне нажмите P и выберите Selection ( 3 ). Не забудьте нажать Restrict rendering ( 5 ) напротив всех частей тела в rig ( 4 ), совпадающих с Вашим мешем тела.
Выберите тело, перейдите во вкладку World и убедитесь, что Ambient Occlusion и Environment Lighting включены. Введите в последний 2,500 ( 6 ). Оставьте Samples на 15 ( 7 ). Перейдите во вкладку Render, но перед запеканием войдите в Режим редактирования, выделите все с помощью A, добавьте новую текстуру размером 1024 х 2048 ( 8 ). Измените Bake Mode на Ambient Occlusion ( 9 ) и нажмите Bake ( 10 ). После окончания загрузки сохраните изображение в .png с помощью Image – Save as Image ( 11 ).
Откройте изображение в любом графическом редакторе. Избавьтесь от ненужных частей, выделив и удалив их, отредактируйте контраст с помощью инструментов на подобие Levels ( 1 ), чтобы убрать оставшиеся тени. Выделите часть тела, находящуюся под одеждой, и заполните ее черным цветом ( нажмите ПКМ - Fill – Black ) ( 2 ). По желанию сгладьте края с помощью фильтров на подобие Median ( 3 ) или Gaussian Blur ( 4 ).

Инвертируйте цвета ( Ctrl I ) и заполните фон черным ( 1 ). Соедините слои, выделите все ( Ctrl A ) и скопируйте ( Ctrl C ). Откройте свою диффузную карту, создайте новый слой заливки. Задержав Alt, нажмите ЛКМ на маске, чтобы ее отредактировать, вставьте ( Ctrl V ) скопированную текстуру.
Если между одеждой и телом имеется значительный зазор, Вы можете столкнутся с вот такой проблемой ( 2 ). Это можно исправить, отредактировав текстуру или меш.
Включите Proportional Editing ( 3 ), нажмите G, прокрутите колесико мыши вверх до тех пор, покамест не появится радиус.

17 notes
·
View notes