#cuz i enjoy transparent pngs
Photo


8K notes
·
View notes
Text
Windows! Tutorial Time!
twinsimmingmain replied to your post “Art Nouveau Miniset”
Amazing! Teach me your window converting ways 😲
Sure thing! 😊👍
☽✶•.¸(✶•.¸★¸.•✶´)¸.•✶´☾ ☆«´¨`•°°•´¨`»☆ ☽.¸.•✶(¸.•✶´★`✶•.¸)`✶•.☾
Welcome to Murf’s School of Crap and Crap-Making!
School Motto: Prepare to be tortured! For Science!
Lesson #17: To the windooooow~! To the wall!! ♩♪
☽✶•.¸(✶•.¸★¸.•✶´)¸.•✶´☾ ☆«´¨`•°°•´¨`»☆ ☽.¸.•✶(¸.•✶´★`✶•.¸)`✶•.☾
So, this is how I made the Banishment Window from TS4 Realm of Magic. I didn’t extract the meshes -- that was thanks to @deniisu-sims.
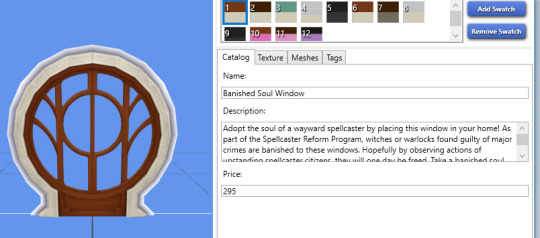
Tuck yourselves in for quite the doozy; this is a biggun.
I just exported the textures and meshes from Sims4Studio, doing all the exact same steps from the TS4 Tutorial I posted here, to get the .obj & .png files into Milkshape.
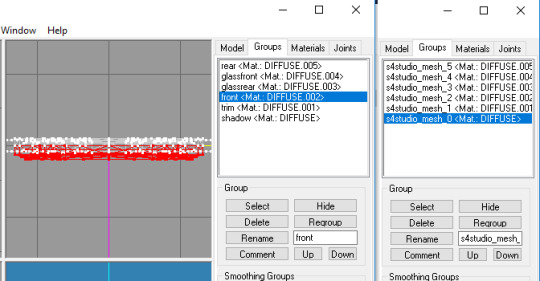
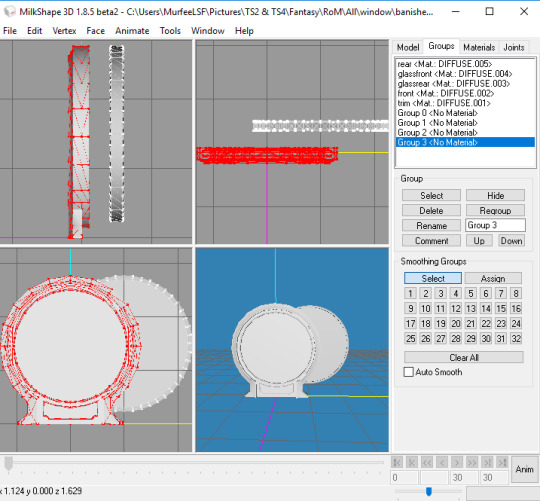
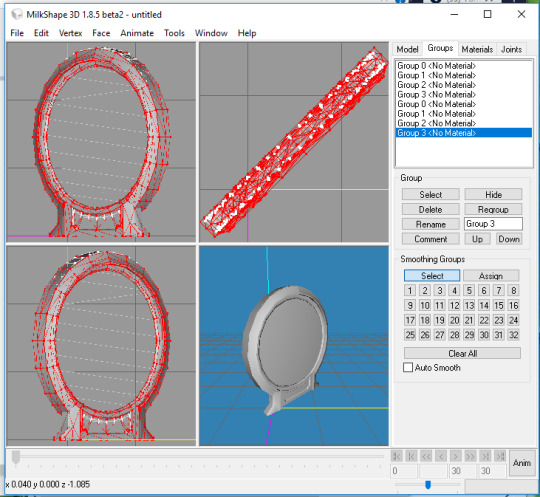
First thing I did was identify all the group parts, to know what’s what. There’s a front and back part of the actual window frame, and a front and back of the window glass. I deleted the shadow mesh, cuz I can’t be bothered.
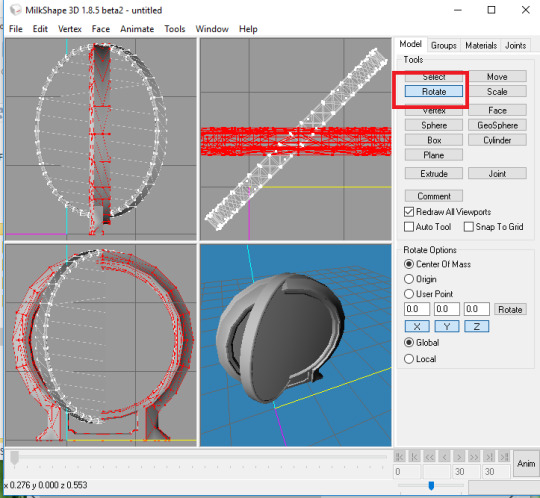
Fortunately, there wasn’t much UV Map editing that needed to be done, just a quick adjustment to the glass meshes. This is what everything should look like:

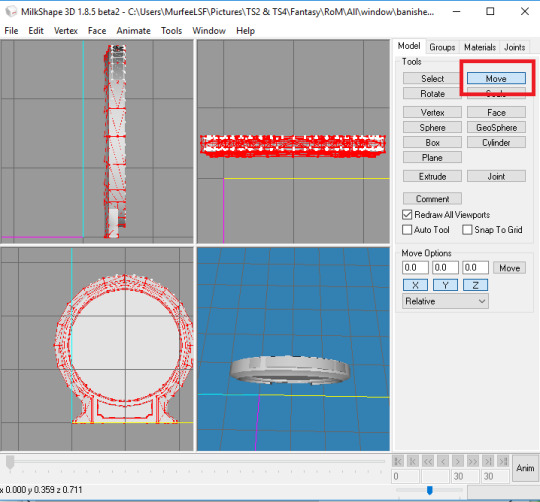
Now, I had never made a window a day in my life; never even tried. So, I cheated. ^_^ The RoM window I wanted was a simple circle, that perfectly matched the 3x1 circle from Into the Future. So that’s the one I cloned.
Export EA’s HLD mesh, cuz you’ll need it for reference in Milkshape.
Imported into Milkshape, you’ll see where TS3 windows sit, compared to TS4. Select all your TS4 meshes, and Move them to sit right on top of TS3’s, as close as you can manage.
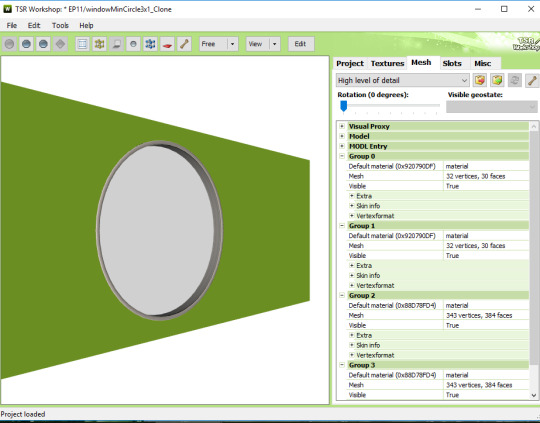
Now, pay attention to EA’s group names:
Group 0 is the rear glass
Group 1 is the front glass
Group 2 is the rear frame
Group 3 is the front frame
Rename your TS4 groups accordingly. I Regrouped/Merged the Trim with the Front, to stick with TS3′s 4 groups. And I Deleted the Shadow mesh, as I said, since the ITF one didn’t have one. (Not that I’d’ve cared, in any event. :P )
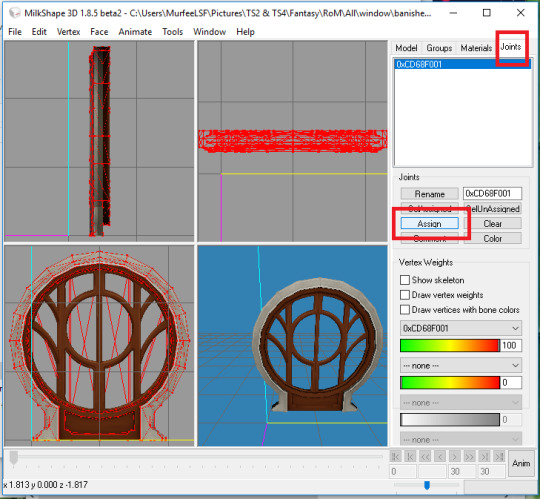
Now, Assign EA’s bone/joint -- DO NOT FORGET to do this; it’s super important that anything with glass has a joint assigned to it, or the glass will be 100% invisible in-game, and won’t that suck. :P
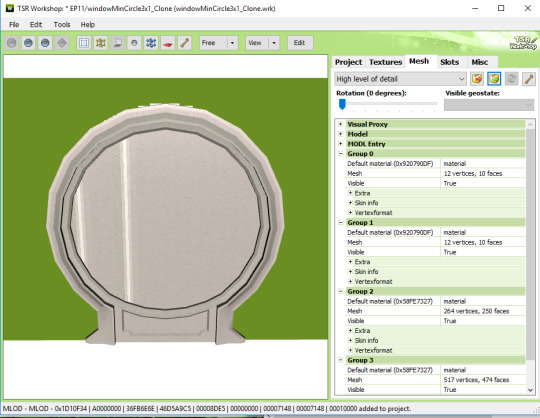
Now, believe it or not, you’re ready for TSRW! First part’s nearly over! ^0^
Export your mesh out of Milkshape, and Import it into TSRW.
Now, before we get to the EVIL part (*cough* wall masks *cough*), lets do the easy bit first, and get your textures ready.
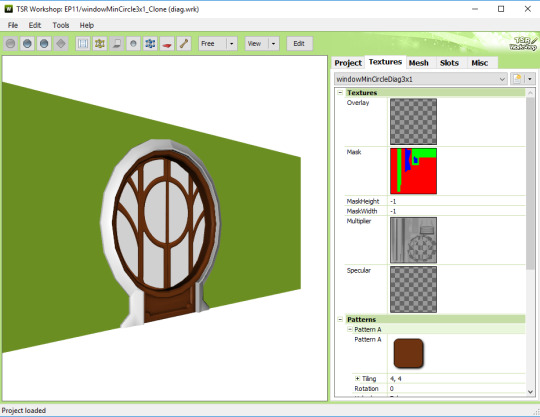
Go into GIMP/Photoshop/etc and make your Multiplier, RGB Mask, Specular, and yes, you’ll need an Overlay for the 2 stained glass versions included.
Delete EA’s extra variations, and make your own. I made 4.
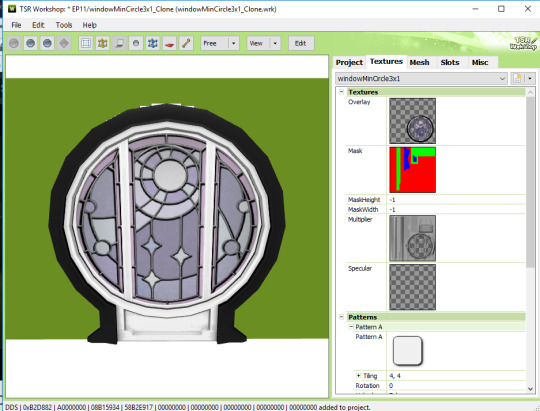
Looks nice, right? WRONG!
Now, before you do another freaking thing, assuming everything’s gravy only to be DUPED once you’re in-game and everything looks like ca-ca, head into your Material Editor and set your shader to Phong Alpha and change the Alpha Mask Threshold to 100 on the 2 front & rear window frame group meshes.
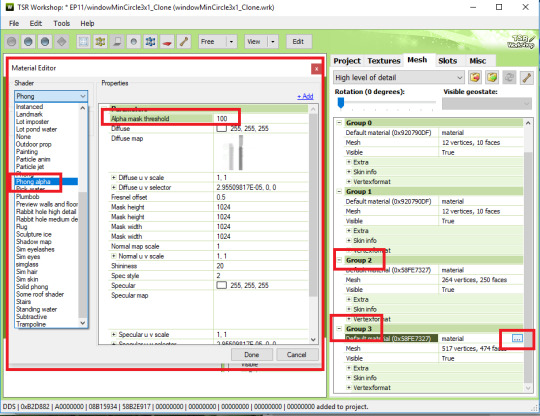
For the love of all things sacred, DO NOT click the Yes button when it prompts you. CLICK NO.

Remember to do the same for Group 2 and Group 3.
Once you’ve done that....we’re ready to address the frikkin elephant in the frikkin room.

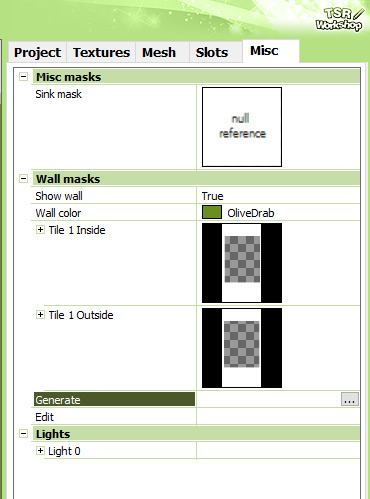
Time to mess with Wall Masks.
Dun Dun DUUUNNNN!
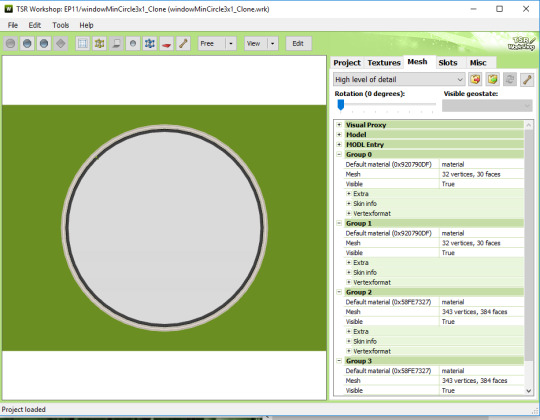
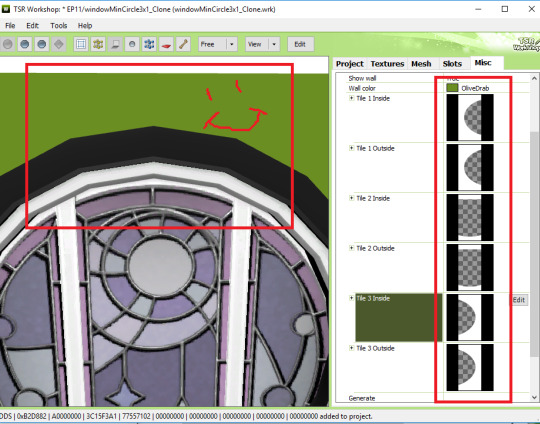
So... *takes a fortifying swig of Pepsi* ...Wall Masks. This utter crapfest.

The green is the TS3 wall. That white crap should NOT BE THERE -- that’s wall tearing that WILL appear in-game, which is NOT sexy.
On the side are all the wall mask textures. Looks like 6, but really it’s only 3, because this 3x1 window is 3 tiles wide in-game. (If you make a 2x1 window, you’ll have 4; if you’ve got a 1 tile window you’ll have 2, yada yada).
Pocci’s got a tutorial here for editing 1x1 rectangular windows with TSRW’s built-in wall mask editor tool, which... I can’t handle the controls on TSRW the way Pocci did; they were just effed up. I dunno if it’s cuz of the version of TSRW I use (2.80.0 cuz eff the TS4 update), but yeah, I had to fix mine manually. :\
So anyway, we’ve got the left side of the window on one tile, the middle, and the right. I exported one of each, and opened them in GIMP/Photoshop.
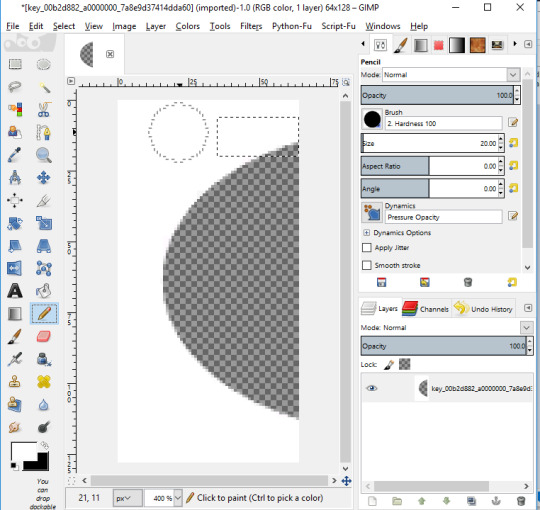
The top portion needs to be painted over with white, to get rid of the unwanted transparent parts there. You don’t want to paint over too much, or you’ll mess with the glass part. But because of the thick window frame mesh, we’ve got a fair bit of leeway.
So block off the tippy tops of the left, middle one especially, and right wall mask textures, and re-import them. It’ll take some fiddling with until you get it right.
I can’t tell you how much time I wasted fiddling with TSRW’s built-in wall mask editor tool. It was a effing crapshoot for me. Just way easier to edit the textures itself.
[EDIT] Deniisu-Sims graciously pointed out to me that I’d wasted even more time than I originally thought -- there’s a EFFING GENERATE BUTTON, y’all.
Lord, THIS is why I stick to simple decor; I can’t be trusted with anything else; I’m so dumb! XD
Anyways, make sure you do all the same steps for your MEDIUM Level Detail mesh!!
Now....
NOW.
You might think you’re done, right? Technically, yes, you would be...if we were working with a 1x1 or 2x1 window. But sadly, things are about to get a whole lot more effing tedious. Why?
CUZ EFFING DIAGONAL WINDOWS. >_<
Don’t export your sims3pack just yet.
Just Save your progress.
Keep your current project open and running, but start a New Project too.
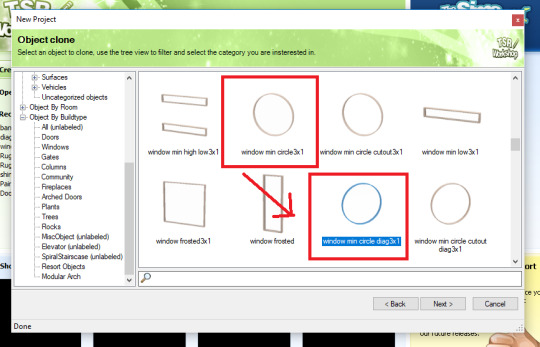
Looking at TS3′s windows, you’ll notice that the 3x1 windows have an extra diag 3x1 version, unlike the 2x1 or 1x1 types, which have diagonal windows built in. But eff my life, I picked the hardest type right out the gate on my very first try, cuz YOLO, right? >_>
So, pick the matching diagonal version....
And yup, you guessed it:
You have to do ALL OF THE STEPS ALL OVER AGAIN!!!
This is some BOOOLSHIIIII~~~~!!!
Omg. WHY, EA. WHY.
@greenplumbboblover breaks it down in this MTS post how to link your regular window to your diagonal one. Bless you, honestly.
In order to enable diagonal versions on your regular window, you have to Copy/Paste the RK (resource key) from the diagonal window into the regular one.
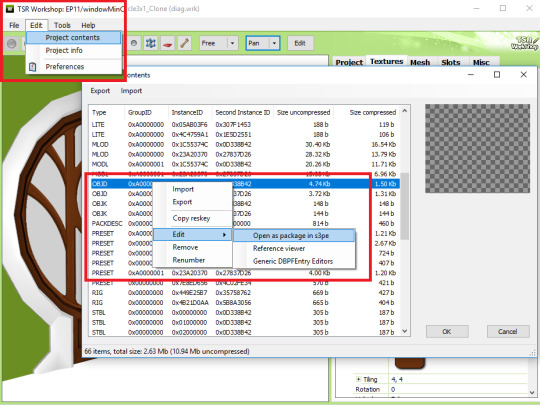
With your Diagonal Window project open, go into Edit > Project Contents > OBJD > Edit > Open in S3PE.
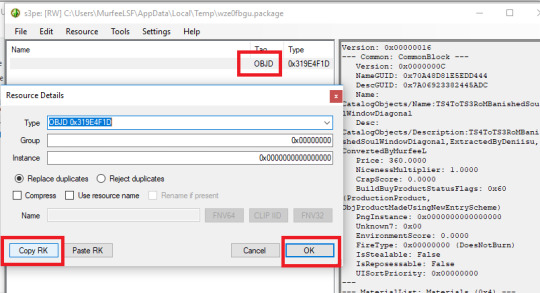
Double-click the OBJD and click the Copy RK button.
Now bounce back to your Regular Window project -- you should have BOTH projects open, remember.
Open your Regular windows’ OBJD in S3PE, and click the Grid button.

Click where it says DiagonalIndex, and you’ll see a dropdown list with a tiny arrow next to it. Click the arrow.
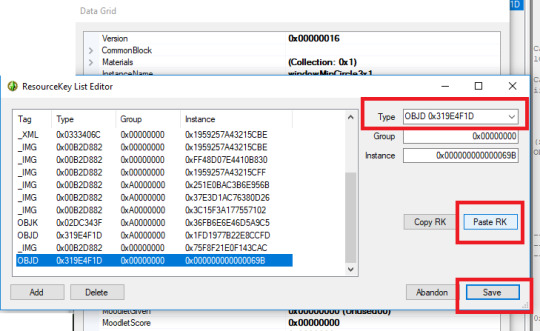
I’ve already done all this, but on a fresh run the top box will say Type: 0x0000000.
Click the Paste RK button, and it will change to whatever you copied from the Diagonal Window RK. Click Save.
Now make sure you scroll down the dropdown list, and you’ll see that your new OBJD entry is all the way at the bottom of the list. Click it so it’s selected, and click Commit. Save your progress, and close S3PE.
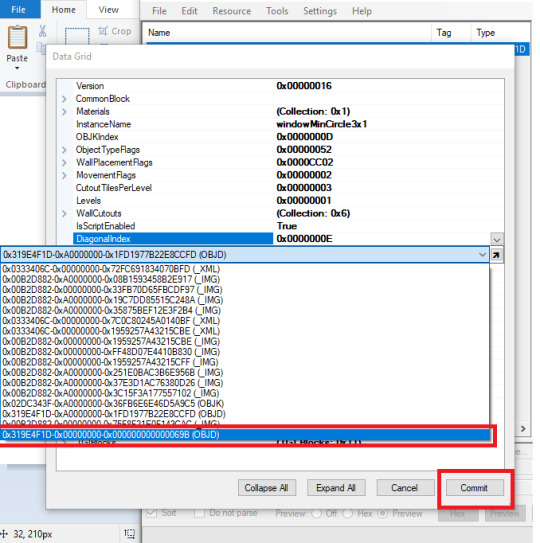
Now, if you’ve been looking carefully, you’ll notice that there are TWO OBJD entries for both the Regular and Diagonal windows. So yup, repeat those steps again for the 2nd OBJD entry.

This is why in my Art Nouveau Miniset I only converted ONE window; eff ALL this noise.
But the good news is that once you’ve finished all this linking crap nonsense, you’re EFFING DONE. \^0^/
Go ahead and Export both of your Regular & Diagonal simspacks/packages!
Install them both in your game. IIRC, in Build Mode you’ll only see the Regular Window. But when you select it and rotate it, you can enjoy the sexiness!


Happy Simming! *dark laughter*
102 notes
·
View notes
Last Seen Blogs