#lempstack
Text
Instalar una pila LAMP o LEMP en Linux
Instalar una pila LAMP o LEMP en Linux.
Una pila LAMP o LEMP (también conocida como "stack") es un paquete de aplicaciones y herramientas open source, que se instalan conjuntamente con el objetivo de adecuar un servidor para que pueda prestar sus servicios a sitios web dinámicos, y aplicaciones web.
En las "stack / pilas" no es necesario que instales las aplicaciones y herramientas una por una, el paquete lo hará por ti.
Existen muchas variantes, pero sin dudarlo una de las mejores alternativas es la que nos ofrece "lempstack.com", y no solo por la multitud de diferentes pilas que ofrece, sino por la calidad de sus stack.
Las pilas que se nos ofrecen son las siguientes (ellos escriben "lnmp" en vez de "lemp" por que es realmente como se escribe):
LNMP (Linux + Nginx+ MySQL/MongoDB+ PHP)
LAMP (Linux + Apache+ MySQL/MongoDB+ PHP)
LNMPA (Linux + Nginx+ MySQL/MongoDB+ PHP+ Apache): Nginx handling the static, Apache processing dynamic PHP
LNMT (Linux + Nginx+ MySQL/MongoDB+ Tomcat)
LNPP (Linux + Nginx+ PostgreSQL+ PHP)
LAPP (Linux + Apache+ PostgreSQL+ PHP)
LNMH (Linux + Nginx+ MySQL+ HHVM)
Ademas son compatibles con multitud de SO:
CentOS (redhat) 6-7
Debian 7-9
Ubuntu 12-18
Fedora 27-28
Deepin 15
Amazon Linux 2
Aliyun Linux
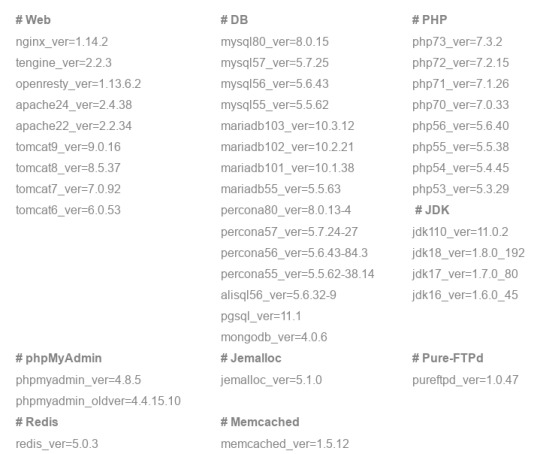
Destacamos que las versiones que ofrecen siempre están actualizadas.
Actualmente (14-03-2019) son las siguientes:
Como ves es bastante completa y actual, así que la instalamos.
Instalar una pila LAMP o LEMP
Para instalar nuestra stack debemos seleccionar la pila y sus componentes, lo hacemos desde su pagina oficial.
Selecciona tu stack.
Marca lo que te interese.
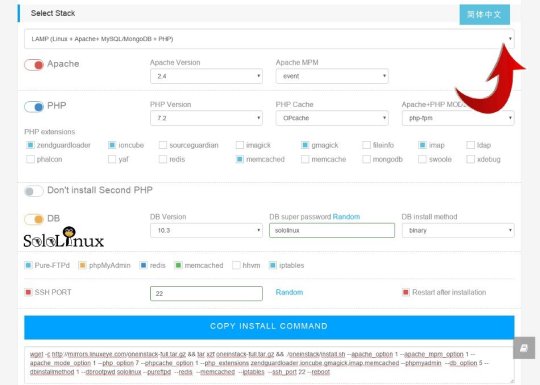
Una vez hayas creado la pila a tu gusto, copias el código que aparece en la parte inferior, lo pegas en la consola / terminal de tu vps o servidor, y lo ejecutas.
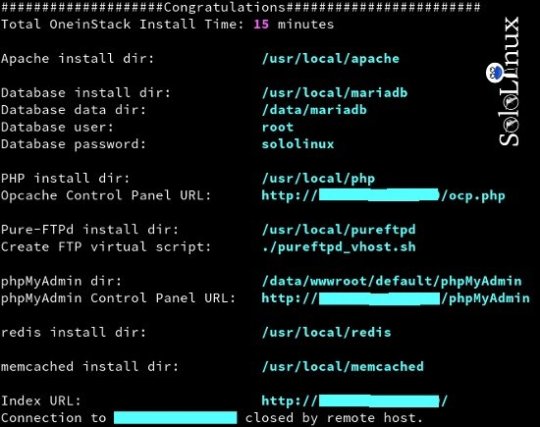
Al finalizar la instalación te aparecerán los datos de acceso y diversas localizaciones.
Para acceder y desde tu navegador web favorito, escribes la ip del server.
http://tu-ip/
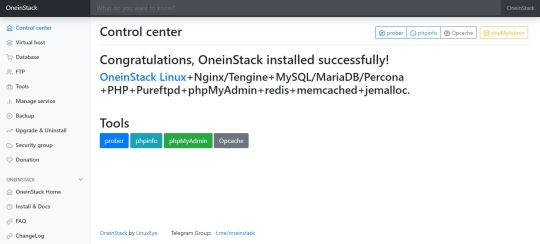
Accedes a la pantalla de control principal.
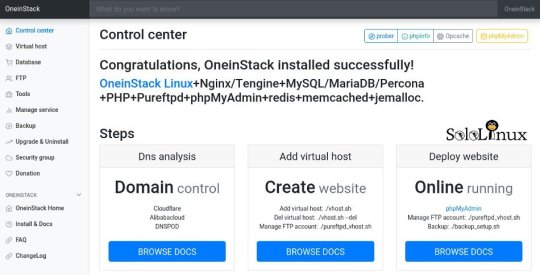
En esta pantalla es donde podrás manejar todo lo que crees en tu "oneinstack", los host virtuales, bases de datos, ftp's, etc...
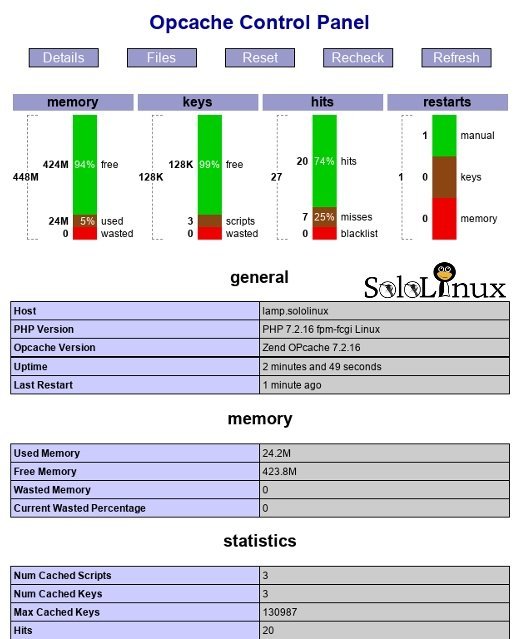
Ademas, en la parte superior derecha tienes unos accesos directos donde podrás consultar datos e información del servidor bastante útiles.
Por ejemplo el consumo de "opcache"...
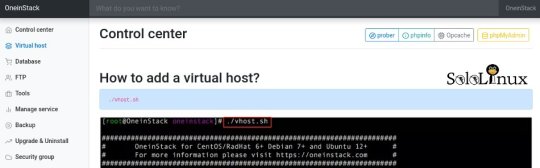
En cada apartado de la columna de la izquierda tienes una explicación de como operar.
Por ejemplo para crear los host virtuales debes escribir en consola:
./vhost.sh
Como punto final... un apunte.
La ejecución de los scripts de creación (en el ejemplo "./vhost"), debe ser desde el directorio propio de la pila.
cd oneinstack
Comparte el articulo.
Read the full article
#basesdedatos#ftp#hostvirtuales#InstalarunapilaLAMP#lamp#LAPP#LEMP#lempstack#lempstack.com#Linux#LNMH#lnmp#LNMPA#LNMT#LNPP#navegadorweb#oneinstack#opcache#opensource#pilaLAMP#servidor#stack#vps
0 notes
Text
OneinStack: How to install it on Ubuntu and CentOS
What is OneinStack? It is an active project that uses to set up an environment for the development of PHP/JAVA applications in just one-click on Linux operating systems such as CentOS (including Redhat), Debian, Ubuntu, Fedora, Deepin, Amazon Linux and other same family Distros.
Just like WAMP or XAMPP server for Windows, OneinStack allows creating different Linux web server environment such as:
Lnmp(Linux + Nginx+ MySQL/MongoDB+ PHP)
Lamp(Linux + Apache+ MySQL/MongoDB+ PHP)
Lnmpa (Linux + Nginx+ MySQL/MongoDB+ PHP+ Apache): Nginx handles static, Apache handles dynamic PHP
Lnmt (Linux + Nginx+ MySQL/MongoDB+ Tomcat): Nginx handles static, Tomcat (JDK) handles JAVA
Lnpp(Linux + Nginx+ PostgreSQL+ PHP)
Lapp(Linux + Apache+ PostgreSQL+ PHP)
Lnmh(Linux + Nginx+ MySQL+ HHVM)
All the above-mentioned web servers combination can be installed using pre-given OneinStack script.
OneinStack updates are timely which makes it very reliable to use. The script of OneinStack provides a wide range of features such as:
All the command and auto installation will be done in Terminal only using the command line. Good for server usage.
Most of the time up to date.
Some security optimization
Wide range of database versions (MySQL-8.0, 5.7, 5.6, 5.5; MariaDB-10.4, 10.3, 10.2, 5.5, Percona-8.0, 5.7, 5.6, 5.5, AliSQL-5.6, PostgreSQL, MongoDB)
Multiple PHP versions (PHP-7.3, 7.2, 7.1, 7.0, 5.6, 5.5, 5.4, 5.3)
Provide Nginx, Tengine, OpenResty and ngx_lua_waf
Tomcat version (Tomcat-9, Tomcat-8, Tomcat-7, Tomcat-6)
JDK version (JDK-11.0, JDK-1.8, JDK-1.7, JDK-1.6)
Apache version (Apache-2.4, Apache-2.2)
OneinStack provides option to install PHP Cache Accelerator provides ZendOPcache, xcache, apcu, eAccelerator. And php extensions, include ZendGuardLoader, ionCube and more... can be installed with one click.
Installation of Pureftpd, phpMyAdmin, memcached, redis
Provide upgrade script for above-mentioned tools
Virtual host script
Support local, remote(rsync between servers), Aliyun OSS, Qcloud COS, UPYUN, QINIU, Amazon S3, Google Drive and Dropbox backup script
And more...
It also comes with the Let's Encrypt certificate that means those want to use the SSL certificate for their project; just only need to enter the domain name with you want to use SSL. After that, it automatically configures the SSL certificate for the domain name. Moreover, OneinStack will also set the auto-renewal of Let's Encrypt certificate.
The OneinStack project is available on GitHub and free to download, install and use.
Read the full article
0 notes
Last Seen Blogs

bynazzen
İsimsiz

mister-auto-fi
Mister-Auto Suomi Tumblr

lu-vargas
@livingworldblog


savagetease
ᴘʀɪᴅᴇғᴜʟ.