#with cinematic dof enabled
Text
does anyone know how to edit gshade settings without going in game? i accidentally enabled cinematic-dof which crashes my game bc my computer can’t handle it and now every time i try to toggle gshade off it crashes bc that dof is on
#nonsims?#i'm mad at myself for turning it on last night#i keep forgetting it's cinematic dof that crashes my game#which boots up with gshade on#hence. my game crashes bc it's on#with cinematic dof enabled#help i wanna play my game
3 notes
·
View notes
Text
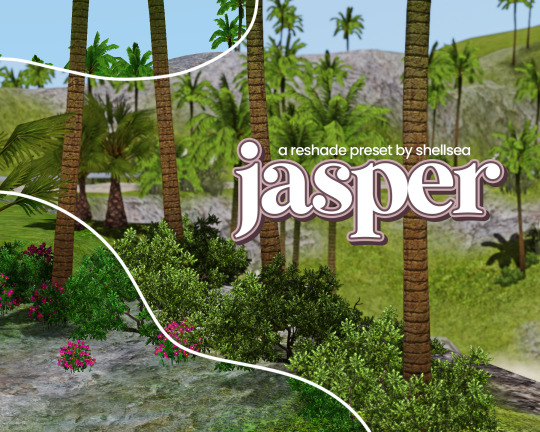


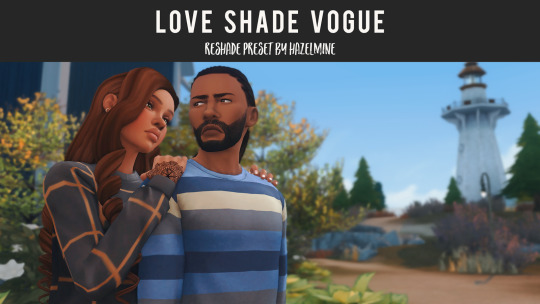
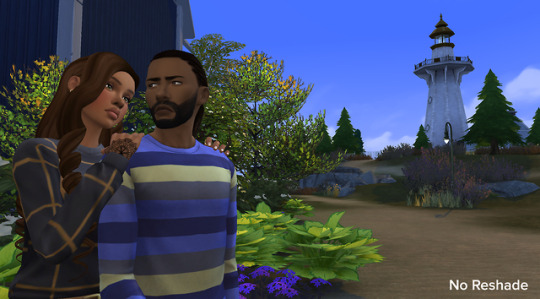
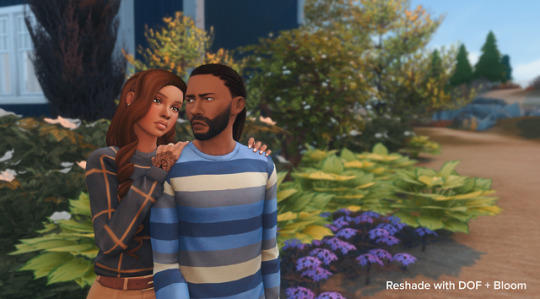
jasper reshade preset.
(just another shellsea preset + 'er' because jasper sounds better than jasp)
much more subtle reshade preset than my last one, but since people have already asked what I'm using after only using this in one video, I figured I'd share :~) game is a little brighter, greens are a little warmer, nothing fancy but nice to look at all the same.
this preset uses 2 different MXAOs, PPFX SSDO, and depth cues because I like my shadows exaggerated; you can disable some of these if you prefer them a little more subtle.
shaders used:
adaptive sharpen, clarity, depth cues, LUT, martys MXAO, color gamut, PPFX SSDO, quint MXAO 2, SMAA, tonemap, cinematic DOF (optional, use f8 key to enable/disable).
download @ patreon.
207 notes
·
View notes
Text


I saw someone recently ask why their shots weren't turning out how they wanted them to despite being able to support the highest graphical settings, so I thought I could share a little behind-the-scenes tidbit re: my approach to lighting and post-editing in VP in case it's useful.
And for my money, lighting is one of the most important factors in getting a shot that I'm happy with. Yes, a high-end graphics card can absolutely help, but that's just one tool of many that can make a difference.
(This info is probably most relevant to folks who can mod their game, but the overall principle can also be applied to vanilla photomode, too. You'll just have to find good in-game light sources since you won't be able to spawn your own, and it might require a little more finagling with the vanilla photomode exposure and contrast settings. Here are some 100% vanilla shots I took recently that I think turned out pretty decent even with those limitations, just to give you some ideas if that's what you're working with.)
Lighting & Exposure
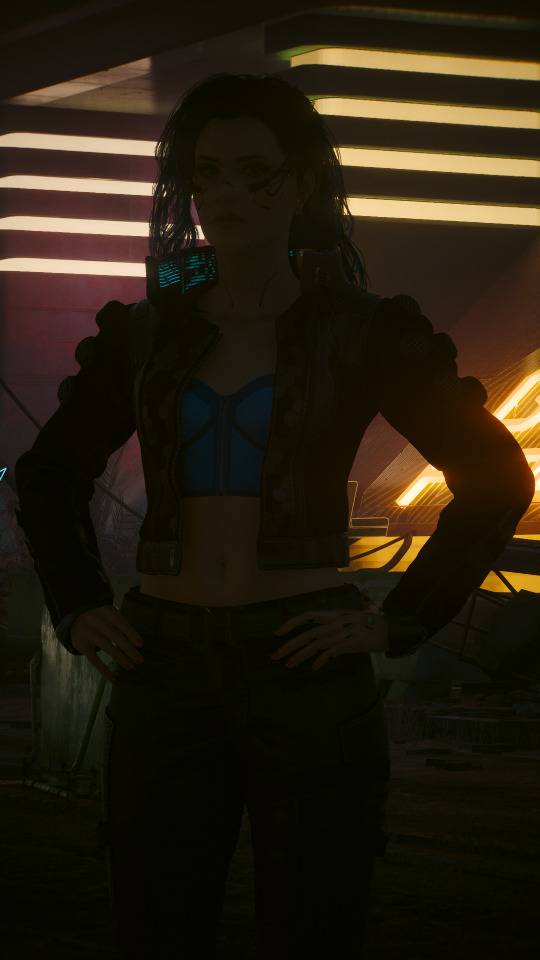
So referencing the photos above, from left to right:
A purely vanilla shot with ray-trace enabled but no lighting tools
The same shot with lighting tools on Valerie
The same shot with lighting tools + some Lightroom editing
Beefy graphics cards can certainly make a difference here since they'll be able to render more nuanced light and shadows, but as you can see in the purely vanilla shot, that ray tracing on its own ain't doing much when it comes to lighting Valerie. The neon lights in the background are pretty, but she's barely even visible in that dark ass street.
In the second shot, Valerie is in the exact same location but has multiple light sources on her. I mostly use CharLi lights these days, which is a free suite of lighting tools available on Nexus, and the customizable ambient lights in AMM, also free on Nexus.
I didn't think to screencap my exact lighting setup, but I'm pretty sure it was something like this:
CharLi spotlight on the left and right of Valerie, tinted pink/magenta
CharLi spotlight on the upper right, tinted teal
(I think I might have had an orange CharLi spotlight too, but it wasn't visible from this angle)
2 CharLi white spotlights directly on Valerie
Probably 1 or 2 AMM customizable point lights on her face (I like using the point lights at very low brightness to accentuate faces and give them a nice glow)
Now putting all these lights on a character could end up way too bright at the default vanilla exposure, especially if you aren't using any kind of major Reshade overhaul (which I do not).
Instead, I just use the vanilla photomode exposure settings to make a scene really dark and then light it back up with my own tools. (This is also a great way to shoot in areas that might have weird lighting effects, and it can be done indoors or outdoors and at all hours of the day.)
Just a simple example of that in these shots:

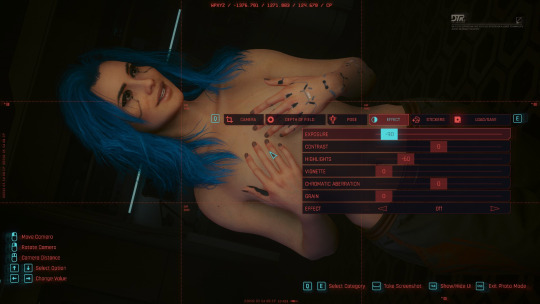
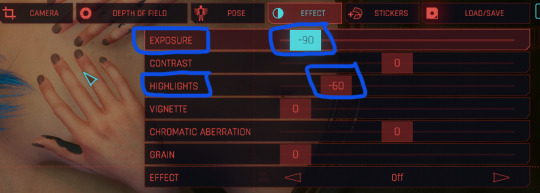
On the left, Valerie has a spotlight on her face and chest--It's pretty bright, too bright for my tastes. On the right, she has the same spotlight, but the overall exposure has been dropped down to -90 and the highlights have been dropped to -60 (now it's a little too dark for my taste--If this was gonna be a real shot, I'd build up more lights, but just wanted to show how much altering the exposure can affect a shot).
Post-Editing
As for making further adjustments to colors, shadow levels, sharpness, etc. of a shot, I know a lot of folks prefer to do that with Reshade presets, but... I don't, haha. I did make a basic shader to reduce the green tint of the game, and I use the Cinematic DOF and Real Long Exposure shaders to get a nice depth of field and reduce hair pixelating. Otherwise, all other adjustments I make are in Adobe Lightroom (or Photoshop if I need to make more precise adjustments).
And it's just a personal preference here. I just don't like having to mess with too many mods and menus in-game--I feel like it increases the chance of something freezing or crashing or me accidentally closing out of photomode. It also helps to give me a new perspective to see the shot outside of the game, especially if it's a portrait-oriented shot. Plus, I just like the process. Gives me one more reason to stare at the blorbos for a little while. :3
I adjust each Lightroom preset as needed depending on the color and exposure of the shots I'm working with, but these are some of the more common settings I modify:
I almost always finetune the exposure and shadows/highlights.
I like to do a global increase for saturation and vibrance.
A lot of my presets increase the saturation of reds and blues and decrease the saturation of yellows and greens, but this can vary; e.g. i like the greens to be vibrant if it's a nature shot.
I also usually make the white balance a little cooler.
I love tinkering with the global curves settings to "flatten" the shadow levels.
And I like really crispy shots, so I always increase the sharpness, and I'll usually bump the texture and add some noise, too.
These are all things that can be done in other similar programs/apps or even with Reshade. If you're just starting out, I think using pre-made presets and filters is a great way to go, and as you get more comfortable with the tools, you can start to make little tweaks and edits to personalize the style.
So anyway, there's some of my process! Everyone's got their own, and what works for me might not work for you--Don't feel like you have to take any of this as gospel or work exactly the way I do. But maybe this will... shed some light (ha ha, I'll see myself out) on how to get started with some VP tools. <3
36 notes
·
View notes
Note
Omg i feel so stupid now lol.. thank you for helping! That seems to be the problem why DOF doesnt work for me in bg3 since i’ve only tried using the regular shaders like cinematic or adof.. i’m gonna try Otis shader and see!! I have another question tho, you said it can take long like 30min to render the picture - is that the case even if you chose to not hotsample too, or only when hotsampling? And in cutscenes etc when I wanna be quick with getting a specific shot or serveral, is that possible like can i screenshot serveral times after another immediately and it renders like 2-4 pictures then, or do i have to take one - let it render - before i can move on to take a new one? Hope that makes sense. I usually smash the screenshot button sometimes cause i dont want to miss a specific scene/shot. Or get several screenshots of like the same moment. Thank you so much anyway!!!
If you want to use IGCS DoF you have to be slow and considered.
Otis' website has instructions how to use it, make sure you read them carefully and you'll understand what's involved, but the tl;dr:
Basically, the way the DoF works is completely different to a DoF shader. It moves the camera very slightly over and over again and takes a temporary screenshot each time to slowly build up the final scene (all of those temporary screenshots will be deleted once it's done). This way it gets very accurate information about what's in the scene, which is why it produces such an excellent result.
You set up a shot, you go into the addons tab and choose IGCS, click start session, and the DoF controls will come up (make sure you have the IGCS DoF shader enabled first - that shader does nothing, but it's required for the addon to work).
Then you choose your bokeh strength, and you set up your focus. You have to be very, very precise with the focus. You choose a few other things, like the shape of the bokeh, and you choose the quality. (Those settings will carry over to next time, but you'll have to set up your focus again.)
The quality is what determines how long the shot will take to render. It will tell you at the bottom how many pictures it will take. The higher the quality you choose, the more of those temporary screenshots it needs to take to get more accurate information and a better image quality. Imagine pressing the print screen key 1,000 times and how long that would take.
The lower your fps the longer it will take. If you have high fps it can fire off those screenshots nice and quick. If you have low fps each screenshot takes a bit longer. If you're hotsampling, you're going to have lower fps.
Because my PC is old, I have a quality that results in about 800 screenshots. When hotsampling and using RTGI etc that can take a long, long, long time to render.
Once the shot is rendered you take your own screenshot as normal, and then you end the session.
One thing, anon. You know you can pause cutscenes, yes? Any current dialogue animation may keep playing until that line has finished, but otherwise it will pause.
The thing about using premium tools from Otis and others, if you're just firing off cutscene screenshots hoping one will look okay you're never going to get the most out of them. They're designed for serious screenshooting (obv anyone can use them if they want). Taking your time to set up a shot, being precise about the composition, the lighting, the aspect ratio, the whole scene, is a lengthy process. I'm not especially great at composition, so my screenshots are only so-so, but I try very hard with each one, and it can take me an hour to get one I'm happy with (this is why I'm still in Act 2). Slowing down improves your skill.
3 notes
·
View notes
Note
Hi, I'm looking through your pictures and I see you're using Thatched Reshade. Have you edited that to make it compatible with TS3? I tried it, but I find some settings to be difficult to navigate through the game. And also, do you have a tip for using reshade while gameplay. To use the HD settings but still make it playable! I love your content! <3
hi!! yes i did use Thatched reshade for my scenery pictures of Kaihola :) it was my first time trying it out. thank you lovely!!
About Thatched:
i didn't have to edit the settings much. btw i'm using reshade 4.9.1 with all the shaders (including the legacy ones) installed.
oh, i did make sure that in "global preprocessor definitions", that all the values for RESHADE_DEPTH_INPUT_IS_[reversed/logarithmic/upsidedown] were zero. i think you need to set it that way in order for mxao and depth of field to work properly.

that's what my screen looks like with almost every shader turned on. for some kaihola pics i switched off some of the bloom shaders, the depth haze, and the sunset filter. i also adjusted the CinematicDOF’s focus setting to be mouse-controlled but that was all.
i noticed that these shaders don’t play nicely with the game’s menus: mxao, depth haze, cinematicDOF, and bloom. i only turn on reshade for taking pics, when i’m in picture mode and after i have my angles saved!! 😂 i turn it on in performance mode, take the pic, and turn it off. my computer slows down and the fan starts whirring if i try to move around or do gameplay stuff while a reshade preset is turned on.
Reshade for Gameplay
ok here’s what i would suggest for a light, gameplay friendly reshade you can leave turned on while doing literally everything:
mxao, for some added shadows. set the “sample quality” to medium or low. you might have to mess around with the settings to get a good effect. if the effect is too subtle, skip it entirely.
or try turning on ambient occlusion using your graphics card.
save the settings but turn on for pictures only: depth haze and/or cinematic DOF. these will blur the game’s menus and get in the way of normal gameplay.
SMAA or FXAA to smooth the pixelated edges. or you can turn on your graphics card’s anti-aliasing. you have to leave TS3′s edge smoothing off to use depth of field shaders.
a sharpening shader.
deband, set it on medium or low strength. this smooths the texture banding on clothes and build/buy textures.
lightroom, if you want to adjust the brightness, contrast, saturation, colors etc. there’s a few different shaders that can do this, just pick one of them and do all the color adjustments within one shader.
a bloom shader if you want to add that soft, dreamy/hazy look, although it might blur the game menus too much on higher settings.
if you only have a few shaders enabled, hopefully it won’t lag your computer too much!
i would also make sure you have limited TS3′s FPS to 30 or 60 FPS. you can do this either through your graphics card settings, lazy duchess smooth patch, 3booter, or rivatuner. the limited FPS reduced lag a lot for me :) also maybe lower the number of high detail lots in the game settings, and set your HQ mod texture sizes back to the default, because those can contribute to lag too.
I HOPE THOSE TIPS ARE HELPFUL ILY TOO I HOPE U DIDNT GET BORED CUZ I WROTE A LOT <3
109 notes
·
View notes
Note
Do you have a resource for ts2? Any tips on how you achieved your latest post too, reshade and editing
I haven't set up a resource page yet, but I do have a post here with the lighting mod and ReShade preset I use for TS2. I use ReShade with LazyDuchess's Launcher (instructions here). The injector method would only work like 10% of the time for me. Plus the launcher has awesome features for better graphics like better quality lot imposters, reflective water, etc!
Latest TS2 post.
I didn't edit the pictures much, it's just the beauty of Feverfew and ReShade! The first two pictures, I just sharpened a bit and resized them. The last one, I added some more blur at the bottom to hide the lot edge. I did have a DoF filter enabled when I took the pictures. Either Quint's DoF or Cinematic DoF. I also use Ivy-sims' default snowflakes.
11 notes
·
View notes
Photo


Preface:
Download at the END
Reshade Version: 4.8.2
I’ve included screenshots of the UI, so you get an idea of whether the discolouration annoys you, and is therefore unsuitable for you. But please go through here for more in-depth previews first.
To keep the fps drop at a minimum please remove any unnecessary shaders upon installation (scroll to the end) as these may make you lag. Please also make sure to disable ‘edge smoothing’ in the ts4 ‘settings’ before trying to enable or use DOF.
Turn off edge smoothing in Game Settings:
Launch Game > Options > Game Settings > Graphic Preferences > Edge Smoothing > off > save
Enabling DOF (Depth of Field e.g ADOF or CinematicDOF) may make you lag. If you hit less than 45 fps without ADOF enabled with high or ultra graphics on, I do not recommend you use them.
For an acceptable performance, aim for 60 fps or higher. If this preset drops your fps rate below 45-60 without DOF enabled, deinstall it entirely.
If you use HQ Mod you require the following reshade settings.
- I have disabled SSAO in my game.
- I use @softerhaze‘s world lighting mods - as a base: Moonglow for Sulani, and Twinkle Toes for all other worlds. I have made this preset compatible with that. Unsure how this will look with EA/Maxis’s original lighting, but I think it won’t look too different. Do leave feedback, thank you.
————————————————————
☆ TOU
If you try out my preset, please tag me, would love to see how this looks in other people’s games. (Not required).
Do not re-upload my preset, always link back to here or tag me if you want to include my preset (required).
You’re free to create new presets based on this one. Tag me if you like, but you’re not obligated to do so.
————————————————————
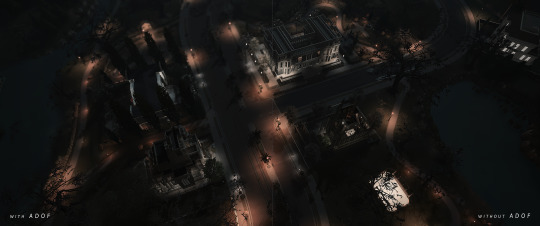
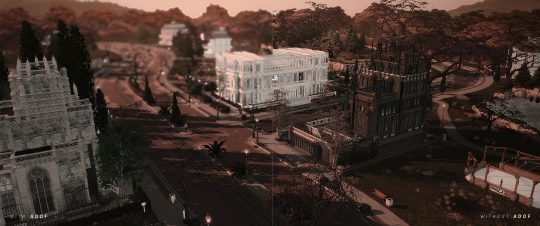
A neutral cinematic reshade preset that:
Neutralises the crayola blue tinge from skies
Shifts yellow tones to a subtle brown/orange
Removes the overpoweringly vibrant ea/maxis green tone in grass, trees etc.), and leaves a deeper, less vibrant, natural green that doesn’t overpower secondary hues such as:
----> Whites, greys, reds, blues and other neutral tones
Lowers shadows
Raises highlights
Doesn’t overly desaturate or oversaturate certain colours, no fade or milkiness
lowers black points for darker nights
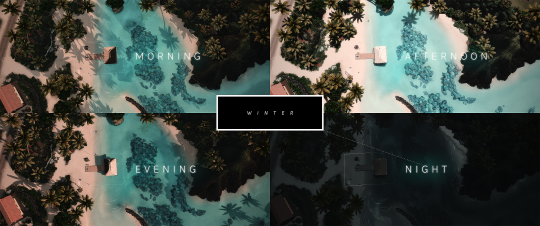
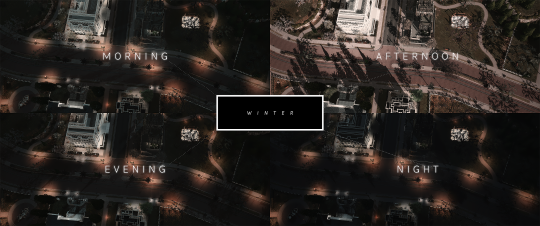
I created this preset mainly to fit the more realistic style in my game; ea’s colours didn’t fit with my gameplay. The preset was adjusted to fit my builds, and the more neutral and realistic style in my save.
I craved darker, less bluish nights, and searing summer noons. I wanted to avoid unnecessary bloom or an unbalanced UI, so I ended up with a colour-fix that was usable for (my) actual gameplay.
The preset has been fully game & play tested, in all worlds & weather conditions. For more previews click here.
The preview images were taken during clear end-of-winter season conditions.
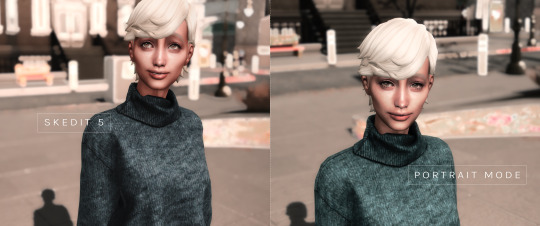
Depth of Field & Portrait Mode Shaders
This preset uses the ADOF (qUINT_dof.fx) shader for depth of field blur, and does not rely on automatic mouse tracking.
To use automatic mouse tracking for screenshots, please disable ADOF and use the cinematic shaders instead. To enable/disable ADOF press CAPS LOCK (⇪)
you can remove adof entirely if you prefer cinematic dof by deleting them from your ‘shaders’ folder in your game’s ‘bin’ folder.
Portrait Mode relies 100% on both qUINT_Lightroom.fx shaders. To enable/disable them press SHIFT+4
portrait mode is designed to add a subtle colour change that cools reds and greens and lifts the vibrancy and luminosity of blues slightly.
you can brighten your nights by raising the gamma levels to 50 or 100 in one of the Lightroom shaders like so*
——————————————————
Shaders Used:
AdaptiveTonemapper.fx
qUINT_lightroom.fx
qUINT_lightroom.fx
Technicolor2.fx
FXAA.fx (this is an ‘edge smoothing’ shader)
Levels.fx
ColorMatrix.fx
Deband.fx (this minimises and softens colour banding)
Prod80_02_Bloom.fx (adds extremely subtle bloom to candlelight in very dark rooms)
FilmicAnamorphSharpen.fx
qUINT_dof.fx (depth of field shader)
Needed (for troubleshooting):
DisplayDepth.fx
AspectRatio.fx
———————
Optional:
Vignette.fx
PD80_05_Sharpening.fx
CinematicDOF.fx
CinematicDOF.fx
Vibrance.fx
ChromaticAberration.fx
Chromakey.fx
PD80_06_FilmGrain.fx
qUINT_rtgi.fx (currently in beta, can be acquired here)
————————————————————
DOWNLOAD HERE.
*Download brighter version here. (obsolete)
Questions? PM me, or send an ask. Thanks!
132 notes
·
View notes
Photo
The Sims 2 Realistic Forest lighting breakdown/tutorial
or how I achieved this realistic looking forest in The Sims 2 without any editing.
It all boils down to being frustrated with the lighting system limitations (and reshade being the best thing ever). For those who have watched my tutorial: you know I am obsessed with light. I am eternally grateful to Gunmod for his lighting system that changed Sims 2 forever - but even with that beautiful mod sims still sometimes don’t look quite right, especially when it comes to outdoor lighting.
I’m using Reshade with CinematicDOF, MXAO, FXAA, bloom and curves.
I used this tutorial to get it to work. Here’s another tutorial to make depth-dependent functions work. Also, I’m going to share my preset soon even though it’s just enabled mxao and dof!
So how did you do this, Soph? This forest looks dense, and moody and has sunlight in it! Well, reshade does most of the work - mxao gives deeper and better shadows, dof blurs the image in a cinematic way. But the in-game lighting is also super important! This picture explains the lighting set-up I used:
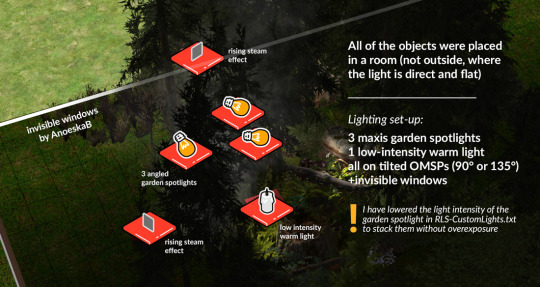
The basic difference is that I placed all of the plants inside a room. This alone makes the light behave differently. Instead of very flat outdoor lighting you have a dark room where you can virtually place any light source you want. I let some of the natural light in using AnoeskaB’s invisible windows. Additionally, I placed 3 spotlights and a random low-intensity warm light on tilted OMSPs to add a feeling of sunlight peeking through the trees.
Also, I used my own very bad recolor of The Great Sky of Totalitarianism as a backdrop:

Extra tip: the In-game moving light thing!
Yes, this is an in-game moving light. I got inspired by one of theElonianCass’ videos and started digging around, trying out even the weirdest ideas to get this to work. Basically it is an invisible sim with a table lamp placed in their hand. The game allows you to place something in sims’ hands when they are occupied (ex. playing an animation). I chose a looped anim from Aikea's Animation Painting, placed a table lamp in the invisible sim’s hand, hid it with the lamp hider and placed the sim in the forest. Done. Maybe a step-by-step video tutorial would be better and easier to understand, but you get the idea. I might make that tut sometime in the future, so stay tuned.
Feel free to send me a pm if you have any questions!
CC and mods mentioned:
OMSP by SilentLucidity
Gunmod's Radiance Light System 2.4 by dDefinder
The Great Sky of Totalitarianism by lowedeus
Animated Lot Based Effects by Sophie-David
Invisible window by AnoeskaB
Main cc you’ve seen in the gifs:
Quixel Megascans by HYDE
Skyrim Pine trees by sunmoon-starfactory
474 notes
·
View notes
Photo


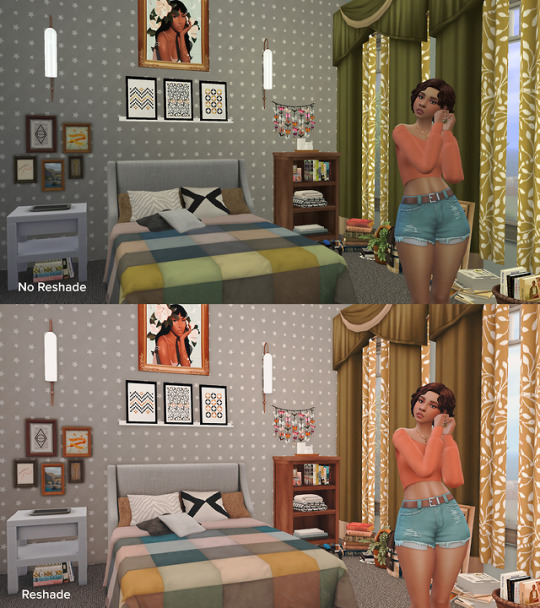
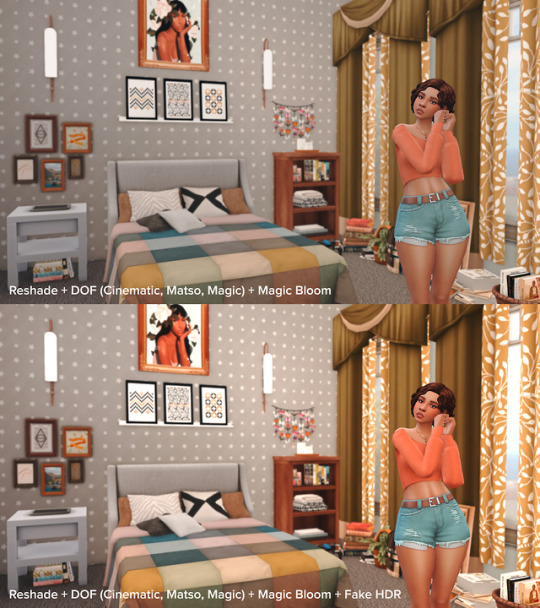
Another follower gift!
This is my personal reshade preset that I have been using and tweaking for some time now. I wanted a film-inspired look that wouldn't wash out my beautiful brown sims.
This preset was created with Reshade 4.1.0 (available here). Each of the shaders I use by default are turned on. Some shaders I only turn on when I am ready to use, and those have hot keys assigned. I do use this preset for my gameplay and don't have any issues with it and my PC setup. Everyone may not be able to leave it on at all times. I tried to make it as lightweight as possible.
DETAILS
Additional shader: qUINT_lightroom.fx - You can download this additional shader, if you don't have it already.
Additional/optional LUT: Full Bloom Multi LUT (39 + 1 LUT version/Vogue) by Picture Amoebae. Available here. You don't need it as the settings I use don't affect the colors a lot, but I notice a difference in different lighting situations. Here's a preview. Pastebin link to see my Multilut.fx file.
To use DOF effects, you will have to disable Edge Smoothing in your graphics settings. Blur is mouse-controlled.
Works in performance mode.
Suggestion: Play around with the shaders that have hot keys assigned. Applying different ones will help you achieve different looks.
SHADERS + HOTKEYS (these should be enabled when first installed)
MXAO
SMAA
FXAA
Clarity - Alt + C
Mode2
DPX - Alt + D
FilmicPass - Alt + F
Colourfulness - Alt + C
Lightroom - Alt + L
MultiLUT - Ctrl - Alt + M
Vibrance - Alt + V
HighPassSharp
DOF Shaders
Cinematic DOF - Numberpad *
Magic DOF - Numberpad *
Matso DOF - Numberpad /
DOWNLOAD INFO
Please don’t re upload or claim as your own.
Please don't put behind any type of pay wall.
Feel free to tag me if you use my preset, I would love to see!
SIMFILESHARE | GOOGLE DRIVE
PREVIEWS || Check this Flickr album for more.
** No editing was done to the preview photos other than sharpening for the web.
2K notes
·
View notes
Photo

So, continuing on from yesterday; I worked to finish animating the SFMMovie collab entry and add the lighting needed to polish everything up... Overall, I'm happy on the results and with the DoF enabled, it gives a nice cinematic gloe o it which I think is visually appealing! The image above showcases a frame from the first shot with the final render settings dailed in... With anyluck because I'm not rendering this at 5K, it'll fit into the frame buffer of the GTX 970, which struggled to render out "Outside"... ^^"
In terms of plans for the rest of the week; I plan to spend the entirety of tomorrow rendering out all 459 frames of the short, Thursday will be focusing solely on the post-production work needed to really sell the joke, and Friday I'll start on the next entry out of the 3 I want to do... Still not out of the fire yet! XP
#blender#blender eevee#blendereevee#eevee render#eevee renderer#eeveerender#eeveerenderer#3D#chibi#My Little Pony#pony#director cut#workinprogress
3 notes
·
View notes
Text
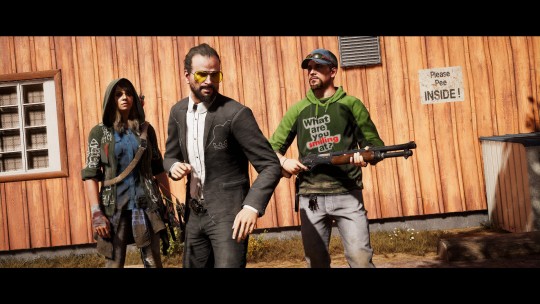
photo mode has been released. what we have?
wanna enable photo mode? open menu. 10/10
FOV - minimum - 60°
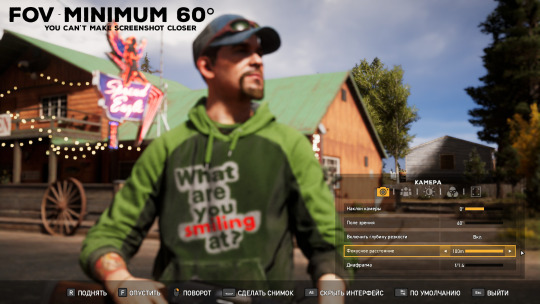
DOF doesn’t work perfectly.
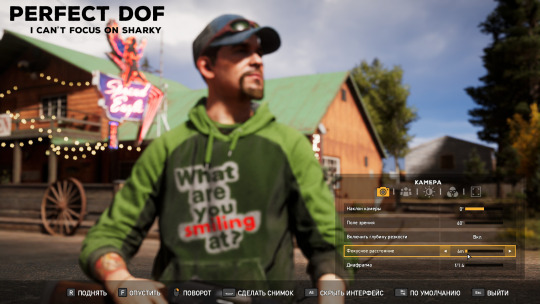
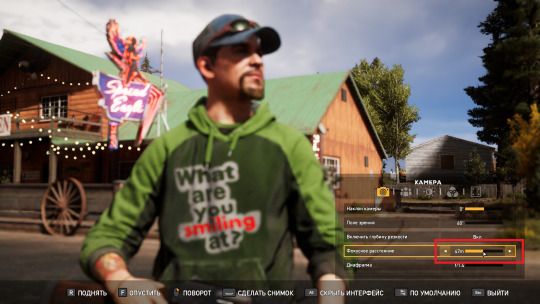

only 3 emotes (wow... cool...), few filters and OF COURSE you can’t use photo mode in cutscenes (it’s not a big problem, but...)
if you play on consoles - photo mode great stuff.
thank you to Matti Hietanen for his cinematic tools.
#pc master race#far cry#far cry 5#ubisoft#может я такой долбоеб что у меня не все получается#UPD: выходит что я долбоеб ибо с глубиной резкости все нормально
76 notes
·
View notes
Text
hey it’s a tutorial on how i make gifs
its a long one
carly, what programs do i need?
what a good question! basically, you need a program to record video (if you’re making gifs of video games), a program to take frames of the video you recorded (or the movie or show you’re giffing because you can do that too, obviously), and a graphic processing program (it’s photoshop, you need photoshop)
also if you’re recording your own game footage you need a computer capable of running that game well. ideally you want medium to high settings at 60fps (this varies; like you want to record, say, skyrim at high settings and probably modded, but newer games like mass effect andromeda, just medium-high settings should be fine!)
for video recording, i strongly recommend:
nvidia shadowplay
i think you can only use this if you have an nvidia graphics card. it’s very good because it automatically records at 60fps and at up to 4k (so like it’s good for taking regular video for video purposes also) and it starts up very quickly (so when you hit record, it’s only a few seconds before it starts recording). in-game, you hit alt+f9 to start recording.
xbox game dvr
i used this for a long time and it’s perfectly satisfactory, and great if you don’t have an nvidia graphics card. it comes with windows 10. you need to go into windows settings and set the quality to High and the framerate to 60fps. the only drawback is that it takes a hot minute to start up the first time you use it in a gaming session (like 10-30 seconds) and there are some games it won’t open over (i had issues with both assassin’s creed odyssey and far cry 5). in-game, you hit ctrl+alt+r to start recording.
for frame-taking:
gomplayer
has a slightly imprecise method of screenshotting, that is you have to time your “burst capture” while the video is playing - you can’t find the spot you want, pause it, start your capturing, and then play the video to have it start at an exact moment. however it really captures every frame and i’ve never had any issues with it. best advice is to record more frames than you need to and delete the ones you don’t need in windows explorer or photoshop. to open the screen-capture window, you hit ctrl+g
potplayer
i used this one for a long time, too! it does what i said gomplayer doesn’t do, which means you can pause it and start screencapturing and it’ll start from where you paused it when you hit play. i’ve had a few issues with it not actually capturing every frame even when i have it set to do so. but that might be just me. to open the screen capture window, you hit ctrl+g
for graphic handing:
photoshop. specifically cs5 -- that’s what i’ve used for about half a decade. i’m sure a lot of the steps are similar in cs6 and cc but i’ve never used either of them and i can’t help you learn those.
that’s it. no other options.
okay great!!!!!!! you got ur software set up. now what???
if you want to make gifs of video games where you use your own footage, read this bit. if not skip down to the next header.
at the most basic level, with creative cropping, you don’t really have to do anything more than record the screen of the game you’re playing. for a lot of games, this is what you have to do (dragon age origins and 2, stardew valley, etc). HOWEVER. there are ways to get different shots in some games and i’ll take you through skyrim/fallout 4 and dragon age inquisition (and i think other frostbite engine games?) if you have questions about other games you’re welcome to ask!
bethesda products (skyrim and fallout 4 mainly)
bethesda is very nice and includes console commands that let you get some good cinematic shots in their base games. these are the same for both skyrim and fallout 4 because they’re the same engine.
tfc
your bread and butter, baby. this is “toggle free camera” or “toggle fly camera” -- it detaches you from your character basically, and you can fly around. if you are in third person when you enter the console command, your character will remain visible and you can take pictures of them. in first person, theyre not. (also, drawn weapons will disappear in first person). note that in fallout 4 third person, your character will continue to rotate/strafe as you move the camera.
you can add a 1 to the end of the command (tfc 1) and it will also freeze time. this is good for taking screenshots, not gifs
entering tfc again will turn it off
tm
‘toggle menu’ -- this turns off the hud, including the crosshair. this is. very important. you don’t want the menu in ur gifs ok.
it also hides the console window! so it may be a little confusing. but generally if the grass/water/dust is moving, the console window isn’t open.
typing tm again will reenable the menus
sucsm #
the default free cam is very fast and imprecise. i usually use sucsm 1 to slow down the speed at which the camera moves.
sgtm #
set global time multiplier. this one isn’t hugely necessary but i still find myself using it sometimes. default is 1. you can set it to, like sgtm .01 to basically freeze the game while you get the camera into position if you’re trying to capture an action. also sometimes if i think things are moving too fast or too slow i’ll change the timescale. MAKE SURE you set it back to 1 when you’re done!
i Heavily suggest, especially for skyrim, that you use an ENB if your computer can handle it. it makes the game look nice, but it also usually includes depth of field which i am an absolute slut for. if not, use the mod dynavision for a DoF effect (available for both skyrim and fo4!)
and then you just have fun with it. getting good shots takes some practice. play with it. i tend to record long sessions (~5-10 minutes) with a LOT of different shots to pick from when i watch it back.
frostbite engine (dragon age inquisition and mass effect andromeda, notably)
here’s where we use the Cinematic Tools, lads! these are a little more difficult. note that there are ct for a lot of games that i don’t play but i’m assuming they work the same. i’ve also never used CT in andromeda but it’s the same engine so they also probably work the same. so i’m mainly talking about DA:Inquisition.
OKAY SO. start the game. load ‘er up. you want to run origin and DAI as admin, and then once you’re in game, start the CT as admin, too. the controls window will open, and then another command prompt type window will open and hack into the matrix. you don’t have to do anything with it, but note that if you close the command prompt window, it will close the game.
okay! party time. there are lots of other tutorials on using the CT, btw, so if i don’t explain it sufficiently you can either ask me or look up other tutorials.
first, i usually take gifs of characters in DAI, which means i wait until cutscenes so we can see them talking or making faces or whatever. you can also do scenery gifs or whatever!
so we’re in a cutscene. first and foremost check “freeze time” and then “enable”. set up your shots. start recording. THEN uncheck “freeze time”. that’s all in the “free camera” tab of the CT and technically all you need. But wait, there’s more. we’ve got two other tabs!
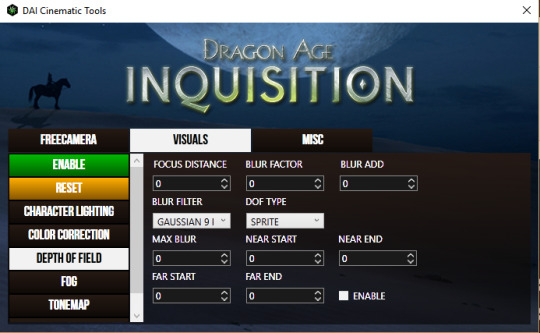
in this tab, I most often use “depth of field” because we’ve already established that i love a strong DoF. all these things are a little hard to understand and mostly require a lot of messing around.
focus distance
pretty self explanatory -- it’s the distance from the camera that objects will be in focus. for portraits, i usually have it at 1.125.
blur factor
how blurry the stuff that’s out of focus will be. i usually set it somewhere between 4 and 7, though you can go higher or lower. dealer’s choice.
blur add
makes everything blurry regardless of focus. don’t use it.
blur filter
i almost always set it to gaussian 9 but it doesn’t make that much of a difference.
dof type
always set it to sprite
max blur
i absolutely do not know what this does and don’t use it.
near start/end
with this you can kind of expand “focus distance” to include more varied distances. i usually don’t mess with this and i suggest you don’t.
far start/end
most useful in outdoor scenes. usually it’ll be set to like 100, meaning that there’s a gradient way out to the most blurred parts. if you bring it lower, the gradient distance gets shorter, so the background gets blurrier closer to your focus. what i set it to depends entirely on the scene. just try messing with it and see what it does for you.
make sure you hit the green enable button on the left and Also tick “enable” on the DOF screen to use it.
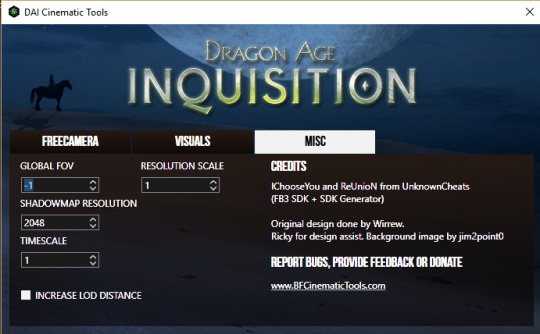
this tab is a little more useful for screenshotting but i’ll include it since i’m going over the CT anyway. i have never messed with global fov or timescale BUT
shadowmap resolution
i usually set it down to 512 for smooth, soft, realistic shadows. otherwise they look kinda stripey.
resolution scale
NOT FOR GIFS. do not use this for gifs. but DEFINITELY do use it for screencaps. set it to two (i’ve had my computer freeze from trying to set it to 4, so like, be careful). it basically doubles the resolution of everything on screen and makes it very pretty but it’ll ruin your framerate so don’t try to record with it.
okay, I’ve got my footage, now what!
now we’re gonna open it in whichever player you picked.
GOMPLAYER:
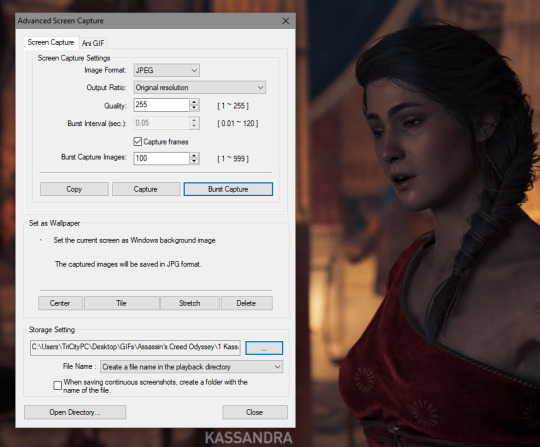
for gomplayer, you’re going to press ctrl + g to bring up the screencapture window. i Don’t remember what the original settings are, but you wanna make sure your quality is set to 255 (highest) and that it’s set to original resolution.
now the slightly hard part. you gotta hit “burst capture” while the video is playing, so it’s slightly imprecise. for that reason i have the number (burst capture images) set much higher than i’ll use, so that i make up for the imprecision. after you capture, go in and delete the frames you don’t need, either in windows explorer or after you’ve loaded them into photoshop.
POTPLAYER:
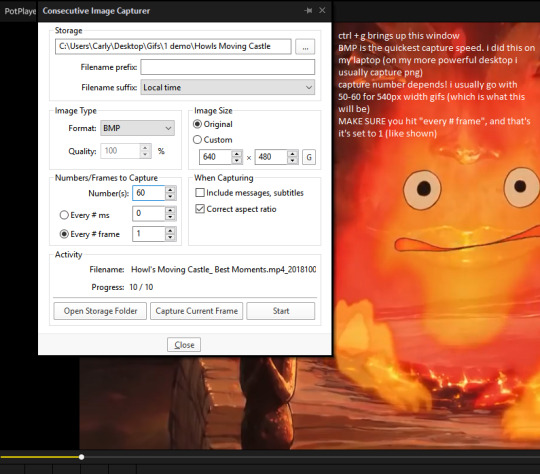
just pause your video, hit ctrl+g, copy my settings, click start, and then play your video. potplayer will capture every frame.
i should have mentioned this earlier but you have to have a folder to save your screencaps in. i usually organize by GIFS>game name># what its a gif of>a numbered folder for each gif in the set. but it’s up to you. just probably don’t save to your desktop or wherever the default location is.
AND NOW THE FUN PART!!
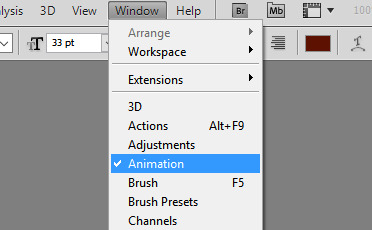
open photoshop!!! if it’s your first time here, go to window>animation so that you’ll. have the animation window open.
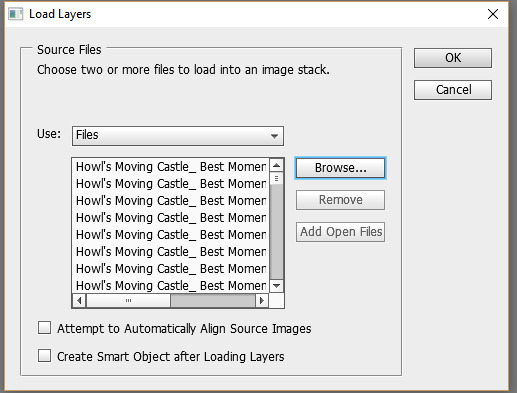
now go file > load files into stack > browse, and find the frames we just took. select em all. click ok.
you’re probably going to start off in timeline view. we don’t want that yet. click the box in the bottom right corner that looks like multiple little boxes to switch to frame view.
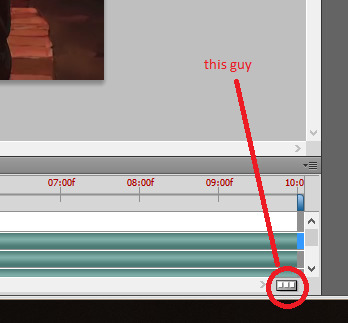
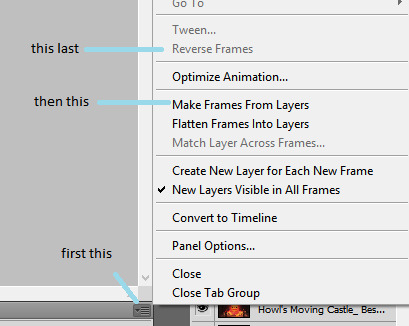
in frame view, click the menu box thing. and click “make frames from layers” and then “reverse frames”
now select all your frames, and on any one of them, select the arrow next to “0.0 sec” (this is the frame delay). select “other”
what you set the frame delay to depends on what your footage frame delay originally was. if you’re using game footage, it was probably 60fps, in which case you should set the delay to 0.04 sec. if it was 30 fps, I usually go 0.06 to 0.08. play around with it and decide which you like best. there’s a play button so you can see how the delay looks before you continue.
now we switch back over to timeline view. so click the same button as we used to get to frame view.
now select all your layers, in the layer panel. right click on them and click “convert to smart object”
here is usually where I do my scaling/cropping. tumblr photoset sizes are 540px for full width, 268 for 2 wide, and 177 for 3 wide. KEEP IN MIND when making especially 540px gifs that the size limit is 3mb. so you can’t make them super tall or super long (time-wise).
the gif of calcifer i’m making is going to be 540x250. make use of set image size (ctrl + alt + i) and canvas size (ctrl + alt +c). set the width of 540 with image size and then crop the canvas to your desired height with canvas size.
okay! technically we can be done. this is what my gif looks like right now:

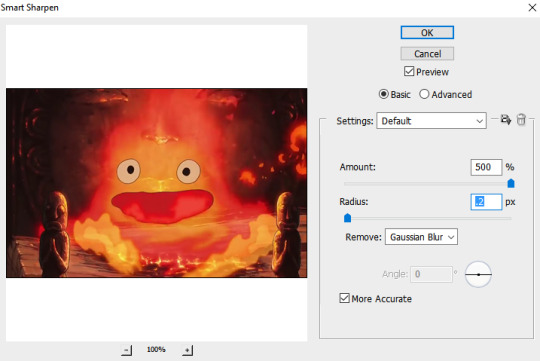
however i like to color and edit mine. yknow. here are my sharpening settings. I cannot help you with coloring because i’m bad at it. at best i will suggest you look at and download resource colorings from blogs like itsphotoshop
anyway, to sharpen: filter>sharpen>smart sharpen
and then apply your coloring. and save with ctrl + alt + shift + s, or just file > save for web and devices. set your file type to GIF. two things to look at:
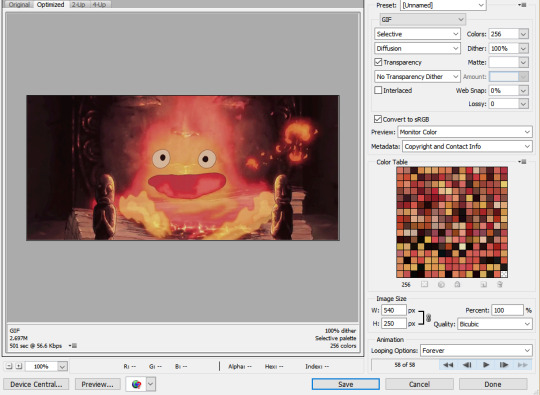
1) MAKE SURE YOU SET THE LOOPING OPTIONS TO “FOREVER”. i put this in caps because I am an idiot who messed this up all the time when i first started.
2) keep an eye on your file size!! if it’s over 3mb (mine, down in the left corner, says it’s 2.697, so it’s fine) then you can try to reduce the number of colors. but don’t go below 128 colors, because then it starts to look bad. instead you can try reducing the height or going back and cutting down the number of frames (so basically remaking the gif again :( ).
okay great, click save. save it. you’re done. here’s our calcifer.

and that’s it! i hope this made sense and like. absolutely ask if you have questions.
#i have been meaning to do this for. months. and finally got around to it these last few weeks!!!!#boy i really hope this all makes sense#carly tells tales#i'm not kidding this is really long. click read more at your own risk.
5 notes
·
View notes
Text
Lytro Cinema- The highest resolution video sensor ever designed, 755 RAW megapixels at up to 300 FPS
Lytro who only just recently announced they are no longer going to focus on consumer cameras, has just announced the Lytro Cinema Camera. According to the company, it is highest resolution video sensor ever designed, 755 RAW megapixels at up to 300 FPS. To put this in perspective, most digital cinema cameras are only capable of capturing between 8 to 12 megapixels. Forget 4k or even 8K, 755MP is around 40K!
Photo: Lytro
Photo: Lytro
The company is touting the new camera as the world’s first Light Field solution for film and television. The capture system enables the complete virtualization of the live action camera, and transforms creative camera controls from fixed on set decisions to a computational post-production processes. Lytro says the new camera can now capture historically impossible shots.
Lytro Cinema comprises a camera, server array for storage and processing, which can also be done in the cloud, and software to edit Light Field data. The entire system integrates into existing production and post-production workflows, working in tandem with popular industry standard tools.
Photo: Lytro
Photo: Lytro
The camera is certainly not aimed at the every day user, and has been specifically designed for cutting edge visual effects (VFX). Lytro Cinema represents a complete paradigm shift in the integration of live action footage and computer generated (CG) visual effects. The dataset captured by the system produces a Light Field master that can be rendered in any format in post-production and enables a whole range of creative possibilities that have never before existed.
“We are in the early innings of a generational shift from a legacy 2D video world to a 3D volumetric Light Field world,” said Jason Rosenthal, CEO of Lytro. “Lytro Cinema represents an important step in that evolution. We are excited to help usher in a new era of cinema technology that allows for a broader creative palette than has ever existed before.”
“Lytro Cinema defies traditional physics of on-set capture allowing filmmakers to capture shots that have been impossible up until now,” said Jon Karafin, Head of Light Field Video at Lytro. “Because of the rich data set and depth information, we’re able to virtualize creative camera controls, meaning that decisions that have traditionally been made on set, like focus position and depth of field, can now be made computationally. We’re on the cutting edge of what’s possible in film production.”
dof
With Lytro Cinema, every frame of a live action scene becomes a 3D model: every pixel has color and directional and depth properties bringing the control and creative flexibility of computer generated VFX to real world capture. The system opens up new creative avenues for the integration of live action footage and visual effects with capabilities like Light Field Camera Tracking and Lytro Depth Screen. This technology means you no longer need to use a green screen. Instead of doing the usual chroma keying, the system uses the vast amount of depth information that will allow VFX easily composite in CGI or to swap out scene elements.
Screen Shot 2016-04-13 at 10.03.27 AM
For big scale productions Lytro Cinema will allow a lot more freedom when composing scenes and shots. Some of the adjustments that can be easily altered in post production include deciding where and what you want to be in focus, depth-of-field, and image perspective. Lytro also claims that by capturing at 300 fps, they can take that captured material and then change the shutter angles in post-production. This removes the age old problem of having to live with high shutter speed angles when shooting at high frame rates. Now you can effectively choose how much or how little motion blur you want, without having to be confined to the decision you made at capture.
“Lytro has always been a company thinking about what the future of imaging will be,” said Ted Schilowitz, Futurist at FOX Studios. “There are a lot of companies that have been applying new technologies and finding better ways to create cinematic content, and they are all looking for better ways and better tools to achieve live action highly immersive content. Lytro is focusing on getting a much bigger, better and more sophisticated cinematography-level dataset that can then flow through the VFX pipeline and modernize that world.”
stroller
Key features:
The highest resolution video sensor ever designed, 755 RAW megapixels at up to 300 FPS
Up to 16 stops of dynamic range and wide color gamut
Integrated high resolution active scanning
Go for More information >> https://www.newsshooter.com/2016/04/13/lytro-cinema-the-highest-resolution-video-sensor-ever-designed-755-raw-megapixels-at-up-to-300-fps/
1 note
·
View note
Note
how do i fix dof making the edges on my sims and other objects blurry? i'm not sure how to explain this, but they almost look doubled? like it's out of focus
*not sure how to insert pictures here, otherwise i would*
If I'm right about what's happening (I would need screenshots to be certain - you can always message them to me instead of sending an ask) it's likely a focusing issue. If the focus point isn't quite right then where the blur starts can be too close to the subject of your picture, which can distort the edges.
The easiest way to use DoF is to use mouse-driven auto-focus (there are a few people for whom this isn't a good option - specifically if you use SRWE for hotsampling, but if that isn't you don't worry). So enable that if you're not already using it.
Then, with your subject in focus (wherever you point your mouse will be where the focus sits), go and look at the far blur and near blur sections. Depending on which DoF you're using they might be called slightly different things.
[Note: if you're using Cinematic DoF I'll add different instructions at the end because it uses a different system]
You're probably only going to need to adjust far blur - that controls how quickly blur begins behind your subject, and as a result how quickly it gets to its most blurry. Try increasing that number. That will push it back so the blur begins further away from your subject.
In terms of what numbers to put in there, try to visualise the distance between you (the camera) and the horizon (the sky in the distance). Everything in between is at a set distance. Most types of DoF calculate this from 0 (at the camera) to 1000 (at the horizon). Knowing this is most useful if you're using manual focus rather than auto-focus (because you have to set the distance at which everything will be in focus yourself) but it also helps give you an idea of scale for setting the numbers for far blur too.
Remember, the higher the number you choose, the further back the blur will start to kick in, which makes the blur weaker overall, so you might need to also adjust the blur strength if you want to keep the same level of blur.
Cinematic DoF:
Cinematic DoF uses Aperture and Focal Length instead of far and near blur distances. It mimics how a real camera calculates focus. In general, a high aperture and low focal length will give the greatest area of focus/weakest dof, and a low aperture and high focal length will give the smallest area of focus/strongest dof. So play around with both of those, either together or independently, to get what you need.
9 notes
·
View notes
Text
IMVU Reshade + RTGI Tutorial
youtube
EDIT: I've got a lil' video now too ლ(=ↀωↀ=)ლ
First thing, I highly recommend Olivia's Guide if you aren't already familiar with reshade & nvidia settings for IMVU. The only difference in how I've done this part is using Direct3D instead of OpenGL graphics. Just make sure you select whichever API you're using while installing reshade.
Second thing, I'll be using some steps listed under Draykos' Tutorial for installing RTGI for Wizard101. He also provides the links to some necessary files ヽ( ಠ益ಠ )ノ yisssssss
Anyways...
PART 1: Installation
1. IMVU Graphics Settings
choose Direct3D or OpenGL in IMVU advanced settings
2. Run ReShade Installer
browse to IMVUClient
choose Direct3D9 or OpenGL depending on IMVU settings
select all effects during setup
3. Run ReShade EVE Mod Installer
click your chosen API
choose update
4. Install ReShade GI Beta Manually
copy shaders and textures into the reshade-shaders folder
PART 2: Tweaking
1. Download Presets
SweetFX Settings DB loads of presets for games including IMVU
Doodle's ReShade Presets includes 10 presets with RTGI :D
you can keep your presets inside the IMVU folder, or put them elsewhere and navigate to the folder through the GUI.
2. Experimenting
go through the entire list of effects in the Reshade GUI if possible, see what looks good to you and what doesn't.
try tweaking the sliders for individual effects, such as the RTGI and depth of field.
make sure to copy/rename your personal presets as you go, as reshade will always overwrite the current one after making changes in the GUI.
3. Mo' Tips
I like to use "Letterbox" and/or "Border" effects to hide IMVU's UI and have a more cinematic look in screenshots, though some DOF effects may cause blurring of the borders.
It may also be useful to use a hotkey for reloading effects, if you want to try the experimental "extreme quality" in the RTGI tab. good for screenshots, not so much gameplay.
4. Performance
- keep IMVU windowed rather than fullscreen
- disable depth of field (ADOF)
Part 3: Troubleshooting
1. Crashing
I personally have CTD issues with OpenGL, so I use Direct3D instead. I suggest trying both and see what works for you. Install one or the other (with that API enabled in IMVU settings), then if you have crashing or other issues, simply run Reshade again for that API and click uninstall. Then run the installer again for the other API. Repeat the steps above to reinstall the EVE Mod and RTGI files.
I can't be of much help myself besides that.
2. Helpful Links
This timestamp in Draykos' video tutorial helps with some Reshade problems you might encounter. Also look to the description and comment sections.
Reshade's Troubleshooting Forum may be helpful as well.

Conclusion:
So that's my first tutorial... Somewhat helpful, I hope? Maybe?
┗┐ヽ(′Д、`*)ノ┌┛THE END
0 notes
Text
GeForce At CES 2020, Ray Tracing, and Quake II RTX v1.3 (Press Release)
New Post has been published on https://www.ultragamerz.com/geforce-at-ces-2020-ray-tracing-and-quake-ii-rtx-v1-3-press-release/
GeForce At CES 2020, Ray Tracing, and Quake II RTX v1.3 (Press Release)
GeForce At CES 2020, Ray Tracing, and Quake II RTX v1.3 (Press Release)
New G-SYNC ULTIMATE Mini-LED and 360Hz Tech, New Feature-Packed Game Ready Driver, 25 new G-SYNC Compatible Monitors and BFGDs, Wolfenstein: Youngblood Ray Tracing, and Quake II RTX v1.3
youtube
GeForce is out in force at CES 2020, unveiling new enhancements and innovations which will further improve your gaming experience. To learn about new Game Ready Driver features, G-SYNC gaming monitors, cutting-edge G-SYNC technology, the release of ray tracing for Wolfenstein: Youngblood, and a Quake II RTX update, read on.
New G-SYNC Innovations, Gaming Monitors and Big Format Gaming Displays At CES 2020
NVIDIA G-SYNC pioneered variable refresh rate gaming, and remains the leader in developing ever-better technology that gives gaming monitors faster refresh rates, better color accuracy, superior contrast, display overclocking, and the ability to run with VRR enabled at all framerates and refresh rates.
At CES 2020, 28 new displays have been announced and are on show. Leading the charge are our new 360Hz and Mini-LED gaming monitors, which feature new display innovations that can’t be found anywhere else.
With our 360Hz technology, G-SYNC gaming monitors leap from 240Hz to a new, much higher refresh rate, which reduces latency and makes images crystal clear. For esports players and competitive gamers, this makes all the difference, enabling them to acquire targets faster and easier, and reduce the time it takes for their clicks to have an effect in-game.
Mini-LED, meanwhile, brings major improvements for 4K HDR G-SYNC ULTIMATE gaming. Primarily, the technology’s smaller, more efficient LEDs allow us to ramp up the number of controllable LED local dimming zones to 1152, from 384 on previous-gen 4K G-SYNC ULTIMATE gaming monitors. This greatly increases color accuracy, brightness, contrast and general image quality, in ways that were previously impossible with prior LED tech.
GeForce At CES 2020:
In November, LG became the first TV manufacturer to add G-SYNC Compatible support for their big-screen TVs, enabling GeForce gamers to enjoy stunning visuals and smooth variable refresh rate gaming on LG’s best-in-class OLEDs. Now, LG has announced a new range of 2020 TVs, and all 12 have been validated as G-SYNC Compatible Big Format Gaming Displays (BFGDs), for the definitive big-screen living room experience, with stunning OLED picture quality, and smooth VRR gameplay.
G-SYNC At CES 2020
And finally, we announced support for over a dozen new G-SYNC Compatible gaming monitors, in numerous shapes, sizes and resolutions, giving prospective buyers even more choice when searching for the perfect monitor.
To learn more about the new displays, and about all of our CES 2020 G-SYNC announcements, head here.
New Game Ready Driver Brings New and Improved Features
If you fire up GeForce Experience right this second, you can download and install our latest Game Ready Driver. Included are our latest game optimizations, Game Ready support for the Wolfenstein: Youngblood and Quake II RTX updates, support for new G-SYNC Compatible gaming monitors, and several new and improved features.
Our first addition is one of the most requested NVIDIA Control Panel features: Max Frame Rate. This can save power, boost laptop battery life, and keep your framerate below a specified limit, which is useful for saving power while gaming on battery, or reducing latency with certain monitor configurations.
Also new to the table is Variable Rate Supersampling (VRSS), a technology that boosts image quality in the center of the VR display, where your eyes are focused, when performance permits (though power users can override this and have the tech always-on). VRSS can reduce aliasing, reduce shimmering and crawling, and boost detail, improving your VR experience.
G-SYNC At CES 2020
See VRSS in action, here
For folks who like to take and customize screenshots and videos, or adjust a game’s image in real-time with NVIDIA Freestyle, we’ve launched a new Split-Screen filter. Using the intuitive on-screen controls, show the game’s look before and after you’ve customized, or blend the two together to create entirely new looks.
CES Game Ready Driver Introduces New Gaming Features, Support For Wolfenstein: Youngblood Ray Tracing, New G-SYNC Compatible displays, and More
CES Game Ready Driver Introduces New Gaming Features, Support For Wolfenstein: Youngblood Ray Tracing, New G-SYNC Compatible displays, and More
One of the most popular Game Ready Driver additions of late has been the Image Sharpening tool, which improves clarity, and can upscale graphics using a high-quality filter. Following end-user feedback, we’ve improved this Control Panel feature to enable you to use upscaling without image sharpening, or vice versa, and to use Custom Resolutions in conjunction with the GPU-powered upscaler.
To learn more about each of these new features, and the other driver’s other additions, head on over to our CES 2020 Game Ready Driver article.
GeForce Leads Way With Thinner, Lighter, More Powerful Gaming Laptops
NVIDIA and its partners have spent a decade making gaming laptops smaller than anyone thought possible. And now, at CES 2020, our friends at ASUS are debuting the ROG Zephyrus G14, the world’s first 14-inch GeForce RTX laptop.
Packing a GeForce RTX 2060, the 18mm-thin Max-Q design Zephyrus G14 gives gamers the power to bring the very latest AAA games to life in all their ray-traced glory, from anywhere in the world, in a portable form factor that weighs just 1.6kg.
GeForce At CES 2020
This combination of performance and portability is why NVIDIA GeForce GPUs now power a record number of laptops. More than 140 models alone are powered by our latest Turing GPU architecture, the most power-efficient GPU on the planet. And there are more than 60 models built around our Max-Q design, for the fastest, thinnest and quietest energy-efficient gaming laptops (Max-Q design has helped notebook manufacturers drive the size of the average 17-inch gaming laptop sold, down from 38mm in 2016 to just 20mm in 2019).
The result is unrivaled performance at killer prices, whatever your budget, with gaming laptops from every major manufacturer powered by GeForce. At the time of writing, laptops with the GeForce GTX 1650 start at just $799, and at $999 for the GeForce GTX 1660 Ti. That’s for systems like the HP Pavilion Gaming 15, Lenovo Legion Y540, IdeaPad L340 Gaming, and ASUS TUF Gaming FX505.
Additionally, GeForce RTX 2060 systems, like ASUS TUF Gaming FX505, start at just $1199, for even more powerful gaming experiences on-the-go.
GeForce At CES 2020
At CES 2020, our partners will be announcing many new laptops, so stay tuned to their websites and social feeds for info about each.
Wolfenstein: Youngblood Ray Tracing Update Coming This Week
Wolfenstein: Youngblood will be receiving a large update this week that adds realistic ray tracing, performance-boosting NVIDIA DLSS, and NVIDIA Highlights, for automatically recording your best gameplay moments.
With ray-tracing enabled, inaccurate cubemap reflections are replaced with realistic, real-time reflections, and entirely new reflections are seen on other metallic surfaces and reflective game elements. As you can see from the video below, this greatly enhances image quality and immersion, and improves the look and feel of combat, which now sees arcing electricity and other weapon effects reflected across surfaces, enemies, and even player characters.
By enabling NVIDIA DLSS, all GeForce RTX gamers can enjoy these ray-traced effects at 60 FPS+, with max settings enabled, for the definitive Wolfenstein: Youngblood experience.
For the full lowdown on the game’s ray tracing, its performance-boosting NVIDIA DLSS tech, and NVIDIA Highlights’ gameplay recording, check out our dedicated Wolfenstein: Youngblood article. And for full support for each feature, along with optimum performance, download and install our new Game Ready Driver.
Quake II RTX v1.3 Update Introduces Photo Mode, and More
Quake II RTX is our ray-traced remaster of the beloved 1997 first-person shooter. In November, we introduced a ton of new features and enhancements, and now we’re back with Quake II RTX v1.3. This adds an awesome new photo mode for custom screenshots, along with a free camera and Depth of Field option for making cinematic-quality shots, such as the samples shown below.
GeForce At CES 2020
To use Photo Mode, simply pause the game with your keyboard’s Pause key. Real-time rendering approximations and denoisers will be disabled, and the picture will instead be rendered using accumulation. This sees the engine render the same frame hundreds or thousands of times with different noise patterns, before averaging the results, for higher-quality screenshots.
To move the camera for unique in-game photos, use the W/A/S/D movement keys, plus Q/E to move up and down. Shift makes movement faster, and Ctrl makes it slower. To change the orientation of the camera, move the mouse while holding the left mouse button. To zoom, move the mouse up or down while holding the right mouse button. Finally, to adjust camera roll, move the mouse left or right while holding both mouse buttons.
G-SYNC At CES 2020
To add cinematic Depth of Field (DoF) effects to your photos, use the mouse wheel and Shift/Ctrl modifier keys: wheel alone adjusts the focal distance, Shift+Wheel adjusts the aperture size, and Ctrl/Ctrl+Wheel/Ctrl+Shift+Wheel makes the adjustments finer. In contrast with depth of field effects used in other real-time renderers, this implementation computes “true” depth of field, which works correctly through reflections and refractions, and has no edge artifacts. But to get those perfect results, accumulation rendering is required, which is why this effect remains exclusive to Quake II RTX’s new Photo Mode.
G-SYNC At CES 2020
To save your screenshot, simply press F12 and navigate to C:\Program Files (x86)\Steam\steamapps\common\Quake II RTX\baseq2\screenshots.
Settings for all of Photo Mode’s features can be found in the game menu. To adjust the settings from the console, see the pt_accumulation_rendering, pt_dof, pt_aperture, pt_freecam and some other similar console variables in the Client Manual.
G-SYNC At CES 2020
In addition to Photo Mode, we’ve introduced support for the campaign’s cutscenes, which are missing from many conversions, remasters and upgrades of Quake II. And have made various other changes, too – to read the full list in v1.3, head here.
If you have Quake II RTX on Steam, the v1.3 update will be automatically installed. If you have a standalone Windows or Linux copy, download the update here. And if you’re interested in modding Quake II RTX, check out our modding guide.
If you don’t own a copy of the game, you can still try the first three levels for free by downloading the standalone version. To get access to everything, buy a copy from Steam, GOG or Bethesda.net.
Starting 2020 With A Bang
Here at NVIDIA we’re constantly optimizing, improving, enhancing, boosting your performance, bringing you new useful features, and advancing the game and tech industry with new innovations, like our 360Hz and Mini-LED G-SYNC tech.
As we begin a new year, we’re demonstrating best-in-class performance, features and tech at CES 2020, and there’s plenty more to come. Expect the year to be filled with exciting game integrations and new technologies that make your games and experiences better day in, day out.
For in-depth info about all of those, and everything GeForce, stay tuned to GeForce.com in 2020.
© 1997 id Software LLC, a ZeniMax Media company. QUAKE, id, id Software, id Tech and related logos are registered trademarks or trademarks of id Software LLC in the U.S. and/or other countries. Bethesda, Bethesda Softworks, ZeniMax and related logos are registered trademarks or trademarks of ZeniMax Media Inc. in the U.S. and/or other countries. All Rights Reserved.
This product is based on or incorporates materials from the sources listed below (third party IP). Such licenses and notices are provided for informational purposes only.
Quake II: Copyright (C) 1997-2001 Id Software, Inc. Licensed under the terms of the GPLv2.
Q2VKPT: Copyright © 2018 Christoph Schied. Licensed under the terms of the GPLv2.
Quake2MaX “A Modscape Production”: Textures from Quake2Max used in Quake2XP. Copyright © 2019 D Scott Boyce @scobotech. All Rights Reserved. Subject to Creative Commons license version 1.0. Roughness and specular channels were adjusted in texture maps to work with the Quake II RTX engine.
Q2XP Mod Pack: Used with permission from Arthur Galaktionov.
Q2Pro: Copyright © 2003-2011 Andrey Nazarov. Licensed under the terms of the GPLv2.
#and Quake II RTX v1.3 (Press Release)#GeForce At CES 2020#Press Release#Ray Tracing#Gaming News#nvda (Nvidia)#Technology
0 notes
Last Seen Blogs

fayewongfuzao
FAYE WONG FUZAO

a-wolf-sweet
La felicidad es un estado pasajero de locura.

rockymountaindetoxllc
Rocky Mountain Detox, LLC

arghavan-fabric-blog
Untitled

kaynaaahh
Pikapika