
Last Seen Blogs

the-glory-season2
더 글로리 시즌2 1화/1회 다시보기 ~8화


sassenach77yle
Outlander Elite

beansprean
te daré los goosebumps

eryellaa
La vie en rosé ♡
Text
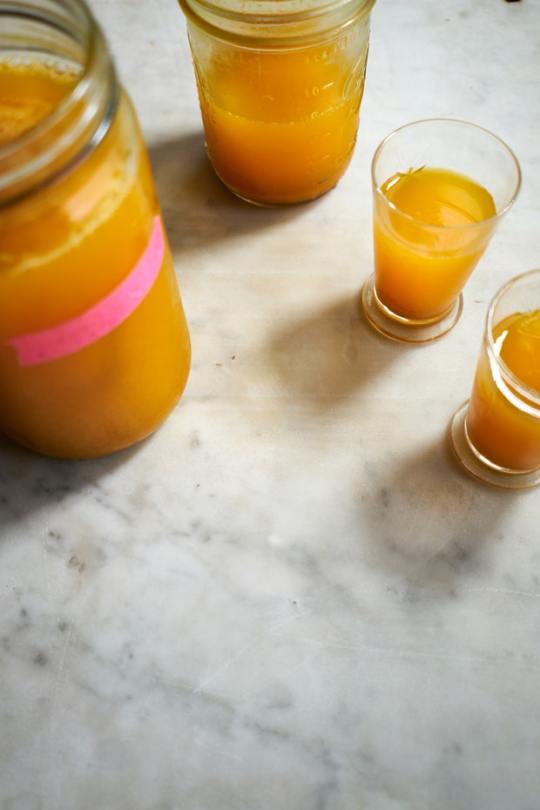
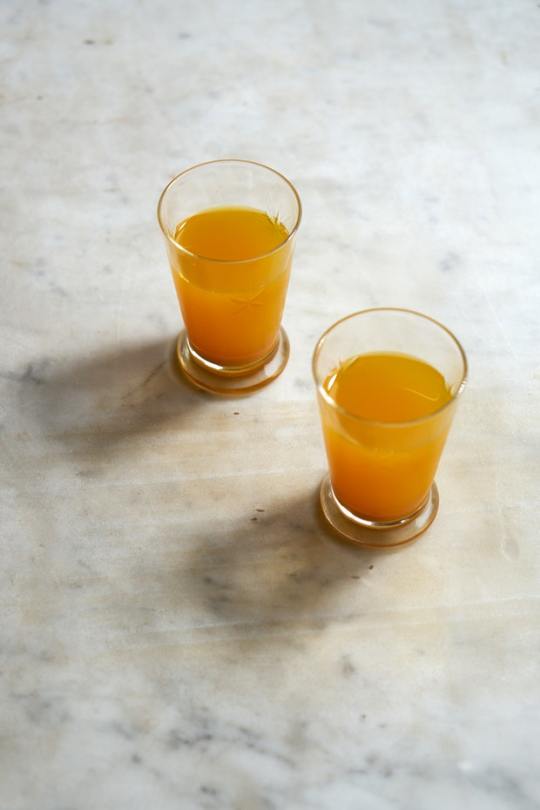
Instant Pot Dynamite Cold Tonic
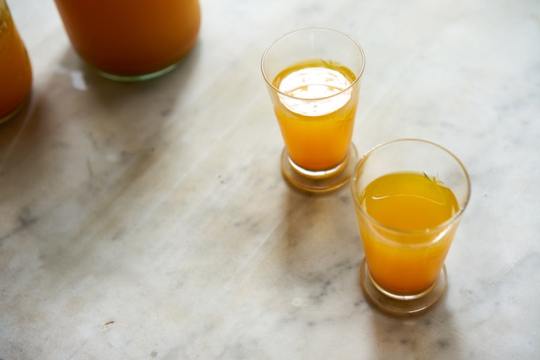
If you need to jolt a cold out of your body with brute force, you might consider starting here. This head-clearing, sniffle-blasting cold tonic is the color of Tang, with flavor like a stick of ginger dynamite. It's a nuclear version of the Honey-Turmeric Tonic in the Coco Morante Essential Instant Pot Cookbook - hydrating, aromatic, invigorating, decongesting, immune boosting, and not for the faint of heart. I made it for Wayne who was fighting a bit of a head cold last week, and sipped on it myself just because it made me feel like I was treating my insides to a spa day.
For reference, this is the Instant Pot I used for this recipe: Instant Pot DUO Plus 6 Qt 9-in-1

Also, if you have an Instant Pot, be sure to poke around this new section with all the instant pot recipes in one place. Or, if you're new to your Instant Pot, start with these 40 Essential Instant Pot Links - recipes, guides, articles - all in one spot.
browse more:
ginger Recipes
turmeric Recipes
Instant Pot Recipes
Instant Pot Dynamite Cold Tonic
PRINT RECIPE
4.46 from 11 votes
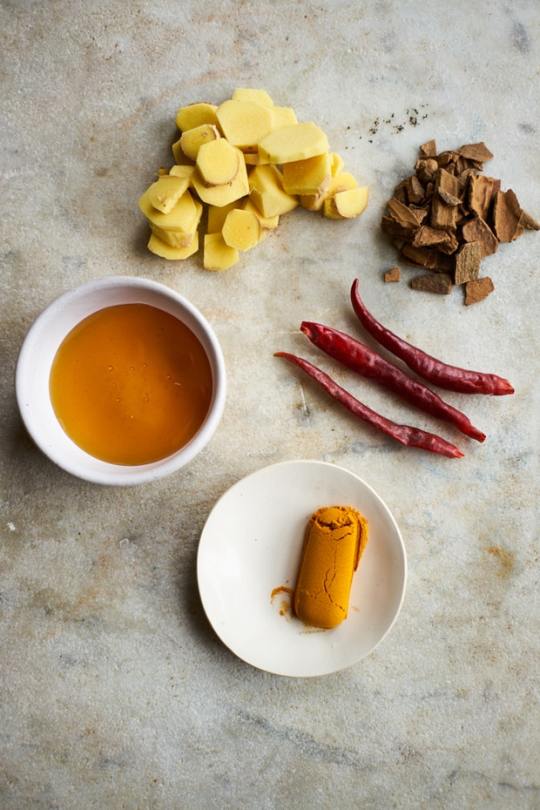
Ingredients
6 cups water
3 tablespoons honey, or more to taste
2 cinnamon sticks
1 teaspoon dried turmeric
3 dried arbol chiles
3- inch knob of fresh ginger, peeled, sliced 1/4-inch thick, and smashed
Instructions
Combine all of the ingredients in the Instant Pot. Secure the lid, and set the pressure release to SEALING. Select MANUAL, and pressure cook on HIGH for 5 minutes. Allow to NATURAL RELEASE for up to 25 minutes (or QUICK RELEASE after 15 minutes, for slightly weaker tonic). Strain, and transfer to glass jars. Serve warm, sweetened with a bit more honey or maple syrup if needed ;). It's best hot.
Notes
For reference, this is the Instant Pot I used for this recipe: Instant Pot DUO Plus 6 Qt 9-in-1
Serves
6 cups
Prep Time
5 mins
Cook Time
30 mins
Total Time
35 mins
PRINT RECIPE
nutrition info nutrition info
January 4, 2019 permalink icon
Per Serving: Calories 39
Total Fat 0g
Saturated Fat 0g
Cholesterol 0mg
Carbohydrates 10g
Sodium 13mg
Fiber 0g
Sugars 8g
Protein 0g
instagram icon
If you make this recipe, I'd love to see it - tag it #101cookbooks on Instagram!
Share this...
Pinterest
0Facebook
282
Google+
0email

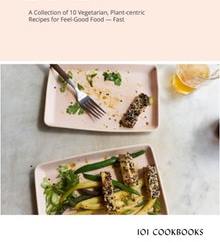
WEEKNIGHT EXPRESS features 10 Vegetarian, Plant-centric Recipes for Feel-Good Food — Fast!
Subscribe to get 32-pages of recipes to view on your tablet, e-book reader or phone.

Follow Me:
Instagram
Youtube
Facebook
Pinterest
Related Recipes

40 Essential Instant Pot Links
All the helpful, essential Instant Pot links in one list. Links to accessories, videos, water test how-to, recipes, guides, etc.
Instant Pot Chickpea Cauliflower Korma
An Insta-friendly riff on the Chickpea Cauliflower Korma recipe in Jennifer Iserloh's The Healing Slow Cooker - chickpeas, cauliflower, combined with a not-shy simmer sauce.
The Instant Pot Starter Guide for Me and You
This is for everyone who ordered an Instant Pot recently. It's an Instant Pot Starter Guide - all the Instant Pot links, references, and resources I've collected.
Spicy Instant Pot Taco Soup
Taco Soup, a weeknight winner. A hearty melding of beans, and corn, and taco spices, and quinoa. Finished with avocado and pepitas and a squeeze of lime.
More Recipes
Whole Grain
WFPB
Vegetarian
Vegan
Soups
Side Dishes
Sandwiches
Salads
Pasta
Quick
Main Course
Low Carb
Instant Pot
Holiday
High Protein
Gluten Free
Drinks
Dinner Ideas
Desserts
Cookies
Chocolate
Breakfast
Baking
Appetizers
Follow Me:
Instagram
Youtube
Facebook
Pinterest
Popular Ingredients
avocado
egg
herb
kale
lemon
lentil
quinoa
pasta
tomato
turmeric
yogurt
zucchini
arugula
asparagus
basil
broccoli
buttermilk
cauliflower
chickpea
chocolate
curry
tempeh
tofu
ALL
© 101 Cookbooks 2019
Use of this site constitutes acceptance of its User Agreement and Privacy Policy.
Source: https://www.101cookbooks.com/instant-pot-dynamite-cold-tonic/
0 notes
Text
The Best Potato Salad Recipes
Sharing is caring!
A potato salad is a must at a summer picnic, cookout, bbq or potluck. I’ve made many different types of potato salad over the years. For me, nothing beats a classic Southern Potato Salad, but sometimes I’m in the mood for something a little more original. These recipes have everything I love about a great potato salad in them. They’re creamy, savory and full of big flavors and I really think they are some of the best potato salads!
These potato salads are the perfect complement to burgers, hot dogs, bbq brisket, you name it! If you’re looking for more summer sides, check out these amazing pasta salad recipes!
Southern Potato Salad will always be my go-to potato salad. It is super creamy with a blend of mayonnaise and mustard, hard-boiled eggs, sweet onion, sweet pickle relish, and celery.
Creamy Dill Potato Salad is full of the fresh summer flavor of dill. Red potatoes are coated in a sour cream-based dressing for a tangy and delicious side. It doesn’t get any creamier than this.
Creole Potato Salad has the flavors of New Orleans. This potato salad has tons of zip from Creole mustard and creole seasoning.
This Jalapeno Popper Potato Salad has all the components of a Jalapeno Popper. With bacon, jalapenos, cream cheese, and cheddar cheese, this one has a nice, spicy kick.
Loaded Bacon Ranch Potato Salad is another potato salad that is full of flavor. If you are a fan of ranch seasoning, it is a must try!
This Cobb Potato Salad is very unique. It is full of crumbled bacon, avocado, cherry tomatoes, and blue cheese.
Caesar Potato Salad is full of bacon, Parmesan cheese and a creamy Caesar dressing.
Be sure to bookmark this page and check back. We will be adding more of our favorite potato salads to it from time to time!
Source: https://spicysouthernkitchen.com/the-best-potato-salad-recipes/
0 notes
Text
Banana Oatmeal Muffins (No Flour Needed!)
These Banana Oatmeal Muffins are a quick and easy breakfast on the go. I love that you can toss everything in your blender and have them baking in just about 10 minutes of hands-on time. With no added oil or refined sugar, they make a healthy snack for kids, too!
How to Make Banana Oatmeal Muffins
Making these oatmeal muffins is incredibly fast and efficient when you use your blender. You’ll only have one dish to clean when you’re done!
You’ll want to use ripe bananas for this recipe, as the more ripe they are, the sweeter they will be. I found that I only need to add 2 tablespoons of honey to make them sweet enough for my kids, but you can leave that out if you want to use no added sweetener and don’t mind a less-sweet muffin.
As an Amazon Affiliate, I earn on qualifying purchases.
Pour the blended batter into a lined muffin pan (I use reusable silicone liners) and bake until the muffins rise and the centers feel firm to a light touch. Let them cool completely before serving.
Oatmeal Muffins with No Added Oil
I’ve been on a mission to use less oil in my recipes lately, so these muffins rely on peanut butter for a bit of healthy fat instead. Make sure you use a nut butter that has no added oil for best results.
If you don’t like peanut butter, you could use almond butter, or even sunflower seed butter for a nut-free version.
Can you Make Banana Oatmeal Muffins without Eggs?
You can make these muffins egg-free by using an extra banana and oat flour. The mixture will be thicker in this case, so I don’t recommend using your blender for mixing. (You can grind rolled oats in your dry blender, however, to make oat flour if you don’t have some already.)
Here’s what you need for Vegan Banana Oatmeal Muffins:
3 ripe bananas (about 1 cup mashed)
1 1/2 cups oat flour (rolled oats finely ground in a food processor)
2 teaspoons baking powder (this is better for vegan baking)
1/4 cup peanut butter butter
2 tablespoons maple syrup
1/4 teaspoon salt
Stir all of the ingredients together in a bowl until it looks uniform, then divide it among the 10 muffin cups and bake for 25 minutes. Cool completely before serving.
Banana Oatmeal Muffins (No Flour Needed!)
These Banana Oatmeal Muffins make a healthy snack or breakfast on the go! I love that they are sweetened with honey and are naturally gluten-free.
Keyword: banana oatmeal muffins
Preheat the oven to 350ºF and line a muffin tin with 10 muffin liners.
In a blender, and in the bananas, eggs, rolled oats, honey, peanut butter, baking soda, and salt. Blend until smooth, stopping to scrape the sides as needed.
Pour the batter evenly into the 10 muffin cups. (They should be about 3/4 the way full.) Top with a sprinkle of rolled oats, if desired. Bake at 350ºF for 25 minutes, or until the center of the muffins feel firm to a light touch.
Allow the muffins to cool completely, then serve. These muffins will keep well at room temperature for up to 3 days, or up to a week when stored in an airtight container in the fridge.
Per Muffin (1 of 10): Calories: 118, Fat: 7g, Carbohydrates: 10g, Fiber: 1g, Protein: 5g
Recipe Notes:
You can swap 2/3 cup applesauce in place of the banana, if you’d like to. Or try it with pumpkin puree for a less-sweet muffin.
Any nut or seed butter can be used in this recipe instead of peanut butter.
You can use 3/4 cup of oat flour to replace the oats if you have that on hand.
You can use frozen bananas in this recipe, but be sure to thaw them completely before using them. Thawed bananas release liquid as they melt, and it’s important to use that liquid in this recipe, too, for correct results.
You can add in any extras you like, such as mini chocolate chips, blueberries, or raspberries.
If you try this recipe, please leave a comment below and let me know what you think! If you make a substitution, please let me know how that works for you, too. We can all benefit from your experience.
–
Reader Feedback: What’s your favorite breakfast on-the-go?
Source: https://detoxinista.com/banana-oatmeal-muffins/
0 notes
Text
Tiny Cinnamon Rolls
Christmas has passed, and the New Year is now upon us. While I have eaten my fair share of cookies, bars, candy canes, and pastries, I find I still need a treat here and there for family in town, brunches, and the like. I decided to make tiny cinnamon rolls this week while headed to an event, mostly to help everyone feel a little better about still indulging in January. These rolls are delicious, and just the right amount of sweet after an entire month of feasting.
Note: I used a no-knead brioche dough from Artisan Bread in Five Minutes A Day. This dough is wonderful because it can be mixed together and then stored in the refrigerator for up to 5 days. The brioche master recipe will make about four pounds of dough, and this recipe only needs just over a half pound. You will have leftover dough, but it can be used for so many other delicious things!)
1/3 cup brown sugar
1 heaping teaspoon ground cinnamon
Pinch salt
1 tablespoon melted butter
1 ounces cream cheese, room temperature
Pinch salt
1/2 teaspoon pure vanilla extract
1-3 tablespoons water
1 cup (226) confectioner’s sugar
directions:
for the filling
In a small bowl, mix together the brown sugar, cinnamon, and salt. Grease a 24-cup mini muffin pan.
On a lightly floured surface, fold the cold dough over 3-4 times and then form it into a ball. Let the dough rest for 15-20 minutes.
Roll the dough into 24 inch by 5 inch rectangle. Brush the entire surface with the melted butter. Spread the sugar over the dough.
Roll the dough up, starting at the long end (there isn’t a lot of dough, so you won’t get a lot of spirals!). Using a sharp kitchen knife or a scissors, cut the log into 24 equal pieces (they will be tiny!).
Place the pieces in the prepared muffin pan and cover loosely with plastic wrap. Let rise for 30 minutes.
Adjust an oven rack to the middle position and heat the oven to 350F while the buns are rising. Also make the icing (instructions follow) while the buns are rising.
Bake for 9-10 minutes, or when the centers are set when poked with your finger. The rolls will still be light in color (if you bake them for much longer, they will not be soft).
Immediately remove the rolls from the oven and flip them onto a wire rack with a piece of parchment paper underneath (this catches any leaky sugar and cinnamon).
Cover the buns with icing while still warm (this will help keep them soft). Best eaten warm.
Place the cream cheese in a small bowl. Add the salt, vanilla, and 1 tablespoon water and mix until smooth. Add the confectioner’s sugar and mix until combined, adding more water if needed, until the desired consistency is reached.
Enjoy!
Source: https://www.handmadecharlotte.com/tiny-cinnamon-rolls/
0 notes
Text
Living Authentically w/ Emily Kyle
Do you ever struggle with being your true self in either your work or personal life? [Raises hand.]
That was the case with this week’s podcast guest, Emily Kyle. As a nationally recognized media dietitian, Emily felt like she wasn’t living an authentic life in the way she was practicing nutrition.
Recently, she decided to do something about it and “came out” about who she really was in a powerful 3,000-word blog post. (A post that had us up an hour past our bedtime reading and nodding through the whole thing.) In this episode, we talk about Emily’s journey to living authentically as a wellness professional.
If you’ve ever struggled with authenticity, you definitely want to tune into this episode.
In this episode, we’ll talk about:
Tips for embracing who you are and living an authentic life
How Emily became interested in nutrition and how she grew to love the field
Her experiences with feeling conflicted about intuitive eating and health at every size
Why she doesn’t identify as an anti-diet dietitian
Where Emily is now with her nutrition approach
& MORE!
SHOUT OUT TO OUR SPONSORS:
This episode is supported by Thrive Market. Sign up to receive 25% off your first order and a free 30 day membership! Shop all your favorite organic food, beauty, and wellness products at 25-50% off the retail price. Click this link to sign up today and see what makes Thrive Market so special.
Resources:
Can you do us a huge favor?
If you enjoyed this episode, please do us a huge favor and leave us a review on iTunes ….right now. The more reviews we get, the higher we are ranked in iTunes, which means we reach more people!
Become a podcast sponsor:
Our podcast reaches thousands of engaged listeners each week. If you are a brand interested in becoming a sponsor, contact us to learn more about our affordable rates.
Connect with us online:
Our podcast is released every week. In each episode, we cover tips and tricks for making lifelong sustainable healthy living changes to upgrade your diet and health. We also interview leading experts in the field of health and nutrition. We hope you enjoyed this episode, and we’ll catch you next time!
Source: https://foodheavenmadeeasy.com/living-authentically-w-emily-kyle/
0 notes
Text
Cheesy Corn Muffins with Green Chiles and Millet
There are certain foods that, even if quite marginal, are still kind of good. Pizza is one. I certainly appreciate and prefer really good pizza – but when the craving for hot, melty cheese strikes, I’ll take bad pizza over no pizza any day. Brownies fall in this camp, too. Muffins, on the other hand, can’t claim this category and I don’t often write about muffins here only because they are so often overly-sweet and not all that interesting. But I’m also always up for a challenge and creating a great updated classic that’s simple to make and packed with whole grain nutrition and flavor (savory, please!): Game on.
Growing up, my mom used to buy the store bought Jiffy corn muffin mix: when I’d see that charming little blue-lined box sitting on the counter after school, I’d know it was chili night. These days though, when I come across corn muffins or even cornbread, they can either be really dry or overly sweet, which is a shame because they’re such a great vehicle for all manner of savory inclusions — which I took liberty to use here.
I added millet — one of my favorite little gluten-free grains for extra crunch — a whole can of mild green chiles (don’t worry, these aren’t spicy: your kids will likely not even notice they’re in there), sweet yellow corn, and a cup of grated cheddar cheese for extra flavor. The result is a savory muffin that’s almost as easy to make as its boxed cousin, will only dirty a few bowls, and is perfect with soup or chili but can stand on its own for breakfast or a midday pick-me-up when you’ve been out in the back yard pacing, trying to figure out what the heck to do with your overgrown garden this spring (not speaking from experience or anything).
Next week Oliver and I are flying to visit my mom in Vermont; it’ll be the first time I travel with him solo, so wish us all the luck. I’ve picked up some stickers, a little travel set of blocks (thanks for the recommendation, Natalie!), and I’ll be sure to stick a few of these muffins in my bag for airport snacking (I froze half the batch to pull out for future snacking; they freeze beautifully).
Some Other Muffins You May Like:
Honey-Roasted Strawberry Muffins
Nibby Chocolate Rye Muffins
Morning Glory Crumble Muffins
P.S. Thank you all so much for your sweet and often insightful comments on my last post. Sometimes I wonder if perhaps I should talk to a friend (or a therapist?!) about some topics rather than posting them on the site, but then it’s also refreshing to read real stories and feelings and not just polished recipes all the time. Lately I really crave getting to know the actual people behind my favorite sites or social media accounts, and I’m always shooting for a little more of that here, too. Happiest of spring Fridays to you all. The weekend: we made it!
Pin recipe Print recipe
These flavor-packed, savory muffins are tender with a light yet sturdy crumb. Make sure your honey is nice and liquidy when you’re using it (if it’s more solid, just microwave it for a few seconds until it liquifies) and look for a looser, traditional yogurt versus a thick Greek yogurt. While it’s tempting to try one right out of the oven, the flavors really do develop as they cool.
Ingredients
1 cup plus 2 tablespoons (168g) whole wheat pastry flour
1 cup (165g) medium-grind cornmeal
1/2 cup (100g) raw millet
2 tablespoons turbinado sugar
1 1/2 tablespoons baking powder
1/2 teaspoon baking soda
1 1/2 teaspoons kosher salt
1/4 teaspoon garlic powder
2 large eggs, beaten
1 cup plain yogurt (use a looser yogurt, not a thick Greek yogurt)
3 tablespoons whole milk (or almond milk)
1/4 cup honey, liquid at room temperature
8 tablespoons (1 stick) unsalted butter, melted and cooled, plus more to serve
1 1/2 cups (210g) corn kernels, fresh or frozen (if frozen, don’t thaw)
7 oz can mild green chiles
4 ounces (about 1 cup) grated sharp cheddar cheese
Instructions
Preheat the oven to 350°F. Grease 16 muffin cups or line with paper liners (the recipe makes 16 muffins so if you have two muffin pans, line 16; if you don’t, line 12 and you’ll just bake them off in two rounds).
In a medium mixing bowl, whisk together the flour, cornmeal, millet, sugar, baking powder, baking soda, salt, and garlic powder.
In a separate small mixing bowl, whisk together the eggs, yogurt, milk, honey, and butter. Pour the wet ingredients into the dry ingredients and stir well to combine. Once all the dry bits are fully incorporated, fold in the corn, green chiles, and grated cheese.
Let dough sit at room temperature for ten minutes.
Spoon the batter into the muffin cups, filling each one to the top (don’t be shy here – these won’t overflow). Bake for about 30 minutes, or until the tops are turning golden brown around the edges and are firm to the touch. Cool in the pan 5 minutes, then remove and cool on a wire rack for additional 15 minutes. Enjoy warm or room temperature, preferably with butter.
Cover leftovers and store at room temperature for up to 3 days (or freeze for up to 3 months).
Source: http://asweetspoonful.com/2018/03/cheesy-corn-muffins-with-green-chiles-and-millet.html
0 notes
Text
Applebee’s(™) Honey Grilled Salmon
Today I have a secret recipe for a healthy and flavorful dish served at Applebee’s. Fresh salmon fillets are grilled to perfection and then brushed with a sweet and savory honey-pepper sauce. Depending on how spicy you like your food you can add more or less cayenne pepper to the sauce.
Serve this dish wit ha wilted spinach salad by following this recipe from our forum: Go Here
Enjoy!
=-=-=-=-=-=-=-=-=-=-=-=-=-=-=-=-=-=-=-=-=-=-=-=
Never Eat Veggies On These 3 Days…
When you avoid veggies these 3 days each week, you’ll easily be able to stick to any diet and you’ll lose fat faster. Learn more in this free video: Go Here
=-=-=-=-=-=-=-=-=-=-=-=-=-=-=-=-=-=-=-=-=-=-=-=
=-=-=-=-=-=-=-=-=-=
New Secret Recipe
=-=-=-=-=-=-=-=-=-=
Applebee’s(™) Honey Grilled Salmon
Like this recipe? Get our secret recipe cookbooks on sale – Go Here

3/4 cup honey
1/3 cup soy sauce
1/4 cup dark brown sugar, packed
1/4 cup pineapple juice
1 lemon, juice of (about 2 tablespoons)
2 tablespoons white distilled vinegar
2 teaspoons olive oil
1 teaspoon ground black pepper
1/8 teaspoon cayenne pepper
1/2 teaspoon paprika
1/4 teaspoon garlic powder
4 salmon fillets
Make the sauce by combining all ingredients in a medium saucepan over medium/low heat.
Stir occasionally until sauce begins to boil, then simmer uncovered for 15 minutes or until syrupy.
Watch the sauce closely to be sure it doesn’t bubble over.
Preheat barbecue grill to medium heat.
Rub each salmon filet with olive oil, then add a light sprinkling of salt and pepper.
Grill the salmon for 3-4 minutes per side or until done.
Alternately, you can bake these at 375 degrees for twelve minutes if you prefer not to grill them.
Once your salmon is cooked, remove the salmon from the grill or pull from the oven, and brush each fillet with the honey pepper sauce.
Serve the fish with small ramekins of additional sauce for extra dipping.
Have a comment or question about this recipe? Post it here
Source: Recipe Secrets Forum
Until Next Time… Be Well!
Kind Regards,
Ron
PS- Join us on Facebook and get more recipes and freebies: Go Here
PPS- Forward this email to a friend or tell them to sign up here.
=-=-=-=-=-=-=-=-=-=-=-=-=-=-=-=-=-=
Source: https://www.recipesecrets.net/blog/recipes/applebees-honey-grilled-salmon/
0 notes
Text
Date Night With Chicken, Date & Apricot Tagine!

Tagines are one of the easiest ways to cook meat. The shape of the tagine and the funnel top acts as a way to trap moisture in the a dish producing an incredibly succulent meat. This recipe uses a whole chicken, cut into pieces with dates and apricots and served with fluffy couscous! And don't worry this also works with a lidded pot too.
Dear Reader, I can't rave enough about this dish and it came at just the right juncture. I love using a whole chicken rather than pieces because that way I get the skin on which is pretty much my favourite part of chicken. But of course feel free to use your favourite pieces skin on or off (but really, why don't you like chicken skin? Let's talk).
I made this on a particularly hectic day Dear Reader, one in which I had no time to marinate meat, no time to stand in front of a stove and no time to do anything really and I had chicken that needed using up. The reason why I had no time is because of the house's number one chicken fan Mochi.

This past month Mochi has been having some health issues. Her breed (Maltese Shihtzu) are prone to certain health problems like luxating patella (floating knee cap), skin disorders, bad teeth, sensitive tummies and are also prone to Cushings. We knew about the rest but she now has been diagnosed with Cushings too.
Cushings is a fairly common adrenal disorder (especially in small white fluffies) where her body produces too much cortisone. As a result she can be lethargic, thirsty and hungry with sparse fur. After the diagnosis we ordered some medication for her as it is treatable. Along with this she has had an upset tummy for the last week too. Whenever she looks panicked I rush her out of our apartment and usher her outside and that may be once every 15 minutes. Sometimes I missed her signals and that was very unfortunate.

At the end of the second day all I could do was lie on the couch. I couldn't even bear the thought of going out. I just held my little puppy and stroked her and hoped that she was ok. And thankfully because this dish spends most of the time in the oven I had dinner because there was no way I could stand there and cook. For this chicken tagine I used fresh apricots because they were quite early on in the season and weren't quite sweet enough and I think it added a balance to the sweet dates so this dish wasn't overly sweet and had a good balance. And although Mochi was sick, she begged for some of this too!
So tell me Dear Reader, are you a skin off or on person? Are there days where you just cannot bear the idea of going out?
An Original Recipe by Lorraine Elliott
Preparation time: 15 minutes
Cooking time: 1 hour 10 minutes
1.5kg/3lb. chicken, cut into 8-10 pieces
1 large or 2 medium red onions
7 garlic cloves, whole
1 teaspoon salt
1 teaspoon ground cumin
1 teaspoon ground coriander
1 teaspoon ground ginger
1 teaspoon smoked paprika
1 teaspoon chilli powder or 2 chillies, sliced
1/2 teaspoon ground turmeric
1/4 teaspoon ground cinnamon
400ml/14flozs. chicken stock
7 medjool dates, pitted and halved
5 apricots, halved and pitted
Easy Fluffy Couscous
2 cups chicken stock
1.5 cups couscous
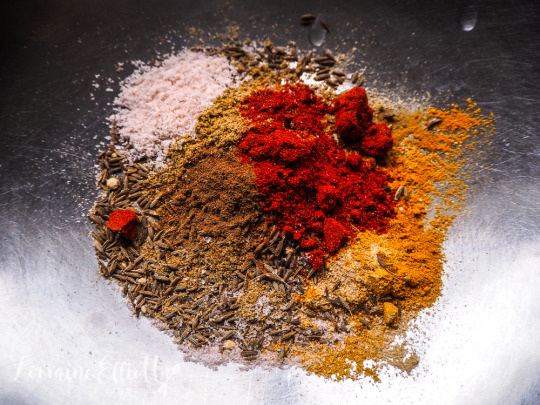
Step 1 - Preheat oven to 190C/380F and place the oven rack on the lowest rung (so that it can fit your tagine or pot). Dice onions and mix the spices together in a bowl. Place salt and spices in a bowl or ziplock bag with chicken and shake all over to distribute.
This is a really unattractive pic I know
Step 2 - Heat the tagine or a cast iron pot on medium heat on the stovetop (electricity or gas is fine) and add oil. Brown the chicken skin side down and then put aside on a plate. Add more oil and saute the onion. Add the garlic cloves and a bit of the chicken stock and deglaze the tagine or pot.

Step 3 - Place the chicken pieces back in the tagine skin side up and add the remaining stock, dates and apricots. Place the lid on the tagine or pot and bake in the oven lid on for 1 hour. Sprinkle with coriander and serve with couscous.
Step 4 - To make couscous-start it 10 minutes before the chicken has finished. Bring the stock to a boil and add the couscous in a steady stream making sure that it is submerged in the water. Take off the heat and place lid on and allow to steam for 7 minutes. Fluff with a fork.

Source: https://www.notquitenigella.com/2019/02/10/chicken-date-apricot-tagine/
0 notes
Text
How to Make Gravlax by Natalie
This is one of those recipes where I wonder why I hadn’t been doing this all of my life. Gravlax or cured salmon is super tasty and something I used to buy for our Christmas morning breakfast spread. It’s on the pricey side, too, and we considered it a treat.
Well, I think we might be spoiled since I started making it at home. It’s much more economical and easier than you think!
There are a lot of ways to make gravlax, including traditional Norwegian methods of burying the salmon in the ground for a few days while it cures.
Spoiler: I don’t have salmon buried in my backyard.
I’m going to get this right out in the open that I’m not a Norwegian gravlax purist. I’ll show you an easy way to make it that is great on its own, yet leaves you some wiggle room to experiment with flavors if you like.
Start off with some fresh salmon laying on top of a large piece of plastic wrap. I love the wild Alaska salmon that comes into stores during the summer. It’s one of my favorite seasonal treats!
You’ll want to find a fillet that’s relatively even in thickness. (It doesn’t need to be exact, though.) You also need some lemon juice, sugar, kosher salt, and fresh dill.
Don’t use fine salt or regular table salt or your salmon will be too salty. You could use coarse sea salt if you like, too.
Squirt the lemon juice over the salmon, the mix the salt, sugar, and chopped dill together. Pile the mixture on top of the salmon. This will be enough for 1 full salmon fillet (around 3 pounds).
I cut it in half to make it easier to prep and to take up less refrigerator space. I’ll show you in a minute.
Wrap the salmon tightly in the plastic wrap.
Stack them in a bread pan. You can use any pan you like, but using a bread pan saves you some refrigerator space.
Place another bread pan on top of the salmon, nesting inside the first pan.
Now take a few cans of something—I used coconut milk—and put them in the upper bread pan to weigh it down.
Refrigerate it for 2–3 days. The curing time depends on the thickness of your fillets. If they are on the thick side, I’d let it go for at least 3 days.
You can check on it after a couple days by removing the weighted bread pan and poking the salmon. If it seems to be more firm than it was, then it’s well on its way. It should be firm enough to slice thinly and have a deep salty, dilly flavor.
There will also be quite a bit of liquid in the pan. It’s ok. Just drain it out.
If the texture and taste aren’t quite right, then return it to the fridge for 8–12 more hours and try again.
Slice up that salmon and make yourself a charcuterie platter! I loved this salmon on a baguette with some herbed cream cheese, sliced cucumber, and a sprig of fresh dill.
It’s even great without that baguette if you’re eating gluten-free. I may have had little cucumber bites for breakfast every day for a week.
After doing a little research I noticed many recipes call for vodka or other spices or even fresh garlic. I’d love to hear if you’ve made cured salmon and how you like to eat it!
Homemade Gravlax
September 9, 2018 0
Prep Time:
10 Minutes
Difficulty:
Easy
Servings:
10 Servings
Ingredients
3 pounds Skin-on Salmon Fillets Of Fairly Even Thickness, Either One Large Or A Few Smaller Ones
1 Lemon
1/3 cup Kosher Salt
2 Tablespoons Sugar
1 cup Fresh Chopped Dill
Instructions
If you are using 1 large fillet, cut it in half. Turn the fillet over, skin-side up, and make 2 to 3 slits into the skin, about 1/2 inch deep and 1-inch long.
Lay each piece of salmon, skin-side down, on its own piece of plastic wrap. Squirt the juice from half of the lemon on the salmon.
In a medium bowl, combine the salt, sugar, and dill. Pile the mixture on top of the salmon fillets, using all of it.
Wrap each piece of salmon tightly in the plastic wrap and stack them in a pan. I like to use a bread pan because it takes up less space in my fridge. Put another pan of equal size on top of the salmon, then put something in the top pan to weigh it down — like a few cans of coconut milk.
Refrigerate for 2–3 days until the salmon has become more firm and slices thinly very easily. It should have a deep salty, dilly taste. If you need to, rinse any remaining salt left on the salmon before serving.
Natalie
Natalie is a third generation cookbook hoarder and started blogging in 2008 as a way to store and organize her recipes digitally. When she realized people other than her mother and close friends were reading her blog, she tidied up the place and fell in love with sharing recipes and creating drool-worthy photos, which have been featured in many places online and in print. Natalie and her family have gravitated toward a paleo/primal-ish lifestyle over the years, which became the focus of her blog, Perry's Plate. However, they wouldn't turn down an invite out for pizza or cookies on their doorstep. When Natalie isn't in the kitchen she loves taking day trips to Lake Tahoe with her family, quilting, and, if she's being honest, drinking La Croix and Netflix binging. She lives in Northern Nevada with her chiropractor husband, three little girls, and a squishy little boy who is still trying to figure out which doting female in the house is his mother.
More Posts by Natalie (20)
Follow Natalie:
Natalie's blog:
http://www.perrysplate.com/
Source: https://thepioneerwoman.com/food-and-friends/how-to-make-gravlax/
0 notes
Text
Keralan Tandoori Fish
The marinade goes well with almost any fish. I used sea bass and bream.
Tandoors and BBQs offer an excellent, healthy way to cook seafood. In this recipe I show you how I did it in my tandoor but there is not reason you can’t skewer your fish up and cook them on the barbecue. The trick is getting the skewering right which I will show you how to do.
The marinade I used is a recipe I learned in Munnar, Kerala. It is quite spicy but can be toned down by adding more yoghurt. Personally, I like it spicy. Any unused marinade can be served, warmed as a sauce with the fish.
By the way, I hold tandoor classes at my home in North Yorkshire where you can cook in a real tandoor oven. The 4 hours classes are a lot of fun and you won’t go away hungry. For more information, please click here.
Lowest Price Guarantee!
Marinate the fish in the roasted tomato marinade for about 20 minutes.
Skewer the fish as described in the recipe below.
Over hot coals on the BBQ or in a flaming hot tandoor, roast the fish for about five minutes.
Remove from the heat and allow to drip for five minutes and then place back on or in the heat to finish cooking.
Keralan Tandoori Fish
Author: Dan Toombs
Recipe type: Main
Cuisine: Keralan
Prep time: 5 mins
Cook time: 10 mins
Total time: 15 mins
Serves: 4
Instructions
Make shallow slits on each side of the fish and smother with the marinade inside and out. The marinade, as it is is quite spicy. Stir in one or more tablespoons Greek yoghurt to taste if you prefer a milder heat.
To skewer the fish, stick your skewer in the mouth end and guide it down the spine of the fish out the tail end. I have found that this is the best way to do it especially in a tandoor oven. I have never lost a fish that way!
If cooking in a tandoor, skewer a potato at the end to stop the fish from sliding into the fire.
Place your skewers either over direct heat on the bbq or into a flaming hot tandoor oven.
Cook, turning often if on a BBQ for about five minutes. Then take the fish off or out of the heat for five minutes to drip. This is important as it will prevent flareups and also help achieve crispier skin. If you like, you could brush some more marinade on the fish at this time.
Place it back on or in the heat to continue cooking for about five minutes. Serve immediately with some of the warmed roasted tomato chutney.
3.4.3177
Source: https://greatcurryrecipes.net/2019/03/14/keralan-tandoori-fish/
0 notes
Text
10 Delicious Wine-Friendly Snacks for Your Next Summer Happy Hour
There's no better time than summer to enjoy a relaxed happy hour with great sips, snacks, and company. We've partnered with La Crema Winery to share a few of our favorite happy hour recipes, plus the very best bottle to pair them with: a crisp, rich Chardonnay.
I'm a fan of happy hour all year long, but especially during the summer when the weather is friendly enough for relaxing outside in the sun. During these months, you can usually catch me after work on a Thursday or Friday on my rooftop or my friend's balcony (a rare gem in New York City) sipping a glass of wine and munching on some snacks.
With July in full swing, these afternoon happy hours have become a quick tradition between me and my friends, and as the weeks have gone by they've become more and more elaborate. I provide the snacks, and Julian, my old college roommate who now conveniently lives just a dozen blocks away from me, will always bring the wine.
His go-to bottle of late has been a Chardonnay, specifically one that's light and balanced, but full of bright fruit and citrus flavors—the taste and texture are super refreshing in the heat, but complex enough to thoughtfully pair with food. Which is where I come in.
When it comes to picking out which happy hour bites to make, I look for recipes that are easy to pull together (or can be prepped ahead of time) and complement the wine. Julian's go-to Chardonnay has notes of stone fruit, lemon, and melon with a subtle oak that's classic to the grape, plus a touch of acidity to keep everything in balance.
Most types of seafood (think: crab, lobster, shrimp, and scallops) play nicely with Chardonnay's rich, mild flavors, as do not-too-pungent cheeses like ricotta, Brie, and fontina. (Fun wine pairing tip: Avoid serving bitter greens, spicy foods, or anything that's super acidic with Chardonnay because it'll make the wine taste bitter.)
With that in mind, here are a handful of simple yet impressive, happy hour-friendly snack and appetizer recipes that match up beautifully with a chilled bottle (or two) of our choice summer wine.
1. Grilled Shrimp Scampi-ish With Garlic & Lemon
This scampi-style grilled shrimp recipe calls for just a handful of fresh ingredients and a quick flash on the grill (or cast-iron pan, if you don't have one). The simple lemon juice, garlic, and parsley seasoning lets the sweetness of the shrimp shine through, and call out the delicate citrus notes in the wine.
2. Yogurt & Spinach Dip
This cooling yogurt and spinach dip is a cinch to make and requires just a touch of heat to mellow out the sharpness of the garlic and the spinach. Once they're cooled, you can mix everything up in a bowl and top with dried mint, toasty walnuts (which bring out the oak in the Chardonnay), and a good-quality olive oil. Add some pita or colorful crudités and you're in business.
3. Crostini with Ricotta, Honey & Lemon Zest
This crostini might be totally uncomplicated to make, but the combination of fluffy ricotta with a sprinkle of zingy lemon zest and honey (oh, and don't forget the crusty bread) is sure to impress even the pickiest eater.
4. Grilled Corn & Ranch Pizzas
If you think fresh pizza sounds like it's going to be a pain to make for an easygoing happy hour, think again. Use a pre-made dough or baked flatbread to save yourself the time and hassle of making it fresh. Top it with fresh mozzarella, sweet corn, and a drizzle of creamy ranch for an addictive bite that hits all the right notes with a silky Chardonnay.
5. Grilled Eggplant & Peach Caprese Salad
This no-fuss, Caprese-style salad really brings the apricot and stone fruit aromas in the wine right to the forefront and makes them taste that much sweeter. Use the best ingredients you can find (fresh eggplant and super-ripe peaches) and it'll come together in 20 minutes or less.
6. Crab Cakes
Since seafood and Chardonnay make such an excellent duo, these buttery fried crab cakes are a no-brainer. They'll require a bit more effort than most of the other recipes on this list (starting with finding excellent fresh crab), but whip them up for happy hour and you'll revel in each little bite of summer that they bring to the table.
7. Lemon-Mint Peas with Burrata & Breadcrumbs
This is one warm-weather recipe where you can get away with a frozen ingredient or two (peas and bread crumbs, both of which freeze nicely). The thawed peas get tossed with crispy breadcrumbs and bright mint leaves, a squeeze of lemon juice, and served alongside a hunk of dreamy burrata that pairs perfectly with the richly textured Chardonnay.
8. Slab Grilled Cheese
This crowd-friendly slab grilled cheese can easily be a snack or a meal, depending on how many you're feeding. The best part is that it's totally customizable to whatever flavors you're craving. If you're pouring a Chardonnay, I'd recommend trying caramelized onions (which, in case you didn't know, you can also freeze) with melty Brie and figs.
9. White Bean Dip with Fresh Herbs
Gently cooked garlic and a few basic ingredients (like white beans, olive oil, and a slew of fresh herbs) team up with your food processor for a quick dip recipe that's perfect for nibbling. The smooth, nutty white beans make a nice match with the buttery texture of the Chardonnay, while the herbs and the wine's acidity keep the flavor profile in check.
10. Grilled Avocado Halves with Cumin-Spiced Quinoa & Black Bean Salad
An exciting vegetarian-friendly option, this grilled number takes everything you love about avocados and kicks it up a notch. The quinoa and black bean salad that you stuff the avocados with can be made a day or two ahead of time to minimize your cook time to just a few minutes.
What's your favorite way to happy hour? Share your favorite bites and sips in the comments below!
In partnership with La Crema Winery—makers of delicious wines produced in the cool-climate growing regions of California—to share elegant yet easy snack recipes that pair wonderfully with our new favorite summer wine. La Crema's 2017 Sonoma Coast Chardonnay makes the perfect warm-weather, food-friendly sipper thanks to its bright citrus and stone fruit aromas, subtle oak and spice, and richly balanced texture.
Source: https://food52.com/blog/24293-happy-hour-snacks-recipes
0 notes
Text
Chicken with Quince and Almonds
Because of complexities with the new General Data Protection Regulation (GDPR), Tasting Table is temporarily unavailable in the European Union (EU). We are currently working on making our web site compliant with GDPR and expect to be available again in the near future. Thank you for your patience!
If you think you reached this page in error, please click here to let us know.
Source: https://www.tastingtable.com/entry_detail/chefs_recipes/27507/Chicken_with_Quince_and_Almonds.htm?referrer=rss_feedly
0 notes
Text
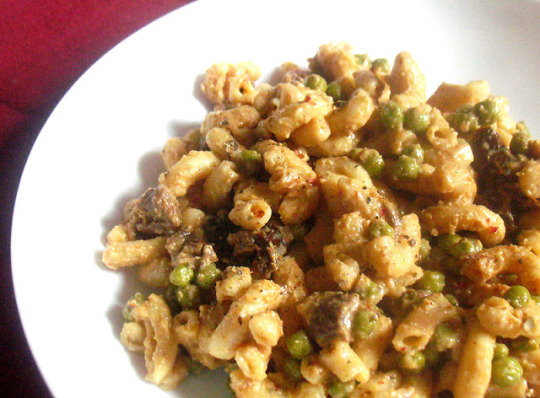
Vegan Macaroni and Cheese with Green Peas

One of my husband's favorite comfort foods has always been mac and cheese. We don't tend to eat a lot of pasta, as my preference is to get my carbs primarily from rice, legumes, vegetables, nuts and seeds. So, on rare occasions when we get take out or dine out, if mac and cheese is in sight, there is a good chance my husband will be inclined to order it because it's not something that I made very often. All the same, I do like to indulge his comfort food cravings from time to time, but I also like to treat him to new and interesting food experiences. This grown-up vegan mac and cheese with plump green peas makes for the best of both worlds.
Though many pasta fans would think the idea of mac and cheese without cheese is an inconceivable abomination, I assure you that the cheese won't be missed. That's because the cheese substitute is not a rubbery soy-based cheese masquerading for the real thing, but actual food. Nuts are an ideal component in dairy-free cheeses, and you don't have to be a vegan to enjoy this preparation. Creamy and decadent tasting, the substance in the sauce comes from cashews — which add a rather rich element — and diced vegetables, along with nutritional yeast that imparts the cheesy flavor in what ends up as a silky sauce.
I use this rich and creamy sauce for the pasta here, but it works well as a dairy cheese substitute for any number of dishes that one might wish to add creamy cheese to, such as nachos and wraps, or consider serving it over cooked vegetables. Because it can be made as thick as you wish, it also works well as a dip for raw vegetables, pita crisps and crackers.
Although this version of mac and cheese might be vegan, and also an easier meal to digest than your traditional mac and cheese, it does not lack in the least in the comfort category, and it's actually hard to resist the urge to go for another serving. It's also a great dish to experiment with, as you can add whatever suits your fancy to enhance the refreshing flavor of the cheese sauce. Spice it up, add some zest with some vinegar, lemon or maybe even some mustard, and as I liked to enjoy it, with some tart sun-dried tomatoes added into the mix along with some sriracha sauce and paprika for heat and contrast. Or just enjoy as is with little adornment, because it really doesn't need anything at all.
Vegan Macaroni and Cheese with Green PeasRecipe by Lisa Turner
Adapted from Oh She Glows Every Day: Quick and Simply Satisfying Plant-Based Recipes
Published on March 1, 2019
Creamy macaroni with a vegan cashew, potato and carrot "cheese" sauce

Print this recipe
Cashew cheese sauce:
1/3 cup raw cashews, soaked in warm water for 30 minutes or longer, and drained
1 medium potato, peeled and diced
1 small carrot, diced
3 tablespoons nutritional yeast
2 tablespoons coconut oil or other oil
2 1/2 tablespoons water
2 teaspoons lemon juice
1/2 to 1 teaspoon sea salt, or to taste
1 clove garlic, minced
1 teaspoon white wine vinegar
sriracha or other hot sauce, to taste (optional)
Pasta:
8 oz (225 g) dried macaroni or other pasta
1 1/2 cups frozen peas
Suggested seasonings:
white wine vinegar
sriracha or other hot sauce
dried herbs
paprika
sea salt
fresh cracked black pepper
Suggested toppings:
1/2 cup sun-dried tomatoes, soaked in hot water for 30 minutes, drained, and chopped
chopped avocado
dried red chili flakes
Instructions:
To make the sauce, transfer the potatoes and carrot to a medium saucepan and cover with water. Bring to a boil over high heat. Reduce the heat to medium and simmer uncovered for 10 to 15 minutes, until the potatoes are fork tender. Drain well.
Transfer the cashews and cooked potatoes and carrots to a blender. Add the nutritional yeast, oil, water, lemon juice, salt, garlic and vinegar, and process until smooth. If the sauce seems too thick, add more water or oil. Taste for seasoning and adjust accordingly. For a bit of heat, add some sriracha or hot sauce. Keep the sauce in a well-sealed container in the refrigerator for up to a week, but if you are making it for the pasta, you'll need the whole batch.
For the pasta, bring a large pot of salted water to a boil and stir in the pasta. Cook the pasta according to package instructions to the desired "bite". When the pasta has only about another minute or so to cook, stir in the peas. Drain.
Return the pasta to the pot and stir in the cheese sauce along with any desired seasonings. Cook over low heat for another minute or so until everything is well combined, heated throughout and the sauce has slightly thickened.
Serve hot with suggested toppings or just as is.
Makes 4 to 6 servings
Other vegan pasta creations to enjoy from Lisa's Vegetarian Kitchen:
Creamy Vegan Cashew Alfredo Sauce with Crispy Roasted Brussels Sprouts and Shell Pasta
Pasta Shells with Roasted Vegetables and Black Olives
Penne with a Spicy Eggplant and Mushroom Tomato Sauce
Zesty Green Pea and Jalapeño Pesto Pasta
I'm sharing this recipe with Eat Your Greens, a monthly event co-hosted by Shaheen of Allotment2Kitchen and The VegHog. Shaheen is hosting this month. See her post for details and to participate this month.
Source: https://foodandspice.blogspot.com/2019/03/vegan-macaroni-and-cheese-with-green.html
0 notes
Text
Chocolate Chip Cookies
Chocolate Chip Cookies - easy and fail-proof recipe that yields buttery, crispy and crunchy chocolate chip cookies that you can't stop eating, hot off your own oven!
Remember I have a talented contributor who is a baking goddess? She is back with another popular cookie recipe—the all-time favorite chocolate chip cookies!
I have to admit that I am not the biggest fan of chocolate (I know!) but I love chocolate chip cookie because it has the the benefit of not being super chocolate-y, with buttery and crunchy texture of cookies. Chocolate chip cookies are oh-so-good when they are fresh out of the oven, with the tiny bits of chocolate chips melt in my mouth while the buttery aroma fills the house…
This is a super easy chocolate chip cookies recipe that yields AMAZING results. Say goodbye to the packaged goods, and hello to fresh chocolate chip cookies from your own oven.
SUBSCRIBE AND NEVER MISS A RECIPE:
SUBSCRIBE TO RASA MALAYSIA NEWSLETTER AND GET EASY AND DELICIOUS RECIPES DELIVERED TO YOUR INBOX. If you try my recipe, please use hashtag #rasamalaysia on social media so I can see your creations! Follow me on Facebook | Instagram | Pinterest | Twitter for new recipes, giveaways and more.
Source: https://rasamalaysia.com/chocolate-chip-cookies-recipe/
0 notes
Text
Family Friday (vol. 88): Holiday Spirit!
A woman from my book club typically hosts our December book club…but she declined hosting this year as she’s preparing to move. For the holidays, we opt for someone’s home over a restaurant and include an ornament exchange. If we get to talking about the book, it’s a bonus. Last year’s was so much fun and the hostess has THE perfect house for entertaining. I live in a lovely home and I’m not complaining, but it’s a home-y home, not a home that’s perfectly suited for entertaining. Plus, we still have the GAPING hole in our kitchen ceiling that is more than likely not going to be repaired by December 12th.
But I offered up our home and it really got me in the holiday spirit. I’ve got my ornament purchased for our exchange and I’m furiously searching Pinterest for the best of the best cocktails and desserts to serve. No one is going to care that our house isn’t perfect for entertaining or the fact that our Christmas tree is two-toned LED bulbs (blue on bottom, white on top) and the tree legs are on TOP of the tree skirt (oh, husband…). It’s all laughable and fun. Plus, I never entertain ANYONE outside of our immediate family. They’ll all understand the marker stains on the carpet – we’re moms!
Anyway, I’m about 90% done with holiday shopping and packages are arriving in rapid succession on our front porch. I have no idea what I’m going to do when I actually have to be a SNEAKY Santa because right now, everything holiday wrapping and to-be-wrapped is sitting in my front entry way….which will need to be removed before book club in a few weeks. I got this.
Work has been busy and my Christmas cards are staring at me unaddressed (but our nanny put all the envelope liners in – LOVE HER TO PIECES!!), but IT’S ALL GOOD. We even left to go swimming at 7pm last night. WHO ARE WE?! And, it was all Mark’s idea. He’s totally trying to be the cool dad. And it’s totally working.
Shea is attending her first ever birthday party this weekend (mom has politely declined every past invite from her schoolmates successfully up until this point). The Hotwheels and dinosaur coloring book are all wrapped and ready to go. She’s pretty into the whole birthday ordeal and as a naive mom, I’ll be interested to see how it goes. I was hoping we could make it another year without a birthday party that included friends and invites and that whole mess, but she can’t wait for her birthday party when she turns FIVE. Not possible.
I’m going push away all of those emotions until at least the middle of 2019.
We’ve canceled our trip to Cancun over New Years. Of course we’re disappointed but we’re more than okay with it – my father-in-law is alive! (If you missed the mention of his accident where he broke BOTH ankles, that story is here). We’ve got our 10-year anniversary trip in the spring to look forward to and honestly, being home or with family for the holidays sounds just like what we need. There’s always vitamin D supplements to make it through winter 😉
Shea is being treated for “mild bronchitis” – ’tis the season! And Piper is turning into a little miss thang before my very eyes. Her language is exploding and she soaks up every moment of being the baby. Potty training is slow going – very capable, sometimes willing, but far away from any actual progress. Oh well.
We’ve been to Champaign and took the girls on a long walk around the campus of the University of Illinois where Mark and I met. We took Shea to a volleyball game (she learned how to cheer for the right team and she’d say, “RIGHT TEAM, MOM….RIGHT TEAM!!”) and Mark and I went to the men’s basketball game at Notre Dame this past week (heartbreaker). We’re hoping for a stronger basketball season than football – shouldn’t be too difficult to improve upon (#facepalm). Shea has a lot of questions about “who was a baby first” (Shea and Piper or Mommy and Daddy) and of course, whoever is the tallest is the oldest. Good thing I’m staying forever young 😉
The girls are on a countdown to Saturday when December 1 is here and they can open the first little door on the advent calendar. I hope they’re not disappointed with the 1 M&M they’ll each find 😉 DREAM BIG, GIRLS! Hard to believe that December is nearly here…but the snow is covering the ground and we’re decorated and ready to go! Our community has lots of fun holiday time activities and we plan to take full advantage. The next few weekends will be busy and fun!
Be well,
Source: https://preventionrd.com/2018/11/family-friday-vol-88-holiday-spirit/
0 notes
Text
Chocolate Chip Paleo Vegan Banana Muffins
Grain-free, refined sugar-free, oil-free, dairy-free vegan banana muffins with chocolate chips. This paleo vegan muffin recipe is so easy to prepare and an excellent choice for sharing with loved ones for breakfast, brunch, or snack.
Six years ago, I started my own personal tradition of posting a muffin recipe on Mother’s Day with a note to my mom. You see, my mom and I share a common love for baking and both of us are muffin-obsessed. Some of my fondest childhood memories are baking with my mom.
To honor my tradition, I baked my mom these Chocolate Chip Paleo Vegan Banana Muffins and am now posting the recipe with my little love letter to her. Here we go!
Dear Mom,
A very happy Mother’s Day to you!
Over the last year, I have needed you more than I ever have before. And you were there for me above and beyond what I could ever expect from any human. You’ve shared wisdom, you’ve listened, you’ve received my tears and snot like a welcoming blanket, you’ve offered food and company and conversation.
You’ve given me everything I need: someone to rely on, someone to understand, someone to carry some pain. When I needed a safe space to upchuck my deepest emotions, you’ve created that space. When I got to points that I sufficiently upchucked my guts, you directed me away from my own self-pity through effective distraction tactics to give me the opportunity to grow and heal.
You are my goldilocks. My just the right amount of everything. You don’t let me get away with my own shit, but you recognize when my shit is valid and you validate it.
With each passing year, I feel more and more blessed to have a solid connection with you. Our bond is sacred and as gooey as it sounds, I believe we’re protected by angels.
As I write this, I’m sitting on your couch and watching a swarm of pigeons eat bird food off of your deck. Which reminds me: Your bird feeding habits need to be dialed back a little, ma. It’s rad that some of the birds that visit your deck (a.k.a. Wildlife feeding station) are cool and colorful and have sweet ass names, but I draw the line at 14 pigeons. That’s too many pigeons. They aren’t pretty, and they make funny sounds.
The end.
Just kidding.
I’m so grateful for you and your curiosity. You gave me your sense of adventure, your wandering soul, your empathy, your strong set of values, and your eye for beauty. Because of you, my life is richer than the moistest, sultriest, sexiest chocolate cake. I can’t thank you enough for what you’ve given and continue to give.
And with that, I give you muffins. Actually, I already gave you these muffins, but here is the recipe, momma.
I love you,
Julia
How to Make Vegan Banana Muffins:
Start by preparing the flax “eggs.” Simply stir the ground flax seed and water together in a small bowl. Allow this mixture to sit until it reaches the consistency of beaten eggs (about 10 to 15 minutes). I like to give the mixture a stir every few minutes to help the process along.
Mash the bananas in a mixing bowl, then stir in the flax eggs and vanilla extract.
In a separate bowl, stir all the remaining dry ingredients together. Transfer the dry mixture to the mixing bowl with the wet and give everything a great big stir until combined.
Bake at 350 for 28 to 35 minutes. Allow the muffins to sit at least 30 minutes at room temp. This step is important, as the muffins will stick to the muffin papers if you try to eat them right away.
Recipe Adaptations:
Use hazelnut flour in place of almond flour
If you have a nut allergy, use this recipe for Coconut Flour Banana Bread – to make it vegan, replace the eggs with flax eggs.
I like using Lily’s Sugar-Free Dark Chocolate Chips to keep the recipe refined sugar-free and vegan, but you can use any chocolate chip or chunk you like.
To make muffins sweeter, add 2 Tbsp pure maple syrup.
To turn these muffins into a loaf, follow this recipe for Chocolate Chip Paleo Vegan Banana Bread.
More Muffin Recipes For Moms On Mother’s Day:
My cookbook, Paleo Power Bowls, is now available! CLICK HERE to check it out. Thank you for your all your support!
If you make these Vegan Banana Muffins, please feel free to share a photo and tag @TheRoastedRoot on Instagram!
Enjoy with your mommas, momma figures and sisters on Mother’s Day or any day beyond!
Chocolate Chip Paleo Vegan Banana Muffins
Grain-free chocolate chip paleo vegan banana muffins are a dairy-free, refined sugar-free snack or breakfast.
Print
Instructions
Preheat the oven to 350 degrees F and line a muffin pan with muffin papers.
In a small bowl, stir together the ground flax seed and water. Allow mixture to sit at least 10 minutes, until it reaches the consistency of beaten eggs. Stir mixture occasionally as it sits.
In a mixing bowl, mash the bananas and whisk in the flax eggs and pure vanilla extract. Stir until well combined (it's okay if the banana stays chunky).
In a separate bowl, stir together the remaining ingredients. Pour the dry ingredients into the bowl with the wet and stir well until combined.
Fill the muffin holes with the banana muffin batter. Bake on the center rack of the preheated oven for 28 to 35 minutes, until muffins are cooked through and lightly golden-brown around the edges.
Allow muffins to sit at least 30 minutes before peeling off the muffin papers and eating.
Chocolate Chip Paleo Vegan Banana Muffins
Amount Per Serving (1 of 9)
Calories 278 Calories from Fat 180
Total Carbohydrates 31g 10%
* Percent Daily Values are based on a 2000 calorie diet.
Source: https://www.theroastedroot.net/chocolate-chip-paleo-vegan-banana-muffins/
0 notes
Text
Lemon-Parsley Chicken Breasts
Today I have some tasty new recipes(below) that will make it easy for you to enjoy a home-cooked meal this weekend. First I have a tasty secret recipe for lemon-parsley chicken breasts. Serve these over pasta with your favorite vegetable on the side and you’re all set.
This recipe is only one of the tried and true chicken recipes featured in the “300 Mouth Watering Chicken Recipes” cookbook. This essential collection of mouthwatering chicken recipes has everything from casseroles to appetizers to pot pies, and more.
Members of our Discount Cookbook Club will receive this entire cookbook with their membership. If you’re interested in joining the club, you can download this title and many others right now: Go Here
Or if you’d like to get this title alone, go here.
Enjoy!
=-=-=-=-=-=-=-=-=-=-=-=-=-=-=
Lose The “Mommy Belly” & Bring Back Your Flat Tummy!
Discover how a frustrated new Mom found a way to go from “baby belly” to FLAT belly in just 15 minutes per day!
For the full story and pictures: Go Here
=-=-=-=-=-=-=-=-=-=-=-=-=-=-=
=-=-=-=-=-=-=-=-=-=-=-=-=-=-=-=-=-=
New Secret Recipe
=-=-=-=-=-=-=-=-=-=-=-=-=-=-=-=-=-=
Lemon-Parsley Chicken Breasts
2 whole chicken breasts, boned & skinned
1/3 c. white wine
1/3 c. lemon juice
2 cloves fresh minced garlic
3 tbsp. breadcrumbs
2 tbsp. olive oil
1/4 c. parsley, fresh
In a measuring cup, combine wine, lemon juice and garlic.
Pound each breast until 1/4 inch thick and lightly coat with breadcrumbs.
Heat olive oil in a large skillet and brown chicken, 5 minutes on each side.
Stir wine mixture and pour over chicken in skillet.
Sprinkle on parsley and let simmer 5 minutes. Serve with pan juices.
Source: 300 Mouthwatering Chicken Recipes
Enjoy these great tasting recipes from our forum:
– Battered Fish Sandwich
– Ricotta-Spinach Pasta
– Fall Harvest Chili
Find these recipes and many more on our forum: Go Here
=-=-=-=-=-=-=-=-=-=-=-=-=-=-=
RECOMMENDED:
1) The “Almost Sugar” That’s Actually GOOD for You!
Discover how you can turn sinful candy…into sumptuous super-foods that guards your heart, boosts brainpower and keeps you looking young: Go Here
2) 4 Foods You Should Never Eat For Breakfast
Most people are eating the wrong foods for breakfast, which cause them to be obese and unhealthy. Lose stubborn belly fat by not eating these 4 foods: Go Here
3) 12 Double Chin Exercises To Tone & Sculpt Your Face!
Facial exercise secrets to rid you of chin fat without expensive surgery or cardio. Reduce your double chin now: Go Here
Until next time… Be Well!
Kind Regards,
Ron
PS- Join us on Facebook and get more recipes and freebies: Go Here
PPS- Forward this email to a friend or tell them to sign up here.
=-=-=-=-=-=-=-=-=-=-=-=-=-=-=

Source: https://www.recipesecrets.net/blog/recipes/lemon-parsley-chicken-breasts/
0 notes