
Last Seen Blogs

smarsupial
Smarsupial

cowardlytrait
we had to end it.

missfiorear
𝙼𝚊𝚜𝚞𝚔𝚞

bye-arerue-fiboo
TDE/R5

dreamingofafaroffland
There Are Worlds In The Words
Text
How to Control Individual Apps’ Volume in M1 Mac
In this article, we have discussed the ways using which you can control individual apps’ volume in M1 Mac.A vast number of cool features can be seen on the M1 Macs, including their ability to run touchscreen apps and more. However, one such feature that still needs to be added to these new computers is their ability to control individual app volumes. With that said, if you are searching for a way in order to ensure that your Netflix volume remains high, but notifications soundfor that specific app remains on moderate levels, go through this article to the end. Below are the details regarding how to control the volume of individual apps in M1 Mac.
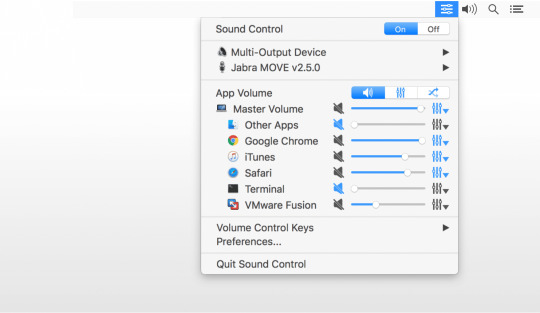
Control Individual Apps’ Volume in M1 Mac
There are several reasons why individuals would require this kind of feature on their Mac Mini or M1 MacBook. Users generally use this feature toget the maximumvolume output from Microsoft Edge, while we have kept the System Sounds low during work. This way, they can watch YouTube videos; while making sure that the notifications sounds doesn’t irritate them.
Individuals can use this service to boost volumes above the maximum output of their PC. However, it might directly have a negative impact on your Mac speakers, and you prefer doing this at your own risk.
Alongside how to control the volume of individual apps, we are also going to tell you how this feature lets individuals record internal audio in M1 Mac and M1 MacBook. With that said, let’s proceed further to the steps to perform the actions.
Control Individual App Volumes in M1 MacBook / Mac Mini
You need to follow these steps to perform the actions:
First, you need to get Background Music (a free, open-source app) to get this functionality on your M1 Mac.
After installing the app, the icon related to it will appear in the menu bar.
By clicking on that icon, you can look into and change the volume for your MacBook. Also, you can control individual app volumes on your Mac.
Auto-Pause Music in Supported Apps
Another feature that you will probably see in the Background Music is ‘auto-pause.’ Using this feature will allow your Mac to automatically pause any ongoing audio that is getting played when it has detected that another app is starting to play music or audio. This is by default set to iTunes, and individuals can change it to Spotify, Apple Music, VLC, or more. This will ensure your music pauses automatically while your M1 Mac starts playing music or a video on another app. Below we have mentioned a list of apps that support the Auto-pause facility: Spotify, iTunes, VOX, VLC, Swinsian, Hermes, GPMDP, and Decibel.
How to Record Internal Audio on M1 Mac
Individuals might sometimes find themselves in a situation where they would want to record the screen on their Mac with the internal audio. But being unavailable in macOS, this featurecan only be used withthe Background Music. Below are the steps mentioned on how to do that:
On your Mac, you need to first launchthe “QuickTime” player and then go to “File.”
Further click on “New Screen Recording.” You may also make use ofthe keyboard shortcut ‘command + shift + 5’ and choose the option“Screen Recording.”
Further tap on “Options” and select“Background Music”appearing under the microphone settings.
Once done, you will be able to initiate screen recording, it the internal audio on your MacBook or Mac Mini will get recorded.
How to Uninstall Background Music
In case you want to uninstall the “Background Music” facility for some reason, you need to remove the Background Music app installed on your Mac. Below we have mentioned the steps for the same:
First, open the Terminal and input the command stated below:
cd /Applications/Background\ Music.app/Contents/Resources/
Now make use of the following command:
bash uninstall.sh
That’s it. This is all you need to do to install Background Music in order to control the volume of individual apps andrecord internal audio on your M1 Mac. It’s great to see that a developer has made this app available for individuals, and they can use them for free. Also, it is open-source, meaning, if anindividual is interested, can look up the source code and customize the app or make improvements accordingly to it.
While it’s easy and straightforward to use the Background Music app on M1 Mac, in case you still face any issues, you may mention it in the comment section below. We would be pleased to help you.
James Boond is a Microsoft Office expert and has been working in the technical industry since 2014. As a technical expert, James has written technical blogs, manuals, white papers, and reviews for many websites such as mcafee.com/activate .
Source – How to Control Individual Apps’ Volume in M1 Mac
0 notes
Text
How to Copy and Paste Real-World Objects in AR Using iPhone and Android
In this article, we have discussed the ways using which you can copy/paste the real-world objects in AR using your Android or iOS device. Larry Tesler invented the method of copying and pasting simple texts, which changed the way of using PCs. Now, with the advancement in the fields of technology, the simple copy-paste feature has reached newer heights. The previous year, Cyril Diagne, the designer based in Paris, developed a unique app that lets individuals copy/paste real-world objects onto a PC with the help of Augmented Reality (AR). With that said, let us proceed further to how individuals can copy/paste real-world objects in AR using their handset. The steps mentioned below are applicable to both Android and iOS.

Copy and Paste Real-World Objects in AR
Augmented Reality is among some of the biggest upcoming technical aspects of the future, and hopefully, it will sooner or later become mainstream. Thanks to giants like Apple, who are pushing forward to bring the AR-based future closer to us. Apple is inclu7ding in its products, hardware, particularly for AR. Just about this year only, we have seen that Apple included a LiDAR sensor to the devices from its iPhone 12 lineup, i.e., iPhone 12 Pro and iPhone 12 Pro Max. No doubt, things will soon be taking an interesting turn. With all that said, let us proceed further to the steps with which you can use your Android or iOS smartphone for creating a real-world object’s AR-based model.
Prerequisites
Recently an app named “ClipDrop,” was launched on the App Store and Play Store. So, to initiate the process of copying real-world text and objects, it is necessary to download and install the ClipDrop on your smartphone.
If the individuals want to download the app on their desktop or laptop, they can do so by downloading the macOS or Windows version of the app accordingly. Using the desktop version, you can paste the copied information onto your Mac or PC. So, before initiating the process of the tutorial, you need to make sure that you have installed the app handset and laptop/PC. The app, as stated above, can be downloaded on iOS, Android, Windows, and Mac.
How to Use ClipDrop to Copy and Paste in AR
So now you have installed the ClipDrop app on your PC or smartphone, proceed further to the steps:
Launch the ClipDrop app on your Android or iOS device.
Further, tap on the option “Clip” appearing on the mode-bar at the bottom. Further, point the camera of your smartphone towards the subject or object that needs to be copied in Augmented Reality. Further, click on your screen’s middle portion to capture the object or subject.
Now, you need to wait for ClipDrop to figure out the object, and once it has been located, separating it from the background and further converting it to an AR-model is all you need to do.
Further, having the copied object on your device’s screen, you need to point your device towards your Mac or PC. You need to ensure that your ClipDrop app is open while you point your smartphone to your PC or Mac.
Now, click on the “Drop” button. Doing this will let you paste the copied AR-model to your PC. Please be noted that by pasting the AR-objects to your Mac or PC, you need to make sure that your handset and PC are connected to a common network.
That’s it. Now you can easily add any real-world object to various editing software like Unity or Adobe Photoshop.
Other Functionalities and Subscription Model
Apart from copying people as well as objects, users can also copy printed and handwritten texts similar to the cross-platform copy-paste that Google Lens offers. In addition to this, individuals can capture images and seamlessly send them onto their laptop or PC using the cross-platform support offered by ClipDrop.
The app in itself comes free of cost when the pricing and subscription model are concerned. However, you can copy only ten clips in the free plan, but you get support for unlimited copying of photos and text on the free version. Talking in general about the yearly or monthly subscription, you need to pay the price of $39.99 and $9.99, respectively.
So, these were the details regarding how to create AR models of real-world objects using your smartphone.
James Boond is a Microsoft Office expert and has been working in the technical industry since 2014. As a technical expert, James has written technical blogs, manuals, white papers, and reviews for many websites such as mcafee.com/activate .
Source – How to Copy and Paste Real-World Objects in AR Using iPhone and Android
0 notes
Text
The Mi 11 to Launch with Qualcomm’s Latest High-End Chip (Snapdragon 888 Processor)
After being launched in China on December 28, the XiaomiMi 11 is ready to get a full global launch on February 8, this is when we’ll hear the price.
XiaomiMi 11 features a 6.81-inch AMOLED panel with WQHD+ resolution, a 120Hz maximum refresh rate, and 1500 nits maximum brightness. It supports HDR10+ and 100 percent of the DCI-P3 color gamut. The display is housed in a minimal-bezel chassis with a 91.4 percent screen to body ratio and protected by the toughest Gorilla Glass Victus.

Snapdragon 888 5G mobile platform offers significant improvements in performance per watt, AI acceleration, 5G support, computational photography, gaming performance, Wi-Fi speed, and photo security, ZDnet reported on Monday.
On the camera department, the Mi 11 has three cameras at the back — 108MP wide-angle, 13MP ultra-wide angle, and 5MP ‘Tele Macro’. The front camera is a 20MP in-display unit. The smartphone also features improved night-mode photos on three of the four cameras (primary, ultra-wide, and front) and RAW-level noise reduction for brighter night-time videos.
AI Cinema mode gives one-click access to six creative features; Magic Zoom, Slow Shutter, Time Freeze, Night Time-lapse, Parallel World, and Freeze Frame Video. Other advanced imaging features include HDR10+ video recording, Pro Time Lapse, and AI Erase 2.0, which cleans up images with a single click. Xiaomi will equip the Mi 11 Pro with the Sony IMX766, a 50 MP sensor that will serve as the device’s primary camera. Xiaomi camera tech is dependable and flexible, as it offers impressive night performance and as smart as S21 8K video.
The smartphone boasts a 4,600mAh battery along with 55W fast charging, 50W wireless charging, and 10W reverse wireless charging.
You can explore any popular android games out there many YouTubers have been testing Genshin Impact, Call of Duty, PUBG, and other popular 2021 Android games, and they run perfectly and smoothly even on high detail settings. You also get support for 5G, plus Wi-Fi 6. Android 11 is on board the XiaomiMi 11, topped with MiUI 12. The result is a feature-packed smartphone, with some great additions, including video tools. Speaking of its display, the 6.81-inch AMOLED screen is slick and smooth, it is quite as eye-catching as Samsung’s Dynamic AMOLED display. You get strong audio smarts here too.
Unfortunately, it has no memory card slot but comes up with internal storage of 128GB and 8GB of RAM, or 256GB of storage and 8GB of RAM, or 256GB of storage and 12GB of RAM which does not make the absence of a slot a disadvantage. The Mi 11 global launch could take place next month, along with Mi 11 Pro that is also expected to launch in February. However, Xiaomi has not officially shared any information on the launch of either phone, so this information should be taken with a pinch of salt.
James Boond is a Microsoft Office expert and has been working in the technical industry since 2014. As a technical expert, James has written technical blogs, manuals, white papers, and reviews for many websites such as mcafee.com/activate .
Source – The Mi 11 to Launch with Qualcomm’s Latest High-End Chip (Snapdragon 888 Processor)
0 notes
Text
The Best Work from Home Gadgets
It has been more than a year since we started working from home due to the Covid-19 pandemic. Many people have already adjusted their workspace, but if you have not done that, then it might be the right time for you to get the best gadgets for your workspace.

Apple AirPods Pro
AirPods Pro is not the be-all-end-all answer to all your audio needs. Sound quality still has a way to go, though it’s better than any AirPods version has ever been. Sound, however, is the only thing stopping me from giving AirPods Pro five stars.
They fit well and are more comfortable than any in-ear or on-ear or over-ear headphones I’ve ever used. They have superb ANC, better than anything I’ve experienced with in-ear ANC earphones.
And they have Apple’s incredible H1 processor chip which makes it, so your earphones pair quickly and easily with one device, and are automatically connected to all of your other devices that are signed in with your Apple ID.
Phone as Webcam
It is possible to turn any phone which has a camera into a webcam. By doing there you can increase your video quality significantly and could save about $200. The steps to take so are simple. You just have to install a free version of DroidCam from the Play Store and follow the steps mentioned in the wizard.
Saatchi Aluminum Multi-Port Adapter V2
They took one of our top-selling customer favorite Type-C adapters and made it even better! Introducing its latestAluminium Multi-Port Adapter V2, with all the same peripherals that you loved on the previous model but with several changes to ensure a consistent connection and stable data transfer. The new version is also upgraded the Micro SD card slot and refined our aluminum design, so now it is easier than ever before to add expansion ports to your MacBook/MacBook Pro. Available in two modern colors, silver and space grey.
The highlighted features of Saatchi Aluminum Multi-Port Adapter V2
• Upgraded MicroSD card reader slot
• HDMI video output — up to 4K 30Hz
• USB-C pass-through charging — up to 60Hz
• Gigabit Ethernet — supports 10/100/1000Mbps
• Micro/SD card reader and 3 USB 3.0 ports.
Panasonic AA Nimh 2,550mah Rechargeable Batteries
The Panasonic Pro battery-powered by Eneloop provides 2550mAh of performance for long-lasting, high power capacity, extreme applications. The pro battery is a perfect choice for powering high current consuming devices such as photo strobe flashlights; providing more than twice the number of flashes per recharge in less than half the time as compared to conventional alkaline batteries! Wireless keyboards, mice, game controllers, radio-controlled toys, and a range of household devices can all realize extended performance when powered by Pro batteries.
Caldigit ts3 Plus Thunderbolt 3 Dock
Connect a variety of Thunderbolt 3, USB 3.1 Type-C, USB 3.0 Type-C, USB 3.0 Type-A, DisplayPort 1.2, Gigabit Ethernet, S/PDIF audio, 3.5 mm audio, and SDXC UHS-II peripherals to your compatible system using the space grey TS3 Plus 15-Port Thunderbolt 3 Dock from CalDigit. This dock contains two bi-directional 40 Gb/s Thunderbolt 3 ports, each of which utilizes the reversible USB Type-C connector and also supports 10 Gb/s USB 3.1 and dual-bandwidth DisplayPort 1.2, allowing you to connect up to two 4K/60 Hz displays simultaneously, or one 5K Thunderbolt 3 display.
Google Nest Wi-Fi Router
This nest Wi-Fi device blankets your whole home in fast, reliable Wi-Fi and eliminates buffering in every room — with coverage up to 4400 square feet. From the team that made the best mesh Wi-Fi System in the US. Nest Wi-Fi is a scalable and flexible Wi-Fi System. One Wi-Fi router plugs into your internet provider modem or gateway to create your Wi-Fi network. Home size, materials, and layout can affect how Wi-Fi signal travels. Larger homes or homes with thicker walls or long, narrow layouts may need additional newest Wi-Fi devices for full coverage. The strength and speed of the signal will depend on your internet provider. Based on monthly retail sales of mesh Wi-Fi systems in the US between 2017 – 2018 as reported by the NPD Group, Inc. Home size, materials, and layout can affect how Wi-Fi signal travels. Larger homes or homes with thicker walls or long, narrow layouts may need extra Wi-Fi points for full coverage. The strength and speed of the signal will depend on your internet provider.
James Boond is a Microsoft Office expert and has been working in the technical industry since 2014. As a technical expert, James has written technical blogs, manuals, white papers, and reviews for many websites such as office.com/setup .
Source – The Best Work from Home Gadgets
0 notes
Text
5 Best Movies and TV Shows Featuring Carrie-Anne Moss
Carrie-Anne Moss is one of the most popular actresses in the film industry, and her performance in The Matrix is one of the most famous roles she took in her career. However, Carrie-Anne Moss has appeared in several great films and TV shows, and several of them became hit solely because of her performance. She also has a great sense of choice while signing any project, resulting in her becoming a part of many blockbuster films and TV shows. If you are a fan of Carrie-Anne Moss, you will not want to miss watching her best movies and TV shows, and if you are not a fan already, we recommend you to watch her best works, and you are likely to become one. In this article, we have listed the best films and TV shows featuring Carrie-Anne Moss. Let’s scroll down and find the top picks for you to watch.

The Matrix
The Matrix undoubtedly has to be on top while talking about Carrie-Anne Moss’s best films. The Matrix was released in 1999 and is one of the highest-rated movies of Carrie-Anne on IMDb, with an excellent rating of 8.7. The Matrix is a sci-fi film which has a lot of action. The film revolves around Thomas Anderson, a computer programmer, who has to fight against powerful computers trying to alter his entire reality. Keanu Reeves (Neo), Carrie-Anne Moss (Trinity), Laurence Fishburne (Morpheus), and Hugo Weaving (Agent Smith) are starring in this film directed by Lana Wachowski and Lilly Wachowski.
Memento
Memento is a film full of mystery and thriller, directed by legendary director Christopher Nolan. Leonard Shelby, an insurance investigator, is the central character of the film. He suffers from anterograde amnesia and uses notes and tattoos to find the man he thinks killed his wife. Guy Pearce (Leonard Shelby), Carrie-Anne Moss (Natalie), Joe Pantoliano (Teddy Gammell), and Mark Boone Jr. (Burt) are starring in this film. Memento has received an IMDb rating of 8.4.
Snow Cake
It was quite a new experience for the fans to see their action star featuring a romantic drama film, and Carrie-Anne Moss gave an example of her versatile talent in this film. Alan Rickman (Alex Hughes), Sigourney Weaver (Linda Freeman), Carrie-Anne Moss (Maggie), and Emily Hampshire (Vivienne Freeman) are starring in this film. Snow Cake is directed by Marc Evans, and the film has received an IMDb rating of 7.5.
The Matrix Reloaded
The Matrix Reloaded witnesses Carrie-Anne Moss again in an action role. The film follows the struggle of freedom fighters Neo, Trinity, and Morpheus against the Machine Army. Keanu Reeves (Neo), Carrie-Anne Moss (Trinity), Monica Bellucci (Persephone), and Laurence Fishburne (Morpheus) are starring in this film. Lana Wachowski and Lilly Wachowski have directed this film. The Matrix Reloaded has received an IMDb rating of 7.2.
Tell Me A Story
Tell Me A Story is a two-season psychological thriller series, and Carrie-Anne Moss appeared as Rebecca Pruitt in the second season of the series. The series featured tales of love, loss, greed, revenge, and murder. Most of the stories were set in New York. Kevin Williamson is the creator of the series. Tell Me A Story has received an IMDb rating of 7.2.
Carrie-Anne Moss is a popular Hollywood actress who is mostly known for her wonderful roles in action movies. She has appeared in many movies and TV shows, proving her versatility as an actor. In this article, we have listed the best movies and TV shows featuring this popular actor. You can watch these movies and TV shows, and enjoy them while appreciating the talent of this great actor.
James Boond is a Microsoft Office expert and has been working in the technical industry since 2014. As a technical expert, James has written technical blogs, manuals, white papers, and reviews for many websites such as webroot.com/safe .
Source – 5 Best Movies and TV Shows Featuring Carrie-Anne Moss
0 notes
Text
5 Best Gallery Vault Apps Available for Android
We use our phones to store a lot of valuable, personal, and sensitive data. There are photos, videos, music, and documents that we would want to keep to ourselves, and keeping those in an open folder is a big risk as we do not know at what point in time we might need to share our phone with someone. Gallery vault apps are a good solution for such problems, and if you are an Android user, there are various options available on Google Play Store to keep your data private. You can download a gallery vault app, set a password, and secure your data from any unauthorized access. However, choosing a quality gallery vault app among many options might be difficult. Check out the best gallery vault apps for Android.

1Gallery
1Gallery is one of the most famous photo vault services. Along with keeping your photos safely in a vault, this app also functions as a regular gallery app where you can view and sort your photos and videos. All the files saved in the vault are encrypted, and you can use pattern lock or PIN to keep those files secured. This app also features basic photo and video editors. You can download this app for free from Google Play Store. The paid version of the app comes for $2.99 with advanced features.
Gallery Vault
Gallery Vault is another excellent app on our list to keep your data secure and private on your phone. This app has been around for a while, and that makes it a popular app. You can use the app to hide the data available on internal storage as well as SD card. The free version of this app comes with ads, while the ad-free version costs $14.99. You can download the app from Google Play Store.
Hide Something
As the name suggests, the app Hide Something is usable to hide the data on your phone. This is a clean app with an easy user interface. This app supports third-party apps, so you can directly import and export files to different apps. GIF support, a fake vault mode, and fingerprint support are other significant features of this device. You can download Hide Something for free from Google Play Store.
LOCKED
LOCKED is a wonderful gallery vault app to enhance the privacy of your phone. This app can hide itself as a calculator in the app drawer of your phone, so only you will know where you have hidden the data. This app also features a private browser. You can download the free version of the app from Google Play Store. The premium version of the app is available for $6.99.
LockMyPix
LockMyPix comes with all the necessary features of a good gallery vault app. Complete offline support, a fake login, AES encryption, fingerprint scanner support, and SD card support are significant features of this device. There is also a fake vault available. You can download the app for free from Google Play Store and upgrade to the premium version for $3.99.
Gallery vault apps can play an important role in maintaining the privacy of your data. Download one of the apps listed above and bolster your privacy.
James Boond is a Microsoft Office expert and has been working in the technical industry since 2014. As a technical expert, James has written technical blogs, manuals, white papers, and reviews for many websites such as webroot.com/safe .
Source – 5 Best Gallery Vault Apps Available for Android
0 notes
Text
How to Use Apple Pay on iPhone 12
Once you set up Apple Pay correctly, it is effortless to use it. Still, a few tips will help you to command greater control on payments.
Apple Pay is available in iPhone 12 and a handy feature to make contactless payments for the goods and services you have purchased at any physical store. The users will need to bring their iPhone close to the payment terminal. It is enough to complete your purchase. There is no need to swipe a card or enter a PIN or sign. Additionally, Apple Pay may be available for some purchases that you make on websites and for in-app payments. However, you will need to make some initial setup before you start using it.

People have been using digital payment systems on their mobiles for many years. Apple Pay is also a mobile payment system that was introduced in the year 2014. Later, in 2015, Google and Samsung followed the trend and introduced Google Pay and Samsung Pay. Fitbit introduced a system of mobile payment in 2018 to its smartwatches. In the beginning, when these payment systems were introduced, it was awkward and difficult to use these payment systems as these were, to some extent, advanced technology for the retailers, and they were unfamiliar with it.
However, mobile wallets started gaining popularity with the increasing number of people using these payment methods in their day to day life all across the world. Now, making payments with a smartwatch or smartphone has become commonplace everywhere. During the social distancing and lockdown situation this year, mobile wallets’ importance increases much more than ever before due to concerns over limiting personal contacts.
Before you start using Apple Pay with your iPhone 12, make sure that your debit and credit cards are added to the Wallet app. Adding debit or credit card to your Wallet app is very easy. You will need to open the Wallet app. When you click on the Plus sign, it will allow you to add a new card or select an already existing Apple pay card if you already have one or more added with your Apple ID. To begin, the app will prompt you to enter your Apple ID to log in.
If you want to add a new card, then the app will switch on the iPhone’s rear camera, providing instructions to position your card so that it can appear within the on-screen shown frame. It will allow your iPhone to read the number of your debit or credit card. If the automatic scan is not working correctly or there is no light, you add card information manually. The issuer of some cards may require the use of their app to verify it.
Once you complete one or more debit or credit card, you will use Apple Pay. If you have added more than one card to your Apple Pay, select your preferred card to make payments. To select your preferred card as the default option, touch and hold the card option and then drag it to the stack’s front.
Apple Pay: How to Use it After Setting Up
Search for the EMV logo or Apple Pay contactless logo at a physical terminal or retail store. To use your preferred card option for making payments, you will need to go to the device’s right side and double-click on the sleep button. Authentication is effortless with iPhone 12 due to the availability of FaceID in it. You will need only to glance at your iPhone for authentication. However, if the FaceID on your iPhone is switched off or you have worn a mask, then you can enter a passcode to make it work.
You have to hold your iPhone near the card reader for authentication until a checkmark appears on your smartphone’s screen. Also, it may give you an audible signal after completion. Some terminals may ask you for a PIN code, but it will occur to you rarely. If you want to use a different card, then double-click the sleep button. But, when your default card appears, then click on the card and choose an alternate from your Apple Wallet.
Apart from these, you can use Apple Pay to use it online to pay at participating websites and make in-app purchases within some apps. You can enter your shipping, contact, and billing information in your iPhone’s Settings app to use it for the app and online purchases when you need it. When you check out, you will get the opportunity to change the name, card, and address you have used. To complete your purchase, you will be prompted for confirmation by double-clicking the side button.
Here, you will need to enter the passcode or use FaceID for authentication and making payment. You will find the payment method anywhere on the Apple Pay logo when it will appear to you. To make in-app or online payments, you will get the option appearing as ‘Buy with Apple Pay’ or ‘Donate with Apple Pay.
James Boond is a Microsoft Office expert and has been working in the technical industry since 2014. As a technical expert, James has written technical blogs, manuals, white papers, and reviews for many websites such as mcafee.com/activate .
Source – How to Use Apple Pay on iPhone 12
0 notes
Text
The Best Home Office Phones 2021
When it comes to home office phones, different people have different needs. Amidst the social distancing measures imposed by the governments worldwide, a large number of companies are augmenting their capabilities of remote collaborations. The solutions lie in the best home office phones designed to enable the users to complete their office work from home conveniently. These phones are packed with many advanced features and technologies. All these home office phones have unique systems to cater to various people’s needs in different circumstances. These highly advanced and augmented home office phones have made remote collaboration much robust and more comfortable than it was never before.

We have picked some of the best home office phones to make your remote working much more comfortable and enhance your productivity. These best picks will surely increase your efficiency and help you to deliver the best performance.
AT & T BL 102-3 DECT 6.0 3-Handset Cordless Phone for Home With Answering Machine
The cordless phone is packed with exceptional features such as a handset speakerphone, smart call blocker, caller id, a large screen of 2 inches, and many others. It is expandable to five handsets conveniently. This reliable and advanced cordless system has a digital answering machine that can record outgoing memos, announcements, and incoming messages for up to 22 minutes. Also, it has a voice guide for an easy setup. The in-built full-duplex speakerphone of this cordless handset allows both ends to speak and, at the same time, can be heard. Its other useful features include handset intercom and audio assist to make your daily conversations enjoyable.
HePesTer P-017BN-2 Call Center Corded Phone with Headset Caller ID Speakerphone Home Office Landline Telephone
The corded phone has a memory for incoming calls of up to 66 groups and outgoing calls of up to 16 groups to make you read the calls record conveniently. Its other features include an rj9 headset, phone base, phone line, receiver, and manual and bracket. The corded phone is equipped with one-touch dialing memories for up to five groups and two-touch dialing memories for up to 10 groups making it easy for you to connect with clients, vendors, and other frequently called numbers. Plus, this call center corded phone with the headset is equipped with a receiver and hands-free key along with three methods of answering calls allowing you to customize your setup. Further, it will help you to maximize your efficiency in your work area.
VTech CS6649 Expandable Corded/Cordless Phone System With Answering System-Caller ID/Call Waiting & Handset/Base Speakerphones
The expandable phone comes in corded and cordless systems with many intuitive and enhanced features to maximize users’ efficiency and productivity in their work area. It is expandable up to five handsets and that too with only one phone jack. Its other features include:
Digital technology based on Dect 6.0.
Base speakerphones and handset.
Quiet mode.
Caller waiting/caller id stores for 50 calls.
Panasonic DECT 6.0 Expandable Cordless Phone with Answering Machine and Smart Call Block -2 Cordless Handsets-XK-TGD532W (White)
The expandable cordless phone has a bilingual caller id audibly announcing the caller information in either Spanish or English. Its large LCD backlit displays of 1.6 inches can make call functions visible in any light, and backlit soft-touch amber keypads augment the readability. Plus, it has a talk time of up to 10 hours and standby time up to 5 days, along with 7 hours of charge time. Using its one-touch telephone call block, the users can register up to 150 numbers in just one touch on the cordless handsets and cordless phone base unit. The cordless phone system has a Quick read message counter allowing the users to know how many phone messages they have received.
AT&T CL2940 Corded Phone with Caller ID/Call waiting, Speakerphone, XL Tilt Display, XL Buttons & Audio Assist Volume Boost
The corded phone is packed with many useful features taking care of the needs of the users. Its features include:
An LCD display.
Extra-large tilt display.
Compatibility with the hearing aid.
Audio assist.
Speakerphone.
Caller id/call waiting.
Extra-large buttons.
Wall-and table mountable capability.
Extra-loud ringer.
Apart from these, some other home office phones are equally packed with intuitive and enhanced features. These home office phones include AT&T CD4930 Corded phone with digital answering system and caller ID, VTech DS6151 2-Line Cordless Phone System for home or small business with digital answering design and other features, SureCall Fusion4Home Cell Phone Signal Booster for home and office, Panasonic Link2Cell Bluetooth Cordless Phone System with Voice Assistant, Call blocking and other useful features, etc. Work from home means you need top-notch technology and business capabilities to show your optimum performance even while dealing with your household responsibilities. These home office phones will surely help you in what way you need and want.
James Boond is a Microsoft Office expert and has been working in the technical industry since 2014. As a technical expert, James has written technical blogs, manuals, white papers, and reviews for many websites such as mcafee.com/activate .
Source – The Best Home Office Phones 2021
0 notes
Text
A Guide on Logging In with Multiple Accounts on Microsoft Teams
If you have a whole team to communicate with, there’s no better platform than Microsoft Teams to conduct meetings, chat, call, video conferencing, and much more. However, according to many professionals, one setback is that they end up in multiple Teams’ account. For instance, you use one account to communicate with your team, another for clients, etc. The big question is, how will you operate multiple accounts on Microsoft Teams?
Notably, there’s no official multi-account functioning offered by Microsoft Teams. All you can do is sign out and then sign in with another account. Stop worrying, as we’ve got your back! Sure, Microsoft doesn’t have a way around it, but there are other methods you can use to work with multiple accounts at once. How? Read along to learn more!
Use Different Browsers
As mentioned above, using multiple accounts with the Microsoft Teams desktop app isn’t possible. However, you can use different browsers to login with other accounts. Start by signing in with one of the Teams account on the web app of Microsoft Teams. Navigate to the website using any browser, and enter your login information. Next, a pop-up dialog box will appear, prompting you to install the desktop app. However, you need to continue using the web app only.
Now, open any other browser and navigate to the Microsoft Teams web app. Enter log in details for a different account and sign in. This way, you can use multiple accounts at once on different browsers.
Use Progressive Web Apps (PWAs)
Progressive Web Apps is a method of distributing apps that can go in an app store and can be installed as an app. Additionally, it can be something that a user may pin from the browser and use as a bookmark.
The steps to create progressive web apps vary with the browser you’re using. Therefore, let’s assume that you’re making one with Microsoft Edge. The steps to do the same are:
Navigate to the Microsoft Teams web app and login with your account.
Tap on the ‘ellipses’ icon in the top-right corner of the window.
Select the ‘Apps’ option from the menu.
Select the ‘Install this site as an app’ from the pop-up menu. Now, the Teams will open in a separate window.
Use your mouse and right-click on the new active progressive web app from the taskbar.
Click on the ‘Pin to Taskbar’ option.
This is it! Now, whenever you want to open the progressive web app, click on the shortcut straightaway on your taskbar.
Use Mobile Application
Using a mobile application to log in with multiple Teams accounts can also work for you. The mobile app enables you to add more than one account and switch between them easily. Therefore, you won’t have to sign out and sign in repeatedly to use different accounts.
Sometimes, it might not be the best option to switch between various accounts while using the mobile app. Therefore, in such a situation, you can use the mobile app and web app simultaneously.
That was easy, isn’t it? Now when you’re familiar with logging in and using multiple accounts using the above three methods, why not reduce your workload? Log in with the accounts at once and work by switching instantly between them.
James Boond is a Microsoft Office expert and has been working in the technical industry since 2014. As a technical expert, James has written technical blogs, manuals, white papers, and reviews for many websites such as mcafee.com/activate .
Source – A Guide on Logging In with Multiple Accounts on Microsoft Teams
0 notes
Text
Review: AirPods Max Shield Case by Waterfield Designs
You must be familiar with the launch of the AirPods Max. What’s unique about the headphones is that these are Apple’s highest-end AirPods till date and the most expensive ones.
One of the biggest reasons the new device received a lot of criticism was because of the design of its Smart Case. Even though the users loved almost everything about the new Apple device, everybody’s rooting for the Smart Case design to change.

Fortunately, Waterfield Designs came up with a solution and created the AirPods Max Shield Case. Other Waterfield products have done incredibly well in the market. Therefore, it helped in building up the excitement to check the AirPods Max cases from them.
Are you interested to know more about what Waterfield Designs have brought you for your AirPods Max? Here’s everything you need to know about the same, so read along to learn more!
What is to Be Liked About the AirPods Max Shield Case by Waterfield Designs?
Everyone will agree that the AirPods Max is incredible to use except for its Smart Case. Sure, it has a mechanism that can put the headphones into ultra-low power mode; however, the appearance is still unattractive.
On the other hand, talking about the Waterfield Designs AirPods Max Shield Case, it features a leather panel in the front. The leather is premium quality, just like all other Waterfield products.
Additionally, you can put things or accessories in the space between the front panel that features a zipper compartment. The Shield Case also has a back pocket where you can store the cables or other light-weight accessories. The inside of the case has a pocket to store the charger, which can be secured using the Velcro strap.
Shield Case is portable and you can carry it anywhere along with you by putting it in your handbag. Alternatively, Waterfield Designs adjusted a nylon loop at the top so that you can grab the same and take it along.
What is Not to Be Liked About the AirPods Max Shield Case by Waterfield Designs?
Undoubtedly, the Shield Case by Waterfield Designs is what you also must be looking for. However, the only downside of getting it is its price. Though there are numerous options in the market to get a storage case for your AirPods Max, there is nothing that can compete with the quality offered by Waterfield.
Assuming that you might have made your mind about getting the Shield Case, it is one of the best accessories offered by Waterfield. Unfortunately, Apple doesn’t offer one like that; however, you’re getting a better option than using the case offered by Apple. So, what are you waiting for?
James Boond is a Microsoft Office expert and has been working in the technical industry since 2014. As a technical expert, James has written technical blogs, manuals, white papers, and reviews for many websites such as office.com/setup .
Source - Review: AirPods Max Shield Case by Waterfield Designs
0 notes
Text
These Are the Best Gallery Apps Available for Android
The basic gallery apps on our phones are suitable for storing photos and videos. Still, if you are looking for a fast-paced app and a better organizer of pictures and videos, you might want to install a new gallery app on your phone. Fortunately, there are so many gallery apps available for Android. However, there is always a scope of picking the best app, so we have got you covered. In this article, we have listed the best gallery apps available for Android. Let’s scroll down and find the best app to introduce yourself to a new experience of using your smartphone.

1Gallery
1Gallery is one of the newest gallery apps available on the Google Play Store. This app does not only work as a standard gallery app but can also be used as a gallery vault to keep your photos and videos secure. You can use a pin, pattern, or fingerprint lock to keep your photos safe, and the best part is that your data is not only hidden but also encrypted for improved privacy. You can easily find a particular image by using various sorting options available on the app. The grid view availability makes it easier to look at the pictures and videos available on your device. Built-in photo and video editors are some other significant features of this app. This app can be used in dark theme mode also. You can download 1Gallery for free.
A+ Gallery
A+ Gallery is another popular gallery app. This app is good at doing all the necessary things like organizing your photos and videos, creating photo albums, and making it easy to share your photos. What makes this app special is the support for Dropbox, Amazon Cloud, and Facebook, so you can also see the images available online in your gallery. The in-built vault allows you to keep your photos and videos private with a password. This app features a user-friendly interface. You can download this app for free from Google Play Store.
F-Stop Gallery
F-Stop Gallery app has been around for a while, and it is one of the most advanced gallery apps available for Android. This app can organize your photos based on the date, time, and location they were clicked. This app comes with a Smart Albums feature, which sorts all your photos and videos on its own, and it becomes easy for you to search for the desired images in the vast collection. What makes this app special is that it can also play GIFs. You can download this app for free from Google Play Store. You can buy the pro version of F-Stop Gallery to unlock some more advanced features.
Gallery Vault
As the name suggests, Gallery Vault is a good app for those looking to store their photos and videos in a private space. You can hide your photos, videos, and other supported files in this app and put a lock on it. For additional security, you can also choose to hide the app icon from your device so no one else will have access to it. However, this app also works well in sending alerts if someone tries to break into your privacy. If you are using a Samsung device, you can keep a fingerprint lock on your vault, and for other devices, maintaining a strong password and PIN is recommended. This is one of the most secure gallery apps available for Android, and you can download it for free from Google Play Store.
Google Photos
Google Photos is one of the most reliable apps to store your photos and videos. It is one of the best organizers of your data when it comes to sorting according to date, time, and place. What makes this app special is that the information you store on this app does not take up space on your phone but gets saved in the cloud storage. However, your photos and videos’ original quality is compressed to Google’s High-Quality setting in this app. You can download this app for free from Google Play Store.
Using a new gallery app other than the basic one available on your phone can enhance your experience of looking at your photos. In this article, we have listed the best gallery apps available for Android, and you can download any of these according to your needs.
Devin Smith is a creative person who has been writing blogs and articles about cyber security. He writes about the latest updates regarding mcafee.com/activate and how it can improve the work experience of users. His articles have been published in many popular e-magazines, blogs and websites.
Source - These Are the Best Gallery Apps Available for Android
0 notes
Text
Proven Ways to Block Websites
Do you want to block a particular website but don’t know how to do it? You are in the right place. There can be many reasons for blocking a site. You may want to keep your kids away from some websites. There are many bad websites on the internet whose primary intention is to steal users’ data.
Further, while the internet is making your life more comfortable and more manageable, it can be dangerous if not used wisely. You need to maintain proper security measures while using the internet. Educate your loved ones about how to use the internet and be safe from malicious websites. Many devices come with parental controls features, making it easy to track a kid’s web activity or block harmful sites.
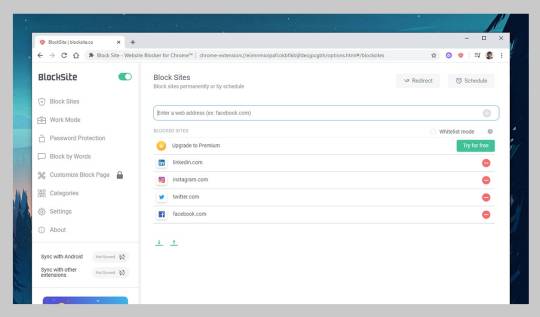
Moreover, today’s guide is all about blocking websites that contain malicious links, explicit content, etc. You will learn how to block sites through settings, parental controls, routers, and host files. So, keep reading this step by step guide to learn different methods.
How to block websites through parental controls
You can block a site through parental control settings available on Windows and MacOS systems. This parental control feature offers many benefits. You can customize your device with safe apps and sites for your kids. Also, you can block certain apps or software.
Block websites in Windows 10
Firstly, you have to create a profile for your child in the system. To set up an account, go to the settings, and search parental control in the search bar. You can also find it through the Start menu icon.
After finding the parental control, click on it.
Now you have to open the Family & other people tab. And, follow the available add family member button.
Then, click on the “add a child” button and fill in all the required details.
Visit your Microsoft account and pick the “Web browsing tab.” You will see a box named “Only see websites on the allowed list”. Then you have to check it.
In this step, you will get two different sections, including “Always allow these and Always block these.” Now you can allow or block a website through these two options. For example, enter the site URL in the “Always block” section and hit the block button.
Block websites in MacOS
You can also customize a device with MacOS through parental control settings. Here you can allow or block a website URL and also can do many more customizations.
In the first step, you have to open “System Preferences.” After opening it, you have to locate a button named Parental Controls and click it.
If you haven’t created an account with parental control, create an account, and move ahead. You can also do the required things with your existing profile.
Here you will have to create a new profile because you want to prevent particular sites’ access while making them functional for you. So follow the option “Create a new user account with parental controls.”
After making the profile, click on the Parental Control setting and open the tab “Web.” Here you can provide access to only preferred sites.
As you click on the customize button, you will see a pop-up window with options like “Always allow these websites and Never allow these websites.”
You can add the websites you want to block or allow in the preferred section using plus signs located below both sections. After adding the websites, hit the OK button in the bottom right corner and you are all set.
How to block websites by altering host files
It is another excellent way to block unwanted websites. By blocking websites, you can make your system safe for your child.
Block websites in Windows altering hosts file
Navigate the directory that has the hosts file. To do so, follow this command: C: > Windows > System32 > drivers > etc.
Now select the hosts from available options and open it in Notepad by following the “open with” option.
When the host file opens in the Notepad, you will get various text lines. Reach at the last line named “127.0.0.1 localhost” or “::1 localhost” and hit enter to create a new line.
Now you have to type 127.0.0.1 and mention the website URL that you need to block. For instance, 127.0.0.1 www. Facebook.com.
After making the required changes, you have to save the host file without making any changes in the file name or location.
Block websites in MacOS through hosts file
Firstly, you have to open the Terminal, type the command: sudo nano /etc/hosts, and press enter. As you press enter, you will see the host file in a pop-up window.
When the host file is opened, you will see several lines of text. You have to reach the last line and hit enter.
Type 127.0.0.1 and make space by pressing the spacebar. Then mention the website address you want to block, such as 127.0.0.1 www. Facebook.com. This act will prevent one from accessing the site.
After adding all the websites you want to block, simply save the file.
How to block websites through router settings
Do you know you can block websites through internet routers? A router doesn’t need any external program or software to block unwanted websites. Your home’s router works as an intelligent tool in blocking processes.
Go to the web interface of the router. Here the pro tip is that you can find your router access through your web browser by entering 192.168.1.1 as a web address in the browser’s search bar. Now input your username and password. While doing this, if you face any issues, you can go through the router’s instruction manual.
Once you login to the router, explore the router security panel and the option to block websites. Generally, manufacturers provide such options under a menu named “Access Restrictions and Content Filtering.”
After finding the right option for blocking a website, add the web URLs you want to block. Do not forget to save changes.
These are the top three ways that will help you block websites for the well being of your kids and family. Through these methods, you can block any sites on the internet, which are harmful or distracting.
Devin Smith is a creative person who has been writing blogs and articles about cyber security. He writes about the latest updates regarding mcafee.com/activate and how it can improve the work experience of users. His articles have been published in many popular e-magazines, blogs and websites.
Source - Proven Ways to Block Websites
0 notes
Text
How to Fix Discord No Route Error?
If you are a passionate gamer, then you must already be familiar with Discord. It lets you chat and coordinate with others through private servers. Many users report that they encounter a ‘Discord No Route’ error while using Discord. This error can crop up due to some third-party tools and the wrong IP address. If you would like to fix this annoying problem, then follow the solutions mentioned below.

Fix the Error by Whitelisting Discord
Navigate to the Windows menu by pressing the Start button.
Thereafter, locate the Settings option and click on it.
You should choose the option of Update & security.
Later, locate the Windows Security or Windows defender option.
You have to choose the ‘Open Windows Defender Security’ option.
After that, go to the ‘Firewall & network protection’ option and click on it.
Then locate and pick the ‘Allow an app through a firewall’ option.
You should mark the box of ‘Change settings’ and locate the Discord option from the list.
Finally, reach the Private checkbox and mark it.
Check the Discord Settings
Navigate to the app and click on to invoke it on your system.
Then reach the ‘User settings’ option and click on it.
You should click on the ‘Voice & Video’ option.
Go to ‘Quality of Service’ and disable the ‘Enable Quality of Service High Packet Priority’ option.
Flush DNS to Solve the Error
Hit the Win and R combination over the keyboard to launch the Run prompt.
Then type ‘cmd’ in it and select the OK button to launch the Command Prompt with administrative rights.
Input ‘ipconfig /flushdns’ in it and hit the Enter button.
Thereafter, you can get the verification message.
Finally, log in again to Discord.
Turn off QoS
First, invoke Discord on your system.
Then launch the “User Settings” option.
Once you are on the new screen, locate the settings of “Voice and Video” at the left side pane.
You should move to the bottom to locate the setting of “Enable Quality of Service High Packet Priority,” and disable it.
Change the Voice Server Region
Firstly, sign-in to Discord on your device.
Then hit on the ‘Server’ option.
Once you get to the screen of server settings, select the ‘Overview’ option at the left pane.
On this screen, you will be shown details about the server.
After that, hit on the button of Change beside the server region.
Now, it will launch the screen of the server region. Pick the one that is closest to you.
Ava Williams is a Microsoft Office expert and has been working in the technology industry since 2002. As a technical expert, she has written technical blogs, manuals, white papers, and reviews for many websites such as office.com/setup.
Source - How to Fix Discord No Route Error?
0 notes
Text
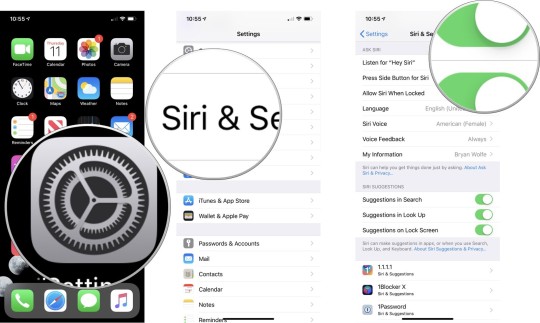
How to Set up Siri on iOS Device?
Siri is a popular virtual assistant developed for Apple devices like iPhone, iPad, Apple Watch, Mac, and Apple TV. You can use Siri to start or stop any function of the system using voice queries. It can be easily set up on iPhone devices by following some workarounds. Once Siri is set up correctly, you can access several tools and features by simply saying “Hey Siri.”
Steps to Set Up Siri on iOS Device
Here is how to set up Siri on your iPhone and iPad:
At the start, open the Settings page directly from the home screen.
After that, scroll down the page and hit the Siri & Search tab there.
Next, press the option “Listen” to activate Hey Siri.
Tap the Continue button.
Pursue all the on-display directions carefully.
After a while, you will be brought to the Setup page in order to prepare Siri to accept your commands.
Finally, tap the Done option.
Steps to Train “Hey Siri” to Detect Your Voice
Here are the tips for training Siri to detect your voice:
First and foremost, go to the Setup page of Siri and then hit the Continue button.
Now, say, “Hey, Siri.”
If you want to send a message, say, “Hey Siri, Send a Message.” Here, you can ask or command anything you want, like fetching weather details, setting the alarm, playing your desired music, etc.
Once you are all set, hit the Done tab on the Ready page of “Hey Siri.”
Steps to Use Hey Siri
If you don’t know how to use hey Siri, then follow these guidelines:
Get started by positioning yourself within the audio limit of your iOS device.
After that, say “Hey Siri!” in a slightly louder voice so that your device could hear you.
Now, say “Siri” followed by the query or command you want to perform by Siri like “call mom on speaker,” “make an invitation to Johnny,” etc.
Steps to Edit a Siri Command or Question
Here are the steps to edit a Siri command or question:
At the start, tap and hold down the Home tab on your iOS device. Here, you can say Hey Siri to activate your virtual assistant.
Now, dictate your request.
Then, hit the Edit button for making modifications in your Siri question or command section.
Make necessary changes and finally tap the OK button.
Steps to Change Siri’s Voice
Follow these guidelines to change the voice of Siri:
Firstly, open the Settings page directly from the home screen.
Then, hit the option Siri and Search.
After that, press the Siri Voice option there.
Click on any available accent, be it British, Indian, American, S. African, or Irish.
Now, press the Gender option and then select the voice type between male and female.
To set up Siri for your iPhone or iPad, open Settings, tap the Siri and Search tab and follow all the instructions on the setup page.
Devin Smith is a creative person who has been writing blogs and articles about cyber security. He writes about the latest updates regarding mcafee.com/activate and how it can improve the work experience of users. His articles have been published in many popular e-magazines, blogs and websites.
Source - How to Set up Siri on iOS Device?
0 notes
Text
How to Save Email Attachments to Cloud on iOS Devices?
Email attachments play an important role in sharing information with the recipient in various forms like PDF, presentations, plain text, or spreadsheets. You can also save your email attachments on your iOS devices like iPad and iPhone. To save your attachments, you can use Dropbox, iCloud, OneDrive, or any Cloud service. If you desire to save your attachment via Cloud services, then this blog is for you.
Here is how to save Email attachments on the iPhone and iPad:

How to Save Email Attachments to iCloud Directly on iOS Devices?
Follow these steps to save email attachments to iCloud services on iOS devices:
First of all, open the Mail app directly on your iPhone or iPad.
Then, select the particular email that has the attachments you desire to save.
After that, hit the attachment to launch the Share sheet.
Next, press the tab “Share sheet” from the bottom left panel of your screen. It resembles a square-shaped upward arrow icon.
Now, hit the tab “Save to Files.”
Press the iCloud Drive option to save to iCloud Drive. In case you wish to save the attachment right on the device, press the “On My iPhone” option.
Hit the Save button located at the uppermost right-hand side of your display.
How to Save Attachments on iOS Devices to Google Drive, OneDrive, Dropbox, or Enterprise Storage?
Saving Attachments to Dropbox
Here is how to save the attachment to Dropbox:
First of all, open the Mail app directly from the Home screen.
Then, select the email that contains the attachment.
Hit the particular attachment to launch the Share sheet.
Select the option “Save to Dropbox.”
Choose the folder to save your file. Alternatively, you can hit the “Choose a Folder” option.
Once you are all set, hit the Save tab.
Saving Attachment to Google Drive
Follow these straightforward steps to save your attachments to Google Drive:
First of all, open the Mail app directly on your Home Screen.
Then, select the email that contains the particular attachment.
After that, hit the attachment to launch the Share sheet.
Next, tap the “More” icon by scrolling towards the left or right side screen to the second row of icons in the Share Sheet.
Then, press the Edit button located at the upper-right edge.
After that, hit the green “+” signed tab located at the left of Google Drive under the section Suggestions.
Then, press the “Done” tab situated at the uppermost right-hand side portion.
Tap the Done button once more from the upper left side row.
Hit the Google Drive icon from the Share sheet. Make sure that it is inside the second row of icons.
Now, login to your Google account, if needed.
Then, select the option “Select Folder” from the bottom portion.
Choose the location to save the file.
Next, tap the Save Here option.
Lastly, choose the Upload tab.
Saving Attachments to OneDrive
Here is how to save your email attachments to OneDrive:
First of all, open the mail app directly on your iOS home screen.
Then, select the email that has a particular attachment file.
Now, hit the attachment option to launch the Share Sheet menu.
Next, press the “More” icon.
Hit the Edit tab.
After that, hit the “+” tab located at the left-hand side section of your OneDrive under the Suggestions sections.
Then, select the Done tab there.
Click the icon of OneDrive in the Share Sheet.
Conclusion
Previously, we had to depend on third-party apps to handle all sorts of attachments, but Apple has bridged the gap by providing a quick and straightforward way to manage and save all our attachments, even on iOS devices. Now, you can use several cloud platforms for this task, like iCloud, OneDrive, Dropbox, etc.
Ava Williams is a self-professed security expert; he has been making the people aware of the security threats. His passion is to write about Cybersecurity, cryptography, malware, social engineering, internet and new media. He writes for Mcafee products at mcafee.com/activate.
Source - How to Save Email Attachments to Cloud on iOS Devices?
0 notes
Text
How to Fix iPhone Battery Issues?
Just like Android devices, iOS gadgets also create issues, especially related to battery performance. iPhone users nowadays are facing battery issues like battery draining very quickly, the battery is not charging, not providing sufficient power-backup to the device, etc.
If you are also an iPhone user and are frustrated with your device’s battery life, then we have listed down some important troubleshooting tips for you.

Reset your iPhone
Sometimes, restarting and resetting the device helps in fixing issues. If you also want to kick glitches out of your device, then follow these straightforward steps:
Resetting iPhone 8, 2nd Gen iPhone SE, or iPhone with Face ID
Here is how to reset your device with Face ID:
First of all, click and release the Volume Up tab.
Then, press and release the Volume Down button.
Now, tap and hold the Side tab specified for a wake, sleep, on or off.
Resetting iPhone 7
Follow these steps to reset iPhone 7 with ease:
At the start, tap and hold down the On or Off tab by navigating the right side portion.
Then, press and hold down the Volume down tab located at the left-hand side section of your iPhone.
Now, hold down both the keys while the screen turns off and keep pressing them until the device switches back on.
Resetting iPhone 6s and Earlier
Here are the steps to reset iPhone 6s or older:
First of all, tap and hold down both the Wake/Sleep and Home tabs simultaneously.
Keep them held down until you view the Apple icon on your screen.
Inspect iPhone Battery Usage
Follow these straightforward steps to check battery usage on your iPhone:
Get started by launching the Settings app on your device. To do so, you need to press the gear-shaped icon.
Then, hit the Battery icon and wait for some time for the battery usage info panel to launch.
Press the Show Activity option to analyze the overall power usage of your phone’s battery.
If you wish to get the battery consumption record of ten days, then press the option “Last ten days.”
Force Stop the App using Home Tab on iPhone
In case you want to enhance battery life by stopping some rogue app on your device, then follow these steps:
First of all, double-tap the Home button to launch the fast app switcher.
Then, swipe the app upward that you desire to force stop.
Tap the app card and flick it up.
Force Stop the App Using Face ID
Here are the steps to force quit the app via Face ID:
Firstly, you have to swipe the screen upward from the bottom portion of the display and then hold the finger in place for a bit until you see the card-like multitasking interface on your screen.
Then, swipe the app you desire to force quit.
Now, flick the app card upward.
Checking iPhone Battery Status
Here is how to check the iPhone health status via the Settings app:
First of all, hit the gear-shaped icon to launch the Settings page.
Now, press the Battery Health option there.
Restore your iPhone
Pursue these guidelines to restore your iOS gadget as new:
First and foremost, hit the Settings icon to expand the Settings page.
Then, press the Reset option.
Press the option “Erase All Content and Settings.”
Tap the “Erase Now” button.
Wait a while until you get your iPhone restored as a new one.
Switch to Low Power Mode
In case you want to save power for further use, then you can use the Low Power Mode feature on your iPhone.
Here is how to turn on the Low Power Mode on your device:
Initially, open the Settings page on your device’s screen.
Then, hit the Battery icon.
Now, switch the Low Power Mode option to ON.
Conclusion
Battery issues nowadays are looming on most of the devices, and Apple devices are not an exception. iPhone and iPad users are reporting battery issues. If you are also frustrated with your iPhone, you need not worry. Follow the aforementioned steps to fix your device’s battery issues.
Ava Williams is a Microsoft Office expert and has been working in the technology industry since 2002. As a technical expert, she has written technical blogs, manuals, white papers, and reviews for many websites such as office.com/setup.
Source - How to Fix iPhone Battery Issues?
0 notes
Text
Did You Know that Keanu Reeves Had Given Up $40 Million from Matrix Sequels As a Gesture of Gratitude?
We can all acknowledge the fact that there is a reason Keanu Reeves survived in Hollywood. We have seen his acting virtuosity, and we know that he has some range. He gracefully accepts difficulties and, more often than not, shows off his acting skills even in the projects that do not end up doing well at the box office.

However, the aspect the fans love the most about him is his nature and the fact that he is always ready to help people.
Many bad stories did come out of Hollywood after 2016, but the image of Keanu Reeves remained pristine. Stories that did come out about him only bettered his perception among the public.
People familiar with Hollywood are aware of what back-end points mean, but the term back-end-points is synonymous with the term percentage points for people outside the industry. Nevertheless, the points mean the percentage of earnings from a particular film or series project.
It can be worked out in a number of different ways, but basically, it will depend on what the actors and creators have agreed upon. So, it means that if the movie ends up making a profit, the actors who are liable to get a share of it will get it.
Residuals are a different thing. It’s a sum of money paid to you if the producers or distributors re-use your work (like that Tony Stark scene in Spider-Man: Far from Home). Residuals is a big term in the TV industry as the actors get paid a handsome amount of money if their show gets a rerun on a different channel.
Reeves, who we very well know is more interested in creativity than profit, refused to take a load of cash from his back-end-points of Matrix sequels and distributed it among the special effects crews. It speaks volumes about his generosity, and given the fact that the special effects did play a big part in making Matrix a hit, it makes logical sense as well.
A source from inside the production team has revealed that Reeves felt that the special effects team are the ones who should be paid that amount because they deserve all the credit.
Reeves didn’t have to think too much, though, as he already had a lot of money from the films. He was paid $10 million upfront, and despite the fact that he gave up $40 million, he still had a lot of money after the release of the films, which amounted to $35 million at least.
We don’t know a lot about the technicalities of the payments, so it is unclear why he was paid $35 million when he had already given up all the back-end points. However, we know that many payment processes are controlled by the protocols set up by the SAG (Screen Actors Guild), which also takes care of the residuals.
Keanu Reeves will be seen again as Neo in the 4th Matrix installment, which is due for a release in 2022.
Devin Smith is a creative person who has been writing blogs and articles about cyber security. He writes about the latest updates regarding mcafee.com/activate and how it can improve the work experience of users. His articles have been published in many popular e-magazines, blogs and websites.
Source - Did You Know that Keanu Reeves Had Given Up $40 Million from Matrix Sequels As a Gesture of Gratitude?
0 notes