
Last Seen Blogs

evermore-fashion
Evermore Fashion

delicious-men
Incredibly handsome

adeolainterest
ADEOLA

deathcar
untitled
evermore-fashion
Evermore Fashion
Text
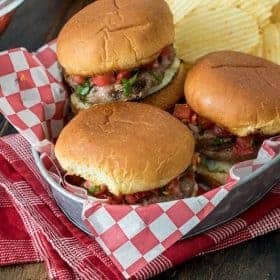
Bruschetta Turkey Burger Sliders with Avocado Spread
August 31, 2018
This post may contain affiliate links, which won’t change your price but
Barbara Bakes will receive some commission.
Juicy, cheesy turkey burger sliders dripping with a creamy avocado spread and fresh tomato bruschetta. These Bruschetta Turkey Burger Sliders are packed with flavor and perfect for tailgating.
Cache Valley Creamery sent me a cookbook they’d created from their Cache Valley® Signature Recipe Contest which included my recipe, Creamy Cashew Chicken Puffs (Vols-au-Vents), which won 3rd place. It also included the recipe for the delicious burger, Bruschetta Turkey Burgers with Zesty Avocado Spread, that won the Grand Prize.
Also included in this post is a Recipe Round Up. I’ve joined a fun group of bloggers to put together a roundup of recipes on the first day of every month. This month we’re sharing Tailgating Recipes.
My daughter bought a slider set at Sur La Table that includes a press and a mini-burger basket that grills nine little burgers at a time. So I changed up the recipe a bit and made cute little sliders using her slider set. If you love sliders and know you’ll be making them often, it’s worth buying a set.
However, you don’t need a slider set to make this recipe. The second time I made the sliders, I just used a biscuit cutter to help me shape the burgers so they were a consistent size.
I also used a digital scale to measure the turkey so my sliders would all be a consistent size. If you don’t have a scale at home, just try and divide the meat equally.
Be sure and oil your bbq grates before putting the burgers on the grill (and even your slider set), so the burgers won’t stick to the grill.
The avocado spread and the bruschetta come together quickly and are what make this burger extra special. Make sure to use flavorful tomatoes and fully ripe avocados.
This Bruschetta Turkey Burger Sliders is a perfect burger for your next tailgating party and a great way to use the fantastic late summer tomatoes from your garden or local farmers market.
Ingredients:
Avocado Spread
2 large avocados, peeled, pitted and chopped
1 cup mayonnaise (I used light)
1/4 teaspoon garlic powder
Dash cayenne pepper
Bruschetta
4 large tomatoes, chopped
1 teaspoon garlic, minced
1/4 cup fresh basil, chopped
1 tablespoon olive oil
Salt and pepper, to taste
Burger
1 1/2 pounds ground turkey
1/2 cup Italian Shredded Cheese
2 cloves garlic, finely chopped
2 tablespoons butter, melted
12 slider rolls
Directions:
Avocado Spread
Mix together avocado, mayonnaise, garlic powder and cayenne pepper.
Bruschetta
Mix together tomatoes, garlic, basil, and olive oil. Add salt and pepper to taste.
Turkey Burger
Mix together ground turkey, shredded cheese and garlic. Form mixture into twelve small patties. Grill patties until center reads 170° F on an instant read thermometer.
Brush melted butter onto ciabatta rolls. Grill rolls, buttered side down, until toasted.
When toasted, spread bottom half of the roll with Avocado Spread. Top with a cooked turkey burger, bruschetta, and finally the top half of the ciabatta roll. Serve immediately.
We are a participant in the Amazon Services LLC Associates Program, an affiliate advertising program designed to provide a means for us to earn fees by linking to Amazon.com and affiliated sites.
DON’T MISS A RECIPE!
Subscribe to get new posts via email:
Source: https://www.barbarabakes.com/bruschetta-turkey-burger-sliders-with-avocado-spread/
0 notes
Text
Impossible Foods Will Attempt the Impossible: a ‘World-Class’ Meatless Steak
A leader in the fake-meat industry has a few tricks up its sleeve for the new year. Impossible Foods — which first created the beef substitute that cooks, chews, and bleeds like meat (but is actually made from potato and wheat protein) — is not only retooling its beef recipe and rolling out non-burger shaped ground beef, but it’s also hoping to conquer what some consider the holy grail of meat dishes: the steak.
In an interview with The Spoon about the Impossible Burger 2.0, the company’s CEO and founder Pat Brown described plans to make an Impossible version of “whole cuts of beef,” with a goal of creating a sustainable and meat-free “world-class” steak. Brown acknowledges that there’s “huge symbolic value” in steak — and in its mission, Impossible Foods calls attention to the notion of meat as a ritualized food at barbecues, taco Tuesdays, and at ballparks, among other events. “Those moments are special, and we never want them to end,” the mission reads. “But using animals to make meat is a prehistoric and destructive technology.”
Brown gave little away in terms of Impossible Foods’ plan of attack for creating the perfect cut of fake steak, and with a goal of using plants to make faux meat just as desirable as the real thing, the company hopes to disrupt the commercial meat industry in the name of environmentalism. Yet the company faces a new challenge when it comes to replicating the coveted steak.
Real meat remains a bit of a tender point for Americans who relate it to identity. And what steak in particular represents — the symbolic value Brown alludes to — tends to center around ideas of luxury (the idea of splurging on a good cut of meat), masculinity (generations of the male-only steakhouse), or cultural heritage tied to the actual animal, which may keep people from diving headfirst into an alternative. Additionally, a portion of meat eaters feel an entitlement toward meat, believing that it belongs in their diets, meaning they’re unlikely to seek an alternative in the first place.
Impossible’s steak might catch the eye of some folks aiming to reduce or cut their meat intake, but unlike the more-forgiving recipes that make fake ground beef passable (and in some cases delicious: Eater’s Ryan Sutton declared White Castle’s Impossible slider the best fast-food burger), steak eaters will likely still want to hang onto what makes a steak a steak: not just the flavor, but also the texture. For real steak, it’s painfully obvious that any cut of meat has been, well, cut from a living thing — it can be fatty, rich, and sinewy and, notably, contiguous, unlike ground beef.
In addition to potato and wheat protein, Impossible meat uses heme protein to add flavor, coconut oil for fat, and konjac and xanthan for the shape. The 2.0 version, which has received positive reviews, subs in soy protein for wheat, adds methylcellulose as a binder, and adds sunflower oil to reduce saturated fat, promising an end product that’s “beefier in texture, and with just a bit of dietary fiber.” The product is entirely plant-based, but still holds the same protein levels as traditional ground beef.
Impossible Foods must find a way to replicate those qualities to come close to replicating steak, which it considers crucial in order to, as Brown told The Spoon, “compete against the incumbent beef industry.” To do that, Impossible Foods will have to ask meat lovers to forego what make a steak a steak.
• Impossible Foods CEO Pat Brown says They’ll Tackle Steak Next [The Spoon]
• Impossible Foods Tackles the Most Impossible Meatless Meat: The Steak [The Takeout]
• Meat-free ‘Impossible Burger 2.0’ Tastes Even Closer to the Real Deal [Engadget]
• The Red-Blooded Politics of Red Meat in Texas [E]
Eater.com
The freshest news from the food world every day
By signing up, you agree to our Privacy Policy and European users agree to the data transfer policy.
Source: https://www.eater.com/2019/1/11/18177441/impossible-foods-fake-meat-substitute-steak
0 notes
Text
The Broiling Days of Summer: Broiled Salmon With Spicy Dilly Beans
[Photographs: Vicky Wasik]
Editor's Note: We're very excited to welcome writer, photographer, and cook Michael Harlan Turkell back to the virtual pages of Serious Eats. In this series, Michael will share some of his favorite recipes that use the broiler, one of the most powerful and underutilized tools in the home kitchen.
Dilly beans are divisive. There are those who prefer the slender pod when it's pickled. I, for one, like the snap of a fresh green bean; warmed by the sun, it packs a summer crunch as viscerally satisfying as any I know. I don't mean this as a slight to all you pickled-bean lovers out there, but why brine a perfectly fine green bean?
Or maybe I'm just missing something. After all, I love pickles, and I love vinegar even more. I’ve just never been able to get past a pickled green bean’s pallid shade and sodden texture. Still, I know that a pickle's acidic pop is enlivening; the bouquet of dill, aromatics, and spice adds character.
This led to an idea: What if I made a quick-pickled version of dilly beans so that I could retain some of the raw characteristics I love while adding that vinegar tang, herbal punch, and veil of spicy heat? This meant abandoning a long, drawn-out vinegar bath in favor of a very quick, hot one.
I started to envision these beans as a side to a fatty protein like salmon, for an easy dinner that came together in well under half an hour. And I'd use the intense heat of my broiler to make it all happen.
My first step was to visit the supermarket to pick up a few jarred samples of “dilly beans,” just so I could analyze the flavor. In all of the jars I bought, there sat the requisite garlic clove, a plentiful pinch of dill seeds, and a slurry of chili flakes, all swimming in a pickling liquid. Often a whole hot pepper was packed in there, too, just to prove a point (it’s spicy!), while some brands even added straight-up Tabasco.
The heavy hand with chili showed a total disregard for the dill, which I had assumed was the most important ingredient in a “dilly" bean. My version would correct this, adjusting the spiciness to a more balanced level while pushing the dill flavor forward.
After playing with several iterations of the idea, here's where I ended up: I start by salting the green beans and blasting them, along with a split garlic clove, under the broiler to drive off some of their water content. Green beans will blister and puff when they’re "dry-fried," and the garlic will become fragrant. This sets them up nicely to both give and receive flavor in the quick-pickling to come.
Once they're done, I add vinegar to the skillet, along with a pinch of cayenne and a handful of chopped fresh dill to finish, which offers a bolder, more vibrant dill flavor than merely adding dill seeds.
On top of that goes a nice hunk of fatty salmon. I generally prefer searing fish skin-on to crisp it up, but that won't work under the broiler. Instead, I opted for another approach: smearing the fish with mayonnaise that I'd flavored with even more dill.
The mayo adds to the salmon's tangy richness, which is especially welcome when paired with the tart green beans, but it also bubbles and browns under the broiler while insulating the fish, leading to deeper flavor. The salmon underneath, meanwhile, remains even juicier and more tender, and the dilly beans are the perfect match.
The whole ensemble goes back under the broiler, just long enough for the salmon to cook (including from the vinegar steam wafting up from below) and for the beans to get a short stint in the vinegar bath. Though the green beans become a little more muted in color, they retain much of the snap and freshness of those that are just-picked, while taking on a zippy, spicy vinegar tang that's clean and clear. The result is a quick and perfectly dilly dinner that I can totally get behind.
This post may contain links to Amazon or other partners; your purchases via these links can benefit Serious Eats. Read more about our affiliate linking policy.

Source: https://www.seriouseats.com/2018/09/one-pan-broiled-salmon-with-dilly-beans.html
0 notes
Text
Yogurt and Oats for Breakfast
Yogurt is a super versatile ingredient or dish in itself. This recipe for yogurt and oats contains all kinds of extra goodies to help you start the day right.
You love yogurt. It’s a health food, isn’t it? It’s even what they call a super food. But, is it really all it’s cracked up to be, or are there some things you should take into consideration when you choose yogurt to enjoy at home?
Yogurt has long been considered a healthy food to enjoy on a regular basis. Not only is it high in protein and important nutrients, but it also can aid digestion, boost your immunities, protect against osteoporosis, and promote heart health and a healthy weight.
However, for years yogurt companies have stuffed their yogurts with sugar and additives making it a little less impressive as a healthy food. The junk they put in can detract from some of yogurt’s innate benefits.
So, how can you enjoy yogurt without all the bad stuff?
Buy or make it plain and dress it up yourself.
Yogurt: Health food or junk food?
As you know, over the last few years I’ve been doing some serious food reading. Not about cooking per se, but about nutrition, portion control, eating habits, our food sources, government regulations on food, and the way marketers try to get us to buy stuff. It has been an education to be sure.
Some of the books that have had a tremendous impact in how I think about food include:
It’s through the reading of these books that I’ve made slow shifts in how I shop and cook and in how my family eats. We’re not as “crunchy” as they come, but we don’t eat exclusively out of a box, either.
Slowly but surely, I’m making changes to improve my family’s diet without busting our budget. I cook more from scratch, and we try to avoid chemicals, artificial ingredients, processed sugars, and unfermented soy. I am working on making healthy eating easier over all.
One of the new wrinkles in this healthier eating paradigm, has been to examine the yogurt we eat.
Yogurt has always been one of my very favorite breakfast foods. In my non-pregnant and nursing years, I haven’t really been a milk-drinker, so yogurt and cheese help me keep up on my calcium.
Years ago I was a diehard Yoplait or La Creme fan. Coupons and sales were plentiful for those items so I could keep the refrigerator stocked to the brim, buying as many as 60 cartons at a time. I thought that I was buying “health food.”
It was only later when I started to reduce our intake of processed sugars and processed foods in general that I found out how SWEET these yogurts actually were. Plus, often they had all kinds of ingredients I couldn’t pronounce.
How to switch to plain yogurt
So, I made some changes. I started buying large 32-ounce cartons of plain, or sometimes vanilla, yogurt, preferably Cascade, Mountain High, or Fage brands.
Not all my kids liked that change. But most of them have gone along with it, especially when honey or maple syrup is drizzled over the top. Occasionally I buy Trader Joe’s vanilla and blueberry cups, but not often.
If you or yours are slow to be won over to plain yogurt, consider one or more of the following toppings for plain yogurt:
maple syrup
honey
jam
fruit syrup
fresh fruit
granola or nuts
It may take some time, but you’ll be a convert before too long.
Uses for plain yogurt.
Plain yogurt is an incredibly versatile ingredient to keep on hand.
It’s great to use in baking instead of buttermilk. Just mix half yogurt and half milk as your buttermilk substitute.
Use it as a thickener in smoothies.
Mix it with whipped cream to reduce the fat and increase the protein in your favorite sweet topping.
Substitute it for sour cream in recipes to give an equivalent tang without all the fat.
Can you make yogurt at home?
Believe it or not, it’s incredibly easy to make yogurt at home! A few years ago I experimented with making yogurt myself. One night I tested two different methods:
I also read about the microwave/oven and cooler methods, but decided to go with these first two methods. The next morning I compared the yogurts I had made. They were like Laurel and Hardy, one was thick, the other thin.
The slow cooker method was good, but thin like buttermilk. Folks suggested that I strain the yogurt to thicken it, but it was so thin, the yogurt went right through the sieve. I used some in baking and churned the rest into frozen yogurt.
The yogurt incubated on the heating pad was thick and creamy. Since we like THICK yogurt, you can guess that I’m a fan of the heating pad method.
Try them both out and see for yourself which you prefer. I originally tested with whole milk, but have since made homemade yogurt with nonfat milk and it turned out fine and thick, albeit a little on the tart side in comparison.
My preferred method for making homemade yogurt is to combine 1 quart milk, 1/4 cup powdered milk, 2 tablespoons yogurt with live cultures, and to incubate it for 5 hours according to the heating pad method.
Enjoy Yogurt and Oats for Breakfast.
As a born Francophile, I’ve loved reading The French Women series by Mireille Guiliano and have been encouraged by many of the suggestions she has to offer for life, work, and good eats.
One of those habits that I’ve adapted for my own is what Ms. Guiliano calls “Magical Breakfast Cream”. I can’t vouch for its magical properties, but I know that I like it, at least how I tweaked it.
I’ve made some significant changes to her recipe. Her recipe calls for shredded wheat cereal instead of oats, flax seed oil instead of meal, and orange instead of lime, as well as the addition of ground nuts. My tweaks are thanks to what I normally stock in my pantry.
This variation has become my daily breakfast, packed with protein and filling enough to get me through the morning.
Yogurt is a super versatile ingredient or dish in itself. This recipe for yogurt and oats contains all kinds of extra goodies to help you start the day right.
Cuisine: American, French
Keyword: oatmeal, oats, yogurt, yogurt and oats
1/2 cup plain greek yogurt
2 tablespoons rolled oats not cooked
1 tablespoon chopped roasted almonds
1 teaspoon flax seed meal
the juice and pulp of half a lime
1 teaspoon honey
In a small bowl, layer the ingredients in the order listed. Stir or not, depending on how you like it.
Level up your meal planning and prep.
Need a little extra motivation to get on your meal planning game? Want to make lunch packing less of a drag? Creating a kitchen survival kit to help you WIN in the kitchen this school year.
I’d love for you to join me for the next Mom’s Kitchen Survival Workshop!
Together, we’ll create a plan to help you get dinner on the table every night, fill your freezer with wholesome snacks and breakfasts, finesse your lunch-packing skills, and even make sure you get a daily dose of MOM food.
Learn more here so that when registration opens, you won’t miss out.

Source: https://goodcheapeats.com/2018/09/morning-yogurt-and-oats/
2 notes
·
View notes
Text
‘Anthony Bourdain’s Hungry Ghosts’ Is a Collection of Eerie Food Tales Steeped in Samurai Lore
While Anthony Bourdain will always be remembered for changing the television landscape with his shows No Reservations and Parts Unknown, it goes without saying he has left behind a great literary legacy. And now, fans of the late author/TV host can explore one of his literary passion projects in the form of a new comic book collection called Anthony Bourdain’s Hungry Ghosts.
Before he became the best-selling author of Kitchen Confidential, a behind-the-scenes look at restaurant life, Bourdain had already published a number of crime novels. And somewhere in between his cookbooks, memoirs, and other non-fiction work, the brilliant globetrotter took a turn at the comic book genre.
In 2012, Bourdain joined co-writer Joel Rose to produce the ultra-violent Get Jiro! (and its follow-up Get Jiro: Blood and Sushi). The graphic novel, which takes place in a not-too-distant future version of Los Angeles where master chefs rule the city like crime lords and people literally kill for a seat at the best restaurants, was a send-up of the “foodie” culture Bourdain so enjoyed diminishing. It also added fuel to a new era of food comics, which would eventually see the likes of Brian Wood’s Starve and Seconds by Bryan Lee O’Malley.
Hungry Ghosts, which reunites Bourdain and Rose with legendary comic book editor Karen Berger (best known for her role as founding editor of Vertigo Comics), is a collection of the four-part comic book series released earlier this year. It tells the story of a Russian oligarch who, in the middle of his dinner party, invites the chefs working in his kitchen to play a version of 100 candles, a Japanese Edo-period game in which brave samurai would try to one-up each other with terrifying tales of ghosts, demons, and unspeakable beings. “I had never heard of Kaiden, the Japanese Edo-period ghost stories, before Tony brought it up,” says Rose. “Never heard of Hyakumonogatari Kaidankai, the samurai game of 100 candles. Tony mentioned it first during a joint interview, and then afterwards over a beer at a nearby tavern, he got into it. He was encyclopedic.”
Bourdain and Rose’s take on the game replaces samurai with chefs who tell dark and gruesome tales about food and hunger, with each story taking inspiration from the many horrors found in Japanese mythology. “We read hundreds of ghost stories and eerie tales, joked over myriad spirits and all their incarnations,” Rose says. “We had fun putting the book together and made sure each story was exactly where we wanted it, told the way we wanted to tell it.”
“We had fun putting the book together and made sure each story was exactly where we wanted it, told the way we wanted to tell it.”
Hungry Ghosts is loaded with a long list of spirits, and Bourdain and Rose play with them all. “We knew we had to make the food thing work for us, so we felt the ghosts and goblins we settled on were also best suited for the palate,” Rose explains. The story, “Boil in the Belly” is certainly a case in point. Featuring the work of comic book legend Paul Pope, who also did the four jaw-dropping covers of the series, this story dives into the shapeshifting monsters known as bakemono. The storyteller chef, based on a famous chef and mutual friend of both Bourdain and Rose, tells the tale of a good-boy chef, based on a local restaurateur held in affection by both authors, who wakes up one morning to find a snake-like monster in his belly. “To put the bakemono in the belly of our poor chef hero was our sweet delight,” Rose says. “To inflict on Paul, our pure pleasure. He never bristled, got it right away, and succeeded beyond our wildest, succulent dreams.”
If you’re a fan of unsettling tales and comic book violence, then you should add Hungry Ghosts to your reading list. Not only is it a celebration of culinary creativity and the power of storytelling, both of which come together to deliver kitchen nightmares that are guaranteed to haunt you, it’s also a collector’s item for both Bourdain fans and comic book enthusiasts. The stories are stunningly illustrated by artists ranging from Vanesa Del Rey (Bitch Planet, Redlands) to Mateus Santolouco (Dial H, Teenage Mutant Ninja Turtles), with amazing color by José Villarrubia, which further amplifies the horror elements in each story.
As a bonus for fans of the comics, the collection features several recipes from Bourdain, including one for pan-seared duck breast with red cabbage (it’s printed below). Co-writer Joel Rose also includes a handy guide called to the ghostly spirits featured in each story called The Real Ghosts, with illustrations by Leonardo Manco, as well as an extended dedication and beautiful send-off to Bourdain.
Anthony Bourdain’s Hungry Ghosts is now available for purchase online and at bookstores across the country. As a preview, here’s Bourdain’s duck recipe:

Dark Horse/Hungry Ghosts
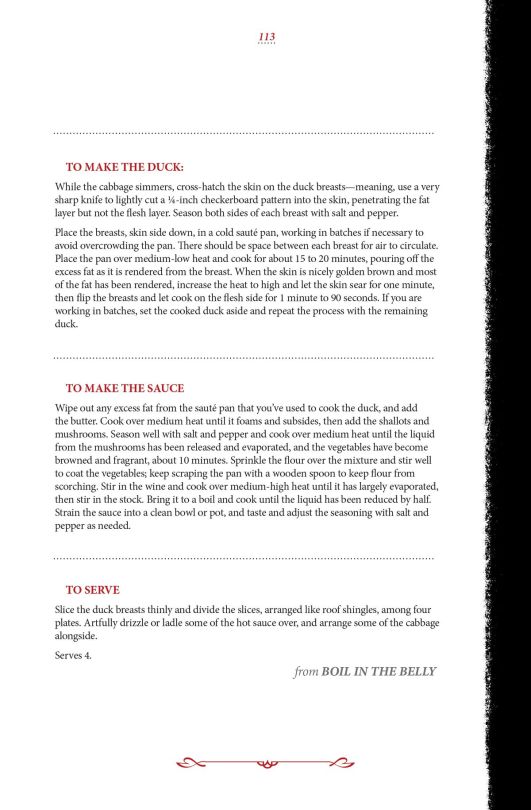
Dark Horse/Hungry Ghosts
• All Anthony Bourdain Coverage [E]
• All Pop Culture Coverage [E]
Eater.com
The freshest news from the food world every day
By signing up, you agree to our Privacy Policy and European users agree to the data transfer policy.

Source: https://www.eater.com/2018/10/3/17929834/anthony-bourdains-hungry-ghosts-comic-book
0 notes
Text
Ballard’s Former Aquavit Distillery Reopens as Nordic Bar With Traditional Food
Ballard’s former aquavit distillery and Nordic cafe, Old Ballard Liquor Co., has completed its quick transition to Nordic bar, reopening over the weekend with the likes of Swedish sangria and dirty dill martinis, beet-pickled eggs, and lutefisk handpies. Yes, lutefisk is mashed here with potatoes and peas, in a nod to one traditional preparation, then stuffed in a flaky rye crust as a sort of edible Trojan horse for anyone skeptical of the infamously pungent lye-cured whitefish. The dish, low on fishiness and high on comfort, is bound to inspire new lutefisk lovers.
Owner Lexi says all of the recipes on the new food menu, from lamb and cabbage stew to Swedish meatballs to spiced pork sausage, are classics rather than originals, unlike the distillery’s previous cafe, which mostly avoided typical dishes like meatballs. It’s all made in a tiny open kitchen in full view of about 16 seats.
Lexi is also running the food program at Adam McQueen’s anticipated upcoming Ballard beer hall Skal, whose kitchen is even tinier. She’s hoping Old Ballard will be busy enough on the weekends to pay for its use as a commissary kitchen for both establishments the rest of the week. Skal’s menu will be a little less traditional, more focused on skewers or rotisserie game meat like rabbit and elk.
The five cocktails on Old Ballard Liquor’s Co.’s reopening menu include a warmly spiced Swedish sangria, a dirty dill martini, made with vodka, dill aquavit, brine, and pickles, and a Kir or Kir Royale, available still or bubbly with a shot of raspberry, blackberry, strawberry, or cassis liqueur from Kent’s excellent Sidetrack Distillery. There are no taps but there are a few beers, from Carlsberg Pilsner to Counterbalance IPA, as well as a red and white wine and nonalcoholic sodas made with spiced fig, cranberry, or rhubarb shrub. And, while supplies last, some of Old Ballard’s aquavit is still available, too.
For now, the menus accompany a note explaining some of the changes to customers, including that “all our serviceware is compostable” and “our food is all handmade, but this isn’t a fine dining establishment,” so there’s no table service. The company’s website suggests some of the reasoning behind the change from distillery to bar: “The distillery closure was directly caused by Washington State legislation hostile to small, independent distilleries. A detailed analysis of the laws and industry impacts will be available as soon as the owner has time to sit down and write it.”
Overall, the small space looks as industrial as it did before, minus the stills: A few high-top blond wood tables and a few low ones have black metal chairs, some twinkle lights are strung up for ambiance, and screened in tools hang on the wall to the right of the entrance. The sign out front still reads “Distillery & Tasting Room,” and may do so for the foreseeable future to save the money a new sign would cost. Hopefully the surging interest in Nordic cuisine, aided by the impressive new Nordic Heritage Museum nearby and its cafe, Freya, will help draw fans to the revamped cocktails and food being served in this unique neighborhood bar and restaurant.
The full menus and explanatory note follow.
Eater Seattle
Sign up for our newsletter.
By signing up, you agree to our Privacy Policy and European users agree to the data transfer policy.
Source: https://seattle.eater.com/2018/9/4/17819830/old-ballard-liquor-co-bar-open-lutefisk-handpie-aquavit-cocktails
0 notes
Text
Asparagus Frittata with Goat Cheese
This Asparagus Frittata is the perfect addition to a Spring brunch, made with protein-rich eggs, thinly sliced leeks, and creamy goat cheese. I love how easy it is to make!
What’s the Difference Between an Omelette and a Frittata?
Omelets and frittatas are both egg dishes that start in a skillet over the stove. The difference is that a frittata is finished in the oven and then sliced, while an omelet is finished in the skillet and folded over to be served.
Personally, I think frittatas are much more convenient than omelets. Just one frittata can serve up to four people, without the extra work of flipping an omelet or cooking eggs individually to order. Even if you’re only cooking for one or two, the leftovers make for a quick and easy meal the next day.
Can You Make a Frittata the Night Before?
To make your life even easier, you can start a frittata the night before you plan on serving it. To do this, you’ll saute the veggies ahead of time, then let them cool in the fridge.
You can stir the cooked veggies into the beaten eggs and cheese and store the mixture in the fridge overnight. Or, you may prefer to stir the pre-cooked veggies into the egg and cheese mixture right before baking the frittata the next morning. Either way, having the veggies done saves you time and extra dishes the next day.
Asparagus Frittata with Goat Cheese
This ASPARAGUS FRITTATA is the perfect recipe for a Spring brunch, featuring leeks and creamy goat cheese. I love how you can make it the night before for an easy morning!
1 tablespoon extra-virgin olive oil
1/2 bunch asparagus , cut into 1-inch pieces (about 1 cup)
1 cup thinly sliced leeks , both white and green parts
8 whole eggs , beaten
2 oz chèvre , crumbled
Sea salt and pepper
Preheat the oven to 400ºF. Add the olive oil to oven-safe skillet over medium-high heat, then sauté the asparagus for 5 minutes. Add in the leeks and continue to sauté until both vegetables are tender, about 5 more minutes.
Meanwhile, in a large bowl beat together the eggs with 1/2 teaspoon of fine sea salt and several grinds of black pepper. Pour the egg mixture into the skillet once the veggies are tender, then sprinkle the goat cheese over the top.
Transfer the skillet to the preheated oven to bake until the top is lightly golden, about 10 minutes. It's okay if the middle still has a little jiggle to it, as the eggs will continue to cook for several more minutes once you remove the pan. Slice and serve warm.
You can keep a frittata out on the table for up to an hour for serving once it's reached room temperature, but after that you need to store it covered in the fridge. Leftovers can last up to 5 days, and you can serve them cold or reheated in the stove.
For 1/4 of the frittata: Calories: 177, Fat: 11g, Carbohydrates: 5g, Fiber: 1g, Protein: 12g
Recipe Notes:
You can easily swap out any other veggies or cheese that you like in this recipe. Feel free to get creative! For guidance, check out my Zucchini Pie or Crustless Quiche (which uses spaghetti squash!).
—
Reader Feedback: What’s your favorite way to serve eggs?
Source: https://detoxinista.com/asparagus-leek-and-goat-cheese-frittata/
0 notes
Text
30-Minute Ground Turkey Sweet Potato Skillet
A quick and easy 30-minute meal made in a skillet! This ground turkey and sweet potato skillet meal comes together lightning fast and easily for a nutritious, paleo or whole30 dinner worthy of putting on repeat.
In real life, a good 70 – 90% of my meals that I don’t make for the blog come out of a skillet. No lie. This is how much I enjoy skillet meals. Just have a look at the Salmon Stir Fry with Vegetables, Butternut Squash Ginger Chicken Stir Fry, and 30-Minute Vegetable and Ground Beef Skillet I posted recently.
The reason is threefold:
1.) Skillet meals are super versatile – you can use all sorts of in-season fresh produce, spices, sauces, and animal proteins.
2.) Meals made in a skillet usually require hardly any time at all! The majority of my meals take under 30 minutes to prepare. This is a HUGE selling point for me, because I am truly lazy in the kitchen when I’m not developing a new recipe. I get how people come home from work and don’t feel like cooking. I getchu, boo.
3.) Super low cleanup. The only tools I use for whipping up a skillet meal are a cutting board, knife, vegetable peeler, skillet, and spatula or wooden spoon. BOOM! Low-fuss, no stress, goof proof.
For this skillet rendition, I simply cooked up a sweet potato, added in some ground turkey, spices, and broth. I covered the skillet to allow everything to cook through, then stirred in some chopped cherry tomatoes and chives. SO easy, so simple, definitely a lazy-human’s meal, but we won’t judge ourselves for eating well, will we?
My one piece of advice is keep close watch on the sweet potato. If you over-cook it, it will turn into mush once you have added the turkey. Sweet potato mush is non-sexy. We’ve all been there, but we prefer our taters taught, know what I’m sayin’?
I kept this ground turkey sweet potato skillet simple for a reason – to inspire you to get cuh-ray-zee with your add-ins! Here are some…
Recipe Adaptations:
Add other vegetables, like broccoli, zucchini, carrot, bok choy, spinach, kale, cabbage, etc.
Mix up the spices and dried herbs, or add fresh herbs.
Incorporate a sauce! Add coconut aminos (or liquid aminos), teriyaki sauce, or curry paste and coconut milk if you’re feeling frisky.
Make it Low-FODMAP by omitting the onions and garlic.
Make it AIP by omitting the tomatoes.
Let this be your base camp to all the skillets!
And since we’re on the topic…
You can 3000% use ground beef or chicken instead of turkey.
Go forth and skillet to your heart’s desire.
My work here is done.
My cookbook, Paleo Power Bowls, is now available! CLICK HERE to check it out. Thank you for your all your support!
If you make this Ground Turkey Sweet Potato Sillet, please feel free to share a photo and tag @TheRoastedRoot on Instagram!
Ground Turkey and Sweet Potato Skillet
Print
Ingredients
2 Tbsp avocado oil
1/2 medium yellow onion finely chopped
1 large sweet potato chopped
4 cloves garlic minced
1 pound ground turkey
2 tsp dried oregano
1/2 tsp sea salt to taste
1/4 cup chicken broth or water
1 cup cherry tomatoes halved
3 chives chopped
Instructions
Heat the avocado oil in a large cast iron skillet. Add the onion and saute, stirring occasionally, until onion begins to sweat, about 3 minutes. Add the sweet potato, cover, and cook for 5 minutes.
Remove cover, scoot potatoes to the side, add meat and seasoning. Brown on each side 2 minutes. Stir to mix sweet potato and turkey together. Add broth. Cover and cook 5 minutes.
Remove cover, cook 2 minutes.
Add chopped tomatoes and chives and cook just until everything is warm. Serve and enjoy!
Source: https://www.theroastedroot.net/30-minute-ground-turkey-sweet-potato-skillet/
0 notes
Text
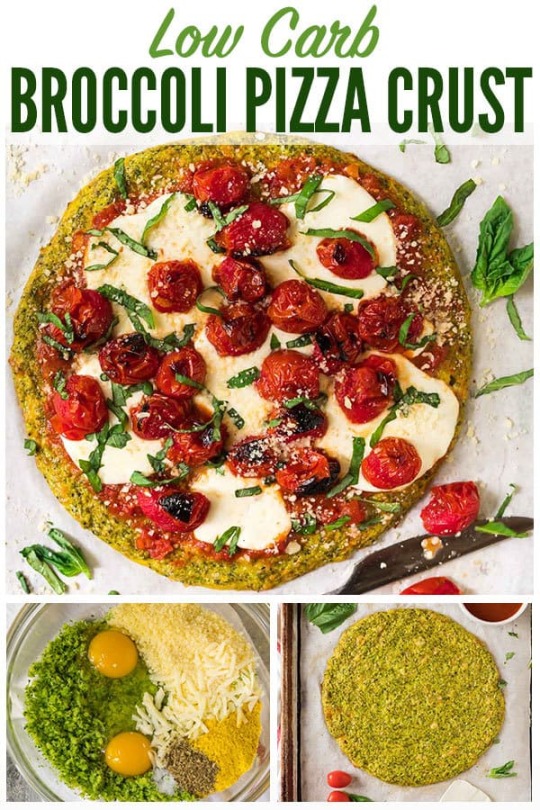
Broccoli Pizza Crust
Allow me to introduce you to cauliflower pizza crust’s lesser-known but oh-so-deserving-of-the-spotlight cousin, Broccoli Pizza Crust. I’m not sure why cauliflower crust pizza was selected for the role of leading lady/Pinterest maven while Broccoli Pizza Crust was cast as understudy, but it’s time for this delish dish to take its place at the table.
Its “place” being on my plate, and “at the table” being my kitchen counter, where I devoured a sneaky slice before taking the rest over to a highly skeptical group of girlfriends who polished it off.
If you’ve tried cauliflower crust pizza, you know that it’s not only “not bad”; it’s “exceptionally good.” Fans include the Pioneer Woman, my Italian-food-loving stepfather, and even Trader Joe’s, which makes a frozen version. My hopeful hunch is that you are open to the idea of a Broccoli Pizza Crust, which is the same concept.
If you haven’t tried cauliflower crust (and maybe even if you have), you are most likely questioning my sanity.
Stick with me. We’ve been in unfamiliar ingredient territory together before and emerged equal parts surprised, delighted, and full.
Remember when I talked you into baking a healthy peanut butter cookie out of a can of chickpeas? Let’s be honest: that was way weirder, and it’s a reader favorite recipe!
Now, I cannot in the spirit of good faith and respect to the great gift that pizza is in all of our lives sit here and type that this Broccoli Pizza Crust tastes just like regular pizza crust.
I can, however, promise you from the bottom of my pizza-loving heart (and if you’ve been following our current trip to Italy over my Instagram stories, you know that I LOVE PIZZA), that this Broccoli Pizza Crust is delicious.
If you are looking for a way to eat pizza that is healthy and low carb, Broccoli Pizza Crust is a recipe for you.
If you need a sneaky way to eat extra veggies, Broccoli Pizza Crust was made for you.
If you are simply feeling adventurous in the kitchen and want to try something new, Broccoli Pizza Crust all the way!
How to Make Boss Broccoli Pizza Crust
This recipe is a mashup of several cauliflower pizza crust recipes I found online, along with a broccoli pizza crust The Chew featured back when it was still on the air.
Start by ricing broccoli (the food processor makes this super quick), then stir in eggs to bind it, along with cheese in two forms: melty mozzarella for the ooey-gooey factor and Parmesan for depth of flavor.
Pat your broccoli “dough” into a pizza-shaped round and bake. Fifteen-ish minutes later, your Broccoli Pizza Crust is ready for any assortment of your favorite pizza toppings.
Once baked, the Broccoli Pizza Crust becomes golden on top and lightly springy inside. Its flavor reminded me a little of a frittata, and I honestly would have been happy eating it on its own with a spoonful of warm tomato sauce.
But then there was that hunk of mozzarella and those juicy cherry tomatoes in our refrigerator. It wouldn’t have been just for me not to allow them to meet their ultimate pizza purpose.
I thought that this Broccoli Crust Pizza would serve four, but that yield turned out to be more appropriate for an appetizer. If you are feeding a larger group, I’d suggest doubling the recipe, then shaping into two pizzas.
OK, cauliflower pizza, your diva days are over. Time to pass the mic. This Broccoli Pizza Crust is center stage and ready to solo.

Broccoli Pizza Crust
A delicious, low-carb recipe for Broccoli Pizza Crust. Add any of your favorite toppings! If you like cauliflower crust pizza, you’ll love this version.
Yield: 1 pizza crust, serves 2
Prep Time: 30 minutes
Cook Time: 30 minutes
Total Time: 1 hour
Ingredients:
For the crust:
1 medium head broccoli, cut into florets (about 16 ounce with center stem, 12 ounces florets)
2 large eggs
1/4 cup freshly grated Parmesan cheese
2 tablespoons nutritional yeast (or another 1 tablespoon Parmesan)
1/4 cup shredded part-skim mozzarella cheese
1 teaspoon Italian seasoning
1/4 teaspoon kosher salt
For the topping:
1/4 cup pizza sauce, homemade or good quality store-bought
4 ounces part-skim mozzarella, sliced, shredded, or roughly torn into small pieces
Pizza toppings of choice (I kept it classic with sautéed cherry tomatoes)
Thinly sliced fresh basil (optional but delicious)
Directions:
Preheat the oven to 400 degrees F. Line a rimmed baking sheet with parchment paper or a silicone baking mat (do not skip lining it!).
Rice the broccoli: Place half of the broccoli florets in a food processor fitted with a steel blade. Pulse in 5-second bursts until the broccoli is in fine crumbs. Transfer to a large, microwave-safe bowl. Repeat with the remaining broccoli. You should have about 2 1/2 to 3 cups broccoli rice total.
Cover the broccoli and microwave on HIGH for 2 to 3 minutes, or until it is steamed. Let cool for 2 minutes, then transfer to a large, clean kitchen towel. Once cool enough to handle, wrap the towel around the broccoli and squeeze out as much liquid as you possibly can, adding a second towel if needed.
Add the broccoli to a large mixing bowl (this can be the same bowl you used to microwave the broccoli; just rinse and wipe it dry first). Add the eggs, Parmesan, nutritional yeast, shredded mozzarella, Italian seasoning, and salt. Stir until well combined. Transfer the mixture to the center of the prepared baking sheet and shape into a 1/2-inch-thick pizza (it will be about 9 inches in diameter.) It will feel very wet and sticky. Bake for 15 to 20 minutes, or until crust is set on top and beginning to very lightly brown at the edges.
Remove from the oven and add the toppings: pizza sauce, additional mozzarella, and any desired toppings. Return to the oven and bake for an additional 10 to 12 minutes, or until the cheese is hot and melted. Remove from the oven and let cool 5 minutes. Just before serving, sprinkle with fresh basil. Slice and enjoy!
This pizza tastes best the day it is made, but it can be reheated in a 400 degree F oven. It will be softer when reheated versus freshly baked but is still tasty.
I have not tried freezing the crust yet, but I would suggest doing so once the crust is fully baked and cooled. Let thaw overnight in the refrigerator, then reheat in the oven until warmed through. Once warm, add the toppings, and return to the oven. Bake until hot and any cheese you’ve added is melted and bubbly.
All images and text ©Erin Clarke/Well Plated.
Nutrition Information
Serving Size: 1 (of 2), crust only
Amount Per Serving:
Calories: 203 Calories
Total Fat: 9g
Saturated Fat: 4g
Cholesterol: 199mg
Carbohydrates: 12g
Fiber: 4g
Sugar: 9g
Protein: 16g
This post contains some affiliate links, which means that I make a small commission off items you purchase at no additional cost to you.

Source: https://www.wellplated.com/broccoli-pizza-crust/
0 notes
Text
Vegan Banana Bread Cinnamon Rolls
Aug 27
Meet the world’s best vegan cinnamon rolls: vegan banana bread cinnamon rolls! A cross between a cinnamon roll and banana bread, these fluffy, soft cinnamon rolls are homemade and make a delicious brunch or treat! This recipe is in partnership with Almond Breeze.
Coming to you with another glorious cinnamon roll recipe, but this time they’re completely vegan, dairy free and taste like a cross between a Cinnabon and banana bread. WHO ELSE IS READY TO GET THEIR BAKE ON?
I’ve tested these approximately 5 times now to get the perfect fluffy results that will make you better than Betty, almost ask cool as Ina, and definitely as legit as Martha. (Hoping we all get these references).
I tested these vegan banana bread cinnamon rolls last spring for the first time, hoping I’d get them to you in time for Easter, but it just wasn’t in the cards. I still needed time to make them better, so I decided to save the recipe for later in the year. And now it’s August. Funny how life happens so quickly.
Since we’ll soon be heading into Fall and all things cozy, I decided that it was the perfect time to whip the recipe out and introduce these beautiful cinnamon rolls to the world.
They’re fluffy, soft and taste like a cinnamon roll and banana bread had a baby. I MEAN COME ON, NOW YOU HAVE TO TRY THEM.
Let’s talk about a few key ingredients:
Bread Flour. The trick to keep these cinnamon rolls soft and fluffy is to use bread flour. You can read more about bread flour vs. all-purpose flour here, but basically bread flour has a higher protein ratio, which means it produces a lighter and softer cinnamon roll instead of one that’s dense. It’s meant to be used in breads and rolls, so do yourself a favor and pick up a bag ASAP.
Vegan butter. We’re using vegan butter in this recipe. However, if you aren’t vegan or dairy free, feel free to use regular unsalted butter. Or you can try my regular cinnamon roll recipe.
Mashed banana. Not only does mashed banana help to give the cinnamon rolls that banana bread flavor, but it also helps to keep the recipe vegan. Not only that, the banana adds a natural sweetness AND softness to the dough. SO addicting. Just make sure that you measure out the mashed banana to ¾ cup. DO NOT USE MORE. DO NOT USE LESS. Trust me!
Almond Breeze Unsweetened Vanilla almondmilk. YUM. This is my go to almondmilk. It keeps these cinnamon rolls dairy free and vegan, plus it adds a lovely hint of vanilla. Simply the best.
I’m not sure what else I could tell you other than to make them ASAP.
You’ll fall in love, I know it.
See how to make the cinnamon rolls:
If you make this recipe, be sure to leave a comment below and rate the recipe! You can also snap a picture and post it on Instagram using the hashtag #ambitiouskitchen. And of course be sure to follow Ambitious Kitchen on Instagram. Xo!
Vegan Banana Bread Cinnamon Rolls
Author: Monique of AmbitiousKitchen.com
Recipe type: Vegan, Dairy Free, Brunch
Prep time: 1 hour 30 mins
Cook time: 25 mins
Total time: 1 hour 55 mins
For the dough:
¾ cup Almond Breeze unsweetened vanilla almondmilk, warmed to 110 degrees F
¼ cup granulated sugar
2 ¼ teaspoons active yeast (1/4-ounce package yeast)
¾ cup mashed ripe banana (from about 2 medium bananas, but make sure you measure)
¼ cup melted vegan butter
4 cups bread flour
3/4 teaspoon salt
For the filling:
2/3 cup dark brown sugar
1 1/2 tablespoons ground cinnamon
¼ cup vegan butter, softened
1 medium banana, thinly sliced
For the vegan cream cheese frosting*:
2 oz vegan cream cheese, softened
1 tablespoon vegan butter, softened
1/3 cup powdered sugar
½ teaspoon vanilla extract
1 teaspoon Almond Breeze unsweetened vanilla almondmilk, to thin frosting for drizzling
Add warm almondmilk and sugar to the bowl of an electric mixer and sprinkle yeast on top. Stir in ¾ cup mashed banana (making sure you measured!) and melted vegan butter. Mix until just combined. Next stir in flour and salt with a wooden spoon until a dough begins to form.
Place dough hook on mixer and knead dough on low speed for 8 minutes. Dough should form into a nice ball and be slightly sticky. (If you don’t want to use an electric mixer, you can use your hands to knead the dough for 8-10 minutes on a well-floured surface.)
Transfer dough ball to a greased large bowl, then cover with plastic wrap and a warm towel. Allow dough to rise for 1 hour or until doubled in size.
After dough has doubled in size, transfer dough to a well-floured surface and roll out into a 14x10 inch rectangle. Spread softened butter over dough, leaving a ¼ inch margin at the far side of the dough.
In a small bowl, mix together brown sugar and cinnamon. Use your hands to sprinkle mixture over the buttered dough, then gently rub the sugar into the butter a little. Add banana slices on top.
Tightly roll dough up the dough, starting from the 9-inch side and place seam side down making sure to seal the edges of the dough as best you can. You will probably need to cut off about ½ inch off the ends of the dough as it won’t be as full of cinnamon sugar as we’d want it to be. Then cut into 1 inch sections with a serrated knife. You should get 9 large pieces.
Place cinnamon rolls in a greased 9x9 inch baking pan or round 9 inch cake pan. (I also recommend lining the pan with parchment paper as well, in case any of the filling ends up leaking out.) Cover with plastic wrap and a warm towel and let rise again while you preheat your oven.
Preheat oven to 350 degrees F. Remove plastic wrap and towel and bake the cinnamon rolls for 25-35 minutes or until just slightly golden brown on the edges. You want to under bake them a little so they stay soft in the middle, that’s why we want them just slightly golden brown. Allow them to cool for a 5-10 minutes before frosting. Makes 9 cinnamon rolls.
To make the frosting: In the bowl of an electric mixer or in a medium bowl, combine cream cheese, butter, powdered sugar and vanilla extract. Beat until smooth and fluffy. Add 1 teaspoon of almondmilk if you’d like a thinner glaze. Spread or drizzle over cinnamon rolls and serve immediately.
If you like a lot of frosting, I suggest doubling it.
To make overnight cinnamon rolls:
After placing rolls into the greased pan, simply cover, place overnight in the fridge and then bake them in the morning as directed. I like to bring my cinnamon rolls to room temperature first by leaving them on the counter for 30 minutes before baking (this is known as the second rise).
*Feel free to use regular butter and cream cheese if you are not vegan or dairy free.
3.5.3251
Pin these cinnamon rolls:
Source: https://www.ambitiouskitchen.com/vegan-banana-bread-cinnamon-rolls/
0 notes
Text
Half Price Shakes, Floats and Ice Cream Slushes at Sonic on 8/29
Posted August 28th, 2018 | 10:18pm by Ryan
All day on Tuesday, August 29th, get half price Shakes, Floats, and Ice Cream Slushes at Sonic. Add-ins cost extra. Limit 5.
Categories: Food News
Tags: Sonic Half Price, Sonic Half Price August 29, Sonic Half Price Floats, Sonic Half Price Ice Cream Slushes, Sonic Half Price Shakes
Post Navigation

Newer Post:
New Froot Loops Mini Donuts from Carl’s Jr. and Hardee’s
Older Post:
New Sweet N’ Spicy Honey BBQ Glazed Tenders from McDonald’s
Source: http://www.grubgrade.com/2018/08/half-price-shakes-floats-and-ice-cream-slushes-at-sonic-on-8-29/

0 notes
Text
New Research: Common Personal Care Ingredient May Cause Newborn Bowel Obstruction with 80% Mortality
Is your baby’s colon worth having pretty eyelashes?
Would you trade your child’s ability to poop for a pretty smelling shampoo?
Let’s make a deal: You get convenient spray sunscreen, your newborn gets bowel surgery. Sound like a plan?
This is the trade-off pregnant women using conventional beauty products may be making every day because of the ingredient oxybenzone, recently under fire for harming coral reefs and even possibly getting removed from the GRASE (Generally Recognized as Safe and Effective) list by the FDA.
For now though, you can still find this toxic endocrine disruptor in mainstream sunscreens as well as “lip balms, shampoos and conditioners, body fragrances, mascaras, hand and dish soaps, and insect repellents, but also single-use plastic packaging and toddler pacifiers and teethers,” according to a press release from Haereticus Environmental Labs just this morning.
Oxybenzone in Sunscreens and Personal Products may Cause Birth Defect Hirschsprung’s Disease
Women in their first trimester of pregnancy (a portion of which happens before the woman is generally even aware she’s pregnant, by the way) are susceptible to their babies developing Hirschsprung’s Disease, a birth defect in which nerve-cell networks don’t form in the lower colon and rectum. Once born, the baby will have trouble or will be unable to poop and requires surgery to correct, or roll the dice on an 80% mortality rate. (DiNardo, J & Downs, CA, Can oxybenzone cause Hirschsprung’s Disease? Journal of Reproductive Toxicology, March 2019)
I admit I had never heard of Hirschsprung’s Disease, although I think I know someone who has it and just didn’t know its name. But it’s not actually that rare – 1 in 5,000 babies born in the U.S. are afflicted with this serious birth defect, running pretty similar to Crohn’s Disease, our family’s personal cross to bear, as far as rate of diagnosis.
To put this in perspective, are you afraid of your child getting cancer? Dude. I am. Terrified.
The American Cancer Society estimated that about 10,590 children in the United States under the age of 15 would be diagnosed with cancer in 2018. About 4 million American babies are born each year. If we assume that, since cancer is the second leading cause of death for kids under age 15 and 80% of child cancer patients survive, we can multiply 4 million babies per year times 15 years to run some numbers, that means the percent chance of your baby being born with Hirschsprung’s is actually slightly greater than being diagnosed with cancer in a given year.
We already know that oxybenzone (and octinoxate, although that chemical isn’t pegged in this study) is a potent endocrine disruptor, interfering with sexual development of children and fertility in adults. Now we know that oxybenzone also causes this birth defect. In fact, if a newly pregnant mother uses the recommended daily application of a conventional sunscreen containing 6% oxybenzone (very common concentration), her baby may have blood levels as high as 384 parts per billion, potentially toxic at the cellular level.
This new study is corroborated by several recent scientific findings. Another study found a correlation between high levels of oxybenzone contamination in pregnant mothers’ urine and their babies developing Hirschsprung’s Disease. Another study showed that oxybenzone can interfere with cell development in exactly the way Hirschsprung’s happens. (And PS, for those of you afraid of cancer already – oxybenzone is linked to that too.)
We Must Avoid Oxybenzone!
But at least we can just avoid these ingredients while pregnant, right?
NO! Because they’re so ubiquitous in the environment as they wash off everyone else’s bodies into the water supply, even bathing can cause an exposure. 🙁 Plus oxybenzone is fat-soluble and can stay in the body for weeks after exposure.
Dr. Denis Dudley M.D., an OB/GYN specializing in Fetal Maternal Medicine & Reproductive Endocrinology confirms that oxybenzone is “especially harmful to the most vulnerable among us – the unborn, young or adolescent children, and couples trying to conceive. They are linked to reproductive, metabolic, or neurological disorders, and several cancers.”
A 2019 study in the Clinical Dermatology Research Journal by DiNardo and Downs questions whether sunscreens containing oxybenzone (among other active ingredients that I’ve been rallying against for years) should even be considered for use on children at all. In the meantime, children are getting their “sun-safe” application of these chemicals on a daily basis, especially as we head into summer.
Are the fear centers in your brain going off yet? They ought to be. Here’s how Hirschsprung’s works:
Outcry Against Endocrine Disrupting Toxic Chemicals Needed
In response to this new study about Hirschsprung’s Disease potentially being caused by oxybenzone, Lara Adler, an environmental health educator whom I interviewed on the Healthy Parenting Connector, warns, “While everyone is exposed to environmental chemicals and are affected to some degree, pregnant women are the most vulnerable population. Fetal development is an incredibly sensitive process that can be altered with the introduction of endocrine disrupting chemicals like oxybenzone.” (See her interview here.)
She calls for health practitioners to feel a grave responsibility to educate their patients, helping them understand why they need to avoid endocrine disruptors like oxybenzone. Wouldn’t it be great if OBs started sharing with new moms-to-be about how to make a simple swap from conventional sunscreen to a mineral-based option? There are many good ones to choose from (my family has tested over 100 personally, so believe me, we know!).
It’s time for parents to put up a fuss about this – the industry will only listen when the consumers speak with their money, their social shares, their very loud outcry against toxic ingredients that are probably harming our babies, our children, and our possibility of future grandchildren (not to mention coral reefs, ocean life, and your own reproductive health)!
Tropical locations are getting on board more and more with banning these ingredients, but we really need sunscreen brands to commit to removing oxybenzone and other endocrine disrupting chemicals for a true shift to happen. Whole Foods just announced that both oxybenzone and octinoxate are not allowed in their stores…won’t it be great if all of Amazon would follow???
In reality, sunscreen shouldn’t even be used as often as it is. Dr. Keira Barr, a dermatologist I interviewed on the Healthy Parenting Connector, along with Craig Downs, PhD., one of the authors of the Hirschsprung’s study, both recommend shade and sun-protective clothing as the first line of defense. (See Dr. Barr’s interview here.)
Your Action Steps:
STOP buying conventional sunscreens
READ ingredients on other personal products, watching for oxybenzone – put them back on the shelf!
SHARE this post with your friends
SPEAK UP against oxybenzone, especially if you live in an ocean area where legislation may soon be coming to ban these chemicals
If you’re frustrated that these chemicals are already in our water supply, share as often as possible so we can STOP the buildup more quickly!
Read the entire research study here, galley proof.
Pin It:
Source: https://www.kitchenstewardship.com/research-oxybenzone-hirschprungs-disease-birth-defect/
0 notes
Text
GOOD MORNING SMOOTHIE
The colors in this smoothie just make me happy. That sunny, egg yolk, perfect marigold color of a cartoon sun just shouts “Good morning!” This is a smoothie filled with vitamins, acids, and beta carotene, anti-oxidants, and all kinds of good stuff for you. Enjoy!
INGREDIENTS
For 2 12-ounce smoothies
2 cups almond coconut milk
2 frozen bananas, peeled and chopped
1/4 cup orange juice
1 teaspoon ground turmeric
1/2 cup mango, chopped
1/2 cup carrot, chopped
DIRECTIONS
For an extra cold smoothie, pour a cup of the almond coconut milk into an ice cube tray to make ice cubes. This way, your smoothie will be ice cold, without watering it down. Just add the ice cubes and a cup of almond coconut milk instead of 2 cups of almond coconut milk when you blend everything together.
Pop the ingredients in a blender, and go from mix to liquify in steps. Let it blend on liquify (or the highest setting) for 30 seconds. The trick to this smoothie is REALLY blending it. Taste and add more almond/coconut milk if you like a thinner consistency.
Source: https://www.thekitchykitchen.com/?recipes=/good-morning-smoothie/
0 notes
Text
Roasted Eggplant Involtini Vegan
Involtini is an Italian word that refers to little "bundles" that feature some sort of filling wrapped in an outer layer. Sometimes referred to as rollatini in the U.S., it means essentially the same sort of food but it is not a term that would be used in Italy. Often served up as little bites in between meals or as an appetizer, the filling of an involtini may consist of meat, seafood, nuts, cheese or vegetables, while the outer layer is sometimes thin slices of meat, seafood or vegetables. Eggplant involtini is a vegetarian classic featuring eggplant as the outer layer, and the filling is often a cheese-based blend with herbs, simmered with tomato sauce. The possibilities are many indeed and fodder for eager cooks.
Though for years I have been especially smitten with trying new ways to feature the undeservedly spurned eggplant, until now I had not made eggplant involtini. The variation I offer up here is not only vegetarian but vegan-friendly too. The filling — wrapped up in slices of lightly fried eggplant — is a rich blend of roasted eggplant, tomato, onion and garlic, along with olives, sun-dried tomatoes and herbs. These involtini are quite hearty and substantial, and are meant to be served as part of a main meal rather than as hors d'oeuvres.
I had some frozen homemade marinara sauce that had been left over from a previous dish. I thawed that and used it for a tomato sauce that tops the eggplant rolls and, because it was a chunky portobello marinara sauce, it added a whole new element to the dish. Any good tomato sauce will do, so make your own ahead of time or buy your favorite prepared jarred variety from your local grocer.
I prepared these involtini as part of special Italian themed meal for a quiet and intimate dining experience. This elegant eggplant dish ended up being the star of the meal, and it was served with a heavenly homemade rustic bread with olives and a Puy lentil soup with Swiss chard and Arborio rice.

Roasted Eggplant Involtini VeganRecipe by Lisa Turner
Cuisine: Italian
Published on March 25, 2019
A vegan version of classic Italian "little bundle" food featuring savory roasted eggplant and tomatoes rolled into slices of fried eggplant and served with tomato sauce

Print this recipe
Ingredients:
6 tablespoons olive oil, divided
2 large eggplants
3 medium tomatoes, seeded and halved
1 medium onion, diced
2 cloves garlic, minced
1/3 cup sun-dried tomatoes
1/4 cup fresh basil, trimmed and chopped
1/4 cup Kalamata olives, pitted and chopped
1/4 cup green olives, pitted and chopped
3 tablespoons fresh parsley, trimmed and chopped
3 tablespoons nutritional yeast
1/2 teaspoon paprika
1/4 teaspoon ground cayenne
sea salt and fresh cracked black pepper to taste
1 1/2 to 2 cups tomato sauce (prepare your own ahead of time or use purchased)
Instructions:
Preheat an oven to 375° and line a baking sheet with parchment paper.
Peel one of the eggplants and dice. Transfer to a large bowl and toss in the fresh tomatoes, onion and garlic, 3 tablespoons of olive oil. Season with a bit of salt and pepper. Toss well to coat. Spread this mixture onto the prepared baking sheet and roast for 30 minutes, turning the vegetables part way through the cooking time, until browned and tender. Remove from the oven and let cool for 10 minutes.
Meanwhile, soak the sun-dried tomatoes in hot water for 30 minutes, then drain and chop. Set aside.
Transfer the cooled roasted vegetables to a food processor. Add the sun-dried tomatoes, basil, olives, parsley, nutritional yeast, paprika and cayenne. Process until combined and fairly smooth. Season with more salt and black pepper if desired. Transfer to a medium bowl.
Trim the ends from the remaining eggplant and slice into about 8 thin slices (about 1/4 inch thick). Heat some of the remaining olive oil in a large non-stick frying pan over medium-high heat. Add a few slices to the pan and cook for about 3 minutes per side until browned. Add more oil to the pan as necessary. Gently remove the slices and transfer to wire racks set over sheets of paper towel. Repeat with the remaining slices of eggplant.
Oil a 13 times; 9-inch glass baking pan and preheat an oven to 375°. Spoon about 1/4 to 1/3 cup of the roasted vegetable mixture onto half of a eggplant slice. Roll the slice into a log and place seamside down in the baking dish. Repeat with the remaining eggplant slices and roasted vegetable mixture.
Spoon the tomato sauce over the rolls. Bake for 10 to 12 minutes until the sauce is bubbling.
Serve hot garnished with fresh chopped basil or parsley and a sprinkling of olives if desired.
Makes 8 side servings or 4 main servings
Other eggplant dishes to enjoy:
Eggplant and Tomato Caponata
Eggplant Quinoa Bites with Pesto
Baked Eggplant Stuffed with Curried Vegetables
Stuffed Eggplant Poriyal
Eggplant in a Tahini Mustard Sauce
Source: https://foodandspice.blogspot.com/2019/03/roasted-eggplant-involtini-vegan.html

0 notes
Text
CARBONARA POLENTA
Carbonara is one of those comfort foods that just makes me happy. It’s so simple: guanciale, cream, egg, and pecorino, with lots of black pepper. Typically you’ll find it swimming between toothsome tendrils of pasta, but today I decided to mix it up. Poached eggs on cheesy grits is another comfort food favorite of mine, and the grits/polenta seemed like the perfect canvas for carbonara, especially with the poached egg on top. Make sure to enjoy it while it’s hot, and mix the poached egg straight in.
INGREDIENTS
For 4
1/4 cup guanciale
2 tablespoons extra virgin olive oil, plus more for drizzling
1 3/4 cups milk
2 cups chicken broth
1 1/2 teaspoons kosher salt
1 cup coarse ground grits
I used Bob’s Red Mill Grits. Cornmeal or polenta will also work
4 tablespoons unsalted butter
1/2 cup of grated pecorino romano
1/4 cup cream
4 eggs, poached
DIRECTIONS
Place the guanciale in a cold pot with a tablespoon or two of olive oil and place over medium heat, the oil will help the rendering process go a little faster. Make sure to slowly cook down the guanciale – no browning – you want it to look translucent and crisp. Remove the guanciale to a plate, but leave the fat in the pot.
Combine 1 cup of the water, the milk, and chicken broth in the pot. Bring to a simmer over high heat. Add the polenta gradually, whisking constantly. When the mixture starts to boil rapidly, reduce the heat to medium low, a steady but not too vigorous bubble and switch to a wooden spoon. Cook, stirring often, for 15 minutes. Stir in the butter, cream, and pecorino. Season with salt and plenty of freshly ground pepper.
Pour the polenta out onto a large serving platter, or individual bowls. Drizzle the surface with olive oil and shower it with more pecorino. Serve warm with poached eggs. If the polenta ever gets gummy, just reheat and add more milk to loosen it up.
Source: https://www.thekitchykitchen.com/?recipes=/carbonara-polenta/

0 notes
Text
Red Beer Is the Midwest’s Cult-Favorite Morning Beverage
It’s 10:30 a.m. outside of Memorial Stadium in Lincoln, Nebraska — home of the University of Nebraska Cornhuskers — but plenty of people here have already had a few alcoholic beverages, as indicated by the difficulty some have controlling the volume of their voices. Technically the area around the stadium is dry, but every group in sight in this parking lot has a cooler full of light beer, and many are also toting a bottle of tomato juice or bloody mary mix — though neither are intended for bloody marys. They’re for red beer, the michelada’s bland but mysterious Midwestern cousin: light domestic beer mixed with a healthy blob of tomato juice.
“Beer isn’t the best-tasting thing at eight in the morning,” said Scott Vonderharr, who drove down from Omaha for a tailgate. “If you’re gonna have a drink, I like to put a little tomato juice in it.”
Red beer is well-known in Nebraska, but its origins are unclear; a local historical society’s menu collection lacks any mention of it. Hypotheses abound, though: Vonderharr’s view on palatability in the morning is one theory why red beer exists; another is that it’s good for hangovers. Some drink it because they want to add flavor to the notoriously flavorless light beers they have on hand. A more cynical take theorizes that tomato juice companies used red beer as a marketing tool.
On this particular sunny morning outside Memorial Stadium, the binge-drinking is fueled by optimism: After years of stagnation, the world is the Huskers’ oyster. Many people sport red shirts with slogans hailing Scott Frost, the new coach who led the team to national glory as a quarterback in the ’90s. Other shirts say “Make Nebraska Great Again.”
Red beer’s thematic coloring leads many Nebraskans to think it’s a product of the tailgates, but the drink is more widespread than that: In different areas of the Midwest and West, a red beer can also be known as a red eye, red rooster, red draw, bloody beer, or Montana mary. At a dive bar or a steakhouse you can get one without fuss; a bartender at a more upscale place, if they agree to mix one for you, might serve it with a side of condescension.
Like many other beloved regional dishes, the progenitor of red beer is unclear, but the simplest version of red beer’s murky origin story is that it was imported from Mexican drinking culture. Micheladas, or beer flavored with a combination of tomato juice, lime, salt, and various spices, sauces, and seasonings, are one of the most popular alcoholic drinks in Mexico, and well-known to taco lovers and brunch-goers in America’s cities.
According to legend, the michelada was invented as a hangover cure by a bartender at Potosino Sports Club in San Luis Potosí in the 1960s, and its ingredients vary by region. It can be as simple as salt and lemon, or it can include bouillon powder, chamoy, tomato juice, or Clamato. (Major brewers have been attuned to the drink’s appeal for some time: Anheuser-Busch sells a beer pre-mixed with Clamato, salt, and lime.)
Pouring and drinking a pitcher of red beer at Neighber’s bar in Omaha
Red beer could also be, like many other tomato-based drinks, simply a case of convergent mixology. By the early 20th century, tomato-based drinks were on the rise: Louis Perrin created what’s considered to be the first tomato juice cocktail in 1917, and Fernand Petiot is largely credited with creating the bloody mary in Paris in 1921. The ascendancy of such drinks was assisted by the invention of canned tomato juice in the 1920s. The Bloody Caesar — a stripped-down version of the bloody mary with clam juice — took Canada by storm in the 1970s. Red beer seems to have emerged somewhere in the midst of all these other beverage inventions: EV Durling, a nationally syndicated newspaper columnist from New York, was puzzled by a man ordering beer and tomato juice in 1946. “When I saw him drink it, I shuddered,” he wrote.
Midwesterners usually add tomato juice to Michelob, Keystone, Bud Light, or Busch Light (often referred to by bros as “Busch Latté”), and they don’t adhere to a standard for the ratio of beer to “red,” leaving it up to drinkers’ individual tastes. “You know why I drank it in college?” asked tailgater Dale Lefferts. “Because it gives you the runs! It cleans you out.”
Lefferts said he only puts a splash of beer in a glass that’s “three-quarters red,” to be consumed with lunch. His digestive theory goes along with the convention among Nebraskans that it’s a drink best suited for the morning.
From the street, the Neighber’s bar in Omaha looks like a suburban version of the false-front architecture of Western films. At 6:30 a.m., it’s quiet inside — just three men drinking alone. One animatedly plays video games on a touchscreen system. Another sits quietly with a Busch Light and a pack of menthol cigarettes, while the other sips on a clear mixed drink.
“[This early], it’s usually a couple of regulars, older guys,” says Josh Bruckner, the son of Neighber’s owner, on the bar’s typical morning clientele. He’s been working mornings here for seven years. “The shift lets out at the hospital over here about 7 to 7:30, then we usually see a big rush of nurses,” he says, referring to the University of Nebraska Medical Center. Sure enough, by 7:30 a.m., there’s a group of nurses in scrubs drinking bottles of Busch Light.
Leah Warren, one of the nurses, takes sips directly from a mini-pitcher of red beer. It’ll set her back $4.50: $4.25 for “whatever light beer Josh pours,” and a quarter for the “red.”
“It’s kind of like breakfast in a cup,” she says. On the way out of Neighber’s, patrons can grab a paper cup of joe from a drip coffee machine before facing the morning traffic on Saddle Creek Road.

The morning crowd at Neighber’s in Omaha
Despite its popularity, a lot of beer drinkers have never heard of red beer, or simply don’t care for it. Darrell Smith, the executive director of the American Breweriana Association, a group of beer aficionados, didn’t know what red beer was; Bill Baburek, the owner of Crescent Moon, one of the oldest craft beer bars in Omaha, isn’t a fan.
“We went to Chicago and when we ordered a red beer, they looked at us and were like, ‘What? What is that?’” said Tina Meeske, a hairdresser from Lincoln, over a red beer at the Railyard, an outdoor drinking hall near Lincoln.
Chris Hernstrom, master brewer at Bolo Beer Co. in Valentine, Nebraska, says red beer’s popularity in the Great Plains might have to do with the historical unavailability of more flavorful beers in small towns. For the older generation, especially in rural Nebraska where it would be rare to see anything but light domestics on the menu, red beer is a way to get a drink with more flavor and depth.
”It’s still relatively hard to find tap beer in a lot of small towns,” Hernstrom said. “Nobody uses a microbrew with a red beer. But almost everywhere has Busch Light or Bud Light.”
Part of the drink’s appeal is also the adjustability of the tomato-to-beer ratio: Some red beer drinkers are just beginning to consume alcohol, while others use it — much like a bloody mary — as the hair of the dog. Tailgater Lefferts claims his red-heavy beer is better for hangovers, while bartender Bruckner says patrons ordering red beer often cite a hungover need for vitamins.
Outside Memorial Stadium, Christine Kupfer said her grandmother likes red beer at any time of the day. “My grandma is 85, and every time we go out to dinner, she orders a red beer,” she said. “Old people like red beer, young people like red beer. Boys like red beer, girls like red beer. Everyone likes red beer. Unless you don’t like tomato juice.”
Jahd Khalil is a radio and print journalist based in Cairo, Egypt. Photographer Alex Matzke is currently based in Omaha focused on Community Building and Mentorship.
Editor: Erin DeJesus
Eater.com
The freshest news from the food world every day
By signing up, you agree to our Privacy Policy and European users agree to the data transfer policy.

Source: https://www.eater.com/2018/12/19/18146459/red-beer-nebraska-tomato-juice-morning-drink-tailgate-midwest
0 notes
Text
SLUTTY WENDY’S RUM CAKE – AKA – SPOOKIE’S FAMOUS RUM CAKE
Spookie is my brother’s godmother, and has been a part of my life ever since I was born. A traveller, adventurer, and always filled with stories and a wink, I remember her teaching me how to cut cards during gin rummy and calling me a “Cheatin’ Charlie” if I ever won a board game. Her humor and wit are only out-classed by her heart, and her deep abiding passion for all creatures, including two adorable rescue dogs named Minky and Scallywag, has always had a great effect on me.
Spookie didn’t bake or cook, but she did have one go-to recipe: her rum cake. This was the most exotic, luscious, delicious cake that ever captured an eight year-old’s mind. She visited my family for a weekend while I was recipe testing, so it was the perfect opportunity to pick her brain for details. When I asked her how she came across the recipe, her answer, like almost everything about Spookie, was unexpected. “Well, when I was a black jack dealer in Vegas, I had this room mate named Wendy. She’d trot this rum cake out all the time, I’m pretty sure it’s the only thing she could make. Then she hooked up with my boyfriend, so I started referring to it as ‘Slutty Wendy’s Rum Cake.’”
Here I thought it was an old Irish or Aussie recipe passed down over the generations.
Using box cake mix, pudding straight from the pack, and a few other odds and ends, this cake is sticky, sweet, and completely delicious.
INGREDIENTS
For one 9 1/2 inch bundt cake
1 box yellow cake mix, sifted
1 3.5 ounce premade pack of vanilla pudding (like a pudding cup you’d have as a snack)
4 eggs
1/2 cup water
1/2 cup vegetable oil
1/2 cup dark rum
3 tablespoons unsweetened cocoa powder
1 tablespoon rum
INGREDIENTS (GLAZE)
4 ounces unsalted butter
1 tablespoon water
1 teaspoon vanilla extract
1 cup white granulated sugar
2 tablespoons dark rum
DIRECTIONS
Preheat oven to 325 F. Grease and flour a 10-inch Bundt pan.
In a large bowl, sift the cake mix. Separately, whisk together the pudding, eggs, water, oil, and dark rum. Add the wet ingredients to the cake mix and mix until just blended, then pour half into the bundt. Add the cocoa and rum to the other half of the batter, stir to blend and pour into the bunt.
Bake in the preheated oven for 60 minutes, or until a toothpick inserted into the cake comes out clean. Let sit for 10 minutes in the pan, then turn out onto a serving plate.
While the cake is sitting in the pan, make the glaze. Combine butter, water, vanilla extract, and sugar in a saucepan. Bring to a boil over medium heat and continue to boil for 5 minutes, stirring constantly. Remove from heat and stir in the dark rum. Drizzle the glaze over top and sides, while warm. Allow cake to absorb glaze and repeat until all glaze is used.

Source: https://www.thekitchykitchen.com/?recipes=/slutty-wendys-rum-cake-aka-spookies-famous-rum-cake/
0 notes