
charlotte-codes
charlotte codes
the diary of a trainee web developer
6 posts
Don't wanna be here? Send us removal request.
Last Seen Blogs

newslc-blog
Sans titre

kidstonehead
Untitled

emgod666
stop making sense

rairnegron
Antro

majougari
oh, no
Text
A $_POST about PHP (and MySQL)
PHP is great.
No, really. It is. The syntax is very much like JavaScript, save for a few fundamental differences.
PHP is a server-side (backend) scripting language that works in the background to enhance your HTML file and make it more dynamic. For instance, paired with a database like MySQL, it can help you create working forms (thus far, our HTML forms have looked pretty, but have done absolutely nothing useful).
The way I see it right now is that If HTML and CSS were the contents and layout of your home, PHP and the backend is a little bit like Marie Kondo organising all of the crap in your cupboards so that if someone needs to find the Sellotape you know exactly where to look for it (a rare occurrence in our house).
It’s more complicated than that but, for now, that metaphor has carried me through.
That’s great, but how do I use it?
There’s a few things you need to do in order to start using PHP.
Unlike CSS stylesheets and Javascript files, you don’t link a PHP file to your HTML in the <head> tag and just start coding. Because PHP works in the backend, it needs a server to work with. In fact it needs a few things to make it work properly - usually in the form of a LAMP stack.
LAMP is an acronym for the four ingredients (software components) needed to make a website work:
L is for Linux (a common operating system used by Macs)
A is for Apache (a web server)
M is for MySQL (a database)
P is for PHP (a scripting language)
These are the four things you need for a dynamic website (there are other versions of a LAMP stack [eg. a WAMP stack for Windows]).
We’ve been using Vagrant to create virtual machines (servers) on our computers so that we can learn PHP. For some reason I find this concept a bit magical and had a Zoolander moment when it was first explained to us.

Furthermore, typing vagrant destroy into the command line feels like the programming equivalent of Daenerys Targaryen saying “Dracarys”:

PHP syntax
Once you’ve got your virtual machine running, you can start using PHP. Like Javascript, PHP deals with strings, functions, arrays and so on. Some differences between the two include things like:
1. You use a $ to declare variables, rather than Javascript ‘let’
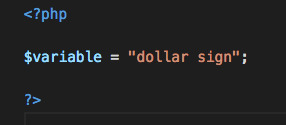
2. You can whack it right in the HTML if you wrap it in <?php ... ?>
3. You output stuff to the browser using echo

4. You use dots to concatenate, rather than +’s

5. Variables are often written in snake_case, rather than camelCase

6. Arrays get a bit more fancy in PHP. An associative array is made up of key => value pairs so you can do things like this ...
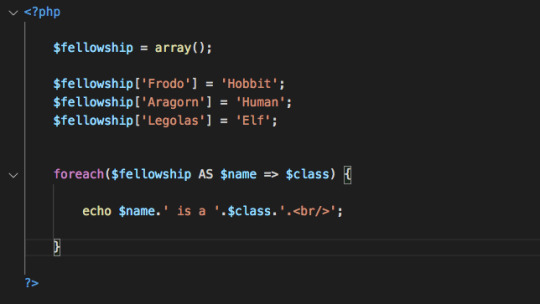
I’ve just realised that will output ‘Legolas is a elf’ which is truly awful grammar but you get the idea. The <br/> added to the end means that the list will output on separate lines ...
You can have a look at what’s going on in an array using var_dump($array_name). This will return a load of info about the array that looks something like this:
array(3) {
[“Frodo”]=>
string(6) “Hobbit”
[“Aragorn”]=>
string(5) “Human”
[“Legolas”]=>
string(3) “Elf”
}
Otherwise, conditionals (for and while loops, switches) and functions work in pretty much the same way as Javascript.
PHP and Forms
Much of PHP week was spent creating a login system - of the type where you register your details using a form, then get sent a verification email with a link that takes you to a login page.
This is something we all use all the time but I did not appreciate just how much effort and coding goes into building one from scratch.
In order to actually do something useful with a login form, you need to use PHP to communicate between the client device and the server (i.e. the user submits a form and, on pressing ‘Send’, the information they have inputted is stored somewhere in a database and they are sent a response to tell them what to do next).
This is done using GET and POST methods. I’ll probably talk more about these when we come to Laravel and APIs but, for now, the essential idea is that a GET method requests data from a specified resource (eg. GET asks the server for the contact.html page and the server responds by loading it) and a POST method submits data to be processed by a specified resource
(eg. POST posts form inputs to the form-handler.php file on the server which then responds with a success page or whatever).
Obviously, when someone inputs information into a form, it has to go somewhere to be stored: that’s where databases come in.
MySQL
MySQL is a database management system that helps you store all your info in neat little tables using even neater commands.
Once you get the hang of the syntax, and how to navigate to MySQL in the first place (using vagrant ssh and typing in your username and password to access mysql), it’s really easy to figure out what’s going on in there.
For example, to create a table, you use the following command:
CREATE TABLE `people` (
`id` int(11) NOT NULL AUTO_INCREMENT,
`fullname` varchar(255) NOT NULL,
`location` varchar(255) NOT NULL,
`age` int(11) NOT NULL,
PRIMARY KEY (`id`)
) ENGINE=InnoDB DEFAULT CHARSET=latin1 AUTO_INCREMENT=1 ;
Looks nasty, but it just says ‘create a table called ‘people’ with the following column headers: ‘id’ (that auto-increments each time a new row is added), ‘fullname’, ‘location’ and ‘age’. The table’s primary key is the ‘id’ and then there’s some default stuff at the end.
This creates an empty table, so you set up your PHP to add data to the table as and when it is inputted by the user.
You can also input data manually in the command line:
INSERT INTO `people` (`id`, `fullname`, `location`, `age`) VALUES
(1, 'Frodo Baggins', 'The Shire', 47),
(2, 'Aragorn', 'Various', 40),
(3, 'Boromir', 'Minas Tirith', 38),
(4, 'Galadriel', 'Lothlorien', 17988);
To check out your table, you use:
SELECT * FROM `people`;

Please don’t write in to tell me how wrong my LOTR estimates are.
Databases are fun. There’s something satisfying about organising tables that I cannot quite explain. I’m getting married next year and one of the first things I made sure we did was to create a wedding spreadsheet, which I call ‘the wed-sheet’. Pete’s a lucky guy...
Building a Login System
Right, I’m not going to be able to put all the fine details of building a login system here but here’s the general gist of it.
Disclaimer: I’m writing this a few weeks after the fact, having done Wordpress, Object Oriented Programming, Laravel and React in the interim - my brain is swimming in React right now, so please forgive anything I miss out.
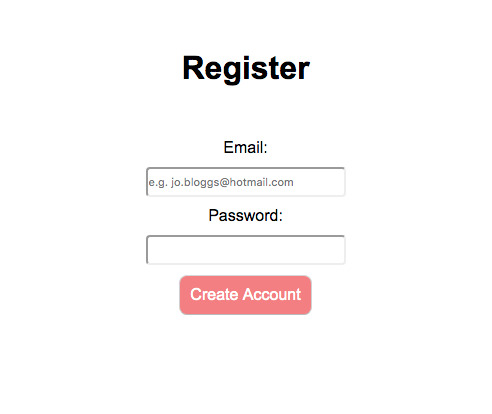
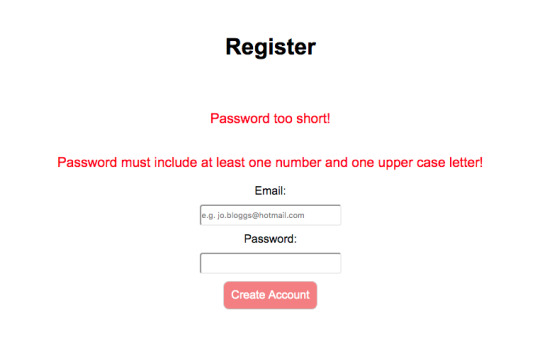
1. The user inputs their details on a registration page to create an account:
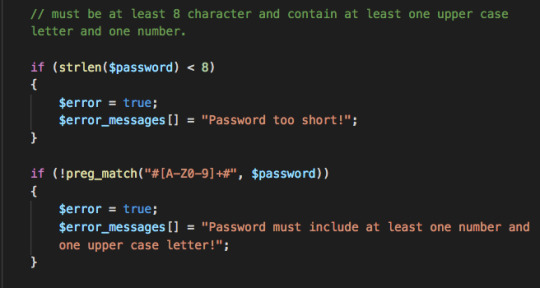
2. I’ve got some conditionals in my register.php page that will alert the user if they haven’t entered a valid email address or password. If they don’t they get a variety of different error messages:
3. If they do it right, they get this success message:
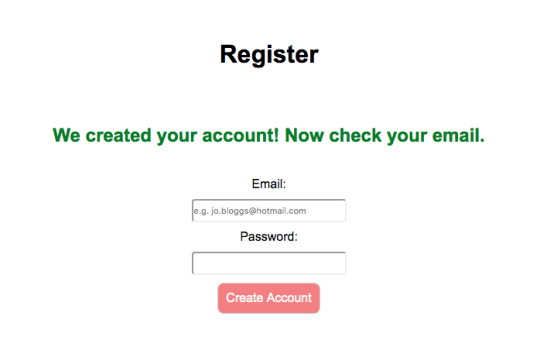
A successful entry also creates a unique activation code and adds the new user details to the database securely by hashing the codes and passwords.
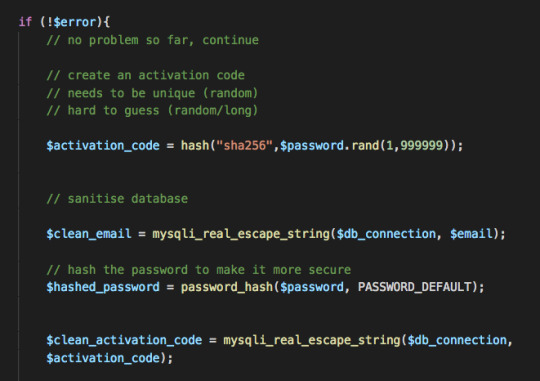
You can see the MySQL syntax in the db query below:

Here’s part of the entry in the MySQL db. The password looks like crazy gibberish because of the hashing.

It then sends the new user an email with a link. The slug of the link’s URL is the activation code, so is unique.
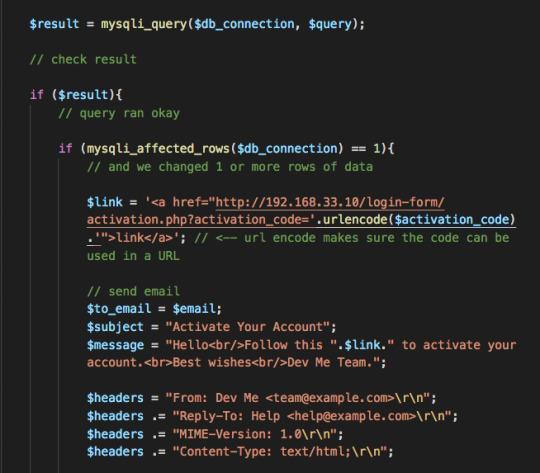
Here’s what they see in their email inbox:

Notice that when they click on the link, the url contains the activation code:
There are various error messages on the activation.php page for anyone who is trying to access the site without registering correctly.
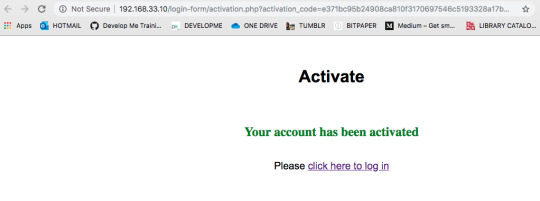
4. Clicking on the link shown in the image above takes them to this login page:

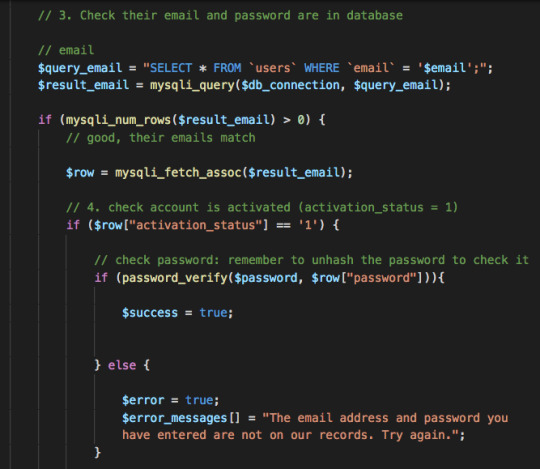
Here, they re-submit their username and password. Again, there’s various conditionals in case they get it wrong, including queries to the database to check that the information they have provided actually exists.
When they’ve successfully logged in, they start a new session, which continues until they log out again. I also coded in a ‘forgot password’ system - which I’m not going to go into now but eventually I’ll add a link here to my completed login system so you can have a look.
When all of this finally came together and worked, it was potentially one of the most satisfying moments on the course up to this point.
When it was done, I was so proud of myself that I just spent 30 minutes registering new people just to go through the motions of what I’d just created. I then made Pete do the same when I got home. Again, lucky guy.
Who knew login systems could provide so much joy. I’m definitely going to be including it as part of my portfolio website - more on that next time when we look at Wordpress! :)
0 notes
Text
Gulp! It’s Git week!

It’s week 5!
(actually, it’s week 6 but I’ve had the flu and was unable to blog last weekend!)
To begin with, Git week felt like taking a break from the fortnight of JavaScript that we had just conquered. It was nice to be doing something with the command line and to learn about how we might approach a collaborative project.
We’d been using Github (a website that allows you to store development projects in online repositories) since day one to access resources for the course, but had yet to be introduced to the beautifully organised world of Git and version management.
Once again, I’m using this blog post as revision - so please correct me if I’ve got something wrong!
Git, init?
Git is a tool that automatically keeps track of changes in your coding project.
It’s used on the command line and allows you to revert back to a previous state if you totally f everything up. This means you have greater control over your code.
As someone who once accidentally moved her entire 90,000-word thesis to the recycle bin, and is therefore now crazy about backing up files in various places, I was ready for Git and its magical time-machine properties.
The basic idea is to take snapshots of your project at certain points in time - these are called commits.
Git tracks files automatically but won’t commit them - you have to do that yourself at regular intervals.
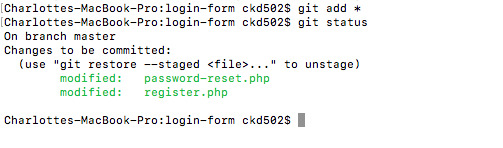
Here’s an example of some git commits for a PHP login system project I’ve been working on in week 6. You can see that when I run git status, it tells me that certain changes I’ve made to the files password-reset.php and register.php are ‘not staged for commit’.

If I were to run git add * (* means ‘all files’, but it’s probably better to type in names of individuals files here so that you don’t end up staging something you shouldn’t) it adds these files to a staging area where they can then be committed.
Running another git status will show that these files have been added.
Then I can commit them using the command git commit -m “a message to future me about what changes I’ve made”.

It’s important to include a useful message (and one without typos ffs!) so that if you need to revert back to a previous state, you can see what you were doing at each step. You can bring up a list of your commits by doing git log or git reflog.
Here’s a visual description of this process that our fab teacher, Oli, showed us. It really stuck in my head and helped a lot with my understanding of what was going on with Git:

You can see from the above that it is possible to bypass the staging area completely using git commit -am “comment”.
There’s a load of different commands that can be used with Git that I won’t go into here, but it is important to mention that you don’t want Git to track absolutely everything that you are doing, particularly if you have sensitive information (like security info) in your project. So you can create a .gitignore file that lists all the project files that you don’t want to track.
The best thing about Git is that if you go wrong somewhere it isn’t the end of the world -- you can Marty McFly it back to a time when you weren’t such an idiot. Just have a look at how to resolve your issue on the brilliantly named, ‘Oh Shit, Git’ https://ohshitgit.com
Github
Once we had learnt how to use Git locally (i.e on our own computers) we moved on to Github.
Github is great for storing a collaborative project remotely so that it can be accessed by everyone. All of your version-managed work can be pushed to the remote repository using the command line.
Here’s how it works:
1. You all connect to the remote repo (git clone {repository URL} {new local folder name} is a good way to bring a shared repo down to your computer).
2. You make your changes to the project.
3. You add and commit them locally.
4. You git pull from the remote repo so that you have the most up-to-date version of the shared project
5. You git push your changes to the repository to update it
But it isn’t quite as simple as that.
Obviously, if you and a team of colleagues are all working on the same project and pushing your changes to Github - there are going to be conflicts where your changes overlap.
We learnt this the hard way when the whole class started using Github to make changes to a page and ended up with something that looked like this ...
What a mess.
I barely got a look in with my changes because every time I tried to git push, the remote repo had been changed and I had to git pull again to keep up.
So that’s why our next project incorporated a feature branch workflow.
(It goes without saying that it helps if you get together face-to-face first to decide who will work on what ... sometimes good-old-fashioned human contact is also the best answer.)
Feature Branch Workflow
If you aren’t using feature branches, then all your changes are being made on a master branch.
That’s like a trainee brain surgeon doing all her initial surgical practice on live subjects - potentially disastrous. Much better to go and practice on something less risky (*insert detached HEAD reference here*).
(a brief aside - when, out of morbid curiosity, I Googled ‘how do brain surgeons practice?’ I got this interesting article about the use of 3D models in neurosurgery ... https://www.cnbc.com/2015/11/23/new-brain-surgery-innovation-practice-on-a-3-d-model.html)
Enter feature branches.
Feature branches allow you to work on the project files separately from the master, then merge your changes at a later date -- preferably after another member of your team has checked them for conflicts.
By the end of the week, the word git was so etched into my brain that I accidentally called my team mates (whose real names are Kit and Jim) “Git” and “Git”.
N.b. avoid this in future.
Gulp
But the fun doesn’t end there.
You can also use a toolkit called Gulp in your development workflow.
Although initially hard to get your head round, Gulp is actually incredibly useful because it automates a lot of stuff that you certainly wouldn’t ever want to have to do manually - like minifying CSS files or uglifying JS files (both of these mean taking all the extraneous whitespace, letters, etc. out of the code and squishing it all together in a horrific looking mess that might cause your eyes to catch fire if you tried to make sense of it).
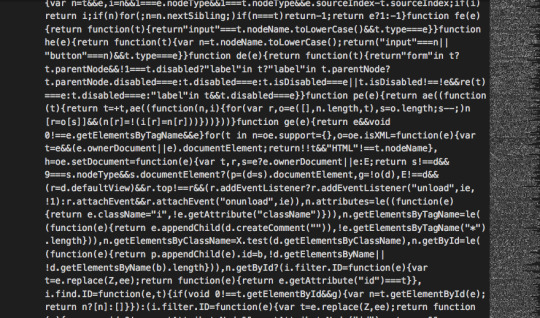
an uglified JS file
You have to install Gulp using JavaScript’s Node Package Manager (NPM). This creates a package.json file to which you can add other useful packages like Bootstrap or jQuery (for more see https://www.npmjs.com/).
Once installed, using npm install gulp in the command line, you need to create a gulpfile.js file (a JavaScript file) for your project where you will outline all of your Gulp tasks.
And so we are back to JavaScript again.
As you can see from the example below, Gulp tasks are like JS functions/methods and therefore use all the familiar syntax we learnt last week.
The examples below combine all the project’s other JavaScript files (Bootstrap, jQuery and popper) into one file called all.js and then uglify it into all.min.js. This tidies up space in your files to make your code as efficient and as manageable as possible.
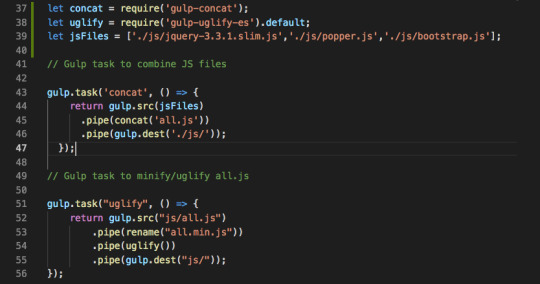
You can also use Gulp to automatically combine those two tasks together.

And, further, you can use Gulp to ‘watch’ for any changes that you make to the JS files, then automatically update the all.js and the all.min.js respectively.

Phew.
It’s very easy to fall into the trap of recursion here.
I discovered this when I first attempted to combine and minify my JS files and ended up creating an all.min.js file, then an all.min.min.js, then an all.min.min.min.js, then an all.min.min.min.min.js ... and so on until my MacBook’s fan started going nuts and I realised what was happening and cancelled it.
It’s good to learn the hard way.
Next week ... PHP.
0 notes
Text
Javascript and the DOM
It’s week 4.
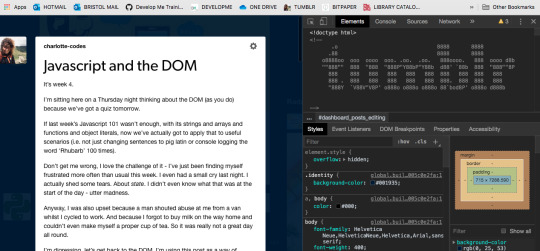
I’m sitting here on a Thursday night thinking about the DOM (as you do) because we’ve got a quiz tomorrow.
If last week’s Javascript 101 wasn’t enough, with its strings and arrays and functions and object literals, now we’ve actually got to apply that to useful scenarios (i.e. not just changing sentences to pig latin or console logging the word ‘Rhubarb’ 100 times).
Don’t get me wrong, I love the challenge of it - I’ve just been finding myself frustrated more often than usual this week. I even had a small cry last night. I actually shed a few tears. About state. I didn’t even know what that was at the start of the day - utter madness.
Anyway, I was also upset because a man shouted abuse at me from a van whilst I cycled to work. And because I forgot to buy milk on the way home and couldn’t even make myself a proper cup of tea. So it was really not a great day all round.
I’m digressing, let’s get back to the DOM. I’m using this post as a way of revising, so please correct me where I go wrong.
DOM, DOM, DOOOOOOM ...
The DOM is the Document Object Model and it lets us use Javascript in the browser.
To do this, we create <script> tags in our HTML which can either be inline or can link to a file elsewhere (much in the same way as a CSS stylesheet links to a separate CSS file).
The document refers to everything between the <html> tags and it works like a Javascript object, so it has properties (like document.body) and methods (like document.getElementById()) that we can use to navigate and manipulate it.
Oh, before I forget, first of all we need to talk about IIFE’s (which I am henceforth pronouncing, ‘iffy’s).
Basically, if you go around creating lots of variables in global scope, and you are working on a site with lots of different scripts, libraries or contributors and your global variable is already being used somewhere else, then you can royally f-up everybody’s fun.
To prevent this from happening, you can wrap your code inside an IIFE, which is essentially a function that is called instantly. Any variable you declare inside the IIFE is now ‘trapped’ inside the function’s scope and cannot pollute the rest of the code.
Your IIFE would look something like this ...

To get things out of the DOM (e.g. if we want to do something with an HTML <button> or <p> or <div>) then you can access elements and classes in a number of ways:
1) the first (and best) way is document.getElementById(”button”). This method searches the DOM for whatever id you pass in (in the above case, id = “button”). This only works if the thing you want to access has been given an id.

2) the second way is to find things by their CSS selectors, which could be the html tag for the element, or its class. So document.querySelector(”ul”) would give you back the first unordered list on the page.
3) you can also select multiple elements using classes - document.getElementsByClassName(”menu__item”) - or by tag name -document.getElementsByTagName(”main”) - or by CSS selectors - document.querySelectorAll(”li a”). These also give you back HTML Collections or Node Lists, which are array-like objects that can be turned into arrays to make them more useful to work with in Javascript.
4) you can also do some crazy traversing around the family tree that is the DOM, which involves understanding things like firstElementChild and nextElementSibling. In this example, I’m storing the children of <main> (which are all <p> elements) in an array.

QUERYING THE DOM
Want to know the size of the viewport? Or the current scroll position? Of course you do.
You can find out by querying the DOM using things like window.innerHeight (this will give you the height of the current viewport, window is also an object that represents the entire browser window) or window.pageYOffset (which gives you the current vertical scroll position.
It’s better to create variables to store your DOM queries rather than calling on the DOM over and over: not only does it make your code neater, but it also makes it run faster. Win.
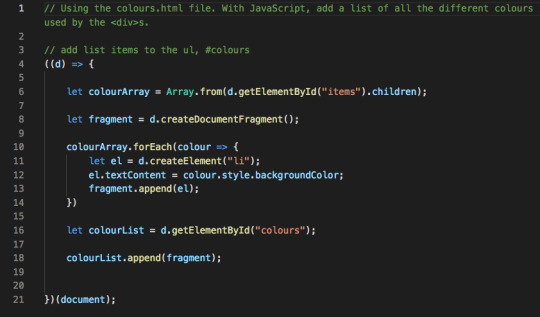
All these tools allow you to create, change and remove elements, classes etc. on your webpage using Javascript.
Here, I’ve added a list of colour names to the page:

This ability to make changes allows for user interactivity, which is where events come in.
EVENTS
An event in Javascript is something like the user ‘clicking’ the mouse. Or pressing a key on the keyboard down. Or releasing a key. Or releasing the mouse. Or scrolling down, or up, the page. Or moving the mouse. You get the idea.
We can ‘listen out’ for these events using Javascript and make an element do something if that event should occur.
We do this using a method called addEventListener( ). When the event is detected, then a function (called an event handler) is run.
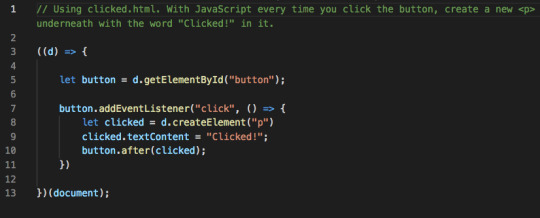
For example, we might want something to happen when the user clicks on a button. Here’s how we would do this ...
But here’s the thing. We’ve got to be careful about state. You know, the thing that I cried about last night #facepalm.
An event handler function is only short-lived. It exists for as long as the event occurs and doesn’t stick around afterwards. It’s the one-night-stand of functions.
So any variable you might have declared inside the event handler function, won’t be there in the morning either. They’re gone. You won’t see them again until the next brief booty call.
So the moral of the story is, declare any important variables that you might want to use later (e.g. to keep track of how things are going) outside the event handler. A lesson for code (and for love?).
I don’t know why this made me cry yesterday. Now that I’ve made it into a dumb metaphor, I totally understand the basics of it. I knew this blog would help me somehow.
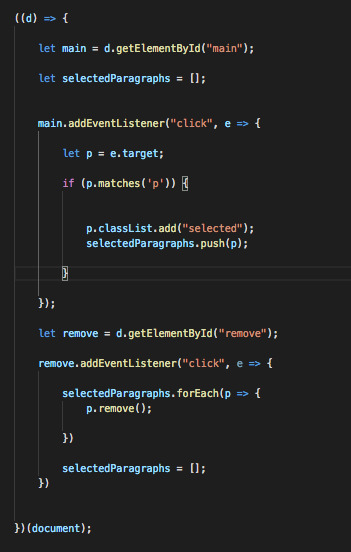
To finish, here’s a particularly tricksy problem from the end of the week.
The challenge: on a page of multiple paragraphs, when the user clicks on a paragraph, the background colour should turn pink. The user could do this for any number of paragraphs and then when they click on the ‘remove’ button, the selected paragraphs would be removed from the page.
The result looked like this:

And my code looked like this ...
Fun!
After two solid weeks of Javascript, we deserved our Friday drinks session :)

0 notes
Text
console.log(“Eek! It’s Javascript week!”);

We’ve just finished two solid weeks of JavaScript and I’m trying to think how I can fit it all into one post. The answer is ... I can’t.
So instead I’m going to deliver it in manageable, bitesize chunks over the next few weeks. It’ll help me revise and keep everything fresh in my head.
We’ve learnt A LOT thanks to our fantastic tutor, Mark.
Contrary to the image above, I think I do know what I’m doing, but I also think my brain might be melting. Again.
Although we haven’t quite become one entity yet, if I were my MacBook, my cooling fan would be working overtime right now.
I’ve been dreaming about code the last few nights - it’s gradually permeating my subconscious, which is good (maybe). The other day I asked Pete what he wanted for dinner using an else if structure (‘if you want pasta then you’ll need to buy garlic bread, else if you want the rest of the curry I need you to get some naans on the way home, else we can just have it without’).
I’ve just finished a post about using JavaScript in the browser, which is coming out Tuesday. In the meantime, I thought I’d better just do a brief intro to JavaScript 101.
Let’s start by talking about types.
There are only a few basic types in JavaScript (we’ll get to functions, arrays and objects and so on in later posts).
1) Strings
Strings are a sequence of characters, e.g. text, numbers, emojis...
They are wrapped in “double quotes” (or single quotes if you want to be a maverick).

The most fun things about strings is learning the words ‘concatenation’ and ‘interpolation’ so that you can impress your friends with your huge lexicon. Who needs a BMW?
Concatenation is how you add strings together and link strings to other types, like variables. You do this with a + operator and it’s pretty straightforward.

I might as well talk briefly about variables here too.
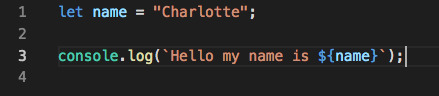
You can see above that I’ve declared a variable called name using the word let (you can also use const if you won’t be redeclaring it later, or you might also see var being used instead of let). I like let because I’ve used it before in maths in a similar way. In fact, variables should be very familiar to anyone who remembers the fundamentals of GCSE algebra.
A variable works kind of like a box that you store something in for later. It’s a bit like when you move house and you empty out various kitchen cupboards into a box that you write kitchen on so that you know where to find it again. In this instance, I’ve put a string into the box with the value Charlotte, then written the word name on the box. I can use it over and over again by calling on the variable, just as you can see in my string concatenation. The result logged to the console would be “Hello my name is Charlotte”. Notice also that I’ve left a space at the end of the first string. If I didn’t do that, it would look like crap (”Hello my name isCharlotte”).
Interpolation is similar but, in my opinion, looks cooler (I’ve never had cause to use backticks until now):
There are various differences between concatenation and interpolation that I cannot be bothered to list in this post (which was meant to be brief). I’ll come back to it later.
2) Numbers
I mean, do you need me to tell you what numbers are?
You can actually do fun mathsy stuff with these in JavaScript eg. (15 % 7).


Yum.
% means modulus. It divides the two numbers and gives back the remainder.
This was a new one for me. In A Level maths, modulus means an absolute value - the positive value of any number. The JavaScript operator uses the percentage sign, which is also mildly confusing to begin with if you are used to teaching maths.
But we like numbers so we’ll roll with it.
3) Booleans
Booleans. Another nice word to bring out at parties.
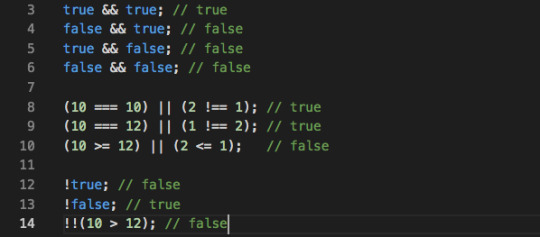
Named after the nineteenth-century mathematician, George Boole, Boolean logic is fun to say and fun to use. It’s fairly simple to understand too - relying purely on the values true and false.
This is most useful when making comparisons, so there are many comparison operators that we can use that will give us Boolean values. Which one of these do you think would return ‘false’?
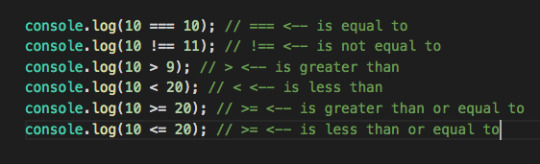
It gets a little bit more complicated when we get to using and ( && ), or ( || ) and not ( ! ) or adding different types into our comparisons (”12″ does not equal 12 because one is a string and one is a number) ...
It’s starting to look serious now, so I’ll stop there for tonight. It’s midnight on a Saturday and I’m in bed revising basic JavaScript AND I COULDN’T BE HAPPIER.
You can keep your all-night raves, I’m off to see if I can get anywhere with CodeWars.
0 notes
Text
This, Charlotte, is the internet ...
It was September 30th: day one, week one.
I cycled across Bristol that Monday morning with a mixture of excitement and trepidation. I am not a seasoned city cyclist, so crossing the leviathan of roadworks at rush-hour was my first test.
Arriving at the DevelopMe offices unscathed, I quickly found my seat. Although we’d all met the week before at a social event organised by DevelopMe (a brilliant idea because I was less nervous having already met some of my fellow classmates) the room was very quiet and you could feel the tension of 12 career-changers psyching themselves up for what was ahead.
Our teacher for the week was Keir, whose enthusiasm and sense of humour made us all feel relaxed and at home very quickly.
We started with a brief introduction to the internet.
Now, I knew that the internet was not contained in a small black box à la the IT Crowd, but I had never really considered its complexity: a global network of computers that can communicate with one another at sub-second speeds is something that takes a while to get your head around.
Although the fundamentals of the internet are fairly easy to digest, thinking about it too much at this point in my understanding is like thinking about the expanding universe - enough to make my brain explode and ooze out of my ears. So, we’re gonna leave that one for another day.
In the meantime, let’s talk about HTML and CSS, our topics for the first fortnight. This post will be an overview of what we learnt, I’ll get into the details in separate posts later on.
HTML (Hypertext Markup Language)
The phrase that has stuck in my mind from our first week at bootcamp is ‘Progressive Enhancement and Graceful Degradation’ - which sounds suspiciously like a general life lesson, or an advert for a skincare range. For our purposes, it’s a way of making sure that every user can access the fundamental parts of your website no matter what browser they use or how slow their internet connection.
The first few days concentrated on writing HTML, which contains the important ‘content’ of the webpage. CSS is used to make it look good and also deals with accessibility. We’ll get into Javascript later, but that allows user interactivity. All three together constitute Front End development. My beginners understanding of this is that a Front End specialist works on the client-side stuff you see and interact with - whilst a Back End specialist works on the server-side stuff you don’t. A Full Stack developer does both.
In terms of HTML, you can split your code up like a human body: at the top is a <head> tag wherein you store all the metadata. Just like a human head, you can’t see what’s going on in there on the webpage itself, but it contains important behind-the-scenes information. The part of the page you see online is the <body> and you can dress this up however you want using CSS.
Within the body you’ll probably have a <header>, a <main> and a <footer>, which are fairly self-explanatory ways to break up a page. A lot of this stuff comes from traditional methods in printing, so if you imagine your page layout a bit like a newspaper, then considering how to split it up seems logical: for instance, you’ll probably further divide your page up into articles, sections and asides.
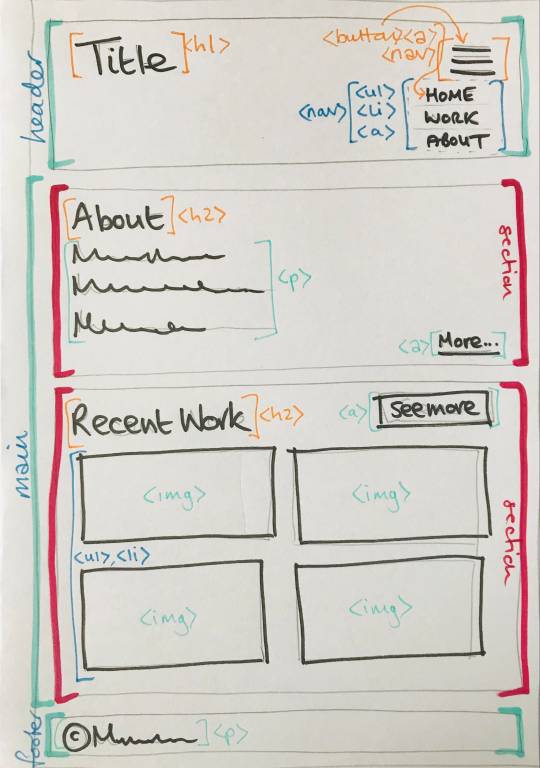
Within these sections you’ll have tags for various elements like paragraphs <p>, images <img/>, links <a>, headings <h1>, <h2>, buttons <button> and so on: again, it’s all wonderfully logical. Here’s some I wrote earlier - this is just part of the <header> on my home page:


The above example is also styled and for the majority of the first fortnight of bootcamp we got to grips with CSS.
CSS (Cascading Style Sheets)
CSS is a little trickier, mainly because there are SO MANY THINGS and you have to think about accessibility and responsiveness (i.e how a screen-reader will understand your code and what it will look like on desktop and mobile devices - this requires the use of @media queries, which I’ve grown to really like because it is SO satisfying when they work properly).
Potentially one of the biggest challenges I found in CSS was positioning things evenly. When you start fiddling about with margins and padding, and forgetting what you’ve fiddled with, you start seeing issues arising on the page: maybe it’s an <h2> that just won’t align with the image underneath; or maybe it’s a <nav> bar that is squishing all the menu items too close together, and pushing them all a little off-centre.
Now, I’m mildly neurotic when it comes to visuals. I’m trained in visual analysis and I’ve spent the best part of the last decade explaining the composition of paintings and other images - why they have a central focal point, or why they don’t etc. etc. Positioning stuff correctly and with meaning is important to me.
So I became particularly enamoured with flexbox and CSS grid (and not just because I enjoyed playing Flexbox Froggy and Grid Garden). These do a large percentage of the positioning legwork for you and I found myself using them a lot for the project work that we did in the second week.
Some excellent resources for these can be found here:
https://css-tricks.com/snippets/css/a-guide-to-flexbox/
https://css-tricks.com/snippets/css/complete-guide-grid/
Week 2: More CSS and SASS
In week 2 we worked on a sample project.
The brief was to practice our HTML and CSS skills by building a pretend portfolio site for a commercial photographer. Our teacher this week was Ruth, who was also super cool and put us all at ease instantly.
The project consisted of a home page with a grid of featured photos and a nav that turned into a burger menu when reduced to a small screen. We also had to create a gallery page, a blog page (and a sample page for one blog post) and a contact page (to practice HTML forms).
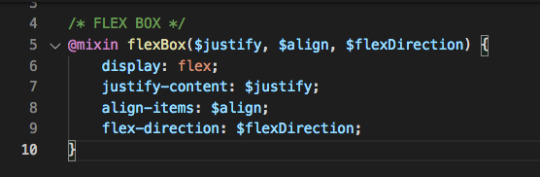
One of the main focuses of week 2 was using SASS to organise our code so that we didn’t have to repeat ourselves throughout the site.
At first I didn’t get on with SASS (it felt complicated). But being a fan of flexboxes, I spent some time creating a mixin that I was particularly proud of so that I didn’t have to create new flexboxes all the time (a mixin is like a function that can be reused by passing values into the variables - in this case, $justify, $align and $flexDirection):
Turns out SASS is super useful.
And being a bit of a neat freak, I enjoyed putting all my code into separate files and tidying everything up.
I was pretty proud of my site by the end of the week:

home page ... big screen
two sample posts on the blog page ...
Every Friday, we have an individual review with one of the course organisers so that we can discuss how we are getting on. Both weeks I mentioned that I was tired, but in a good way! I was getting great feedback from my teachers too.
So far, so good.
Downtime
Learning new information day after day is super tiring and it’s important to have a break at the weekends.
So I’ve been kind to myself and made sure I get out into nature on Saturdays and Sundays and away from my desk. The temptation just to work through is there all the time - I love what I’m doing, so it doesn’t feel like work and I have to drag myself away from it in the evenings and at weekends. This can only be a good thing though, right?!
The entire cohort are so friendly and everyone gets on really well. A few of us finished the first fortnight with a celebratory drink at Bocabar.

Next week ... Javascript ... bring it on!
9 notes
·
View notes
Text
from da vinci to code: confessions of a career-switcher
why a postdoctoral researcher specialising in arts and cultural history decided to pursue a career in web development ...

Not long ago I was standing in front of a lecture theatre full of art history students teaching them about eighteenth-century print culture and its role in French Revolutionary propaganda (!). I was an expert in my field (and have a doctorate to prove it).
Now I'm spending my days on the other side of the desk, learning to code from the ground up to prepare myself for a career in web development. I'm a total newbie and, despite often feeling like my brain might implode with the weight of all the new information, I love it.
You might be thinking, 'why the hell would you do that?' Why leave the comparative comfort of a familiar career, where you've already done a lot of the intellectual leg work, to pursue an alternative direction THAT YOU APPARENTLY KNOW NOTHING ABOUT?
Well, there are a number of reasons, but here's the thing. For all the years that I've pursued a career in the academic arts I've had a dirty little secret.
It's maths.
I cannot deny my love for maths.
I've been moonlighting as a maths tutor (KS3 to A Level) since I rediscovered my love for all things mathematical in 2011. I even took a Subject Knowledge Enhancement course at University to get my maths and teaching skills up to scratch.
So, for the past 8 years, I've lived a double life, spending my days writing and lecturing about nineteenth-century material culture and my evenings helping kids solve trig problems. And whilst 'secret-maths-tutor-woman' is not exactly an alter-ego worthy of DC Comics, it kept both sides of my brain occupied and my appetite for learning satiated.
However, like all good secret identities, the longer it went on the more difficult it became to keep maths and art separate. After all, they are not innately separate skills: both need a similar degree of creative problem solving and lateral thinking abilities. The notion that we are inherently left-brain (mathematical, logical) or right-brain (artistic, imaginative) dominant is utter balls. I cannot count the number of times I've heard maths students (or worse, their parents) say that they are 'more of an art person than a maths person'. Just, no.
Quite frankly, I was fed up of having to separate out maths and creativity.
Enter coding.
I remember that when I was at school (in the 90s), prior to all things Digital Age, IT lessons were extremely dry. I certainly didn't make any connection between the boring stuff we did with Encarta (that's all I remember doing) and the incredible computer games that I played when I got home (I have, and always will be, a die hard Tomb Raider fan).
I realise now that my A Level choices reflected a coder in the making: Art, Maths and Modern Languages. I loved to problem solve, create, find patterns and understand syntaxes.
Last year, I was moaning to a friend about how I wanted to find a career that combined my skills and interests in one place. They suggested I look into web development as an option, and maybe have a go on Codecademy to see if I liked it.
I did.
I tried HTML, CSS and even some Javascript. It felt complex, yet beautifully logical; new, yet strangely familiar. I was instantly hooked.
In September 2019 I took the plunge. After completing my research project at the University I was working for, and with no further employment tying me to academia, I joined DevelopMe, a coding bootcamp based in Bristol.
I am now two weeks into a 12-week course that will see me learning a host of new skills and programming languages and provide me with the tools to embark on a career in web development. It's very exciting.
I'm a writer. And my favourite way to learn is to write. So I've started this blog as a way of organising my thoughts.
I'll try and keep it updated each week, sharing some of the things I've learned and giving some insight into the experience as a whole. It won't just be about coding either. Downtime is super important when you are working at a screen all day, so I'll be sharing some of my top tips for recharging the grey matter too (I'm a hiker, so this will mostly be about mountains).
I hope it might be helpful to anyone thinking of getting into code, or considering changing their career. Seasoned developers, I hope you enjoy my many mistakes along the way and can offer me advice on how to improve!
Enjoy! :)
1 note
·
View note