
Last Seen Blogs

ladymuscles
World Champion Kickboxer.

wishfuldivine
Ali

incorrect-bridgerton-family
Incorrect Quotes

yemenmusicstore
متجر الالآت الموسيقية اليمن

lilyoftheval
Lili🇪🇬
Text
That Tiny Restaurant Dream
Many restaurant cooks have had the thought: I just want to cook for a dozen people, four nights a week, making the food I love and then take off during the winter. That is the dream. And that is what Bryan did. He converted the bottom floor of his house into a “restaurant”. It’s only a restaurant in quotes because the kitchen is just like any home kitchen — and besides having more rustic pottery and glassware than I own (and a couple extra tables), it is pretty similar to my home. His dad makes the bread; His girlfriend and a couple friends each serve one night a week; and on his days off he preps, forages and enjoys the amazing outdoor life of Cape Breton.
The two days I spent with Bryan weren’t too bad for me either: after looking for chanterelles, fishing with his dad and picking a few beach edibles, Bryan cooked dinner and made each of the dishes for me as well. Just the kind of living the dream filming I like to do: Film the plating, then eat the most delicious food.
As Bryan mentions in the film, he likes the quiet, and he is quiet. So In our interview, he didn’t wax poetic like some Chefs are prone to do – raising their craft up to the level of art. Chef as God. No. Bryan is matter of fact. I walked away from our interview not sure if I could make a movie out of it. But when I sat down to edit, I remembered that I wasn’t making Chef’s Table – I was trying to represent this person and share his lovely way of living and being. So instead of searching for the poetry, I found the humble and peaceful lines that spoke to the experience of The Bite House. He is living the dream without talking about it. He’s just doing it — and he’s sold out for the entire season.
Source: http://www.theperennialplate.com/blog/2018/03/that-tiny-restaurant-dream/
0 notes
Text
Simple Cauliflower Soup
This simple cauliflower soup is made with just five ingredients, including salt! It's a quick and easy weeknight meal that's easy to dress up or down. Dinner is served!
Photography Credit: Elise Bauer
Making soup doesn’t have to be difficult, and if you are working with fresh, high quality vegetables, you don’t even have to add stock.
This cauliflower soup couldn’t be easier! Just chop up a head of cauliflower (see how here), blanch the florets for a few minutes, and then purée them with some of the blanching liquid, salt, and butter. Serve with olive oil and chopped chives.
Of course when you are working with so few ingredients, you have to make sure that each ingredient is as good as it can be. There’s no place to hide if something is off.
What I love about this soup is that the cauliflower really shines through, and it’s also pretty light, so it works well as a starter for other courses.
Ways to Adapt This Recipe
As is, this soup is simplicity at its best. But if you’re in the mood for something a little more, try one of these ideas:
Cream of Cauliflower Soup: After blending, add cream, half-and-half, or whole milk to the soup to make it rich and extra-creamy.
Truffled Cauliflower Soup: To take this soup from simple to sublime, add a dash or two of truffle salt or truffle oil to the soup when serving.
Roasted Cauliflower Soup: Instead of blanching the cauliflower, toss the florets with olive oil and salt and roast in a 400°F oven until tender and charred in spots. Blend with vegetable broth or chicken broth.
Cheesy Cauliflower Soup: Add a handful or two of your favorite shredded cheese after blending. (Or try this version!)
Vegan Cauliflower Soup: Instead of butter, use good-quality olive oil.
How Long will This Soup Keep in the Fridge?
If you have leftovers, let the soup cool completely and then store in a covered container in the fridge for up to five days. Reheat gently on the stovetop over medium heat or in the microwave.
How to Freeze this Soup
This soup freezes very well and it’s so nice to have some stocked in the freezer for dinner emergencies!
To freeze, let the soup cool completely and then transfer to freezer containers or zip-top bags (which you can freeze flat). Freeze for up to three months.
To reheat, warm the thawed or frozen soup gently over low heat on the stove, or warm in one minute increments in the microwave, stirring between each increment.
What to Serve with Cauliflower Soup
If you’re serving this soup as the main course for a light meal, think about making some simple garlic bread or assembling a leafy green salad to serve along side.
This soup is also an easy side dish or first course to serve with a larger meal, like roast beef or roast chicken.
Love Cauliflower? Try These Recipes!
Updated December 20, 2018 : We spiffed up this post a little to make it sparkle! No changes to the recipe.
Simple Cauliflower Soup Recipe
Print
Method
1 Cook cauliflower florets in salted water: Bring 1 quart of water to a rolling boil in a medium-sized pot. Add 2 teaspoons of salt to the water.
Add the cauliflower florets, and cook until cooked through, about 4 minutes. Use a slotted spoon to remove florets to a bowl. Reserve cooking water.
2 Purée cooked cauliflower: Working in batches, fill a blender half-way with cooked cauliflower, add enough cooking water to the blender bowl so that it comes up a quarter of the way. Purée until smooth. You want the consistency to be that of soup, so if you need to add more water, do so.
3 Add salt and butter: or each blender batch, add salt and butter to taste (about 1/2 teaspoon of salt, and about a tablespoon or more of butter for each blender batch). Since you are using only lightly salted cooking water for a base, not stock, you will need to salt this more than you would otherwise.
4 Serve: Serve immediately into bowls. Drizzle olive oil over the top and sprinkle with chopped chives.
Hello! All photos and content are copyright protected. Please do not use our photos without prior written permission. If you wish to republish this recipe, please rewrite the recipe in your own unique words and link back to Simple Cauliflower Soup on Simply Recipes. Thank you!
Print
This post may contain links to Amazon or other partners; your purchases via these links can benefit Simply Recipes. Read more about our affiliate linking policy.
Elise Bauer
Elise Bauer is the founder of Simply Recipes. Elise launched Simply Recipes in 2003 as a way to keep track of her family's recipes, and along the way grew it into one of the most popular cooking websites in the world. Elise is dedicated to helping home cooks be successful in the kitchen. Elise is a graduate of Stanford University, and lives in Sacramento, California.
More from Elise
Source: https://www.simplyrecipes.com/recipes/simple_cauliflower_soup/
0 notes
Text
Best Recipes of 2018
This year flew by! My daughter started high school and my son started middle school.
My dog remained unschooled.
Every year, I put out a list of the top recipes. These are the ones that more people clicked on, shared, and (hopefully) made this year.
There isn’t really a dessert in the bunch. It may be that I have gotten tired of trying to come up with something sweet and luxurious without the benefit of butter. I have had many failed attempts over the years.
My favorite healthy dessert? Medjool dates or a square of dark chocolate. My favorite not healthy dessert? Cheesecake.
Check these out in case you missed any. Let me know what your favorite recipes were this year.
1. Baked Cod Recipe
Get the recipe here: Baked Cod Recipe
2. Cottage Cheese Waffle Recipe
Get the recipe here: Cottage Cheese Waffle Recipe
3. Slow Cooker Chicken Fajita Recipe
Get the recipe here: Chicken Fajita Recipe Slow Cooker
4. Crunchy Cauliflower Recipe
Get the recipe here: Crunchy Cauliflower Recipe
5. Homemade Instant Hot Chocolate Mix
Get the recipe here: Homemade Instant Hot Chocolate Mix Recipe
6. How To Make a Starbucks Iced Mocha
Get the recipe here: How to Make a Starbucks Iced Mocha Recipe
7. Creamy Chicken & Wild Rice Soup (Slow Cooker)
Get the recipe here: Creamy Chicken & Wild Rice Soup Recipe
8. Mexican Chicken Soup Recipe
Get the recipe here: Mexican Chicken Soup Recipe
9. Tuna and Bean Salad
Get the recipe here: Tuna and Bean Salad Recipe
10. How to Make Homemade Marinara Sauce in 20 Minutes
Get the recipe here: [[/snack/how-to-make-homemade-marinara-sauce-20-minutes|How to Make Homemade Marinara Sauce in 20 Minutes Recipe]]
Did you discover any new recipes in 2018 that inspired you? Please share.
Source: https://snack-girl.com/snack/best-recipes-2018/

0 notes
Text
Egg Salad Recipe with the Best Dressing
Truly the best Egg Salad Recipe you are going to try with minimal ingredients and so quick to make. Hard-boiled eggs with celery, dill, seasoning and chives in a creamy garlic Dijon mayo dressing make up this classic egg salad. Add this to your Easter menu!
Eggs are are a healthy, high quality protein. We love recipes where eggs are the star ingredient like these incredible Deviled Eggs with Bacon and Egg Muffins.
This post may contain affiliate links. Read my disclosure policy.
Hey, hey! Valentina with Valentina’s Corner sharing an Egg Salad Recipe.
Egg Salad Recipe:
This is easiest egg salad recipe and the perfect way to use up leftover hard-boiled eggs. Eggs with herbs, celery and crisp onion in the creamiest dressing makes for one amazing salad.
Egg salad can be served in so many different ways – as a side salad, on toast, etc (see more ideas below). Adding hard boiled eggs is a great way to pack more protein into Potato Salad, a Pasta Chicken Caesar Salad or Salmon Cobb Salad. This classic salad is simple and just as satisfying, but so much faster to make!
What Goes Into an Egg Salad?
Though this is a simple recipe and uses basic ingredients of eggs, dill, chives, celery and onion in creamy garlic mayo, it tastes amazing. Here are suggestions for other ingredients to add to the salad for a fancier salad:
Protein- such as bacon, chicken or shrimp.
Veggies- tomatoes, cucumbers or carrots are great options.
Avocado- can either be cubed and added to the salad or blended with the dressing.
TIP: If you will be adding other ingredients to the salad, prepare a larger portion of the dressing.
How to Make Egg Salad:
Making a salad doesn’t get easier than this homemade egg salad. Just be sure your eggs have cooled completely before preparing the salad or make them ahead and refrigerate until ready to use.
Hard boil eggs and cool. Once cooled, cut into desired pieces (we like ours chunky)
Finely cube the celery and red onion (sweet onion may be substituted for red onion)
Chop the chives (or green onions) and fresh dill
Prepare homemade dressing
Mix salad well to combine and enjoy!
Are Eggs Good for You?
Eggs are the least expensive high quality protein. They are nutrient dense and will keep you feeling good throughout the day. Egg yolks are rich in choline which is important for brain and liver health. Eggs also contain lutein which benefits eye health. They also have zero carbs and no sugar. Read more below on free-range egg nutrition.
The Best Dressing for Egg Salad-
The dressing in any salad can really make or break a recipe. This awesome creamy dressing adds so much flavor to the simple salad. Eggs never tasted so good!
In a bowl, add the mayonnaise, Dijon mustard, paprika, garlic, lemon juice, salt and pepper.
Mix until the dressing is creamy and ingredients are well incorporated.
How to Serve Egg Salad-
Though the salad may be enjoyed as a side dish, it is rather versatile. Enjoy these other variations to serve Egg Salad:
Egg Salad Sandwich- Serve the egg salad as a sandwich between bread slices, as an open-faced sandwich or even in stuffed in a wrap or pita.
Avocado Egg Salad- Load the egg salad onto a halved avocado.
Lettuce wrap- Add the egg salad to lettuce or Romaine and enjoy as lettuce wraps.
Breakfast sandwich- Load salad onto toast for an easy breakfast sandwich, perfect.
Free Range Eggs Vs. Caged Eggs:
Pay attention to the packaging of the eggs you buy. Free-range hens have been shown to lay healthier eggs and more nutritious eggs* which have a shocking:
1/3 less cholesterol
1/4 less saturated fat
2/3 more Vitamin A
2x more omega 3 fatty acids
3x more vitamin E
7x more beta-carotene
Free range eggs are also 98% less likely to carry salmonella since they are surrounded by better conditions, which is reason enough to buy free-range eggs.
More Egg Recipes to Try:
I can’t wait for you to try this easy Egg Salad Recipe. Once you try it, you are going to make it over and over again!
Egg Salad Recipe
Prep Time: 5 minutes
Cook Time: 15 minutes
Total Time: 20 minutes
The easiest Egg Salad Recipe. Hard-boiled eggs with chives, dill, celery and onion in the creamiest Dijon mayonnaise dressing.
Author: Valentina Ablaev
Skill Level: Easy
Cost to Make: $3-$6
Keyword: egg salad
Calories: 290 kcal
Servings: 4 people
For the Salad:
8 hard-boiled eggs
2 Tbsp celery finely chopped
3 Tbsp red onion finely chopped
3 Tbsp dill chopped
3 Tbsp chives chopped
For the Dressing:
1/3 cup mayonnaise
2 tsp lemon juice
2 tsp Dijon mustard
1/2 tsp paprika
1/2 tsp salt
1/4 tsp ground pepper
1 garlic clove, minced
Cook eggs and cool. Once cooled, peel and chop eggs (we like ours chunky) and place into a salad bowl.
Add finely chopped celery, red onion, dill and chives.
In a separate bowl, combine ingredients for the dressing. Gently stir dressing into the egg salad until coated and serve.
Nutrition Facts
Egg Salad Recipe
Amount Per Serving
Calories 290 Calories from Fat 216
% Daily Value*
Total Fat 24g 37%
Saturated Fat 5g 25%
Cholesterol 380mg 127%
Sodium 565mg 24%
Potassium 146mg 4%
Total Carbohydrates 2g 1%
Sugars 2g
Protein 13g 26%
Vitamin A 16%
Vitamin C 4%
Calcium 5%
Iron 6.9%
* Percent Daily Values are based on a 2000 calorie diet.
If you make this recipe, I’d love to see pics of your creations on Instagram, Facebook and Twitter! Hashtag them #natashaskitchen
*Egg nutrition information sourced from Dr. Axe and The Incredible Egg.

Source: https://natashaskitchen.com/egg-salad-recipe/
0 notes
Text
No Bake Chewy Peanut Butter Granola Bars
These homemade peanut butter granola bars are chewy bars made with oats and honey. Skip the boxed bars and grab these healthy, no bake treats instead.
Granola bars, the Minutemen of breakfast or snack time
You know that feeling of free-floating anxiety, the kind that you can’t quite pin down? For me, it usually comes from a lack of control. And when you’re responsible for the well-being of others (like children), there is so much that’s always going to be out of your control.
Of course, having a refrigerator (or freezer) stocked with all sorts of grab-and-go breakfast snacks doesn’t actually solve whatever is really bothering me. But it does honestly give me a feeling of control.
The older I get, the more I accept that feeling is fact. And having homemade peanut butter granola bars on hand makes me feel like I’m more in control.
These bars not as healthy, of course, as a piece of fruit or, say, a bowl of unsweetened muesli. But the combination of whole grain oats, coconut, protein-packed nut butter and healthy fat from virgin coconut oil means that these bars are way healthier than the boxed kind.
These homemade peanut butter granola bars are chewy as the day is long, don’t require you to fire up the oven, and keep forever in the refrigerator (even longer in the freezer). Like any sort of granola bar, certain ingredients are interchangeable within their particular categories, such as mix-ins (like chocolate chips), sugars (like brown sugar and honey), fats (like virgin coconut oil), aromatics (like vanilla), and bulk (like oats, oat flour and crisp rice cereal).
The art of breakfast and snacking right
Before they head off to school in the morning, I like to make sure that my kids aren’t hungry at all. I know the whole idea of breakfast’s being the most important meal of the day has been debunked, but hunger is distracting. The wait until lunchtime can be long.
When they come home from school, they’re always hungry. I want to make something satisfying available to them. But ever since my kids were little, I’ve been wary of ruining their appetites for dinnertime. It probably isn’t for the virtuous reason you think, though!
Since my kids are (nearly) all teenagers, I’m past the point of expecting that I can expand their palates. They like what they like at this point, and they likely won’t revisit those preferences until long after they’ve graduated from high school.
But a hungry dinner companion is a more forgiving, less picky and overall more pleasant dinner companion. So I want them to eat something filling, but as quickly as possible. That way, they have time to rebuild an appetite before dinner.
Having snacks like these peanut butter granola bars on hand is essential. A granola bar, a piece of fruit or a small yogurt, and my kids are willing to get started on their homework.
I’ll make a double recipe of these and other granola bars or breakfast cookies, and wrap them tightly. When my kids open the refrigerator, they’ll almost always find my stash. Grab … and go.
Ingredients and substitutions
If you have dietary restrictions beyond what is already specified in the recipe, I’ll do my best to help you out in this section. This recipe for homemade peanut butter granola bars is already dairy-free if you use dairy-free chocolate chips, or just leave the chips out.
Peanut butter: I specify a no-stir peanut butter in the ingredients list, which sometimes that causes confusion. All I mean by “no-stir” is the type of nut butter that doesn’t have separated oil at the top of the jar when it’s first opened.
Nut butter that doesn’t need to be stirred is much thicker at room temperature. That’s helpful, especially in a no-bake granola bar. If you’d like to use another no-stir nut butter, like Barney Butter almond butter, I’m confident it would work quite well.
If you’d like to use a simpler, entirely natural nut butter or even a homemade nut butter, you’ll have to experiment. I’m concerned that the bars simply won’t set up. If you’d like to make them without any nut butter at all, please see my recipe for basic no bake granola bars.
Oats: In the U.S., there are certified gluten free oats that are grown on dedicated gluten-free fields and stored in dedicated silos. We use them all the time. I never buy oats that are more processed than old-fashioned rolled oats. For oat flour, I simply grind them in a blender or food processor as finely as possible.
Oats can be replaced in baking. Oat flour should be replaced with quinoa flakes and the old-fashioned oats with beaten rice, but click through the link in the previous sentence for a complete explanation.
Honey: If you can’t have honey or you’d like to make this recipe vegan, you can try replacing the honey with agave syrup or Lyle’s golden syrup. In general, liquid sweeteners should be replaced with other liquid sweeteners of similar thickness, and granulated sugars with granulated ones.
Brown sugar: The brown sugar in this recipe can be replaced with coconut palm sugar, an unrefined sugar. To make sure that it melts properly when heated with the other wet ingredients, try grinding the coconut palm sugar into a fine powder in a blender or food processor first.
How do you handle breakfast and snacks in your house? Even though I’ve been a mom for 16 years, there are definitely tips and tricks that you can share that have never occurred to me. Let’s help each other get through, especially in the mad back-to-school dash!
Source: https://glutenfreeonashoestring.com/peanut-butter-granola-bars/

0 notes
Text
Peach Cobbler (Grain-Free, Gluten-Free, Nut-Free, Egg-Free)
Peach cobbler is the essence of summer! Sweet juicy peaches topped with a fluffy, buttery, cake-like topping that’s just slightly crisp is one of the best ways I can think of to finish off a meal.
I know that peach season is very short, and finding organic peaches can sometimes be a challenge, so you can make this with either fresh or frozen (and thawed) peaches. I made the topping nut-free and if you’d like to make it egg-free, you can make a double batch of my gelatin egg recipe and add it when you add the eggs in this recipe.
Enjoy!
Carrie Vitt
Peach Cobbler (Grain-Free, Egg-Free, Nut-Free, Gluten-Free)
20 minPrep Time
50 minCook Time
1 hr, 10 Total Time
Ingredients
For the peach filling:
3 ten-ounce bags of sliced frozen peaches, thawed (or about 10 cups of fresh peaches, peeled and cut into wedges)
1/3 cup maple sugar or organic cane sugar
2 tablespoons arrowroot flour
1 tablespoon fresh lemon juice
1/3 cup water
For the topping:
1/3 cup coconut flour
1/3 cup arrowroot flour
1/3 cup tapioca flour
1/4 teaspoon ground cinnamon
1/2 cup plus 1 tablespoon maple sugar or organic cane sugar, divided
1 teaspoon baking powder
12 tablespoons cold unsalted butter, cut into tablespoons
2 large eggs, beaten (or make a double-batch of my gelatin egg recipe . I tested the recipe with the gelatin eggs and it works beautifully!)
1 teaspoon vanilla extract
Instructions
Preheat the oven to 350ºF and adjust the rack to the middle position. Place the peaches in a large mixing bowl. Remove about one quarter of the peaches and chop them.
Combine the chopped peaches, maple sugar, arrowroot flour, lemon juice and water in a medium saucepan and heat over medium, stirring constantly until the liquid begins to thicken. Remove from the heat and pour the hot peach mixture over the remaining cold peaches and stir to combine. Pour the peach mixture into an 8 x 11 x 2-inch baking dish and set aside.
Place the coconut flour, arrowroot flour, tapioca flour, cinnamon, 1/2 cup sugar, and baking powder into the bowl of a food processor and pulse to combine. Add the butter and pulse 15-20 times, until it is the size of peas. Add the beaten eggs and vanilla and pulse until the mixture is evenly moistened. Spoon dollops of the dough onto the peaches and sprinkle with the remaining 1 tablespoon of sugar.
Bake for 45-50 minutes, until the topping is just turning golden brown. Cool for 20 minutes and then serve.
<![CDATA[#search_tagsmargin-left:-20px;margin-top:25px;text-align:left#search_tags .tags dtline-height:23px;font-size:12px!important#search_tags .tags spanbackground:#a1a1a1;color:#fff;height:22px;margin:0 6px .375rem 0;padding:0 6px;text-transform:uppercase;display:inline-block#search_tags .tagsdisplay:-webkit-inline-box;width:100%#search_tags .tags .tagdisplay:inline-block#search_tags .tags .highlightedbackground:#01a64f]]>
7.8.1.2
4600
https://deliciouslyorganic.net/peach-cobbler-grain-free-gluten-free/
Copyright 2016 Deliciously Organic
Photo credit: Becky Winkler
Source: https://deliciouslyorganic.net/peach-cobbler-grain-free-gluten-free/
0 notes
Text
This Chain Just Launched Bite-Size Vegan Burgers
This spring, White Castle tested plant-based Impossible Sliders at 140 locations in New York, New Jersey, and Chicago. The pilot program proved uber successful with vegans and meat-eaters alike, and now the chain is offering these teensy burgers for $1.99 each at all 377 White Castle restaurants in the U.S. — making it the very first nationwide fast-food chain to feature the Impossible Burger as part of its permanent menu.
The Best Burger in Every State
“Our Cravers definitely developed a hunger for the Impossible Slider,” CEO Lisa Ingram said in a release. “Sales easily exceeded our expectations. The Impossible Slider is a hit with both loyal ‘Cravers’ and customers brand new to White Castle who are seeking out this buzz-worthy slider.”
We can vouch for that. When the Impossible Sliders first hit test markets, Daily Meal staffers set out to try them alongside real beef sliders for comparison. The vast majority of our editorial are unapologetic carnivores, so some were definitely skeptical at first.
Our reactions were mixed. We all agreed that the Impossible variety actually looked more like a fast-food cheeseburger than the real beef slider did, but we butted heads on taste. One faux-meat hater said, “I will not eat that again. Ever. It was weird and uncomfortable. It does not replace a burger and all it did was make me crave a burger.”
It was also noted that the patties we tested didn’t “bleed” as Impossible Burger marketing suggests. But others enjoyed the taste, especially the two in the group who don’t eat meat.
“I thought it was a fast-food quality veggie burger. I would get this as an alternative to beef if I was forced to eat at White Castle because what other meatless options are there?” one opined. “The one thing I miss about McDonald’s is the burgers, just for the soft bun, American cheese, and tiny pickles. This had those elements without the standard puck of frozen beef.”
Long story short, we give the Impossible Sliders a thumbs-up. It’s a pretty great option for fast-food eaters who don’t want to break the bank. Carnivores on a budget can save a buck here and there too with America’s 10 best burgers for under $10.

Source: https://www.thedailymeal.com/eat/white-castle-impossible-sliders/091218
0 notes
Text
Smoky Chocolate Cigars

Father's Day is just around the corner, and we're hosting a proper cookout for the special guys in our lives. I already have a couple of potluck-style desserts in mind for the day, but I also wanted to make something cute and kind of funny. Inspiration struck when I found a bag of smoky Lapsang Souchong tea in the pantry. Steeped in heavy cream, it makes a marvelous smoked ganache - and it's a fitting flavor for a chocolate cigar!
You won't need a fancy gadget to make these. Waxed paper rolled into tubes makes a simple and effective cigar mold.

You'll need at least two pieces of waxed paper about 20-inches long and 12-inches wide. Roll the paper into a tube 12-inches long with a 1-inch opening, and affix a piece of cellophane tape across the seam to hold it closed. Stand the tubes upright in tall glasses, this will make piping the ganache into the tubes much easier than trying to fill them lying on a counter top.
After a thorough chill in the refrigerator, the ganache will be firm and can be unrolled from the waxed paper. Cut each 12-inch ganache baton into three 4-inch pieces while the chocolate is still cold.
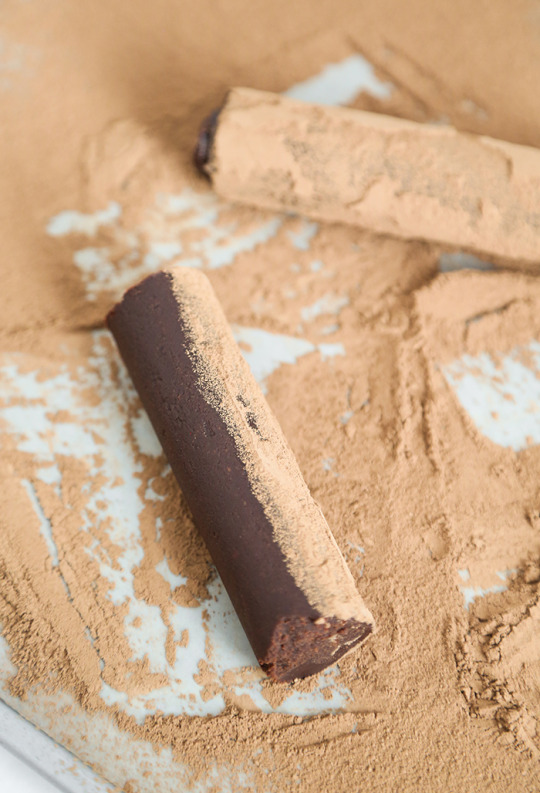
Immediately roll the cigars in unsweetened cocoa powder.

After the cigars are rolled in the cocoa, dip one end in a little more loose-leaf Lapsang Souchong. Use a straight edge (such as the ruler pictured) to make a single diagonal line that runs through the centers of the cigars. This gives them an authentic rolled appearance.


If you're not into the cigar motif, then you can opt to roll the smoked ganache into truffles instead. We had a little leftover ganache after making the cigars, and there was no way it was going to waste. They were quickly rolled into bite-size truffles.

Ganache will become soft at room temperature, so I recommend keeping these cool. Summertime is in full swing here, so I plan to store these in the refrigerator until ready to serve. All of our taste-testers really enjoyed the unique flavor of the smoked tea ganache. I recommend using semisweet chocolate, because it's strong enough to go toe-to-toe with intense smoky black tea.
We found free printable cigar bands online, and printed them at 75% to most perfectly fit the size of our chocolates (you can find them here!). The bands can be fastened with a tiny piece of clear tape where the ends meet. We packaged the banded cigars in clear cellophane, which is a common cigar packaging.
These were so much fun to make, and a light-hearted approach to confectionery. We do not encourage the use of tobacco products, but we do encourage and condone the use of chocolate.
[click to print]
Smoky Chocolate Cigars
Yields 6 cigars and a dozen 1-inch truffles
This recipe uses Lapsang Souchong, which is a smoked black tea. You can find it at well-stocked grocery stores, or it can be ordered online.
1 1/2 cups (360ml) heavy whipping cream
1/4 cup (20g) loose leaf Lapsang Souchong tea, plus 2 tablespoons more for dipping
3 cups (540g) semisweet chocolate, chopped (or semisweet chips)
1/2 cup (65g) unsweet cocoa powder
Heat the cream in a medium saucepan over medium-low heat until steaming but not boiling. Remove from the heat and stir in 1/4 cup of the loose leaf tea. Remove from the heat and steep for 10-15 minutes. Pour the cream through a sieve to strain out the tea. Transfer the cream back into the saucepan.
Return the saucepan to medium-low heat and cook again until steaming but not boiling. Remove from the heat and stir in the chocolate. Let stand for 1 minute. Using a whisk, stir the mixture until a glossy ganache is formed. Let stand at room temperature until the ganache thickens to the consistency of soft, spreadable chocolate frosting. Transfer the ganache to a disposable piping bag with a 1/2-inch hole snipped in the end.
Cut two pieces of waxed paper to 12x20 inches. Roll each piece up from the short side creating a 12x1-inch tube. Affix a piece of cellophane tape across the seam to hold the tube closed. Stand each tube upright inside two tall drinking glasses or tumblers. Place the tip of the piping bag into the opening of one of the tubes and squeeze until the tube is filled with ganache. Rap the glass on the work surface to remove air bubbles or gaps in the chocolate. Fill with more ganache if needed.
Transfer the tubes to the refrigerator to chill, about 3 hours or overnight. You will have a little leftover ganache, so I recommend rolling them into truffles.
Sift the cocoa onto a jelly roll pan, or other baking pan with a lip.
Lightly grind the remaining 2 tablespoons of tea in a mortar and pestle, or crush the leaves between your fingers. Transfer to a small bowl.
Unmold the ganache by unrolling the waxed paper. Cut the 12-inch batons into three 4-inch cigars using a knife or bench scraper. Immediately roll the cigars in unsweet cocoa powder. Dip one end of the cigars into the ground tea. Using a straight edge, such as the edge of a ruler or knife, impress a line diagonally through the center of the cigars to give them an authentically rolled appearance.
Print and cut out cigar bands using an X-acto knife (see blog post for link). Affix to cigars using a small piece of cellophane tape. Wrap cigars individually in cellophane, or package them in an unused (new) cigar box lined with parchment paper.
Keep cigars refrigerated.
link Smoky Chocolate Cigars
By Heather Baird Published: Thursday, June 14, 2018 Thursday, June 14, 2018Smoky Chocolate Cigars Recipe
Source: https://www.sprinklebakes.com/2018/06/smoky-chocolate-cigars.html

0 notes
Text
Yotam Ottolenghi’s seafood recipes
Seafood releases its flavour very swiftly, so is ideal for cooking with grains – pasta, barley, bulgur, rice – because the timings for both the protein and starch are roughly the same. We’re all familiar with boiling grains and serving them with a rich sauce or stew on top, but there’s a lot to be said for cooking them in the sauce itself, so the grains soak up the richness and, in the process, thicken the liquid. Today I have two such stews, plus a quick fritter for when you don’t want to wait.
Mussels and barley with caraway and watercress (pictured above)
This bowl of goodness is somewhere between a stew and a soup. It’s light enough for a summer supper, but also warming when the temperature drops. Serve in the pot at the table.
Prep 5 min
Cook 1 hr 10 min
Serves 4
1 large head of garlic, top fifth cut off to expose the bulbs
80ml olive oil
Salt and black pepper
300g pearl barley
3 banana shallots, peeled and finely sliced
2 tsp caraway seeds
1 lemon – finely shave off 5 strips of peel, then cut into wedges, to serve
½ scotch bonnet chilli
400g cherry tomatoes
1½ tbsp tomato paste
250ml dry white wine
800g mussels
60ml double cream
50g watercress
Heat the oven to 200C/390F/gas 6. Take two cloves from the garlic head and peel and thinly slice them. Drizzle a teaspoon of oil over the rest of the head, and sprinkle with a little salt and pepper. Wrap the head tightly in foil and roast for 40 minutes, until the cloves have softened and turned golden brown. Remove the foil and, when the garlic is cool enough to handle, squeeze out the cloves and discard the skin.
Meanwhile, put the barley in a medium saucepan with plenty of cold water and put on a medium-high heat. Bring to a simmer and cook for 25-30 minutes, until the barley is semi-cooked but still has a good bite to it, then drain.
Put a large saucepan on a medium heat with the remaining 75ml oil, the raw and cooked garlic, shallots, caraway seeds, lemon peel, scotch bonnet and two and a half teaspoons of salt. Fry gently for 10-12 minutes, stirring often, until the shallots are soft and golden brown (turn down the heat if they start colouring too quickly). Add the tomatoes and tomato paste, and cook for eight minutes, until the tomatoes start to break down. Add the wine, 750ml cold water and plenty of pepper, bring to a simmer and cook for seven minutes. Add the barley and cook for eight minutes more, until it has swollen a little in the sauce.
Turn up the heat to medium-high, add the mussels, cover the pan and cook until they open – anywhere between three and six minutes.
Pour over the cream, add the watercress and plenty of pepper, and gently stir everything together. Serve hot with the lemon wedges.
Spicy squid and giant couscous stew
Yotam Ottolenghi’s spicy squid and giant couscous stew. Photograph: Louise Hagger for the Guardian
This dish has just enough sauce and couscous to serve without side dishes. Giant couscous is widely available, but if you can’t get hold of it, use a small pasta such as fregola or orzo instead.
Prep 15 min
Cook 55 min
Serves 4
350g cherry tomatoes
65ml olive oil
1 onion, peeled and finely chopped
3 garlic cloves, peeled and crushed
2 tsp caraway seeds, lightly crushed in a mortar
1 tsp tomato paste
1kg squid tubes, cleaned and cut into 1.5cm rounds
100ml dry white wine
1 tbsp caster sugar
1 x 400g tin chopped tomatoes
20g coriander leaves (about 2 tbsp), roughly chopped
Salt and pepper
100g giant couscous
2 tsp rose harissa
1 small shallot, peeled and finely chopped
½ tbsp cider vinegar
70g pitted kalamata olives, roughly chopped
1 tbsp coriander seeds, lightly crushed in a mortar
1 tsp grated lemon zest
Toss the cherry tomatoes in a teaspoon of oil, to coat. Put a large saute pan on a high heat and, once very hot, add the tomatoes and fry, stirring gently, for five minutes, until their skins are charred and blistered. Transfer to a plate and wipe the pan clean.
Turn the heat to medium-high, add two tablespoons of oil and the onion to the same pan, and cook until softened and lightly browned – about seven minutes. Add the garlic, caraway and tomato paste, and cook, stirring, for a minute, until fragrant. Add the squid and wine, cook for seven minutes, then stir in the sugar, tinned tomatoes, three-quarters of the fresh coriander, a teaspoon and three-quarters of salt and a good grind of pepper. Bring to a simmer, lower the heat to medium and cook for 20 minutes.
Stir in the couscous and cook for 12 minutes, until the couscous is cooked through and the squid is tender, then stir in the harissa and charred tomatoes and cook for two minutes more, to heat through.
While the couscous is cooking, put the shallots, vinegar and an eighth of a teaspoon of salt in a bowl, leave to pickle for 15 minutes, then stir in the olives and remaining fresh coriander. Heat the remaining two tablespoons of oil in a small frying pan on medium-high heat, and fry the coriander seeds for two minutes, until fragrant. Tip into the pickle mixture and stir to combine.
Transfer the stew to a deep serving platter, spoon over the shallot and olive mixture, sprinkle with the lemon zest and serve.
Prawn and corn fritters
Yotam Ottolenghi’s prawn and sweetcorn fritters. Photograph: Louise Hagger for the Guardian
These work in many contexts: with poached eggs for brunch, say, or with a side salad for a light lunch or dinner. You could even turn them into a canapé by making them a third of the size. Makes 12 fritters, to serve as a starter or snack.
Prep 5 min
Cook 15 min
Serves 6 as a starter
350g peeled raw king prawns
140g sweetcorn, fresh or frozen and defrosted
¼ tsp ground cumin
½ tsp ground coriander
½ tsp smoked paprika
¼ tsp chilli flakes
10g coriander leaves (about 2½ tbsp), roughly chopped
1 large egg, beaten
2 limes – zest finely grated, to get 2 tsp, then cut into wedges, to serve
Salt
3 tbsp vegetable oil
Put the prawns and sweetcorn in the bowl of a food processor and give them a quick single pulse, to break them up just a little. Add the spices, coriander, egg, lime zest and a third of a teaspoon of salt, and pulse a few more times until the prawns are roughly broken and the ingredients are mixed together but not turned into a paste. Spoon into a bowl.
Heat the oil in a medium frying pan on a medium-high flame. Once hot, use two dessertspoons to shape half the prawn mixture into six fritters (or more, if making canapés), then drop them into the hot oil and flatten slightly so they’re about 2cm thick. Fry for two minutes on each side (or one minute if making canapé-sized versions), then transfer to a plate lined with kitchen paper and keep warm. Repeat with the remaining prawn mix, and serve warm with a sprinkle of salt and the wedges of lime.
Source: https://www.theguardian.com/lifeandstyle/2018/aug/04/yotam-ottolenghi-seafood-recipes
0 notes
Text
Big Batch Multi-Cooker Cinnamon and Oatmeal
Big Batch Multi-cooker Oatmeal is perfect for back to school or even when you need to serve up or prepare a large breakfast for a lot of people.
I often use the weekends to prepare food for the week. Yes, I have even made larger batches of oatmeal on the weekend to reheat during the week. I don’t like the packages of instant oatmeal, they have a lot of extra ingredients in them, and they also have a lot of sugar. So I like to purchase a better quality of oatmeal and prepare it in a large batch.
Large Batch Oatmeal
For this large batch oatmeal recipe, you could make it on your stove top, or you can make it in a multi cooker. I know not everyone has a full kitchen to prepare food in, and appliance like this could easily take care of a lot of your food preparation needs. For this recipe, I opted to make an apple and cinnamon flavored one. If you are looking for more types of oatmeal recipes, I recommend Oatrageous Oatmeals.
This week I have been testing out the Cosori Multi-Cooker. I was sent this appliance to review, all opinions are my own. If you are unfamiliar with Multi-Cookers, they have been around for a while. I don’t know about you, but I don’t have an infinite amount of space in my kitchen, so I have to really think through small kitchen appliances very well. I love appliances like multi cookers because they can do so many different things.
A multi cooker can
Steam
Slow Cook
Saute
Boil
Brown
Bake
I tested this multi cooker by making hard cooked eggs by steaming them, making macaroni and cheese, and large batch oatmeal. I have been very pleased with the variety of food preparation with this multi cooker.
More foods that would be ideal for a multi cooker
I could easily envision using a multi cooker for the holidays. With large gatherings it’s hard to figure out who is going to use the stove and in what order. With a cooker like this, you could easily make some mashed potatoes, other vegetables, and heat up soups, and cocoa. I have actually brought a device like this to a pot luck, and finished cooking my food while at my pot luck.
This blog post contains an affliate link.
Big Batch Cinnamon and Apples Oatmeal
Make a large batch of oatmeal, this is perfect for a large family, or for when you want to make it ahead of time.
Ingredients
6 cups water
2 cups whole milk do not use skim or 2% milk, it may curdle
4 cups old fashioned oats
1 teaspoon salt
3 teaspoons ground cinnamon
1/2 teaspoon nutmeg
1/2 cup brown sugar
1 1/2 cups chopped apple I prefer granny smith
1 teaspoon vanilla
Instructions
Multi Cooker Instructions
Place the multicooker on boil. Add water and milk, (use whole milk, lower fat milk may curdle). When the milk and water begina to simmer, add the oatmeal, salt, cinnamon, and nutmeg.
When the oatmeal begins to boil add the chopped apple. Cook on a full boil for 7 to 8 minutes. Stir frequently, the oatmeal will scorch if you do not stir.
Add apples and brown sugar, and cook for 3 to 4 minutes more. Turn off the heat.
Add the vanilla and stir in well.
Stovetop Instructions
In a large pot water and milk, (use whole milk, lower fat milk may curdle). Cook on high. When the milk and water begins to simmer, add the oatmeal, salt, cinnamon, and nutmeg.
When the oatmeal begins to boil add the chopped apple. Cook on a full boil for 7 to 8 minutes. Stir frequently, the oatmeal will scorch if you do not stir.
Add apples and brown sugar, and cook for 3 to 4 minutes more. Remove from heat.
Add the vanilla and stir in well.
Nutrition Facts
Big Batch Cinnamon and Apples Oatmeal
Amount Per Serving
Calories 172 Calories from Fat 27
% Daily Value*
Total Fat 3g 5%
Saturated Fat 1g 5%
Cholesterol 4mg 1%
Sodium 221mg 9%
Potassium 180mg 5%
Total Carbohydrates 31g 10%
Dietary Fiber 3g 12%
Sugars 12g
Protein 4g 8%
Vitamin A 1.5%
Vitamin C 0.9%
Calcium 7.7%
Iron 7.1%
* Percent Daily Values are based on a 2000 calorie diet.
Source: https://copykat.com/big-batch-multi-cooker-cinnamon-and-oatmeal/
0 notes
Text
10 Essential Episodes of Anthony Bourdain’s ‘Parts Unknown’
Over the last five years, Anthony Bourdain brought TV viewers to the most interesting places around the world on his award-winning, game-changing CNN show Parts Unknown. And now, following Bourdain’s death last June, the show is sadly coming to a close. The final season of Parts Unknown will wrap up at Bourdain’s old stomping grounds — the Lower East Side of New York City — this Sunday, November 11, in an episode that will explore the people and places that shaped Bourdain as a young adult.
Parts Unknown had a monumental impact on food and travel TV, most notably because it eschewed coverage of tourist attractions, and focused, instead, on artists, thinkers, and doers around the world, with special attention paid to disenfranchised communities and their hopes for the future. Some episodes were intense, others lighthearted, but the show was always essential viewing.
Here’s a look back at 10 episodes that defined the series, in chronological order:
“Peru”
(Season 1, Episode 7; original air date June 2, 2013): Anthony Bourdain and Eric Ripert let their bromance blossom on camera throughout the filming of Parts Unknown, and, tragically, they were actually shooting a new episode together when the Kitchen Confidential author died in France over the summer.
The Peru episode from Season 1 sets the tone for future adventures to come: The friends eat amazing meals while discussing the great mysteries of the human experience, all the while pushing each other outside of their respective comfort zones. In this case, Bourdain brings his gentlemanly pal to an ancient erotica museum, while the chef coaxes his sarcastic friend into participating in a ceremonial blessing from a local shaman. Along the way, the friends eat Amazon-inspired cuisine at Amaz, sizzling beef hearts on the streets of Lima, and a rustic hen soup at a market in the mountains.
Bourdain and Ripert actually have a bit of business to accomplish on this trip: They hike up to the Andes to meet farmers who are harvesting the cocoa that’s used in the duo’s gourmet chocolate bars. The friends are clearly inspired by working with the farmers, but this experience only leads to more questions. “Do I wanna be in the chocolate business?” Bourdain remarks at the end. “That’s something I’m gonna have to figure out.”
“Lyon”
(Season 3, Episode 3; original air date April 27, 2014): While visiting France’s second largest city, Bourdain and his pal, New York City chef Daniel Boulud, eat their way through tiny bistros, learn the art of sausage-making from a charcuterie expert, and spend a weekend in the company of a proper culinary legend.
The duo’s visit to Paul Bocuse’s eponymous restaurant, where Bourdain, Boulud, and the late Bocuse dine on the legendary French chef’s greatest creations, is arguably the best food sequence in the entire series. Tony refers to this feast as “the meal of my life,” emphasized by his reactions on camera. Later, Bourdain and his chef friends go duck hunting and enjoy a hearty lunch in Bocuse’s lodge out in the country. The episode ends with another rustic family meal, this time with Boulud’s parents at their home just south of the city.
The Lyon episode shows Tony fully enjoying himself in the company of a great friend, while also offering a concise history of the last century of French cuisine.
Read Eater’s full recap here.
“Iran”
(Season 4, Episode 6; original air date November 2, 2014): Throughout its 12 seasons, Parts Unknown often showed audiences what life was like in places that aren’t often featured on Western television: The Iran episode is arguably the most important one in that regard. “All I can tell you is, the Iran I’ve seen on TV and read about in the papers, it’s a much bigger picture,” Bourdain remarks. “Let’s put it this way: It’s complicated.”
Bourdain is immediately surprised by the warm welcome he receives everywhere he goes, and he’s delighted by the hospitality that his hosts extend toward him, especially in their homes. He visits bustling markets, centuries-old places of worship, and parts of Tehran where the locals unwind. Tony also memorably chats with married journalists Jason Rezaian and Yeganeh Salehi about the local way of life. As noted at the end of the show, Rezaian and Yeganeh were both imprisoned shortly after filming this episode in 2014; Salehi was released after a few months, but Rezaian was kept in an Iranian prison until 2016. Bourdain remained a vocal advocate for Rezaian until his release.
After the TV host died, Rezaian told CNN: “The show actually had nothing to do with us being arrested, and if anything I think our appearance there — with really one of the most beloved television personalities, and people, of our generation — raised awareness in a different kind of way that nothing else could have.”
Read Eater’s full recap here.
“Massachusetts”
(Season 4, Episode 7; original air date November 9, 2014): A large chunk of this episode features Bourdain visiting his old haunts from when he was a young, aimless chef bumming around Provincetown. “[I] pretty much had my first everything on the beach,” he says while standing outside of a boarded-up seaside apartment in P-Town. But the real heart of this episode is its second half, when Tony heads west to learn about the opioid epidemic devastating small towns throughout the state.
Tony meets with an undercover narcotics division cop and one of his anonymous sources, as well as a young woman who has stepped back from the brink of heroin addiction and is constantly looking out for addicts in need of help. Tony knows these struggles all too well: One of the episode’s last scenes shows Bourdain talking to a group of recovering addicts about his own past drug use. “I’ll tell you something really shameful about myself,” Bourdain remarks. “The first time I shot up I looked at myself in the mirror with a big grin.”
Read Eater’s full recap here.
“Hanoi”
(Season 8, Episode 1; original air date September 25, 2016): Bourdain clearly loves the capitol of Vietnam, a city he says “grabs you and doesn’t let you go.”
On this very special episode, Tony gets to introduce President Barack Obama to one of his favorite Hanoi activities: eating the pork and noodle dish bun cha and drinking local beer from the bottle. During their convivial meal at a small noodle shop outfitted with stools and tiny tables, Bourdain and Obama discuss the sensory elements of travel, the dining habits of their children, and whether or not it’s ever acceptable to put ketchup on hot dogs (Obama deems that it’s “not acceptable past the age of eight”).
Elsewhere in the episode, Bourdain eats streetside snails in the Old Quarter, and freshly caught squid aboard a steamer ship. The host also chats with a family in a floating fishing village about how the culture and economy in Vietnam are always changing.
Read Eater’s full recap here.
“Houston”
(Season 8, Episode 5; original air date October 30, 2016): Bourdain enters Houston with a goal of ripping up the white-washed image of the city that often finds its way on TV — the one that leans into cowboy hats, the oil industry, NASA, and football. “Close minded, prejudicial, quick to make assumptions about places different than where we grew up,” Bourdain says in the episode’s intro. “I’m talking about me and people like me who are way too comfortable thinking of Texas as a big space filled with intolerant and variably right-wing white people waddling between the fast-food outlet and the gun store.”
During his stay, Bourdain meets with the owners of the Acapulco Ballroom, a popular quinceañera venue for the local Mexican-American community. He visits high school principal and Vietnamese refugee Jonathan N. Trinh, who oversees a student body that hails from 70 different countries. He hangs out with local hip-hop star Slim Thug and learns about local “slab” car culture. And he ends his trip by visiting the Houston Indian Cricket Club, where the game day snacks involve tandoori chicken and “some spicy, tender, and totally delicious curried goat, and made-to-order potato masala dosas.”
Read Eater’s full recap here.
“Rome”
(Season 8, episode 9; original air date December 4, 2016): In a clear homage to filmmaker Pier Pasolini, the Rome episode showcases the working-class neighborhoods of the Eternal City. “This is about people, often extraordinary ones, living their lives in the Rome you don’t see much in the travel guides or TV shows,” Bourdain says at the start of the show.
It’s here, on camera, that Bourdain meets his future girlfriend, filmmaker/actress/activist Asia Argento. They go to a boxing arena where spaghetti is served to attendees during the match. Argento brings him to her home, where they enjoy a rustic meal with her family. And later, they go ambling among the Brutalist ruins of the Mussolini area. Like many of the best episodes of Parts Unknown, Bourdain seems creatively charged by the people and places he meets along the way.
“Rome is a city where you find the most extraordinary pleasures in the most ordinary things,” Bourdain says while dining in a trattoria, “like this place which I’m not ever going to tell you the name of.”
Read Eater’s full recap here.
“Los Angeles”
(Season 9, Episode 1; original air date April 30, 2017): The first Parts Unknown episode to air during the Trump administration is a passionate celebration of LA’s Latinx community, and the immigrant workers who drive so many of the city’s industries. “Los Angeles, like much of California, used to be part of Mexico,” Bourdain says in the intro. “Now Mexico, or a whole lot of Mexicans, are a vital part of us.”
Bourdain meets with community activist Elisa Sol Garcia, tattoo artist Mister Cartoon, actor Danny Trejo, and MMA fighters Nick and Nate Diaz. Throughout his LA sojourn, the host samples some of the city’s myriad Mexican specialties, from tongue tacos to traditional Oaxacan moles to Ray Garcia’s modern cuisine at Broken Spanish, all the while emphasizing the importance of Latinx chefs in the American food scene.
“I worked in French and Italian restaurants my whole career, but really, if I think about it, they were Mexican restaurants and Ecuadorian restaurants, because the majority of the cooks and the people working with me were from those countries,” Bourdain remarks. “That’s who, you know, picked me up when I fell down; who showed me what to do when I walked in and didn’t know anything and nobody knew my name.”
Read Eater’s full recap here.
“Laos”
(Season 9, Episode 4; original air date May 14, 2017): Although he eats some terrific local delicacies in this episode — including steaming bowls of khao soi and charcoal-grilled squid skewers — the majority of Bourdain’s visit focuses on the tragic story of how Laos became “the most heavily bombed country per capita in the history of the world.”
Tony spends a lot of time in Hmong villages discussing the bomb clean-up from the war, and sees, first-hand, why it’s so difficult to remove the unexploded ordnances. Bourdain also explores the country’s complicated relationship with the United States, and meets the aid workers trying to help the country bounce back. “Here, on one hand, we have Americans dropping bombs that at the time blow this child up, and then there are American doctors to put them back together,” Bourdain says.
Read Eater’s full recap here.
“Kenya”
(Season 12, Episode 1; original air date September 23, 2018): A big part of Bourdain’s appeal on Parts Unknown is that he seemingly lived an enviable life, bouncing around the world, surrounded by fascinating people and delectable things to eat. And the joy of this episode is seeing a bona fide Bourdain fan — fellow CNN host W. Kamau Bell — join him on one of his adventures for the very first time.
Tony is a benevolent traveling companion, imparting various bits of wisdom to Bell on his first trip to Africa, and the United Shades of America host seems thrilled to be rolling with Bourdain and experiencing the local culture for the first time. While sitting atop a mountain on safari, with a drink in hand, Bell turns to Bourdain and says, “The idea that I’m sitting here with you doing this now, knowing where my life and career have come, it’s pretty cool.”
The Kenya episode was the first to air since Bourdain’s death, and the last to feature his full participation. It’s a great way to remember this TV legend, particularly because Bell’s commentary highlights the reason why audiences loved Bourdain so much throughout his career: He kept exploring, never talked down to anyone, and always brought us along for the ride.
Read Eater’s Full recap here.
Eat, Drink, Watch.
Food entertainment news and streaming recommendations every Friday
By signing up, you agree to our Privacy Policy and European users agree to the data transfer policy.
Source: https://www.eater.com/2018/11/10/18079924/anthony-bourdain-parts-unknown-cnn-best-episodes

0 notes
Text
10 Smart Costco Products This Busy Mom Always Buys in Bulk
As a food writer and recipe developer, I’m also by default a professional food shopper. I have all kinds of user-generated algorithms in my mind about where I like to buy certain things, how much I want to spend on them, how much of them I want to keep on hand, and so on. Even though I need to shop continuously for my job, and, like many people, I have a family who needs to be fed, I still get a little adrenaline rush when I food-shop. And thank goodness, because it’s a pretty big part of my life.
More from Food52
I’m also a little bit of a hoarder. When I see only four rolls of paper towels in the closet, I start to feel a little frisson of panic. But buying things in bulk has its pros and its cons. The pros include being stocked up for a long time, and usually saving some cash when you compare prices by weight, volume, or unit against smaller packages. The cons are buying too much of something, which can be problematic in terms of storage space (especially for those of us city-dwellers), and also spoilage (it feels so wasteful to throw away half of a 64-ounce container of sour cream just because it was a little cheaper per ounce than the smaller tub).
Few places challenge our abilities to bulk-shop smartly like Costco. The choices range from necessary to enticingly impulse-purchase-y, and the size of the packages is usually large to ginormous. But there are some items I have no qualms about piling high in my cart on repeat. Your list of Costco stocker-uppers will surely vary from mine, but these are the items that I most often load up on.
1. Broth
There are a variety of brands sold at Costco, and a variety of sizes, from big 50-ounce cans to packs of smaller 32-ounce cartons or multipacks of 14.5-ounce cans. The options often include chicken, beef, vegetable, organic, and less-sodium. I use gallons of broth every week—in soups, stews, sauces, and casseroles. You name it. If it’s savory and hot, there might well be broth in it. I like to keep an assortment of sizes of cartons and cans on hand for various recipe needs.
Want to make a rich, semi-homemade chicken stock? While you're there, buy a rotisserie chicken (one of Costco’s most famous products for quality and price—$4.99!), have it for dinner and use the carcass and some of that store-bought broth to make delicious, mahogany-colored stock. Add ramen (without the seasoning packet) and any leftover shredded meat from the rotisserie chicken to make the world’s easiest chicken noodle soup.
2. Canned Tomatoes
There are often several versions available—whole, crushed, diced, paste, and sauce. I buy these in two sizes: the mega cans (6.6 pounds) and the eight-packs of everyday 28-ounce cans. The big cans are for huge batches of pasta sauces, like bolognese or marinara (which I love to freeze), and for when I’m throwing the occasional lasagna party. The smaller sizes are for day-to-day cooking, for recipes like my One-Skillet Cheesy Beef and Macaroni or Fragrant Chicken Tomato Soup. Costco can carry a variety of brands. Last time I got eight 28-ounce cans of Tuttorosso crushed tomatoes for $6.39 (about 80 cents each). Or if you want to splurge on the San Marzano tomatoes, those can be bought for $8.99 for a three pack of 28-ounce cans.
3. Parmesan
If you cook with real Parmesan regularly, then you know that this cheese is a) expensive and b) worth it. But the wedge Parmesan carried by Costco is a mere $10.59 per pound (some versions even less). Plus, it lasts for months when properly stored, and you can grate it freshly as needed. Perfect over salads, pastas, or this simple, four-ingredient creamed kale .
4. Boneless, Skinless Chicken Breasts
Costco makes it easy to buy their chicken breasts in bulk because they come in connected, perforated six-packs, each containing about 1.5 pounds of chicken breasts (9 or so pounds total). This allows you to open and use as many sections as you want and leave the rest perfectly sealed. These sealed packages can also go right into the freezer, and are easy to pull out and defrost in the fridge as you need them. They're $2.79 per pound, and also available in organic form for $4.99 per pound. Organic boneless, skinless thighs are $3.99 per pound, packaged in the same way (for some reason the boneless thighs are only available in an organic version).
Whatever the recipe—whether it's grilled chicken breasts, marinated kebabs, or rolled cutlets, you'll know that you're set because you've got some bulk chicken hanging out in the freezer.
5. Hearts of Palm
This is a weird one, I know, but I love hearts of palm dearly—and they can be very pricey! Since they come canned or jarred, they last for years. But because I add them to as many salads as I can and eat them by the handful as a snack, I can never have too many jars in stock. (Hearts of palm were also my pregnancy craving—I ate them every day while I was gestating Charlie.)
6. Peanuts
Okay, well, for those of you without allergies to tree nuts, I guess this would translate to ALL nuts. I'm only able to eat peanuts, though, and my family eats a lot of them. Luckily Costco has quite a number of ways for us to sate my peanut fix in a more economical way: The most important buy is the 48-pack of 1-ounce Planters salted peanut packs. I know you can do even better price-wise when you buy larger containers, but I appreciate the individual packages because they help me keep track of how many peanuts I'm inhaling. They're also terrific protein-filled snacks to keep in my bag when I'm on the go.
I also love the 2 1/2–pound canister of Kirkland Super Extra Large Peanuts, which are impossible to resist at just $6.69—but you need some serious self-discipline with these in the house, or a lot of peanut loving friends. Or just whip up a batch of cookies.
7. Cooking Spray
Sometimes you can find their house brand of cooking spray, Kirkland, which is very well priced. But even if they're only carrying classic Pam, you're going to save some real cash. Two 12-ounce cans are $6.99 at Costco, compared to about $4 to $5 for a single 8-ounce can at a standard national supermarket. And cooking sprays last forever, both in terms of spoilage and in terms of use. A critical staple to keep on hand for all manner of baking projects.
8. Pure Vanilla Extract
If you're a baker (or you're a reluctant one because your kids go to a bake-sale heavy school), then you'll immediately realize what a great price you’re getting for their big 16-ounce bottle of vanilla extract. $34.99 is a total steal, it lasts for years, and the quality is great—pure vanilla, not artificially flavored (which is not worth using even if it’s free, by the way). Elsewhere, a 1-ounce bottle of a leading national vanilla brand might be closer to $6 or $7, which would translate to almost over $100 if you were to buy the same amount of vanilla, or 16 of those little bottles. Startling, huh? Now you won’t need to hesitate before baking up a batch of oatmeal or chocolate chunk cookies.
9. Aluminum Foil
I have what can only be termed a deep, meaningful relationship with my oversized role of Kirkland Signature Reynolds Foodservice Foil. 12x1000 feet of aluminum foil may not be what everyone needs in their house, but if you regularly line baking sheets and wrap brownies for freezing (before sliding them into zipper-sealed bags of course), then you can seriously save a large amount of money by purchasing this mega-roll. I buy about one of these a year for $27.99, and that carries me right on through.
10. Prosciutto
While I know that you can’t stock up on prosciutto the way you can on paper towels or aluminum foil, a sealed package will last for four whole months, so you can certainly buy for the future. And it just so happens that my kids' favorite sandwich is prosciutto and mozzarella on a baguette. On my last visit to Costco, a 1-pound sleeve of Citterio prosciutto was priced at $9.99. Suddenly indulgences like prosciutto-wrapped shrimp and this easy party appetizer seem much more accessible.
What do YOU like to buy in bulk at Costco? Let us know in the comments below.
This post is an unsponsored grocery-store love letter.

Source: https://food52.com/blog/23614-best-costco-products-to-buy-in-bulk
0 notes
Text
5 Ingredient Chocolate-Covered Peanut Butter Cereal Bars
My 3 Ingredient Peanut Butter & Honey Cereal Bars are by far my most popular recipe on Pinterest. I’ve been wanting to make a different version for a while now, and adding chocolate was a no-brainer.
I went back and read through a bunch of the comments on Pinterest, and although the overwhelming majority of them were positive, every once in a while I saw one that said the bars were too sweet and/or too gooey/sticky. For this version, I increased the amount of cereal and decreased the amount of honey. The chocolate layer helps to hold the bars together, but be forewarned: if not chilled, the bars WILL fall apart easily, so they are best eaten straight from the fridge or freezer.
When chilled, the cereal base stays crunchy with a lightly sweetened peanut butter flavor, and there’s just enough chocolate blanketing the top to deem the bars dessert-worthy.
Check out the subtle marble-like swirled effect of the coconut oil running throughout the chocolate!
If the classic chocolate & peanut butter combination is your weakness, (like it is mine), then these bars are a healthy way to indulge.
5 Ingredient Chocolate-Covered Peanut Butter Cereal Bars

by Lauren Zembron
Prep Time: 10 minutes
Cook Time: 0 minutes
Ingredients (16 bars)
1/2 cup natural unsweetened peanut butter (the only ingredients should be peanuts and salt), preferably organic, well-stirred
1/4 cup honey
4 cups toasted whole grain oats cereal (I used Cheerios)
2/3 cup dark chocolate chips
2 tsp unrefined virgin coconut oil
Instructions
Line an 8 x 8 inch square baking pan with parchment.
Combine peanut butter & honey in a large saucepan and set over medium heat. Heat until the ingredients melt, then remove from heat and stir until mixture is well combined. You may also melt the ingredients together in the microwave for 20-30 seconds.
Stir in cereal until evenly coated. The peanut butter & honey mixture will clump up, so make sure you thoroughly stir until the cereal is evenly coated. I found a metal spoon to be helpful.
Pour mixture into prepared pan, cover with parchment, and press firmly. A pastry roller will help to firmly and evenly pack down the mixture so the bars hold their shape. Make sure to really press down to ensure the mixture sticks together.
In a small microwave safe bowl, combine the chocolate chips and coconut oil. Heat for 30 second, stir, then heat for another 30 seconds. If still not melted, heat for an additional 15 seconds. Stir until fully melted and smooth. Evenly spread over the cereal mixture. The chocolate will form a thin layer.
Chill in the refrigerator for 1 hour or in the freezer for 30 minutes. Carefully cut into bars. Store individually wrapped in the refrigerator or freezer. If left at room temperature, the bars will not stick together as well as if they’re kept chilled.
Source: http://www.healthyfoodforliving.com/5-ingredient-chocolate-covered-peanut-butter-cereal-bars/
0 notes
Text
The Happiness Report #39
My happiness report is a collection of things currently making me happy, for the week ending September 1st 2018.
Dear friend,
Happiness Reports! Remember these? My goodness it’s been a long time since I’ve done one of these posts. I was actually looking through some old blog posts and kept coming across my old Happiness Reports. Each time I’d read through one it made me so, incredibly happy. It’s really too bad that the things that make me the happiest tend to get pushed away by things I’m obligated to and that are necessary. Well, with my new blogging mantra, that’s no more. I’m saying YES to more happy, which includes sharing these happiness reports with you!
Here’s a list of things making me happy, lately:
This recipe…first of all it felt so good to share a recipe on here again with you AND most of the ingredients came from Ella’s garden!
Speaking of Ella’s garden (which makes me SO happy), my friend Adele shared her secret, award winning dill pickle recipe with us and Ella canned her first pickles. We waited the suggested 3 weeks to taste and tried them today and they were AMAZING. I was so intimidated to try and make them, but Ella was a pro and I was so impressed with how easy pickles are to make and how good they are!
I taught Ella how to Bullet Journal today and she loved it. In the process, we discovered this resource and were totally inspired and amazed.
Everyone needs a Wally in their life, don’t you think?
Who knew adding sour cream to these would make them so darn good? I may not make them any other way from now on. A definite must try.
I kind of suck at setting goals, but I like how this guys idea makes it a little less daunting.
I started a new job a couple weeks ago (I’m actually working for the owner I worked with before Leah was born). It’s been a little bit of an adjustment, but I have to tell you how nice it feels to be productive and actually feel like my brain still works just fine. This working mom and her “keep it real” attitude has been serving as inspiration
This is one of the best articles I’ve ever read on the importance of slowing down. A definite must read.
Finally, if you are searching for more happy in your life, make sure to watch my “Coffee Talk” series most every Tuesday and Thursday on Instagram Stories. Getting to know you all better through our “chatting as if we’re actually having coffee together” dates makes me so happy. Come for the chat, stay for the good news story! Find past chats (and good news) under my Coffee Talk highlight button on Instagram.
That’s it, friends. Now I’d like to hear back from you…it’s the favorite part of my week. What’s making YOU happy lately? I look forward to your response.
I hope you all have a wonderful extended weekend. Take some time to make happy memories!
All the best,
Kristen
Source: https://dineanddish.net/2018/09/the-happiness-report-39/
0 notes
Text
A Taste of Maple Bourbon Eggnog: Clover Sonoma Santa Clo Tour
Say cheers to the holidays with a sip (or two!) of exceptional eggnog — Santa Clo is coming to town with Maple Bourbon Eggnog to share! This post is sponsored by Clover Sonoma.
While the big guy is busy making his list and checking it twice up in the North Pole, down here in Northern California, there’s someone very special coming to town! Here are a couple of hints: this someone special is a SHE, is white with black spots (or is it black with white spots?), and is ready to say ho ho ho with us with a holiday classic!
Can you guess?
Clo, the friendly cow from our friends at Clover Sonoma, is getting in the holiday spirit and will be traveling in her sleigh adorable Clover truck all over Northern California!! She’ll be fashionably dressed in her full Santa suit and pouring her Maple Bourbon Eggnog, as well as Organic Eggnog to spread some holiday cheer!
Plus, she’s embracing the full spirit of Christmas by supporting some special charities, and you can help! Simply snap a holiday photo with Santa Clo! For every Santa Clo photo sent to your email, Clover Sonoma will make a $1 donation to one of these charities of your choosing:
CUESA: CUESA (Center for Urban Education about Sustainable Agriculture) is dedicated to cultivating a sustainable food system through the operation of farmers markets and educational programs.
Variety Children’s Charity: Variety – The Children’s Charity of Northern CA is dedicated to delivering life-enriching services and needed funds that build better futures for the children of Northern California, from the Oregon state line down to Bakersfield.
Redwood Empire Food Bank: The Redwood Empire Food Bank is the largest hunger-relief organization serving north coastal California, from Sonoma County to the Oregon border.
What a fun way for all of us to help Santa Clo raise money for these worthy causes! Be sure to check out where Santa Clo will be stopping for her next holiday parking lot party!
A Taste of Maple Bourbon Eggnog
If you can’t make it to meet Santa Clo in person, not to worry! You can still get in the holiday spirit at home with Clover Sonoma’s newest eggnog (and my new personal favorite!). Their Organic Maple Bourbon Eggnog combines their traditional creamy eggnog with the sweetness of maple and a dash of bourbon flavor. And if you need a little extra wamth, add a dash of cozy by BYOB – Bring Your Own Bourbon!
Organic Maple Bourbon Eggnog is based on a founder’s recipe, that includes special holiday spices and uses clean ingredients that contain no carrageenan, cornstarch or corn syrup. Can you think of a better way to add a little extra holiday cheer? All you need are some twinkly lights, a crackling fire, and the ones you love!
Pick up Organic Maple Bourbon Eggnog and the entire line of Clover Sonoma eggnogs at fine retailers like Save Mart, Lucky, Nugget, Oliver’s Markets, Mollie Stone’s, Lunardis, Draegers and New Leaf!
Disclosure: This post is brought to you in partnership with Clover Sonoma. Thank you for supporting brands that matter to me; sponsored posts such as this help behind the scenes at Kitchen Confidante. All opinions in this post are, as always, my own.
Toast the holidays with a glass of Maple Bourbon Eggnog, inspired by Clover Sonoma's founding fathers.
1 quart Clover Sonoma Organic Eggnog
1/4 cup maple syrup (to taste)
1/2 cup bourbon (or brandy or cognac)
1/4 teaspoon cinnamon
whipped cream for garnish
nutmeg for garnish
Pour eggnog into a punch bowl or pitcher. Whisk in maple syrup and bourbon, adding more or less to taste, along with cinnamon. Serve chilled with whipped cream and a dusting of nutmeg.
Recipe lightly adapted from Clover Sonoma's Founding Fathers Eggnog Recipe.
Nutrition Facts
Maple Bourbon Eggnog
Amount Per Serving (1 serving)
Calories 277 Calories from Fat 81
% Daily Value*
Total Fat 9g 14%
Saturated Fat 6g 30%
Cholesterol 139mg 46%
Sodium 128mg 5%
Potassium 390mg 11%
Total Carbohydrates 19g 6%
Sugars 19g
Protein 10g 20%
Vitamin A 9.7%
Vitamin C 4.3%
Calcium 30.8%
Iron 2.6%
* Percent Daily Values are based on a 2000 calorie diet.
Source: https://kitchenconfidante.com/maple-bourbon-eggnog-clover-sonoma-santa-clo-tour
0 notes
Text
Clean Eating Instant Pot Cauliflower Sweet Potato Mash Recipe
Cooked up on September 4, 2018
This clean eating Instant Pot cauliflower sweet potato mash is the perfect side dish for almost any comfort food.
If you love comfort foods like meatloaf and other such dishes that require mashed potatoes as a side dish, then I’ve got a fabulous recipe for you today!
No longer do you have to have the same ol’, same ol’ mashed potatoes. These totally kick things up a notch!
WHY GIVE THIS A TRY?
Sweet potatoes are far more nutritious then white potatoes
Sweet potatoes are far easier on your blood sugar then white potatoes
This recipe sneaks in a secret ingredient that is totally nutritious. Cauliflower!
No, you won’t taste a bunch of cauliflower. The predominant flavor is the sweet potatoes.
If you have little ones at home, this doubles as a totally delicious and nutritious baby food!
It has the same consistency as mashed potatoes, but tons more flavor.
Easily double this recipe for more servings of deliciousness.
Made in and Instant Pot, it’s a “set it and forget it” type of recipe.
With minimal prep, this “one-pot-meal” is quick and easy and packed with both flavor and nutrition. And yes, it’s absolute comfort food. Yum!
MY INSTANT POT:
I love the 7 in 1 because it has a yogurt-making feature. I haven’t made any yet, but I love that I have the option!
(affiliate link)
YOU MIGHT ALSO ENJOY THESE CLEAN EATING RECIPES:

CLEAN EATING INSTANT POT CAULIFLOWER SWEET POTATO MASH RECIPE:
Clean Eating Instant Pot Cauliflower Sweet Potato Mash
A delicious side dish for almost any meal. Great with meatloaf or even as a deliciously nutritious jar of baby food!
Course: Side Dish, Vegetables
Cuisine: American
Yield: 7 servings (approximate)
Calories: 86 kcal
Author: The Gracious Pantry
Ingredients
1 tbsp. oil
1/2 cup chopped red onion
3 medium garlic cloves (chopped fine)
3 cups peeled and chopped sweet potatoes
12 oz. riced cauliflower (fresh or frozen)
1 cup vegetable broth (no sugar added
salt to taste
butter to taste (I used vegan butter, but either will work. Optional, but tasty!)
Instructions
Pour the oil into the IP insert and press the Saute button.
Add the onions and saute until the onions become translucent and slightly browned. Add the garlic and cook for about 30-60 additional seconds.
Press the off button and add in everything else to the onions. Stir and place the lid on the pot securely. Clove the vent as well.
Press the Manual button and adjust the time to 10 minutes.
When the cooking is done, do a quick release and remove the lid, opening away from you to avoid any steam burning your hand or arm.
Using a hand blender, blend the ingredients until smooth.
Season with a little salt and butter to your liking and serve.
Recipe Notes
Please note that the nutrition data below is a ballpark figure. Exact data is not possible.
Nutrition Facts
Clean Eating Instant Pot Cauliflower Sweet Potato Mash
Amount Per Serving (0.5 cup)
Calories 86 Calories from Fat 18
% Daily Value*
Total Fat 2g 3%
Sodium 180mg 8%
Potassium 354mg 10%
Total Carbohydrates 15g 5%
Dietary Fiber 2g 8%
Sugars 4g
Protein 1g 2%
Vitamin A 163.2%
Vitamin C 31.2%
Calcium 3%
Iron 3.1%
* Percent Daily Values are based on a 2000 calorie diet.
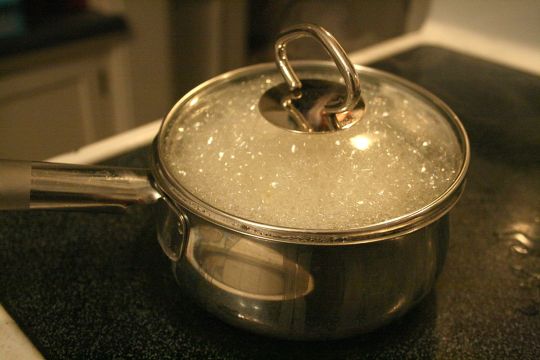
Source: https://www.thegraciouspantry.com/clean-eating-pressure-cooker-cauliflower-sweet-potato-mash-recipe/
0 notes
Text
Uganda – Africa’s Current Hotspot
When you think of the continent of Africa, it’s easy to think of the old standby countries like South Africa, Kenya or Ethiopia – all countries that either have made a splash in the news in the past or are already well established tourist hot spots. It’s unlikely you’d rush to mention some of the other up and comers such as Zambia, Botswana, or Uganda, but you should! With so much to see and do they’re fast becoming huge hot spots with backpackers, flashpackers and luxury travellers alike. But which should you check out? Here are a couple of reasons why Uganda is currently Africa’s number one hot spot.
The Cities
There’s only one official city in Uganda – the capital, Kampala. Kampala is your typical bustling African capital featuring maze-like streets, curious tin roof markets such as the Kampala market and a whole host of bars and restaurants that range from local holes in the wall all the way up to posh five star luxury eateries. A huge number of NGO’s operate out of Kampala, giving the city a huge expat base and an international vibe. There are a great number of outdoor based things to do in Kampala as well, including river rafting and boating safaris along the shorelines nearby.
The Countryside and Towns
The countryside of Uganda is lush and dotted with subsistence farms, villages and larger towns. Some of the larger towns are well worth a visit, such as Jinja at the base of the Nile River. An absolute must see in Jinja is the Jinja market – a crowded network of colourful shacks that offer up every manner of item that you can imagine. Quite honestly when it comes to Jinja market, you can find it all. The town is a hotspot with backpackers and adventure travellers who come for the rapids and other outdoor sports. It’s also located right on the East African Highway, so if you’re going by road to neighbouring countries, this is a great stop off for a day or six to experience the more rural side of Uganda.
The Safaris
Options for going on safari in Uganda are, hands down, some of the best in Africa. With numerous national parks to choose from such as Ajai, Kidepo, Bwindi, Mgahinga, and Murchison Falls the options for locations to see truly stunning wildlife are nigh on endless. Gorilla tracking is popular in Uganda, and permits to see these magnificent creatures in the wild can be obtained from the Uganda Wildlife Authority prior to arrival. In fact, they must be obtained prior to arrival as they sell out extremely quickly due to not just the popularity of the trek, but the significantly limited numbers of permits given out to help in conservation efforts.
So if you’re looking for an African country that has it all, consider Uganda. Touted as one of the safest countries in eastern Africa it’s no wonder it’s becoming the next big thing in terms of tourism. While the infrastructure still needs a sprucing up, there are enough higher rated hotels, guesthouses and restaurants for discerning travellers to whet their African appetites in this up and comer. Don’t miss out!
Source: http://kissmyspatula.com/africa/uganda-africas-current-hotspot/
0 notes