
Last Seen Blogs

ruem
RU

matburitsblog-blog
Untitled

jjaebum
미친거 아니야?

zerogravsk8r-blog
(1)-877-fin-esse

vaxstoleallmycriticals
Just all the niche fandoms
Text
Family Road Trip - Amarillo, Durango, & Telluride
Hello there! Remember me?! I'm the girl who used to blog semi-regularly. Now we're lucky if I even remember my password to get on this thing! Ha! All that to be said, I've taken a break from both of my blogs to truly enjoy the summer with my family. I wanted this summer to be all about family and that it has. #noragrets
We just got home from a two week vacation in Colorado. I received several messages regarding our trip....where did we stay? what did we do? where did we eat? SO...I thought it would be easiest just to update our travels here and dust the old cobwebs off this site. Today's post will highlight some of our favorites in Amarillo, TX, and Durango & Telluride, CO. Tomorrow will be all about my most favorite place in the world...Breckenridge!!!
We started out early on a Sunday morning and headed west for the first leg of our trip. We originally planned on spending two weeks in Breckenridge, but at the last minute we changed up our plans and decided we wanted to see a few things we've never seen before. We drove a total of 14 hours the first day and ended up in a little hotel right outside of Albequerque, New Mexico. We received lots of dinner recommendations for our short stay, but because we arrived so late, we grabbed some Subway and called it a night.
I love road trips, so the 14 hours we spent driving seemed to fly by. Truly. Between pit stops and random pullovers to check out sights we'd never seen before...plus an EXCELLENT playlist (if I do say so myself ;)...14 hours flew by in a flash. And even though I'm sure I'll receive some sort of "you don't deserve to raise your children" type messages for this, our McDonald's stop was pretty on point. We only get it a couple of times a year and you better believe I went all out. All the large fries, pink slime (aka: nuggets...amazing)...and Coke I could handle. #feelfreetojudge
Before getting to Albequerque, we stopped off the highway in Amarillo to check out Cadillac Ranch. We really didn't know much about what to expect other than what we heard from friends so we didn't come prepared. I should've read up on it, but I didn't. Just seemed like a cool thing we'd see and then leave. Anyway, Cadillac Ranch is a large piece of land with about 10 Cadillacs buried in the ground nose down. One of those crazy Texas landmarks, lol. It's definitely a cool sight to see & part of the allure is getting to spray paint the cars. The kids were in awe. We should've come prepared with spray paint bottles...which we didn't...but there was a family there with extras who saw us aimlessly wandering about and gifted the boys their half-used cans. Super nice. And just enough to give the boys a taste for tagging :)
This was the perfect pit stop to get out, stretch our legs, and see something we've never seen before. The boys REALLY enjoyed this stop so we didn't rush through it. We stayed for about 30-45 minutes, but probably could've stayed a lot less. I think we were all a little happy to be out of the car.
If you've never seen it before and it's a stop along your way, you definitely want to pull over and check it out for yourself. It's right off of HWY 40 so you don't have to travel far off of your route to get there. We'll probably stop again next summer when we head that way again. Just make sure to bring your own cans of spray paint before you go!
Day 2 found us on our last leg of our first destination. It was about a 5.5 hour drive from Albequerque to Durango, CO and we arrived just in time for lunch. Before getting to Durango, we had to pull over for a photo op. The boys wanted to say they walked to Colorado, LOL!!!
Luckily another family pulled in right behind us and we were able to get a family pic together. Cheesy, but had to be done. Onward and upward to Durango we went.
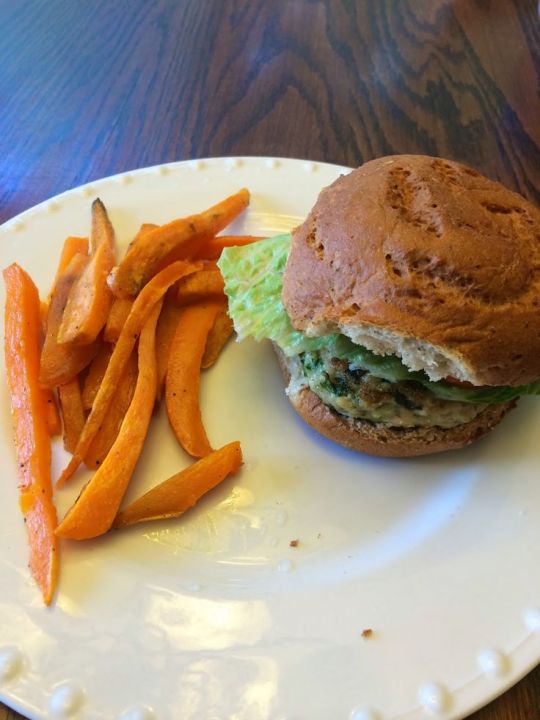
A friend of mine who is from that area suggested we eat at Steamworks Brewery for lunch. GREAT recommendation! We sat on the patio, enjoyed the cool breeze, and the food was 12 kinds of delicious. We both enjoyed the special...beef brisket tacos...and they were amazing. I also had a side of chicken tortilla soup and it was sensational. Let me just warn you right here that much of this vacation consisted of me stuffing my face full of #allthefood. Not sad about it at all.
After lunch, we walked around the historic downtown area and took in the sights. We walked into a few little shops, grabbed some cinnamon rolls for the boys, and then headed to Telluride. We had a ton of people telling us to make sure we rode the train from Durango to Silverton, check out the cave dwellings in Mesa Verde National Park, and go rafting. We would've done ALL of those things, but we didn't plan for it so we were strapped for time. We wanted to get to Telluride before dark. No part of driving through the mountains in the dark is fun for either of us and with Telluride being our ultimate destination, we decided to cut our time in Durango really short to give us plenty of time to make it to Telluride before sunset. Next year Durango will be a one or two night pit stop, God willing! We'd LOVE to check out some of those recommendations. The downtown area was so charming!
Telluride was only a couple of hours drive from Durango and we couldn't wait to arrive. The drive was gorgeous...and really scary. We're not used to ascending into the highest heights of the mountains on a regular basis. Couple that with insane rain, hail, and a 40 degree drop in temperatures through some of the highest points and you can bet that we were white knuckle driving and on edge for the last hour or so of our drive. YIKES. I envy the locals who can drive through the mountains in those conditions without so much as blinking an eye.
Once we made it through the scary parts of our journey, we found ourselves in Telluride and y'all...I was taken aback. I mean, completely speechless. The views in Telluride are truly BREATHTAKING. Everywhere we turned we were surrounded by mountains & peaks. In every single direction. And not in the distance. I felt like the mountains were hugging the town. Heaven on Earth.
Since we added this stop to our trip at the last minute our choices of places to stay were a little limited. Or so we thought. Neither of us knew a thing about the town, so knowing where to stay (Mountain Village?? or in town???) threw us for a loop. We read and read and read about it, but still came out unsure of what to do. We eventually decided it would be best to stay in town because from what we read we thought Mountain Village would be dead in the summer. We ended up finding a pretty inexpensive lodge to call home for a couple of nights that was in walking distance of Colorado Ave. & close to the trailhead of the hike up Bear Creek Falls Trail we planned on taking.
We stayed at Manitou Lodge in a loft style room. Y'all...it was the cutest thing. The entire unit was made up of 11 different rooms. Our loft-style room upstairs included both lower and upper balconies. This was truly the perfect accommodation for our little family of four. Adam and I slept upstairs and the boys slept downstairs on the couch. We couldn't get over how perfect it was! Comfy and quaint...our kind of place.
This was the view outside our balcony doors...
The San Miguel river ran right alongside our lodge. We kept our windows and balcony doors open at night so that we could listen to the rushing water as we trailed off to sleep. Pure heaven.
This is where the boys liked to play every time we walked outside...
It felt like we were semi-nestled in the woods and that was the most amazing feeling. The only downside...if I had to pick one...was that the bathroom was really, really tiny. NOT a big deal at all. We dont' need a lot of space. But if you're someone who likes a bigger bathroom, this wouldn't be your jam. However, for us, it was the perfect spot. This will be our go-to lodging when we visit Telluride again, for sure!!!
We settled into our lodge, changed into warmer clothes, and walked to Colorado Ave. (which is the main drag) for dinner. I felt like our lodge was centrally located to everything we wanted to do and once we parked the car we didn't drive it again until leaving town.
Everyone we met and several people on IG recommended we eat at Brown Dog Pizza. We're never one to turn down pizza, so that's where we headed for our first meal in town. Everyone clearly knew what they were talking about because that was one of the best meals we've had in a long time!!!
It's a cozy place with lots of TVs for the sports fanatics, and the kids had the option of making their own pizzas at the table and sending them back to bake. I thought that was such a cool touch! Of course, they both opted to create their own and here they are making their meals...
The end product....
They ate every last bite! As did we (we opted for the supreme pizza...highly recommed!). Ha! Great first meal! I would HIGHLY recommend stopping here if you find yourself in Telluride.
We headed to bed a little early so we could wake up and hit the trails for some hiking the next morning. We are a family who loves to hike, so I researched some of our options before getting into town. I wanted an easy to moderate trail because we aren't experts & I figured we'd still be acclimating to the altitude. Plus, hiking with kids for this semi-overprotective mom sometimes has me on edge. Both boys are great hikers. They LOVE it. But they're also a little over-confident so I didn't want anything extraordinarily difficult or treacherous. After lots of research, we decided on the Bear Creek Falls Trail and it was a bonus that the trailhead was about a 5 minute walk from our lodge.
We read that the bugs can be pretty annoying through certain parts of the hike, so we came prepared with bug spray....and LOTS of trail mix, granola bars, and water. It's a 4.5 mile round trip hike so all of those extras came in handy. The hike was AMAZING. Wide open trails to walk up until hitting the top before the waterfall. Some parts of the trail were a little more challenging to hike than others (steep, rocky, etc.), but it wasn't "hard" by any means. This little area was a great resting point going up and coming back down...
I guess hikers stop here and stack rocks one on top of the other and leave them for the next group of hikers to ogle. My youngest absolutely LOVED this area. He quickly went to work making his own little stacks and he was so very proud of his handiwork. See?! LOL.
We stopped and snacked. Drank some water. Stacked some rocks. And then headed to the top.
It was sweet heaven when we finally made it. I mean, just LOOK AT THIS VIEW!!!!!!
We sat down our gear and the boys headed into the water to jump across the rocks and explore. I watched our things and sat down to catch my breath while taking in the beauty of God's creation.
The sheer magnitude of those views is so hard to articulate.
We realized we hadn't exactly made it to the top when the boys finally came back from exploring. We came to see the waterfall so we needed to climb a little bit more to get to our final destination. The path going up was a bit trickier. Definitely narrow and steep-ish in parts...wet and rocky...a little slippery...but the boys powered through and the climb to the top was worth every breath lost.
It was BEAUTIFUL.
We stayed at the falls long enough to snap a few pics and marvel at the view. My oldest was ready to get down. He's not a fan of heights...just like his momma....and this part of the hike had him feeling a little nervous. And if I'm being honest, it had me a little nervous, too.
If you're in Telluride with kids, I definitely recommend this hike. Yes...it's long. 4.5 miles round trip isn't exactly a short walk in the park. But it's definitely worth it. My boys did so much better than I expected. They were great! My youngest lives life at a much slower pace than my oldest. He takes his sweet time doing everything (hello 45 minutes to eat a hot dog!!!!). So he definitely took his time on this trail. Dad walked with our oldest and I walked with our youngest. We lagged behind the other two the majority of the hike, but the conversations we had were worth the distance between us. The only time the boys complained was on our way down when we had about a mile left to walk. My youngest said, "are we close yet? My legs are getting tired." And that was it. Not too bad!
Walking back to our lodge after the hike....just right down the street.
We headed back to the lodge, changed clothes, and walked back to Colorado Ave. for lunch. We were STARVING!!! We went up and down the street trying to figure out what to eat. Everyone wanted something different. We were all a little irritable and HANGRY. My oldest could live on grilled cheese and when we found this cart we knew he found his lunch...
We grabbed him a sandwich that he could eat on the go while the rest of us tried to agree on something. IMPOSSIBLE. Like I said, irritable and hangry. After walking in and out of several different places, we finally settled on Smuggler's Brew Pub which was right around the corner from our lodge. We sat on the patio, ordered our food, and after what seemed like forever, we finally chowed down. And then came the rain. OF COURSE!!! Irritable moods were made even worse. Lord help us. Let me say this though...the food was EXCELLENT. Great menu and the atmosphere was one of my favorites. The only thing that dampened our experience was the rain ( no pun intended). I would definitely recommend stopping in for a meal here. I ordered the meatball slider sandwhich (amazing!) and my youngest ordered the nutella on toast (which he took two bites of and then abandoned. not cool). No idea what the spouse was eating because I was hyperfocused on my own meal and all the food my son wasn't eating. Definitely would go back again!
We headed back to the lodge for a nap because we ALL needed one. And it was the best nap ever. We slept with the windows and doors open as the rain came down. Perfection. When we woke up a few hours later, we got dressed and headed to the gondola to ride up to Mountain Village and see what it was all about.
Like I said earlier, I have a fear of heights, so I was NOT looking forward to the ride up. It's a pretty steep climb, but everyone was telling us it was a MUST DO and I certainly didn't want the kids to see my fears get the best of me. So up we went and I'm SO glad we did! Yes, I had butterflies in my stomach almost the whole way up, but WOW. The views were unparalleled. Just stunning!!!!
Mountain Village was DARLING and I could absolutley see how it would be even more amazing during ski season. By the time we got there, all the little shops were starting to shut down and it was pretty quiet. However, I think we would've loved staying here this time of year. There were a ton of things for the kids to do...panning for gold, trampoline bungee, obstacle course, park, etc....but they were all closed for the night. . However, we were able to find a little park with a rock climbing wall and the boys enjoying *trying* to scale it until they gave up. Ha.
The restaurants were all still open as was an open area with yard checkers and other little games for the kids to play. We just got up there at the wrong time. Going during the day would've been our best bet. I would probably suggest staying in Mountain Village during the summer if you have kids. You could always take the gondola down into Telluride if you plan on hiking or just walking around town. The vibe in Mountain Village just seemed a bit more family friendly. But dang...that Manitou Lodge in town was the best!!!!
After the boys finished playing, we headed to a little pub to grab a local beer and then gondola back down to town. We walked to The Floradora Saloon for a late dinner. I was OBSESSED with this place!!!! I'm all about the cozy little places with lots of history and The Floradora Saloon has been around Telluride since the early 70's. Much of the decor from those days is still intact which adds to the charm of the atmosphere. The food was WONDERFUL, too. So flavorful and completely unexpected. I had the baked mac & cheese and ohmiword....to-die-for. Adam got the Pork Green Chili and said it was the best chili he's ever had. Great dining experience!! HIGHLY recommend.
The next morning we were up bright and early to clean-up, pack up, and hit the road to our ultimate destination...Breckenridge! We loaded up the car and walked to Baked in Telluride for breakfast. It was just one block up from our lodge and we were dying to check it out after walking past it several different times. Just look at all these baked goods!!!! Of course, the boys opted for donuts as big as their heads...
Dad had a croissant and I had an apple turnover. Both excellent selections, but I'm thinking anything from this place would've been amazing.
After breakfast,we took the gondola back up to Mountain Village to grab a souvenir Tervis we saw window shopping the night before, and then back down to head out. I LOVE Breckenridge and couldn't wait to get there, but I did NOT want to leave Telluride at all. Two nights wasn't enough. We decided we need more time to explore next time we're out that way. We'll tack this on to our trip and make our stay last a few extra nights. There are a couple of other hiking trails we'd love to try and sights we'd love to see like Bridal Veil Falls.
If you're thinking about a trip to Telluride, GO! NOW. Hahah. But seriously. You definitely want to see it for yourself. It's impossible to describe until you experience it in person. We will definitely be back and we'd even love to ski here one ski season if possible! I say "if possible" because the tiny airport isn't anything I'm brave enough to conquer. Big planes, big airports...I can barely even do those. Driving in the summer is way easier for my chicken self to conquer.
Many people asked why we didn't fly and this is exactly why. There's SO much to see and we wanted to see it all. Driving is the best way to do it! And since we both have time during the summer to road trip, we figured we'd make the most of it and drive. I personally LOVE road trips. Not just because I don't like flying, but road trips afford you the opportunity to see things you wouldn't otherwise. It helps that our kids are a little older (8 & 10), are easily entertained, and don't need diaper changes or bottles. We've been on 18 hour road trips to Indiana when they were babies and I know that's hard! But even so, road trips, in my opinion, are always the best way to travel!!!
Let's talk Breck tomorrow!
Source: http://pearls-handcuffs-happyhour.blogspot.com/2017/07/family-road-trip-amarillo-durango.html
0 notes
Text
Arctic Air Portable Air Conditioner Giveaway
posted by Jaden
Not a review, just a giveaway featuring Arctic Air! -jaden
Enjoy Cool, Clean Air, Anywhere!
The powerful, compact personal air cooler that pulls warm air from the room through its evaporative water filter to fill any space with cool, clean comfortable air! Arctic Air cools, humidifies, and purifies for better air! Simply fill with water, plug it into any standard wall outlet or USB port and enjoy! It runs up to 8 hours per fill! Arctic Air is an evaporative air cooler that allows you to create your own personal climate! The whisper-quiet fan and soothing night light make it perfect to use throughout the night for a comfortable sleep!
Arctic Air is sold on Amazon for $37.99
Enjoy Cool, Clean Air…Anywhere! Introducing Arctic Air: The powerful, compact personal air cooler that pulls warm air from the room through its evaporative water filter to fill any space with cool, clean comfortable air! Arctic Air cools, humidifies, and purifies for better air! Simply fill with water, plug it into any standard wall outlet or USB port and enjoy! It runs up to 8 hours per fill!
Arctic Air is an evaporative air cooler that allows you to create your own personal climate! The whisper-quiet fan and soothing night light make it perfect to use throughout the night for a comfortable sleep! The built-in LED mood light can be set to any of its 7 color option, set to color-cycle mode or turned off with the touch of a button! Running other air conditioners all day long can cost a lot of money and take up so much space! Some of them even have to vent out a window, making it very inconvenient. Arctic Air sleek compact design fits nicely on your desk, nightstand or coffee table – wherever you need it! It’s great for dens, reading nooks, work, dorm rooms, offices, home offices, campers, work spaces, benches, basements, garages and more!
It’s lightweight & even convenient for travel! Great for outdoors too! It’s not just safe to use but energy efficient !This personal space air cooler actually cools the air around you, where you need it most, while using the size and power consumption of a small fan!
Even if you don’t buy the product shown, starting your Amazon shopping here helps our small family business. We get a small commission from Amazon that helps keep this site running free!
** Please add [email protected] to your contacts to help prevent email notifications from going into spam folders.
Never miss another Steamy Kitchen Giveaway!
Subscribe to our Giveaway Notifications to keep up to date on all of our giveaways! We will even throw in a special gift when you confirm your subscription!
List of Past Winners.
DISCLAIMER & OFFICIAL RULES: The giveaway product is provided by the sponsor of the giveaway and will be shipped from the sponsor directly. No purchase necessary to enter or win. Giveaway is open to people who are 18 years of age at time of entry and open to people worldwide. Steamy Kitchen and its sponsors only ship physical prizes to United States addresses. However, Steamy Kitchen reserves the right to provide an Amazon.com or Amazon.ca gift card for the value of the prize (at time of publishing) in lieu of shipping physical product due to shipping costs and logistics, especially for our international winners. Steamy Kitchen assumes no responsibility for late or misdirected entries due to SPAM, technological, or e-mail filtering issues or for prizes lost in transit. Winner will be notified by email, and must respond within 5 business days, otherwise winner will forfeit the prize and another winner may be drawn. For this giveaway, entrants can enter the designated number of times per e-mail address per day. The use of any system, robot, agent, or software to automatically submit entries in connection with this Giveaway is prohibited. Winners of giveaways are published on Steamy Kitchen, and winner's name and city/state/country are announced in Steamy Kitchen email newsletters. See rest of the Official Giveaway Rules.
Comments Off on Arctic Air Portable Air Conditioner Giveaway
Source: https://steamykitchen.com/47041-arctic-air-portable-air-conditioner-giveaway.html
0 notes
Text
Chewy Molasses Chocolate Chip Cookies
Robustly flavored and delightfully chewy, these sugar-coated molasses cookies are studded with finely shaved chocolate for a unique twist on a classic holiday cookie.
When you can’t decide between a richly spiced molasses cookie and a classic chocolate chip, this recipe is for you! These cookies are so simple to whip up, with an intense gingerbread flavor and delightfully soft chew, they’ll be your new go-to holiday recipe for years to come!
Ok, so these really shouldn’t be called chocolate chip cookies, but chocolate fleck cookies or shaved chocolate cookies just doesn’t have the same ring to it. They are first and foremost a chewy molasses cookie… with some finely grated chocolate mixed in.
Ideally you want to grate the chocolate with a cheese grater, or shave flakes off the bar using a sharp knife (don’t chop… shave). These thin flakes of chocolate will almost melt into the cookie as it bakes, giving it a rich depth of flavor without interrupting the chewy goodness.
It’s the same way I infused extra chocolate into my salt and pepper sable cookies: again, the texture of the cookie is best when uninterrupted by chips.
These cookies are not mild in any sense of the word: they definitely pack a flavorful punch, with ample ground ginger, cinnamon, nutmeg and cloves to compliment the sweet and smoky flavor of molasses.
If you love spicy gingerbread, robust molasses, pungent ginger… AND chocolate… these cookies are for you.
I love cookies like this. Robust and molassesy and oh so spicy. Oh and did I mention chewy? (Thank the hydroscopic properties of molasses for that, it’s also the reason these cookies will stay soft for days.)
So how on earth did I end up married to a gingerbread hater and molasses skeptic?
Seriously though, gingerbread tastes like Christmas. He loves Christmas. So why, whenever I pull out the jar of ground ginger, does he give me the side eye?
I’m not talking about fresh ginger (in savory situations, like stir fry for example, he’s all for it), rather it’s just ground ginger he’s morally opposed to. Ground ginger definitely has a wildly different flavor profile than fresh, I’ll give him that, but Christmas just wouldn’t be the same without its fiery goodness.
Whatever. He’s more than content nibbling on brownie scraps. Which means more cookies for me!
For a cookie like this that gets its primary flavor from ground spices, using the freshest spices possible really makes a world of difference.
Despite what you might think, spices do not have an infinite shelf life. If you’ve had that jar of ginger for more than a year or two (or, um, four or five?) it’s probably time to pick up a new jar.
I just did a huge spice drawer makeover recently, replacing most of my old and long-expired spices with fresh bulk spices (will be doing a post in January about spice organization, including some awesome printables!) and was shocked at just how fragrant and flavor-packed the fresh ground ginger was compared to what I had been using before.
Even a ‘new’ jar of ground ginger could be lacking, as you really have no idea just how long its been sitting there. (For those curious, I purchased this amazingly potent ground ginger from World Spice).
This is what shaved chocolate looks like. I used a 70% dark chocolate bar (Trader Joe’s Pound Plus bar, if your curious) and shaved off the chocolate using a large chef’s knife. You could also use a vegetable peeler on the side of a thick bar, or even grate the chocolate using a coarse cheese grater.
The shaved chocolate almost melts into the dough, adding a chocolatey richness that perfectly compliments the molasses and spice. While you could substitute chocolate chips in theory, I think the larger chunks of chocolate would interrupt the delightfully chewy texture.
These cookies are great for holiday cookie boxes and cookie exchanges, as, thanks to the molasses, they stay soft for days!
I used a small cookie scoop for these, which make 2-inch cookies perfectly sized for shipping. I’d rather send a half a dozen smaller cookies than 2 or 3 larger ones, plus the smaller size tends to be less fragile and thus better for shipping purposes.
Ingredients:
3/4 cup (1 1/2 sticks or 6 ounces) unsalted butter, at room temperature
1/2 cup granulated sugar, plus more for rolling
1/2 cup packed light brown sugar
1/4 cup mild molasses (not blackstrap)
1 large egg
2 1/3 cup (10 1/8oz or 285g) all-purpose flour
2 teaspoons baking soda
2 teaspoons ground ginger
1 teaspoon ground cinnamon
1/2 teaspoon kosher salt
1/2 teaspoon ground cloves
1/4 teaspoon freshly ground nutmeg
3 ounces (85g) good quality dark chocolate, finely shaved or grated
Directions:
In a large mixing bowl or the bowl of a stand mixer, beat together butter, sugar and brown sugar until smooth and fluffy, 1 to 2 minutes. Add molasses and mix until smooth. Add egg and mix until incorporated, scraping down the sides of the bowl as necessary.
In a separate bowl, whisk together flour, baking soda, salt and spices until evenly incorporated. Add to wet ingredients and mix on low speed until almost fully incorporated. Fold in shaved chocolate.
Cover tightly, pressing a piece of plastic wrap or waxed paper down on the surface of the dough to keep it from drying out, and refrigerate for at least 2 hours or overnight.
Preheat oven to 350 degrees F. Line a medium-colored baking sheet with parchment paper or silicone baking mats. If dough has been chilling for longer than 2 hours, let it come to room temperature for 15 minutes or so before shaping.
Using a small cookie scoop, roll dough into 1-inch balls. Roll in granulated sugar to coat, then arrange on prepared baking sheet, leaving 2 inches of space between each cookie.
Bake for 10 to 11 minutes or until cookie is set but still soft and slightly crackled on the surface. For a crunchier cookie bake for a few minutes longer.
Remove from oven and let cool on baking sheet for 10 minutes, then transfer to a wire rack to cool completely. Repeat with remaining dough.
Cookies will keep in an airtight container at cool room temperature for up to 5 days.
Did you make this recipe?
Let us know what you think!
Leave a Comment or share a photo on Instagram with the hashtag #loveandoliveoil.
We are a participant in the Amazon Services LLC Associates Program, an affiliate advertising program designed to provide a means for us to earn fees by linking to Amazon.com and affiliated sites.
Source: https://www.loveandoliveoil.com/2018/12/chewy-molasses-chocolate-chip-cookies.html
0 notes
Text
Bye, Bye, Birdie: 22 Grilled Chicken Recipes to Devour This Memorial Day
[Photographs: J. Kenji López-Alt, Shao Z.]
If I show up at a barbecue and don't trust the chef, I steer clear of any chicken I see—more often than not it's going to be mediocre. But grilled chicken doesn't have to be stringy and flavorless—use the right technique and it'll be perfectly juicy and still have shatteringly crispy skin. And, of course, it will taste great. To show you how it's done, we've rounded up 22 of our favorite grilled chicken recipes, from a simple spatchcocked bird and Thai-style satay to homemade chicken sausages with roasted garlic and feta.
[Photograph: J. Kenji López-Alt]
Spatchcocking works just as well for grilling as it does for roasting—I never cook a whole bird any other way. To cook the chicken right use a two-step process, starting with the chicken skin-side up on the cooler side of the grill before finishing it over the coals to crisp up the skin.
Grilled Butterflied Chicken Recipe »
Back to the full list
[Photograph: J. Kenji López-Alt]
Bigger birds aren't well-suited to conventional grilling because it's hard to cook them through evenly. Barbecue is the way to go for large roasting chickens—the low-and-slow technique cooks them gently and imbues them with tons of smoke. For extra flavor we like to brush the chicken with barbecue sauce toward the end of cooking.
The Best Barbecue Chicken Recipe »
Back to the full list
[Photograph: J. Kenji López-Alt]
Without question, the best grilled chicken I've ever had was on a little island in the Gulf of Thailand. In a country full of wonderful grilled meat, the chicken stands out. The secret is marinating the meat with fish sauce and sugar, which helps create an intense, caramelized crust on the grill.
Thai-Style Grilled Chicken (Gai Yang) Recipe »
Back to the full list
[Photograph: J. Kenji López-Alt]
In American Thai restaurants, satay is the grilled chicken dish you're most likely to find on the menu. Our version is marinated with coriander, white pepper, palm sugar, garlic, ginger, shallot, turmeric, lemongrass, and a handful of other ingredients and served with a tamarind-peanut dipping sauce.
Thai-Style Chicken Satay With Peanut-Tamarind Dipping Sauce Recipe »
Back to the full list
[Photograph: J. Kenji López-Alt]
The average yakitori joint will serve dozens of cuts of chicken, but at home it's easiest to stick with boneless, skinless chicken thighs, which are good for grilling because they're harder to overcook than breasts. These skewers are super easy—just alternate the chicken with big pieces of scallion, grill, and glaze with teriyaki sauce. If you want a riff on the same theme, you could also try grilling up some skewers with nanbansu, a sweet-sour sauce that can pull double duty as a dip and a marinade.
Japanese Chicken Skewers With Scallion (Negima Yakitori) Recipe »
Back to the full list
[Photograph: Morgan Eisenberg]
If you've got your skewers and chicken out already, you could also give this combination of chicken, sage, prosciutto, and peach a try. The meat and fruit take a brief bath in a white wine marinade, which adds flavor even as it helps the chicken retain its moisture on the grill, and that same marinade gets reduced and served alongside as a dipping sauce.
Grilled Chicken and Peach Saltimbocca Skewers Recipe »
Back to the full list
[Photograph: Joshua Bousel]
If you're not going to cook with wood, then next best option is to cook on wood. Here we cook chicken on wood planks set onto the grates of the grill to give them a little bit of wood flavor. We use a mixture of olive oil, lemon juice, and fresh herbs to both marinate and baste the chicken to keep it moist.
Planked Chicken Quarters With Lemon and Herb Recipe »
Back to the full list
[Photograph: J. Kenji López-Alt]
The marinade for Jamaican jerk chicken is pretty straightforward—allspice, thyme, and Scotch bonnet peppers will get you that classic jerk flavor, and habaneros make fine replacements for the Scotch bonnets. Unfortunately, true jerk chicken is smoked over hard-to-find pimento wood. The good news? Using bay leaves instead works remarkably well.
Jerk Chicken Recipe »
Back to the full list
[Photograph: J. Kenji López-Alt]
Moving from the Caribbean to the Middle East, this recipe seasons grilled chicken with the earthy spice blend za'atar. I grew up eating the store-bought version of this mix of sesame seeds, sumac, and other herbs, but our homemade version is worth a little extra effort.
Grilled Chicken With Za'atar Recipe »
Back to the full list
[Photograph: J. Kenji López-Alt]
Sprinkling chicken with lemon juice as it grills is a typical Greek technique that sounds great until you realize that the juice keeps the skin from crisping up until long after the meat overcooks. To get the same flavors without sacrificing the quality of the chicken, we make a lemon-heavy vinaigrette and use it as a marinade and sauce.
Greek-Style Grilled Chicken With Oregano, Garlic, Lemon, and Olive Oil Recipe »
Back to the full list
[Photograph: J. Kenji López-Alt]
The chicken itself in this recipe is nothing too special—just a spatchcocked bird rubbed with salt, cumin, paprika, pepper, garlic, vinegar, and oil before grilling. The real magic of Peruvian grilled chicken is in the spicy-yet-cooling green sauce, which is made with a mayo and sour cream base and flavored with jalapeños, cilantro, and aji amarillo pepper paste. Make extra, because your guests are going to want to put it on everything. If you're feeding a crowd, or if you just feel like eating sandwiches instead, we've got you covered.
Peruvian-Style Grilled Chicken With Green Sauce Recipe »
Back to the full list
[Photograph: Joshua Bousel]
Boneless, skinless chicken breasts tend to be bland and dry, but that doesn't keep them from being one of the most popular cuts of meat in America. If you're going to give chicken breasts space on the grill come Memorial Day, treat them right by pounding them to a uniform thickness, brining them, and using an instant-read thermometer to avoid overcooking them.
The Best Juicy Grilled Boneless, Skinless Chicken Breasts Recipe »
Back to the full list
[Photograph: J. Kenji López-Alt]
Tandoori chicken is cooked at a high temperature, which leads to a risk of the meat drying out. Our solution? Just replace the chicken with smaller, faster-cooking Cornish game hens. Our tandoor-style marinade is made with yogurt, paprika, cumin, turmeric, and other spices—if you want that vibrant red color you find in restaurants you're going to have to add achiote powder or food coloring.
Tandoor-Style Grilled Chickens or Cornish Hens Recipe »
Back to the full list
[Photograph: Shao Z.]
Despite the name, these chicken wings don't taste like seafood—the fish sauce is there to add extra savoriness to the meat. It's joined in the marinade by Asian ingredients like Shaoxing wine, soy sauce, and as many dried red chili peppers as you can handle. A two-zone grill gets the wings juicy on the inside and crispy on the outside.
Grilled Spicy Chicken Wings With Soy and Fish Sauce Recipe »
Back to the full list
[Photograph: Joshua Bousel]
If you want your grilled chicken wings to be extra crispy, sprinkle them with baking powder and salt and rest them overnight in the refrigerator. This both dries out the surface of the wings and raises the pH, which improves browning. Once you have perfectly cooked wings you can sauce them however you want—here we go with a soy sauce, honey, and hoisin glaze.
Grilled Hoisin-Glazed Chicken Wings Recipe »
Back to the full list
[Photograph: Joshua Bousel]
If you're going to do the air-drying step of preparing chicken wings you can also add seasonings to the mix—for these Cajun-inspired wings we mix paprika, garlic powder, thyme, oregano, cayenne, and more in with the salt and baking powder. After grilling we toss the wings in a Buffalo-style sauce that replaces the Frank's with Louisiana-style hot sauce.
Grilled Cajun Chicken Wings Recipe »
Back to the full list
[Photograph: Joshua Bousel]
These sausages, made with juicy chicken thigh meat, sweet roasted garlic, and tangy feta cheese, are a fun variation on the hot dogs or brats you might expect to find on the grill come Memorial Day. We also add shallots, oregano, vinegar, and lemon juice, but in moderate quantities so as not to cover up the flavor of the chicken.
Roasted Garlic and Feta Chicken Sausage Recipe »
Back to the full list
[Photograph: Joshua Bousel]
Mixing ground chicken with Buffalo sauce is a recipe for disaster—all that butter makes for sausages prone to exploding on the grill. We get around this by using Frank's Buffalo Wings Sauce, which is made with "Natural Butter Type Flavor." The sauce is a little on the bland side, so we add extra Frank's and cayenne pepper to give it more of an edge.
Buffalo Chicken Sausages Recipe »
Back to the full list
[Photograph: Vicky Wasik]
This Korean bar food is perfect for a beer-filled Memorial Day cookout. Chicken thighs marinated in a spicy gochujang-based sauce are grilled until nicely charred. The crisp thighs are then covered in melty mozzarella, which cuts through the spicy and sweet marinade.
Korean-Style Fire Chicken (Buldak) With Cheese Recipe »
Back to the full list
[Photograph: Morgan Eisenberg]
It doesn't take a lot of time or ingredients to turn chicken from boring to bright, flavorful, and exciting. The marinade for these skewers combines Dijon mustard, lemon juice, honey, and tarragon. The honey caramelizes over the grill, while the lemon and tarragon keep the skewers tasting fresh and balanced.
Grilled Tarragon-Mustard Chicken Skewers Recipe »
Back to the full list
[Photograph: Morgan Eisenberg]
These grilled tandoori chicken patties are a great alternative to the beef or chicken burgers most people will be expecting when you tell them you're grilling. Inspired by tandoori chicken, we toss ground chicken with yogurt and Indian spices, then grill the patties until they're lightly charred. Before serving, we top the patties with a tangy yogurt sauce, and wrap them in toasted flatbread.
Grilled Tandoori Chicken Patties With Jalapeño-Mint Yogurt Sauce Recipe »
Back to the full list
[Photograph: Morgan Eisenberg]
These sticky, sweet, and smoky wings are inspired by the flavors of Hawaii. They marinate in a mixture of pineapple juice, soy sauce, light brown sugar, and sriracha, along with a few other flavor-packed ingredients. Once the wings are grilled to golden-brown, with nice charred bits from the flames, they're showered with thinly sliced scallions and served with grilled pineapple.
Hawaiian Huli Huli Grilled Chicken Wings Recipe »
Back to the full list
This post may contain links to Amazon or other partners; your purchases via these links can benefit Serious Eats. Read more about our affiliate linking policy.
Source: https://www.seriouseats.com/roundups/memorial-day-grilled-chicken-recipes
0 notes
Text
YELLOW NECTARINE, BLOOD ORANGE, MINT + SERRANO CHILI AGUA FRESCA
Sweet, tart, and a little spicy, this refreshing fresca is perfect dressed up as a cocktail or dressed down as an easy summer drink. Mix up the flavors with white nectarines, peaches, or any type of orange you like.
INGREDIENTS
For 6
8 yellow nectarines, sliced
2 blood oranges, peeled and sliced
10 mint leaves
1 serrano chili, split and deseeded
1 lime, juiced
3 tablespoons agave nectar
Water (to taste)
DIRECTIONS
In a blender, combine the nectarines, oranges, mint, and chili. Puree until completely smooth (adding water if you need it to blend). Strain it and add lime juice and agave to taste. Serve in a pitcher with sliced serrano and orange, and a few sprigs of mint. Enjoy!
Source: https://www.thekitchykitchen.com/?recipes=/yellow-nectarine-blood-orange-mint-and-serrano-chili-agua-fresca/
0 notes
Text
7 Easy Ways To Improve Your Memory And Stop Forgetting Things
For me, one of the most frustrating aspects of getting older has been the realization that my memory isn’t as sharp as it once was. But memory problems aren’t exclusive to older adults—people of all ages can have trouble remembering things! And while it’s easy to feel hopeless and even depressed about your memory going downhill, don’t give up hope just yet! Because I recently learned some really great tricks that can help you improve your memory and stop forgetfulness in its tracks.
Related: 10 Things No One Ever Told Me About Menopause
Today I’ll be sharing 7 memory tricks that you can use to help you remember just about anything! Start practicing a few of these memory tricks, and I’m sure you’ll be surprised at how effective they can be! After those, I’ll share a few bonus tips for keeping your mind (and thus your memory) sharp as a tack. :-)
<![CDATA[.player-position padding-left:0px !important; padding-right:0px !important; padding-bottom:0px !important; .copy padding: 12px !important; font-weight: 700; font-size: 15px !important; ]]>
1. Visualize Your Purpose
I can’t even begin to count how many times I’ve gone into another room to grab something, only to immediately forget what I went in there to get. There seems to be something about moving into a different space that resets our short-term memory. But you can guard yourself against a memory reset by practicing visualization!
Before you leave the room you’re in, stop for a moment and picture whatever your purpose is in your mind. Imagine yourself picking up that item, or doing that thing you don’t want to forget to do. Having a clear mental image of your purpose will make it much harder to forget once you leave the room.
2. Use Musical Memory
Names, numbers, dates, and other pieces of information are easy to forget. Yet we seem to have no trouble remembering songs and nursery rhymes from our childhoods, so what gives? It’s the musicality of rhymes and songs that makes them easy to remember. You can use this to your advantage by making up a song about something you want to remember.
Your musical memory can also be useful for learning a foreign language! Follow along with a foreign music video with the subtitles on, or search for karaoke songs that are in that language. You’ll be surprised at how much you’re able to remember!
3. Get To Know Somebody
There are a lot of situations where forgetting something can be annoying, but few of them are as awkward as forgetting someone’s name! But in our defense, remembering any fact about someone you don’t know well is hard. The trick is to make memorable connections between the name and the person.
Try looking at the person while repeating their name over and over in your head. Another approach is to introduce that person to someone else, which forces you to repeat their name out loud. And when the conversation with a new person is ending, you can always repeat their name while saying goodbye.
4. Create Reminder Images
When you need to remember something important, try creating a rich visual image of that thing. The more senses you can involve, the better! For instance, say you need to remember to submit a proposal by 10 PM. You can commit this to memory by visualizing the proposal (a stack of papers, a folder, or whatever your proposal looks like.) Then imagine a ringing alarm clock on top of the papers that shows the time as 10 PM. Picture the clock, the time, and the papers, and imagine the sound of the alarm going off. This rich visual cue will make it much easier to remember that 10 PM deadline!
5. Use Mnemonic Devices
There are several kinds of mnemonic devices that can make things easier to remember. Acronyms like HOMES can help you remember the names of the Great Lakes (Huron, Ontario, Michigan, Erie, and Superior). And sentences like “Please Excuse My Dear Aunt Sally” can help you remember the mathematical order of operations (Parentheses, Exponents, Multiplication, Division, Addition, and Subtraction).
Creating memorable mnemonic devices like these can help you remember all sorts of important information! I recently learned that the name Roy G. Biv makes a handy mnemonic device for remembering the colors of the rainbow (red, orange, yellow, green, blue, indigo, and violet.)
6. Summarize It
There’s a reason why teachers made you write book reports in grade school. That’s because writing a summary of something you’ve read makes it much easier to remember! Summarizing requires you to read something, analyze it, and understand it deeply enough that you’re able to pass on the information to someone else.
Summarizing can be useful if you’re reading a document or book for work and finding it hard to retain the information. Just pause after each paragraph and jot down a short summary in the margin or in a separate notebook. It will give you a much better chance of actually remembering what you read!
7. Make It Interesting
We’re all better at remember things that we are interested in. I’m sure you have no trouble remembering the names and faces of the person(s) you had a crush on in grade school, right? ;-) So if you need to remember something that just isn’t that interesting to you, you’ll likely have a harder time hanging onto it.
So get creative, and wrack your brain for any possible connections you can make between the information you want to remember, and something that actually interests you. For instance, my daughter Britta grew up with the Harry Potter series, and knows it like the back of her hand. She would be highly likely to remember something if she could connect it to Harry Potter in some way!
Bonus Tips For Keeping Your Memory Sharp!
Exercise Regularly. Aerobic exercise and physical activities that require hand-eye coordination are both great for your brain. Anything that gets your blood pumping can help reenergize your brain!
Sleep Well. Your brain can’t operate at its best when you’re sleepy! Make sure to stick to a regular sleep schedule, and cut back on caffeine if that’s an issue for you.
Meditate. Mindfulness meditation is the practice of building awareness of one’s thoughts, feelings, and body. A 2010 study found that just 4 days of practicing mindfulness meditation improved participants’ attention and working memory (even when the participants had no previous experience with meditation!)
Keep Learning. Any activity that engages and challenges your brain can help keep your memory sharp. Make time for reading, playing chess, doing puzzles and brain-teasers. You could also take a class on something, or learn a new skill!
Eat Healthy. Your brain needs fuel to work properly, so make sure to give it the best fuel possible! Make sure to eat plenty of fruits and veggies, limit your saturated fat intake, and get omega-3s from fatty fish.
What methods do you use to help you remember things?

Source: https://www.onegoodthingbyjillee.com/how-to-remember-things
0 notes
Text
Pizza Roasted Vegetables
If you love the flavor of pizza, you’re going to love these pizza-roasted vegetables. They taste like pizza, but without the greasy crust. (And with more nutrition!)
I make this easy dish at least once a week. You can make a big batch and serve it as a main course (I can eat the whole pan by myself!), or you can serve it as a side dish. Either way, it’s a delicious way to eat more vegetables.
How to Make Pizza Vegetables
To make these pizza vegetables, you’ll need to chop your veggies into bite-sized pieces. You can use any vegetable you like for this, but I’ve found that cauliflower and zucchini have a pretty neutral flavor and work well. You can also roast any pizza toppings you like along with them, such as bell peppers, olives, red onions, and more.
Toss them in your favorite marinara sauce, then roast them until tender and top them with cheese and any other pizza toppings you like. So simple, yet so delicious.
Because this dish is so simple, it’s important that you use ingredients that you love. I like to use a fat-free marinara sauce with no added sugar to keep this dish as healthy as possible, but I think a thicker pizza-style sauce would also work. (Keep in mind that the marinara sauce dries out as it bakes on the vegetables, so you won’t wind up with a watery result.)
As written, this dish is properly combined so you can enjoy pizza flavors without slowing down your digestion. When you serve it with cheese it’s in the animal protein category, but if you skip the cheese it’s a neutral dish. You can top the veggies with a vegan cheese sauce, if you prefer.
Pizza Roasted Vegetables is an easy 3-ingredient recipe, that's low-carb and easier to digest, thanks to proper food combining. It's a great way to eat more vegetables, and your favorite pizza toppings at the same time!
Keyword: low carb, pizza, zucchini
3 zucchini , cut into half-moons (or other non-starchy vegetable)
1 cup marinara sauce (no added sugar)
2 ounces parmesan , shredded (or other cheese of choice)
any other pizza toppings you love
Preheat the oven to 350ºF. Slice the zucchini into coins about 1/2-inch thick, then cut the coins in half to make half-moon shapes.
Transfer the cut zucchini pieces to a baking sheet and pour some marinara sauce over the top. (The amount of marinara sauce listed is just a suggestion-- use as much or as little as you like, making sure that the vegetable pieces all get coated in sauce.) Use a spatula to toss the zucchini several times to make sure the vegetables are coated well.
Spread the coated vegetables into a single layer on the baking sheet for even cooking. Place the pan in the oven and bake at 350ºF for 20 minutes. When the time is up, use a spatula to flip the zucchini and continue cooking until the zucchini are as tender as you like, 5 to 10 more minutes.
When the vegetables are tender, remove the pan from the oven and use a spatula to serve the warm vegetables right away. Top them with cheese, and any other toppings you like, then dig in!
Per serving: Calories: 190, Fat: 8g, Carbohydrates: 16, Fiber: 4g, Protein: 15g
Recipe Notes:
As mentioned above, feel free to use any other vegetable you like, roasting until they are tender. (Cauliflower is another favorite, but this is a great way to use up zucchini in the summer!) This is simply a delicious method for serving vegetables, so feel free to adapt as needed.
—
Reader Feedback: What’s your favorite way to prepare vegetables?

Source: https://detoxinista.com/pizza-roasted-veggies/
0 notes
Text
Almond Butter Granola
Almond Butter Granola is a wholesome way to start the day! This easy, homemade granola recipe is made with heart-healthy nuts, seeds, and no refined sugar.
You might say I have a pretty boring breakfast most mornings, at least in the winter months. I eat pretty much the same thing on weekdays when the mornings are chilly: a bowl of oats mixed with mashed banana and a dollop of nut butter. Insta-worthy? Not so much. It’s probably the ugliest breakfast ever. But I crave it because it’s cozy, naturally sweet, and it fuels me for a morning workout.
But the days are getting warmer, and just as I am ready to trade in my boots for sandals, I’m ready for a breakfast change.
It turns out I’m not the only one! My son mentioned a craving for granola, and asked me to make some. “I like your homemade granola, mom.” So I thought about making some of our old favorites, trying to decide between Blueberry Maple Granola and Mocha Coconut Granola.
But I just can’t give up my almond butter. Call me obsessed!
So, I whipped up a batch of homemade almond butter granola, one full of nuts (more almonds! and coconut!) and seeds (hemp seeds) and naturally sweetened with almond butter and maple syrup. It’s like a summertime version of my favorite winter oats, and delicious drowned in almond milk and tons of fresh berries. My kids love it with yogurt and fruit after school, and I find the jar out on the counter all day, between breakfasts, snacks, and even for dessert!
HOW TO MAKE GRANOLA
Homemade granola is so easy to make at home, there really is no reason to buy expensive granola at the store. This recipe for Almond Butter Granola is utterly delicious, protein-rich, and will fuel you all morning long!
MORE HOMEMADE GRANOLA RECIPES TO TRY
Cranberry Sauce Granola
Blueberry Maple Granola
Mocha Coconut Granola
Trail Mix Granola
Gingersnap Granola from The Bojon Gourmet
Spicy Pumpkin, Maple, and Tahini Granola from Foolproof Living
Lemon Tahini Cashew Granola from Vanilla and Bean
Almond Butter Granola is a wholesome way to start the day! This easy, homemade granola recipe is made with heart-healthy nuts, seeds, and no refined sugar.
Course Breakfast, Snack
Cuisine American, Vegan, Vegetarian
Keyword almond butter, gluten-free, granola, vegan, vegetarian
Prep Time 5 minutes
Cook Time 25 minutes
Total Time 30 minutes
Servings 10 servings
Calories 373kcal
Author Liren Baker
3 cups rolled oats
1 cup sliced almonds
1/3 cup shredded coconut
1/2 cup hemp seeds
1 teaspoon ground cinnamon
1/4 teaspoon kosher salt
1/2 cup creamy almond butter
1/4 cup coconut oil melted
1/4 cup maple syrup to taste
Preheat the oven to 300°F. Line a baking sheet with a silicone mat or lightly mist with baking spray.
In a large bowl, mix together the oats, almonds, coconut, hemp seeds, cinnamon, and salt. In a small bowl, whisk together the almond butter, oil, and maple syrup. Pour the sauce over the oat mixture and stir until evenly coated.
Spread the mixture in the prepared baking tray and place it in the oven. Bake for about 20 minutes, stirring every five minutes. When the granola is toasted, remove from oven and let it cool on a wire rack. Once it is cool, break into smaller pieces and store in an airtight container.
Enjoy with yogurt, milk, or by the handful!
This recipe makes about 5 cups of granola.
Serving: 1serving | Calories: 373kcal | Carbohydrates: 29g | Protein: 12g | Fat: 25g | Saturated Fat: 7g | Sodium: 69mg | Potassium: 286mg | Fiber: 6g | Sugar: 7g | Vitamin A: 1% | Calcium: 10.9% | Iron: 18.4%
Source: https://kitchenconfidante.com/almond-butter-granola
0 notes
Text
March Menu - Menu Plan Monthly

Happy Saturday Friends! I hope you're having a great weekend. Today I have my March Menu Plan for you. I'm sorry this months menu is so late, but things have been crazy around our house this last week. Any recipe noted with New are the recipes I plan to make and will post in the near future. I hope y'all find something you like. ❤
March Menu Plan
Stuffed French Bread Pizza & Garden Salad
Salisbury Steak & Gravy, Brown Rice & Green Beans & Squash
Chicken & Dumplings
Amish Chicken Casserole & Milk & Honey Corn on the Cob New
Korean Beef & Rice Bowls
Barbecue Meatballs, Mashed Potatoes & Steamed Carrots
Hash Brown Breakfast Casserole & Sweet Cooked Apples
Homemade Cheeseburger Helper, Dinner Rolls & Steamed California Blend Veggies
Pan Fried Ham Steaks, Hoe Cake & New Potatoes & Green Beans
Angel Chicken over Whole Grain Pasta & Roasted Broccoli
Italian Beef Sandwiches & Fries & Fresh Fruit
Skillet Potatoes , Smoked Sausage & Sweet & Sour Green Beans
Slow Cooker Brown Sugar Chicken , Baked Sweet Potatoes & Roasted Broccoli
Southwest Chicken Hummus Wraps & Blueberry Ambrosia Fruit Salad
Mama's Chicken Roll Ups, Mixed Vegetables & Garden Salad
Friendship Casserole, Cesar Salad & French Bread Rolls
Copy Kat Stouffers Chicken & Rice Casserole
Grilled Baked Bean Stuffed Peppers, Salad & Kenny Rogers Corn Muffins
Logan's Country Hamburgers, Fries & Yogurt Fruit Salad
All-in-One Crock Pot Pork Chop Dinner (Potatoes, Corn & Pork Chops)
American Goulash, Butter Dip Biscuits & Fruit Salad
Ma Maws Dorito Beef Casserole, Cilantro Lime Rice & Tortillas
Slow Cooker Pinto Beans (without ham) & Mexican Cornbread
Bean & Cheese Burritos (Leftover Pinto Beans)
No Fail Beef Pot Roast with Carrots & Potatoes & Dinner Rolls
Chicken Alfredo Pizza & Olive Garden Salad
Orange Chicken & Vegetables & Brown Jasmine Rice
Desserts:
Strawberry Pie
Cinnabon Cinnamon Roll Cake New
Butter Pecan Cake Brownies New
Vanilla Cream Cake with Caramel Frosting (My Birthday)
Join the Mommy's Kitchen Free Email Subscription and you'll receive an email each time, I add a new recipe or post to Mommy's Kitchen. As a subscriber you'll also receive a monthly issue of "My Texas Table" newsletter packed with all the latest recipes, menu plans, special features, seasonal recipes, canning, gardening, holiday recipes and DIY projects!
Source: https://www.mommyskitchen.net/2019/03/march-menu-menu-plan-monthly.html

0 notes
Text
Crispy Creamy Chicken Tacos
Tacos are in our usual meal rotation, but I love to mix up the type of tacos we have. This version is made with chicken and corn tortilla.
This filling for these tacos is creamy and flavorful. Once the tortillas are filled with the creamy chicken filling, they get brushed with oil and baked until crispy.
This recipe makes 16 tacos so it is a perfect filling meal or will even work as an appetizer.
Crispy Creamy Chicken Tacos
2 chicken breasts, cooked and shredded
6 oz light cream cheese, softened
½ tsp salt
½ tsp cumin
1 tsp chili powder
1 tsp garlic powder
1 Tbsp lime juice
1 Tbsp milk
2 cups shredded cheese
16 corn tortillas
olive oil and kosher or sea salt
Preheat oven to 425 degrees.
In a bowl, mix together chicken, cream cheese, salt, cumin, chili powder, garlic powder, lime juice, and milk.
Sprinkle cheese over the tortillas. Then place 2-3 Tbsp of the chicken mixture onto half of each tortilla and then fold over.
Place on a cookie sheet and brush each side with oil and then sprinkle with salt.
Bake and 425 degrees until crisp and golden. Serves 6 as a main dish.
Recipe adapted from Mel and Boys Kitchen.

Source: https://www.realmomkitchen.com/26462/crispy-creamy-chicken-tacos/
0 notes
Text
Caramel Apple Lollipops
Fall is the perfect time to gather with friends around a bonfire, meet at the apple orchard, or host a backyard campout! No matter what excuse you use for getting together, it’s always fun to have a little treat or favor to pass out to young guests. I’ll be honest, I’m not a huge fan of slaving over anything in the kitchen. However, these caramel apple lollipops are SO easy, it’s almost embarrassing!
Also, it’s always fun when you can get little kids involved in making or baking. It gives them a feeling of accomplishment, and builds their confidence – and this particular treat won’t make a disaster of your kitchen! It would be fun to have the kiddos help make these “caramel apples” to pass out at a fall or Halloween class party, or just to share with their favorite teachers and friends. They would also be adorable for a fall carnival!
• Gourmet lollipops in red or green (NOTE: Choose perfectly round lollipops with no ridges, and a flavor that pairs well with caramel. We actually used caramel apple lollipops, but a green sour apple would taste good too!)
• 1 bag Kraft caramels
• 2 T Water
• Saucepan / Stove
• 3 Small bowls
• Peanuts
• Food chopper
• Sprinkles
• Mini baking cups
• Clear plastic bags
• Baker’s twine
Step 1
Place a large handful of peanuts in a food chopper, and chop them up until they are in small pieces. Do not over-chop…you want mini chunks – not dust! Put them in a small bowl, and set aside. Pour your sprinkles into another small bowl, and unwrap your lollipops.
Step 2
Melt 2/3 bag of caramel squares (about 2 per lollipop) mixed with 2 Tablespoons of water, in a saucepan over low heat. Stir until completely melted, and remove from heat. While the caramel is still hot, pour it into a small bowl. Dip and roll a lollipop into the hot caramel, and then immediately begin step 3.
Step 3
Roll the lollipop into the peanuts or sprinkles while the caramel is still hot, so they stick. You may want to place the lollipop on a piece of wax paper, and allow to cool. Next, place it in a mini baking cup, and then put it in a clear, plastic bag and tie the top with a piece of baker’s twine.
Your caramel apple lollipops are ready to enjoy! Happy fall!

Source: https://www.handmadecharlotte.com/caramel-apple-lollipops/
0 notes
Text
August Coffee Date: Baby Edition!
Sticky-sweet, lightly crispy peanut butter rice krispie mixture topped with a thick layer of melted chocolate and sprinkled with magical flakes of sea salt. That's all, thank you and goodnight Twin Cities! Friends, this is the food I was raised on. In the background of every family and school event of my childhood lies a scratched and dented 9x13 of almost-gone scotcheroos. It is simple Midwestern goodness and it should not be messed with. Except, I did one thing: I messed with it. Whyyyy. As an anxious person finding her way through the world, I'd say I follow all rules…

Source: https://pinchofyum.com/august-coffee-date-baby-edition
0 notes
Text
Smoked Toor Dhal Samosas
The smoky flavour of these toor dhal samosas makes them extra delicious.
This is a recipe I learned at a street food stall on a recent trip to Mumbai. It’s so good! The smoky flavour of the samosas really makes them special. As you will see in the photos below, I used a Traeger smoker to smoke the dhal but there is another way of doing it that is really easy. All is explained in the method.
I like to serve these with tamarind sauce and mint and coriander sauce. They are also good with lime juice squeezed over the top just before popping them into your mouth.
I used shop bought samosa wrappers for this one. They are really convenient and turn out nice and crispy. Another way to do it is to make your own pastry as I do in my potato and artichoke samosa recipe.
Temper the whole spices and curry leaves in a little oil.
Add the chopped onion, garlic, ginger and chillies along with the ground spices.
Add the cooked toor dhal and allow it to simmer down until it is thick enough to be used as a filling.
Smoke the cooked dhal however you want. I used a Traeger smoker but I mention another way to do it without a smoker below.
Time to fold your samosas. Take your samosa wrapper and fold the top left-hand corner to the right.
Now fold the top right corner over to the left. This will make a triangular pocket.
Fill the pocket with the smoky dhal filling.
Fold the remaining pastry over one or two time and seal with the flour paste.
First one done. Now repeat with the rest.
Heat your oil and fry until browned. Serve immediately.
Be sure to rest the samosas on paper towels to soak up any excess oil.
Dig in!
Over 100 new recipes!
Best Seller! Over 100 Curry House Recipes.
International & UK Orders
Smoked Toor Dhal Samosas
Author: Dan Toombs
Recipe type: Side
Cuisine: Indian
Serves: 15 - 18
Ingredients
150g 1 cup toor Dhal
1 litre (4 cups) water
½ tsp salt
2 tbspfinely chopped ginger
1 tsp amchoor
1 tsp garam masala
3 tbsp finely chopped coriander
Salt to taste
1 tsp rapeseed oil
FOR THE TEMPERING
2 tbsp rapeseed oil
1 tsp mustard seeds
1 tsp cumin seeds
10 curry leaves – roughly chopped
Shop bought samosa wrappers
Lime wedges to serve (optional)
Instructions
Rinse the dhal several times and then cover with water to soak for 30 minutes. Then, light a few pieces of lump wood charcoal outside to become white hot. Pour the lentils into a saucepan and cover with one litre (4 cups) water, the turmeric and ginger. Bring to a boil and then reduce the heat and simmer for 30 minutes or until the dhal is really soft.
Stir in the amchoor and garam masala. You want the dhal to be really thick as it is a stuffing so continue to reduce the water down until good and thick. Stir regularly so that the dhal doesn’t burn to the bottom of the pan. Set aside to cool.
Now heat the tempering oil over high heat in another pan until visibly hot. When hot, add the mustard seeds. When they begin to pop, reduce the heat to medium and stir in the cumin seeds and curry leaves. Temper for about 40 seconds and then pour it over the cooked dhal.
By this time, your charcoal should be ready. Place it on a piece of foil and carefully transfer to the pan with the dhal. Drizzle the oil over the charcoal and it will begin to smoke heavily. Cover the pan and let the dhal smoke until all of the smoke is gone. I smoked mine in my Traeger which for me is much more convenient. Feel free to use a smoker if you have one.
Take you samosa wrapper and fold the left corner down to the right hand side. TPlace a tablespoon of the smoked dhal on one of the samosa wrappers and fold into triangular samosas using the instructions on the packaging. The most important thing is that the filling is tightly wrapped inside the pastry. Repeat with the rest of the dhal and wrappers until it is all used up.
3.4.3177
Source: http://www.greatcurryrecipes.net/2018/04/30/smoked-toor-dhal-samosas/

0 notes
Text
Cilantro-Lime Grilled Chicken with Mango-Avocado Salsa + Weekly Menu
More than usual, I have a case of the Sundays. A super fun weekend is coming to a close and it’s making me very grateful that I scheduled myself on PTO Wednesday afternoon for a little mom time. Weather pending, I’m grabbing my Kindle and heading to the beach for a few hours. Fingers crossed the weather holds out. If it doesn’t, I’ll probably just stay at work because being at home with the contractors on WEEK NINE of our THREE WEEK bathroom renovation just doesn’t sound appealing.
Can ya blame me? But, I do think it’ll be worth the wait. Fingers crossed.
Yesterday was a JAM packed day of summer fun, starting with a boat rental in the morning. We cruised down Lake Michigan about 4 miles south of the pier to where our neighborhood beach is and can I just say how grateful it made me for the little beach that we do have. The erosion of the bluff here in St. Joseph, Michigan is scary. Land is just dropping into the water and attempts to limit the damage have been futile, it seems.
Anyway…the boat was a blast and Piper LOVED going fast. Shea loved being in the river and jumping off the back of the boat again and again and again. The girl continues to love swimming and all things water. Of course little sis hopped in on the fun. We had Pandora synced with the boat’s Bluetooth and just rocked out! A very fun morning followed by naps and an impromptu visit from my little brother, Uncle Bubbie.
We eventually headed out to the local youth fair which is BIG STUFF in our neck of the woods. As a Chicago native, I am forever interested in the whole world of livestock, show animals, fair food…the whole bit. My little Piper fearlessly walked up to HUGE goats and fed them fistful after fistful of green stuff (hay?). She may find her calling with animals – we’ll see. The girls then demolished huge fair corn dogs and tasteless French fries while the grandparents, Mark, and I were on ketchup damage control. Mark and I sent the grandparents home with the kids for baths and bed while we headed out for a healthy little dinner of salad and crab cakes with a nice, cold IPA on the river. Perfection.
Today is back to the grind – grocery shopping, lunches, laundry, and hockey. As I was planning the weekly menu this morning, I was hoping to run across something for the grill that piqued my interested. Problem is, I’m comparing everything to this gem of a recipe and nothing made the cut. This marinade is fantastic and the Mango-Avocado Salsa makes this meal so very light and summer-y. Big time flavor and beautiful colors – it’s sure to please!
Cilantro-Lime Grilled Chicken with Mango-Avocado Salsa
Author: Nicole Morrissey
Prep time: 8 hours
Cook time: 15 mins
Total time: 8 hours 15 mins
Serves: 5 servings (6 oz chicken with ~3/4 cup salsa each)
Ingredients
Marinade:
2 lbs boneless skinless chicken breasts, pounded to 1-inch thickness
¾ cup orange juice
½ cup extra-virgin olive oil
1 tsp lime zest
⅓ cup freshly squeezed lime juice
1 Tbsp honey
1 tsp cumin
2 Tbsp low-sodium soy sauce
2 tsp minced garlic
¼ cup chopped cilantro
Salsa:
2 mangoes, diced
2 avocados, diced
¼ cup finely diced red onion
1 Tbsp finely chopped jalapeno
1 Tbsp orange juice
1 tsp extra-virgin olive oil
½ tsp lime zest
2 Tbsp freshly squeezed lime juice
¼ cup chopped cilantro
½ tsp salt
Instructions
Combine marinade ingredients, orange juice through cilantro in a medium bowl and whisk well. Remove ½ cup to a separate container to reserve for grilling. Add chicken to remaining marinade and flip chicken to fully coat. Cover and refrigerate for 8 hours or overnight.
Prepare grill grates by brushing with oil. Preheat grill to 450 degrees F. Once hot, add chicken and cook 8-10 minutes, brushing with reserved marinade. Flip chicken and cook an additional 5-7 minutes or until cooked through, brushing with remaining reserved marinade.
Meanwhile, combine mango, avocado, onion, and jalapeno in a medium bowl. Top with orange juice, olive oil, lime zest, lime juice, and salt; gently stir to combine.
Serve 6 ounces of chicken with ¼ of the salsa.
Nutrition Information
Serving size: 6 oz chicken with ~3/4 cup salsa Calories: 354 Fat: 17.0 Carbohydrates: 18.2 Sugar: 11.8 Sodium: 620 Fiber: 5.0 Protein: 37.2 Cholesterol: 88
3.5.3251
Weekly Menu: August 19th – 23rd
Be well,

Source: https://preventionrd.com/2018/08/cilantro-lime-grilled-chicken-with-mango-avocado-salsa-weekly-menu/
0 notes
Text
How To Make An Easy Moisturizing Salve You’ll Use All Winter
If there’s one time of year that’s especially tough on our bodies, it’s wintertime. For example, you can get sick with a cold, struggle with dry skin and hair, or end up with wind-burned cheeks from being out in the cold. So today I’ll be showing you how to make a concoction that can help with all of those issues (and more!): an all-natural, homemade salve!
This salve is made up of beneficial and natural ingredients like coconut oil, olive oil, and nourishing vitamin E. It’s plenty useful on its own, but you also have the option of making it more specialized by adding in essential oils! I’ll start by showing you how to make the base salve (or “naked salve,” as I like to call it). After that, I’ll share a few essential oils blends you can add to your salve to help target specific ailments!
<![CDATA[.player-position padding-left:0px !important; padding-right:0px !important; padding-bottom:0px !important; .copy padding: 12px !important; font-weight: 700; font-size: 15px !important; ]]>
But before we get started, one quick note about the salve recipe. The recipe below makes enough salve to fill 4 small glass jars (4-ounces each). But of course, you can feel free to use whatever containers you happen to have handy! Just make sure to evenly distribute the vitamin E oil among your containers when you get to that step. :-)
Ingredients:
1 cup coconut oil
1 cup organic olive oil
4 Tbsp beeswax pellets
1 tsp vitamin E oil, divided
Directions:
Firstly, heat the coconut oil, olive oil, and beeswax together in a double boiler. (Keep in mind that if you don’t have a double boiler, then you can always set a bowl over a pan of simmering water!) Stir occasionally until completely melted.
Pour or ladle the oil mixture into jars, then let the oil mixture cool for a minute or two.
Then divide the teaspoon of vitamin E oil evenly among your jars. If you’re adding essential oils to the salves, add them at this point. (See below for salve-ready essential oil blends!)
Give each one a final stir with a bamboo skewer, then let them cool and harden completely.
How To Use Your Salve
Here are just a few of the things you can use it for:
To moisturize dry nasal passages
To heal dry, cracked cuticles
To treat chapped, wind-burned cheeks
As a moisturizing lip balm
To soothe insect bites and minor burns
To soothe diaper rash
4 Essential Oil Blends For Salves
As I mentioned previously, the “naked” salve is already useful on its own. But if you’re dealing with a specific ailment, you can make it even more useful by adding certain essential oils! Here are a few of my favorite oil blends to use in salves. (Note: The amounts listed for each blend are meant to be added to 4 ounces of salve. So if you’re making your salves in 4-ounce jars, you would add the total amount listed for the blend to each individual jar.)
1. Sleep Blend (for restful sleep)
20 drops cinnamon bark essential oil
20 drops ginger essential oil
10 drops peppermint essential oil
6 drops lemon essential oil
6 drops grapefruit essential oil
Apply your sleep salve to the bottoms of your feet before bedtime. The essential oils help promote restful sleep, while the salve softens and moisturizes your feet. (Perfect for those with dry, cracked heels!)
2. Healing Blend (for minor cuts and scrapes)
30 drops lavender essential oil
10 drops lemon essential oil
10 drops tea tree essential oil
Apply your healing salve to minor wounds like cuts, scrapes, and bruises to promote speedy healing.
3. Headache Blend
20 drops peppermint essential oil
20 drops lavender essential oil
5 drops frankincense essential oil
5 drops wintergreen essential oil
5 drops birch essential oil
Apply your headache salve to the back of your neck, which will help relieve pain and tension from headaches. You can also rub it onto your temples if your skin tolerates these oils wells. (Those with sensitive skin may want to stick to the neck area to be safe.)
4. Menstrual Cramps Blend
20 drops clary sage essential oil
10 drops marjoram essential oil
10 drops ginger essential oil
10 drops geranium essential oil
5 drops cinnamon bark essential oil
Apply this cramps salve to your lower abdomen in order to soothe menstrual cramps and other related symptoms.
What sort of ailments do you typically deal with during the winter?

Source: https://www.onegoodthingbyjillee.com/how-to-make-salve
0 notes
Text
Why I Switched Our Cleaning Supplies
Household cleaners and soaps are some of the biggest offenders of toxins in homes and they can routinely expose us to chemicals that can affect us to varying degrees ranging from minor skin irritation to hormone disruption or cancer. If you’re cleaning up what you’re putting IN your body, you should care what you put ON your body, and what you put in your environment. Period. There are safe cleaning products out there.
Most every household contains traditional cleaning supplies that are laced with toxic chemicals that are harmful. We’re exposed to them routinely — from the phthalates in synthetic fragrances to the noxious fumes in oven cleaners. Ingredients in common household products have been linked to asthma, cancer, reproductive disorders, hormone disruption and neurotoxicity. According to the Environmental Working Group, using them just once a week can have a harmful effect.
How Toxic Are Your Cleaning Supplies?
Toxic chemicals in conventional household cleaners vary in their severity – from immediate hazards such as skin or respiratory issues, chemical burns or watery eyes to long term major problems such as cancer, fertility issues, ADHD, compromised immune system and more.
It can be overwhelming to to start to realize how many toxic chemicals are in our home, and I’m not saying we can avoid exposure to toxic chemicals altogether, but it is possible to reduce it, and significantly decrease our risk of illness. Some chemicals build up and can cause enough harm in our bodies over time, that can trigger harmful effects. So knowledge is power.
How Do I Find Out What are Truly Safe Cleaning Products?
Here’s the thing: there’s so much we cannot control, but for the things we can, and use daily, why wouldn’t we do a little research and make safer swaps for our families? At the very least, we should be aware of what is in them! I use two resources in our home to identify how toxic our products are. One is EWG.ORG/SKINDEEP and the other is the Think Dirty APP. Both are apps that you can use to scan barcodes in your home, and see how toxic your current products are. Pretty cool, right?
It can be slightly terrifying when you start scanning your products, but remember: make small changes and do the best you can. I’m not advocating you throw out every product in your home right now, but rather once you are informed you can try to make the best choices you can going forward.
What are the Harmful Chemicals in Household Cleaning Products to Avoid?
Here are a few to look out for:
1. Phthalates: Often found in many household products with a fragrance, such as air fresheners, dish soap, even toilet paper. Because of proprietary laws, companies don’t have to disclose what is in their scents, so you won’t find phthalates on a label. If you see the word “fragrance” on a label, there’s a good chance phthalates are present.
2. Perchloroethylene or “PERC”: Often found in dry-cleaning solutions, spot removers, and carpet and upholstery cleaners.
3. Triclosan: Found mostly in liquid dishwashing detergents and hand soaps labeled “antibacterial.”
4. Quarternary Ammonium Compounds, or “QUATS”: Fabric softener liquids and sheets, most household cleaners labeled “antibacterial.”
5. 2-Butoxyethanol: Often found in window, kitchen and multipurpose cleaners.
6. Ammonia: Find them in polishing agents for bathroom fixtures, sinks and jewelry; also in glass cleaner.
7. Chlorine: You’ll find this in toilet bowl cleaners, mildew removers, laundry whiteners, household tap water.
8. Sodium Hydroxide: An ingredient often in oven cleaners and drain openers.
A Note on “All Natural Cleaners”
This might surprise you, but many “all-natural” cleaners found in grocery and health food stores still have harmful chemicals and may even score worse than conventional cleaning products. This is where those handy apps above come in handy. Again, do your own research!
What Safe Cleaning Products are in my Home:
I avoiding conventional household products as much as possible and have found great alternative, safe swaps for cleaning products, laundry detergent, dryer sheets, and air fresheners. Here are some options for you:
You can make your own DIY household cleaners: LCK Food Editor Kelli uses a mixture of Dr. Bronner’s Castille Soap, Water, and Essential Oils for almost all cleaning tasks. For heavy duty jobs she also will add in baking soda.
All-Purpose Cleaning Products: I use Branch Basics for my Bathroom, All-Purpose Counter Cleaner, Glass, and hand soap!
Laundry Detergent: Again, I use Branch Basics. I also use their Oxygen Boost for my Whites. I’ve also heard Molly’s Suds is a good brand, but haven’t personally tried it!
Dryer Sheets: I use Dryer Balls (see this post).
Air Freshener: I use this home spray by The Laundress or safer candles by Phlur.
For me, Branch Basics is literally magic. Their multi-purpose concentrate makes cleaning simple, affordable and sustainable. The products are refillable and they’re significantly less expensive than similar single-use products. You dilute The Concentrate with water, and then it’s ready for any cleaning job around the house, even dirty laundry!
A word from the Branch Basics team:
“We’re not fans of shipping water. Our multi-purpose concentrated cleaner makes cleaning simple, sustainable, safe and affordable. Just dilute with water in our spray and foamer bottles (complete with marked fill lines) and you’re all set to effectively tackle every room in the house and your laundry too! Our kits come with everything you need to get started or you can purchase the concentrate in whatever size it best for you.”
Discount for you:
My friends at Branch Basics let me give you 15% off starter kit with code LEXI15! The starter set includes one 33 oz. Concentrate, three empty spray bottles, one Foaming Wash bottle, one Laundry bottle, and then I add the oxygen boost and dryer balls to my order.
I was not paid to write this post, though it does contain affiliate links. Here’s my promise to you. While I make a small percentage on sales used through my code, this is the brand I TRUST. I PERSONALLY use them in my home for my family, and no super small amount of commission is worth compromising your trust. So please trust me when I say I would never promote a product that I don’t fully stand behind.
Source: https://lexiscleankitchen.com/safer-cleaning-supplies/
0 notes
Text
Chicken Fricassee
Chicken Fricassee is a classic French dish that is timeless. The chicken is browned, then slowly braised with onions, garlic, herbs and carrots in a white wine cream sauce.
Serve this amazing chicken fricassee recipe with our creamy mashed potatoes and a crusty bread to experience the fullness of French cuisine. Your friends and family will be so impressed!
This post may contain affiliate links. Read my disclosure policy.
Chicken Fricassee Recipe
Hi, it’s Julia from Vikalinka once gain and today we are exploring some of Europe’s best.
French cuisine has always had a shroud of mystery surrounding it and rightfully so. Many countries’ cuisines have been influenced by it! However, it doesn’t mean that attempting French dishes like this Chicken Fricassee Recipe at home should be complicated.
What is the Origin of Chicken Fricassee?
This chicken fricassee recipe is not the one that comes from Michelin star restaurants. This recipe is the heritage of country cooks aka home cooks like you and I. It is rustic and simple. This recipe doesn’t require precise measurements but instead relies on quality ingredients and a slow braising technique for its savory and rich taste.
What is Chicken Fricassee?
It is more of a method of cooking than an actual recipe. Chicken Fricassee literally means cut up and fried chicken, so what you add to the chicken is up to the cook entirely.
However, what is nowadays accepted as a chicken fricassee is chicken braised in white wine cream sauce.
What Vegetables can I put in Chicken Fricassee?
Good news is you can add any vegetables that can sustain a slow braising process without falling apart. So carrots, mushrooms, green beans or even broccoli will all work well here.
How to Make Chicken Fricassee:
Brown chicken pieces until golden and removing them to a separate plate.
In the same pan, sautee onions, carrots, garlic and your choice of herbs.
Next we need to thicken the sauce by adding flour and quickly cooking it until it’s mixed with the butter and smells slightly nutty.
Add white wine and mix with a wooden spoon until you have a thick sauce.
Return the browned chicken with the juices back to the pan and cook in the oven uncovered for 45 minutes.
The final touch is the addition of cream. It’s important to add it last, so it doesn’t separate under the intense heat of the oven. After your chicken has finished its time in the oven, stir in a splash of heavy cream.
We used heavy cream for thicker sauce, however you can add light cream, which will result in a slightly thinner sauce with less calories. The choice is yours. We love to enjoy this with Rustic Farmhouse Bread.
More Chicken Recipes
I hope this Chicken Fricassee Recipe becomes a new favorite for you. It is an excellent staple for any kitchen and you can change the vegetables and herbs based on what you have on hand.
Chicken Fricassee
Prep Time: 10 minutes
Cook Time: 1 hour
Total Time: 1 hour 10 minutes
This Chicken Fricassee is braised in a creamy white wine sauce making the chicken tender with rich flavor. Serve over mashed potatoes or rice with crusty bread.
Author: Julia Frey
Skill Level: Medium
Cost to Make: $8-$12
Keyword: Chicken Fricassee
Calories: 538 kcal
Servings: 6 people
1 Tbsp olive oil
8 chicken thighs and legs combined
salt and pepper to taste
1 Tbsp butter
1 small onion chopped
2 cloves garlic minced
2 carrots cut in large pieces
3-4 sprigs thyme (leaves only)
2 Tbsp all-purpose flour
1/2 cup dry white wine such as Sauvignon Blanc
1 1/2 cup chicken stock
1/2 cup heavy cream
Preheat oven to 350 F. Pat dry chicken with a paper towel and season with salt and pepper. Place a large deep pan over medium/high heat with 1 Tbsp olive oil. Brown chicken approximately 4 minutes per side until golden on each side but not cooked through. Remove to a plate and set aside until needed. Discard excess fat leaving 1 Tbsp in the pan.
Add 1 Tbsp butter to the pan and saute chopped onions and carrots over low heat for 7-10 minutes. Add minced garlic and fresh thyme leaves and cook briefly for 30 seconds. Add 2 Tbsp flour and cook while stirring until flour is completely absorbed by the fat and mixture smells nutty. Add 1/2 cup white wine and simmer until slightly reduced. Pour in 1 1/2 cups chicken stock.
Return chicken to the pan together with the juices and bake uncovered at 350˚F for 45 minutes.
Take the chicken out of the oven and add 1/2 cup heavy cream, stir until combined. Taste and season with salt if needed.
Nutrition Facts
Chicken Fricassee
Amount Per Serving
Calories 538 Calories from Fat 351
% Daily Value*
Total Fat 39g 60%
Saturated Fat 13g 65%
Cholesterol 193mg 64%
Sodium 270mg 11%
Potassium 532mg 15%
Total Carbohydrates 9g 3%
Dietary Fiber 1g 4%
Sugars 2g
Protein 30g 60%
Vitamin A 78.6%
Vitamin C 4.9%
Calcium 4.7%
Iron 9.3%
* Percent Daily Values are based on a 2000 calorie diet.
If you make this recipe, I’d love to see pics of your creations on Instagram, Facebook and Twitter! Hashtag them #natashaskitchen
Love French Cooking? Our Top French Recipes:
Source: https://natashaskitchen.com/chicken-fricassee/
0 notes