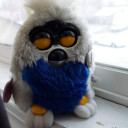
fubbybebby
over enthusiastic furby fanatic
furby postings, reblogs, and guides! I am not an expert, but I sure hope I can be one at some point.
3 posts
Don't wanna be here? Send us removal request.
Last Seen Blogs

dzzzzdzz
Sissy for black Kings 👑

ghosst-girl
curiosity killed the cat

redstarnotebooks
Untitled

r--kt
the post-credits scene

Text
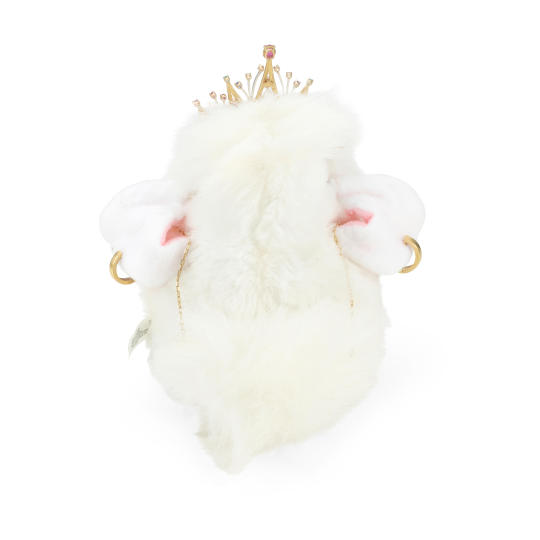
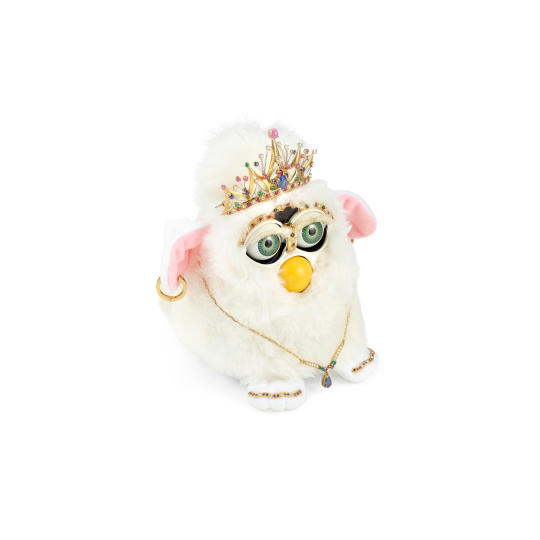
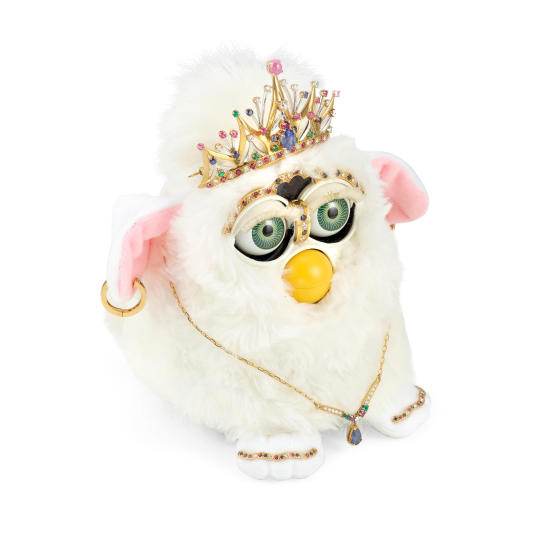
Bejewled furby resurfaces - June 2023
Hello everyone! I have been on a slight hiatus due to a myriad of personal reasons, I am back for a short post with some interesting news
a GENUINE Bejeweled furby has surfaced!
Foreword:
This bejeweled furby is in my opinion the only one to exist, as with much other furby information numbers of units produced is a shaky 25 year-old game of telephone. But having researched archived Tiger and FAO sites, it appears all promotional images are the same snowball furby (Notably with green eyes) and we haven’t really seen any different versions, For the information in this post I consulted several archived websites on archive.org along with the new listing
Background info:
The following description is transcribed from the original FAO Schwarz listing for the bejeweled furby.
“Created by designer Sidney Mobell. The world's most exciting tay is now the world's
most precious. bedecked with 156 gleaming and glittering genuine gemstones Lovable Furby comes adorned with a tiara necklace. and earrings crafted in platinum and 18k gold and containing 63 full cut diamonds (3.7 ctw) 44 rubies (4.5 ctw) blue sapphires (5 3 ctw) and emeralds (1.O ctw). AIl 3 pieces are removable So you can wear them too!
A portion of the proceeds will benefit the word class hasbro children's hospital–”
The listing + info
So here is the description of the listing, the starting bid is 1,200.
(ill add it in later once the auction ends)
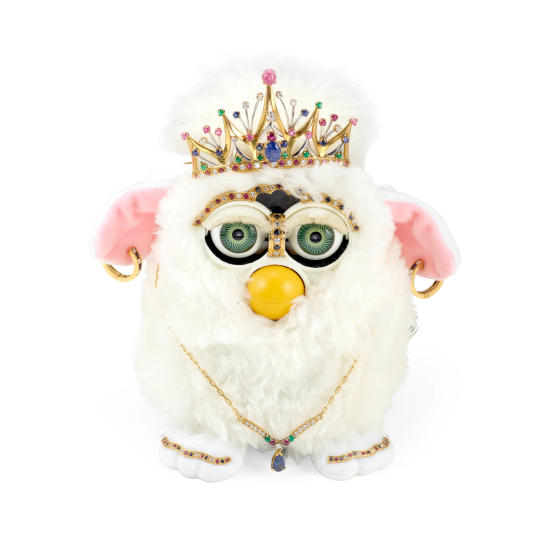


Now for those of you at home, you may be thinking... a $100,000 furby with an auction cap of $2,000. somthing must be fishy right?
but on paper... the bejweled furby isnt worth that much, and Ill explain.
For those of you who are not jewelers (I have only taken intro classes myself) this furby may appear to be absolutely studded in expensive gems… but in reality the true value is being obscured by the cwt, or Carat Total Weight, this value is in reference to the TOTAL cumulative weight of the gemstones. So for example, the 63 diamonds CWT is 3.7, so each diamond is only 0.06 ct. so in reality the QUALITY of the dimaonds used is very low, for comparison you can purchase 25 loose diamonds of the same color, carat and clarity for around $50
So after a very novice rough calculation the total value of all the metals and gemstones here dont seem to total over $800. This is why I think the piece was designed to be a symbolic representation to the person who donated the $100,000 to the hospital, rather than a truly $100,000 furby which is why the capped value of the auction is $2,000
Conclusion + opinions
I still think this is an absolute amazing piece of furby history, one that I admittedly was not to familiar with, but was aware of in my deep dives into the furby archived sites, I think that the resurfacing of this piece is a ode to the furby community, and the fact that we are STILL actively learning about undiscovered information relating to Furbys a quarter of a century later! This toy line was only produced for just under 3 years but has provided a trove of information that's out there just waiting to be discovered!
And with that, ciao
-Cray
250 notes
·
View notes
Text
Complete 2023 Furblet Teardown/Disassembly Guide
hi!! this post will be an image heavy teardown guide for the newest 2023 furby furblets. questions are welcome!
Be aware there will be skinning and disassembly below the cut!
You will need:
A PH1 size screwdriver
a stiff, strong, thin prying tool (like a very thin flat head screwdriver, a butterknife, a palette knife, etc.)
a second stiff tool to pull/push on tabs (i used a mini plastic curved scraper)
optional, but a small magnetic mat and a small container (or just 2 containers) to hold parts and screws so you don't lose them!
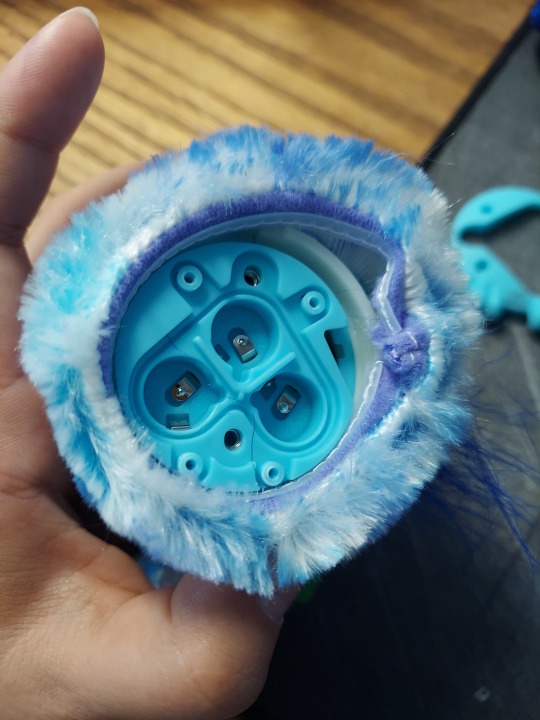
This is my volunteer model ooh-koo!
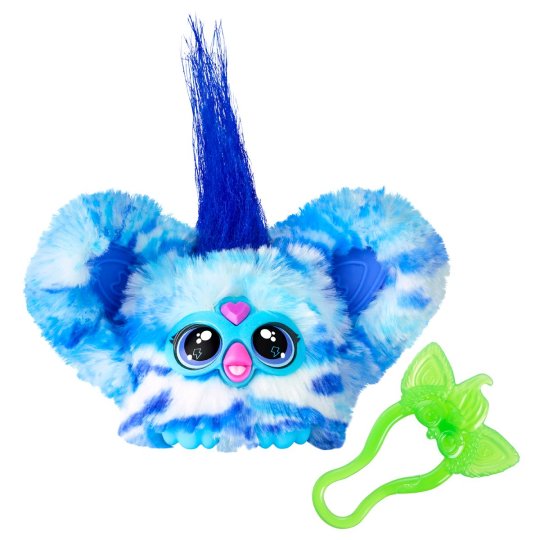
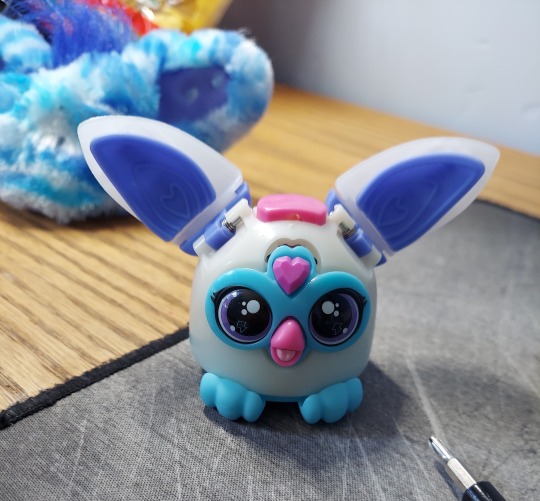
She is in complete working order, both before and after the teardown. There aren't many fragile parts inside furblets (they're surprisingly simple but clever!) but I still do not recommend following through with this disassembly unless you're absolutely fine with damaging your furblet. Furblets are NOT meant to be taken apart, and are filled with 1-way safety pins in the faceplate that cannot be removed without bending/breaking them out.
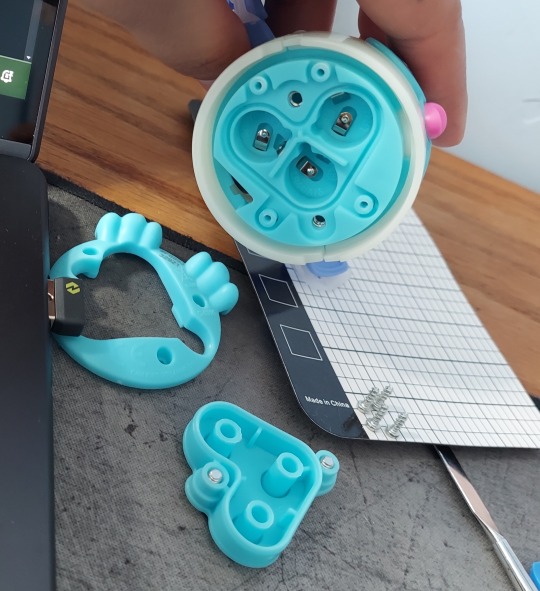
To start, remove all visible screws on the underside of the furblet where the battery compartment is. There are 6 total screws, two larger ones for the battery compartment and 4 smaller ones on the outside holding the bottom on to the furb. These screws are different sizes, don't lose them and put them back in the right places! The bottom of your furby should look like this now:
(i forgot to take a photo of this initially, so she is skinless here.)
After this, you should very easily be able to lift the plastic strip holding the fur into the shell. Part of it is tucked into a nook to allow slack in the fur for lifting it over the body!
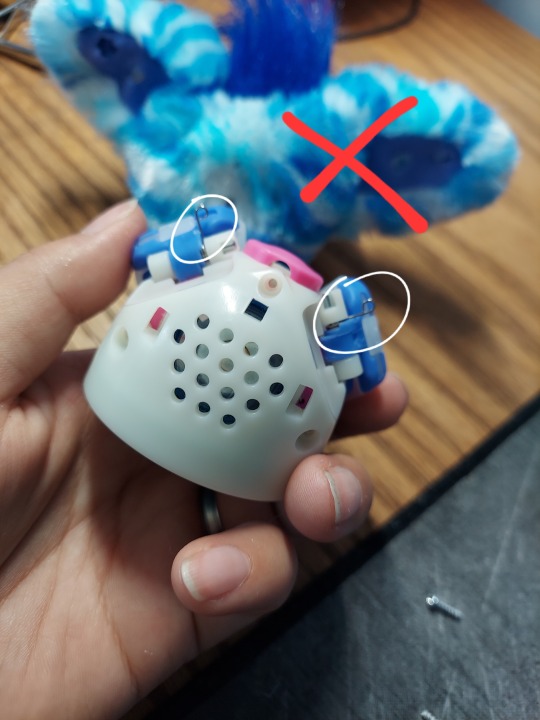
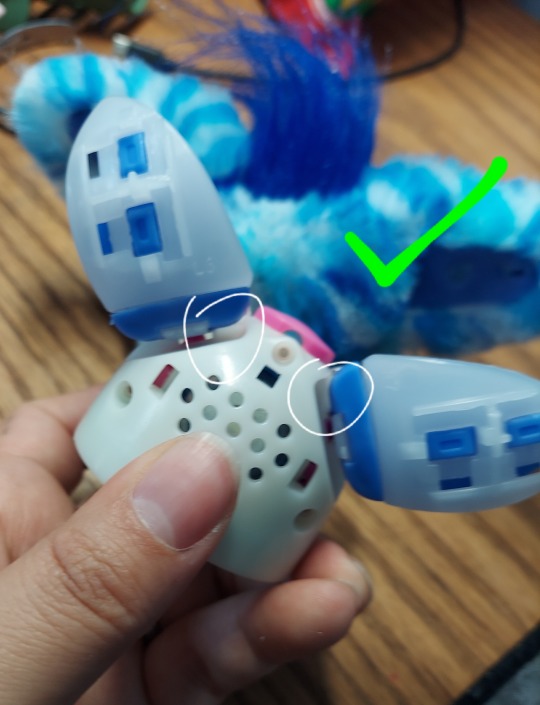
After this, gently pull the fur up and over the body shell, and flip it over the ears. These are held in place by plastic clips so be gentle and don't force it off yet.
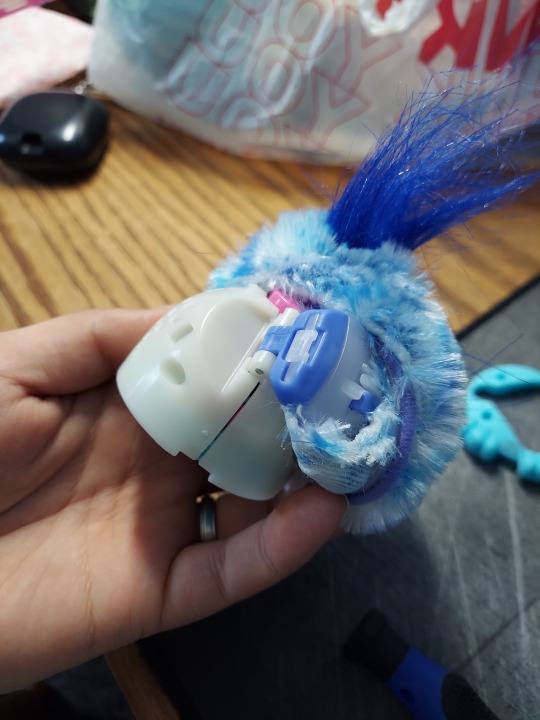
now for the most genuinely difficult part of the whole process, unclipping the ears
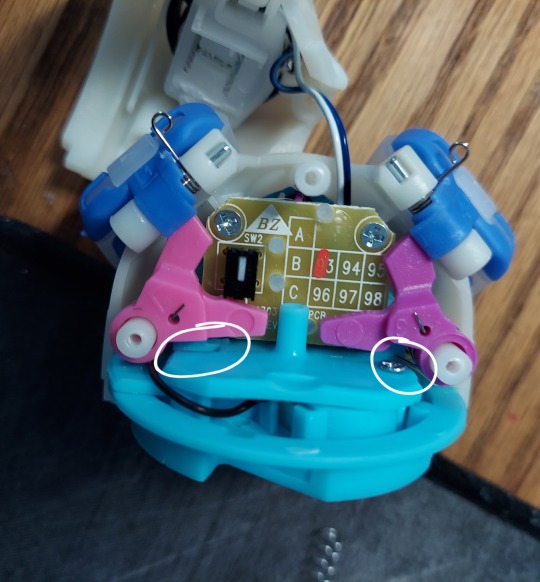
Holding the ear on the front and back to sandwich the pieces together, and being VERY gentle, slide your first prying object under the wide end of the white ear clips. This will lift it to allow you to pull the clips up over the barrier. While still leaving the pry in, use your second object and push/pull on the clip. Here I am pulling since my scraper is curved and it was easiest. The T shaped clip should pop right out, but may need a lot of finagling to get it there. I stretched the second clip and damaged it, so again be slow and careful!
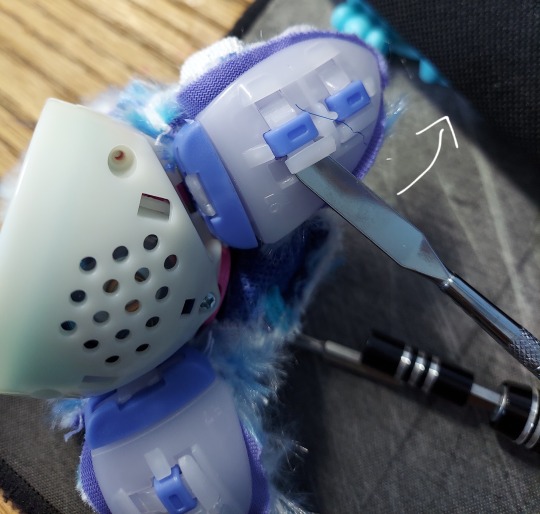

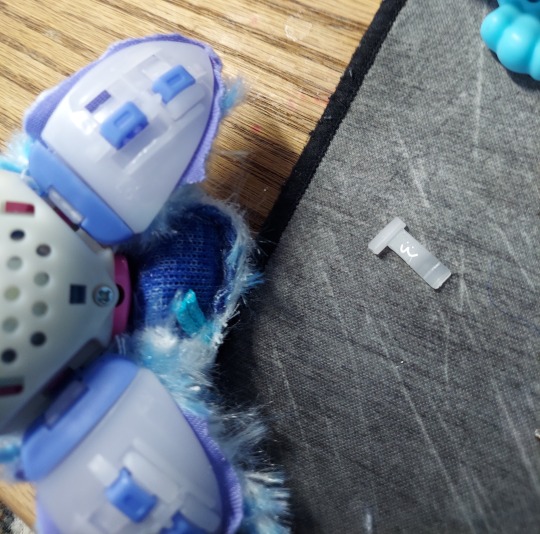
Repeat this process on all four tabs! Now, the skin should only be held on to the furb by the face plate.
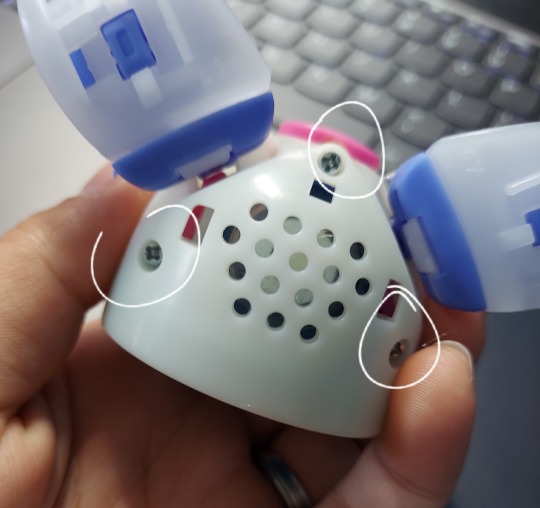
To open up and remove the faceplate, start by removing all three screws on the back of the shell. Again, I forgot the picture initially so she is already skinless here.
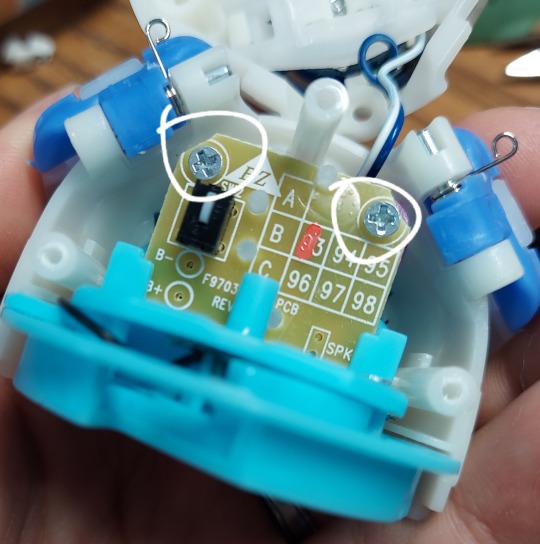
Now, pull apart the two halves of the shell. The microphone is wired from the center board to the back half of the shell, so don't pull too hard or you might rip the wires out!
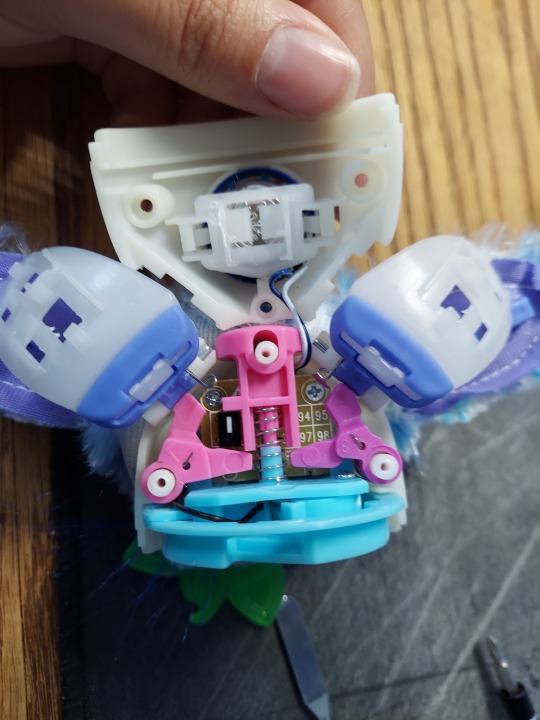
Pay attention to your individual furblet! Mine has pink and purple components, remember or take a picture of the lay out so you aren't confused later. the pink and purple parts on either side just pop right out, and the button slides off the peg along with its spring. This will give you full access to the backside of the motherboard.
Remove the screws on either side, and it will release the whole center plate from the front half of the shell. There is a third screw on the bottom of the center plate, but this only separates the battery contact plate and the base plate of the motherboard (i wouldn't really recommend removing it since it's not relevant to anything you need access to) The whole center plate will now just slide out of the empty front half of the shell!
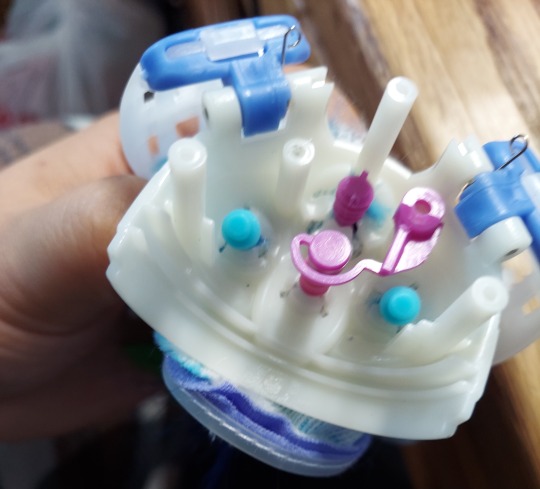
There is one additional piece kind of floating on the pegs here, and it's needed so the furb recognizes button presses to the mouth. Here it's the J shaped purple piece! This just pops right off and you can see all the safety pegs for the faceplate and mouth/gem buttons. To remove the pegs, you will have to manually bend the tabs holding the pegs in place. This WILL damage your furblet. Do not go further if you aren't wanting to break anything.
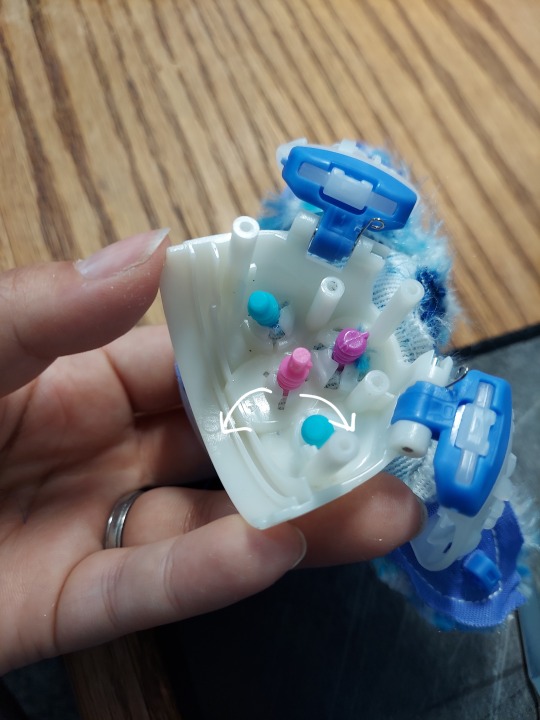
After bending the tabs out, the pegs should pull straight through, releasing the whole faceplate. At this point, the skin should come right off too! Here are the inside and outside parts.
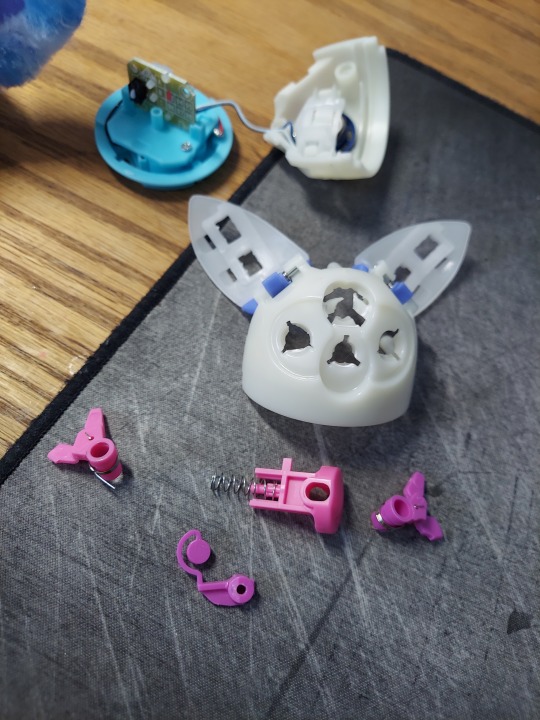

Congrats! You've completed a disassembly. To put your furblet back together, just do everything in reverse!, however please note the following:
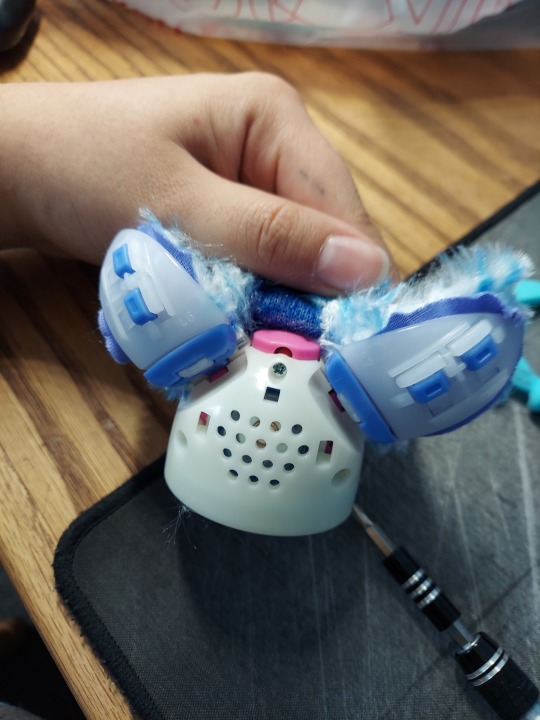
When reassembling, be sure to replace all spring parts in their correct positions! The ear mechanisms are reliant on all of these springs to work. For the inside, make sure the Y shaped brackets are on their correct sides, and that the end of the metal spring is INSIDE the furb, pushing against the bottom plate (the left side here has a small divot where the left side spring goes, the right side just kind of sits on top of the plate)
Similarly, when replacing the shell be sure to lift the ears all the way up and close the metal pins into the shell. This puts tension on the spring so they'll be able to pop out when the button on top is pressed. Test the button to make sure everything is working mechanically!
And that's all! This wasn't very difficult to do, but because of the actual inevitable damage caused by removing the face plate, i figured it wouldn't be a bad idea to make a guide of some sort. Please feel free to use and link this guide however you see fit, but please don't use my photos! Thanks for reading 🩵💙
#furby#furby community#furby guide#gator guide#furby disassembly#furby furblet#furby custom#all furby#furblets
24 notes
·
View notes
Text
hello!! first post because I don't just want to immediately upload a guide on a blank account. this is a side blog, my main blog is @dero-gatory !
My name is Jade (or Gator), I use she/her pronouns and I've been collecting furbies for ~5 years now! I used to have one as a kid but it disappeared at some point and I just forgot about them for a while.
I currently have way too big of a collection. I have no updated pictures because if I put all my furbies in one place it might cause an explosion or something. My grail/dream furbies are the kid cuisine and tropical. I'll be working on getting a flamingo and 2013 rainbow crystal boom at some point
You can find me elsewhere on instagram and discord (@dero.gatory for both, @fubby.bebby on IG for furby only stuff)
My guides will be tagged with #gator guide, reblogged art with #gator loves and regular things with #gator post. This is a safe furby blog!
0 notes