
Last Seen Blogs

deadpangea
Eat Your Profile

getvalentined
arm yourself with the memories of my teeth

keyholder-captions
Keyholder Captions

sanskritisethi
sanskritisethi

conon-t-t
Conon
Text
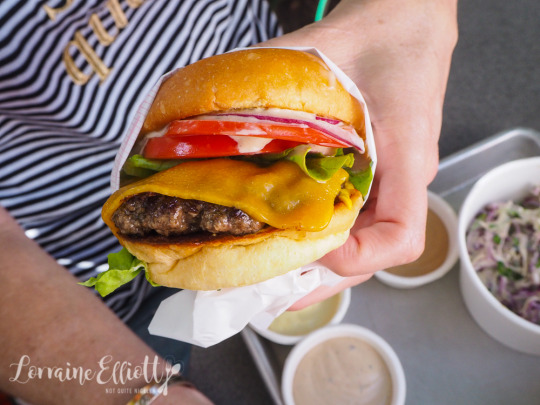
Air Fried Artichoke Hearts Sandwiches with Coleslaw
Breaded in seasoned panko and air-fried until crispy, these air fried artichoke hearts make a delicious sandwich with tangy vegan coleslaw and spicy mayo.
I’m back in steamy Mississippi after a 10-day visit to the Vancouver area, and I can’t tell you how much I miss the beauty of the mountains and the sea and the cooler temperatures. I won’t bore you with my vacation photos, which were gorgeous (but that’s because of where we were, no skill on my part). If you’re interested in scenic vistas and whale, sea lion, and eagle watching, check them out on my personal Facebook page, which is open to followers.
When I’m on vacation, I don’t deny myself much when it comes to food. I like to try vegan versions of things I can’t get here, such as poutine and burgers stuffed with mac and cheese, and to look for dishes I can recreate at home. (You can see a lot of the decadent food I ate on this trip on Instagram.)
On our last day in Vancouver, we ate lunch in a restaurant called The Arbor, and I had their Southern Fried Artichoke Sandwich (which is funny now that I think of it, going to Canada to eat Southern food.) Several people had recommended it to me, and though I usually avoid fried food, I decided to give it a try.
It turned out to be delicious–stuffed with coleslaw, macadamia cheese, and eggplant bacon, in addition to the breaded artichoke hearts. In truth, I didn’t really notice the individual elements because the overall effect was so good. I knew I had to come home and make a fat-free version of it.
I decided to leave off everything I hadn’t noticed while I was eating the sandwich (eggplant bacon and macadamia cheese) and concentrate on creating crunchy artichoke hearts and a tangy but oil-free coleslaw. Since the menu said the sandwich included “avocado mousse” (another ingredient I didn’t notice), I added slices of avocado to my sandwich.
To perfect the recipe, I made these air fried artichoke sandwiches twice. The second time, I added the Sriracha mayo, and folks, that took them to the next level. I have a feeling my husband will be asking for them again and again.
Of course, air fried artichoke hearts are not just for sandwiches. They make a great appetizer dipped in your favorite sauce or dressing. We loved them with Sriracha mayo, made with my super-low-fat Tofu-Cashew Mayonnaise.
To Air Fry or Not to Air Fry
That’s the “why” of the recipe. Before I get into the “how,” let me just say that this type of cooking is what the air fryer is made for. It circulates hot air all around the food, meaning you don’t have to disturb the artichoke hearts or their breading by turning them over.
But, if you don’t have an air fryer, I’m sure that you can get good results by cooking them on a parchment-lined baking sheet in the oven. I would bake them at 400F for about 10 minutes before turning them over carefully, and then count on at least 10 more minutes to get them fully brown.
How to Air Fry an Artichoke Heart
Breading foods for air frying is a task I tend to avoid unless the results are worth it. It can be messy and time consuming, but I’ve figured out a few tricks that make it easier.
First, clear off a large section of counter space. You’ll need room to arrange the following ingredients in this order: rinsed and drained artichoke hearts, flour mixture, liquid mixture, breading, and a plate for breaded artichokes (if you’re making a small batch, you can just put them on the edge of the breading plate.)
My recipe is written for 6 servings, but since I’m cooking for only two, I’ve made half-recipes each time I’ve cooked it. If you decide to do a half recipe, I recommend using the full amounts of the flour, liquid, and breading mixtures; you will have some leftover, but that’s better than running out in the middle of preparation. You can always use the leftovers to air fry some zucchini or even pickles!
More Oil-Free Recipes for Your Air Fryer
I’ve made everything from burgers to fries in my air fryer. Check out all my recipes here.
Air Fried Artichoke Hearts Sandwiches with Coleslaw
What's better than air fried artichoke hearts? Air fried artichoke hearts on a sandwich, with tangy coleslaw and avocado. Finish it off with a drizzle of spicy Sriracha mayo.
Ingredients
2 14-ounce cans artichoke hearts (500 grams)
Coleslaw
4 cups bagged coleslaw or shredded cabbage and carrots
2 tablespoons cider vinegar
1 tablespoon Tofu-Cashew Mayonnaise or your favorite vegan mayo
1/2 tablespoon mustard (I like stone-ground or Creole mustard)
salt and black pepper to taste
Flour Mixture
1/3 cup flour
1/2 teaspoon garlic powder
salt and freshly ground black pepper to taste
Liquid Mixture
1/2 cup plain unsweetened soymilk or other plant milk (soy works best)
1 teaspoon lemon juice
1 teaspoon flour mixture heaping
Breading
3/4 cup panko
1 teaspoon oregano
1 teaspoon basil
1/2 teaspoon garlic powder
1/2 teaspoon smoked paprika
salt and black pepper to taste
For the Sandwich
6 servings ciabatta bread (or your choice of hearty bread)
1 avocado sliced
Instructions
Coleslaw
Make the coleslaw an hour or two in advance, for the best flavor. Mix the coleslaw ingredients together, cover, and refrigerate.
Air Fried Artichoke Hearts
Drain the artichoke hearts well, and rinse in a colander. Remove any tough outer leaves, and place them on a layer of kitchen towels.
Combine the Flour Mixture Ingedients on a small plate. In a small bowl, mix the plant milk with the lemon juice and whisk in a heaping tablespoon of the flour mixture. On a large plate, combine the panko and other breading ingredients. Clear a good work area and arrange these dishes from left to right: artichokes, Flour Mixture, Liquid Mixture, Breading, and an empty plate.
Put the basket in your air fryer and preheat it. For a Breville Smart Oven, heat it to 425F. For other air fryers, set the temperature to 375-390F. (If you're using a smaller air fryer, you may have to cook the artichoke hearts in batches.)
Dip an artichoke heart in the flour mixture, covering it completely. Then dip it in the "milk," making sure that all sides are covered. Then place it in the breading, and sprinkle/roll it to make sure it's completely covered. Place it on the empty plate. Repeat with all artichoke hearts.
When all the artichoke hearts are breaded, place them carefully in the hot air fryer basket in a single layer. If your air fryer is small, cook them in two or three batches. Air fry until all artichokes are browned and crispy. This takes 10-12 minutes in a Breville Smart Oven but may be much less in other air fryers, so start checking after 5 minutes.
Remove from the air fryer and keep warm until serving.
Making the Sandwich
Mix the mayo with the sriracha. Prepare the bread by slicing if necessary and toasting. Place slices of avocado on one slice of bread, cover with 2 artichokes (sliced in half, if large), a drizzle of sriracha mayo, and coleslaw. Top with another slice of bread and serve.
Notes
To bake in an oven, preheat oven to 400F. Place breaded artichoke hearts on a parchment-lined baking and bake for about 10 minutes before turning them over carefully. Bake until lightly browned and crispy all over, at least 10 more minutes. Nutrition info below is for the entire sandwich with all listed ingredients, including Tofu-Cashew Mayo. Exact nutrition will vary depending on the size and type of the bread used and any other type of mayo. These figures are approximates. For the artichoke hearts alone, 1 serving provides 81 calories, 0.17g fat, 293mg sodium, 16g carbohydrates, 2.58g fiber, 1.23g sugar, and 2.32g protein. One serving of Sriracha Mayo, made with Tofu-Cashew Mayo, is 10 calories, 0.6g fat. Using other vegan mayonnaise will change these figures considerably.
Nutrition Facts
Air Fried Artichoke Hearts Sandwiches with Coleslaw
Amount Per Serving (1 sandwich)
Calories 246 Calories from Fat 43
% Daily Value*
Total Fat 4.73g 7%
Saturated Fat 0.91g 5%
Polyunsaturated Fat 1g
Monounsaturated Fat 2.6g
Cholesterol 0mg 0%
Sodium 567mg 24%
Total Carbohydrates 41g 14%
Dietary Fiber 7g 28%
Sugars 3.5g
Protein 7g 14%
* Percent Daily Values are based on a 2000 calorie diet.
Course Appetizer, Salad, Sandwich
Cuisine Air-Fryer, American
Keyword air fryer artichoke hearts, artichoke hearts sandwich, fat-free vegan coleslaw
Tried this recipe?Post a photo to Instagram and tag @susanffvk!
I hope you enjoy the recipe! Please pin and share.
Source: https://blog.fatfreevegan.com/2019/08/air-fried-artichoke-hearts-sandwiches-with-coleslaw.html
0 notes
Text
Chocolate Zucchini Muffins
posted on September 12, 2018 by aimee @ shugarysweets 5 comments »
Rich and fudgy Chocolate Zucchini Muffins with double the chocolate! Freezer friendly instructions too!
Click HERE to save recipe to Pinterest!
Heading into fall baking season now, but before I bombard you with pumpkin and peppermint, I’ve got one last zucchini recipe to share!
You may remember a few weeks ago I shared this decadent, fudgy Double Chocolate Zucchini Bread. It’s like a cross between chocolate cake and fudgy brownies. Seriously, so good, and my kids had no idea that there was zucchini hidden inside!
Well, because I know at least ONE of you will ask:
Can I make this zucchini bread into muffins?
Yes. Yes you can. But can I give you one suggestion? Once they are all baked and ready to enjoy…eat it warm. You won’t regret it. The next day, when you have a couple left (if they last that long), heat it up for about 10 seconds in your microwave. AMAZING.
This year I have had a love/hate relationship with my zucchini plant. It produced the most amount of zucchini I have ever grown, and this was my busiest summer. So creating a lot of NEW recipes just didn’t happen.
However, I have zucchini archives with so many wonderful recipes that I use all the time. My freezer is now stocked with breads and muffins, and my pantry even has canned zucchini that tastes like pineapple (anyone want this recipe???).
Here are a few of my FAVORITE zucchini recipes (in no particular order):
**Delicious Cinnamon Swirl Zucchini Bread recipe tastes like a coffee cake with a cinnamon glaze. Two freezable loaves, and possibly my very favorite bread recipe!
**Enjoy a slice of this incredibly sweet and moist Lemon Zucchini Bread for breakfast, brunch or as an evening treat! It won’t disappoint!
**Super moist and delicious, this Zucchini Bundt Cake with a decadent Cinnamon glaze is a fantastic dessert! Such a great way to use up some of that fresh zucchini in your garden!
**This simple, made from scratch, Zucchini Spice Cake from Mom on Timeout is loaded with spices and topped with a sweet cream cheese icing. Applesauce and zucchini make this easy snack cake extra moist and totally delicious. No butter or oil!
**A slice of this Zucchini Honey Loaf from Noble Pig is all you need in the afternoon to get you through the afternoon slump. It’s definitely the right choice with a cup of coffee or tea.
I created a fun little group on facebook and I’d love for you to join in! It’s a place where you can share YOUR favorite recipes, ask questions, and see what’s new with Shugary Sweets (so that you never miss a new recipe)! If you’d like to check it out, you can request to join HERE.
Be sure to follow me on Instagram and tag #shugarysweets so I can see all the wonderful SHUGARY SWEETS recipes YOU make!
Connect with Shugary Sweets!
Be sure to follow me on my social media, so you never miss a post!
Facebook | Twitter | Google+ | Pinterest | instagram
Sign up to receive an email in your inbox for each new recipe:
FREE EMAIL SUBSCRIPTION
Chocolate Zucchini Muffins recipe:

Chocolate Zucchini Muffins
Yield: 24 muffins
Prep Time:20 minutes
Cook Time:20 minutes
Total Time:40 minutes
Rich and fudgy Chocolate Zucchini Muffins with double the chocolate! Freezer friendly instructions too!
Ingredients:
4 large eggs
1/2 cup vegetable oil
1/2 cup sour cream
1 cup granulated sugar
1 tsp vanilla extract
2 cups all-purpose flour
1 cup unsweetened cocoa powder
2 tsp baking soda
1/2 tsp baking powder
1 tsp kosher salt
1/2 tsp espresso powder
3 cups shredded zucchini
1 bag (11 oz) semi-sweet chocolate chips, divided
Directions:
Preheat oven to 425 degrees F. Spray two 12-count muffin pans with nonstick baking spray and set aside.
In a large mixing bowl, combine the eggs, vegetable oil, sour cream, sugar, and vanilla until blended. Add in flour, cocoa powder, baking soda, baking powder, salt, and espresso powder. Mix until combined.
Fold in zucchini and 1 1/2 cups chocolate chips. Using a large scoop (about 1/4 cup batter), fill each muffin tin nearly to the top. Top with remaining chocolate chips.
Bake for 5 minutes. While keeping the muffins in the oven, reduce oven temperature to 350 degree F. Continue baking for an additional 15 minutes. Remove from oven and cool.
If freezing, cool completely. Slide each muffin carefully into a gallon sized ziploc bag (I can fit 9 per bag nicely) and freeze for several months. Place on room temperature counter to thaw overnight (still in bag).
For extra deliciousness, heat muffin for ten seconds in the microwave to give it a warm, fudgy texture!
Adding the Espresso Powder does NOT make it taste like coffee. It just brings out the richness of the chocolate. I use this one from amazon!Recipe can be halved for 12 muffins if preferred. I like to bake extra and freeze for a later date!
MAKING THIS RECIPE? Share it with me on Instagram using the hashtag #ShugarySweets so I can see what you're cooking up in the kitchen!
**There may be affiliate links in this post! By clicking on them, or purchasing recommended items I may receive a small compensation. However, I only recommend products I love! Thank you for supporting Shugary Sweets! See my disclosure policy for more info**
Stay Connected
subscribe to receive new posts via email:
Source: https://www.shugarysweets.com/chocolate-zucchini-muffins/

0 notes
Text
Sundae Sundays At Sunset Diner, Avalon

It was a glorious, unseasonably warm Autumn Sunday this past weekend so we ventured across the bridge. The destination? The picturesque suburb of Avalon on Sydney's Northern Beaches for Sunset Diner!

Avalon local and Sunset Diner's owner Ben Varela was inspired by his and his wife's trips to America to L.A., Florida and Aspen. Their idea was to pair Avalon's holiday style town and community vibe with the Californian and Miami one. "I was nervous at first with the pink but it seems to have worked," says Ben and it has since become a popular venue on Instagram.

The flamingo pink colour scheme hits Ivy as soon as she sees it. To her it's the colours and Art Deco architecture of Florida's Key West. There's an indoor section with candy pink chairs and tables as well as some back booths. But we are seated in the beer garden area at a shady table in the dog friendly section. Looking down on us is a bright flamingo mural.

The food menu has a mix of hot dogs, burgers, shakes and sundaes. Ryan knows what he wants already: a salad and a key lime sundae. He even promises to share some of it. Ivy and I choose the rest and go up to the front counter to order.

The Pina $17 Vanilla Malt Shake $6 with whipped cream and cherry 50c
Drinks and food come out surprisingly quickly. First the drinks-the vanilla malt milkshake is malty perfection. They're not stingy on the malt and cook it down into a malt caramel to really concentrate the flavour. In fact their shake sales rival beer sales they're that popular. Likewise The Pina cocktail with spiced rum, pineapple, coconut, banana jam and soft serve is utterly drinkable especially on a warm day.
The Burger $12
The Burger just plain and simple ends up being my favourite item and is their bestseller. We didn't pimp this up with bacon (although that is my habit) nor did we double up on the patty (another bad habit of mine). This is just well balanced and juicy with a beef patty, cheese onion, lettuce, tomato, pickles and sunset sauce which is a slightly spicy aioli.

Crispy Chicken burger $15 and bacon $3
The chicken burger with a crunchy buttermilk marinated chicken fillet, herb and cabbage slaw, pickles and chipotle mayo and added bacon (look I tried to resist but couldn't) is also good and this too is juicy and moist although I think the regular burger is a little ahead of it in terms of moreishness.

Smoked Brisket Dog $12 and Onion Rings $5
There are three hot dogs and we go for their recommendation which they warned up was rich. It's their signature smokey frankfurt with pieces of smoked brisket on top with mustard, pickle relish and onion. And yes it is rich but it's also really good.

Havana Salad $16, Crispy Chicken $4
Ryan's meal choice is the Havana salad with brown rice, black beans, avocado, coriander tomato salsa, spiced mango vinaigrette and corn crumble and he adds the crispy chicken to it. It's tasty but you'd have to have a will of steel to keep eating the salad if the burgers and hot dogs are around.

Truffle parmesan fries $7, Herb and Cabbage Slaw $5, 4 sauces $1 each
The truffle parmesan fries are fine but I wanted more truffle and parmesan on these. Still we dip them in the four sauces because we just love sauce and they were $1 each so it seems silly not to try them all. We tried the chipotle mayo, honey mustard, sunset sauce and mayo Sriracha aioli with the first and last being my favourites. The coleslaw is finely shaved but there is a lot of dressing on it which may be too much for some. The onion rings are crisp and crunchy and also good dipped in the sauces.

Sundaes clockwise from left: Strawberry Cheesecake, Key Lime Pie and Smores $8 each
It's time for dessert and there are six sundaes on the menu. The original plan was to split two sundaes but when we saw them coming towards another table we decided on three. There's a S'mores sundae made with torched marshmallows, Callebaut chocolate sauce and cookie crumble-this is nice but we all prefer the other two. The strawberry sundae has chunks of cheesecake and slices of fresh strawberries and is sweet and moreish. But the prettiest and tastiest of them all is the key lime sundae-with house made lime curd, crisp meringue and cookie crumble!
Just enough energy to power us back home!
So tell me Dear Reader, which sundae appeals to you the most? Which cuisine or style of food would you focus on if you were to open up your own restaurant?
This meal was independently paid for.

41 Old Barrenjoey Rd, Avalon Beach NSW 2017
Monday & Tuesday Closed
Wednesday & Thursday 12–10pm
Friday 12–11pm
Saturday 11am–11pm
Sunday 10am–11pm
Phone: (02) 9918 8776
sunsetdiner.com.au/
Source: https://www.notquitenigella.com/2019/04/09/sunset-diner-avalon/
0 notes
Text
Foil Pack Mediterranean Red Snapper
I love using our outdoor grill in the summer months as much as we can. We get such lousy weather the rest of the year, when the sun is shining, I want to make the most of it. Next Thursday we have all the Missionaries invited over for a BBQ, so it will be dogs and burgers (I hope the sun shines!). Today we took advantage of the glorious weather and I cooked some fabulous Red Snapper which I had gotten from The Fish Society.
It has been at least 20 years since I have had Red Snapper. Its not a fish that I have seen readily available over here in the UK, which is a shame since it is a really beautiful fish, with sweet succulent flesh. I love it. I was so excited when I discovered it at The Fish Society!
Todd had never had Red Snapper. Did you know there are over a hundred species of Snapper? There are only twenty five that are red. The Fish Society sources their snapper from Indonesia, and comes flash frozen, descaled and ready to cook! I knew we were in for a real treat!
Because of the lovely weather we are having I decided to grill it on the BBQ grill. We don't have a fish basket so I did it in foil packets. Its so easy to cook in foil packets, there is no fuss, no muss and no cleanup!
I added some lovely Mediterranean flavours . . . with a mix of olives, both black and green . . . I used pitted Kalamata and Green Halkidiki olives. Yummy!
I added some sliced unwaxed lemons for a bit of an acidic hit. Lemon and fish go so very well together. I also added some halved cherry plum tomatoes . . . you can't get more Mediterranean than using olives, tomatoes and lemons . . .
I tucked in a few torn basil leaves, and sprinkled them with some Italian garlic seasoning and coarse black pepper. You could also sprinkle with salt, but I didn't think with the seasoning mix that we needed any.
I also added some sliced Shallots for a bit of sharpness . . . peel them first. A drizzle of good quality olive oil and we were ready to seal up the packets and go!
Make sure when you seal them up you leave some air space in the packets so that the fish can steam and absorb all of those aromatic and delicious Mediterranean flavours!
From between 12 and 18 minutes (depending on the thickness of your fish) on the grill and your fish will be perfectly cooked. Sweet, succulent . . . tender and yes, really delicious!
Todd enjoyed his with a baked potato and some green beans! He really loved the flavour of the fish. Some of the best he has ever eaten! I concurred!
This was a real taste treat, and oh so healthy as well! The Mediterranean diet is one of the healthiest in the world!
Yield: 4
Author: Marie Rayner
Print
With ImageWithout Image
Foil Pack Mediterranean Red Snapper
White succulent sweet fleshed fish cooked in a foil packet on the grill with plenty of Mediterranean flavours. Deliciously healthy!
ingredients:
4 Red Snapper Fillets (each about 3.5 ounces/99g)
2 TBS good quality olive oil
240g pitted olives (1 cup) (a mix of green and kalamata)
2 large unwaxed lemons sliced
4 shallots, peeled and sliced
150g cherry tomatoes, halved (1 cup)
torn fresh basil leaves
2 tsp Italian garlic seasoning
salt and black pepper to taste
fresh basil to garnish (optional)
instructions:
You will need four large squares of heavy duty aluminium foil. Place one fish fillet in the centre of each. Top each fillet with 1/4 of the olives, lemon slices, shallots and cherry tomatoes. Tear a few basil leaves and scatter over each filled. Sprinkle with the Italian seasoning, season to taste and drizzle with a bit of olive oil. Bring up the foil to cover completely, folding the top together and each side together, to completely seal, leaving some air space over the top of the fish giving it room to steam.
Grill over a moderately hot grill for 12 to 15 minutes, until the fish flakes easily with the tines of a fork. (It all depends on the thickness of your fish. Mine took about 18 minutes, but it was quite thick. Alternately you can bake it in the foil packs on a baking sheet in a hot oven. (200*C/400*F/ gas mark 6) for the same length of time. Serve garnished with some fresh basil if desired. You can serve in the packets if you want, or using a spatula scoop out onto heated plates.
I had a salad with mine, Todd had a baked potato and green beans.
I enjoyed mine with a salad on the side. Oh, I would have loved to have a baked potato too . . . but I am really trying to be good! This is a very healthy, Low Carb and Keto Friendly Recipe. Coming in at only 269 calories and a very low carb count (5.9 total) it is also perfect for anyone doing the 800 fast diet.
Fish from the Fish Society comes straight to your door, with an overnight delivery, and it is beautifully packaged. Ready to throw right into your own freezer. I highly recommend!

Source: https://theenglishkitchen.blogspot.com/2019/07/foil-pack-mediterranean-red-snapper.html
0 notes
Text
Nutty Chocolate Hormone-Balancing Bars from The Thirlby
Having wholesome, nourishing snacks around is my way of preparing for success. I’ve never been able to have three square meals a day. I’ve tried a bunch of times, and it just doesn’t work for me. I’d rather have multiple, small meals within a few hours of each other throughout the day, than have to wait out the long windows between the prescribed times for breakfast, lunch, and dinner. Some say that craving food between meals is a ‘bad habit,’ and means that your meals are not nutritious enough, but for me, eating when I’m hungry (frequently) and until just full (small portions) feels right, and the other way does not. And I really try to listen and understand whether I’m actually hungry, or just thirsty, bored, anxious, etc. It’s not always easy, but I’ve been working on tuning in to all those feelings lately, and it truly helps me to have better digestion and to feel full and nourished. Are you a snacker or more of a meal-only person? I’d love to hear!
A lot of the time, I don’t have the space to make multiple, tiny meals for myself, so that’s where easily portable, bite-able snacks come in. I try to make sure that my snacks are more healthful than indulgent (though still tasty!), and I’m always on the lookout for snack recipes that pack a punch. That’s where these Nutty Chocolate Bars from our friend Almila Kakinc-Dodd‘s beautiful new book The Thirlby: A Field Guide to a Vibrant Mind, Body, and Soul come in!
The hormone-balancing part of these bars comes in with the seeds that are used in the recipe, which are flax and pumpkin seeds. Certain seeds contain properties that may help support and balance women’s hormones at specific parts of their cycle, which is all encompassed in an awesome little practice called seed cycling. You can read a whole lot about seed cycling on the internet (check out Elenore’s posts and beautiful seed cycling milk recipes here and here), but it basically entails including freshly-ground flax and/or pumkin seeds in your meals during the first part of your cycle (menstrual and follicular phases) and ground sesame and/or sunflower seeds during the second part (ovulation and luteal phase). So, these bars are a great snack to have around during the first part of the cycle.
Here’s what Almila says: “Flax seeds bind to estrogen receptors and block their uptake, allowing the body to eventually clear some of the excess. Flax also provides omega-3s, which have anti-inflammatory effects and promote healthy, glowing skin.” Other ingredients in these bars are also stellar: pumpkin seeds are high in zinc, coconut is a “source of sustainable energy,” and raw cacao is high in magnesium, zinc, iron and calcium. They taste delicious, too: dense, filling, chocolatey, and (my favorite) not too sweet. They are not quite dessert, which makes them perfect for a wholesome snack, but could pass for a dessert-like snack – does that make sense? :)
Almila’s whole book is full of beautifully-presented information, recipes, and tips for supporting your body and mind with fun daily rituals, practices, and foods. Almila is an integrative health practitioner, and she really knows her stuff. The book covers everything from digestion and immunity to breathwork and energy medicine, and from hangover cures to how to assemble an herbal first aid kit. The recipes in the Beauty Bites chapter (not all plant-based) are so inventive and well-considered. I can’t wait to try the Bean-Free Hummus, Siren Spread, Vegan Mineralizing Broth, and Probiotic Vegan Lassi, and I’ll be making these bars regularly from now on. Congratulations, Almila, it’s such a beauty!
Nutty Chocolate Hormone-Balancing Bars from The Thirlby
Recipe from 'The Thirlby: A Field Guide to a Vibrant Mind, Body, and Soul'
Ingredients
¾ cup (78 g) freshly ground flax seeds
½ cup (90 g) chopped Medjool dates or dried mission figs
½ cup (46 g) desiccated coconut
¼ cup (32 g) pumpkin seeds
¼ cup (30 g) cacao nibs
¼ cup (25 g) raw cacao powder
2 tablespoons coconut oil
2 tablespoons nut or seed milk
1 tablespoon raw almond butter
1 tablespoon maca powder
½ teaspoon ground cinnamon
dash of Himalayan pink salt
your choice of crushed nuts, cacao nibs, dried crushed roses, and flaked sea salt for garnish
Instructions
Line a 9 x 9-inch (23 cm) pan with parchment paper.
In a food processor, combine the flax seeds, dates, coconut, pumpkin seeds, cacao nibs, cacao powder, coconut oil, nut milk, almond butter, maca powder, cinnamon, and salt. Blend on medium speed until a dough forms. Use your hands to press the dough evenly into the parchment-lined pan. Alternatively, roll the dough into balls and arrange on a parchment-lined pan.
Top with crushed nuts of choice, cacao nibs, dried crushed roses, and a dash of flaked sea salt. Refrigerate until firm, about 2 hours. Slice and serve. Store the bars in an airtight glass container in the refrigerator for up to 1 week.
3.5.3226
<![CDATA[ .yuzo_related_post .relatedthumb background: !important; -webkit-transition: background 0.2s linear; -moz-transition: background 0.2s linear; -o-transition: background 0.2s linear; transition: background 0.2s linear;;color:!important; .yuzo_related_post .relatedthumb:hoverbackground:#ffffff !important;color:!important; .yuzo_related_post .yuzo_text, .yuzo_related_post .yuzo_views_post color:!important; .yuzo_related_post .relatedthumb:hover .yuzo_text, .yuzo_related_post:hover .yuzo_views_post color:!important; .yuzo_related_post .relatedthumb acolor:!important; .yuzo_related_post .relatedthumb a:hovercolor:!important; .yuzo_related_post .relatedthumb:hover a color:!important; .yuzo_related_post .relatedthumb margin: 0px 0px 0px 0px; padding: 5px 5px 5px 5px; ]]>
Source: http://golubkakitchen.com/nutty-chocolate-hormone-balancing-bars-from-the-thirlby/
0 notes
Text
Chocolate Hazelnut Baklava and Middle Eastern Month on the blog!
go to link
viagra generico 25 mg pagamento online a Torino Happy September, everyone! Wow, I cannot believe fall is upon us. It is my absolute favorite season, and I am just over the moon excited about sweater weather, fall beer, and all those lovely fall baked goodies.
using less than 1 mg propecia pills
source So I’ve come up with this thing. I’m calling it Middle Eastern Month. Basically for the month of September, I will be doing nearly all Middle Eastern-inspired recipes on the blog!
free accutane powered by vbulletin This all started because I was thinking of fun things I could do for the blog. Things experimental and different. I thought about a how-to baking techniquet series (which I think I’m going to do in the winter), writing more about photography tips (which has already started, and you can expect more frequent posting there!), and focusing on a specific cuisine.
http://maientertainmentlaw.com/?search=does-accutane-cause-blindness So in focusing on a specific cuisine, I wanted to start off with my absolute favorite cuisine, Middle Eastern food. From Turkish to Armenian to Israeli to North African, it’s going to be flavor-packed and absolutely delicious.
http://cinziamazzamakeup.com/?x=viagra-generico-200-mg-prezzo-a-Firenze
http://buy-generic-clomid.com/ Some recipes will be more traditional (Persian Love Cake and Ma’amoul), and some will be more flavor-inspired (Tahini Brownies and Pistachio Nougat). And I’ve thrown in a few of my absolute favorite dips and spreads in there, too (hello Muhammara, you glorious thing).
alcohol use on accutane We start today with one of my favorite takes on a classic, this Chocolate Hazelnut Baklava from my old employer, Sofra,’s cookbook http://maientertainmentlaw.com/?search=buy-online-genuine-merck-propecia Soframiz.
When I worked at Sofra years ago, I was in charge of cutting up the baklava into those perfect triangles. The result was always messy because I created so many little crumbs, and always delicious because I got to eat so many little crumbs.
It feels so right to start off this month with a recipe from my employer who was my true introduction to the world of Middle Eastern food, after all.
Happy Middle Eastern Month, you guys! I, for one, cannot wait!
Chocolate Hazelnut Baklava
Ingredients
For the syrup
2 cups water
1 1/2 cups honey
1 cup sugar
1/2 cup cocoa nibs
2 whole cinnamon sticks
For the filling
1 pound whole blanched hazelnuts
12 ounces extra bittersweet chocolate (I used 84%), coarsely chopped
1 1/2 tablespoons ground cinnamon
About 9 oz / 12 sheets phyllo
12 oz melted clarified butter
Directions
To make the syrup, combine the water, honey, sugar, cococa nibs, and cinnamon sticks in a saucepan and bring to a boil, stirring to dissolve the sugar. Once boiling, lower the heat and keep at a low boil for 15 minutes. Set aside to cool. Strain; you should have 2 1/2 cups of syrup.
Preheat oven to 350°F.
To make the filling, spread out the hazelnuts on a rimmed baking sheet in a single layer. Bake until toasted, 12-15 minutes. Set aside to cool slightly. Keep oven going at 350°F.
Using a food processor, pulse the hazelnuts until finely ground. The texture should resemble tiny pebbles. Remove from food processor and place in a large bowl.
In the same food processor, pulse the chocolate into similarly sized pieces to the hazelnuts. Remove from food processor and add to the bowl of chopped hazelnuts. Add in cinnamon and stir to combine. Set aside.
Cut the phyllo into 9" X 13" pieces, Generously butter the bottom and sides of a 9" X 13" baking dish.
Place one sheet of phyllo in the pan and somewhat generously butter the top using the melted clarified butter and a pastry brush. Repeat until you have 8 sheets of phyllo for the bottom layer.
Spread 2 cups of hazelnut chocolate filling evenly over the phyllo. Layer and butter four sheets of phyllo.
Again spread 2 cups of hazelnut chocolate filling evenly over the phyllo. Again layer and butter four sheets of phyllo.
Spread the remaining hazelnut chocolate filling on top. Layer and butter ten sheets of phyllo for the top layer. Let sit at room temperature for 20-30 minutes, so the butter solidifies a bit.
Using a ruler, cut the baklava into 3" X 3" squares; this will leave a small amount at one end. Cut each square diagonally into two triangles.
Bake at 350°F for 25 minutes, then lower the temperature to 300°F and bake for an additional 45-50 minutes, until golden brown and the top layers of phyllo appear separated.
Remove from oven and ladle the cocoa nib and honey syrup evenly over the hot baklava. Set aside to cool for at least 2 hours, preferably 3-4.
Remove the baklava by carefully sliding a thin spatula down and under the sides of the pan. ENJOY!
by Sarah | Broma Bakery
Recipe Notes
Recipe from Soframiz, the unreal cookbook by my former employer!
Loading nutrition data...

Source: https://bromabakery.com/2018/09/chocolate-hazelnut-baklava.html
0 notes
Text
Roasted Cauliflower with Hummus, Olives and Feta.
by Jessica on September 12, 2018 11 5
That time when you make the roasted cauliflower that you like to eat at the mall.
Yep. It happens.
If you follow me on Instagram, then you see that every few weeks we do a big mall day. It sounds so 90s (okay, it is so 90s), but there is more to it, I swear!
Growing up, every Friday, my mom, aunt, Lacy, Mother Lovett and I would go shopping and spend the ENTIRE day out. Sometimes our brothers would come but most of the time, my grandpa would watch them and it would be a girls’ day. I even remember doing this in kindergarten, when I only had school for half a day. We did it forever!
It was so fun and I swear it ingrained mall shopping in me at a young age. Yes, I realize how seriously ridiculous that sounds. But it wasn’t about buying things, per se. It was really just about the routine or… dare I say it, the ritual of us all going together.
The reason this even matters at all (okay maybe it doesn’t but INDULGE ME) is because this cauliflower dish is my version of the one served at Nordstrom café and it.is.wonderful.
Like so good.
Frankly, it’s not much to look at. Roasted cauliflower (beige) with hummus (beige) and Kalamata olives (eggplant-ish?) does not the most vibrant plate make.
HOWEVER.
The flavor is insane. It’s so much more than you would expect.
The thing is that I have made plenty of recipes that are super delicious but that don’t translate well to photos. They end up being ugly or unappealing.
And I sort of felt like this was one of those, but I couldn’t help it. Because this is so freaking good and I must tell you about it.
There is a richness from the roasted cauliflower, a briney bite from the olives and it all comes together with this creamy hummus. Topped with tangy feta and some herbs or microgreens. Ugh. Totally going to make it again for dinner tonight because it’s addictive. And it works perfectly as a meal, a side dish, lunch or even an app!
Just how much do I love it? A few weeks ago my mom and I were starving after being out all day and not eating. Nordstrom Café was closing but we could still get takeout – and we got this in a takeout box, then I promptly stood over my kitchen sink at home and devoured it. Even though it was cold by that time, it was excellent. These flavors together are dreamy!
Now you know.

Yield: serves 4
Total Time: 45 minutes
Ingredients:
1 large head of cauliflower (or 2 small!)
2 garlic cloves, minced
1/2 teaspoon salt
1/2 teaspoon pepper
1/4 teaspoon crushed red pepper
3 tablespoons olive oil
1/2 cup kalamata olives, pitted and sliced
1/4 cup feta cheese
1 handful of fresh herbs or microgreens
hummus
1 (25-ounce) cans chickpeas, drained and rinsed
1 cup tahini paste
2 garlic cloves, minced
1/2 lemon, juiced
1/2 teaspoon salt
1/2 teaspoon pepper
4 to 5 tablespoons ice water
3 tablespoons olive oil + more for drizzling
fresh herbs for topping
Directions:
Preheat the oven to 425 degrees F.
Slice the cauliflower head into large pieces or simply break it into florets. Place it on a baking sheet. Sprinkle the minced garlic over the cauliflower. Drizzle with the olive oil. Season the cauliflower with the salt, pepper and red pepper flakes.
Roast the cauliflower for 20 to 25 minutes, until golden brown and toasty. While the cauliflower is roasting, make the hummus.
Once everything is finished, spread some hummus on a plate or in a bowl and top with the cauliflower. Drizzle with a touch of olive oil if desired. Sprinkle with the olives, feta, herbs or microgreens. Serve!
hummus
Place the chickpeas, tahini, the lemon juice, garlic, salt and pepper in your food processor. Puree until the chickpeas break down and the mixture starts to come together (it probably won’t be smooth at this point!). Make sure to scrape the sides with a spatula. Drizzle in the ice water. Blend it for a minute or two – just let it go! Once the water is in, the hummus should really start to get smooth – if you need a little more water, add it 1 tablespoon at a time. Drizzle in the olive oil. Taste and season with more salt and pepper if necessary.
All images and text ©How Sweet Eats.
I mean, it’s my kind of mall food.

Source: https://www.howsweeteats.com/2018/09/roasted-cauliflower-hummus-olives-feta/
0 notes
Text
Vegetarian Carbonara Pasta w/ Roasted Asparagus
Disclosure: This post is sponsored by Barilla. Thank you for supporting our work here at Food Heaven!
There are only two vegetables that I don’t like. The first is eggplant. The second is mushrooms. No matter how hard I try, I can’t get into them. Friends say I am cooking them wrong. That the texture shouldn’t be “slimy” if you are “doing it right.”
But it doesn’t matter. I tried, tried, and tried again. It’s still a no.
Because of this fact, when Barilla(R) (a maker of pasta) asked us to create a Carbonara pasta recipe in celebration of Carbonara Day on April 6, I had to put my creative cap on… tight.
Why? Carbonara is an Italian pasta dish from Rome made with egg, hard cheese and bacon. Obviously, bacon is not my jam (hence the plant-powered mission behind this platform). The real problem, though, is that most vegetarian Carbonara dishes replace the bacon with mushrooms. Sadly, not happening.
So, what does a mushroom-hating vegetarian girl like me do in lieu of bacon and mushrooms? ASPARAGUS. Duh.
It’s crunchy, green, delicious, & nutritious — the perfect Carbonara accent vegetable.
Without further ado, we present An Egg-Free Vegetarian Carbonara Pasta w/ Roasted Asparagus using Barilla Collezione Bucatini. And I have to say, I kind of agree with Bon Appetit’s statement that Bucatini is “the best long pasta that there ever was or will be”. When cooked al dente, it offers the perfect chewy texture that elevates any dish tenfold. BTW, this recipe is SUPER simple to make. But enough with the talking. Ready to eat more pasta?
Here’s what you do: Start by soaking 1 cup of cashews in 2 cups of water for 1 hour.
Preheat the oven to 415F, then lay asparagus on a baking sheet. Drizzle 1 teaspoon of olive oil onto the asparagus and top with salt and pepper. Roast for about 10 minutes or until the tops of asparagus start to crisp.
Next, we’re going to cook the pasta. Bring 4-6 quarts of water to a boil. Add salt to taste, then add the pasta to boiling water. For authentic “al dente” pasta, boil for 7 minutes, stirring occasionally. For more tender pasta boil an additional minute.
While the pasta is boiling, get out a pan and sauté the chopped onions in 2 teaspoons of olive oil over medium heat for 1-2 minutes or until fragrant. Add the chopped garlic and cook for another 1-2 minutes, continue to stir.
Once the cashews are done soaking, add 1 cup of cashews and 1 cup of soaking water in a high-speed blender or food processor. Add the cooked onions, garlic and almond milk and pulse/blend until creamy. Remove the sauce from the food processor and mix with the cooked pasta. Squeeze the juice of ½ lemon on top and stir. Then sprinkle in parmesan cheese or nutritional yeast, and pepper and onion powder.
Next, chop half of the cooked asparagus into ½-inch pieces. Mix throughout pasta. Serve the other half of the cooked asparagus as a side. Lastly, if you want to add basil, chop it now then sprinkle on top. Enjoy!
Now it’s your turn. Join us in celebrating Carbonara Day on April 6 by sharing your favorite version of the dish on social the hashtag #CarbonaraChallenge. Do you think you’ll give this recipe a try? Let us know in the comments below! Until next time <3
Egg-Free Vegetarian Carbonara Pasta Roasted with Asparagus
1 cup of cashews
1-2 cups of water
10 small asparagus
½ box of Barilla Collezione Bucatini pasta
3 teaspoons of olive oil divided
Salt to taste
1 cup chopped yellow onion
3 cloves of chopped garlic
½ cup of unsweetened almond milk
½ teaspoon of fresh cracked pepper
1 teaspoon of onion powder
Juice of 1 lemon
2 tablespoons of parmesan cheese or nutrition yeast for a vegan version
Optional: basil
Start by soaking 1 cup of cashews in 2 cups of water for 1 hour.
Preheat the oven to 415F, then lay asparagus on a baking sheet.
Drizzle 1 teaspoon of olive oil onto the asparagus and top with salt and pepper.
Roast for about 10 minutes or until the tops of asparagus start to crisp.Next we’re going to cook the pasta.
Bring 4-6 quarts of water to a boil. Add salt to taste, then add the pasta to boiling water.
For authentic “al dente” pasta, boil for 7 minutes, stirring occasionally. For more tender pasta boil an additional minute.
While the pasta is boiling, get out a pan and sauté the chopped onions in 2 teaspoons of olive oil over medium heat for 1-2 minutes or until fragrant.
Add the chopped garlic and cook for another 1-2 minutes, continue to stir. Once the cashews are done soaking, add 1 cup of cashews and 1 cup of soaking water in a high-speed blender or food processor.
Add the cooked onions, garlic and almond milk and pulse/blend until creamy. Remove the sauce from the food processor and mix with the cooked pasta. Squeeze the juice of ½ lemon on top and stir.
Then sprinkle in parmesan cheese or nutritional yeast, and pepper and onion powder.
Next, chop half of the cooked asparagus into ½-inch pieces.
Mix throughout pasta. Serve the other half of the cooked asparagus as a side.
Lastly, if you want to add basil, chop it now then sprinkle on top.

Source: https://foodheavenmadeeasy.com/vegetarian-carbonara/
0 notes
Text
CrockPot Jamaican Salmon
This is how to make Jamaican Salmon in the CrockPot. There's also recipe below to make the best Jerk spice rub I've ever had!

Originally posted July 12, 2008, during my one year slow cooking challenge.
Day 194.
I like it when sweet and spicy flavors co-mingle, so I was intrigued by the idea of making a Jamaican dry rub of my own to use on chicken or fish.
That, and when ever I hear someone on TV name a dish "Jamaican Me Crazy" something or other, I simultaneously groan and laugh. Every. Single. Time.
We've had rather heavy meals lately, and needed to lighten it up a bit. Cooking fish in your crockpot is super easy, and results in a perfectly cooked, flaky fish, with no icky fish smell.
and! since you're cooking the fish in foil, the crock is virtually spotless when you're finished; an added bonus.
The Ingredients.
--aluminum foil (go for a good quality, not the cheapy dollar store stuff)
--1 pound thawed or fresh salmon
For the jerk rub:
1/8 teaspoon cloves
1/8 teaspoon ginger
1/8 teaspoon nutmeg
1 teaspoon kosher salt
1 teaspoon onion or garlic powder (I used onion)
2 teaspoons white sugar
1/4 teaspoon chipotle chili powder
1/2 teaspoon cayenne pepper (this was TOO much for us. Don't use this much. -- start with 1/8 for super mild or 1/4 for normal)
1/4 teaspoon black pepper
1/8 teaspoon thyme
1/2 teaspoon cinnamon
or buy a bottle of Jamaican jerk rub seasoning, and use about 1/4 cup.
HONESTLY, this is such a good seasoning blend you could really make this up and put on a happy label and give it out as gifts. You're welcome! :-)
The Directions.
Combine all of the spice run ingredients in a bowl. Spread out a length of foil, and put the fish in the middle of it. Rub both sides of the fish with the dry rub. Fold the foil over and make an enclosed packet. If it looks like there is a gap and it might leak fish juice out, use another piece to wrap around, just in case.
Put the foil packet into the crockpot. Do not add any water.
Cover and cook on low for 2 hours. Fish doesn't take long to cook. The fish is done when it flakes easily with a fork.
Serve with rice or pasta and vegetables.
The Verdict.
The salmon cooked perfectly, but the spice rub was way too spicy for me (SEE ADDED NOTE UP ABOVE). I needed a big bite of rice with each bite to act as a fire extinguisher. Adam wasn't home to taste it, he'll have the leftovers.
I didn't even try to get the kids to eat any---it was much too spicy.
BUT! I still liked the flavor---I would definitely use a dry jerk rub again, but use much less cayenne, or leave it out all together and just stick with the chipotle chili powder and the black pepper.
Source: https://www.ayearofslowcooking.com/2008/07/crockpot-jamaican-salmon.html

0 notes
Text
Edamame Chakli
Edamame Chakli
Wish you all a very happy and prosperous Diwali.
This year has been one of the busiest years as far as I can remember. Although I have weekdays and weekends packed with work, kids activities and other household stuff, I am trying my best to take out some time to celebrate festivals. Diwali for me is full of lights, food and fireworks. Although we don’t do fireworks anymore since they are banned in our city, I always make sure to have some delicious homemade food. This year I wanted to make something new. My 7 year old loves chaklis and gulab jamuns. So I zeroed on them. I prepared sweet potato and paneer gulab jamun. I initially thought of making spinach chakli, but then decided to try Edamame chaklis instead.
Edamame are whole immature soy beans. My family straight away rejected them when we tried first time. Then we became fans of them after trying few times at Thai and Chinese restaurants. I get shelled frozen edamame and usually have a pack in my freezer. I need to start using them more frequently. They somehow come home and disappear in the bottom of my freezer!. I decided to make use of one such pack. They have a peculiar smell to them, so I was not sure how the chaklis would turn out. But they were fantastic and no one could taste the edamame in them!.
The dough was quite ‘loose’, so I could not get them into traditional chakli shape. So I made small piles of them on a parchment paper and then slowly picked them up and slid them into hot oil. Once fried, they retained the shape.
Check out the other chakli recipes at traditional chakli, moong dal chakli, spinach chakli, ragi chakli, sugarcane chakli
Pictorial:
Frozen edamame, microwaved.
Dry roast urad dal, powder and add it to rice flour along with remaining ingredients.
Press chaklis on a paper.
Deep fry.
Edamame Chakli
Delicious and full of protein, made with edamame beans and spices
4 cups rice flour
1 pack (280g) frozen (or fresh) edamame
3 tea spn urad dal
1 tea spn cumin seeds
1 tea spn chilli powder
1 tbl spn butter
Oil
1 and ½ cups milk
Salt
Microwave the edamame for 3mins (or pressure cook).
Make a smooth paste with milk.
Dry roast urad dal till nice aroma comes out and make a powder.
Add edamame paste, urad dal powder, cumin seeds, chilli powder, butter, salt and milk to rice flour.
Mix them very well.
Take a ball of the dough in chakli press and Press them into desired shape (they were delicate and easily broke, so I just pressed them into piles).
Heat oil and deep fry.
When they cool down to room temperature, store in air tight container.
Edamame Chakli
Source: http://www.aayisrecipes.com/munchies-dabbe-khaan/edamame-chakli/
0 notes
Text
GINGERBREAD CHEX PARTY MIX WITH CANDIED ORANGE // SPONSORED BY CHEX CEREAL
I love gingerbread around the holidays, but not ginger snaps, or barely golden brown ginger cookies. I want dark, rich, spicy gingerbread with a little bite. Inspired by these elegant flavors, I thought a gingerbread Chex Party Mix would be the perfect holiday party treat when Chex reached out to me about partnering with them. Chex Party Mix is such a classic party snack, and always treads that line of sweet and savory, so I thought the intense flavors in this version of gingerbread would be wonderful with it. The two key ingredients are the molasses, providing the deep color and flavor plus a nice, caramel-y texture, and the black pepper, providing an unexpected kick. Plus, this takes only minutes to put together and doesn’t involve architecture with baked goods – definitely more my speed around the holidays!
INGREDIENTS:
3 cups Chex cereal (I used Wheat Chex)
1/2 cup brown sugar
1/2 cup unsalted butter, melted
1/2 cup all-purpose flour
1 tablespoon molasses
1 teaspoon ground cinnamon
1 teaspoon ground ginger
1/4 teaspoon ground cloves
1/4 teaspoon black pepper
1/2 teaspoon vanilla extract
1/4 teaspoon kosher salt
4 ounces dark chocolate, melted
Golden Sprinkles
DIRECTIONS:
Preheat oven to 375.
Combine the melted butter and molasses, stirring to combine.
Mix everything for the cinnamon streusel and crust together in a large bowl. Spread the Chex mixture onto a lined baking sheet and bake for about 20 minutes, until crispy and fragrant. Set aside to cool. When cool, drizzle with dark chocolate and top with sprinkles.
Source: https://www.thekitchykitchen.com/gingerbread-chex-party-mix-with-candied-orange-sponsored-by-chex-cereal/

0 notes
Text
Peanut Butter Brownie Baked Oatmeal + Weekly Menu
Monday night, hellllooooo. I listened to my body – so sore. I skipped my workout. I also gave into my weakness for TV and wine. Some nights, a girl just needs such a thing. Thingssssssss, I mean.
I have major conflict in my life right now: a ton of Bachelorette AND Roland Garros to catch up with…BUT game 4 of the Stanley Cup playoffs is on. Major dilemma, let me tell you. I so rarely feel drawn to the TV and now I’ll have to exercise some serious self-control to get myself into bed on time. Or even close to on time.
It’s going to be a long week of evening t-ball (trying not to regret signing her up!), so I have to keep up the execution of my plans. This weekend will not be for naught – I spent a few hours on Sunday getting busy in the kitchen so that snacks and breakfast for the week are prepped and ready to go.
They’re also photographed and ready to go for this here blog because I’ve been slacking. I’ve been cooking and then just getting lazy with the food photography – my least favorite part of food blogging. I used to love it, now…not so much. Some foods are just darn near impossible to make look good.
But then there’s times where you almost don’t even need a picture to accompany a recipe. I mean, PEANUT BUTTER BROWNIE BAKED OATMEAL? I’m so there. ‘Nuff said. But srsly, that swirly, delicious peanut butter is almost too much.
Healthy, you say? I’m saying it! Nuke this in the mornings and serve with a splash of milk (and a sprinkle of slivered almonds if you’re feeling a little wild) – it’s basically like eating a Reese’s for breakfast and I, for one, can get behind that 10000%.
Peanut Butter Brownie Baked Oatmeal
Author: Nicole Morrissey
Prep time: 10 mins
Cook time: 45 mins
Total time: 55 mins
Serves: 6 servings (1 heaping cup each)
Ingredients
3 cups old-fashioned oats
½ tsp salt
1 tsp baking powder
½ tsp cinnamon
⅓ cup unsweetened cocoa powder
3 ripe bananas
1 large egg
¼ cup natural peanut butter
¼ cup brown sugar
1 tsp vanilla extract
2 cups unsweetened vanilla almond milk
2 Tbsp natural peanut butter (for topping)
Instructions
Preheat the oven to 375 degrees F. Mist a 2-3 quart casserole dish with nonstick cooking spray and set aside.
In a large bowl, whisk together the oats, salt, baking powder, cinnamon, and cocoa until well-combined.
Mash the bananas against the sides of a medium bowl with the backside of a fork until only a few small lumps remains. To the bananas, add the egg, peanut butter, brown sugar, vanilla, and almond milk. Whisk until the mixture is smooth.
Pour the wet ingredients into the dry and mix until well-combined. Pour into the prepared casserole dish and spread evenly over the bottom.
Microwave the remaining 2 tablespoons peanut butter for 15-30 seconds or until softened. Dollop on top of the oats and use a knife to draw swirls through the oats using a knife.
Bake the oats for 45 minutes. Serve warm, or refrigerate until ready to eat.
Nutrition Information
Serving size: 1 heaping cup Calories: 368 Fat: 13.3 Carbohydrates: 54.8 Sugar: 17.8 Sodium: 406 Fiber: 7.3 Protein: 11.5 Cholesterol: 29
3.5.3251
Weekly Menu: June 2nd – 6th
Be well,
Source: https://preventionrd.com/2019/06/peanut-butter-brownie-baked-oatmeal-weekly-menu/
0 notes
Text
Avocado Tuna Salad
Avocado tuna salad made quickly and easily with just 5 ingredients. This simple, healthy recipe makes for a nutritious lunch.
If you follow my Instagram stories, you know I had a massive craving for a tuna melt and white wine earlier this month. Yielding to the craving, one of my girlfriends and I gathered up all sorts of tuna melting ingredients, grabbed a bottle of sauvignon blanc, and created the most epic Tuna Melt Fest known to human kind.
Because the responses I got from my Instagram story were so sensational, I figured I would share my go-to avocado tuna salad recipe so that you, too, can have a marvelous tuna melt extravaganza.
I used to make a 3-Ingredient Mayo-Free Avocado Tuna Salad without mayonnaise altogether but I now add a small amount of avocado oil mayonnaise. I find this helps with the texture and creaminess, and it doesn’t take much! In addition, I chop up some dill pickles (use the naturally fermented ones for added probiotic points), and add stone ground mustard for tang to balance out the creaminess.
So let’s do this!
How to Make Avocado Tuna Salad:
Place all ingredients (tuna, avocado, mayo, mustard, chopped pickles and sea salt) in a mixing bowl.
Stir well to combine. Taste the tuna for flavor and add more sea salt, mayo, mustard, and/or pickles to your personal satisfaction.
Make a tuna sandwich or melt, eat it on top of a green salad, enjoy it on crackers, etc.
Tuna Melt Ideas:
For our tuna melts, we found havarti cheese with dill was an incredible choice. We also enjoyed aged white cheddar and regular cheddar. We used both gluten-free sliced bread and gluten-free rolls and determined we liked the sliced bread best.
On one of our rounds, we used canned salmon instead of tuna, which we both really enjoyed! The fish flavor is more subtle and there’s more natural creaminess to it. We also used sauerkraut and baby spinach in one of the tuna melts, which was fabulous.
Get your tuna melt on!
My cookbook, Paleo Power Bowls, is now available! CLICK HERE to check it out. Thank you for your support!
If you make this Avocado Tuna Salad, please feel free to share a photo and tag @TheRoastedRoot on Instagram!
Avocado Tuna Salad
5-ingredient avocado tuna salad makes for an easy and nutritious lunch or dinner
Print
Ingredients
2 cans tuna drained
1 avocado diced
2 Tbsp avocado oil mayonnaise
1 Tbsp stone ground mustard
2 spears dill pickles chopped
1/4 tsp sea salt to taste
Instructions
Add all ingredients for the avocado tuna salad to a large mixing bowl. Mix well until combined and the consistency is creamy. Taste tuna salad for flavor and add more sea salt, mayonnaise, or dill pickles to taste.
Consume tuna salad as is, or use it on a green salad, sandwich, or tuna melt
Amount Per Serving (1 of 3)
Calories 148 Calories from Fat 99
Total Carbohydrates 4g 1%
* Percent Daily Values are based on a 2000 calorie diet.
Source: https://www.theroastedroot.net/avocado-tuna-salad/

0 notes
Text
Healing Lemongrass Chickpea Thai Green Curry with Toasted Coconut Brown Rice
Jan 02
This vegetarian Thai green curry is made with chickpeas, ginger, garlic, turmeric, green curry paste, and lemongrass. The ultimate bowl of healthy comfort food to eat when you’re feeling under the weather. Served with a delicious coconut infused brown rice!
You know that feeling when you start getting a little sick — the feeling that something just isn’t quite right? Well, I have that right now. A slight fever crept in and my glands started to swell. Immediately I could tell that my body needed rest and a healthy dose of anti-inflammatory, disease-fighting food.
So of course, Thai green curry was on the dinner menu.
And guess what? It works. I make this recipe and my healing chicken soup every single time I’m sick. The next day I wake up feeling a little better. Thus, this recipe was crowned the name ‘healing thai green curry’… with a few other descriptors in there too, I suppose.
Before we get into just how amazing and incredible this recipe is, I want to let you know that 1) you don’t absolutely need to have lemongrass to make this dish fabulous and b) I need you to make this recipe immediately. I SAID IMMEDIATELY. OK?
Besides being vegan and gluten free, this comforting Thai green curry is filled with the most delicious flavor combination I think I’ve ever tasted. I could proclaim my love for it over and over again, and if you trust me for recipes, then you know you need to make it too.
And here’s what else is awesome: It truly is filled with heaps of anti-inflammatory good-for-you spices and herbs:
Garlic: Studies have actually found it to be effective against fighting colds. It also has been known to fight infections naturally. I actually eat a clove raw when I feel sick. Tony thinks it’s weird because he’s the one who has to kiss me.
Ginger: A true tummy tamer aka really good for when you have an upset stomach. Put it in your smoothie or put it in this curry.
Lemongrass: The leaves of this plant are often used to make medicine. Its oil is often used in aromatherapy too. Check out how else lemongrass is commonly used here. I love the flavor it gives this curry and I promise you will too. Of course, you can always leave it out if it’s unavailable to you or if you don’t like it.
Turmeric: Super trendy for the past year or two, but always delicious and a known anti-inflammatory spice. I love the brightness it adds to this dish. I recommend using fresh turmeric.
Thai Green Curry Paste: You can get this at most grocery stores, but if they don’t have it — you can order it from Amazon.
So what are you waiting for? It’s time to make this fabulous dish. I love to do it for meal prep and cook everything up on a Sunday for myself, then divide into containers. I’ve also included an easy recipe for a delicious toasted coconut brown rice that I think pairs well with the curry.
I hope you all enjoy this dish as much as I do! It’s a new favorite of mine. If you make this recipe, be sure to rate the recipe and leave a comment below, or take a pic, upload it to Instagram and tag #ambitiouskitchen! xoxo love you guys.
THAI GREEN CURRY RECIPE VIDEO
Healing Lemongrass Chickpea Thai Green Curry
Author: Monique of AmbitiousKitchen.com
Nutrition Information
Serving size: 1/4th of recipe (includes rice)
Calories: 389
Fat: 12.7g
Carbohydrates: 42.1g
Sugar: 5.1g
Fiber: 11.5g
Protein: 12.2g
Recipe type: dinner, vegetarian, vegan, gluten free
Prep time: 15 mins
Cook time: 45 mins
Total time: 1 hour
For the brown rice:
1 teaspoon coconut oil
1 cup uncooked short grain brown rice
For the Thai green curry:
2 teaspoons olive oil or coconut oil
3 cloves garlic, minced
3/4 cup diced green onion
2 stalks lemongrass, tender white inner bulb only, minced
1 heaping cup diced carrots (about 3 large carrots)
1 tablespoon freshly minced ginger
3 tablespoons finely diced fresh basil
2 tablespoons green curry paste
1/2 teaspoon turmeric (or 1/2 tablespoon freshly ground turmeric)
1 (15 oounce) can lite coconut milk
1/2 cup vegetarian broth (or water)
1 (15 ounce) can chickpeas, rinsed and drained
1 tablespoon gluten free soy sauce (or coconut aminos)
1 lime, juiced
1/2 teaspoon salt, plus more to taste
1 red bell pepper, thinly sliced
1 cup frozen peas
To garnish: Cilantro, green onion & hot sauce
To make the brown rice: Add one cup of brown rice to a pan along with 1 teaspoon of coconut oil. Toast rice over medium heat for 5 minutes until fragrant. Next and 2 1/2 cups of water to a pot; bring to a boil, then reduce heat to low, cover and simmer for about 45 minutes.
Heat oil in a large pot over medium high heat. Once oil is hot, add in garlic, green onion, lemongrass, carrots, fresh ginger, and diced fresh basil. Stir fry for about 5 minute until the onions begin to slightly brown. Next add in green curry paste and turmeric and stir for 30 seconds to release flavors.
Add in coconut milk, vegetarian broth, chickpeas, soy sauce, lime juice, salt and red bell pepper. Stir well to combine. Bring to a boil, then reduce heat to low and simmer uncovered for about 20 minutes, or until carrots are tender. Right before serving, stir in frozen peas. Taste and adjust seasonings as necessary.
Serve over brown rice in a bowl and garnish with fresh cilantro, green onion and a dash of hot sauce if you like things spicy. Serves 4.
*You can leave out the lemongrass and still get fabulous flavor! I know it can be difficult to find. I usually get mine from Whole Foods.
If you'd like more protein in this dish, add another can of chickpeas, or if you aren't vegetarian/vegan, you can add 1/2 pound of chopped cooked chicken breast.
3.5.3251
PIN THIS CURRY RECIPE:
Source: https://www.ambitiouskitchen.com/healing-lemongrass-chickpea-thai-green-curry/
0 notes
Text
Almond Flour Pancakes
Almond flour pancakes are grain-free, gluten-free and seriously delicious. My family loves eating these paleo-friendly pancakes topped with bananas and maple syrup.
These almond flour pancakes are light, fluffy, moist, and absolutely addictive. The natural sweet flavor from the almonds creates a delicious base and the healthy fats help to keep you satiated for hours.
The secret to making your almond flour pancakes light and fluffy, is using a combination of almond flour and tapioca flour.
I’ve partnered with my friends at Bob’s Red Mill (again!) because they offer a huge variety of high quality whole grains and flour alternatives to satisfy all types of dietary approaches. They make non-traditional recipes, like this one, super easy to make. That’s why they are my go-to brand for healthy baking and pancake making.
Best of all, the Bob’s Red Mill team is offering everyone in the C&D Fam a special discount code that you can use for 20% OFF any and all of their products!
Visit the Bob’s Red Mill online store and use the code “CLEAN20” at checkout for 20% OFF your entire order—anytime between now and April 30, 2019!
Almond flour and tapioca flour are grain and gluten free.
Almond flour is simply made from blanched almonds that have been ground up into a fine meal. It’s a naturally gluten free, low carb flour which is why we often see it used in paleo recipes or grain free baking.
Tapioca flour is a starchy, slightly sweet flour that comes from the cassava plant, and it works really well as a thickener. I love adding it to grain free batters like these pancakes.
It may seem like a bother to to use two flours to make your pancakes, but I promise that the results are well worth the effort.
Combine almond flour, tapioca flour, baking powder and salt in a large bowl.
Whisk almond milk, egg, maple syrup and vanilla extract in a separate bowl.
Add the wet ingredients to the dry ingredients and gently stir until everything has come together.
Heat a medium non-stick skillet over a medium heat and coat with butter or coconut oil.
Scoop 1/4 cup pancake batter and pour into the pan to form a small to medium sized pancake.
Cook until the edges begin to puff and the bottom is golden brown. Flip and cook until cooked through.
Serve with your favorite pancake toppings! I love bananas and maple syrup with these.
Yield: 6-8 pancakes
Prep Time:5 minutes
Cook Time:10 minutes
Total Time:15 minutes
Almond flour pancakes are perfect for a family breakfast or your weekend meal prep!
Ingredients:
1 cup almond flour (I like Bob's blanched super fine almond flour)*
2 tablespoons tapioca starch
1 teaspoon baking powder
Pinch of kosher salt
1/3 cup unsweetened almond milk
1 egg
1 tablespoon maple syrup
1 teaspoon vanilla extract
Directions:
In a large bowl combine almond flour, tapioca flour, baking powder and salt. Gently whisk all ingredients together with a fork.
In a separate bowl or spouted cup combine almond milk, egg, maple syrup and vanilla extract.
Whisk everything together and then add the wet ingredients to the dry ingredients and gently stir until everything has come together.
Heat a medium non-stick skillet over a medium heat and coat with butter or coconut oil. Scoop 1/4 cup pancake batter and pour into the pan to form a small to medium sized pancake.
Cook for 2-3 minutes or until the edges begin to puff and the bottom is golden brown. Flip and cook for another two minutes or until cooked through. Repeat until you have worked through all the batter. Serve + enjoy!
*Blanched almond flour keeps these pancakes super light and fluffy. You can use almond flour that is not blanched, but the end result will be a little more dense.
NUTRIENTS PER SERVING (1/2 of recipe): Calories 410 | Total Fat 30.4g | Saturated Fat 2.8g | Cholesterol 105mg | Sodium: 328mg | Carbohydrate 27g | Dietary Fiber 6.2g | Sugars 7.9g | Protein 15.1g
Source: https://cleananddelicious.com/almond-flour-pancakes/
0 notes
Text
Little Caesars’ new pizza is topped with meatless sausage from Impossible Foods
Little Caesars, one of America’s favorite pizza chains, has teamed up with Impossible Foods, inventors of the famous Impossible Burger, to create the first-ever plant-based “meat” topping on a pizza from a chain. The Impossible Supreme Pizza is topped with a plant-based imitation of the spicy-sweet Italian sausage usually found on supreme pizzas. The pizza is now available in three test markets.
101 Best Pizzas in America
Little Caesars is known for its over-the-top, usually meat-heavy fare. They’ve tested bacon-wrapped crust, bacon-loaded fries and a lasagna pizza drowning in Italian sausage and cheese. So this isn’t exactly in Little Caesar’s wheelhouse. But both companies are confident that the imitation sausage tastes great enough to please vegetarians and meat-lovers alike.
“Customers have been asking for Impossible Sausage for years,” said Impossible Foods’ CEO and founder Dr. Patrick O. Brown in a press release, “and when Little Caesars said they wanted a unique, delicious pizza topping, our team developed more than 50 prototypes. One product stood out from the rest. You need to taste it to believe it.”
The new plant-based sausage was custom-made by Impossible Foods specifically to top Little Caesars pizza. To mimic the taste and texture of beef sausage, Impossible Foods uses heme, the same ingredient used to make their plant-based burger patties. Due to their plant-based production methods, Impossible Foods’ burgers and sausage have a much smaller environmental footprint than their meaty counterparts. And nutritionally, the Impossible Sausage has fewer calories and less fat than a conventional beef sausage.
The complete list of toppings includes the Impossible Sausage, caramelized onions, mushrooms, green peppers, tomatoes, mozzarella and Muenster cheese. So this pizza is not vegan. But as long as you’re cool with cheese, you can try it for yourself in three Little Caesars test markets: Fort Meyers, Florida; Albuquerque, New Mexico; and Yakima, Washington. One Impossible Supreme Pizza is $12 plus tax. And if this pizza left you hungry for more, check out the best pizza in your state.
Source: https://www.thedailymeal.com/eat/little-caesars-pizza-meatless-sausage-impossible-foods/052019
0 notes
Text
Acron Jelly Muchim
Many of my readers ask me about Korean diet food. They think that Koreans are slim and they wonder what kind of low calorie foods Koreans eat daily. So today I will introduce one of them to you. I will show you how to make a delicious side using acorn jelly. This acorn jelly dish is one of those Korean diet foods, although people will eat this even if they are not dieting. Acorn jelly is a perfect ingredient for healthy, light, and delicious salads with lots of vegetables and a tasty sauce. Depending on your tastes, you can use other vegetables for your acorn jelly salad. Try it someday.
Yield: 2 Servings
Short Korean Lesson
SangWhang (상황) = Situation
GyeongHeom (경험) = Experience
Video Instructions
Main Ingredients
1½ lb Acorn Jelly
2 Cups Green Leaf Lettuce (3 oz)
1 Cup Crown Daisy (1.5 oz)
1 Cup Cucumber
½ Cup Onion
½ Cup Carrot
¼ Cup Hot Pepper (Green and Red)
Some Sesame Seeds (for Garnish)
Sauce Ingredients
Directions
Mix all the ingredients for the sauce in a small bowl: 3 Tbsp soy sauce, 1 Tbsp water, 1 Tbsp sugar, 1 Tbsp hot pepper powder, 1 Tbsp sesame seeds, 1 Tbsp minced garlic, 1 Tbsp minced green onion, Minced, 2 tsp sesame oil, ½ tsp vinegar, and 1 tsp Sempio YonDu (optional). Cover it with some plastic wrap and chill it in the refrigerator.
If you buy a acorn jelly from a grocery store, obtain about 1½ pounds of it. If you can not buy it, you can also make it at home with acorn jelly powder. Please check my other recipe to see how to make acorn jelly.
Divide the acorn jelly piece into 1½ thick strips.
Cut each strip into ½ inch thick slices. If you have a wavy vegetable slicer, use it to get a fun shape. I used about 1½ pounds (30 pieces) of acorn jelly for this recipe.
Pour half of the sauce you chilled onto the acorn jelly. Mix it gently and set it aside while you are preparing the vegetable ingredients. This will give the acorn jelly some flavor from the sauce.
Obtain 2 cups worth of green leaf lettuce, 1 cup worth of crown daisy, 1 cup worth of cucumber, ½ cup worth of onion, ½ cup worth of carrot, and ¼ cup worth of both red and green hot peppers. Wash all the vegetable ingredients.
Cut the lettuce and crown daisy into bite-sized pieces. You can either use a knife or your hand. Cut the cucumber diagonally. Slice the onion, carrot, and hot peppers thinly.
Add all the chopped vegetables in a large mixing bowl.
Pour the rest of the sauce to the vegetables and toss them gently.
Add the seasoned acorn jelly to the vegetables and mix them gently. Since both the acorn jelly and vegetables are fragile, it is important to mix them gently.
Sprinkle some extra sesame seeds on top before serving.
It tastes best fresh, so only mix the needed amount of sauce and other ingredients. You can serve it as a side for a meal, but you can also eat it by itself as a diet meal with less sauce. Please check out my post about how to make acorn jelly at home. Enjoy!

Source: http://aeriskitchen.com/2019/04/acron-jelly-muchim/
0 notes