
Last Seen Blogs

anthonochthonios
anthonochthonios

vickapinto
Vicka's Stuff

moonlightdiamond
I'm not enough...

cosmo-the-psychic-dog
Prison break?

feebmaster
Untitled
Text
Common Issues Associated with the Audi 2.0T Engine
The Audi 2.0T engine is a popular and reliable engine, but it is not without its issues. In this article, we’ll take a look at some of the most common problems you might encounter when using the audi 2.0t reliability.
Oil Consumption
Oil consumption is a common issue with the Audi 2.0T engine and is usually caused by worn piston rings, worn valve guides, or a faulty turbocharger. This can lead to a decrease in engine performance and efficiency, as well as an increase in emissions. It’s important to regularly check the oil level and top up as needed to ensure that the engine is properly lubricated.
Excessive Smoke
Excessive smoke is another common issue with the Audi 2.0T engine. This is usually caused by a clogged air filter, a worn turbocharger, a leaking valve, or a faulty fuel injector. It’s important to check the air filter, replace the turbocharger if necessary, and check the fuel injectors for any problems.
Faulty Ignition System
The Audi 2.0T engine is equipped with an ignition system that can malfunction. This can cause the engine to run rough or stall unexpectedly. To diagnose the problem, it’s important to check the spark plugs, spark plug wires, and ignition coils for any problems. If any of these components are faulty, they should be replaced as needed.
Cooling System Issues
The Audi 2.0T engine also suffers from cooling system issues. This is usually caused by a clogged radiator, a faulty water pump, or a faulty thermostat. It’s important to check the radiator, replace the water pump if necessary, and replace the thermostat if it is not working properly.
Conclusion
The Audi 2.0T engine is a reliable and powerful engine, but it is not without its issues. Common problems include oil consumption, excessive smoke, faulty ignition systems, and cooling system issues. It’s important to regularly check the engine and replace any faulty parts as needed to keep it running properly.
0 notes
Text
The Importance of Regularly Checking and Replacing Engine Splash Shields
Introduction Engine splash shields are important pieces of equipment that help protect your engine from dirt, debris, and other elements that can cause damage over time. Regularly checking and replacing these shields can help ensure that your engine is running efficiently and without any potential issues. If your engine splash shield hanging here are possible solutions.
What Are Engine Splash Shields?
Engine splash shields are protective covers that are placed over the engine, typically near the lower part of the engine bay. They are designed to shield the engine from the elements, helping to protect it from dirt, debris, and other environmental factors that can cause damage or reduce its efficiency.
Why Is Regular Checking and Replacing Important?
Regularly checking and replacing engine splash shields is important because it helps to ensure that your engine is running at its peak performance. Over time, dirt, debris, and other factors can cause wear and tear on the shields, potentially leading to leaks, cracks, or other damage that can reduce the engine's efficiency or cause other issues.
By regularly checking and replacing the shields, you can help ensure that your engine is running smoothly and that your vehicle is safe on the road. Additionally, replacing the shields can help reduce environmental pollution, as damaged shields may allow oil and other pollutants to leak into the environment.
How to Tell When an Engine Splash Shield Needs to Be Replaced
There are a few signs that can indicate it’s time to replace an engine splash shield, such as:
• Cracks or holes in the shield
• Loose or missing fasteners
• Oil or other fluid leaking from the shield
• Rusting or corrosion on the shield
• Visible wear and tear
If any of these signs are present, it’s important to replace the shield as soon as possible to ensure that your engine is running properly and efficiently.
Tips for Properly Installing and Securing an Engine Splash Shield
When installing and securing an engine splash shield, it’s important to follow these steps:
• Use the correct fasteners for the shield. Make sure that the fasteners are the correct type and size for the shield.
• Use the provided gaskets when needed. Gaskets help to ensure a tight seal between the shield and the engine.
• Use a torque wrench to tighten the fasteners.
0 notes
Text
0 notes
Text
How to remove dents from cars quickly, easily, and cheaply
How to remove dents from cars quickly, easily, and cheaply
Do you have a dent in your car that you’d like to remove? If so, you’re not alone! Many people are looking for ways to remove dents from their cars quickly, easily, and cheaply. In this blog post, we’ll show you how to remove dents from cars, so you can restore your car’s original look. Read on to learn more about how to remove dents from cars quickly, easily, and cheaply.
Boiling water
When it comes to how to remove dents from cars, one of the most effective and inexpensive methods is boiling water. This technique works especially well on smaller dents, but you may also be able to tackle larger ones with this method as well.
First, fill a pot or large bowl with water and bring it to a boil on your stove. Then, take the boiling water outside and slowly pour it over the dent until the area is completely saturated. When the metal becomes hot, use a flat-head screwdriver to press against the dent from the inside out. Doing this should slowly and carefully push the dent out.
Once the dent is removed, let the area cool down before running your hand over the surface to make sure the dent is gone. If you’re still not satisfied with the results, you can always repeat this process until the dent is fully gone.
Use a vacuum cleaner
Removing dents from cars is a task that many car owners face. You can save yourself the hassle and expense of taking your car to a professional repair shop by learning in detail how to remove dents from car yourself. One simple and effective way of removing dents from cars is by using a vacuum cleaner.
Using a vacuum cleaner to remove a dent from your car is a surprisingly easy process that requires minimal tools and supplies. All you need is a vacuum cleaner, some duct tape, and something to create a suction seal between the vacuum hose and the car's surface.
Start by taping the hose of the vacuum cleaner securely to the car's surface over the dent. Ensure that the seal is airtight. Turn on the vacuum cleaner to its maximum setting and hold it in place for two to three minutes. The suction created will pull the dent out of the car's surface. When the dent pops back out, turn off the vacuum cleaner and carefully remove the tape.
As you can see, this method of how to remove dents from cars is both quick and cost-effective. It's also very easy to do, so why not give it a try next time you encounter a dent on your car?

If you find yourself in a situation where you need to remove a dent from your car quickly and easily, a great tool to use is a plunger. While this may seem strange, it's actually an effective and inexpensive way to get the job done! To begin, use a cloth to protect the paint on the car, then apply the plunger onto the dent. Make sure it is firmly pressed against the surface of the car. Then, begin slowly pushing and pulling the plunger back and forth. You should begin to feel the dent slowly coming out. When it is completely removed, you can use a fender pulling tool to ensure the dent is completely gone. After this, the area will be as good as new!
Use a vacuum cleaner with the hose attachment
Do you have a dent in your car that needs to be removed? Are you looking for an easy and affordable way to fix the damage? If so, you may want to try using a vacuum cleaner with the hose attachment. This is a great way to quickly and easily remove dents from cars without breaking the bank.
Here’s how to remove dents from cars using this method:
1. First, make sure you have the right equipment. You will need a vacuum cleaner with a hose attachment and some duct tape. Make sure the hose is tightly attached to the vacuum cleaner so it won’t come off during the process.
2. Now, cover the dent with duct tape. This helps keep the air from escaping, allowing more suction power to be applied directly onto the dent.
3. Then, put the hose attachment over the duct tape and turn on the vacuum cleaner. Make sure the suction is strong enough to pull the dent out.
4. Finally, move the hose around to help even out the suction across the entire dent. Be careful not to move it too quickly as it could cause more damage.
By using a vacuum cleaner with the hose attachment, you can quickly and easily remove dents from cars without spending a fortune. Have you tried this method before? Let us know in the comments!
Use a hairdryer
If you’re looking for an easy and cost-effective way to remove dents from your car, one of the simplest solutions is to use a hairdryer. This method works by using the heat of the hairdryer to soften up the paint around the dent, making it easier to pull out without causing any damage.

To start, make sure you are working in a well-ventilated area with good light. Put on safety goggles, gloves, and a mask to protect yourself from any dust or chemicals that may be released during the repair process. Then, direct the hot air from the hairdryer onto the dented area for about two minutes. Keep the heat about 8 inches away from the surface and make sure to keep the hair dryer moving to avoid melting any plastic parts on your car.
Once the area is sufficiently warmed up, you can begin to fender pull the dent out of your car. Use a pry bar or a special fender-pulling tool to push out the dent. Make sure you apply pressure slowly and evenly and work your way around the edge of the dent until it pops out. Be careful not to apply too much force or you may end up cracking or damaging the paint.
Once the dent is removed, you may need to sand down and repaint the area, depending on how large and deep the dent was. To finish off your repair job, buff and wax your car as usual.
Use a can of compressed air
If you're looking for an easy, cheap way how pull a dent out of a car, then using a can of compressed air might be just what you need. A fender pulling tool, also known as a fender bender, is a great way to do this job. It uses a high-pressure stream of air to lift and move the dent in the right direction until it pops back into its original shape. Here are the steps you need to take to get started with your fender pulling project:
1. Start by cleaning the area around the dent. Make sure there is no dirt or debris in the area that could interfere with the process.
2. Apply masking tape around the dent to keep the paint from chipping when the air hits it.
3. Secure the fender bender tool to the dent and make sure it's tight. You don't want any movement during the process.
4. Now, attach a can of compressed air to the tool and press the button to begin the flow of air. You may need to adjust the angle of the tool for best results.
5. Keep an eye on the dent as it slowly begins to lift up and move in the right direction.
6. Once you've successfully pulled out the dent, use a cloth to remove any residual moisture and dirt from the area.
Using a can of compressed air and a fender bender tool is an easy, affordable way to quickly remove dents from your car. Give it a try!
0 notes
Text
Why Is My Service Engine Soon Light On? 5 Possible Causes

If you're a car owner, chances are you've seen the service engine light illuminated on your dashboard. This can be a worrying sight, as it can indicate a variety of potential problems with your vehicle. In this blog post, we'll explore five of the most common reasons why your service engine will soon be on and provide some tips on how to address each one. Read on to learn more about why your service engine will soon be on and what steps you can take to get it fixed.
The Check Engine Light Is On

The service engine light, often referred to as the check engine light, is one of the most common indicators of a potential issue with your vehicle. The service engine soon light is designed to alert you that something is amiss and needs to be looked at by a qualified professional. It’s important to note that service engine light can mean different things depending on the make and model of your vehicle, but it generally indicates an issue with the engine or related system.
When your service engine light is illuminated, there could be a variety of issues causing it. It could be something minor, such as a loose gas cap, or something more serious, such as a faulty catalytic converter or a bad oxygen sensor. It’s best to have your vehicle checked out by a qualified mechanic so they can determine the exact cause and repair it for you.
Another common reason for the service engine soon to come on is due to an issue with the emissions system. This means your vehicle is not producing the proper amount of emissions or burning fuel inefficiently. If this is the case, it’s important to have it checked out by a qualified technician so they can diagnose the issue and make any necessary repairs.
No matter what the cause of the service engine light is, it’s important to get it checked out and repaired as soon as possible. Ignoring it could lead to further damage to your vehicle and result in costly repairs. If you ever see your service engine soon light illuminated, don’t hesitate to take it in and have it checked out.
The Car Has Failed an Emissions Test
If you've noticed your Service Engine Soon light turns on, it could mean that your car has failed an emissions test. This is because the light indicates that there is a problem with the engine or exhaust system, which could cause your vehicle to produce too much pollution. If this is the case, you'll need to take your car to a mechanic to have the issue fixed.
In order to determine what is causing your Service Engine Soon light to come on, you will need to find out what is wrong with your car and why it has failed an emissions test. Common issues include faulty spark plugs, a clogged air filter, dirty fuel injectors, and a defective catalytic converter. Depending on the root of the problem, your mechanic may be able to reset the light by clearing any codes stored in the computer.
Once the problem has been identified and repaired, it's important to make sure you properly maintain your car in order to prevent future problems. This includes getting regular oil changes and tune-ups, checking your air filter and spark plugs often, and using the correct type of fuel for your vehicle. Taking these steps can help you avoid having to deal with a Service Engine Soon light again.

The Gas Cap Is Loose or Damaged
One of the most common causes of the Service Engine Soon light coming on is a loose or damaged gas cap. This is because it allows fuel to evaporate and can cause your engine to run poorly or even not at all. If you're wondering what is service engine soon light and what to do when its on, this is a great place to start.
If you're lucky, all you'll need to do is tighten or replace your gas cap. However, if the problem persists then it could indicate something more serious, like an oxygen sensor or fuel injector issue.
To make sure that a loose or damaged gas cap is the root of your Service Engine Soon light, you should first visually inspect it for any signs of wear and tear. If it looks fine, try tightening it, making sure it's securely closed. If that doesn't work, try replacing the gas cap entirely and see if that solves the issue.
The Oxygen Sensor Needs to Be Replaced
One of the most common reasons for the service engine soon to come on is a faulty oxygen sensor. The oxygen sensor is responsible for monitoring the levels of oxygen in your car's exhaust system and sending the information to the engine control module. When the oxygen sensor fails, it can lead to the service engine soon light being illuminated.
In most cases, replacing the oxygen sensor will fix the issue and turn off the service engine soon. If you suspect that this is the cause of your service engine becoming light, it is important to take your car to a qualified mechanic as soon as possible. Replacing the oxygen sensor is a relatively simple procedure but it should be done by someone with experience so that it is done properly.
The Catalytic Converter Needs to Be Replaced

One of the most common causes of a Service Engine Soon light being on is a faulty catalytic converter. The catalytic converter is an important part of your vehicle's emissions control system, and when it fails, the engine will not be able to properly burn fuel and the light will turn on. To diagnose the issue, you should take your car to a mechanic and have them run a diagnostic test.
If the results come back that the catalytic converter needs to be replaced, then you should get it done as soon as possible. Catalytic converters are expensive, but they are essential for ensuring that your car produces fewer emissions, so replacing it will help keep your car running better and more efficiently for longer.
Once you have had the catalytic converter replaced, the Service Engine Soon light should turn off and your car should be able to run normally. Be sure to have regular maintenance done on your vehicle and get any other repairs done as soon as possible so that you can avoid any further damage and keep your car running its best.
1 note
·
View note
Text
How to fix a fender bender without a dent
It is a common thing that comes to mind: how to pull a dent out of a car fender, how to pull a dent out of a metal fender. There are two reasons that fender benders happen. The first, and probably most common, is that one driver in a lane isn’t paying attention to what’s going on around them and they slam into another car or some other object around them without realizing it. The second reason happens when two cars pull out from opposite directions at the same time and collide with each other in the middle of the intersection as a result of their own ignorance or negligence to keep an eye on what’s happening behind them.

Assess the damage
If the fender popped out, you may be able to pop it back in. If not, you’ll need to pull the dent out of the metal. You can do this by using a plunger or other utensil that can bend metal and place it over the top of the dent. Then use your knee or foot on top of the plunger and push down into the dent with as much force as possible. Continue pushing until either you cannot push any further or it appears that you have removed all of the depth from the hole. Then use your hands to smooth out any sharp edges or creases in the metal, which should now resemble how it was before.
Choose the right tools
The first step in fixing a fender bender is choosing the right tools for the job. Ideally, you’ll need a metal file, an 8mm drill bit, and some WD-40. You might also want to buy new screws that are designed specifically for plastic or metal. However, if you don’t want to spend any money on tools, you can use old credit cards or keys as substitutes.
Follow the instructions
The best way to pull out a small, shallow dent is with a plunger. First, wet the plunger head with soapy water. Then place the plunger over the area of the dent and apply pressure. Push down and pull up repeatedly until you see the dent come out. If this doesn't work, try using boiling water instead of soapy water. Fill a pot or large pot with boiling water then dip the head of your plunger in it before you press it against your car's fender. Boiling water can expand metal molecules and sometimes make pulling out dents easier. For larger dents, use other tools that are designed for prying or pulling out dents from cars like a rubber mallet or claw hammer.
Take your time
If you want to get rid of a dent in your car, the first step is to assess the damage. If the dent is small and close enough to the surface, it’s easy to pop it out by using your hands. You can also take an unbent coat hanger, straighten it out and make a U-shape with one end pointed down. Lay that end on top of the dent and push up with both hands on either side of the hole until you feel it pop out. If that doesn’t work, you can try pouring hot water over the affected area for about 15 seconds before drying off and popping it again. This should take care of any residue that was preventing the metal from going back into shape.
Check your work
Fixing a fender is easy, and all you need is some liquid soap and water. Check out the how-to video below for details on how to pull a dent out of your car’s metal or plastic body. You can also use this method on any other surface made of metal or plastic, such as an old chair or garbage can. If your chair or trash can has been in the sun for a while, you may want to wear gloves when you remove the dent.
Fixing dents in your car's body is as easy as using some liquid soap and water!
I hope your all doubts on how to fix fender dent have cleared. If you are still stuck somewhere then you can get detailed information from autovehicleparts.
0 notes
Text
Why You Should Never Ignore Engine Knocking and What to Do About It
If you notice knocking or pinging coming from the engine of your vehicle, then you might think or some questions can comes in your mind such as what does rod knocking sound like, what does engine pinging sound like, there’s nothing to worry about and that your vehicle will be fine despite the knocking sound. But just because you can’t immediately hear damage doesn’t mean that your engine isn’t being damaged by the noises it’s making, and ignoring engine knocking can lead to thousands of dollars in engine knocking repair down the road if left untreated. Read on to learn more about why you should never ignore engine knocking and what to do about it if you suspect your vehicle is suffering from this common problem.

What Causes Engine Knocking?
Engine knocking is caused by fuel igniting too soon. This can be caused by a number of factors including low oil, dirty air filter or a faulty spark plug. Rod knocking is similar, but it sounds like a loud banging noise from the engine block. Your vehicle's engine may be damaged if you ignore engine knocking because it could lead to rod failure, which will cause your car to stop running in an even shorter period of time than before. If you think you might have engine knocking, bring your vehicle in for an inspection as soon as possible so that we can identify the source of the problem and fix it right away.
The Dangers of Ignoring Engine Knocking
Engine knocking is a serious problem that can be caused by a variety of factors. When you start hearing engine knocking, it’s important to address the problem right away before it becomes more costly or dangerous. If your engine is knocking after an oil change, the cause might be that the car owner put in too much oil. If your car is pinging when you rev up the engine, the most likely culprit is that something has come loose in the engine and needs to be tightened down. The sound of rod knocking (usually heard from under the hood) will vary depending on what parts are causing it. What all three of these sounds have in common is that they are signs of damage to your vehicle’s engine, so don’t ignore them!
How to Fix Engine Knocking
If you experience engine knocking after an oil change, you may have overfilled your engine with oil. Remove the excess oil from the engine. If you’ve recently had your oil changed, but are still experiencing engine knocking, it could be a sign that something else needs attention. When you hear pinging sounds in your vehicle’s engine, it could be because of a number of different problems: low compression in one or more cylinders, bad timing belt or chain, loose or worn piston rings, too much air entering the combustion chamber, etc.
Hearing rod knocking is likely not a good sign and should be addressed immediately by a professional mechanic who will check for other signs that might indicate greater issues with the engine.
Preventing Future Engine Knocking
It is important to address engine knocking as soon as possible, because the longer you wait, the more damage will be done. If you are experiencing engine knocking after an oil change, there could be a clogged air filter or dirty air filter. If you notice that your vehicle is pinging when idling, it may mean that your spark plugs need replacing. To determine if the rod knocks in your engine, take note of whether the sound occurs during acceleration or deceleration.
If you have any questions about these symptoms or how to fix them, please contact our service department for a free inspection!
0 notes
Text
Don't Let a Faulty ECM spoil your driving fun - Here's how to reset it!
Each time you start your car, it’s doing more than making sure the battery has enough juice to power the ignition system and the fuel system gets filled up with the proper amount of gas. It’s also retrieving data from its engine control module (ECM) and making adjustments based on what it learns from that data every time you drive. But what if one day you realize your car isn’t performing like it used to? Fortunately, that’s something you can fix by reset engine control module – all you need is 15 minutes of uninterrupted driving time and a screwdriver!

What is an ECM?
The engine control module (ECM) is an electronic device that controls the powertrain and emissions systems of your vehicle. It has two primary functions: to adjust the way other modules perform, and to store long term data within its term memory. As you drive, the engine computers are continuously working and will learn about the way you drive your vehicle, adjusting accordingly with time. The ECM also stores any fault codes or diagnostic trouble codes that may have popped up as well as data on how the engine is running.
If you find yourself in need of an ECM reset, be sure to consult with a professional who can help guide you through this process so that there is no risk of damaging your car’s computer system in the process.
What does an ECM do?
The Engine Control Module or ECM is an important part of your vehicle. It’s job is in part to store long term data within its term memory. As you drive, the engine computers are continuously working to learn about the way you drive and will adjust the way other modules perform. One of the most common problems with an ECM is that it can be hard to reset after being incorrectly set by a fault signal from another module.
One key way to diagnose this problem is if one or more of the warning lights on your dashboard are lit up (such as Check Engine Light). When this happens, you need to find out what’s causing the light and then resetting the engine control module so that everything returns back to normal.
How to tell if your ECM is faulty
If you’ve been experiencing problems with your vehicle and want to know how to reset the powertrain control module, follow these steps. First, turn off the engine. Next, disconnect and reconnect the battery cables (in most cases one or two in order). Finally, start up the engine and see if the problem persists. If it does not, then you should be good to go!
How to reset your ECM
How do you Reset an Engine Control Module?
- Press and hold the brake and accelerator pedal.
- Turn the ignition key on, but don't start the engine.
- Keep holding both pedals until you see the powertrain control module (PCM) message display on the dashboard.
How to Reset Powertrain Control Module?
- Shut off your truck and wait 10 seconds.
- Start up the engine, put it in neutral and then park it in a safe spot.
- Wait 10 more seconds before shutting off the engine again.
0 notes
Text
Why You Should Fix or Replace a Dragging Splash Shield Right Away
What do you do if you’re driving your vehicle and you notice that the splash guard or splash shield is dragging on the road? Most people may think, Ah well, I’ll just drive with it like this for now. I can always fix or replace it later on. But in reality, there are many reasons why you should fix or replace the splash guard right away. Before getting into those reasons, though, let’s discuss what a splash shield does and how to recognize when yours is dragging on the ground.
What Is a Splash Shield?
A splash shield is designed to protect the underside of your car from water, dirt, and debris kicked up by the tires. It is located on the front bumper and attaches to the underside of your vehicle. When you go over puddles, waves, or drive through rainstorms, this shield will catch any liquid that comes up from below and keep it from getting into your engine compartment.
Splash shields are made with two different materials - metal and rubber. Metal splash shields are made of steel for durability and can withstand harsh weather conditions without breaking down. Rubber splash shields are less expensive but may need to be replaced more often than metal if exposed to extreme conditions such as snow and ice.
The Purpose of a Splash Shield
A splash shield is a vital component of your vehicle's engine compartment. The primary function of the splash shield is to keep dirt, water, and other debris from entering the engine compartment. A splash shield does not allow moisture and dirt to enter the engine compartments, which may cause irreversible damage to your car's engine. Additionally, it can be hard to see while driving because of the amount of dirt that accumulates on the windshield while driving with a Dragging Splash Shield.
Why You Should Fix or Replace a Dragging Splash Shield Right Away
You can drive your vehicle while the splash shield is dragging. However, it is strongly advised that you fix or replace it right away. In the absence of such precautions, moisture, dirt, and debris may enter the engine compartments and harm the engine parts. Furthermore, once water has accumulated inside your vehicle's engine compartment and dripped down to an exhaust pipe (even just one time), corrosion will be caused on the metal parts of your exhaust system. The corrosion will continue as long as there is water dripping down onto them. This will eventually lead to rusting; which could result in broken pipes and mufflers that could pose a serious safety hazard to you and other drivers around you.
How to Prevent Splash Shields from Dragging
Splash shields are made to protect the engine compartment from water, dirt and debris. Usually, they're affixed to the bottom of the vehicle with bolts. When they start to fall off, they may drag on the ground and can cause serious issues with your vehicle's engine. To prevent this from happening, follow these steps:
- Check for any loose bolts that might be causing the splash shield to come loose and fix them as soon as possible.
- If you notice that your splash shield is dragging on the ground, stop driving immediately and inspect it for damage. Even if it doesn't seem damaged now, continued use may worsen the issue over time until you have major problems with your engine. If you are still stuck somewhere or want to read more on Dragging Splash Shield you can easily continue your reading from Autovehicleparts.
0 notes
Text
P0420: Why Your SCION's Check Engine Light is On & How to Fix It
How many times have you been driving along, and the check engine light pops on? It's frustrating to say the least, but knowing what it means and how to fix it isn't as difficult as you might think. Let's look at the code P0420, dtc p0420, what it indicates, and then how to go about fixing it in order to have your car running in peak condition again!
What is Code P0420?
Code P0420 indicates a problem with the catalytic converter. The job of a catalytic converter is to break down harmful pollutants produced during the combustion cycle. The catalyst can reduce exhaust emissions by using fine meshes of platinum and gold to filter exhaust gasses. If the engine light stays on, it means that there is an issue with the cat, and we need to figure out what it is. You can find out what the code P0420 means in your vehicle by checking your car manual or on Google by searching the p040 code followed by your make and model of car. This will give you more information about how serious this code could be for you and your vehicle, as well as what you should do next.
What Causes Code P0420?
Code P0420 indicates a problem with the catalytic converter. The job of a catalytic converter is to break down harmful pollutants produced during the combustion cycle. The catalyst can reduce exhaust emissions by using fine meshes of platinum and gold to filter exhaust gasses.
Code P0420 can be caused by failed oxygen sensors, a leaking fuel injector, or an Acura emissions system P0420 that needs replacement. If you have code p040, it could be that one or more of your cylinders are not getting enough air (check for vacuum leaks) or fuel (check for clogged fuel filter). Code P040 may also show up if your vehicle has been run rich for an extended period of time due to faulty readings from the oxygen sensor.
How to Diagnose and Repair Code P0420
In conclusion, your car's check engine light may be on for a variety of reasons. If you have a Mazda, Chrysler or Infiniti with the DTC P040 code then there is a problem with the catalytic converter which can be fixed by replacing it. If you have an Acura with the DTC P0420 code then there may be an issue with your emissions system that can also be repaired by replacing it. In any case, it's best to take your car in for a diagnosis and repair as soon as possible because emission problems can lead to costly repairs in future years.
Catalytic Converter Replacement
This code, dtc p0420 scion, P0420, indicates a problem with the catalytic converter. The job of a catalytic converter is to break down harmful pollutants produced during the combustion cycle. The catalyst can reduce exhaust emissions by using fine meshes of platinum and gold to filter exhaust gasses. Replacing your catalytic converter can be costly and is not something you should take lightly. If you are experiencing symptoms such as reduced power, rough idling, stalling or check engine light on, your catalytic converter needs replacing. This job should be handled by a certified technician at your nearest ACDelco Professional Service Center because only they have the right equipment for this repair.
Conclusion
If you are experiencing a Infiniti DTC P0420 Chrysler, there are many reasons why it could have popped up. The catalytic converter itself might be defective and need to be replaced or your vehicle may have an exhaust leak. Either way, it is important that you take your car in for an inspection as soon as possible so that you know the extent of the problem. Waiting too long could result in engine damage.If you are still stuck somewhere or want to read more on Infiniti DTC P0420 Chrysler you can easily continue your reading from Autovehicleparts.
0 notes
Text
How to Reset Your Engine Control Module for Optimal Efficiency
If your vehicle’s ECM, or engine control module, has been storing information about your driving style over time, then most probably you are looking for how to reset the engine control module. You can easily reset it to get an immediate boost in performance. Many people don’t realize that they can take advantage of this feature to keep their vehicles running as smoothly as possible over the long term, but it’s easier than you might think. With these instructions on how to reset an engine control module (ECM), you’ll be well on your way to enjoying better gas mileage and reduced emissions right away!
The role of an engine computer
The ECM collects information from the engine and other sensors and helps control how the engine performs. The ECM has two primary functions: it stores long term data within its term memory, and it constantly learns about how you drive your vehicle. These two functions help the computer adjust how other modules function so that your vehicle runs as efficiently as possible. To reset the computer, turn off your car and let it sit for 10 minutes. This will ensure that all data is cleared from memory before you start driving again.
How does my car's computer know how I like my car to drive?
The engine control module is an on-board computer responsible to regulate the performance of your vehicle, while also helping it achieve its maximum fuel economy. The ECM is able to store long term data within its term memory and will continuously work in order to learn about how you drive your car. This information will then be applied towards other modules such as the transmission, air conditioning and even the emissions system. In order for all of these systems to work together in harmony, it's important that you reset your engine control module from time-to-time with a scan tool.
How can I learn what my car's control module is doing behind the scenes?
Your vehicle’s ECM is one of the most important parts of your car. It stores long-term data within its term memory, and continuously works to learn about the way you drive your vehicle. This enables your vehicle to run as efficiently as possible. You can reset your engine control module for optimal efficiency by following these steps: turn off the engine, disconnect the battery terminal, wait 10 seconds, reconnect the terminal and restart the engine.
How can resetting an ECM help me out?
A reset engine control module can help improve fuel economy, driveability and maximize emissions. Before it performs a reset, your engine will already have detected any problems with your vehicle’s electronics or physical components and have likely already made adjustments to the way that other modules behave in order to compensate. However, it will take up to 200 miles of driving before these settings make a significant difference. Resetting the ECM clears all learned data so that the system is working on an even playing field once again.
A reset engine control module could also be helpful if you are experiencing sudden power loss, rough idle or poor throttle response while accelerating.
0 notes
Text

Driving with a damaged bumper cover is not only inconvenient. Your life and your car are also in risk. Replace it right away with a premium AutovehicleParts front and rear Used bumper covers. Our durable bumper cover replacements can enhance your driving style and lessen the impact of collisions. The industry's most trusted brands manufacture each and every one of our items. Check out our huge selection of products right away!
0 notes
Text
Rusty Cars: What Causes Them?
Introduction: Is your car reliable? Do you know how to maintain it? If you answered “no” to both of these questions, then you might be in for a problem. Rusty Cars are a problem. And not just any old problem, either. According to the Insurance Institute for Highway Safety, over 50% of all crashes are caused by rusty cars. That means that even if your car is running perfectly, something may have gone wrong and crashed into your windshield—or worse. To make matters worse, your car might not even be the only one with problems. By understanding what causesRusty Cars and how to fix them quickly and easily, you can protect yourself and your passengers from serious injury or death.

What are Rusty Cars?
Rusty cars are made of metal, which can cause them to rust. The metal can corrode and cause different parts of the car to come apart. This can result in the car being unable to start, causing damage to the inside and outside of the car, and looking dirty.

Rusty Cars Can Cause Damage
Do fender flares cause rust When a rusty car is used, it can cause damage to other parts of the car. For example, if a part is missing or has been replaced with a less-safe material, it could potentially damage other parts of the car as well. Additionally, if something falls out from inside a rusty car, it could go through the windshield and onto the ground outside, potentially harming someone else in the process.

Rusty Cars Can Look Dirty
Rusty cars can also look dirty because of how bacteria has taken up residence on some of the metals in a car. When there’s too much bacteria present, it causes rust to form on exposed metal surfaces and this can make the area look dirty or browning.
How Rusty Cars Cause Damage.
If a car is dropped, the metal on the bottom of the vehicle will rust. This process can start very quickly and can cause major damage to the car. Rusty cars that are dropped more often than other cars will also have more rust and will be more difficult to fix.
Rusty Cars can Cause Damage when They Are Hit
If a car is hit, it will likely result in some damage to the car. Rusty cars are especially susceptible to being hit because they're made of glass, which can be easily shattered if hit. If you're ever in an accident with a rusty car, make sure to take it to a mechanic as soon as possible so that your injuries aren't further exacerbated by the damage done to the car.
Rusty Cars can Cause Damage When They Are Made of Glass
Sometimes, rusty cars may also exhibit signs of being made of glass. For example, if one side of the car has many dents or there are broken windows, this may be an indication that this vehicle was once made out of glass and has since started corroding on its own accord. If you're ever driving a car that seems to be made of glass, be sure to take it to a mechanic as soon as possible to get the damage fixed.

Tips for Avoiding Rusty Cars.
One of the most important things you can do to avoid rusting your car is to keep it clean. Not only will this help remove any build-up that may have caused the rust, but it will also protect your car from becoming dirty and stained.
If you can, try to take preventative measures by keeping your car clean and free of debris. For example, using a dryer on low or no heat might help to remove any built-up grease and oils. As for Dropping Your Rusty Car...
Don't do it! It's not just a matter of aesthetics - dropped cars can cause serious damage to both the inside and outside of a vehicle. If you're unlucky enough to lose your license or registration while driving a rusty car, you could be in for some costly repairs (and possible legal troubles).
In addition, it's always a good idea to change the tire on a rusty car as soon as possible - not only does this prevent further damage, but it also reduces the chance of getting stranded on the side of the road.
Conclusion
Rusty Cars are a popular product on the internet. They can cause damage if dropped, hit, or when they're made of glass. It's important to keep your Rusty Car clean and avoid dropping it. If you have any questions or concerns about your purchase, please contact us at [email protected]
0 notes
Text
Replace a wiring harness if an electrical connector melts or burns
Introduction: The heat from the electrical connector can melt or burn the insulation in a wire. If this happens, you need to replace the wiring harness as soon as possible.
Replace a Wiring Harness if an Electrical Connector Melt or Burn.
Patching a blown electrical connector can be a challenging task, but it’s important to do your research before starting. To help avoid any trouble down the road, follow these steps:
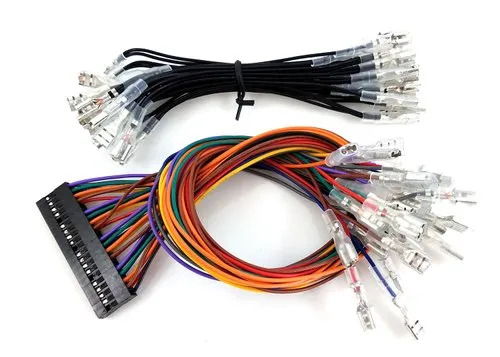
1. Look for an electrical diagram of the product you’re repairing or replacing. This will help you understand how the connector works and where potential problems may exist.
2. Remove all accessories from the system and store them away in a safe place. This includes cords, power adapters, and any other devices that may be used in the replacement process.
3. Connect one end of the new wiring harness to an appropriate terminal on the old connector and connect the other end to a power outlet or another ground terminal.
4. Place the old connector in a safe place and wait until it has cooled slightly (about 20 minutes). Then replace it with the new wiring harness.
5. reattach any accessories that have been removed during restoration or replacement, if necessary.
Replace a Wire Harness if It Burns.
If your electrical connector starts to melt or burn, you will need to replace it. Here are some tips on how to do this:
1. First, check the connector for any damage. If there is damage, it will need to be replaced.
2. Next, find a wire harness that Match Your Model and Year of Use. This can be difficult because the Harness may not be marked anywhere specific. To find a wire harness that matches your year of use and model, you can use this online search tool:
3. Once you have found a wire harness that matches your year of use and model, cut the wires off the old harness and place them into the new one. Be sure to match up all of the wires so they are properly connected.
4. Finally, reattach the power cord to the electrical outlet and turn on the appliances you need to stay plugged in while you work on fixing the problem with your wiring harness (like turning on a light).
Replace a Wire Harness if It Burns.
If a wire harness melts or burns, follow these steps to replace it:
1. Cut the harness cable off of the electrical connector.
2. Tie each end of the new wire harness together with a knot (or other strong tie) and place it back on the electrical connector.
3. Replace the electrical connector if it has been melted or burned down.
4. Check for any damage to the electrical connector and replace if necessary.
Conclusion
Replacement wiring harness if an electrical connector melts or burns can be a difficult task. However, if done correctly, it can prevent any damage to your equipment. By checking the electrical connector for damage and replacing it if necessary, you can keep your equipment running smoothly.
2 notes
·
View notes