mibyle
mibyle
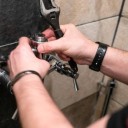
A plumbing service is a professional that performs the required repairs or installation of plumbing systems in a residential or commercial building. A plumbing service typically includes the plumber and pipefitter and a carpenter. If you need extra resources about plumbing, browse Plumbing Techie website.
3 posts
Don't wanna be here? Send us removal request.
Last Seen Blogs


Text
How to Adjust Your Shower Valve for Better Water Pressure

Your shower is one of the most important places in your home to have good water pressure. Without it, you can’t enjoy a good shower, and you may even be frustrated with the experience. Luckily, you can do a few things to adjust your shower valve and improve the water pressure. In this article, we will discuss some of those things so that you can get the most out of your shower.
Why Do You Need To Adjust the Shower Valve?
The shower valve regulates the flow of water into the showerhead. When the valve is turned on, water flows from the pipes and into the showerhead at a set rate. However, over time, the components of the valve can become worn out, causing the water pressure to decrease.
To maintain optimal water pressure, it is necessary to adjust the valve regularly. In this way, you will be able to ensure that you will always have a powerful stream of water flowing from your shower. Additionally, adjusting the valve can help prolong your showerhead's life by preventing premature wear and tear.
The Steps Involved In Adjusting a Shower Valve
In order to achieve your desired results, it is very important to adjust your shower valve correctly on every occasion. For a proper adjustment of your shower valve, follow these steps:
Locate the Shower Valve
The first step to improving low water pressure is locating the shower valve. This is usually located near the showerhead, wall, or floor. Once you've found the valve, take a look at the handle. In most cases, there will be a screw that can be turned to adjust the water pressure.
Turn Off the Water
Once you've located the shower valve, the next step is to turn off the water supply. This can usually be done by turning a knob or lever connected to the water supply pipe. After the water is turned off, go ahead and turn on the shower to release any residual water pressure that may be in the line.
Remove the Handle
The next step is to remove the handle from the shower valve. You will need to remove the screw holding it in place to do this. Once the screw is removed, you should be able to pull the handle off of the valve simply.
Adjust the Screw
youtube
Now that the water is turned off, you can adjust the screw on the shower valve handle. As mentioned before, turning the screw clockwise will increase the water pressure, while turning it counterclockwise will decrease it. Start by turning the screw a quarter in either direction, then turns the water back on to test the results. Continue to adjust the screw until you achieve the desired water pressure.
Test the New Setting
Once you've found the perfect setting, it's important to test it to ensure everything works properly. Start by turning off the water at the main shutoff valve. Then, turn on the shower and let it run for a minute or two. After the shower has been running for a while, turn off the water and check the floor to see if there are any leaks. If there are no leaks, then you're all set.
Final Words
Adjusting your shower valve is a simple process that anyone can do. By following the steps outlined in this article, you can ensure that your shower always has good water pressure. Additionally, adjusting the valve regularly can help prolong the life of your showerhead. So, don’t wait any longer; get out and adjust that valve.
2 notes
·
View notes
Text
How to Replace a Bathroom Faucet

Bathroom faucets can be a pain to replace they're usually difficult to reach and are full of small parts that can easily get lost. That's why it's important to know how to replace a bathroom faucet - not only is it a simple task, but it can also save your time and money in the long run. In this article, we'll discuss you how to replace a bathroom faucet without any hassle. Ready to get started?
Steps to Replace a Bathroom Faucet
Here are the steps you need to take in order to replace a bathroom faucet:
Materials Required:
Bathroom faucet
Tape measure
Hammer
Wrench or pliers
Screwdriver
Tub or sink connector
Drill/driver
Pipe clamp or a ring nut and bolt
Step 1: Remove the Old Faucet
First, you'll need to remove the old bathroom faucet. To do this, use a wrench or pliers to unscrew the Nut on the stem of the faucet. Once it's unscrewed, try to pull out the stem as well. If it's difficult to get out, use a pipe clamp or ring nut and bolt to secure it in place while you work.
Step 2: Remove the Old Hardware
Once the old faucet is removed, you can start to remove the hardware that was attached to it. This includes the water supply line, drain line, and possible handle. Make sure to keep all of these parts in a safe place so you can re-use them later on if necessary.
Step 3: Install the New Bathroom Faucet
Now that you have all of the hardware removed from the old faucet, it's time to install your new bathroom fixture. First, thread the bolt through the hole in the stem and utilize a wrench to tighten it up. Then, screw on the top plate until it's secure. Finally, screw on the water connector and tub/sink connector (if applicable) and you're done.
Step 4: Reinstall Any Plumbing Connections
youtube
After you have the hardware installed, it's time to reattach any plumbing connections that were removed in step one. Start by threading the pipe clamp or ring nut onto the piping and tightening until it's secure. Then, attach the new faucet stem to the newly cut hardware with a screwdriver. Finally, tighten everything down with a wrench or pliers.
Step 5: Test the Water Flow
Now that everything is back in place, test the water flow to make sure it works correctly. If there are any problems, you can fix them now or you can wait until later when everything has been properly installed.
Step 6: Finishing Touches
Once you have test the water flow and made any necessary repairs, it's time to finish the job by caulking around all of the joints and installing finished trim. This will give your bathroom a completed look.
Conclusion:
Now that you have learned how to replace a bathroom faucet, your home will look much more updated and modern. Be sure to follow all of the instructions carefully so you don't lose any small parts or damage any of the new plumbing. Once everything is installed, test the water flow and finish up with some finishing touches. Thanks for reading!
0 notes
Text
How to Remove a Bathtub Drain

Bathtub drains are one of the most common causes of homeowner frustration. If you've ever tried to remove a bathtub drain, you know it's not an easy task. In this article, we'll overview the steps you need to take to remove a bathtub drain and provide some tips that will make the process easier.
Steps to Remove a Bathtub Drain
Here are the steps to removing a bathtub drain:
Step 1: Identify the Drain Location
The first step is to identify the location of the bathtub drain. Once you have determined this, locate and mark the spot on the floor where you will remove the drain. For specifics information all about plumbing, check out Plumbing Blog.
Step 2: Remove Drain Covers
If there are any coverings over or around your bathtub's drain, remove them before beginning. This includes if there are any screws or nails holding these covers in place. You will need to access these covers in order to remove your bathtub drain properly.
Step 3: Disconnecting Tub & Faucet Plugs
If your bathtub has a direct connection to the water supply, you will need to disconnect the tub & faucet plugs before removing your drain. This is usually done by unscrewing or unplugging the appropriate connectors.
Step 4: Removal of Tub Drain Cover
If your bathtub has a removable cover over the drain hole, remove this cover before removing the screws that hold it in place. Once the cover is removed, use a flathead screwdriver to pry up on the edge of the drain assembly until it comes free from its base. It is important to be careful when doing this as improper removal may result in damage to your bathtub.
Step 5: Removal of Tub Drain Assembly from Floor
Once the drain assembly is free from its base, carefully remove it from the floor. Be sure to hold onto any clips or wire that are attached to the assembly in order for them not to get lost.
Step 6: Cleaning Up Remnant Hardware
youtube
Once you have removed your bathtub drain and all hardware, it is important to clean up any remaining debris. Use a damp cloth or sponge to clean everything down until there is no visible residue left behind. Remember, being careful when removing and cleaning your bathtub drain will help prevent damage in the future.
Step 7: Reinstallation
Once everything is clean and dry, you can reassemble your tub drain by following the instructions that came with your assembly. Remember to replace any clips or wire that may have been lost during removal. Once your bathtub drain is back in place, be sure to test it for proper drainage before allowing children or guests into the bathroom.
Conclusion:
If you are having problems with your bathtub drain, it is always best to consult a professional. However, if you would like to try and fix the issue yourself, follow these simple steps. Be careful when performing any of the tasks listed as improper removal or repair can result in damage to your bathtub.
1 note
·
View note