
michaeldswanson
Mike Swanson's Blog
Hi. I'm Mike Swanson, technologist, owner of Juicy Bits, and former Microsoft employee of 12 years. This is my blog.
Have a comment or question? Contact me.
39 posts
Don't wanna be here? Send us removal request.
Last Seen Blogs

havingapoemwithyou
having a poem with you

slutnancy
Nancy

mcrsession
i miss eren jaeger

mikylife
miky.life

selenophil
ingrid emilie
Text
Apple’s Mysterious Fisheye Projection
If you’ve read my first post about Spatial Video, the second about Encoding Spatial Video, or if you’ve used my command-line tool, you may recall a mention of Apple’s mysterious “fisheye” projection format. Mysterious because they’ve documented a CMProjectionType.fisheye enumeration with no elaboration, they stream their immersive Apple TV+ videos in this format, yet they’ve provided no method to produce or playback third-party content using this projection type.
Additionally, the format is undocumented, they haven’t responded to an open question on the Apple Discussion Forums asking for more detail, and they didn’t cover it in their WWDC23 sessions. As someone who has experience in this area – and a relentless curiosity – I’ve spent time digging-in to Apple’s fisheye projection format, and this post shares what I’ve learned.
As stated in my prior post, I am not an Apple employee, and everything I’ve written here is based on my own history, experience (specifically my time at immersive video startup, Pixvana, from 2016-2020), research, and experimentation. I’m sure that some of this is incorrect, and I hope we’ll all learn more at WWDC24.
Spherical Content
Imagine sitting in a swivel chair and looking straight ahead. If you tilt your head to look straight up (at the zenith), that’s 90 degrees. Likewise, if you were looking straight ahead and tilted your head all the way down (at the nadir), that’s also 90 degrees. So, your reality has a total vertical field-of-view of 90 + 90 = 180 degrees.
Sitting in that same chair, if you swivel 90 degrees to the left or 90 degrees to the right, you’re able to view a full 90 + 90 = 180 degrees of horizontal content (your horizontal field-of-view). If you spun your chair all the way around to look at the “back half” of your environment, you would spin past a full 360 degrees of content.
When we talk about immersive video, it’s common to only refer to the horizontal field-of-view (like 180 or 360) with the assumption that the vertical field-of-view is always 180. Of course, this doesn’t have to be true, because we can capture whatever we’d like, edit whatever we’d like, and playback whatever we’d like.
But when someone says something like VR180, they really mean immersive video that has a 180-degree horizontal field-of-view and a 180-degree vertical field-of-view. Similarly, 360 video is 360-degrees horizontally by 180-degrees vertically.
Projections
When immersive video is played back in a device like the Apple Vision Pro, the Meta Quest, or others, the content is displayed as if a viewer’s eyes are at the center of a sphere watching video that is displayed on its inner surface. For 180-degree content, this is a hemisphere. For 360-degree content, this is a full sphere. But it can really be anything in between; at Pixvana, we sometimes referred to this as any-degree video.
It's here where we run into a small problem. How do we encode this immersive, spherical content? All the common video codecs (H.264, VP9, HEVC, MV-HEVC, AVC1, etc.) are designed to encode and decode data to and from a rectangular frame. So how do you take something like a spherical image of the Earth (i.e. a globe) and store it in a rectangular shape? That sounds like a map to me. And indeed, that transformation is referred to as a map projection.
Equirectangular
While there are many different projection types that each have useful properties in specific situations, spherical video and images most commonly use an equirectangular projection. This is a very simple transformation to perform (it looks more complicated than it is). Each x location on a rectangular image represents a longitude value on a sphere, and each y location represents a latitude. That’s it. Because of these relationships, this kind of projection can also be called a lat/long.
Imagine “peeling” thin one-degree-tall strips from a globe, starting at the equator. We start there because it’s the longest strip. To transform it to a rectangular shape, start by pasting that strip horizontally across the middle of a sheet of paper (in landscape orientation). Then, continue peeling and pasting up or down in one-degree increments. Be sure to stretch each strip to be as long as the first, meaning that the very short strips at the north and south poles are stretched a lot. Don’t break them! When you’re done, you’ll have a 360-degree equirectangular projection that looks like this.
If you did this exact same thing with half of the globe, you’d end up with a 180-degree equirectangular projection, sometimes called a half-equirect. Performed digitally, it’s common to allocate the same number of pixels to each degree of image data. So, for a full 360-degree by 180-degree equirect, the rectangular video frame would have an aspect ratio of 2:1 (the horizontal dimension is twice the vertical dimension). For 180-degree by 180-degree video, it’d be 1:1 (a square). Like many things, these aren’t hard and fast rules, and for technical reasons, sometimes frames are stretched horizontally or vertically to fit within the capabilities of an encoder or playback device.
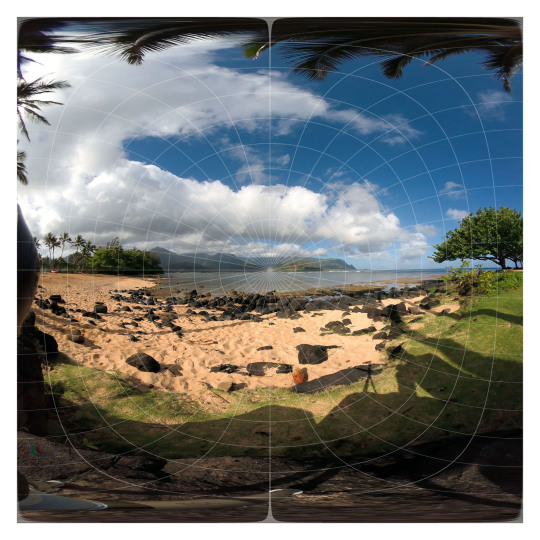
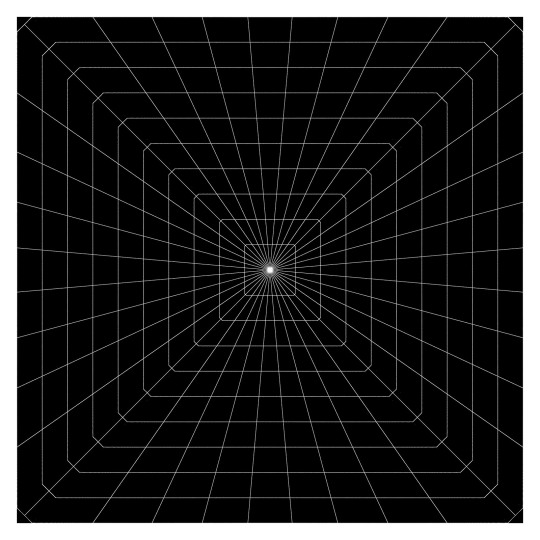
This is a 180-degree half equirectangular image overlaid with a grid to illustrate its distortions. It was created from the standard fisheye image further below. Watch an animated version of this transformation.
What we’ve described so far is equivalent to monoscopic (2D) video. For stereoscopic (3D) video, we need to pack two of these images into each frame…one for each eye. This is usually accomplished by arranging two images in a side-by-side or over/under layout. For full 360-degree stereoscopic video in an over/under layout, this makes the final video frame 1:1 (because we now have 360 degrees of image data in both dimensions). As described in my prior post on Encoding Spatial Video, though, Apple has chosen to encode stereo video using MV-HEVC, so each eye’s projection is stored in its own dedicated video layer, meaning that the reported video dimensions match that of a single eye.
Standard Fisheye
Most immersive video cameras feature one or more fisheye lenses. For 180-degree stereo (the short way of saying stereoscopic) video, this is almost always two lenses in a side-by-side configuration, separated by ~63-65mm, very much like human eyes (some 180 cameras).
The raw frames that are captured by these cameras are recorded as fisheye images where each circular image area represents ~180 degrees (or more) of visual content. In most workflows, these raw fisheye images are transformed into an equirectangular or half-equirectangular projection for final delivery and playback.
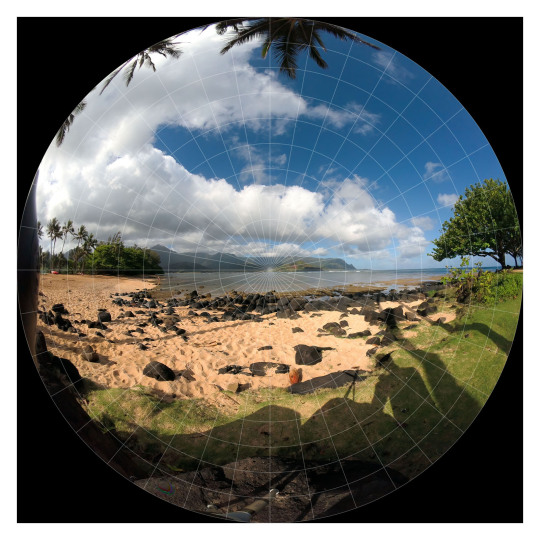
This is a 180 degree standard fisheye image overlaid with a grid. This image is the source of the other images in this post.
Apple’s Fisheye
This brings us to the topic of this post. As I stated in the introduction, Apple has encoded the raw frames of their immersive videos in a “fisheye” projection format. I know this, because I’ve monitored the network traffic to my Apple Vision Pro, and I’ve seen the HLS streaming manifests that describe each of the network streams. This is how I originally discovered and reported that these streams – in their highest quality representations – are ~50Mbps, HDR10, 4320x4320 per eye, at 90fps.
While I can see the streaming manifests, I am unable to view the raw video frames, because all the immersive videos are protected by DRM. This makes perfect sense, and while I’m a curious engineer who would love to see a raw fisheye frame, I am unwilling to go any further. So, in an earlier post, I asked anyone who knew more about the fisheye projection type to contact me directly. Otherwise, I figured I’d just have to wait for WWDC24.
Lo and behold, not a week or two after my post, an acquaintance introduced me to Andrew Chang who said that he had also monitored his network traffic and noticed that the Apple TV+ intro clip (an immersive version of this) is streamed in-the-clear. And indeed, it is encoded in the same fisheye projection. Bingo! Thank you, Andrew!
Now, I can finally see a raw fisheye video frame. Unfortunately, the frame is mostly black and featureless, including only an Apple TV+ logo and some God rays. Not a lot to go on. Still, having a lot of experience with both practical and experimental projection types, I figured I’d see what I could figure out. And before you ask, no, I’m not including the actual logo, raw frame, or video in this post, because it’s not mine to distribute.
Immediately, just based on logo distortions, it’s clear that Apple’s fisheye projection format isn’t the same as a standard fisheye recording. This isn’t too surprising, given that it makes little sense to encode only a circular region in the center of a square frame and leave the remainder black; you typically want to use all the pixels in the frame to send as much data as possible (like the equirectangular format described earlier).
Additionally, instead of seeing the logo horizontally aligned, it’s rotated 45 degrees clockwise, aligning it with the diagonal that runs from the upper-left to the lower-right of the frame. This makes sense, because the diagonal is the longest dimension of the frame, and as a result, it can store more horizontal (post-rotation) pixels than if the frame wasn’t rotated at all.
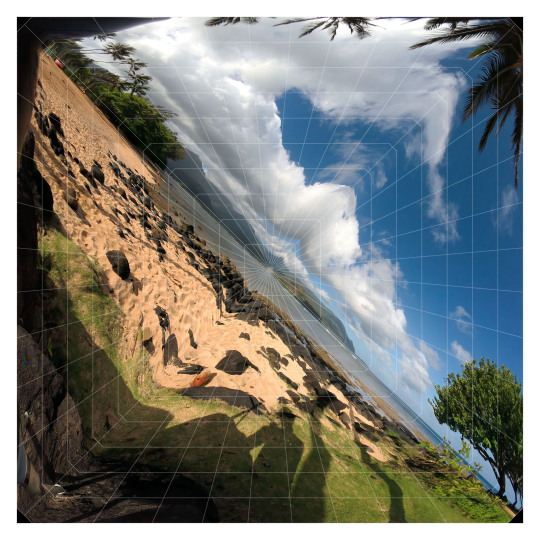
This is the same standard fisheye image from above transformed into a format that seems very similar to Apple’s fisheye format. Watch an animated version of this transformation.
Likewise, the diagonal from the lower-left to the upper-right represents the vertical dimension of playback (again, post-rotation) providing a similar increase in available pixels. This means that – during rotated playback – the now-diagonal directions should contain the least amount of image data. Correctly-tuned, this likely isn’t visible, but it’s interesting to note.
More Pixels
You might be asking, where do these “extra” pixels come from? I mean, if we start with a traditional raw circular fisheye image captured from a camera and just stretch it out to cover a square frame, what have we gained? Those are great questions that have many possible answers.
This is why I liken video processing to turning knobs in a 747 cockpit: if you turn one of those knobs, you more-than-likely need to change something else to balance it out. Which leads to turning more knobs, and so on. Video processing is frequently an optimization problem just like this. Some initial thoughts:
It could be that the source video is captured at a higher resolution, and when transforming the video to a lower resolution, the “extra” image data is preserved by taking advantage of the square frame.
Perhaps the camera optically transforms the circular fisheye image (using physical lenses) to fill more of the rectangular sensor during capture. This means that we have additional image data to start and storing it in this expanded fisheye format allows us to preserve more of it.
Similarly, if we record the image using more than two lenses, there may be more data to preserve during the transformation. For what it’s worth, it appears that Apple captures their immersive videos with a two-lens pair, and you can see them hiding in the speaker cabinets in the Alicia Keys video.
There are many other factors beyond the scope of this post that can influence the design of Apple’s fisheye format. Some of them include distortion handling, the size of the area that’s allocated to each pixel, where the “most important” pixels are located in the frame, how high-frequency details affect encoder performance, how the distorted motion in the transformed frame influences motion estimation efficiency, how the pixels are sampled and displayed during playback, and much more.
Blender
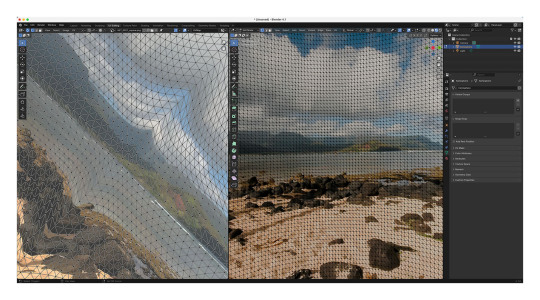
But let’s get back to that raw Apple fisheye frame. Knowing that the image represents ~180 degrees, I loaded up Blender and started to guess at a possible geometry for playback based on the visible distortions. At that point, I wasn’t sure if the frame encodes faces of the playback geometry or if the distortions are related to another kind of mathematical mapping. Some of the distortions are more severe than expected, though, and my mind couldn’t imagine what kind of mesh corrected for those distortions (so tempted to blame my aphantasia here, but my spatial senses are otherwise excellent).
One of the many meshes and UV maps that I’ve experimented with in Blender.
Radial Stretching
If you’ve ever worked with projection mappings, fisheye lenses, equirectangular images, camera calibration, cube mapping techniques, and so much more, Google has inevitably led you to one of Paul Bourke’s many fantastic articles. I’ve exchanged a few e-mails with Paul over the years, so I reached out to see if he had any insight.
After some back-and-forth discussion over a couple of weeks, we both agreed that Apple’s fisheye projection is most similar to a technique called radial stretching (with that 45-degree clockwise rotation thrown in). You can read more about this technique and others in Mappings between Sphere, Disc, and Square and Marc B. Reynolds’ interactive page on Square/Disc mappings.
Basically, though, imagine a traditional centered, circular fisheye image that touches each edge of a square frame. Now, similar to the equirectangular strip-peeling exercise I described earlier with the globe, imagine peeling one-degree wide strips radially from the center of the image and stretching those along the same angle until they touch the edge of the square frame. As the name implies, that’s radial stretching. It’s probably the technique you’d invent on your own if you had to come up with something.
By performing the reverse of this operation on a raw Apple fisheye frame, you end up with a pretty good looking version of the Apple TV+ logo. But, it’s not 100% correct. It appears that there is some additional logic being used along the diagonals to reduce the amount of radial stretching and distortion (and perhaps to keep image data away from the encoded corners). I’ve experimented with many approaches, but I still can’t achieve a 100% match. My best guess so far uses simple beveled corners, and this is the same transformation I used for the earlier image.
It's also possible that this last bit of distortion could be explained by a specific projection geometry, and I’ve iterated over many permutations that get close…but not all the way there. For what it’s worth, I would be slightly surprised if Apple was encoding to a specific geometry because it adds unnecessary complexity to the toolchain and reduces overall flexibility.
While I have been able to playback the Apple TV+ logo using the techniques I’ve described, the frame lacks any real detail beyond its center. So, it’s still possible that the mapping I’ve arrived at falls apart along the periphery. Guess I’ll continue to cross my fingers and hope that we learn more at WWDC24.
Conclusion
This post covered my experimentation with the technical aspects of Apple’s fisheye projection format. Along the way, it’s been fun to collaborate with Andrew, Paul, and others to work through the details. And while we were unable to arrive at a 100% solution, we’re most definitely within range.
The remaining questions I have relate to why someone would choose this projection format over half-equirectangular. Clearly Apple believes there are worthwhile benefits, or they wouldn’t have bothered to build a toolchain to capture, process, and stream video in this format. I can imagine many possible advantages, and I’ve enumerated some of them in this post. With time, I’m sure we’ll learn more from Apple themselves and from experiments that all of us can run when their fisheye format is supported by existing tools.
It's an exciting time to be revisiting immersive video, and we have Apple to thank for it.
As always, I love hearing from you. It keeps me motivated! Thank you for reading.
12 notes
·
View notes
Text
Encoding Spatial Video
As I mentioned in my prior post about Spatial Video, the launch of the Apple Vision Pro has reignited interest in spatial and immersive video formats, and it's exciting to hear from users who are experiencing this format for the first time. The release of my spatial video command-line tool and example spatial video player has inadvertently pulled me into a lot of fun discussions, and I've really enjoyed chatting with studios, content producers, camera manufacturers, streaming providers, enthusiasts, software developers, and even casual users. Many have shared test footage, and I've been impressed by a lot of what I've seen. In these interactions, I'm often asked about encoding options, playback, and streaming, and this post will focus on encoding.
To start, I'm not an Apple employee, and other than my time working at an immersive video startup (Pixvana, 2016-2020), I don't have any secret or behind-the-scenes knowledge. Everything I've written here is based on my own research and experimentation. That means that some of this will be incorrect, and it's likely that things will change, perhaps as early as WWDC24 in June (crossing my fingers). With that out of the way, let's get going.
Encoding
Apple's spatial and immersive videos are encoded using a multi-view extension of HEVC referred to as MV-HEVC (found in Annex G of the latest specification). While this format and extension were defined as a standard many years ago, as far as I can tell, MV-HEVC has not been used in practice. Because of this, there are very few encoders that support this format. As of this writing, these are the encoders that I'm aware of:
spatial - my own command-line tool for encoding MV-HEVC on an Apple silicon Mac
Spatialify - an iPhone/iPad app
SpatialGen - an online encoding solution
QooCam EGO spatial video and photo converter - for users of this Kandao camera
Dolby/Hybrik - professional online encoding
Ateme TITAN - professional encoding (note the upcoming April 16, 2024 panel discussion at NAB)
SpatialMediaKit - an open source GitHub project for Mac
MV-HEVC reference software - complex reference software mostly intended for conformance testing
Like my own spatial tool, many of these encoders rely on the MV-HEVC support that has been added to Apple's AVFoundation framework. As such, you can expect them to behave in similar ways. I'm not as familiar with the professional solutions that are provided by Dolby/Hyrbik and Ateme, so I can't say much about them. Finally, the MV-HEVC reference software was put together by the standards committee, and while it is an invaluable tool for testing conformance, it was never intended to be a commercial tool, and it is extremely slow. Also, the reference software was completed well before Apple defined its vexu metadata, so that would have to be added manually (my spatial tool can do this).
Layers
As I mentioned earlier, MV-HEVC is an extension to HEVC, and the multi-view nature of that extension is intended to encode multiple views of the same content all within a single bitstream. One use might be to enable multiple camera angles of an event – like a football game – to be carried in a single stream, perhaps allowing a user to switch between them. Another use might be to encode left- and right-eye views to be played back stereoscopically (in 3D).
To carry multiple views, MV-HEVC assigns each view a different layer ID. In a normal HEVC stream, there is only one so-called primary layer that is assigned an ID of 0. When you watch standard 2D HEVC-encoded media, you're watching the only/primary layer 0 content. With Apple's spatial and immersive MV-HEVC content, a second layer (typically ID 1) is also encoded, and it represents a second view of the same content. Note that while it's common for layer 0 to represent a left-eye view, this is not a requirement.
One benefit of this scheme is that you can playback MV-HEVC content on a standard 2D player, and it will only playback the primary layer 0 content, effectively ignoring anything else. But, when played back on a MV-HEVC-aware player, each layered view can be presented to the appropriate eye. This is why my spatial tool allows you to choose which eye's view is stored in the primary layer 0 for 2D-only players. Sometimes (like on iPhone 15 Pro), one camera's view looks better than the other.
All video encoders take advantage of the fact that the current video frame looks an awful lot like the prior video frame. Which looks a lot like the one before that. Most of the bandwidth savings depends on this fact. This is called temporal (changes over time) or inter-view (where a view in this sense is just another image frame) compression. As an aside, if you're more than casually interested in how this works, I highly recommend this excellent digital video introduction. But even if you don't read that article, a lot of the data in compressed video consists of one frame referencing part of another frame (or frames) along with motion vectors that describe which direction and distance an image chunk has moved.
Now, what happens when we introduce the second layer (the other eye's view) in MV-HEVC-encoded video? Well, in addition to a new set of frames that is tagged as layer 1, these layer 1 frames can also reference frames that are in layer 0. And because stereoscopic frames are remarkably similar – after all, the two captures are typically 65mm or less apart – there is a lot of efficiency when storing the layer 1 data: "looks almost exactly the same as layer 0, with these minor changes…" It isn't unreasonable to expect 50% or more savings in that second layer.
This diagram shows a set of frames encoded in MV-HEVC. Perhaps confusing at first glance, the arrows show the flow of referenced image data. Notice that layer 0 does not depend on anything in layer 1, making this primary layer playable on standard 2D HEVC video players. Layer 1, however, relies on data from layer 0 and from other adjacent layer 1 frames.
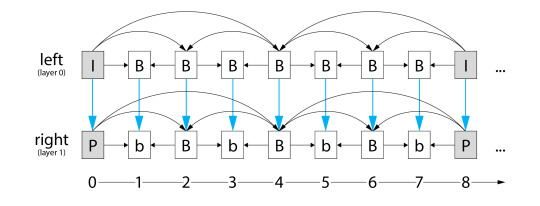
Thanks to Fraunhofer for the structure of this diagram.
Mystery
I am very familiar with MV-HEVC output that is recorded by Apple Vision Pro and iPhone 15 Pro, and it's safe to assume that these are being encoded with AVFoundation. I'm also familiar with the output of my own spatial tool and a few of the others that I mentioned above, and they too use AVFoundation. However, the streams that Apple is using for its immersive content appear to be encoded by something else. Or at least a very different (future?) version of AVFoundation. Perhaps another WWDC24 announcement?
By monitoring the network, I've already learned that Apple's immersive content is encoded in 10-bit HDR, 4320x4320 per-eye resolution, at 90 frames-per-second. Their best streaming version is around 50Mbps, and the format of the frame is (their version of) fisheye. While they've exposed a fisheye enumeration in Core Media and their files are tagged as such, they haven't shared the details of this projection type. Because they've chosen it as the projection type for their excellent Apple TV immersive content, though, it'll be interesting to hear more when they're ready to share.
So, why do I suspect that they're encoding their video with a different MV-HEVC tool? First, where I'd expect to see a FourCC codec type of hvc1 (as noted in the current Apple documentation), in some instances, I've also seen a qhvc codec type. I've never encountered that HEVC codec type, and as far as I know, AVFoundation currently tags all MV-HEVC content with hvc1. At least that's been my experience. If anyone has more information about qhvc, drop me a line.
Next, as I explained in the prior section, the second layer in MV-HEVC-encoded files is expected to achieve a bitrate savings of around 50% or more by referencing the nearly-identical frame data in layer 0. But, when I compare files that have been encoded by Apple Vision Pro, iPhone 15 Pro, and the current version of AVFoundation (including my spatial tool), both layers are nearly identical in size. On the other hand, Apple's immersive content is clearly using a more advanced encoder, and the second layer is only ~45% of the primary layer…just what you'd expect.
Here is a diagram that shows three subsections of three different MV-HEVC videos, each showing a layer 0 (blue), then layer 1 (green) cadence of frames. The height of each bar represents the size of that frame's payload. Because the content of each video is different, this chart is only useful to illustrate the payload difference between layers.

As we've learned, for a mature encoder, we'd expect the green bars to be noticeably smaller than the blue bars. For Apple Vision Pro and spatial tool encodings (both using the current version of AVFoundation), the bars are often similar, and in some cases, the green bars are even higher than their blue counterparts. In contrast, look closely at the Apple Immersive data; the green layer 1 frame payload is always smaller.
Immaturity
What does this mean? Well, it means that Apple's optimized 50Mbps stream might need closer to 70Mbps using the existing AVFoundation-based tools to achieve a similar quality. My guess is that the MV-HEVC encoder in AVFoundation is essentially encoding two separate HEVC streams, then "stitching" them together (by updating layer IDs and inter-frame references), almost as-if they're completely independent of each other. That would explain the remarkable size similarity between the two layers, and as an initial release, this seems like a reasonable engineering simplification. It also aligns with Apple's statement that one minute of spatial video from iPhone 15 Pro is approximately 130MB while one minute of regular video is 65MB…exactly half.
Another possibility is that it's too computationally expensive to encode inter-layer references while capturing two live camera feeds in Vision Pro or iPhone 15 Pro. This makes a lot of sense, but I'd then expect a non-real-time source to produce a more efficient bitstream, and that's not what I'm seeing.
For what it's worth, I spent a bit of time trying to validate a lack of inter-layer references, but as mentioned, there are no readily-available tools that process MV-HEVC at this deeper level (even the reference decoder was having its issues). I started to modify some existing tools (and even wrote my own), but after a bunch of work, I was still too far away from an answer. So, I'll leave it as a problem for another day.
To further improve compression efficiency, I tried to add AVFoundation's multi-pass encoding to my spatial tool. Sadly, after many attempts and an unanswered post to the Apple Developer Forums, I haven't had any luck. It appears that the current MV-HEVC encoder doesn't support multi-pass encoding. Or if it does, I haven't found the magical incantation to get it working properly.
Finally, I tried adding more data rate options to my spatial tool. The tool can currently target a quality level or an average bitrate, but it really needs finer control for better HLS streaming support. Unfortunately, I couldn't get the data rate limits feature to work either. Again, I'm either doing something wrong, or the current encoder doesn't yet support all of these features.
Closing Thoughts
I've been exploring MV-HEVC in depth since the beginning of the year. I continue to think that it's a great format for immersive media, but it's clear that the current state of encoders (at least those that I've encountered) are in their infancy. Because the multi-view extensions for HEVC have never really been used in the past, HEVC encoders have reached a mature state without multi-view support. It will now take some effort to revisit these codebases to add support for things like multiple input streams, the introduction of additional layers, and features like rate control.
While we wait for answers at WWDC24, we're in an awkward transition period where the tools we have to encode media will require higher bitrates and offer less control over bitstreams. We can encode rectilinear media for playback in the Files and Photos apps on Vision Pro, but Apple has provided no native player support for these more immersive formats (though you can use my example spatial player). Fortunately, Apple's HLS toolset has been updated to handle spatial and immersive media. I had intended to write about streaming MV-HEVC in this post, but it's already long enough, so I'll save that topic for another time.
As always, I hope this information is useful, and if you have any comments, feedback, suggestions, or if you just want to share some media, feel free to contact me.
3 notes
·
View notes
Text
Spatial Video
One month ago, Apple released the Vision Pro, and with it, the ability to record and playback spatial (and immersive) video. The Apple TV app includes a set of beautifully produced videos giving viewers the chance to sit in the studio with Alicia Keys, visit the world's largest rhino sanctuary, and perhaps most stunningly, follow Faith Dickey as she traverses a "highline" 3,000 feet above Norway’s fjords. These are videos that envelop the viewer with ~180 degrees of wraparound content and provide a very strong sense of presence.
It isn't too hyperbolic to say that immersive video — when done right — makes you feel like you've been teleported to a new location. While you might "have seen" a place in a traditional flat video, with immersive video, you've "been there." If you haven't experienced video like this, I'm jealous, because there's nothing like the first time. If you own a Vision Pro and haven't watched these yet, stop reading and do it now!
What readers of my admittedly sparse blog might not know is that I worked for an immersive video startup in Seattle (called Pixvana) for four full years starting in early 2016. I helped build our cross-platform video playback SDK, the on-device video players themselves, the in-headset authoring, editing, and scripting tools, a viewport-adaptive streaming technology, some novel frame mapping techniques, and the transformation, encoding, and streaming pipeline that we ran in the cloud. It was an exciting and challenging time, and looking back, I'm surprised that I never posted about it. I loved it!
The launch of the Apple Vision Pro has reignited interest in these formats, introducing them to an audience that was previously unaware of their existence. And as a huge fan of immersive video myself, I had to dig-in.
(Apologies for the formatting of this post. Unfortunately, Tumblr resizes images, adds redirects, and collapses bulleted lists.)
Context
As useful context, Apple acquired one of the very few startups in the space, NextVR, back in 2020. While we (at Pixvana) were focused on pre-recorded, on-demand content and tooling, NextVR was focused on the capture and streaming of live events, including sports and music. I was a fan and user of their technology, and we were all in a situation where "a rising tide lifts all boats." It looks like Apple is planning to continue NextVR's trajectory with events like the MLS Cup Playoffs.
I could probably write a books-worth of content on lessons learned regarding the capture, processing, encoding, streaming, and playback of spatial media (both video and audio). While it all starts with the history and experience of working with traditional, flat media, it quickly explodes into huge frame dimensions, even larger master files, crashing tools, and mapping spherical immersive content to a rectangular video frame.
Then, because viewers are experiencing content with two huge magnifying lenses in front of their eyes, they inadvertently become pixel-peepers, and compression-related artifacts that may have been acceptable with flat media become glaring, reality-busting anomalies like glitches in the matrix. Oh, did I forget to mention that there's now two frames that have to be delivered, one to each eye? Or the fact that 60 or even 90 frames-per-second is ideal? It's a physics nightmare, and the fact that we can stream this reality over limited bandwidth to a headset in our home is truly amazing. But I digress.
Terminology
First, let's get some terminology out of the way. While I haven't seen any official Apple definitions, based on what I've read, when Apple talks about spatial video, they're referring to rectangular, traditional 3D video. Yes, there is the opportunity to store additional depth data along with the video (very useful for subtitle placement), but for the most part, spatial videos are videos that contain both left- and right-eye views. The iPhone 15 Pro and the Vision Pro can record these videos, each utilizing its respective camera configuration.
When Apple talks about immersive video, they appear to be referring to non-rectangular video that surrounds the viewer; this is actually a very good term for the experience. Videos like this are typically captured by two (or more) sensors, often with wide-angle/fisheye lenses. The spherical space they capture is typically mapped to a rectangular video frame using what is known as an equirectangular projection (think about a map of the Earth...also a spherical object distorted to fit into a rectangle). Apple's own Immersive videos are mapped using a fisheye projection to cover an approximately 180-degree field of view.
Resolution
The other bit of terminology that matters, especially when talking about stereo video, is video resolution. For traditional 2D flat formats, it is common to refer to something as "4K video." And to someone familiar with the term, 4K generally means a resolution of 3840x2160 at a 16:9 aspect ratio. 8K generally means 7680x4320 at a 16:9 aspect ratio. Notice that the "#K" number comes from the horizontal resolution (-ish) only.
When talking about stereo video, the method that is used to store both the left- and right-eye views matters. In a traditional side-by-side or over/under format, both the left- and right-eye images are packed into a single video frame. So, if I refer to a 4K side-by-side stereo video, am I referring to the total width of the frame, meaning that each eye is really "2K" each? Or am I saying that each eye is 4K wide, meaning the actual frame is 8K wide? Unless someone is specific, it's easy to jump to the wrong conclusion.
To add to this, Apple Immersive Video is described as "180-degree 8K recordings." Because the MV-HEVC format doesn't store left- and right-eye views side-by-side in a single image, the frame size reported by video tools is actually the resolution for each eye. So, does Apple intend to mean that each eye is 8K wide?
Well, if you monitor your network traffic while playing Apple Immersive videos, you can easily determine that the highest quality version of each video has a resolution of 4320x4320 per eye at a 1:1 aspect ratio. Wait a minute! That sounds like 4K per eye at first glance. But then, notice that instead of a wide 16:9 frame, the video is presented as a square, 1:1 frame. And if you squint just right, 4K width + 4K height might lead to something like an 8K term. Or maybe Apple means that if you did place them side-by-side, you'd end up with something like an 8K-ish video?
Some various frame sizes and layouts for comparison (to scale):
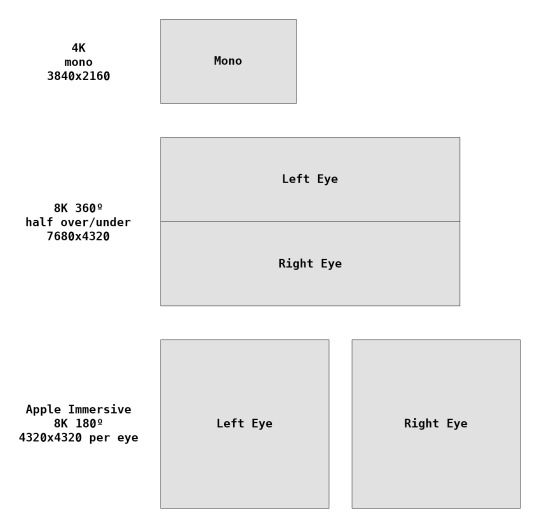
The confusion around these shorthand terms is why I like to refer to the per-eye resolution of stereo video, and I like to be explicit about both the width and height when it matters.
Before I leave the topic, I'll also note that Apple's Immersive Video is presented at 90 frames-per-second in HDR10 at a top bitrate around 50Mbps. The frames are stored in a fisheye projection format, and while I have some ideas about that format, until Apple releases more information, it's only speculation.
MV-HEVC
Apple has decided to use the multiview extensions of the HEVC codec, known as MV-HEVC. This format encodes multiple views (one for each eye) using the well-known and efficient HEVC codec. For many reasons beyond the scope of this article, I think this is a fantastic choice. Earlier versions of the multiview technique have been used to encode 3D Blu-ray discs. The biggest challenge with MV-HEVC is that — even though the format was defined years ago — there is almost no tooling that works with it (and yes, that includes the ubiquitous ffmpeg).
Fortunately, Apple has provided support for MV-HEVC encoding and decoding in AVFoundation. It seems very probable that tools like ffmpeg, Adobe Premiere, DaVinci Resolve, Final Cut Pro and others will add support eventually, but as of this writing, Apple provides the only practical solution. For completeness, I am aware of other projects, and I hope that they're announced at some point in the future.
Necessity
When my Apple Vision Pro arrived, I wanted to see how our older Pixvana footage looked in this new higher-fidelity headset. So, I hacked together a quick tool to take a flat, side-by-side or top/bottom video and encode it using MV-HEVC. The lack of detailed documentation made this more difficult than expected, but I was able to get it working.
When I tried to play a properly-encoded immersive (equirectangular) video in the Apple Vision Pro Files and Photos apps, they played back as standard, rectilinear spatial video. Yes, they had 3D depth, but they were displayed on a virtual movie screen, not wrapped around me like an immersive video should. After chatting with others in the immersive video community, we've all concluded that Apple currently provides no built-in method to playback user-created immersive video. Surprising, to be honest.
To work around this limitation, I built a bare-bones MV-HEVC video player to watch my videos. When I could finally see them in the Vision Pro, they looked fantastic! That led to a bunch of experimentation, with others in the community sending me increasingly large video files at even higher frame rates. While we haven't identified the exact limitations of the hardware and software, we've definitely been pushing the limits of what the device can handle, and we're learning a little bit more every day.
Stopgap
As a stopgap, I released a free command-line macOS version of my encoding tool that I just call spatial. There's more on the download page and in the documentation, but it can take flat, side-by-side or top/bottom video (or two separate video files) and encode them into a single MV-HEVC file while setting the appropriate metadata values for playback. It can also perform the reverse process and export the same flat video files from a source MV-HEVC file. Finally, it has some metadata inspection and editing commands. I've been very busy addressing user feedback, fixing bugs, and adding new features. It's fun to see all of the excitement around this format!
As I've interacted with users of my tool (and others), there's been general frustration, confusion, and surprise around how to play these new video files on the Vision Pro. Developers are struggling to find the right documentation, understand the new format, and figure out how to play these videos in the headset. We've been waiting on third-party players as they also experiment and update their App Store offerings.
To address the playback issue, I've released an example spatial player project on GitHub that demonstrates how to read the new spatial metadata, generate the correct projection geometry, and playback in stereo or mono. It's my hope that this is just enough to unblock any developers who are trying to make a video playback app. I also hope that creators can finally see what their immersive content can look like in the Vision Pro! I've been sent some stunning footage, and I'm always excited to experience new content.
Perhaps this is enough to hold us over until WWDC24, where I hope that Apple shares a lot more about their plans for third-party immersive media.
Documentation
At this point, I've spent a lot of time digging-in to this new format, and along the way, I've discovered information that isn't captured or explained in the documentation. So while it's not my intention to write official documentation, it is important to share these details so that others can make progress. Just keep in mind that these undocumented values may change, and some of them are based on my interpretation.
In the 0.9 (beta) document that describes Apple HEVC Stereo Video from June 21, 2023, Apple describes the general format of their new "Video Extended Usage" box, called vexu. Unfortunately, this document is out-of-date and doesn't reflect the format of the vexu box in video that is captured by iPhone 15 Pro or Vision Pro. It is still worth reading for background and context, though, and I hope that we'll see an updated version soon.
Below is the actual structure of the metadata related to spatial and immersive video, and it is found in the video track under the visual sample entries. If you want to investigate this metadata, I'd direct you to my spatial tool or something like mp4box. Normally you'd want to use AVFoundation consts and enums to set and read these values, but for those who want to know more:
Most of these boxes are optional, and they'll only appear if they're used. Here's what I know (with some guesses about what the names might mean):
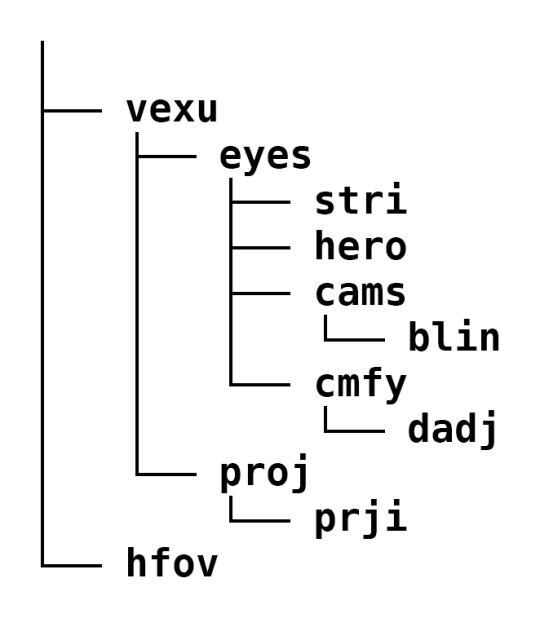
vexu - top-level container for everything except hfov
eyes - eye-related container only
stri - "stereo view information," contains four boolean values:
eyeViewsReversed - the order of the stereo left eye and stereo right eye are reversed from the default order of left being first and right being second
hasAdditionalViews - one or more additional views may be present beyond stereo left and stereo right eyes
hasLeftEyeView - the stereo left eye is present in video frames (kVTCompressionPropertyKey_HasLeftStereoEyeView)
hasRightEyeView - the stereo right eye is present in video frames (kVTCompressionPropertyKey_HasRightStereoEyeView)
hero - contains a 32-bit integer that defines the hero eye:
0 = none
1 = left
2 = right
cams - perhaps "cameras," container only
blin - perhaps "baseline," contains a 32-bit integer (in micrometers) that specifies the distance between the camera lens centers
cmfy - perhaps "comfy," container only
dadj - perhaps "disparity adjustment," contains a 32-bit integer that represents the horizontal disparity adjustment over the range of -10000 to 10000 (that maps to a range of -1.0 to 1.0)
proj - perhaps "projection," container only
prji - perhaps "projection information," contains a FourCC that represents the projection format:
rect = rectangular (standard spatial video)
equi = equirectangular (assume this means 360 degrees, immersive video)
hequ = half-equirectangular (assume this means ~180 degrees, immersive video)
fish = fisheye (mapping unclear, immersive video, format for Apple's Immersive videos in Apple TV)
hfov - contains a 32-bit integer that represents the horizontal field of view in thousandths of a degree
In AVFoundation, these values are found in the extensions for the format description of the video track.
While the projection values are defined as CMProjectionTypes, the key that defines the projection in the media extensions appears to be undocumented (at least for now). Between you and me, the key is "ProjectionKind".
Also, to have media labeled as "spatial" (and to playback as such) in the Files and Photos apps on Vision Pro, the horizontal field of view (--hfov in my spatial tool) needs to be set along with either the camera baseline (--cdist in my tool) or the horizontal disparity adjustment (--hadjust in my tool).
If you want the aspect ratio of your spatial videos to be respected during playback in Files and Photos, you should set the projection to rectangular (--projection rect in my tool). Otherwise, your video might playback in a square-ish format.
The horizontal field of view value seems to be used during playback in the Files and Photos apps to size the virtual screen so that it takes up the specified number of degrees. I'm sure there are lower and upper limits, and someone will figure them out.
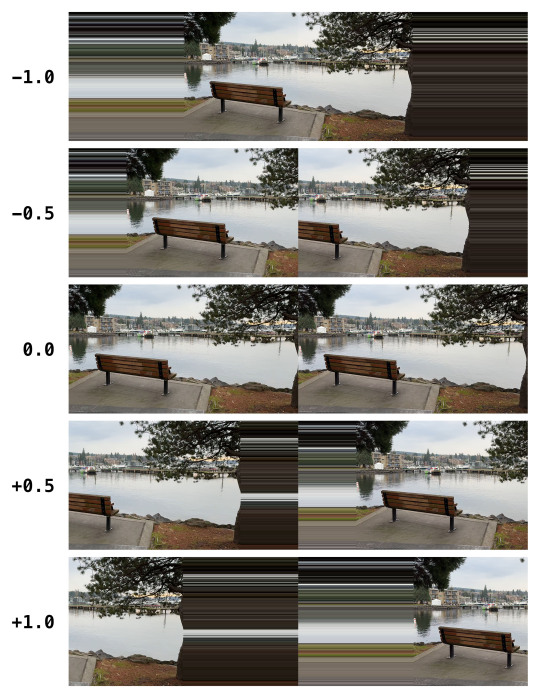
This graphic illustrates the effect of setting different horizontal disparity adjustment values for stereo rectilinear playback on Apple Vision Pro (while I've simulated this graphic, the pixel smearing looks like this during playback). As expected, positive values increase the separation between the two eyes, making the depth appear more pronounced. Obviously, these are extreme test values to illustrate the effect; normal values are typically very small.
Here are the metadata values for the Apple Vision Pro and iPhone 15 Pro for reference:
Apple Vision Pro
Camera baseline: 63.76mm
Horizontal field of view: 71.59 degrees
Horizontal disparity adjustment: +0.0293
Projection: rectangular
iPhone 15 Pro
Camera baseline: 19.24mm
Horizontal field of view: 63.4 degrees
Horizontal disparity adjustment: +0.02
Projection: rectangular
Limitations
I receive multiple messages and files every day from people who are trying to find the limits of what the Apple Vision Pro is capable of playing. You can start with the 4320x4320 per-eye 90fps content that Apple is producing and go up from there. I've personally played up to "12K" (11520x5760) per eye 360-degree stereo video at 30fps. For what it's worth, that is an insane amount of data throughput and speaks to the power of the Vision Pro hardware!
I've had my Vision Pro crash and reset itself many times while attempting to playback some of these extra large videos. I've even had it crash and reset with more reasonable (but still large) videos, so clearly there are some issues to fix.
On the encoding side, it takes a lot of horsepower to encode frames that are this large. Video encoding works by comparing frames over time and storing movements and differences between pixels to save bandwidth. To do this, a video encoder not only has to retain multiple frames in memory, but it has to perform comparisons between them. With frames that can easily be 100MB or more in size, a fast machine with lots of memory is your best friend. Even my M1 Ultra Mac Studio is brought to a crawl when encoding the aforementioned 12K content.
Conclusion
I hope that this tour through what I've learned about Apple Vision Pro's support for spatial and immersive media has been insightful. And I hope that my spatial command-line tool and related video player example on GitHub are useful to interested developers and content creators.
As always, if you have questions, comments, or feedback...or if you just want to share some interesting spatial media files, I'd love to hear from you.
1 note
·
View note
Text
My Year-Long Struggle Against a Call of Duty False Permanent Ban
Over the past year, I’ve found myself in an unexpected and relentless battle, not in the digital arenas of Call of Duty, but against an unseen, unyielding opponent: a false permanent ban. This isn’t just my story; it’s a glimpse into a widespread issue that has quietly affected thousands of players. It started with a simple misstep by an anti-cheat system and spiraled into a complex ordeal that questions the balance between vigilance against cheating and the rights of innocent gamers.
In the following account, I’ll take you through the twists and turns of my efforts to seek justice, the broader implications for the community, and the pressing need for accountability and change in Activision’s approach to fair play. Finally, I’ll share my optimism that new owner Microsoft can rise to the occasion and fix this ongoing issue.
TL;DR
Over the past year, I — and likely tens of thousands of fellow gamers — have struggled with false permanent bans in Activision’s Call of Duty, facing challenges in getting the company to acknowledge, resolve, or even respond to the issue. My personal integrity and history contrast sharply with the accusation of cheating. The broader context includes flawed anti-cheat software, the impact on the gaming community, and ineffective communication channels. Despite various efforts to address the problem, including reaching out to Activision executives and proposing solutions, there has been little progress, though the recent acquisition by Microsoft provides some hope. The article highlights the need for transparency, fairness, and better handling of these cases.
Introduction
You may find it helpful to review my (slightly rant-y) December 2022 post, Activision’s Faulty Anti-Cheat Software. That post marks the beginning of my journey and provides important background and context for what I write here.
This is a long article. I’ve tried to include all relevant details, because it’s nearly impossible to share this information elsewhere (for reasons that will become clear). I hope it can serve as a central reference for others who encounter this issue.
If you do nothing else, please share this article with anyone who might be able to help (Activision, Microsoft, press, bloggers, influencers, gamers, etc.). Thank you in advance!
Analogy
Imagine a scenario familiar to many, yet distinctly parallel to the ordeal faced by falsely banned players in Call of Duty. Picture yourself as a member of a popular sports facility, one where you've paid a yearly membership fee. This facility is not just a gym; it's a community hub where you've spent countless hours over many years, honing your skills in a particular sport, say tennis (go with me here). You've always played by the rules, respected the facility, and maintained a spotless record. Your dedication and sportsmanship are known to all, and you've become a respected figure among the regulars.
One day, without warning or explanation, you find your access revoked. You're informed that you've been banned for misconduct in a basketball game – a sport you've never played at this facility. The shock is palpable. You try to reason with the management, but they're unyielding, offering no evidence or details of the alleged infraction.
They keep your membership fee, and your attempts to clarify or appeal the decision are met with silence or generic responses. The ban not only bars you from your beloved tennis courts but also stains your reputation. Fellow members, unaware of the specifics, begin to view you with suspicion. You're shunned from a community where you once held a place of esteem.
This bewildering scenario mirrors the situation with Call of Duty players who are hit by a false ban. The sports facility represents the game, and the tennis court is your chosen mode of play. The baseless basketball game accusation reflects the unfounded cheating allegations in a multiplayer context you've never engaged in (at least in my case). Your unblemished history and commitment to the sport are disregarded in an instant, leaving you ostracized and helpless.
The analogy underscores the absurdity of the situation – being punished for something you've never done, in a setting you've never ventured into, without any chance to defend yourself. It's a sobering reflection of the arbitrary and unjust nature of these bans, underscoring the need for a more equitable and transparent system that respects the tenure and integrity of its members.
Me
Most of you don’t know me, but as you may already understand, the quality of my character — specifically as it relates to integrity and cheating — is tantamount to my defense. Unfortunately, Activision does not provide any proof when it issues a permanent ban, and there is no evidence that I can provide of my innocence. Someone on Reddit used this analogy: “It’s like when you order food, don’t get it, and the support form says: take a picture of the missing food.” Indeed.
So, am I an honest person? Am I trustworthy? While I don’t have the ability to call character witnesses to this article, I will don my bragging hat for just a moment and share a couple of relevant items (and God, I hate the bragging hat…please forgive me).
I received a perfect 5.0 review score at Microsoft where I spent 12 fantastic years (they’ve since changed the review scale). This score is a measure of both performance and personal character. So few of these scores were given that many employees have never met anyone who received a 5.0. And when this fact came up during a manager training workshop, none of my fellow attendees could believe it; talk about this mythical score monopolized the rest of our session. Most of my friends and colleagues don’t (well, didn’t) even know this.
I was also recognized with a Distinguished Alumni award by my hometown school district, and I flew home to accept the honor and give an acceptance speech. The selection criteria include someone who “exhibits inspirational leadership, character, and service.” I am proud of this award, and I aspire each day to remain worthy of it.
As far as Call of Duty is concerned, I’ve bought every PC release since the series debut in 2003. According to the release list, that’s nearly 20 titles over that many years. A quick review of my gaming history would show that my CoD record isn’t just good, it’s spotless. No warnings. No violations. No bans.
Now I am anything but perfect! Personal character is important to me, and I spend a lot of time on self-improvement. Still, there is no way for me to prove to you or Activision that I have never used cheat-related software or somehow manipulated the game to improve my score. Sadly, this is what I call a “trust me” defense. The only time I’ve knowingly cheated in a game was to enable “god mode” in Quake when I couldn’t beat a final boss in the single-player campaign. That was in 1996. So long ago.
While I grew up on video games and first-person shooters, I am now a casual player. I don’t play for hours on end, and the inability to play Call of Duty has no direct impact on my social life. Look, I’m not happy that the $70 I spent on the game is now worthless, but it won’t lead to financial ruin. Even after this year-long struggle, I’d prefer to have the ban lifted so I can continue to play rather than get a refund.
Cheaters
After my original post received some traction, I heard from cheat software developers who offered to explain how Activision’s anti-cheat software, RICOCHET, actually works behind-the-scenes (including the kernel-level driver that monitors your system during game play). They claimed to have reverse-engineered the logic and already understood how the software could erroneously detect “unauthorized software” or “manipulation of game data.” I’ll admit that — as a software developer myself — I was curious. But I politely declined their offer, because I do not consort with cheaters.
I despise cheaters, and so does everyone else. They ruin the game. As stated in my original post, I haven’t played even one multiplayer game with humans in this release (only bots), but I’ve spent the past year talking to affected players and taking part in the community. Even without my own first-hand experience, one thing is perfectly clear: multiplayer Call of Duty has a massive and chronic cheating problem.
Against this proliferation of cheaters, it’s easy to understand why most players are frustrated and mad that Activision can’t seem to keep them out of their multiplayer games. It only makes sense that anyone who might be a cheater is treated like one. From a player’s perspective, if I’ve been permanently banned by RICOCHET’s perfect AI (and dare to admit it), I must be cheater, and therefore, part of the problem!
I’ve spent countless hours over the past year replying to tweets, Discord messages, YouTube comments, and Reddit posts about false bans. In each of those replies, I’ve tried to provide some solace and the sense that the banned player is not alone. I’ve also linked to posts and articles about the situation, including a false ban Discord server with thousands of members that is run by another wrongly accused player.
People inevitably respond to posts about bans with comments like “shut up cheater” or “you’re part of the problem” (or much worse and more vulgar), and the posts are immediately downvoted. It is extremely demotivating, and there is no way to have a meaningful conversation. The thought that a player might be innocent, and that Activision’s anti-cheat software might be wrong, is never…ever…up for consideration. As far as they’re concerned, there is no such thing as being innocent until proven guilty. You are 100% guilty. End of story.
Well, at least until it turns around and happens to you. Karma, anyone?
Never mind the fact that I’ve come out and admitted to being banned. Or that most cheaters (I’ve come to learn) just set up a brand-new account and continue to play. Or that they use a method to circumvent so-called hardware ID bans that prevent using the game on the same machine. They generally don’t bother to post about the issue, send people to Discord servers, or spend a full year trying to remedy the situation. They just move on.
I have a whole new appreciation for people who are wrongly accused. The opportunity to be taken seriously — for even a moment — is a distant dream. It’s no wonder that people give up or remain silent. If someone has wrongly accused you of anything in your past, I now see you, and I apologize on their behalf.
So What?
I agree that among the many things to worry about in this world, being banned from Call of Duty probably doesn’t rank near the top of the list. As stated earlier, I’m an older casual player who can afford to lose $70, and I don’t play against other humans. So why have I spent so much time and energy on this?
I care a lot about my personal character and take umbrage at being labeled a cheater.
I spent $70 for a game that I can no longer launch (not even single player). Others have spent a whole lot more on deluxe editions, Battle Passes, and digital content from the in-game store.
I am a man of principle, and it’s wrong that Activision is allowed to continue this user-hostile behavior.
While it’s impossible to know exactly, there are thousands of members who have found their way to the false ban Discord and thousands more who have reported false bans on places like X/Twitter, and Reddit. If we speculate that only 10% of affected players have shared publicly, that makes tens of thousands that have gone unreported.
I have bought every Call of Duty PC game since 2003, and I’d like to continue playing. Other players have also bought this game year after year.
Many players use a Call of Duty release as a reason to upgrade their computers or consoles, often to the tune of hundreds or thousands of dollars.
Some players, to avoid a false hardware ID ban, have purchased a completely different system just so they can continue to play! That’s real dedication.
For many, online multiplayer is an opportunity to spend time with friends. It’s an important part of their social circle. A ban can have a negative effect on their ability to socialize.
A false ban is a kind of scarlet letter among fellow players that creates a stigma that is extremely difficult to overcome. Like being shunned.
Playing Call of Duty after work or school can serve as stress relief. For someone who has invested significant time and energy to build up an in-game character, losing this activity can have a big impact.
Though this article focuses mostly on my efforts, many unjustly banned players have taken similar steps, and the collective time that has been wasted is incalculable.
I continue — perhaps naively — to believe that anyone (including Activision) who takes the time to fully understand this issue will agree that it absolutely needs to be fixed. To-date, 100% of the people who listen express shock that this behavior continues. This is my eternal optimism at work.
Because of my original post and almost daily involvement, I’ve inadvertently become a spokesperson for this issue. And because I’m a determined and persistent individual, I continue to press for a resolution.
The Bans
If you recall from my first post, I am banned for “using unauthorized software and manipulation of game data.” You may also recall that Activision states that “to preserve the integrity of our security systems and detection methods, this is the only information our policy allows us to share regarding your case.”
In other words, it is impossible to know what software is considered unauthorized by Activision. Some have speculated that it might be triggered by RGB control software, MSI Afterburner, or even Discord. But then, many players have used that same software for years with no issue. Whatever it is, it’s probably something that is being detected incorrectly by RICOCHET. Unfortunately, there’s really no way to know. My offers to allow an Activision employee to remotely connect to my PC to debug this issue have been met with silence.
Let’s pretend for a moment that I was running something unauthorized. Perhaps Microsoft Excel. According to the official Call of Duty Security and Enforcement Policy document that was in effect at the time, for my first offense, “User may be permanently suspended from playing the game online.” They list the same penalty under the section titled, Decompiling or Reverse Engineering of Game Data.
While I’ve done neither of these things, I have not just been “permanently suspended from playing the game online.” I’ve been prevented from starting the game at all. So, despite agreeing to the policy, I can’t even play the single-player game…the only version of the game I’ve ever played.
Some users have reported that Activision permanently banned them before starting the single-player campaign, almost right after their purchase! Many more have reported being banned within the first few minutes or hours of the campaign, again, having never launched a multiplayer game. Some are banned before firing a shot or joining a server. Still others report being banned after months of not playing the game at all. A couple of recent comments on Discord illustrate the point:
“Bought the game today, not played a COD in 3 or 4 years, turns out im banned appeal denied”
“same thing with me. first cod in years, brand new to playing. now im $70 down with no playable account and they denied the ban appeal”
Naysayers often state that this “supposed” issue only happens on PC. In fact, a survey organized by the false ban Discord server (with 625 responses as of this post) shows that players are banned on PC, Xbox, and PlayStation. Posts on X/Twitter and Reddit tell the same story. Activision has also banned console players for “using unauthorized software and manipulation of game data.” I’m not even sure that it’s technically possible for an average user to run unauthorized software or manipulate game data on a console.
Call of Duty: Modern Warfare III is 2023’s recent release, and anyone banned in MW2 is already pre-banned in MW3. Congratulations! Unless you’ve read about these pre-bans in an article like mine, nobody will inform you in advance. In fact, I’m told that you can visit the store, buy the game, install it, and then discover your ban when you try to launch the game.
Those of us who follow these issues have noticed a significant uptick in the number of false bans being reported over the past couple of weeks (including a possible ban for clicking on an event link inside the game). I’m guessing that the bump is related to new or returning players who have purchased MW3.
Shadow Bans
I’d be remiss if I neglected to mention other ban-related issues experienced by fellow gamers. I don’t have first-hand experience with these, because — if you haven’t heard — I am under a permanent ban and don’t play multiplayer. As such, I can’t provide as much detail.
One issue that has seen an increase over the past year is the problem of unjustified shadow bans. According to players, the anti-cheat system is issuing bans in response to opponents who spam the system with false reports (among other unverifiable theories). While these bans are temporary, many gamers find themselves in a shadow ban loop. That is, once a temporary shadow ban is lifted, they find themselves banned again, then again, unable to play on normal servers with legitimate players. Shadow bans are a frequent topic on the Discord server, and the problem has been covered by gaming sites.
There are also reports of players being banned for foul language even though they’ve never used the voice chat feature. You can find similar stories for bans related to inappropriate or offensive player names, even though their names are seemingly innocuous and inoffensive.
Five Stages
Nearly all permanently banned players go through the same process, like the five stages of grief:
Denial: “That can’t be right…I’ve never cheated in my life! It must be a mistake.”
Anger: After realizing that they can’t even launch the game, they visit Activision’s ban appeal page, where they fill out the details of their false ban. They’re confident in their success because they know they didn’t cheat. Mere hours later, though, the appeal is automatically denied, supposedly having been reviewed by the security team. For what it’s worth, I have yet to hear from any permanently banned player whose appeal has been successful; and I’ve heard from hundreds, if not thousands, of players. Does that sound like a legitimate appeal process to you?
Bargaining: Depending on the resourcefulness of the player, some will then try to reach out to Activision support. Any mention of a ban elicits a response like this (an actual reply): “Sorry, but I am limited in support, since the decisions that are made in the Security Team are not shared with us, so we cannot appeal them.” Conveniently, “We also cannot communicate with the Security Team, because they do not have a contact form.” Why do I imagine the Security Team locked inside of an impenetrable vault with no external access? I hope they get food and water! This phase can also involve reaching out to the Better Business Bureau (where Activision replies with a similar response) or filing an issue with the United States Federal Trade Commission.
Depression: After exhausting the steps in the bargaining phase, players start to feel hopeless. “How am I supposed to play with my friends?” or “I just uninstalled CoD…I’m never going to buy an Activision game ever again!”
Acceptance: Players just give up. While they may accept the situation, it’s not necessarily a happy or satisfied feeling. “This is probably good for me anyway. I was spending too many hours playing CoD.”
Awareness
A common rebuttal to these issues is: “if false bans are a real problem, why don’t I see lots of articles online or stories in the press?” This is a fantastic question! It also forces me to reveal that I’m stuck squarely in the middle of that bargaining phase I mentioned earlier; I just won’t give up.
The Socials
Like a lot of affected players, I started by venting my frustration anywhere and everywhere. I tweeted, posted in CoD-related subreddits, commented on YouTube videos, and wrote messages to MW2 Facebook groups. Tweets directed at Activision and related companies are ignored. Posts to CoD-related subreddits about bans are 1) not approved by moderators in the first place, or 2) summarily deleted immediately after posting. The same moderation-and-delete cycle happens on Facebook.
It doesn’t take too much of an imagination to understand why forums quash this topic. First, many of them depend on the good graces — and perhaps the advertising revenue — from Activision. Second, because the game is riddled with cheaters, moderators are loath to help these perceived cheaters air their complaints. As a result, visits to these forums give no indication whatsoever that false bans exist, let alone are a genuine issue.
The singular forum that — until recently — allowed ban-related posts is Reddit’s /r/activision. While it shares the company’s name, I don’t believe that it is an officially sanctioned subreddit. In early November 2023, the mods created an Activision Account and Ban Issues Mega Thread and implemented a new rule stating that they will remove ban-related posts outside of that thread. Sadly, is seems that some posts to that thread are also being removed by the moderators.
Still, a historical search of that subreddit reveals many posts on the topic. Yes, I understand that not everyone who claims to be the victim of a false ban is always being 100% truthful, but I encourage you to read through a few of the posts to form your own opinion (keeping in mind that it’s impossible to show evidence of a player’s innocence).
The Press
Besides online forums, I have reached out to a very long list of reporters and publications. I’d like to thank Ted Litchfield at PC Gamer for his December 15, 2022 article, It looks like Call of Duty’s anti-cheat is permabanning innocent players. PC Gamer is the only online publication to date that has written a story about this issue, and it’s a frequently shared post.
For the record, the end of the PC Gamer article incorrectly states that I am “attempting to organize claimants for a class action lawsuit against Activision Blizzard via Discord.” This is not true. In fact, the Discord server is run by another affected player, and he has long since repurposed it as a discussion forum for people who are affected by false bans. I recently e-mailed the editors of PC Gamer to gauge interest in a follow-up article, but unfortunately, I have yet to receive a response.
As to the other reporters and publications, there are too many to list (some very high-profile), and I’m not here to shame them. Like online communities, though, these publications depend on advertising revenue. They also need to maintain a good relationship with their Activision counterparts. And oh yeah…I almost forgot…I sound like a cheater with all this talk about false bans. Some politely decline, a few have followed-up with moderate interest, but most have simply ignored my inquiry. Disappointing, but not completely unexpected.
So, “if false bans are a real problem, why don’t I see lots of articles online or stories in the press?” Simply, because Activision is a huge and influential company, false bans are bad news, and Call of Duty is a juggernaut.
Desperation
Put yourself in my situation. You’ve been permanently banned from a favorite $70 game. You didn’t do anything wrong, and you’ve been labeled a cheater. You followed the appeals process, were denied, and support (via web, e-mail, and twitter) won’t respond to any of your requests. You can’t find anything about the issue online, and when you ask for help, your posts are never approved, or they’re deleted. What do you do?
You’re convinced that anyone who considers the issue seriously for even a few minutes will agree that something is wrong, so you decide to contact the powers-that-be at Activision. That’s exactly what I did.
Activision Contacts
Over time, I’ve sent personal appeals to Activision’s CEO, COO, their PR department, their Senior Director of Communications, a VP of Business and Application Security, the legal affairs department, and their Senior Legal Counsel. I’ve also e-mailed some heads of community engagement and even a few employees who have publicly shared their contact details or engaged directly with the public.
Each of these contacts heard from me more than once, and all the messages were friendly, respectful, and an attempt to help resolve the situation for all falsely banned customers (not just my own personal tech support). None of the e-mails bounced back as undeliverable. Would you like to guess how many responses I’ve received to date? That’s right…exactly zero. I’m convinced that there must be a “don’t talk about bans” dictate across the whole company.
Now put yourself back into my situation. You’ve spent weeks trying to alert anyone at Activision, offering to help debug this issue, all for naught. Nobody will respond. What’s next?
Someone made an ill-advised trip to an Activision office. I remember initially reading this article and wondering what kind of person would go to such lengths. After my own permanent ban and stonewalling by Activision, I found myself a little more empathetic. Still, I would never encourage that kind of behavior, even if I understand his frustration. Don’t do this.
Just Cheat?
It’s at this point, dear reader, that I’m reminded of a quote by Tim Robbins’ character, Andy Dufresne, in 1994’s Shawshank Redemption where he states, “I had to come to prison to be a crook.”
Having spent so much time in the Call of Duty community talking to affected players and hearing from self-admitted cheaters who see permanent bans as a mere speed bump, I will admit to being briefly tempted by the siren song of their devious methods. I suspect that many frustrated players at the end of their rope take this proverbial off-ramp and never look back. Me? See that prior section on personal character. There’s no way I’d do that to myself.
But isn’t it ironic to think that many of Activision’s most passionate and loyal customers end up being driven to cheat precisely because of a false permanent ban and inaction by the company? It’s disheartening.
EULA
An almost universal comment comes up at this point: “we need to file a class action lawsuit!” Now I’m not a lawyer, I don’t play one on TV, and I’m not giving anyone legal advice. That said, I have read and written my fair share of legal documents, and I have been more involved than I’d like in professional legal matters in the past (often from a big company perspective).
Everyone who plays Call of Duty is required to agree to an end-user license agreement (EULA). While the language in the EULA has changed over time, the version from November 2022 includes a provision that residents in North America agree to binding arbitration by an Activision-selected third-party and a waiver that explicitly prevents class action lawsuits. Yep, you read that right. Customers opt out of class action activity as soon as they agree to the EULA. As you can read in this blog entry about Epic Games and Fortnite’s EULA, these provisions are nearly impossible to overcome.
I’ve learned that language like this appears in almost any modern consumer agreement, including agreements with internet companies, cell phone providers, and other common services. In fact, I’ve even reached out to Sen. Richard Blumenthal’s office regarding The Forced Arbitration Injustice Repeal (FAIR) Act he co-authored with Rep. Hank Johnson. If passed, “instead of forcing arbitration, the FAIR Act would allow consumers and workers to choose between arbitration and the Court system after a dispute occurs.” The bill has been re-introduced, and while it’s been passed by the House, it hasn’t passed the Senate. So we wait.
The Call of Duty EULA includes a 30 Day Right to Opt Out clause that requires players to send an e-mail to Activision within 30 days of the game’s purchase to “not be bound by the arbitration agreement and class action waiver provisions.” Sadly, because almost nobody reads the EULA (“I just want to play my game!”), by the time someone considers legal action, the time to opt out has likely passed.
It’s important to note that non-U.S. countries have different laws about forced arbitration and class action lawsuits, so again, please don’t take anything I’ve written in this section as legal advice. As always, consult with your own attorney.
For completeness, I have also sent a summary of this issue to Lena Khan at the Federal Trade Commission and submitted a case to an FTC Open Meeting. While I have not yet received a response, I’m also not surprised, especially given the FTC’s involvement in Microsoft’s recently closed $69 billion Activision acquisition.
Microsoft
The ever-pending status of Microsoft’s Activision acquisition over the past year has made it difficult to get reporters, the press, the FTC, and others to engage with this issue. The $69 billion deal was always looming in the background, making a relatively minor false ban problem seem irrelevant in comparison. Some reporters even recommended that I hold off talking to them until the acquisition was complete, citing the sheer volume of distracting Activision- and Microsoft-related coverage.
As I mentioned at the beginning of this article, I was a proud Microsoft employee for 12 years from 2000 through 2012. I eventually ended up as a Senior Director in our Developer and Platform Evangelism organization, primarily responsible for our big technical events: PDC, MIX, and the first BUILD conference. For those who aren’t familiar with these conferences, think of them like Apple’s WWDC or Google I/O. Basically thousands of tech folks in a big convention center.
In that role, I spent much of my time working on keynotes and messaging with our senior executives and their respective teams. Driving from building to building on campus introduced me to people from across the company, and I remain in close contact with many of them to this day. Because of these relationships, and because of the good people I know at the company, I am optimistic that this problem can now be resolved.
However, since the deal closed on October 13, 2023, I have had great difficulty reaching anyone at Microsoft who can address this issue. I was sure that my initial round of e-mail would garner at least one useful response, if not only because of my twelve-year alumni-in-good-standing status. The minimal responses I have received were from my second round, and unfortunately, none of those former colleagues are in a position to assist. Additionally, because gaming has always been a separate activity within Microsoft, most of my contacts don’t know anyone in the gaming organization, so they can’t even forward my message.
Regarding the Activision acquisition, President Brad Smith stated that it “will benefit players and the gaming industry worldwide.” I really hope that addressing Call of Duty’s false ban problem is one of the first player benefits. This is Microsoft’s opportunity to step in and do the right thing.
Remediation
As Teddy Roosevelt once said, “complaining about a problem without posing a solution is called whining.” And in that spirit, I’ve spent a lot of time thinking about solutions and remedies for the false ban issue. I present them here for your consideration.
Public Recognition
Activision should issue a public statement acknowledging the problem. This statement should detail the issues with the RICOCHET system (without revealing sensitive IP) that led to false bans and express a commitment to rectify the situation. By publicly addressing the issue, the company can provide vindication to those who are falsely banned and encourage them to return to the game.
In the interest of transparency, Activision should provide regular updates on the measures being taken to address the issue, just like the anti-cheat improvements they cover on their blog. This transparency would build trust and demonstrate accountability.
Unbanning
Activision should implement a thorough review process for all bans issued since the integration of the RICOCHET system. This process should be transparent and expedited to restore access to wrongfully banned players. If a clear determination cannot be made, the account should be unbanned by default. As mentioned earlier, cheaters have likely moved on to new accounts anyway.
Consider compensating affected players. This could include in-game credits, extensions of subscription services, or other forms of restitution to acknowledge the inconvenience and distress caused. Remember that these are innocent and passionate players who want to continue playing Call of Duty. They never cheated in the first place, yet they’ve been shunned by the community and unable to play for up to a full year.
System Improvements
Activision should review and modify the RICOCHET anti-cheat system to reduce false positives. This could involve refining the algorithms, incorporating more nuanced detection mechanisms, and regular system audits to ensure fairness and effectiveness.
Create a structured system for players to report concerns and feedback about the game’s anti-cheat measures. This could include dedicated forums, regular surveys, and community Q&A sessions. Review feedback and reporting systems from other games and borrow best practices.
Before rolling out new updates or changes to the anti-cheat system, conduct better beta testing with community involvement. Feedback from these tests should be used to fine-tune the system.
Improve customer service channels to address ban disputes. This could involve setting up a dedicated support team to handle ban-related issues, ensuring that players’ concerns are heard and addressed promptly. As it stands today, customers feel stonewalled by the lack of reasonable or useful responses.
Provide clear and updated information about what constitutes cheating and the processes in place for detecting and penalizing such actions. The terms of use are already out-of-sync with the penalties, and improved information can help set clear expectations and reduce misunderstandings. Include a list of unauthorized software (even if it’s a partial list) so that players know what to avoid.
Reputation
In the spirit of fairness and recognizing the dedication of long-standing community members, I propose that Activision incorporates a player's reputation and history into their decision-making process. This approach acknowledges the value of those who have been part of the Call of Duty community for years, maintaining a solid record. A player's longevity and history should weigh in their favor when assessing ban disputes.
It's unjust to equate a decades-long loyal player, with no prior incidents, to someone who's new or has a questionable history. This system would not only incentivize good behavior but also demonstrate a level of respect and appreciation for the community's most steadfast members. After all, a consistent record of fair play over several years should count for something significant in situations where a player's integrity is under question.
By implementing these remedies, Activision can take significant steps towards resolving the current crisis and rebuild trust with falsely banned Call of Duty players. Such actions would not only rectify the immediate issue but also set a positive precedent for how the company can responsively and ethically manage their own player communities.
Conclusion
As I conclude this recount of my year-long struggle with a wrongful ban in Call of Duty, it’s clear that this issue extends far beyond my individual case. It’s a reflection of a larger problem with a flawed anti-cheat system that can ensnare innocent players. Throughout this journey, I’ve encountered others who share my frustration and the realization that our voices often go unheard.
However, this experience has also highlighted the importance of perseverance and the need for greater transparency. It’s a call to Activision (and Microsoft) to recognize and rectify these issues, ensuring that a cheat-free environment does not come at the cost of unjustly penalizing honest players. In the end, this isn’t just about a game; it’s about standing up for fairness and integrity, values that should always be at the core of our gaming experience.
How You Can Help
If you’re an Activision or Microsoft employee (or if you know one) and you’re frustrated — even angry — about this situation, thank you for your humanity! I firmly believe that the system is broken, not the people. But it’s the people who can ultimately make a difference.
If you know anybody who can help to raise awareness of this issue, please share this story with them. The solution to this problem starts with open communication, and I would go to almost any length to meet or talk with the right person.
Thank you for your time and consideration.
Update on 11/28/2023: Added TL;DR section. Also, for another perspective on this issue, check out Huang Fang Long's post: Almost 9 months after launch, Activision’s Ricochet system is still banning innocent players in Call of Duty: Modern Warfare II and the new Warzone.
Update on 12/2/2023: As this article notes, "RICOCHET has had problems with misconstruing software applications" and has falsely banned thousands of Call of Duty players using the NVIDIA GeForce Now service: 3 Call of Duty titles joined NVIDIA GeForce Now yesterday, but some gamers are claiming to be banned after playing on the cloud. Sounds familiar.
Update on 12/5/2023: Many Sony PlayStation accounts were recently suspended for ostensibly violating the terms of service, even though players claim that they haven't done anything wrong. Hmmm. At least in this case, it sounds like some accounts have been restored: PlayStation Permanently Suspends Online Accounts for No Clear Reason
515 notes
·
View notes
Text
Activision’s Faulty Anti-Cheat Software
Activision’s blind faith in the infallibility of their RICOCHET anti-cheat software, combined with a buggy and unstable Call of Duty: Modern Warfare II release, has resulted in faulty, permanent, and unappealable player account bans that prevent users from starting even the single-player game. These bans leave wrongly accused users who paid $70+ (USD) with no explanation, recourse, or ability to communicate with Activision about their issue. The message is: you’ve been banned for doing something, we can’t tell you what you did, please don’t do it again (or we might ban you from our other games), and oh, thanks for the money.
Because actual in-game cheating is so rampant, attempts to raise this issue meet with predictable “shut up and go away, cheater”-style responses on Twitter and Reddit. And moderators of popular forums like r/ModernWarfareII refuse to allow posts that try to increase awareness of the issue, again, likely assuming we’re all a bunch of whining cheaters. I don’t think they’re aware of the disservice they’re doing to their community by actively suppressing these reports (or conspiratorially, they’re influenced by Activision itself).
The top-rated review on Steam for Modern Warfare II includes comments from many banned users, and the r/Activision subreddit also contains several posts. Players are so frustrated that they’re organizing themselves in places like Discord - COD False Ban Class Action Lawsuit (500+ current members) where they’re filing reports with the Better Business Bureau (BBB) and the Federal Trade Commission (FTC), among others. An Activision Anti-Consumer Practices site has also been setup to coordinate efforts.
Even Activision Blizzard’s own support staff are aware of the issue, responding:
We understand that bans can be frustrating and sometimes can be raised by Activision for no reason, and we have had several complaints about the same matter. (boldface mine)
Yet all attempts to get Activision to recognize, respond to, or address this issue have fallen on deaf ears.
I’m a casual player, and while I’ve completed the single-player campaign on PC and fought automated bots in custom/private matches, I’ve never once played online multiplayer (a quick check of my logs would easily confirm this). I’ve also never cheated, nor have I downloaded or used any cheat software. In fact, I wasn’t aware of cheat software until I researched this issue.
Anyone who’s played (at least the PC version of) Modern Warfare II is fully aware of the instability and bugginess of the release. A brief review of the MWII subreddit will reveal users complaining about the constant crashes. A few nights ago, I was trying to start a custom match, and each of my ~8 attempts resulted in a crash (like “DEV ERROR 292”, “DEV ERROR 11642”, or messages about corrupted files). I gave up for the evening, and when I launched Battle.net the next morning, I saw an “account banned” message, and I am now prevented from launching the game.
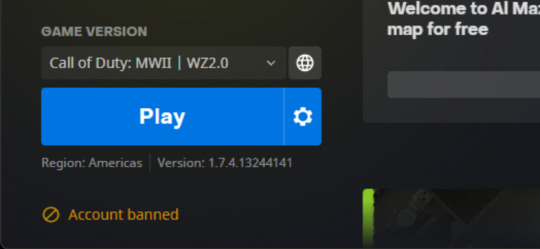
Activision’s “appeal” process seems to result in the same automated response for everyone, including me:
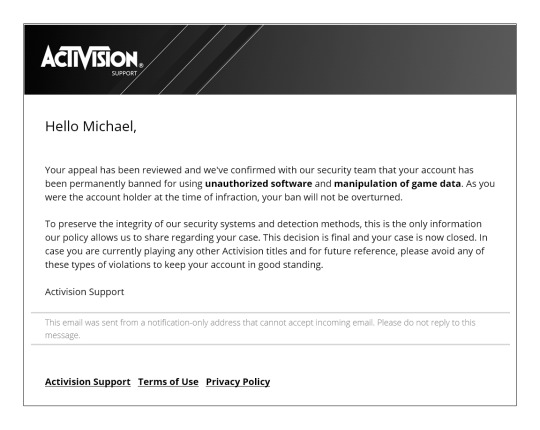
Conveniently, they can’t tell me what caused the ban, and their decision is final. They helpfully recommend that I “avoid any of these types of violations” to keep my account in good standing. As I don’t know what to avoid and did nothing in the first place, I’ve not installed any other Activision software just to be safe.
Complaints to the BBB by others have resulted in responses from Activision like:
Activision has reviewed your case and confirmed your account has been banned. Any specifics regarding the ban will not be released in order to help maintain the integrity and security of the game, this is company policy that will not be changing. Please be aware that the Enforcement team runs a thorough investigation before taking these actions on the account, therefore, our position remains unchanged.” (boldface mine)
Yes, that’s right. Activision can permanently ban your account for any reason, never tell you why, provide no recourse, and keep your money. This is absolutely user-hostile (if not fraudulent) behavior.
As a developer, my personal theory is that the frequent crashes (and accompanying errors about corrupted files) are being incorrectly flagged by the RICOCHET anti-cheat software as intentional manipulations made by players. I can imagine the logic that would need to be implemented to avoid false positives like this, and given the number of game crashes, I suspect they have issues with RICOCHET that they’re unwilling to review. I have offered to allow Activision developers to connect remotely to my PC to debug this issue, but as of this post, I have received no response.
For completeness, users have also suspected that RICOCHET may be incorrectly detecting RGB control software, GPU software like MSI Afterburner or NVIDIA GeForce Experience, or programs like Discord. Additionally, console players are being permanently banned with the same “unauthorized software and manipulation of game data” message, causing many to wonder how it’s even possible for console players to perform those actions. Again, with no communication from Activision, we’re left completely in the dark.
If—after all of this—you still think I’m a cheater who deserves to be banned, there’s probably nothing I can do to convince you otherwise, and in that case, I sincerely hope that this never happens to you.
If, however, you think that it’s unfair to pay $70+ for a game, play it for a few hours, and be permanently banned from ever playing it again (for no reason and with no recourse), I’d appreciate if you can help us spread the word by sharing this post and any of the resources I’ve referenced.
It’s my hope that Activision recognizes that this is an actual issue and addresses/fixes it accordingly.
Thank you for your time!
Update on 12/6/2022: This post made it to #1 on Hacker News, and the comments are worth reading. Also, as predicted, the post on r/ModernWarfareII was deleted by the mods shortly after submission.
Update on 12/8/2022: A YouTube video from @ItsHapa about this issue along with some good comments.
Update on 12/13/2022: A YouTube video from @BadBoyBeaman that references @ItsHapa's post. Includes more relevant comments from falsely banned players.
Update on 12/15/2022: An article from PC Gamer: It looks like Call of Duty's anti-cheat is permabanning innocent players. Thanks for helping to raise the visibility of this issue, Ted!
Update on 12/2/2023: I detail everything that's happened over the past year: My Year-Long Struggle Against a Call of Duty False Permanent Ban.
291 notes
·
View notes
Text
Achieving 2.5Gbps with the UDM Pro
This past April, 2021, Comcast/Xfinity Seattle increased the speed of its top-tier internet service from 1Gbps to 1.2Gbps. With the 20% over-provisioning that is common to Xfinity, this means that you can now expect download speeds of up to 1.44Gbps with their top-tier plan. That is, if you have the correct network devices and configuration in place.
Because we also use Xfinity's voice service, I upgraded from a Netgear Nighthawk CM1150V to a new Netgear Nighthawk CM2050V. While the old CM1150V has DOCSIS 3.1 support (which is required for 1Gbps+ cable connections), its RJ45 network ports are limited to 1Gbps. Fortunately, the CM2050V includes a 2.5Gbps RJ45 network port.
I was concerned that the Cat 5e cable runs between my modem and the Ubiquiti Dream Machine Pro (UDM Pro) in our networking closet, and between the networking closet and upstairs office wouldn't support a 2.5Gbps connection. In fact, many of the forum posts, guides, and related products suggest Cat 6/6a (or higher). According to this article that references the official spec, "the new 2.5G/5GBASE-T standard will let you run 2.5Gbps over 100 metres of Cat 5e." So, unless you have a huge house, it's highly likely that your existing Cat 5e cable runs will work just fine.
In addition to the UDM Pro, we have a Ubiquiti Switch Pro 24 PoE. The UDM Pro is connected to the switch with a 0.5 meter Ubiquiti Direct Attach Copper Cable enabling a full 10Gbps connection between the two devices.
To achieve a 2.5Gbps connection between the modem and the UDM Pro, I used a Wiitek SFP+ to RJ45 Copper Module (SFP-10G-T-S) plugged in to the SFP+ Internet (port 10) on the UDM Pro. Modules like this present themselves as full 10Gbps devices on the SFP+ side and autonegotiate 2.5Gbps (and often speeds like 5Gbps) on the RJ45 side. There are posts about other compatible SFP+ modules, and I chose the Wiitek based on its reasonable price and hassle-free plug-and-play operation. I literally unplugged the RJ45 cable from the RJ45 Internet (port 9) and plugged it into the Wiitek module. After restarting my Netgear modem, I waited to see the blue-colored "Multi Gig" light indicating a 2.5Gbps connection (the same indicator is white for a 1Gbps connection).
At this point, I ran a Speedtest with my PC still connected to its 1Gbps port on the switch, and I was sad to see download speeds in the ~150Mbps range (it's worth noting that prior to all of these changes, I would frequently measure ~940Mbps). Others have reported similar behavior. It took me a while to discover that I needed to enable the "flow control" feature on both the UDM Pro and the Switch Pro 24. After enabling this feature, my speed tests returned to ~940Mbps.
To enable flow control, select a device from the UniFi Devices listing in the Network app. You'll find a toggle under the Services section of the Device tab titled "Flow Control." Turn it to on. Update on 2/8/2022: Looks like the switch is no longer in this location (at least as of v7.0.20). You now have to go under Settings, then System, then enable the Legacy Interface. Now, select a device and you can find Flow Control under the Config icon (looks like a gear). You can re-enable the new UI after making this change.
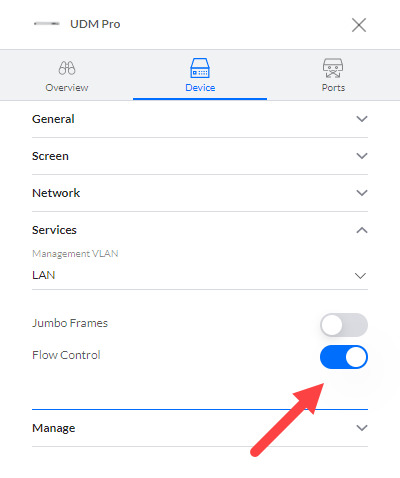
If you only need the 1.44Gbps internet connection into your network and are okay with all of your devices being limited by the 1Gbps RJ45 ports (but still sharing the faster internet bandwidth), there's nothing else to do. You can stop here. But, if you want at least one of your devices to be able to individually achieve over 1Gbps of bandwidth, read on.
To get a full 2.5Gbps connection to my upstairs PC, I plugged a second identical Wiitek SFP+ module into the bottom/unused SFP+ (port 26) of my switch. Then, I moved the PC's connection to the switch from the RJ45 port to the Wiitek. Windows 10 network settings reported the expected 2500/2500Mbps (2.5Gbps) connection, but when I ran a Speedtest, the results were back in the ~150Mbps range. I enabled and disabled flow control in the network driver on my PC, but no matter how I reconfigured my PC or the Ubiquiti devices, I could not achieve the expected results.
Fortunately, after searching a bit more on the Ubiquiti forums, I ran across this post suggesting that a MikroTik S+RJ10 SFP+ module would provide a full 2.5Gbps connection. When I replaced the Wiitek with the MikroTik module, I was able to achieve a full 1.44Gb Speedtest result from my PC! Note that the MikroTik module doesn't appear to support hot-swapping like the Wiitek, so I'd suggest powering down your switch (or UDM Pro if you're using the SFP+ LAN port) before connecting it.
Finally, I added a TRENDnet 8-Port Unmanaged 2.5G Switch (TEG-S380) in front of my PC to allow other devices in the office to connect at 2.5Gbps or lower speeds. This is how I'm running the network today, and everything is working perfectly.

2 notes
·
View notes
Text
Illustrator Plug-In Updates and New Scripting Support
I’ve updated all three of my plug-ins to support Adobe Illustrator 2021 (25.x). It’s hard to believe that Ai->XAML was released almost 16 years ago in July, 2005! Ai->Canvas was released almost 11 years ago in October, 2010. And my youngest, Duplicate, is coming up on 4 years this July. Amazing.
Over the years, I’ve received occasional requests about scripting my export plug-ins, but because I don’t do any Illustrator scripting myself, I never took the time to figure out how to automate them. Recently, though, a user contacted me about converting 1,400 SVG files to XAML, and this provided the perfect excuse to dig-in.
This user had understandably tried to use the exportFile(exportFile,exportFormat[,options]) method on Document to export to XAML. According to the documentation, exportFile:
Exports the document to the specified file using one of the predefined export file formats.
Unfortunately, the formats that my plug-ins add aren’t “predefined,” so this method won’t work.
Fortunately, Illustrator plug-ins can optionally add support for the sendScriptMessage(pluginName, messageSelector, inputString) method on Application. This simple method:
Sends a plug-in-defined command message to a plug-in with given input arguments, and returns the plug-in-defined result string.
This is exactly what was needed, and support has been added to both export plug-ins.
To automate an export with Ai->XAML, pluginName must be “XAMLExport”. The messageSelector can be “ExportWPF” or “ExportSilverlight”. The inputString is the OS-appropriate file path destination (e.g. “c:\Users\mike\output.xaml” or “/Users/mike/output.xaml”). The returned string reports whether the export succeeded or failed.
For Ai->Canvas, pluginName must be “Ai2Canvas”. The messageSelector must be “Export”. The inputString is the OS-appropriate file path destination as described above. The returned string reports whether the export succeeded or failed.
The example script in the Ai->Canvas GitHub repo should get you going.
Note that I’ve also dropped 32-bit support for the Windows plug-ins, as I don’t think you can obtain a 32-bit version of Illustrator anymore.
You can download the latest version of the Adobe Illustrator Scripting Guide via the Adobe Developer Console.
0 notes
Text
Duplicate Plug-in for Adobe Illustrator
About a week ago, the prolific Marc Edwards tweeted:
Seems like a simple question, but I can’t find an answer: Is there a single shortcut to duplicate an object in Illustrator? Like ⌘J in Ps.
— Marc Edwards (@marcedwards)
June 24, 2017
As a frequent Illustrator user, my immediate thought was: “of course there is!” I mean…there has to be, right? What was that key combination again? I better fire up Illustrator and double-check. Hmmm…it really doesn’t exist!? You have to be kidding me.
After confirming Marc’s suspicion with a few quick Google searches, I did what any developer would do and wrote a plug-in. The plug-in adds a Duplicate option to the Edit menu that makes a copy of all selected objects on top of their originals. The clipboard isn’t used, so it won’t be affected. When the Duplicate operation is complete, the originals are deselected and their duplicates are selected.
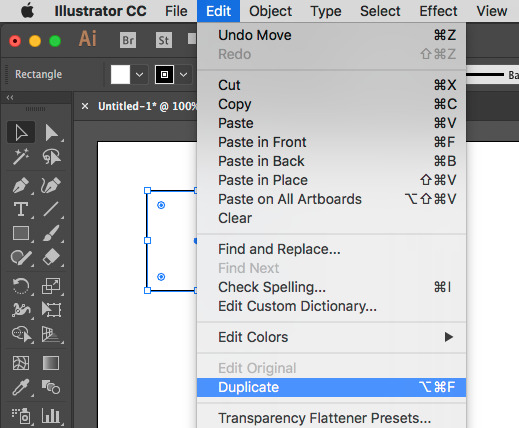
The default shortcut for Duplicate is ⌥⌘F (Alt+Ctrl+F on Windows), though it can be changed under Edit/Keyboard Shortcuts... within the Menu Commands section. The command is registered for undo and redo operations as Duplicate, and it can be used in Actions.
The plug-in was built using the Adobe Illustrator CC 2017 SDK on macOS Sierra and Windows 10 Creators Update. If you’re able to get it working on older OS versions, feel free to leave a comment for other users, but otherwise, I have no intention of backporting it.
(note updated versions at end of post) After downloading Duplicate_1.0.1.zip (79 KB), extract the appropriate Duplicate.aip version to your Illustrator plug-ins folder. This is usually something like /Applications/Adobe Illustrator CC 2017/Plug-ins on Mac and C:\Program Files\Adobe\Adobe Illustrator CC 2017\Plug-ins on Windows.
Then, start Illustrator and have fun duplicating.
Update on 12-25-2019: Version 1.1 is compatible with Adobe Illustrator 2020 (24.0): Duplicate_1.1.zip (75 KB)
Update on 5-3-2021: Version 1.2 is compatible with Adobe Illustrator 2021 (25.0): Duplicate_1.2.zip (49 KB)
Update on 2-8-2022: Version 1.2 (above) is also compatible with Adobe Illustrator 2022 (26.0).
Update on 4-21-2022: Version 1.3 is compatible with Adobe Illustrator 2022 (26.0) and adds Apple silicon and Intel processor support: Duplicate_1.3.zip (88 KB)
Update on 6-4-2022: Version 1.4 is more compatible with Adobe Illustrator 2022 (26.0) and includes Apple silicon and Intel processor support: Duplicate_1.4.zip (88 KB)
0 notes
Text
iOS 9 Split View Drag-and-Drop
If you watched Apple’s September 9th Special Event when they introduced the upcoming iPad Pro, you may remember the segment around 35:05 where Microsoft demonstrated Excel and Word side-by-side using the new iOS 9 Split View feature.
“So having these two applications side-by-side is a huge productivity boost…and allows us to do things like copy and paste this chart that you see and put it into Microsoft Word.”
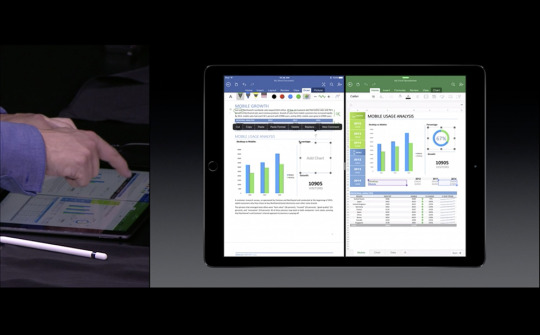
I don’t know about you, but I was excited to see the first reveal of drag-and-drop across Split Views on an iOS device! But then, like the destruction of Alderaan, I heard the collective gasp of iOS developers everywhere—as if millions of voices suddenly cried out in terror and were suddenly silenced—while we watched one of the presenters simply copy the chart from Excel and paste it into Word.
Fast-forward to this past Thursday, when I was eating lunch with a friend. We were talking about this segment of the presentation, and I started to wonder if there would be any way to pull off the drag-and-drop that we all expected. It was time for some experimentation.
The first question that I needed to answer was whether or not a touch that begins in one window continues to be tracked across the Split View. If you’ve ever worked with touch events in UIKit, you’ve probably noticed that a touch is tracked relative to its initial view. This is true even if your finger is dragged outside of the view’s bounds. But surely the touch would be cancelled if your finger crossed the Split View into another running process, right? After a few minutes in Xcode it was easy to demonstrate that yes, touch events continue to be delivered to the initial view, even when your finger is dragged across the splitter.
Because there is no method to “hand off” a touch event to another app, I knew that the rest of the gesture would rely on communication between the two running processes. I decided to use system-wide Darwin Notifications, and in particular, the fantastic MMWormhole project on GitHub. MMWormhole provides a convenient wrapper for Darwin notifications while also making it easy to pass data back-and-forth between the two processes. Unfortunately, system-wide Darwin notifications prohibit the use of userInfo-style data payloads, so other marshalling techniques are necessary.
At this point, I had everything I needed for my test. Here is a simple example showing a green UIView being dragged across the splitter.
Of course, in reality, nothing is being dragged across the splitter. The UIView in the left app is being moved out-of-view, and a corresponding UIView in the right app is being positioned based on a Darwin notification and data payload that contains the touch location translated to the coordinate system of the right app. A very useful illusion.
This is where I stopped, only because I have no use for this feature in my current apps. However, my experiment has shown that with a bit more work, this can be turned into a very useful project. Here are some thoughts and considerations that will need to be addressed:
How do the collaborating apps determine the offset of their respective coordinate systems? My test assumed a left-running app and a right-running app. I’m not aware of a method to determine actual window coordinates relative to screen coordinates, but if that exists, this is a simple problem to solve (update below). If not, you can imagine some heuristics to get you most—if not all—of the way there (e.g. a limited set of Split View sizes, a known screen size, and known window sizes).
What is the protocol for drag-and-drop handoff? A simple protocol might assume 1) a beginDragWithThumbnail-style event followed by 2) touch-tracking, ending with 3) an endDragWithData-style event to pass the shared data. Another method could employ the system-wide UIPasteboard to handle the copy and paste functionality, leaving the protocol to handle the illusion.
Can this work outside of an App Group? My test worked because I am a single developer who is able to setup a shared data container between the two running apps. Any developer (including Microsoft) can use the same technique to make this work. But I wonder if there is any reasonable way to pull this off across apps that don’t share an App Group. The “live” nature of the touch events would make this very difficult for a web service, for example.
If anyone does turn this into a reusable project, please let me know. Otherwise, it’s my hope that functionality like this is on Apple’s near-term radar. It’s something that’s obviously needed, especially with Split View.
Have fun!
Update: shortly after posting, I realized that you can use the UICoordinateSpace methods on UIScreen to determine actual coordinates for each participating app:
UIWindow *keyWindow = [UIApplication sharedApplication].keyWindow; CGRect actualFrame = [[UIScreen mainScreen].coordinateSpace convertRect:keyWindow.bounds fromCoordinateSpace:keyWindow];
4 notes
·
View notes
Text
Watch OS 1.0.1 Controller Life Cycle Changes
Today, Apple released OS 1.0.1 for Apple Watch. Among a list of other updates, the release notes mention performance improvements for third-party apps. I was curious to see if this OS update fixed the disappearing status bar bug, and indeed, it did. Thank you, Apple!
I also noticed that the WatchKit Controller Life Cycle that I detailed in my prior post has changed slightly in OS 1.0.1. Unfortunately, these changes affect the heuristics I was using to work around the status bar bug, and because the fix is associated with an OS version (and not an iOS version), I am left with no method to determine when to apply the workaround. This is due to the fact that there seems to be no way to programmatically determine the Watch OS version. But enough about my troubles.
From what I’ve gathered so far, it looks like there are two changes to the general WKInterfaceController life cycle:
When a page-based set of interface controllers are loaded, the prior OS 1.0.0 initialization sequence occurs first, followed by two new calls to willActivate and didDeactivate on the next controller (in this case, Page 2). Presumably, Apple added these calls so that the next controller is primed and ready to go by the time the user moves it into view.
When an app is moved back into the foreground (for example, after being suspended), willActivate is called before the two NSExtensionContext notifications. In OS 1.0.0, willActivate is called after those notifications.
I’ve added a third page to the diagram to illustrate the fact that not all controllers receive the new willActivate and didDeactivate calls when they’re loaded; they’re only sent to the next controller in the sequence. Changes are highlighted in yellow.
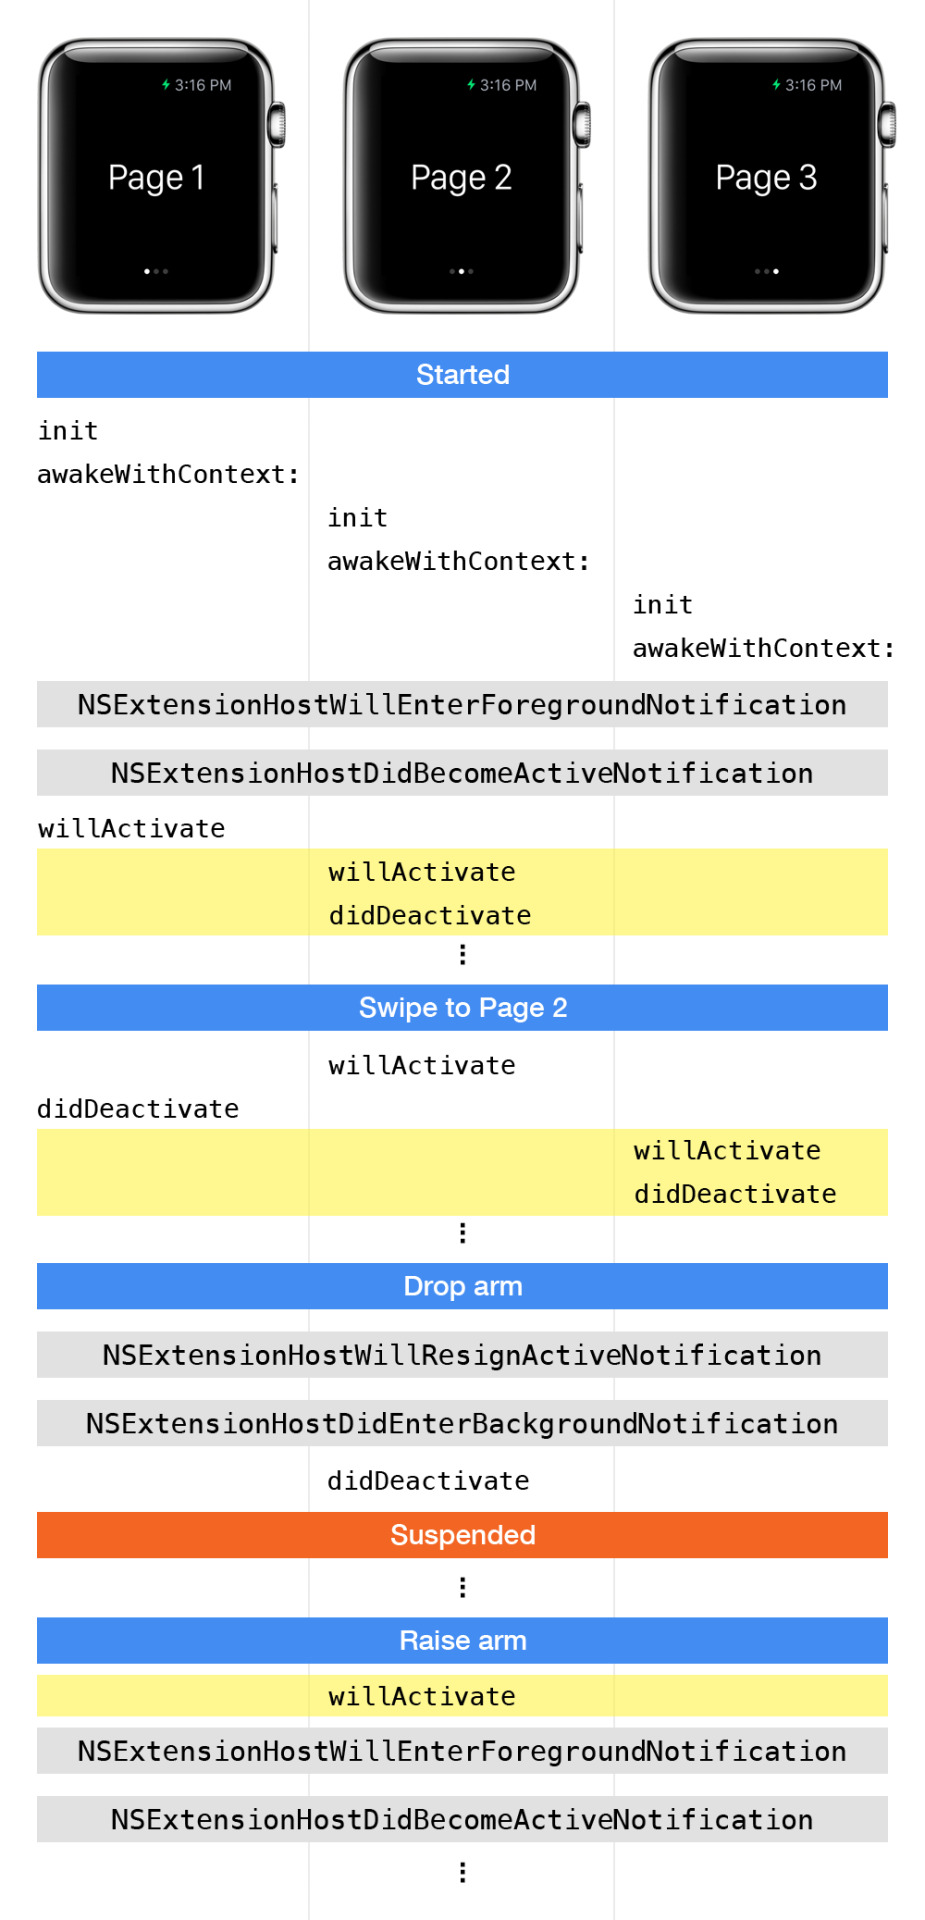
The documentation for willActivate states that it is:
Called to let you know that the interface controller’s contents are onscreen.
Clearly, in the new speculative willActivate/didDeactivate sequence, the contents are not onscreen. But, the documentation goes on to say:
Activation can happen at any time, including while the user’s iPhone is locked.
Okay...so willActivate can be called at any time. But then, the documentation for didDeactivate states:
Called to let you know that the interface controller’s contents are now offscreen.
It’s difficult to imagine content going offscreen if it’s never been onscreen in the first place. It seems to me that the meaning of these two events has changed in OS 1.0.1.
You might ask: so what? Well, for straightforward WatchKit apps, the addition of these two speculative willActivate/didDeactivate calls are like a free perceptual performance boost. Your “next page” now has a chance to configure itself with fresh data before the page is truly displayed onscreen. If this is your scenario, you’re in great shape.
However, If—like me—you use these methods to determine which interface controller a user is currently viewing, these events have now lost a key component of their meaning. In my app, I use this information to intelligently pre-cache assets on a background thread just before they’re needed. I will have to reconsider how to accomplish the same goal in OS 1.0.1. And because I can’t detect the Watch OS version, I have no way to modify the behavior for users who are still running 1.0.0.
As always, happy coding!
4 notes
·
View notes
Text
Advanced WatchKit Interface Controller Techniques
Fueled by your interest and encouragement from developers like Brian Gilham (curator of the very useful WatchKit Resources site), and the fact that I’ve already shipped my Apple Watch app, I’ve decided to share some interface controller techniques that I’ve used in my own app. I call them “advanced,” only because they’re techniques that most developers won’t need, not because they’re difficult to understand or implement.
Most of you are probably used to working with UIKit, and at first glance, you might think that WatchKit works along the same lines. Indeed, for both technologies, you can create your interface using the familiar interface builder features of Xcode: you connect controls to IBOutlets, setup action methods for control events, and position and size elements. You implement some logic in UIViewController for UIKit and WKInterfaceController for WatchKit. Things feel similar.
It’s only when you push your WatchKit app a little further that you begin to notice some key differences. It starts with passing information to another controller. In UIKit, it’s common to create a method like initWithThing:(JBThing *)thing on your UIViewController subclass or to set a property like setThing:(JBThing *)thing. In WatchKit, you call a method like presentControllerWithName:context: or implement contextForSegueWithIdentifier:. A little different, but the paradigm still makes sense.
Then, one day, you decide that you’d like to pass information back to the presenting interface controller, and that’s when the world changes. Unlike UIKit where you have a reference to all of your objects, WatchKit tries its best to abstract those references away, and you end up with methods that accept string identifiers and don’t let you allocate objects directly. And try as you might, you can’t seem to get a reference to your WKInterfaceController objects! You ask, “How am I supposed to implement a delegate pattern without a reference to my presenting interface controller!?”
Before I get to the solution that I’ve implemented, I’d like to step aside and point out that NSNotifications are a fantastic (and easy) way to communicate across controllers that don’t have direct or indirect references to each other. A lot of developers that I talk to don’t realize that notification center delivers notifications to observers synchronously, meaning that the postNotification:-style methods do not return until all observers have received the notification. It’s basically a way to package up any information you’d like and immediately call zero-to-many observers that don’t need to be aware of each other. This is great solution for a set of WKInterfaceController instances.
JBInterfaceController
If NSNotifications don’t solve your communication needs, you can consider the techniques that I use in the JBInterfaceController class that I created for my own Watch app. Initially, I implemented these techniques to work around a nasty bug that’s present in iOS/WatchKit 8.2 and 8.3 where the status bar disappears in certain situations. Eventually, I realized that these techniques are useful to make WKInterfaceController just a bit more like the UIViewController patterns I am already familiar with.
As mentioned, with WatchKit, you never allocate your own WKInterfaceController instances. The closest you get to referencing a controller is by indirectly passing a string identifier using methods like presentControllerWithName:context:. You can pass anything you’d like for context, and typically, this is a data model or perhaps a dictionary of useful values. Instead, what if you passed a reference to self? We at least have that reference. Feels almost like cheating, doesn’t it? Don’t worry…the WatchKit police won’t show up. Using that technique, we end up with something like this:
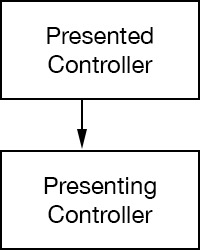
That’s a good start: in awakeWithContext:, our presented controller now has a direct reference to the presenting controller. To complete the UIViewController-like concept of presentedViewController, though, the presenting controller also needs a reference to the presented controller. So, in my solution, the presented controller (still in its awakeWithContext: method) passes its self reference to the presenting controller, and the graph is complete.
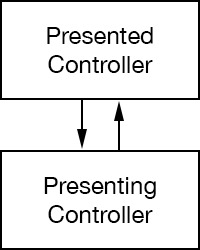
This same technique is used to build an array of presentedControllers when multiple pages are involved.
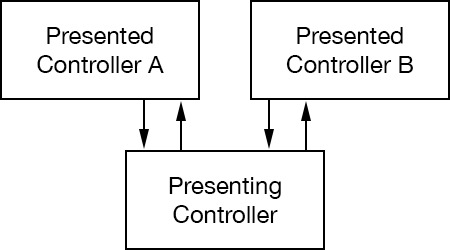
With these relationships in place, controllers can begin to inform each other of important events in the controller life cycle that aren’t provided by WatchKit. For example, in my JBInterfaceController class, a presenting controller can now process events like presentedController:didAwakeWithContext: and presentedControllerWillActivate:.
Additionally, because we’re now more aware of the life cycle, we can inject useful patterns like configuration blocks for presented controllers. With JBInterfaceController, a configuration block is executed by the presenting controller as soon as these references are in place. The block is passed a reference to the presented controller, which makes it very easy, for example, to setup delegate patterns. Without a technique like this, delegate patterns between controllers simply don’t exist in WatchKit.
Again, because we’re now more aware of the life cycle, JBInterfaceController accepts an optional dismiss block that is automatically executed when a presented controller is dismissed.
Finally, because the presenting controller is aware of all its presented children and when they activate and deactivate, it can determine a paging direction (e.g. whether the user is moving forward or backward through a page-based interface) and speculatively inform the next controller with a prepareForActivation event. In my app, I use this event to pre-cache the upcoming image on a background thread. That way, when the user moves to the next page, the image is already in the cache and ready for display.
JBInterface
Switching gears, I’d like to cover a different technique that I use to update the controls in my WatchKit app. As you may know, you can only update an interface when it is considered active (see my WatchKit Controller Life Cycle for an explanation). This means that if you want to update, for example, a label on a presenting interface controller while a modal controller is being presented “on top,” you somehow need to wait until the presenting controller is active again before making the update.
Initially, I was trying to stuff all of my update code into willActivate, because that method is called when the modal controller is dismissed. In fact, this is the perfect place to perform the update, and if you have simple needs, this is absolutely the correct approach.
The problem I have is that my main interface includes a WKInterfaceTable with multiple records, and edits made in the modal controller affect what is displayed in the table rows (on top of that, my app updates and re-sorts data with any Core Location change). Trying to intelligently manage the logic of potentially updating an entire table in willActivate was becoming a real challenge. So, I looked to UIViewController and UIView for inspiration.
If you’ve ever written a UIView drawRect: method, you probably recall that drawRect: is automatically called by the view subsystem. In fact, you’re never supposed to call drawRect: yourself. Instead, you let the view subsystem know that your content needs to be redrawn by calling setNeedsDisplay, and the system will call drawRect: sometime later, when it’s appropriate. This also means that you can repeatedly call setNeedsDisplay to invalidate your content and the system will efficiently perform a single drawRect: call as a result.
So, I’ve created a JBInterface class that is influenced by this UIView behavior. My table rows are a subclass of JBInterface, and all update logic for the row happens in an updateInterface method. Like drawRect:, updateInterface is called automatically at an appropriate time (i.e. when its JBInterfaceController is considered active).
To let the system know that the contents of a JBInterface need to be updated, you call setNeedsUpdate, which marks it as dirty. The JBInterfaceController class has an interface property that contains the root JBInterface instance (similar to UIViewController’s root UIView instance). By calling addSubinterface:, you’re adding each table row to the interface (similar to adding subviews to UIView). Of course, adding these subinterfaces doesn’t actually add anything to the screen, but it does allow the interface instances to be updated intelligently.
At this point, I can simply call setNeedsUpdate on any table row at any time I’d like, even if the interface is covered by a modal controller, knowing that the system will automatically call my updateInterface method at an appropriate time. It’s quite liberating. It also cuts down on unnecessary screen updates, which saves iPhone-to-Watch transmission time and battery power.
If you don’t want to build-up a set of JBInterface instances (for example, if you have a straightforward interface controller with no table rows), you can take advantage of the default/root JBInterface instance and call setNeedsUpdate whenever the interface needs an update. Similar to the viewDidLayoutSubviews method on UIViewController that’s called after a UIView layout pass completes, JBInterfaceController calls didUpdateInterface after a JBInterface is updated, so that’s where I do my screen updates. Yes, this means that most of my willActivate methods are completely empty.
If I lost you in the last few paragraphs, don’t worry. Download the JBInterfaceController project from GitHub, and the simple example I’ve included shows this basic form of interface updates.
Key-Value Observing
Last, but not least, I want to point out how Key-Value Observing (a.k.a. KVO) can make your life a lot easier. Again, if your app has simple needs, you probably don’t need KVO. But if you’re handling screen updates with data that can change at any time (especially if you’re propagating changes to your data model between processes), it is worth the effort.
As one example, the table rows I mentioned earlier use KVO to watch for changes to their underlying data model. When a row is notified of a change to its data model, it simply makes a call to setNeedsUpdate knowing that its updateInterface method will be called at the next opportune time. The call could happen immediately, or it could happen after a Force Touch menu is canceled and a modal interface controller is dismissed. The great part is that you don’t have to think about it.
It’s my hope that Apple will implement patterns like this in an upcoming update to WatchKit, especially since my solution is already inspired by existing Cocoa Touch patterns and UIKit. Here’s looking at you, WWDC 2015!
I’ve wrapped all of this functionality in a JBInterfaceController project that I’ve shared on GitHub. I know that the project isn’t perfect, but it has certainly made the logic in my own Watch app much easier to deal with. To take advantage of these techniques, simply create a subclass of JBInterfaceController (which is already a subclass of WKInterfaceController) and add it to your storyboard. Note that I haven’t implemented logic for segues, because I don’t use them in my app; all of my controllers are presented in code. If someone wants to add support for segues, feel free to send a pull request.
This post ended up being a little longer than expected, but I hope that regardless of whether you adopt JBInterfaceController, you’ve at least found an idea or two that can help with your own Watch apps.
Good luck!
4 notes
·
View notes
Text
WatchKit Image Tips
I heard from many of you that my WatchKit Development Tips post was helpful. So, in the same vein, I’ve assembled a set of tips that pertain specifically to the use of images in a WatchKit app. I hope you can find at least one item that helps with your own design and development.
First, it’s helpful to understand how you can get an image onto the Watch screen. WKInterfaceImage, WKInterfaceGroup, WKInterfaceButton, and WKInterfaceController provide the only elements that accept an image. Of those, WKInterfaceImage (akin to UIImageView in UIKit) is the single control that includes an image as its primary content; the other three only provide support for a background image. Among these, WKInterfaceController’s background image must be set in interface builder.
Second, recall that your Watch extension (where all of your logic and code resides) runs on the iPhone, while your Watch app is really just a bundle of storyboards and assets that are installed on the physical Watch hardware. This means that for an image to be displayed, it somehow needs to make its way from the iPhone, through the air, and to the Watch itself. There are three distinct ways this can happen:
Include the image in your Watch app bundle. In this case, the image is transferred to the Watch during installation of the Watch app. This is the best way to store images that you can generate ahead of time.
Use a setImage:- or setImageData:-style method on one of the mentioned controls. These methods accept a UIImage or equivalent NSData, and the image is transferred to the Watch at the time of the call. Images transferred this way are not stored for future use. These methods are acceptable for one-off style images that you don’t intend to use again.
Add the image to the 5MB per-app Watch cache. Transferring any image to the Watch takes time and battery. If you have an image that can’t be generated ahead of time and stored in the bundle, and you intend to use it more than once, I highly recommend sending the image to the Watch for storage in its cache. After adding the image to the cache with a named key, you can subsequently refer to it using setImageNamed:-style methods.
With all of that preamble out of the way, let’s get to the rest of the tips.
Use an assets catalog. I don’t think that this is explicitly required, but there have been too many horror stories of developers who used “loose” image files (i.e. in the bundle, but not in an assets catalog) that worked in the simulator but not on actual hardware. Save yourself the grief. Assets catalogs work very well.
Make sure the assets catalog is in the WatchKit app, not the extension. As I mentioned earlier, the WatchKit app is transferred to the Watch during installation.
Developers have reported that there is currently a 50MB size limit on the WatchKit app (not the extension). This means that any pre-generated images you intend to install must fit within this limit.
It is a very good (though not required) practice to name images with a “@2x” suffix, since all Watch screens are currently 2x Retina displays. By including the @2x suffix, Xcode can categorize the image correctly when you drag it into an assets catalog.
If your filename does not include a “@2x” suffix, Xcode may add it to a 1x slot, and when the image is loaded by your app, it’ll show up at twice its intended size. If this happens, you can manually drag the 1x file to a 2x slot, and the image will be sized correctly.
All image pixel (not point) sizes should be an even multiple of two. While you can get away with odd-sized images in some situations (for example, if you place a WKInterfaceImage using the Position and Size fields in the inspector panel), even-sized images will always work.
If you configure a WKInterfaceImage with its Mode set to Center (which will center your image in the control without resizing it) and you provide an odd-sized image, the result will be blurry. For example, if your image is 59 pixels (not points) wide, the image control will center it at pixel 29.5, blurring every pixel in the image. Here are two actual screenshots at 400% magnification.

Related to the previous centering mode, this is likely the reason that Force Touch menu items sometimes look blurry if you provide odd-sized images. My guess is that the Force Touch menu is using WKInterfaceImage controls with their Mode set to Center.
Keep in mind that the even-sized rule applies to dynamically generated and downloaded images too. If you download an image that has an odd pixel size in either dimension, please be sure to carefully test your scenario to ensure that it doesn’t look blurry on the Watch. To be safe, process the image and add a single-pixel row or column so that it has an even dimension.
For each image in your Watch assets catalog, I recommend setting Devices to Device Specific and checking only Apple Watch. If you have a single image that works for both the 38mm and 42mm Watch screens, you can safely add it only to the 2x slot. But, if you have two different images, add one for 38mm, another for 42mm, and leave the 2x slot empty. By leaving the 2x slot empty, you’ll avoid having a third (and duplicate) image in your Watch app bundle. The downside is that you won’t see the preview image in interface builder, unless you specifically switch to the 38mm or 42mm screen size.
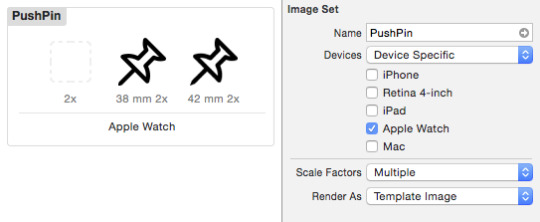
The Render As setting in the inspector panel for asset catalog images is often overlooked. By setting it to Template Image, you can dynamically change the color of an image with the setTintColor: method on WKInterfaceImage. You can also set the tint color in the inspector panel.
When numbering animated images in the Watch app bundle, be sure to avoid leading zeros. For example, use Frame1, Frame2, Frame3, not Frame001, Frame002, Frame003. The animated image filename algorithm won’t correctly recognize images that are numbered with leading zeros.
The addCachedImageWithData:name: method on WKInterfaceDevice adds your NSData to the cache without additional conversion. That means that you can achieve significant cache savings and transfer time by encoding with UIImageJPEGRepresentation(). Experiment to find the best quality setting.
The addCachedImage:name: method on WKInterfaceDevice appears to use PNG encoding behind-the-scenes. This is a safe choice, as PNG is a lossless format with alpha channel support. In my testing, the cache cost for using this method is equal to the size of UIImagePNGRepresentation() + 753 bytes. I have no idea where the additional 753 bytes come from, but if you send your own PNG-encoded image using addCachedImageWithData:name:, you'll immediately save 753 bytes per image.
Because of the aforementioned 753-byte penalty, I recommend that you always cache images using addCachedImageWithData:name:.
According to an Apple employee in the developer forums, you are allowed to cache images on a background thread. In fact, this is what I do in my own Watch app to speculatively cache the next image before it’s needed.
Unfortunately, there is currently no way to send animated images to the cache as individually numbered frames (like you can with animated images in the assets catalog). You have to send a full animated UIImage, and unless you’re careful, these can be quite large.
You can check the size of your images using the cachedImages property on WKInterfaceDevice. The property contains a dictionary of key names along with NSNumbers that indicate the cache cost of each image in bytes.
There is no built-in method to intelligently evict images, so you may want to wrap the cache with your own eviction logic. In my case, I track a “last use” time for each key, and under memory pressure, I evict the oldest cache entry before adding a new one.
WatchKit doesn’t currently include an activity indicator (like UIActivityIndicatorView), but you can easily display a series of animated images while long-running tasks are executing. When the task completes, stop and/or hide the animation. Check out my JBWatchActivityIndicator project on GitHub for some Apple-like images or to create your own.
It’s a common scenario to fetch images while a user is scrolling through a WKInterfaceTable. If you’re downloading images over the network, offload that task to your primary iPhone app by using the openParentApplication:reply: class method on WKInterfaceController. To ensure that your iPhone app isn’t terminated during the download, begin a background task immediately with the beginBackgroundTaskWithName:expirationHandler: method on UIApplication and use endBackgroundTask: when your download is complete. When you receive the reply in your Watch extension, dispatch to a background queue to cache the image data, then dispatch back to the main queue to update the image.
Related to tables, while you can set a background image on WKInterfaceController, note that it will scroll with your content. There is no method to create a fixed background.
There is no provision for a launch screen image in WatchKit. While it existed in early betas, it is no longer available.
The app icon sizes that are needed for a Watch app can be confusing, so I’ve added their actual pixel dimensions above each icon. Note that if you’re using the assets catalog (as you should), the filenames don’t matter as long as the images are in their correct slots.
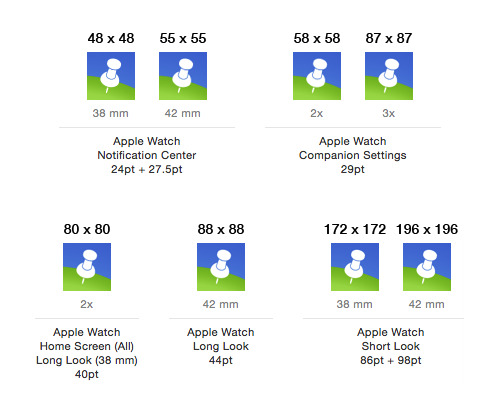
Don’t use a black background for your Watch app icon or your app will be rejected. It has been reported by some developers, however, that black backgrounds that have an “edge” or stroke around the icon circle have been accepted. From Preparing Your App Submission for the Apple Watch:
Avoid using black in the background of your icon to keep it from blending in to the black Apple Watch home screen.
The only way to stack or layer images in WatchKit is to set the background image of a supported grouping element (like WKInterfaceGroup) and include other image controls within the group.
Beyond the built-in Notification template, there is no way for an image to overlap the Watch status bar.
To easily round the corners of an image, place it in a WKInterfaceGroup and use setCornerRadius:.
If you need an interface that can’t be designed within the limitations of the standard WatchKit controls, consider dynamically drawing a custom interface image in your WatchKit extension, then transmitting it to the Watch. For interactivity, set the image as a group background and include “blank” controls on top to capture user input. This isn’t always easy to pull off, but it can be done.
If you want to display a single frame from an animated image sequence, use startAnimatingWithImagesInRange:duration:repeatCount: to specify just that frame. Otherwise, if you use setImageNamed: with Frame1, the WKInterfaceImage control will display Frame10 if it exists, because it’s the 0th frame of the Frame1 animation. Yes, someone was trying to be too clever with file names.
I hope that something in this list of tips is helpful. Happy coding!
5 notes
·
View notes
Text
WatchKit Controller Life Cycle
Update on 5/19/2015: Be sure to read about the Watch OS 1.0.1 Controller Life Cycle Changes
There seem to be a lot of questions about the order of WKInterfaceController events and how those events relate to the NSExtensionContext notifications I referenced in my WatchKit Development Tips. Hopefully, this post will bring some clarity to the WatchKit controller life cycle.
The example I’ll use features two interface controllers in a page-based layout. However, the same general principles apply to hierarchical interfaces, Glances, and Notification interfaces.
When multiple page-based interface controllers are loaded (whether they’re the root interfaces or they’ve been presented modally), init and awakeWithContext: are called on all controllers before willActivate is called on the first page. This means that you can improve the apparent responsiveness of your app by doing as little work as necessary in these two methods. As it’s a common question, be aware that awakeWithContext: will not be called again.
While there are no hard-and-fast rules about the work you should perform in init vs. awakeWithContext:, awakeWithContext: is the earliest that you have access to the context. Because of this, you could decide to perform general initialization in init and more context-specific work in awakeWithContext:. Note that you can configure interface elements in both of these methods.
After an interface controller is initialized and passed its context, the only time it can update its interface is while the interface is active. This means that you can perform updates in willActivate (when the interface becomes active) and at any point until didDeactivate is called. You cannot, however, update the interface within didDeactivate, as the interface is no longer considered active.
The following diagram illustrates two page-based interface controllers running on actual Apple Watch hardware. I mention this, because the NSExtensionContext notifications that you see here are not delivered in the simulator.

After the app starts, you can see that both interface controllers are given a chance to initialize and configure their contexts. It’s important to note that all of the calls in this diagram occur on the main thread.
Next, you see two NSExtensionContext notifications, NSExtensionHostWillEnterForegroundNotification and NSExtensionHostDidBecomeActiveNotification. Normally, these two notifications are very reliable. In my testing, though, I’ve noticed that—even if you register as an observer in your interface controller’s initialize class method—you might not catch these first two notifications. So, you need to plan accordingly.
Next, I swipe to Page 2. Note that willActivate is called on the second interface controller before didDeactivate is called on the first. This is contrary to the following statement in the Apple Watch Programming Guide:
During a transition, the currently visible interface controller’s didDeactivate method is called, followed by a call to the willActivate method of the interface controller that is about to be displayed.
This bit of documentation appears to be incorrect or out-of-date based on my experience with both the simulator and actual hardware.
Side note: This same sequence occurs when presenting a modal interface. That is, willActivate is called on the presented controller, followed by a call to didDeactivate on the presenting controller. When the modal interface is dismissed, again, willActivate is called on the presenting controller, followed by a call to didDeactivate on the presented (now dismissed) controller. Finally, as you’d expect, if there is no longer a strong reference to the now-deactivated controller, it is deallocated (from a different thread, by the way).
Back to our two-page example. If I drop my arm, you can see that two notifications are delivered: NSExtensionHostWillResignActiveNotification and NSExtensionHostDidEnterBackgroundNotification. Last, didDeactivate is called on the second interface controller before the app is suspended (the Watch does reserve the right to terminate your app).
After waiting a few seconds, I raise my arm to wake up the app, and you can see the two NSExtensionContext notifications before willActivate is called on our second interface controller. This pattern continues as controllers are pushed, popped, presented, and dismissed.
The life cycle that we’ve explored here is the same for hierarchical interfaces, Glances, and Notification interfaces, so you can take advantage of these events in all of those situations.
Happy coding!
0 notes
Text
WatchKit Development Tips
I’ve been working full-time on the Apple Watch component of my new WhereNotes app since mid-January. I was also fortunate to be invited to (and attend) an Apple Watch Lab in Cupertino. Over the past three-and-a-half months, I’ve assembled a lot of little tips and tricks, and I’ve included many of them in this post. I hope that something here helps you with your Apple Watch development.
You’re probably familiar with methods like applicationWillEnterForeground: and applicationDidEnterBackground: on UIApplication that are called just prior to their corresponding notifications (UIApplicationWillEnterForegroundNotification and
UIApplicationDidEnterBackgroundNotification, respectively). The equivalent (and little-known) WatchKit NSExtensionContext notifications are:
NSExtensionHostWillEnterForegroundNotification
NSExtensionHostDidEnterBackgroundNotification
NSExtensionHostWillResignActiveNotification
NSExtensionHostDidBecomeActiveNotification
My own personal experience along with the experience of others in the Apple Developer Forums indicates that you’ll have a much better and more reliable debugging experience by testing the Watch while it’s on the charger.
Unlike iOS where you can update interface elements (almost) whenever you’d like, with WatchKit, you can only update elements on the currently active/visible interface controller. Updates can safely be made until didDeactivate is called (note also that you cannot update interface elements within this method). This means that if you plan to update a currently-hidden interface controller (for example, if you’re viewing a modal controller “on top”), you’ll need to perform the update in the presenting controller’s willActivate method, which is called when the modal controller is dismissed.
In addition to assets that are included in your WatchKit app bundle, each app is allowed a 5MB image cache that can be populated and managed by your extension using methods on WKInterfaceDevice. Sending images from your extension to the Watch takes time and battery, so if you plan to re-use an image (even once), it’s worth caching. If you send an image using addCachedImage:name:, that image is automatically PNG-encoded and sent to the cache, regardless of whether or not PNG is the best format (it’s the safest format). If your image can be represented as a JPG, I’d highly recommend using addCachedImageWithData:name: instead. Encode the image as a JPG, and experiment with the quality setting. Not only will the image transfer go much more quickly, but you’ll save a lot of space in the cache allowing you to store more images.
Related to the prior advice, note that you are allowed to cache images on a background thread (according to an Apple employee on the Developer Forums). I use this technique in my own Watch app to pre-cache images just before they’re needed.
If you use the aforementioned image cache, there is no built-in method to determine the oldest-used image to evict. If your app is managing many images, you’ll probably want to wrap your own manager around the cache.
To test notifications on your Apple Watch, turn off Wrist Detection in the General settings of the Apple Watch Companion app.
To force-quit your app, hold down the side button, then hold it down again (note that force-quitting your app does not force quit your extension).
Improve loading time by minimizing the amount of work you do in willActivate.
Consider what happens if a user launches your Watch app before your iPhone app and design accordingly. App review will catch this if you don’t.
Remember that your Watch app is running as an extension. As such, your Watch app has much tighter memory constraints than your iPhone app. If you’re processing large images, for example, it’s better to offload that work to your iPhone app (using openParentApplication:reply:). Also note that the simulator doesn’t implement these memory constraints, so you must test on actual hardware.
To find out if your app is paired to a Watch, set a BOOL from your Watch app in a shared NSUserDefaults (using a shared app group) that your iPhone app can also access.
To synchronize data between the iPhone and Watch, you can either call into your iPhone app to perform all data updates (using openParentApplication:reply:), or use Darwin notifications to send events between your extension and your iPhone app. Darwin notifications don’t support a data payload, so if you want to pass data with your notifications, take a look at the very useful MMWormhole project.
While you can update and refresh interface elements with timers (and in willActivate, of course), you can also use KVO if your data source supports it. This is how I do it in my Watch app. Using this method, elements are only updated when they change, saving both communication overhead and battery.
If you need to track interface controllers, consider passing a reference to self in awakeWithContext: to establish a relationship. I have used this pattern extensively in my own app with my JBInterfaceController subclass. Using techniques like this allows you to do things like setup delegate patterns and think of your controllers a little more like UIViewController.
A WatchKit extension is considered a foreground extension, so if you need Core Location permission, you really only need to request when-in-use authorization.
Unless your scenario requires it, think carefully about whether you need to have “live updates” that immediately sync between the Watch and the iPhone. Users won’t typically use both devices at the same time, so you can avoid a lot of messy synchronization logic by simply refreshing data the next time the Watch or iPhone app becomes active. Unfortunately, seeing the simulator screens right next to each other makes it tempting to build complicated synchronization logic. Yeah, maybe I did. But I’m not telling.
While you can’t construct interface controllers and controls programmatically, you can be clever about how you hide/unhide elements. It has become a common WatchKit practice, for example, to build a full-page label that can be unhidden if there is an important message to display. Or, if you have two layouts that you need to choose from programmatically, you can include them in top-level groups and hide/unhide them as necessary.
Remember that each screen touch and interface update requires round-trip communication between the Watch and the iPhone. Code accordingly.
As WatchKit interface elements are write-only (they only have setters), it is handy to keep track of values that you’ve already set so you don’t have to set them again. WatchKit tries to help by coalescing values and only sending final values at the turn of the run loop, but you can assist by tracking your own values too.
While there is no built-in activity indicator control, you can show a series of animated images while long-running processes (like image transfers or downloads) are taking place. Simply hide the activity indicator image when the operation is complete. Update on 5/3/2015: I just released a JBWatchActivityIndicator project on GitHub that makes it easy to create activity indicator image sequences. It also includes some pre-rendered Apple-like sequences.
Be sure to download and review the Apple Watch Design Resources. In addition to helpful color and size recommendations, they also include high quality bezel images that you can use for screenshots in your marketing. While I’m on the topic, it’s worth noting that the screenshots you submit with your app cannot include bezel images.
Many developers have reported frustration with images that display properly in the simulator but not on an actual watch. In fact, this has been the source of many app rejections. The problem appears to be related to file naming and “loose” image files. The safest solution seems to be including all images in an assets library in the Watch App (not the extension). This is what I did in my Watch app, and I recommend that you do the same.
While it is a very common request, there is no programmatic method to launch your iPhone app in the foreground from the Watch (even though there are methods that work in the simulator). Consider Handoff instead.
If you need to communicate between interface controllers, and you can’t do it via awakeWithContext:, consider sending NSNotifications. They work just fine in an extension. Or check out my JBInterfaceController subclass and use delegate patterns.
Local notifications require setting the soundName property to generate Taptic feedback and an audible chime.
The simulator is a good start, but it is critical (much more than with an iPhone or iPad app) to test your app on actual hardware.
Good luck with your Watch app!
13 notes
·
View notes
Text
Introducing Instagram from Juicy Bits
Today, Instagram announced an app called Layout from Instagram. It’s described as “a new app that lets you easily combine multiple photos into a single image.” In 2012, I released an Apple Editors’ Choice app called Layout that lets you combine multiple photos into a single image. It was even named an App Store Best of 2012 app. Is it just me, or does it seem insincere for Instagram to release a similar app with the exact same name only differentiated by the inclusion of their company name? Do you think they’d be okay with me releasing an app called “Instagram from Juicy Bits?” Neither do I.
If you’ve been following the app business for any length of time, this probably reminds you of Facebook’s Paper app, released well after Paper by FiftyThree (which was Apple’s 2012 iPad App of the Year). Of course, we all know that Facebook bought Instagram in 2012. It looks like they’re at it again.
Look, I’m an indie iOS developer with apps that are nowhere near as popular as Instagram (or Facebook). I struggle to make people aware of my apps, as it’s my full-time and only job. I pour blood, sweat, and passion into my work; I consider it a craft, and delighting customers is my primary focus. I don’t expect anyone to feel sorry for me, because I’ve purposely chosen to be an indie developer, and I love what I do. Honestly, the struggle is part of the fun.
You might think I’d be happy that some people will inadvertently come across my Layout app and buy it, confident that they’re buying the Instagram app (actually, I first heard about the new Instagram app from an article that incorrectly linked to my Layout app). While I like sales as much as any independent developer, I don’t like sales that I haven’t earned. And I certainly don’t like sales where customers are confused. I’m sure I’ll hear from many who didn’t get what they expected, and that will lead to one-star reviews and refunds.
Some of you are probably wondering if I registered Layout as a trademark. I didn’t. While being an indie developer is no excuse, filing for a trademark is an expense that didn’t seem worth it at the time, especially given the income from an average app (to be fair, Layout did end up doing much better than I expected). I’ve relied on common app naming courtesy and the desire to avoid obvious confusion. It takes a lot of time and effort to find a unique app name, and most developers seem to follow these rules.
In this case, I’m sure that Instagram first tried to register Layout as the app name. When the App Store rejected the name as already in use, they simply tacked on “from Instagram” to pass the uniqueness test. The fact that they made this decision willingly and decided to release it under that name anyway—all-the-while knowing that it would cause confusion with an existing app—is what makes me sad.
I know it’s naïve to think that everyone in our community of software developers will do the right thing, but I’d like to think that most of the well-known companies in our industry would recognize their leadership roles and lead by example.
For what it’s worth, I like Instagram, and I’m a frequent Facebook user. I don’t have anywhere near their resources, and I’m not interested in a fight. I’d like them to do the right thing: use the same time, effort, and energy to make a unique contribution instead of squatting on an existing name that they already know is confusing.
Update on 3/25/2015: As expected, I’ve already received e-mail from confused users who thought they were getting a different app. There are now multiple news stories that incorrectly link to my app page too. Confusion all around.
14 notes
·
View notes
Text
Ai->XAML Plug-In Updated for Illustrator CC
Many users have switched to using Blend for Visual Studio, because you can import .ai files directly. However, I often hear that users prefer the "clean output" of the plug-in. Others have resorted to running old versions of Illustrator inside a VM. That seems like a lot of work to continue running a plug-in, but it tells me that the plug-in is an integral part of some workflows.
I've tried to quickly port the code to newer versions of the Illustrator SDK more than a few times. Each time, I've walked away disappointed with my progress. It always seemed that it would require a lot of work to properly bring the code foward. Ideally, a newer version of the plug-in would adopt the architecture that I used in Ai->Canvas.
Finally, about a week ago, I was contemplating a Kickstarter-style project that would help me justify the time it would take to convert everything to the latest SDK. I feel guilty that my users have been left out in the cold, so I dove-in to the code one more time to estimate the effort it would take. Then it occurred to me that I might be able to make a "frankenbuild" of the old code with the plug-in model of the new Ai->Canvas code.
An afternoon-or-so of work later, I had an updated Ai->XAML plug-in building against the Illustrator CC 2014.1 SDK in Visual Studio. Later that evening, I had it working in Xcode. Best of all, the plug-in successfully exported all of the test files I've built-up over the years. I shared the plug-in with some users who have since confirmed that it works with Adobe Illustrator CC 2014.1 on both Mac and PC.
The only "feature" that this build adds is that it works with the latest version of Illustrator. Otherwise, it should behave exactly as it has in the past.
You can download version 0.2 of the plug-in on the Ai->XAML project page.
0 notes
Text
Making Grids Great in iOS 8
I've spent the past few months updating all of my apps to be compatible with iOS 8. In the case of Halftone 2, I wanted to make sure that it took full advantage of the new iPhone 6 and iPhone 6 Plus screen dimensions at launch. All I can say is: thank goodness I fell in love with Auto Layout years ago! With over 90,000 lines of original code, I'd have been lost without my NSLayoutConstraints. By the way, if you're just starting to adapt your apps, your first project-wide search should be for "320".
One of the components that I share across apps is a custom photo picker. Like many photo pickers, it displays a grid of thumbnails in a UICollectionView. The Auto Layout constraints on the collection view were keeping it pinned to the edges of the new iPhone 6 and iPhone 6 Plus screens, but the orderly grid of thumbnails had turned into a grid with all the extra space distributed between the columns.
This animation shows the custom photo picker on a 4-inch iPhone 5s, then on a 4.7-inch iPhone 6. You can see that UICollectionViewFlowLayout has allocted the extra space between the columns.
I was tempted to fire up Excel and calculate the perfect margin and gutter (inner padding) sizes for all of the known screen dimensions. Then, I could simply apply the correct set of measurements by detecting the screen width. Nice and easy! And that's when the developer voice in the back of my head started to shame me.
Yeah. That little developer voice is right. Hard-coding is almost always a bad idea. Also, what if the next iPad has new screen dimensions? Or what if it has the previously-rumored split screen mode? Those resizable simulators are installed with Xcode for some good reason, right? And what about the Apple Watch? Or size classes and UITraitCollections? Or all of the talk at WWDC 2014 about building Adaptable UIs? It's almost like Apple is trying to tell us something.
A Better Way
Typically, when I'm calculating margin and gutter sizes in Excel, I'm looking for numbers that have a harmonious relationship. Perhaps a margin of zero paired with a reasonbly small gutter. Or, if that doesn't work, how about a margin that's equal to the gutter? Or, worst case, a margin that's 1.5x the size of the gutter? I realized that I usually have a set of acceptable relationships that I try to achieve.
So, I decided to build a system that would allow me to express a list of desired gutter-to-margin relationships and have it calculate a result that had the best/tightest spacing. That's what JBSpacer does.
The optimal spacing that JBSpacer calculates can be used to configure or build almost any grid. For most of my cases, though, I use one of the convenience methods to automatically and accurately configure a UICollectionFlowLayout.
This animation shows the difference between standard UICollectionViewFlowLayout behavior (if I had changed nothing) on an iPhone 6 and the same layout with JBSpacer calculations applied:
@3x
By default, JBSpacer performs all of its calculations to snap to the current screen scale (@1x, @2x, @3x, etc.). It didn't take long to realize that the @3x screen scale of the iPhone 6 Plus brings with it a host of issues related to floating point math.
If you're not familiar with floating point numbers, you can start with the knowledge that a float represents only an approximation of a real number (albeit a very close approximation), and when you perform operations on a float, you can accumulate error. In some applications, this loss of precision might not matter. But when you're trying to account for every single pixel (not point) in a UICollectionView at @3x, you can easily throw off its spacing.
As a simple example, 0.3334 + 0.6667 = 1.0001. If you were expecting 1/3 + 2/3 = 1, you'll be sad to learn that even that small difference can cause UICollectionViewFlowLayout to assume you needed more than a single point (3 pixels in this case), and it will adjust according...err...frustratingly.
If you're doing any sub-point/pixel-level calculations for the new @3x screen scale, you owe it to yourself to learn about floating point math. Here's a simple start.
Wolfram Alpha
We interrupt this blog post for a developer tip that I keep forgetting to include in one of my posts (and no, this isn't a sponsored ad). Most software developers have at least a moderate grasp of mathematics, but there are times when you can't quickly figure out how to express, reduce, or solve an expression, and nobody on Stack Overflow seems to have the exact same problem. At least I find myself in this situation.
For JBSpacer, I needed to quickly calculate an ideal gutter size based on the following:
a = available space (e.g. width of a UICollectionView)
c = count of items on a single row
s = size of each item
g = gutter size
r = ratio of gutter size to margin size
I knew I could easily express a (the available space) with the following expression:
((g * r) * 2) + (c * s) + ((c - 1) * g) = a
Basically, (g * r) is the margin size, and since there's a margin on both the left and right, it's multiplied by 2. Next, I add the total size taken up by all items in a single row: (c * s). Finally, I account for the gutter between each item with ((c - 1) * g), meaning that there's always one fewer gutter than the number of items in a single row.
So, here's my developer tip: to solve for g (the gutter size), I can use the following Wolfram Alpha query:
solve ((g * r) * 2) + (c * s) + ((c - 1) * g) = a for g
From there, it's a simple matter of converting the result into code. And...done!
If I've piqued your interest, be sure to look at some of the other Wolfram Alpha examples. You'll be amazed at how much time this can save you.
JBSpacer on GitHub
If you'd like to use JBSpacer in your own project, head on over to the JBSpacer page on GitHub. Or, if you prefer CocoaPods, add this to your Podfile:
pod 'JBSpacer', '~> 1.0'
I hope that this helps you create good looking grids in iOS 8 for the new device sizes.
Best of luck!
0 notes