miseenplaceandtherebel
Mise en Place and the Rebel
Two contrasting cooking styles and where they meet
16 posts
Don't wanna be here? Send us removal request.
Last Seen Blogs

berixblitz
BerixBlitz

gokucooks
kari

angel-w0nderland
🤍Sky🤍

do-da-bartman
Do_Da_Bartman.

lakelander
Lakelander
Text
Easy Intimidating Food
Day 14 - 8/19/17
We’ve all see the TV chefs, haven’t we? The ones who whip up culinary masterpieces in half an hour, all while talking to the camera, and act as if it’s as easy as frying an egg. Here’s a trade secret: not all culinary masterpieces are difficult. The Master and the Rebel decided to prove this by each making a dish fit for television that anyone can also make at home. Once you’ve driven your guests mad with jealousy that you've created such edible artistry, you can casually remark, “Oh, it was nothing.” Just don’t tell them that it actually *was* nothing. Let them remain in awe.
Mark went first because his dish requires a longer cooking time. His dish is ratatouille using a recipe he got from www.chefsteps.com. For those who aren’t familiar with it, the dish is pronounced “Rat-ta-tooey.” You may have heard of the Disney movie with the same name. Fear not: despite what you learned in “History of the World: Part 1″ (”Get your rats here! Great for rat pie, rat stew, or ratatouille!”), there are no rats in this dish. In fact, there is no meat at all, so you don’t have to worry about squeamish guests demanding to know whether or not you have roasted vermin in your food. You can tell there isn’t any meat because there isn’t any in the obligatory ingredients photo.

See? Veggies. Far healthier than eating rats, even talking and singing Disney rats.
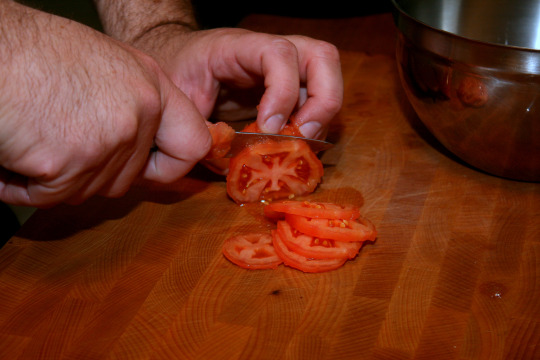
First, Mark preheated his oven to 300 degrees. Then, he put a pot of water on to boil and prepared an ice bath. (An ice bath is a bowl filled with water and ice cubes. Some chef a million years ago had to be artistic and name it something, but it’s just a bowl of ice water.) With a sharp paring knife, he cut an X into the bottom of each tomato. Don’t cut too deeply; you're just looking to pierce the skin of the tomato. Then he dropped each tomato into the boiling water for about 45 seconds. The amount of time will vary a little depending on the size of the individual tomato. You’re looking for the skin to split along the length of the tomato. When he saw it split, he removed it from the boiling water and placed it into the ice bath. Once each tomato was cold, he removed it from the water and peeled the skin off. The easiest way to do that is by hand rather than with a knife.


You can see the faint X in the bottom of each tomato even once it is peeled. That shows you the size of the X to cut.
Then Mark cut the tomatoes into even slices about 1/8 inch thick.
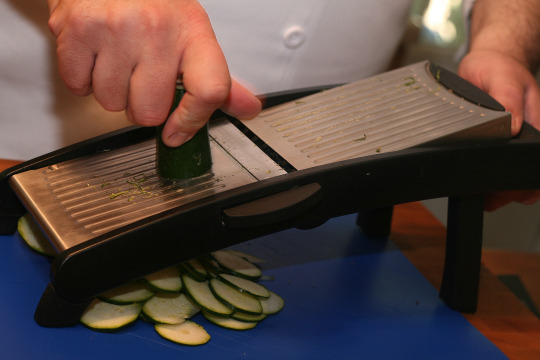
Then he used a mandolin to slice the zucchini and yellow zucchini 1/8 inch thick. Despite what you might be thinking if you read a lot of medieval literature, in this instance a mandolin is not actually a stringed instrument traveling minstrels use to entertain kings, taverns, or chefs making ratatouille. It’s a device for slicing food to even widths.
Mark did not use the mandolin for the eggplant because the mandolin works best on vegetables which are a little firmer. Instead, he used a knife, still aiming for 1/8 inch slices.
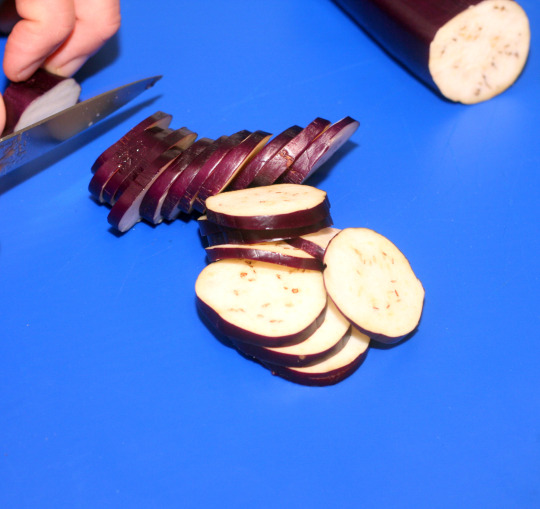
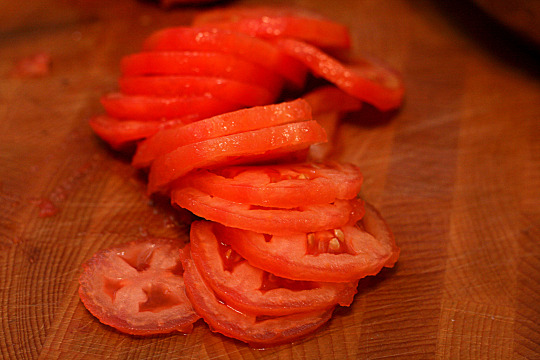
With any luck, all the sliced vegetables should end up about the same thickness. Aren’t they gorgeous?
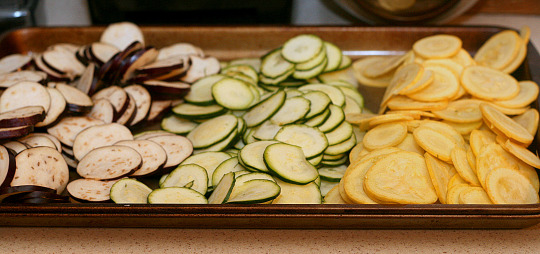
Mark knows to keep any veggie scraps for the sauce.
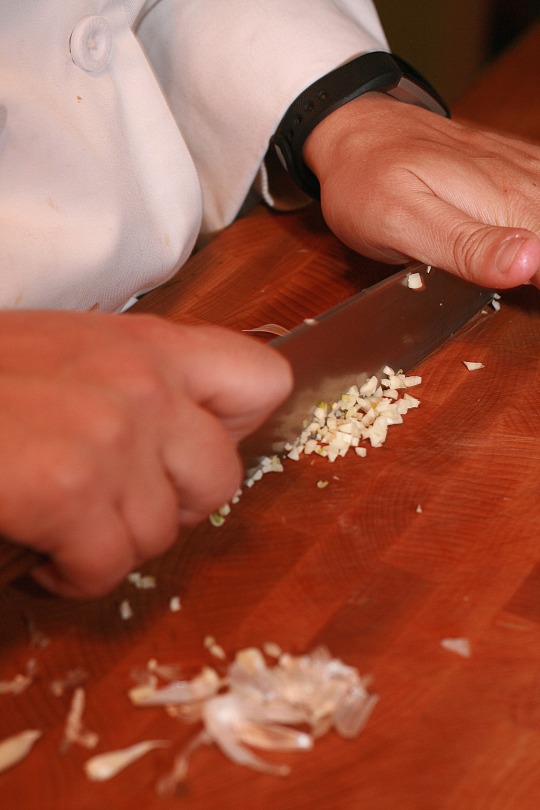
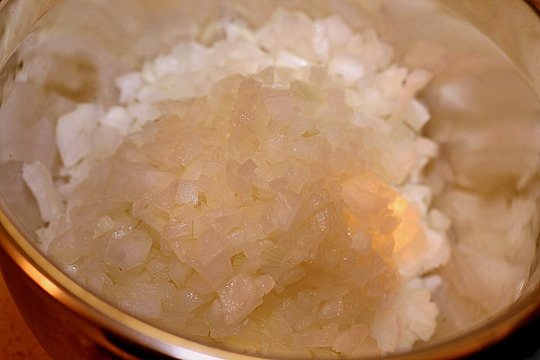
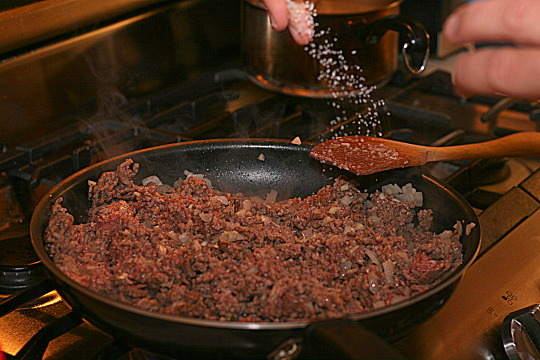
Hurray for the sauce! Mark finely chopped onions and garlic, then he seeded and chopped the bell pepper. He added olive oil to a medium-sized pot and warmed over medium heat and sautéd the garlic until translucent. Then he added the onions, bell peppers, and the scraps from the tomato, zucchini, and eggplant.

He cooked all the veggies while slowly stirring. Then he reduced the heat to medium-low and covered the pot to slightly steam the contents until soft. Once the veggies were soft, he uncovered the pot and continued cooking until the onions appeared jammy (without letting the bottoms get brown). Jammy vegetables are not carrots wearing PJs before bed, despite what fun images you might have in your mind. Rather, it means that the onions are translucent and just starting to lose their shape.
Once the onions were jammy, Mark removed the pot from the heat.
There are two ways to go from this point. You can either pour the pot contents into a blender/Vitamix and puree, or you can strain the vegetables out of the liquid. Either one is acceptable.
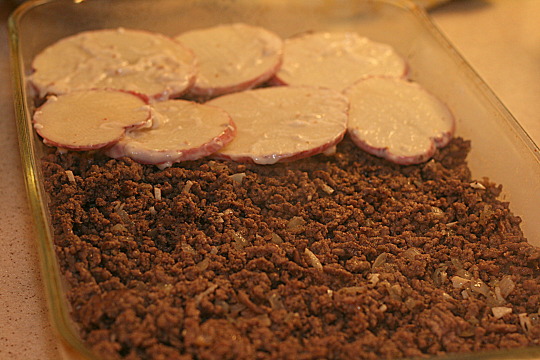
Mark then poured the sauce evenly into a casserole pan. He didn't pour the sauce too thick, because then it will seep into the vegetable layer and ruin it. He described it as similar to saucing a pizza: when you’ve as much sauce on the bottom of the pan as you would on pizza dough, stop. You can also shake the pan back and forth to create an even spread of the sauce.

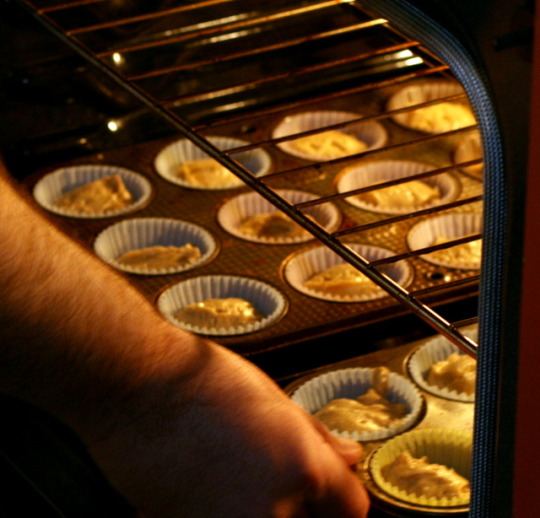
Then he arranged the vegetable slices on edge in the pan on top of the sauce. Creating a repeating pattern for the vegetables is fun and artistic! Go crazy!

Mark filled the whole pan with vegetable slices.

Once he had the vegetables slices all arranged, he sprinkled with salt and seasoned with olive oil and fresh herbs as desired.
Fresh herbs are the best! This is rosemary from Mark’s garden!

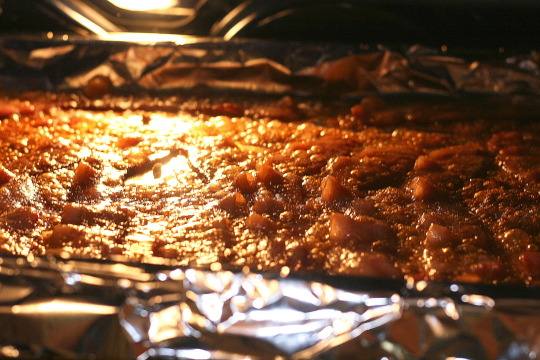
Then he put the lid on top of the casserole dish and cooked in the oven for 90 minutes.

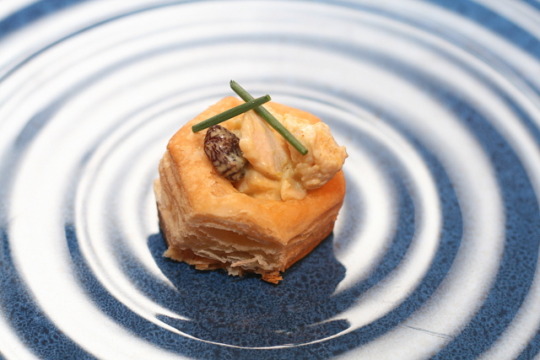
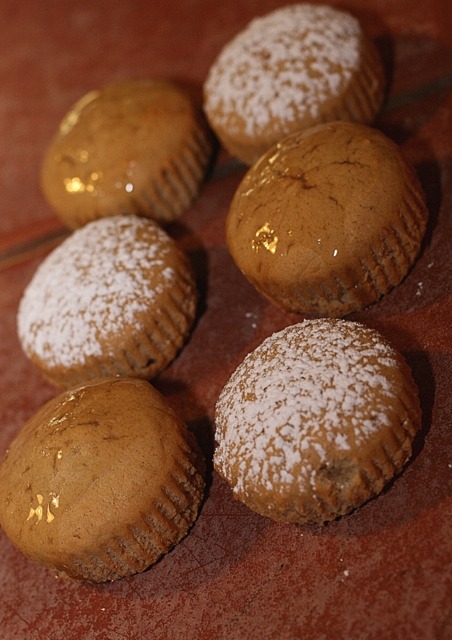
Garnish with herbs as desired. These are chives.

Lori went next, creating cheesy buffalo stuffed chicken. This dish is the result of turning buffalo chicken dip (another Rebel special - for a future blog?) into a formal dish. Reports of the main ingredients of this dip being from a furry chicken with horns are unconfirmed at this time, as are reports that the only acceptable chickens are from upstate New York.
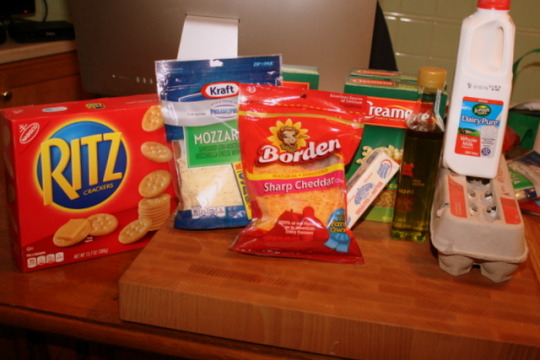
First things first: ingredients:

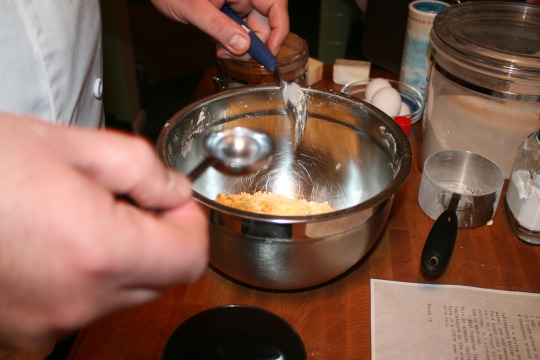
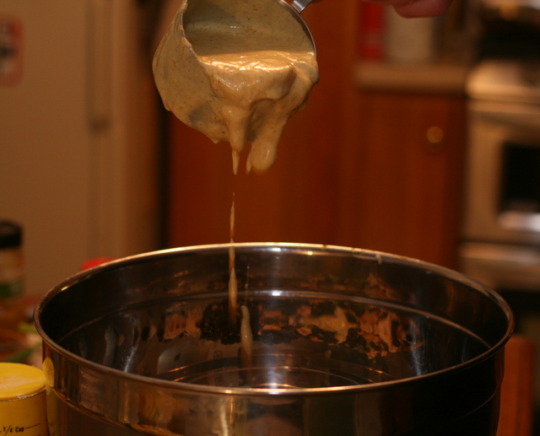
Please ignore the egg in this photograph. At some point after this picture was taken, Lori decided to use blue cheese dressing instead of egg to adhere the breadcrumbs to the chicken. As usual, the Rebel is making it up as she goes along, and she decided two different stages of chicken were unnecessary. It also confirms that, when it comes to buffalo chicken, the egg definitely does not come first.
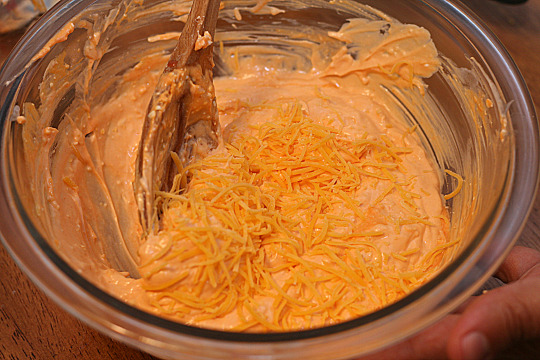
First, she blended hot sauce, blue cheese dressing, and cream cheese in a bowl using a hand mixer.


Once it was all evenly blended, she mixed in shredded cheese with a spoon.
Then the bowl (with all its contents, naturally - you wouldn’t go through all this trouble and then dump it out, would you?) went into the refrigerator for approximately an hour - the texture should be slightly firm.
While the bowl (yes, and its contents - didn’t we already talk about this?) were chilling in the fridge (book and alcoholic beverage optional, as discussed in previous blog entries), Lori preheated the oven to 450.
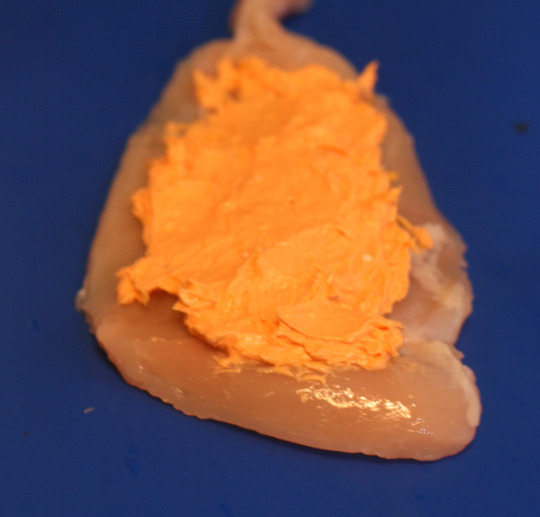
After an hour, she flattened chicken breasts and spread one teaspoon of the buffalo mix on top.
Then Lori rolled the chicken around the buffalo dip and secured the roll with toothpicks. Don’t poke yourself! Toothpick injuries can be serious.


Once the chicken was all neatly rolled up, she filled a bowl with blue cheese dressing and put panko breadcrumbs on a plate. (If you want to use Lori’s original idea, you can use an egg instead of blue cheese in the bowl. Just substitute “egg” for “blue cheese” in the next couple steps.)

She coated the rolled up chicken with blue cheese and then rolled it in breadcrumbs until it was fully coated.

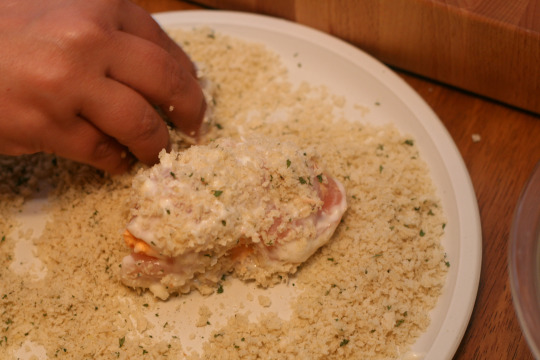
When coating the chicken with blue cheese and breadcrumbs, it is helpful to use the “wet hand dry hand” technique. To do this, the “wet” hand puts the chicken in the blue cheese dressing, then the “dry” hand transfers the chicken to the bread crumbs. This will ensure only one hand (the “dry” hand) gets coated with breadcrumbs and allows greater dexterity with the wet hand.
Once the chicken is fully coated, Lori placed it in a rectangular pyrex baking dish with the overlapping ends of the chicken facing up.
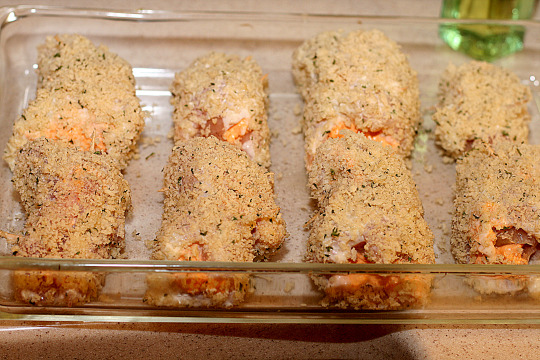
Then she baked the chicken in the over for 25 to 30 minutes. Do not - I repeat, do not - forget to take out the toothpicks before eating. If I didn't tell you that and you hurt yourself, I’d definitely be demoted to the Grill Corporal, and that wouldn’t be nearly as fun a title. So toothpicks out!

So there you have it! Fancy dishes which are (Shhhhhh! Don’t tell!) actually really easy to make.

When you’re digging in, don’t forget to eat with one pinky raised. That will drive home how fancy this food is. We were going to take a picture of a raised pinky, but we couldn’t stop eating to do so. Enjoy!

RECIPES:
Mark:
“Ratatouille”
Ingredients:
10 Roma tomatoes
Ice water for ice bath, as needed
2 zucchini
2 yellow zucchini
2 Japanese eggplant
2 small sweet onions
0.5 head of garlic
1 large red bell pepper
1 teaspoon olive oil
Salt
Black pepper
3 sprigs rosemary, plus more for garnish
2 sprigs thyme
Recipe:
Prep:
Preheat oven to 300 degree F
Bring a pot of water to a vigorous boil and prepare a large pot of ice water
Score the bottom of each tomato with an X – you’re aiming to pierce just the skin, so don’t cut too deeply
Drop each tomato into the boiling water for about 45 seconds, then transfer immediately to the ice water to halt cooking
Note: Blanching time may vary a little depending on tomato size. Look for the skin to split along the length of the tomato, then remove from boiling water – this will make peeling easier
Remove the tomatoes from the ice bath, then peel and discard the skins.
Use a knife to slice tomatoes into evenly shaped pieces about 1/8 inch thick
Use a mandolin to slice the zucchini, yellow zucchini, and eggplant 1/8 inch thick pieces
Reserve scraps for the sauce
With a knife, finely chop onions and garlic
Seed and chop bell pepper
Sauce:
Add olive oil to a medium-sized pot and warm over medium heat
Sauté garlic until translucent
Add onions, bell peppers, and reserved tomato, zucchini, and eggplant scraps, and cook slowly while stirring
Reduce heat to medium-low and place lid atop pot to lightly steam the contents until soft
Remove lid and continue cooking until onions appear jammy (don’t let the bottoms brown)
Remove from heat
Ratatouille:
Pour sauce evenly into casserole pan and spread it around (don’t pour too thick, because if you use too much sauce, it will seep through and ruin the shingled top layer – imagine you are saucing a pizza, then stop when your pizza looks properly sauced)
Arrange your vegetable slices on edge in a pattern on top of the sauce
Sprinkle ratatouille generously with salt and season with more olive oil and fresh herbs if desired
Place lid on top of the casserole and cook in the oven for approximately 90 minutes
Lori:
“Cheesy buffalo stuffed chicken”
Ingredients:
0.25 cup hot sauce
0.25 cup blue cheese dressing (plus whatever is necessary to secure breadcrumbs)
1 8oz brick cream cheese
0.5 cup shredded mild cheddar cheese
Recipe:
Blend hot sauce, blue cheese dressing, and cream cheese in a bowl using a hand mixer
Mix in shredded cheese with a spoon
Chill bowl and contents in the refrigerator for approximately an hour
Preheat oven to 450
Flatten chicken breasts and spread one teaspoon of the buffalo mix on top
Roll the chicken up and secure with toothpicks
Fill bowl with blue cheese dressing and put panko breadcrumbs on a plate
Coat rolled up chicken with blue cheese and then roll in breadcrumbs until fully coated
Place chicken in rectangular pyrex baking dish with overlapping ends of the chicken up
Cook 25-30 minutes
#miseenplaceandtherebel#food foodblog ratatouille buffalochicken stuffedchicken master rebel grillsergeant masterofmiseenplace fancyfood easyfood
0 notes
Text
Healthy Food
Day 13 - 1/14/17
Every January 1, many people make new years resolutions. People resolve to curse less, have better relationships with their significant others’ families, or work out more and eat better. By a month or two into the year, a lot of people are back to cursing a blue streak, fighting with their in-laws, and eating bonbons on the couch while the gyms turn back to ghost towns.
The Master and Rebel understand that, and while they can’t amend your language (seriously, do you kiss your mother with that mouth?) or make in-laws less horrible - or even get you to walk a mile or two - they can provide healthy and delicious recipes to keep your healthy eating on track.
Mark went first with Smoked Paprika Roasted Salmon with Wilted Spinach, which he took from a McCormick’s Smoke Paprika advertisement. (Pro tip: there are recipes and food inspirations everywhere!)
First, naturally, came ingredients.
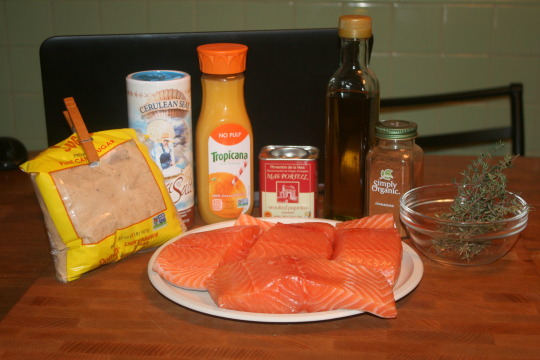
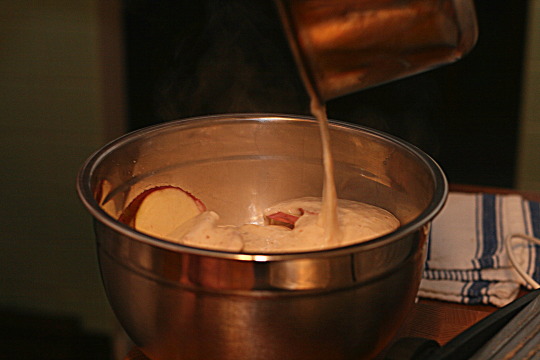
He mixed the orange juice, two tablespoons of olive oil, and one teaspoon of thyme in a measuring cup (though most people would simply use a small bowl). This created a marinade.

Then he placed the salmon filets in a glass dish.

He added the marinade, turning the filets to ensure they were coated on both sides. This is very important, otherwise the fish can be marinated inconsistently, which just won't taste as good.

Once the salmon was coated and resting in the marinade, he covered the dish with saran wrap and refrigerated for 30 minutes.
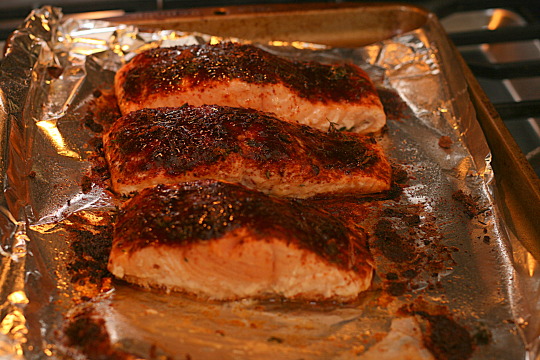
While it was in the fridge, he mixed brown sugar, smoked paprika, cinnamon, orange peel, the remaining one teaspoon of thyme, and sea salt in a bowl. (An actual bowl this time, not a measuring cup.)

After 30 minutes passed, he removed the salmon from the marinade (and from the fridge, too, of course, for those of you who might be inclined to try that while it was still being refrigerated). He discarded the remaining marinade and placed the salmon on a greased foil-lined baking pan. Then he rubbed the top of the salmon evenly with the smoked paprika mixture.

Then he roasted the salmon in a 400 degree oven for 10-15 minutes (or until the fish flakes easily with a fork).
While the salmon is roasting, you can heat the last remaining teaspoon of olive oil in a large skillet on medium heat then add the spinach and cook for two minutes (or until wilted). This will give you the wilted spinach to go with your salmon. Mark decided against the spinach because of Lori’s healthy dish.
What was that healthy dish Lori made, you may ask? (Or you may not ask, because you already assume I’m going to tell you - otherwise, what the heck are we doing here?) She made cauliflower fried rice. That’s just like regular fried rice, only without the rice. And with cauliflower. I think you get the picture. And, if you don’t, here’s one of ingredients:

First, Lori whisked together the liquid aminos (which is a healthier soy sauce), water, and honey to make a teriyaki mixture.

Then she pulverized the cauliflower in a food processor.

It’s easier to do one small piece of cauliflower at a time rather than try to do all of it at once, which can bind up the processor.

Then, in a pan, she scrambled egg whites and set aside.

She sliced the onion and minced the garlic.

Then she put oil in a wok and added the onion, garlic, and frozen vegetables and simmered them down.


It should be noted that garlic and onion in midair do not look nearly as dramatic as salt in midair. (If you don’t get the reference, scroll down to Day 3 - Soups to see Mark show off with salt granules.) Once they were simmering nicely, she added the cauliflower and eggs and cooked the mixture for three minutes.

She added the teriyaki sauce mixture and cooked until the vegetables were tender, then added salt and pepper to taste.
Voila! (That’s French, which doesn’t pair very well with fried “rice,” but we’re multi-cultural here.) Salmon and cauliflower fried rice!

Remember, just because something is healthy (talking food here, not profane venting or releasing your feelings about extended family) doesn’t mean it can’t be wonderful as well. And since it’s healthy, you don’t have to feel guilty about cleaning your plate. We certainly didn't.

RECIPES
Mark - Smoked Paprika Roasted Salmon with Wilted Spinach
McCormick’s Smoked Paprika advertisement
Ingredients:
0/25 cup orange juice
2 tablespoons plus 1 teaspoon olive oil, divided
2 teaspoons thyme leaves, divided
2 pounds salmon filets
1 tablespoon brown sugar
1 tablespoon smoked paprika
1 teaspoon cinnamon
1 teaspoon grated orange peel
0.5 teaspoon Sicilian sea salt
1 bag (10 ounces) fresh spinach leaves
Recipe:
Mix orange juice, 2 tablespoons olive oil, and 1 teaspoon thyme in small bowl
Place salmon in glass dish
Add marinade and turn the filets to coat
Cover and refrigerate 30 minutes (or longer for extra flavor)
Preheat oven to 400
Mix brown sugar, smoked paprika, cinnamon, orange peel, remaining 1 teaspoon thyme and sea salt in a small bowl
Remove salmon from marinade
Discard remaining marinade
Place salmon in greased foil-lined baking pan
Rub top of salmon evenly with smoked paprika mixture
Roast 10 – 15 minutes or until fish flakes easily with a fork
Meanwhile, heat remaining 1 teaspoon olive oil in large skillet on medium heat
Add spinach and cook 2 minutes or until wilted
Serve salmon over spinach
Lori - Cauliflower Fried Rice
Ingredients:
0.5 cup liquid aminos (soy sauce substitute)
2 tablespoons (4 dollops) of honey
0.25 cup water
1 head of cauliflower
1 medium onion
2 cloves of garlic
4 egg whites
1 bag frozen Asian stir fry vegetables
1 bag frozen peas
1 dollop sesame oil
Recipe:
Whisk together the liquid aminos, water, and honey to make teriyaki mixture
Pulverize the cauliflower in a food processor
In a pan, scramble egg whites and set aside
Slice onions
Mince garlic
Put oil in wok
Put in onion, garlic, and frozen vegetables in wok and simmer down
Add cauliflower and eggs
Cook for three minutes
Add teriyaki sauce mixture
Cook until vegetables are tender
Add salt and pepper to taste
#food foodporn salmon friedrice paprika cauliflower miseenplace rebel masterofmisen#masterofmiseenplace grillsergeant miseenplaceandtherebel cauliflowerfriedrice
0 notes
Text
Christmas Cookies
Day 12 - 12/17/16
Christmas comes but once a year (which is a bit of a saccharine animated short video but also a factually true statement). (If you’re not inclined to celebrate Christmas, whether for religious or other reasons, it doesn’t come at all for you, but you’re still welcome to try to make the subject of this blog anyway; the results won’t be any less delicious.) When Christmas does come, it means family (which makes some people more happy than others), presents (which make people happy unless they believe Lexus and Mercedes and are subsequently disappointed not to get a new car with a giant bow on top), and cookies (which make everyone happy). Because they like making people happy, the Master and the Rebel picked this time of year to share their favorite cookie recipes.
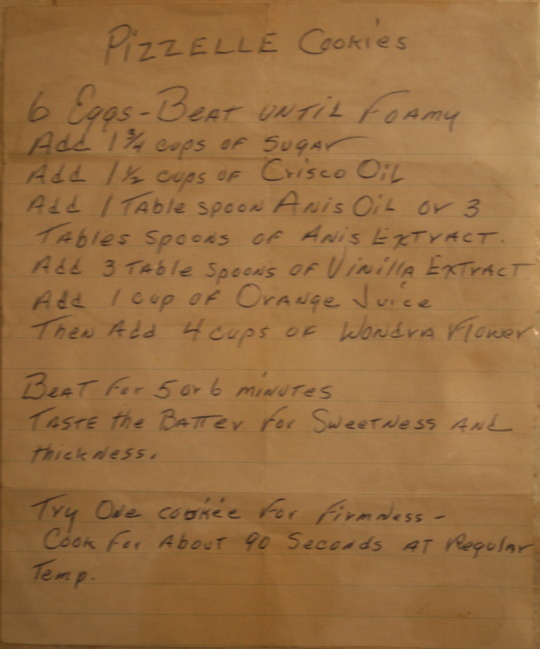
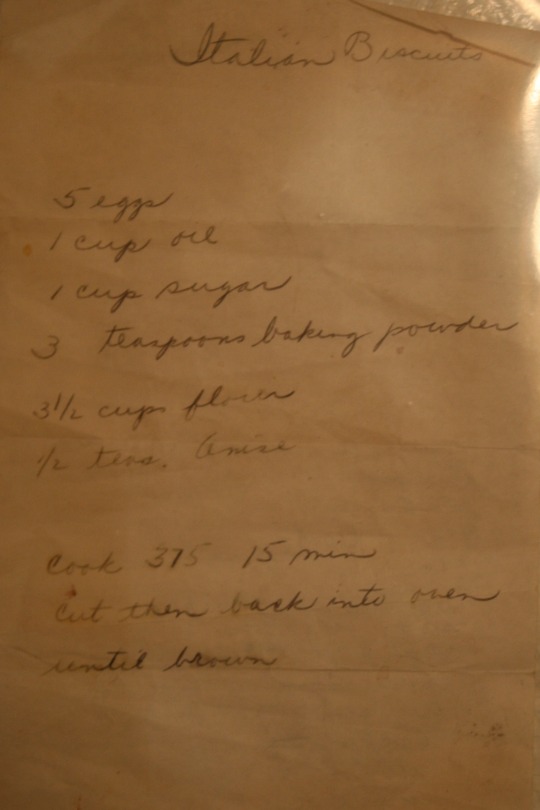
Lori made Pizzelles and Italian Biscuits, often known as Biscotti. The Pizzelle recipe came from her PopPop:
and the Biscotti recipe came from her MomMom:
(Don’t worry: I’ll write out the recipes at the bottom of this entry as usual, so you don’t have to strain to read handwriting.)
We have to start with ingredients, as usual.

For the Pizzelles, she beat 6 eggs until they were foamy.

Then she added sugar, oil, anise extract, vanilla extract, orange juice, and flour, then she beat the mixture for five to six minutes.

Once it was blended together, she tasted to make sure she was happy with the degree of sweetness. Then she put a dollop (Google defines “dollop” as “a shapeless mass or blob of something, especially soft food,” which sounds completely unappetizing, so don’t Google “dollop”) of batter in the center of each side of her Pizzelle press.
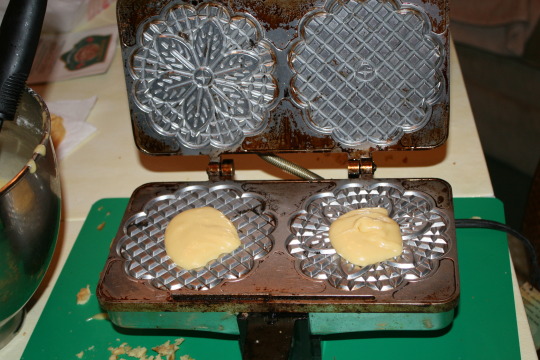
She closed the press firmly. Lori’s recipe (excuse me - *PopPop’s* recipe) calls for 90 seconds in the press, but we found that a full two minutes gets the best results. You’ll have to experiment, since every press is probably different, but if you don’t have it closed long enough they’ll be undercooked, soft, and cakey. If you have it closed for too long they’ll be burned (duh).
The Rebel’s, of course, were neither cakey nor burned.

Next came the Biscotti. Lori mixed sugar, melted butter, almond extract, eggs, vanilla extract, flour, baking powder, salt, and chocolate chips.
Then she shaped the dough into to loaves, each one 16 inches by 12, and put them on a baking sheet with a silicone sheet (though you can also use parchment paper). She put them into an oven set for 350 degrees.
She baked them for 25 minutes (or until firm), then removed them from the oven and let them cool for 15 minutes. Then she cut them into slices 0.75 inches wide.

Then she put the slices back into the oven for 10 minutes on each side before cooling them on a rack. (Cooling on a rack is a lot more delicious now than it was during the Spanish Inquisition, I’d figure.)

Mark also made two types of cookies. First came his New Orleans Christmas cookies. His mother used to make them when he was a little boy...until she stopped. He thought it was because no one liked them, but apparently she just got tired of making them. So the Master brought them out of retirement, and everyone loves them.
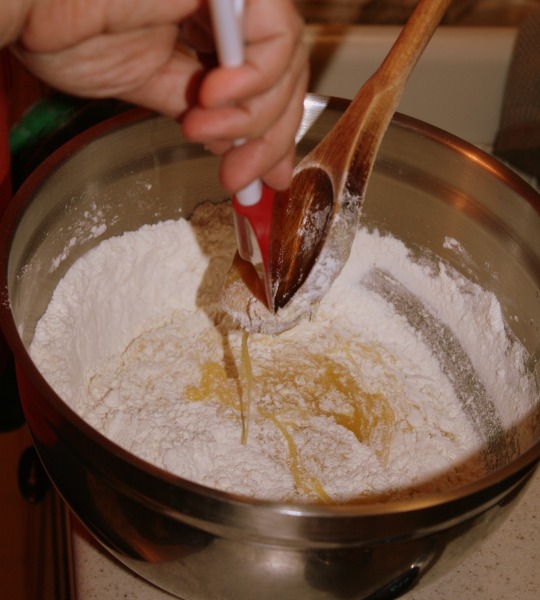
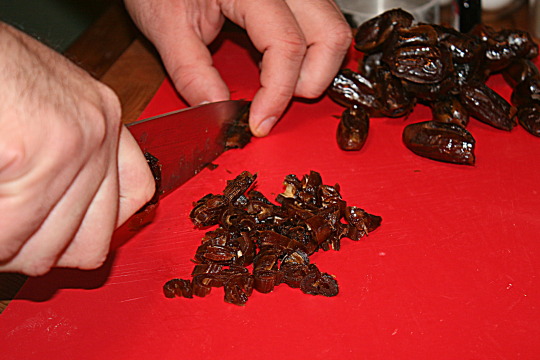
He chopped up one pound candied cherries (his preference is half a pound of red ones and half a pound of green ones), two pounds of pitted dates, and one pound of pecans. Knife skills are important!
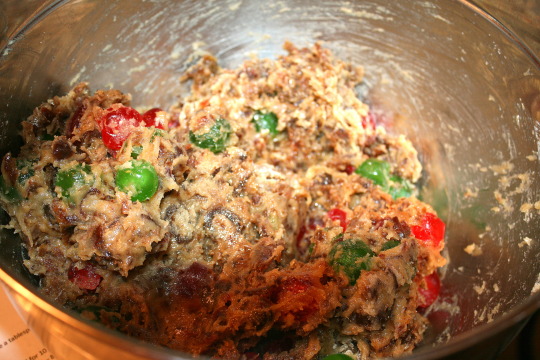
The he mixed the chopped fruit and nuts in with flour, baking salt, cinnamon, butter, sugar, and eggs.
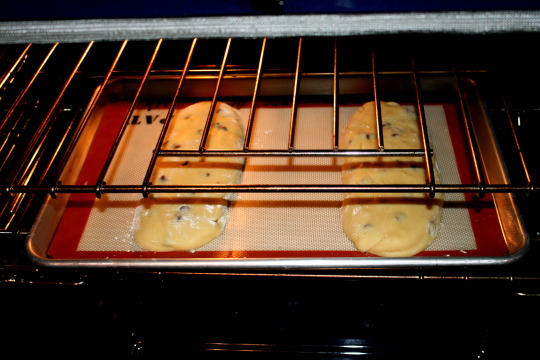
He put a tablespoonful of the dough onto an ungreased cookie sheet with parchment paper and baked for 10 minutes at 375 degrees.

The cookies will have have a light color as they come out of the oven. They will darken as they cool.
Mark also made Maid of Honor cookies. This is an old recipe traced back to British royalty. This makes sense for two reasons. The first is that Mark is an unapologetic monarchist (which is strange, since the only King in the US is Elvis, which is not Mark’s musical taste). The second is because Mark’s cousin the king of Norway, and you know that the nobility always sticks together.
In a mixing bowl, Mark stirred together flour and salt, then added six tablespoons of butter cut down to the size of small peas before adding three to four tablespoons of cold water, one spoon at a time.
Then he tossed the mixture gently with a fork. (To clarify, that means he turned it over and over in the bowl, not that he threw the whole bowl across the room our out of the window).

Then he formed the dough into a ball, which he wrapped in saran wrap and chilled for one hour. Then, on a floured surface, he rolled the flour to 1/8 inch thickness.
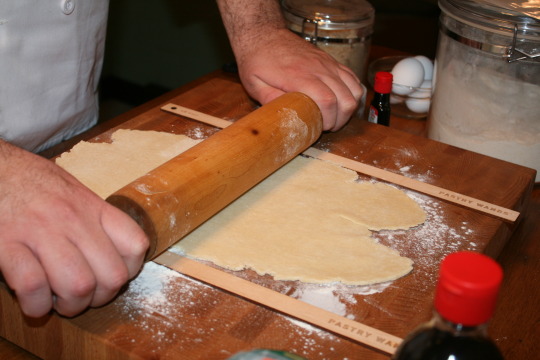
Observe that he used “pastry wands,” which ensures that the dough is the proper thickness. Expect nothing but precision from the Master!
Then, using a 2.75 inch cookie cutter, he cut 18 circles from the dough.
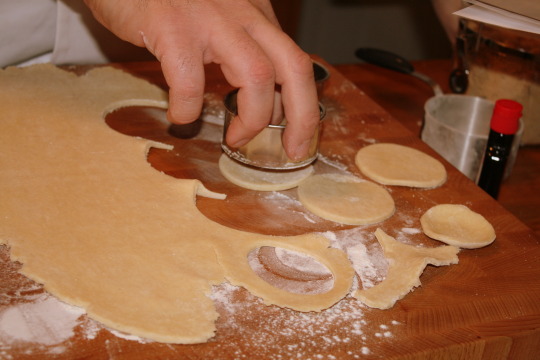
He fit the circles into a tray of 1.75 inch muffin cups greased with cooking spray, then he placed 0.25 teaspoons of jam into each cup.

In a separate bowl, he beat together sugar, three tablespoons of butter, and an egg. Then he stirred in almonds and almond extract.

He spooned lightly rounded tablespoons of that mixture on top of the jam in each pastry shell, then he baked them in an oven at 375 degrees for 25 to 28 minutes. He removed them from the pan and cooled them on a rack.

Once the cookies were all finished, we set them out for Santa. What? You thought we were going to each them all ourselves? For shame! They’re for Santa!

And Santa sure seemed to enjoy them!

RECIPES:
Lori:
Pizzelle Cookies:
Ingredients:
6 eggs
1.75 cups of sugar
1.5 cups of vegetable oil
3 tablespoons of anise extract
3 tablespoons of vanilla extract
1 cup of orange juice
4 cups of flour
Recipe:
Beat the eggs until foamy
Add sugar
Add oil
Add anise extract
Add vanilla extract
Add orange juice
Add flour
Beat for five or six minutes, then taste for sweetness and thickness
Cook in pizzelle maker for approximately 90-120 seconds
Italian Biscuits (Biscotti):
Ingredients:
1 cup of sugar
0.5 cup of butter, melted
2 teaspoons of pure almond extract
3 large eggs
1 teaspoon of pure vanilla extract
2.75 cups of flour
1.5 teaspoons of baking powder
0.25 teaspoon of salt
1 cup of chocolate chips
Recipe:
Stir together all of the ingredients, making sure the dough is thoroughly combined
Preheat the oven to 350 degrees
Line a baking sheet with parchment paper and set aside
Divide your dough into two equal pieces (it’s going to be sticky, so run your hands under cool water to moisten them)
Shape each dough half into a loaf that is 16 by 12 inches
Place on your prepared baking sheet and bake for 25 minutes or until firm
Cool for 15 minutes then slice into 0.75 inch pieces
Place the slices back onto the cookie sheet on their sides and cook for 10 more minutes on each side
Mark:
Graham Crackers:
Ingredients:
0.75 cup of all-purpose flour
0.75 cup of graham or whole-wheat flour
0.5 teaspoon of ground cinnamon
0.5 teaspoon of baking soda
0.25 teaspoon of baking powder
0.25 teaspoon of coarse salt
6 tablespoons of unsalted butter, softened
0.33 cup of packed light brown sugar
1 tablespoon of honey
1 large egg
Recipe:
In a medium bowl, whisk together flour, cinnamon, baking soda, baking powder, and salt.
Using an electric mixer, cream butter, brown sugar, and honey until fluffy (2-3 minutes)
Scrape down the sides of the bowl
With mixer on low speed, add egg and mix until combined
Add flour mixture and mix until combined
Turn out dough onto a lightly floured surface
Roll between two sheets of parchment to a 1/8 to ¼ inch thickness
Remove top piece of parchment paper and place dough on a baking sheet
Refrigerate until firm (about 30 minutes)
Using a fluted pastry wheel, cut dough into two 0.25 inch squares and prick dough with a fork to create dotted lines
Transfer to two parchment-lined baking sheets and freeze until firm (about 30 minutes)
Preheat oven to 350 degrees with racks in upper and lower thirds
Bake graham crackers until golden brown, rotating sheets from top to bottom and front to back halfway through (12 to 14 minutes)
Transfer crackers to a wire rack to cool completely
Note: Crackers can be stored in an airtight container at room temperature for up to one week
Almond Cookies:
Ingredients:
0.5 cups of butter, softened
1 large egg
0.5 cup of granulated sugar
1 tablespoon of milk
0.5 teaspoon of almond extract
0.75 cup of all-purpose flour
0.75 cup of whole wheat flour
0.25 teaspoon of salt
0.25 teaspoon of baking soda
0.5 cup of slivered almonds
Recipe:
Preheat oven to 350 degrees
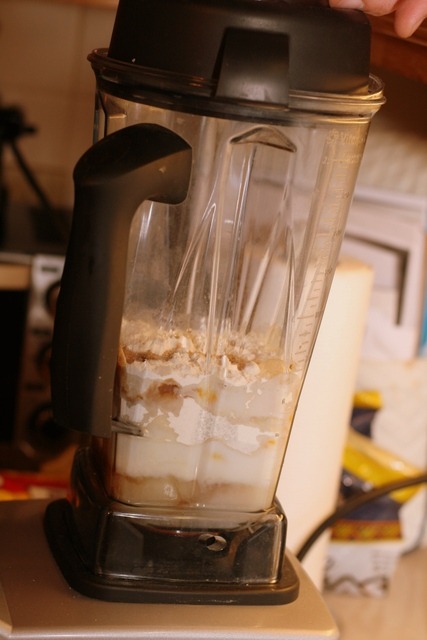
Place butter, egg, sugar, milk and almond extract into the Vitamix container in the order listed and secure the lid
Select Variable 1
Turn machine on and slowly increase speed to Variable 4 or 5
Blend for 10-15 seconds or until ingredients are creamed, then remove the lid plug
Add flours, salt, baking soda, and almonds
Blend for 10-15 seconds or until well mixed, using the tamper to press the ingredients into the blades
Drop by teaspoons onto a cookie sheet
Bake 12-15 minutes or until golden brown
New Orleans Christmas Cookie
Ingredients:
2 ½ cups all-purpose flour, sifted
1 teaspoon baking soda
1 teaspoon salt
2 pounds pitted dates, chopped
1 pound candied cherries (½ pound red and ½ pound green)
1 pound pecans, chopped
1 teaspoon cinnamon
1 cup butter or margarine, melted
1 ½ cups sugar
2 eggs, lightly beaten
Recipe:
Mix all ingredients together in a bowl.
Place a tablespoonful of the dough onto an ungreased cookie sheet with parchment paper.
Bake 10 minutes at 375F.
Remove from the oven.
When they have cooled for 10 minutes, they will have a light color. They will darken as they cool.
The cookies can be frozen for 6 – 8 months, however they will stick together so put a layer of wax paper or parchment paper between layers of the cookies if you do freeze them.
Depending on the size you make them, this will make up to about 8 dozen or more cookies. The cookies will taste like traditional American oatmeal cookies, even though there is no oatmeal in them!
Maids of Honor
Ingredients:
2 cup of all-purpose flour
0.25 teaspoons of salt
9 tablespoons of butter (or margarine)
3-4 tablespoons of cold water
4.5 teaspoons of raspberry jam (or as much as needed)
0.5 cup of sugar
1 egg
0.67 cup of ground almonds (optional)
0.25 teaspoon of almond extract
Recipe:
In a mixing bowl, stir together flour and salt
Cut in 6 tablespoons of butter until pieces are the size of small peas
Sprinkle water, one tablespoon at a time, over mixture
Toss gently with a fork
Form dough into a ball
Wrap and chill one hour
On a floured surface, roll to 1/8 inch thickness
Using a 2.75 inch cookie cutter, cut 18 circles
Fit circles into 1.75 inch muffin cups
Place 0.25 teaspoon of jam in each cup
Beat together the sugar and 3 tablespoons butter
Beat in the egg
Stir in almonds and almond extract
Spoon lightly rounded tablespoons of the almond mixture on top of jam in each pastry shell
Bake in a 375 degree oven for 25-28 minutes
Remove from the pan
Cool on a wire rack
0 notes
Text
Thanksgiving
Day 11 - 10/22/16
People are thankful for all manner of things in life: family, friends, a roof over their heads or food in their bellies, or that the Dallas Cowboys didn’t win the Super Bowl again. (Or that they did - except they haven't. So maybe Dallas fans aren’t as thankful as the rest of us. I don’t know. I root against the Cowboys.) To formalize being thankful, every November we gather around the table with friends, family, and the Dallas Cowboys (on TV) and eat turkey and sides and dessert. Thanksgiving is a truly American holiday, unique to our country. The turkey is standard, of course, but everything else can vary from family to family or region to region. To help our American readers (and our non-American readers who might be interested), the Master and Rebel each have a favorite side to share.
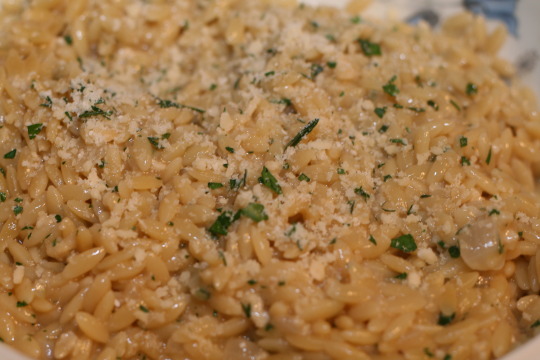
Lori went first with her take on Mark Bittman’s Orzo “Risotto,” or, as she likes to call it, “Orzotto.” First, she set up her ingredients.

She put two tablespoons of butter in a four quart saucepan (for those of you who are paying attention, yes, that’s one gallon) and turned the heat to medium.
Once the foam subsided, she added one small, minced onion and cooked, stirring well, until the onion was translucent.
In a separate pan, she heated three cups chicken stock. If you prefer, you can use beef or vegetable stock - contrary to popular belief, you cannot buy these on the stock market, but I’m sure your local supermarket has them.
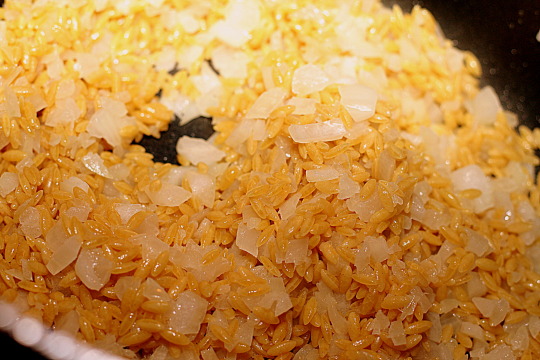
Then she added orzo to the onion.
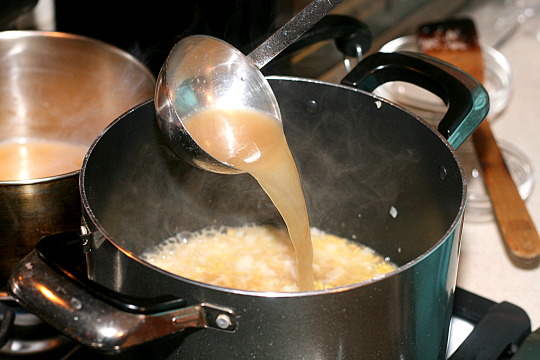
Immediately after, she added stock using a ladle (or, if you're Italian, what you might refer to as a “scoopine,” whatever that is...).
The she covered the pot and reduced heat to medium low. As the mixture cooked, she stirred every few minutes to prevent sticking.
After fifteen minutes, the liquid was absorbed and the pasta was tender. At this time, you can feel free to taste it and adjust seasoning. In the unlikely case that the pasta is underdone, add another half cup of stock and cook until it’s absorbed. Lori, being the Rebel that she is, did not adjust seasoning or add any more liquid.
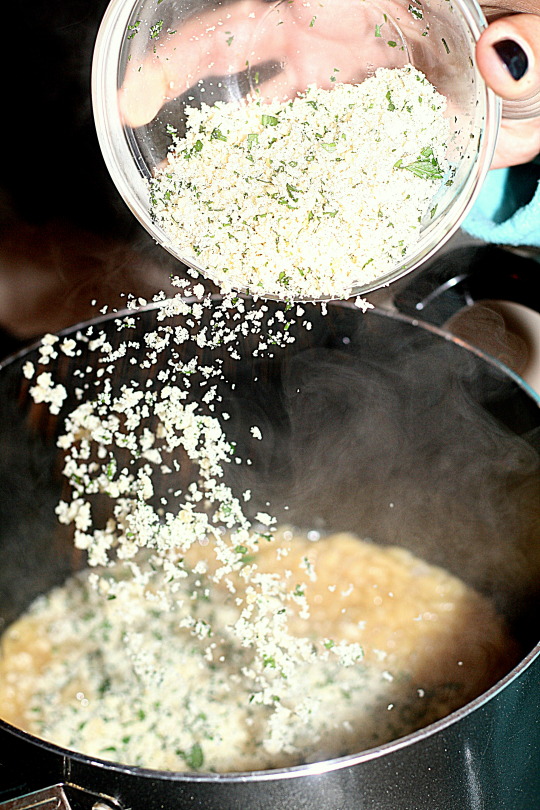
She mixed one cup grated Parmesan cheese and half a cup of minced fresh parsley, then added half of it to the pasta.
Then she garnished with the remaining cheese and parsley and served.
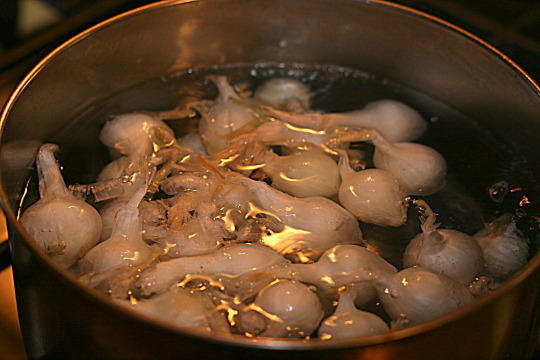
Mark made glazed carrots and shallots, from “French: Delicious Classic Cuisine Made Easy” by Carole Clements and Elizabeth Wolf-Cohen. It should be noted that the original recipe calls for one pound of turnips, but Mark has never added them. It should be further noted (are you taking notes?) that Mark uses pearl onions rather than shallots. Isn’t he acting far more like the Rebel, altering recipes all willy-nilly?
First, he set out his ingredients.

First things first: it’s important to peel the onions. Mark dropped them whole into boiling water for three minutes, then cooled them in cold water. He cut off the root ends and gently squeezed, and the onions slipped out whole.

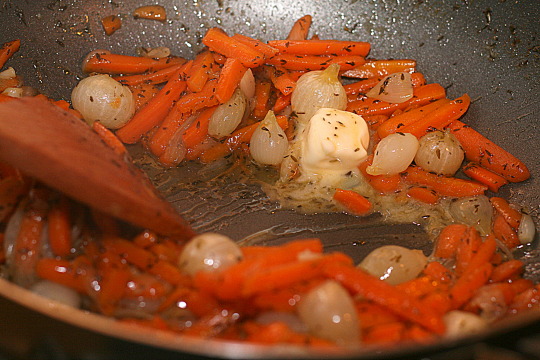
In a large, heavy frying pan, he melted two tablespoons of butter over a medium heat. He added one pound of baby carrots, well-scrubbed and sliced into sticks. If you prefer, you can use a pound of carrot medallions instead. He also added the onions, allowing the butter to coat them.

He added half a cup of chicken stock, though you can also use beef stock or water, then stirred in two tablespoons of sugar and three teaspoons of thyme - adjust those quantities to taste. The Master takes great pride in the fact that his stock is homemade.

He covered the pan and simmered it over medium heat for eight to ten minutes, until the vegetables soften. It’s important to shake the pan occasionally to prevent everything from sticking together (which, to paraphrase Ben Franklin, no doubt leads to them sticking separately). He checked the pan to see if he needed to add a little more liquid to ensure the vegetables softened up. Once they were tender, he uncovered the pan and increased the heat to evaporate any remaining liquid, stirring frequently. This also ensured all the vegetables were coated with the glaze. Then he added the remaining butter and stirred until it melted.

Since it’s Thanksgiving (well, not today it’s not, but the day you serve this will be (presumably)), serve with turkey. Well, serve with whatever you want, but we served with turkey.
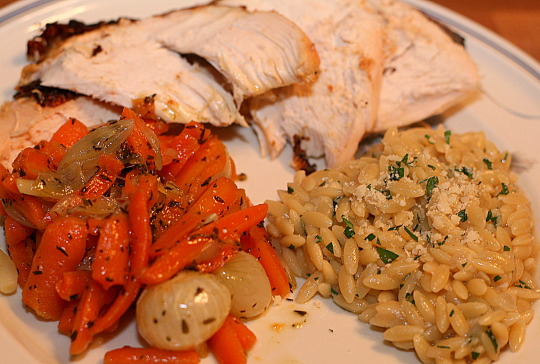
Mark, trained by professionals, wanted to point out that he is aware the picture above is upside down. (Virtually no one else would notice this, I wager.) However, since this picture is to highlight the side dishes rather than the protein, it is a conscious breaking of the plating rules rather than a simple error.
Happy Thanksgiving! Enjoy!

RECIPES
Lori – “Orzotto”
Mark Bittman: “How To Cook Everything” – Orzo “Risotto”
Ingredients:
2 tablespoons butter
1 small onion, minced
3 cups chicken stock (can also use beef or vegetable stock as well as wine or water) – 0.5 cups more if needed
1.5 cups orzo
Salt and pepper to taste
1 cup grated Parmesan cheese
0.5 cup minced fresh parsley leaves
Recipe:
Place the butter in a 4 quart saucepan and turn the heat to medium
When the foam subsides, add onion and cook, stirring until translucent
Heat stock in separate pan
Add orzo to onion and add stock at the same time
Cover and reduce heat to medium-low
Cook, stirring every few minutes – this prevents sticking
When liquid is absorbed and pasta is tender (15 minutes) taste and adjust seasoning
If pasta is underdone (unlikely), add 0.5 cups more liquid and cook until it’s absorbed
Stir in half the Parmesan and parsley and serve
Garnish with remaining parsley and remaining Parmesan to taste
Mark – Glazed Carrots and Shallots
Carole Clements and Elizabeth Wolf-Cohen: “French: Delicious Classic Cuisine Made Easy”
Note: the original recipe calls for 1 lb. turnips but Mark has never added them
Ingredients:
3 tablespoons butter
1 lb. baby carrots, well-scrubbed and sliced into sticks OR 1 lb. carrot medallions
0.5 lb. pearl onions, peeled (or 20 shallots, peeled)
0.5 cup chicken stock (can also use beef broth or water)
2 tablespoons sugar (adjust to taste)
3 teaspoons thyme (adjust to taste)
Note: Peeling Onions:
Drop whole in boiling water for 3 minutes
Cool in cold water
Cut root end and gently squeeze toward root end
Onion will slip out unblemished
Recipe:
In a large, heavy frying pan, melt 2 tablespoons butter over a medium heat
Add the carrots and onions and toss to coat
Add broth/water and stir in sugar and thyme
Bring vegetables to a boil over medium-high heat
Cover and simmer over medium heat for 8 to 10 minutes (until they soften), shaking pan occasionally to prevent vegetables from sticking
Check pan during cooking and add a little more liquid if needed
Uncover pan and increase heat to evaporate any remaining liquid, stirring frequently, until vegetables are lightly coated with glaze
Add remaining butter and stir until butter melts
#foodporn#food miseenplace rebel miseenplaceandtherebel grillsergeant thanksgiving thanksgivingdinner sides sidedishes
0 notes
Text
Stuffed Stuff
Day 10 - 10/9/16
When we were kids, we all had stuffed animals. When we were teenagers (or Rick Grimes from the Walking Dead) we referred to everything as “stuff.” And when we get a really good meal, we eat so much we are stuffed. Sometimes, though, the food itself is stuffed - hopefully with something delicious. The Master, the Rebel, and the Grill Sergeant combined to make a three course meal of stuffed food.
Mark, making an appetizer, went first with his Scotch Eggs. He learned how to make these eggs 25 years ago, back when he was the Apprentice of Mise En Place, presumably. Ingredients!

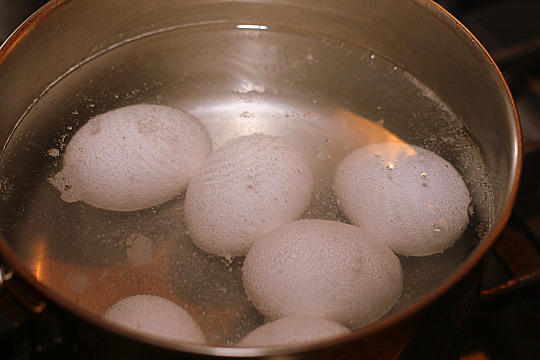
First, he pre-heated the oven to 400. Then he hard boiled six eggs. Hard boiling eggs seems simple, but a lot of people have trouble with it, so the Master has a foolproof method (I should be careful saying that, because every time people come up with something else foolproof, the world comes up with a better fool - just figure this is an improved method) for getting perfect eggs. He put the eggs in a pot and filled it with cold water. He added lots of salt and brought the water to a boil. The salt is supposed to make the egg shell easier to remove. As soon as it boiled, he put a lid on the pot and removed it from the heat, and let it sit for 10 minutes - he insists you must use a timer. After 10 minutes, he removed the eggs from the pot and put them in an ice bath. Once they were chilled, the shells flaked right off. That’s the second best hard boiled you’ll ever find - the best was with Chow Yun Fat (Google that, trust me).
Once the eggs were boiled and shelled, Mark shaped the sausage meat into patties. Six - one for each egg, naturally.

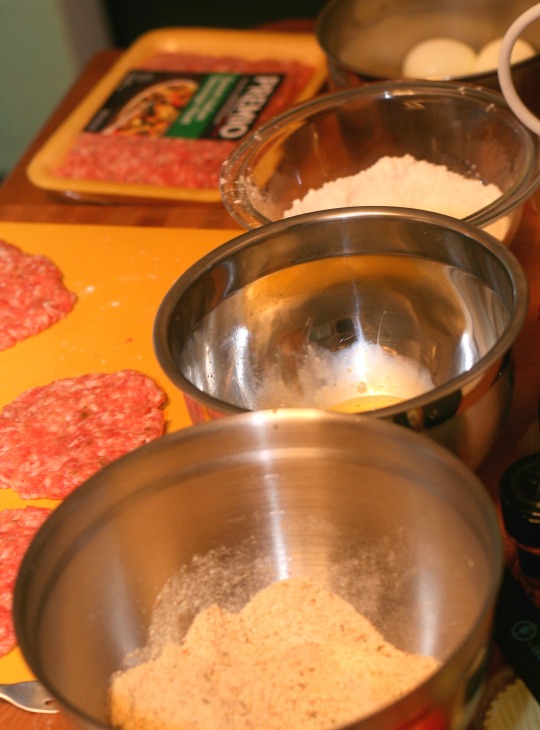
Then he set up bowls filled with flour, beaten egg, and breadcrumbs - the Master is always prepared!
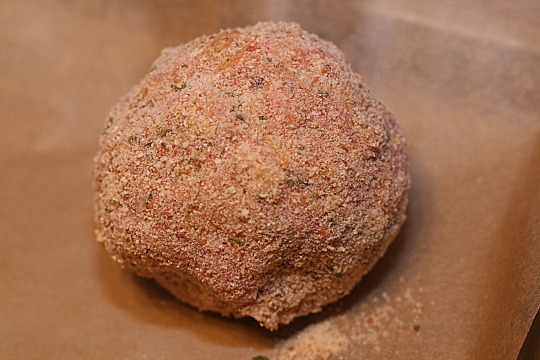
He coated the egg in flour, then wrapped the sausage patty around the egg.

Then he dipped the patty-wrapped egg in beaten egg and coated with breadcrumbs.
They they went on a cooking sheet lined with parchment and into the oven.

He baked them for 35 to 45 minutes, unit the sausage is cooked all the way through. Then he removed them to a cooling rack so they do not get soggy.

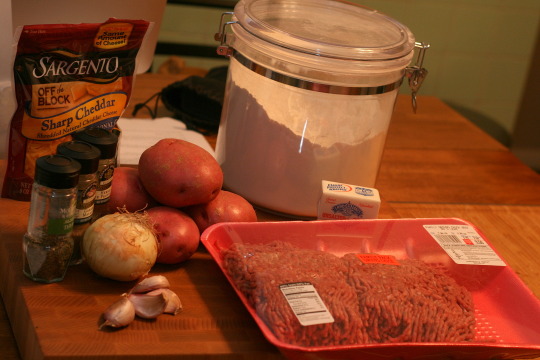
After the appetizers, naturally you need an entree. In keeping with the theme, stuffed burgers! They’re like regular burgers but better! And burgers are only up to snuff if they’re done on a grill, so I get my first chance to step into the line of (propane) fire. Grill Sergeant reporting for duty! With ingredients, of course:

First, the bacon: cooked to the desired level of doneness and then chopped into bits.

Then the diced onions sautéed on the cooktop and the cheddar cheese grated.

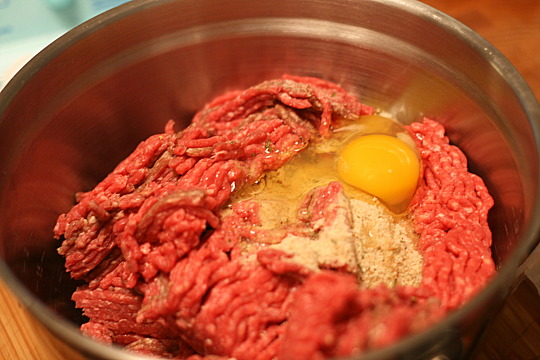
In a large bowl, I mixed the beef, breadcrumbs, eggs, and seasoning with my hands.

The Master felt the need to ensure that all was progressing according to his standards.

I used a StufZ burger press to ensure equal sized burgers, though that’s not technically required. I filled the bottom of the press with the beef mixture, also lining the sides to create a cup shape. Then I filled the cup with sautéed onions, bacon, and grated cheese. Feel free to use whatever other ingredients you prefer. Peppers, mushrooms, other types of cheese, or anything else your heart (and stomach!) desires.
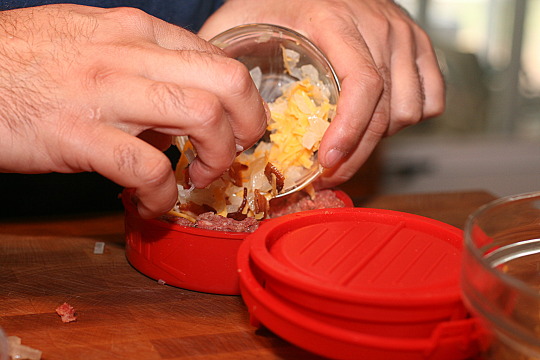
Then I covered cup with more beef and pressed it in the StufZ press. The burgers come out pretty thick.
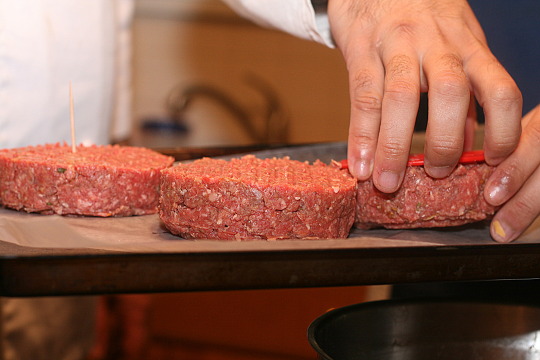
Mark had some concerns about my grilling skills, clearly. Unnecessary concerns, of course! I’m the Grill Sergeant!
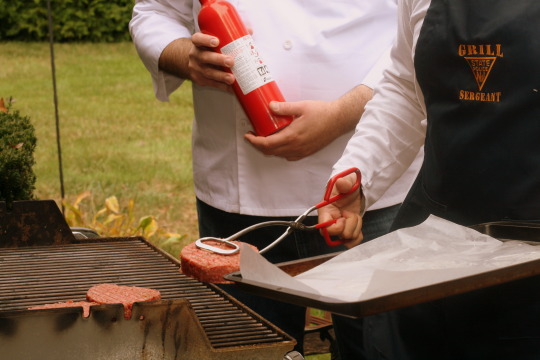
Because they are so thick, I grilled the burgers for 10 minutes on one side and four minutes on the other.


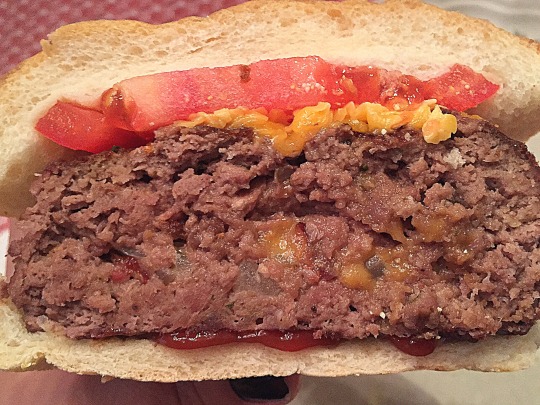
Feel free to adjust the cooking time for preferred results. These burgers ended up medium. I plated them on a Kaiser roll with a slice of tomato and some cheddar, though you can serve them however you prefer your burgers.
Dessert fell to the Rebel, who made a self-created recipe for pancake cupcakes. She set out her ingredients:
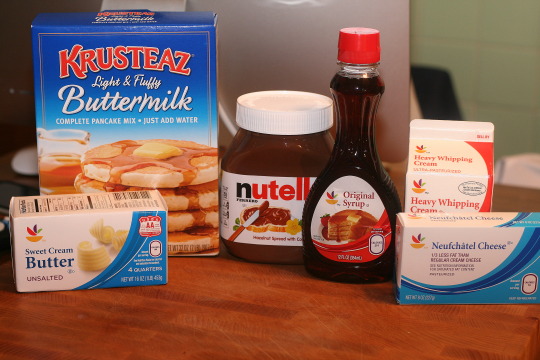
She made the stuffing first. She mixed cream cheese and syrup together and blended well.

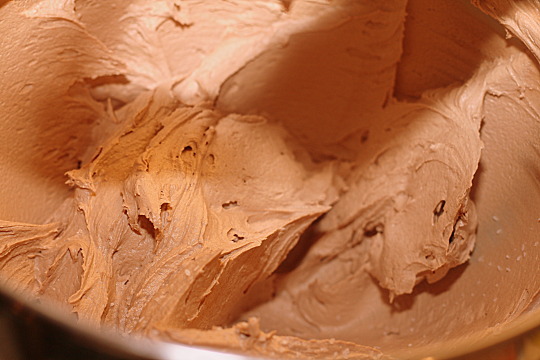
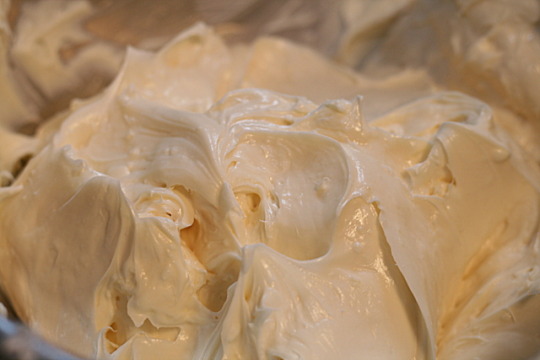
Then she made the frosting. She beat butter and powdered sugar on low until well-blended. Then she added Nutella and increased the speed to medium to beat for two minutes. Next she added vanilla extract and salt, beating for another 30 seconds. Finally, in went the whipping cream for another minute of beating, until the frosting lightens in both color and texture. Sorry we don’t have more than one picture; we were all distracted by the Nutella (and who can blame us?). But doesn’t it look amazing when it’s done?
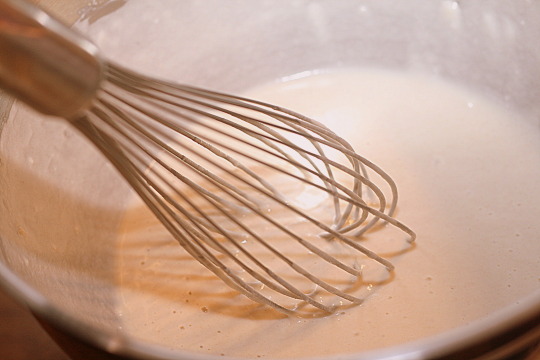
Finally, it was time to make the cupcakes themselves. She preheated the oven to 350. Then she added water to the pancake mix and whisked until smooth.
Then she placed cupcake baking cups in a cupcake tin and filled with the batter.

She baked in the oven for 15 to 20 minutes, until a toothpick came out clean.

She cut out a small hole in the top of the cupcakes and filled it with the cream cheese and syrup filling before covering the hole with a piece of the removed cupcake.

The she topped it with the frosting and some of my leftover pieces of bacon. A full breakfast on a plate - except it’s dessert!

So there you go: three different stuffed foods stuffed into one meal to leave you stuffed.

RECIPES:
Mark - Scotch Eggs
Ingredients:
1 lb pork sausages removed from casing (sweet Italian sausage - does not need to be seasoned)
6 hard boiled eggs
Flour
Italian breadcrumbs (pre-seasoned or do your own)
1 beaten egg
Recipe:
Heat oven to 400
Shape sausage into patties
Coat eggs with flour
Wrap sausage patty around the egg
Dip the patty-wrapped egg in beaten egg then coat with breadcrumbs
Place on cooking sheet lined with parchment
Bake 35-45 minutes or until sausage thoroughly cooked through
Remove to cooling rack so they do not get soggy
Note: Hardboiled eggs:
Put eggs in pot
Fill with cold water
Add lots of salt to water
Bring it to a boil
As soon as it boils, put a lid on, remove from heat, let sit for 10 minutes (use a timer)
After 10 minutes, remove from pot and place into ice bath
Oliver - Stuffed Hamburgers
3 lbs ground beef (85% lean, 15% fat)
3 strips bacon
1 tomato
1 cup breadcrumbs
0.5 large white onion (diced)
0.67 cup grated cheese (sharp cheddar)
2 eggs
2 tablespoons McCormick’s Steakhouse Onion Burger with Garlic seasoning
Kaiser rolls
Recipe:
Cook the bacon in the oven to your desired degree of doneness then chop
Sauté the diced onions on the cooktop
In a large bowl, mix the beef, breadcrumbs, eggs, and seasoning with your hands
Using a StufZ burger press, fill the bottom of the press with the beef mixture, making sure to also line the sides of the press and creating a cup shape
Fill with onions, bacon, and cheese - you can stuff with any other ingredients in addition or instead
Cover with more beef
Press in the StufZ press
Burgers will be very thick; grill on medium flame for 10 minutes on one side, then flip and grill for four minutes on the other side. Adjust cooking time for preferred degree of doneness
Plate on Kaiser roll, garnish with slice of tomato (or any other preferred garnish)
Lori - Pancake Cupcakes
Ingredients:
Cupcakes:
3.5 cups pancake mix
2 cups water
2 teaspoons of vanilla extract
1 strip bacon
Stuffing
0.5 cups maple syrup
8 oz. cream cheese
Frosting (Kitchen Treaty - www.kitchentreaty.com - Fluffy Nutella Buttercream Frosting):
0.66 Nutella
1 cup (2 sticks) unsalted butter
2 cups powdered sugar
1 teaspoon vanilla extract
Kosher salt (up to 0.25 teaspoon, to taste)
2 tablespoons heavy whipping cream
Recipe:
Stuffing:
Mix cream cheese and syrup together
Blend well
Frosting:
Beat butter and powdered sugar on low until well-blended
Add Nutella and increase speed to medium and beat for two minutes
Add vanilla extract and salt and whip for an additional 30 seconds
Add whipping cream and beat for one minute, until the frosting lightens slightly in both color and texture
Cupcakes:
Preheat oven (not a convection oven) to 350
Add water to pancake mix
Whisk until smooth
Place cupcake baking cups in cupcake tin
Fill with cupcake batter
Bake in oven for 15-20 minutes
Cut hole in top of cupcake and fill with stuffing
Top with frosting and bacon
0 notes
Text
Easy Recipes
Day 9 - 7/28/16
We are all busy. Work. Family. Friends. Hobbies. Not everyone always feels like there is enough time to cook. So the Master and Rebel decided to show two recipes that are delicious and easy to make. (I’m assuming that cooking is not your profession and not your only hobby. If you’re a professional chef, please disregard - and also hire the Master and Rebel to cook at your restaurant!)
Mark went first with Norwegian moussaka, a recipe from his dear friend Petter Naess. Moussaka is a potato-based dish (sometimes eggplant-based, if you like that sort of thing; even my father, who eats *everything,* hates eggplant - both the Master and the Rebel like eggplant, though, so what do I know?) which often includes ground meat. It is popular in the regions that used to make up the Ottoman Empire (Turkey, the Balkans, the Middle East, and North Africa). How Petter, Norwegian to the bone, has a moussaka recipe from Norway was never satisfactorily explained to me.
First: ingredients! (You knew that was coming.)
First thing you’ll need to make is a Bechamel sauce for cooking the moussaka. Bechemel, according to Wikipedia (which knows all and sees all), is a sauce made from white roux and milk which is now considered one of the mother sauces of French cuisine. What is a French sauce doing in a Norwegian recipe? Silence! Don’t question! (Mostly because I don’t have any idea of the answer and putting someone on the spot is rude.) This is a general recipe for the sauce; it works out to be more than you’ll need for the moussaka. Keep the rest for other dishes, such as lasagna, or drizzle it over cannelloni and manicotti.
Mark melted butter in a pan over medium low heat, then added flour and whisked. He let it cook for about one minute, which helps cook off the starchy taste. He slowly added the milk a little at a time, whisking after each addition.

After all the milk was added, he let it simmer for about 10 to 15 minutes. Voila! (I’m allowed to say that because this is a French sauce, even though the moussaka is Norwegian.) Bechamel sauce!
Once that was done, it was time to begin the moussaka. Mark preheated the oven to 450 degrees (225 degrees Celsius if you’re in Norway). Then he prepped a 9″x13″ (20x25cm if you are still in Norway) pan with oil, though you can also use butter.
He chopped onions and garlic to be added to the meat.

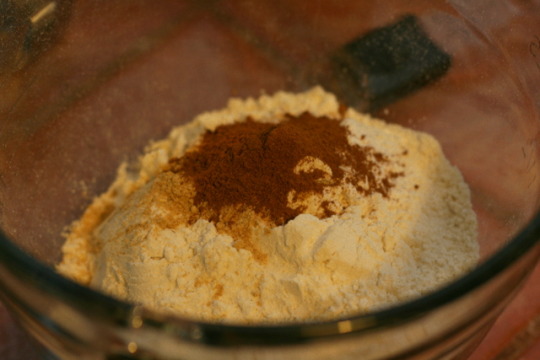
He put 1-2 pounds (400-800 grams - Norway!) in a pan, adding the minced garlic and chopped onions almost immediately, cooking at least five minutes after adding them so as to get full flavor. He also added spices as he stirred. He added salt, cinnamon, allspice, black pepper, cloves, and thyme, though you can add any spices you wish. Don’t be stingy with the amounts! Remember the immortal words of Shepherd Book: “A man can live on packaged food from here ‘til Judgement Day if he’s got enough rosemary.” (What? You haven’t watched the amazing TV show Firefly? That’s a character flaw. Don’t worry; it’s on Netflix. Go watch. Seriously. Right now. I’ll wait.) As is his habit, Mark dropped the salt in from a height so it photographed well.
He added 1.5 cups (3.5 decaliters - seriously? You’re still in Norway?) of water into the pan and stirred it into the meat mixture. This gave him a thick, flavorful meat sauce.
Next, he thinly sliced potatoes. He needed enough potato slices to completely cover the meat in the pan.

He put the potato slices in a bowl and added the Bechamel sauce.

Remember that pan Mark prepped all the way back right after he made the Bechamel sauce? He filled it with the spiced meat sauce, spreading it evenly in the pan.

Then he covered the layer of meat with the potatoes and Bechamel as the second layer.
On top of that he made a top layer of 2 cups (400 grams - seriously, I’m not saying Norway isn’t a lovely country, but maybe it’s time to come home) of shredded cheddar cheese.

Mark is extremely precise about the placement of his cheese; you can be just as obsessive if you like, or you can be a little more relaxed about it. (I blame Mark’s German heritage.)

Then he put the pan in the pre-heated oven for about 25 minutes. (Minutes are the same here and in Norway, so don’t look for any conversions.) The cheese melted into the lower layers, making everything gooey and delicious.

See? Gooey and delicious!

Lori went with one of her specialties: candied bacon. Who doesn’t love bacon? And candy? If you can get them both together, what’s better than that? What? You can also get other flavors mixed in? Sold!
Ingredients, naturally.

She preheated the oven to 350 degrees (that’s Fahrenheit - you don’t get Celsius because this isn’t Norwegian bacon). Then she filled the bottom third of a large ziploc bag with brown sugar. If you want an additional seasoning, just add it in. In addition to regular candied bacon with brown sugar, Lori also likes to make cocoa, coffee, and cayenne flavors. Just add the additional seasonings into the brown sugar. 3 teaspoons recommended for cocoa, 3 teaspoons recommended for coffee, and two teaspoons recommended for cayenne. Feel free to adjust for taste! You can use any sort of coffee you like, but Lori uses medium roast.
She put strips of bacon in the various bags and coated them in the contents by shaking the bags.

She lined up the strips of bacon on a cookie sheet covered in aluminum foil, putting additional sugar on top to cover any bare spots. Mark “helped” by pointing any and all gaps in sugar coverage, no matter how small.

She put the cookie sheet in the over until the bacon is crispy, not burned.
Once they were glistening, crispy, juicy, delicious, succulent, mouth watering, heavenly, amazing...(sorry - got a little carried away) she removed them from the oven and immediately put them on non-stick parchment paper to cool. Once they were cool, she transferred them to aluminum pans separated by flavors.

An easy meal and an easy snack. What could be better than that? They sure go down easy too.

RECIPES:
Mark:
Norwegian Moussaka (Petter Naess)
Ingredients:
1-2 lbs ground meat (ground beef, 80% lean)
1.25 cups water
4-5 potatoes, sliced thin
2 cups cheddar cheese, shredded
spices and herbs of your choice
1 yellow onion
Bechamel sauce
Preheat oven to 225*C (450*F)
Prepare a 20x25cm (9”x13”) casserole dish with oil or butter
Part 1 - The Meat:
400-800 grams (1-2 lbs) ground meat
Cook it in a frying pan, then add spices - salt, cinnamon, allspice, black pepper, clove, thyme, etc. Any spices you wish. Mix the spices evenly among the meat. Don’t be stingy with the amounts. Note: you can add minced garlic and chopped onions, too. If you do, add the garlic and onion early and let it cook at least five minutes.
Add 3.5 deciliters (about 1.5 cups) of water in the pan and stir the meat and spices and let it cook a few minutes. The result is a thick, flavorful meat sauce.
Part 2 - The Potatoes:
Thinly slice (0.25” thick) potatoes and mix in a Bechamel sauce. You will need enough sliced potatoes to completely cover the meat in the pan.
Part 3 - Assembling the Layers:
Butter or oil a 20 x 25 cm (9”x13”) casserole dish. Fill it with the spiced meat sauce. Spread it evenly in the pan. Top this with the potatoes coated with the Bechamel sauce as the second layer. Finally, add a top layer of 400 grams (2 cups) of shredded cheddar cheese.
Part 4 - The Cooking:
Place the pan in a pre-heated oven, about 225*C (450*F) and let it cook for about 25 minutes.
Bechamel Sauce
Note: This is a general recipe for Bechamel sauce. You won’t need all of this to coat the potatoes. You can save the rest to use in other dishes, such as lasagna or to drizzle over cannelloni and manicotti.
4 tablespoons unsalted butter
4 tablespoons all purpose flour
2 cups cold milk
salt
white pepper
Melt butter in a pan over medium low heat. Add the flour and whisk. Let cook for about 1 minute (to cook off the starchy taste). Slowly add the milk a little at a time and whisk after each addition. Once all the milk is added, simmer for about 10 to 15 minutes.
Lori:
Candied Bacon
Ingredients:
Bacon (Lori used 60 oz)
2 lbs dark brown sugar
Optional: cayenne powder, cocoa powder, ground coffee (whatever you have in the cabinet; Lori used medium roast)
Recipe:
Preheat oven to 350*F
Fill the botton third of large ziploc bag with brown sugar (and seasonings if desired: 3 teaspoons coffee, 2 teaspoons cayenne, 3 teaspoons of cocoa - adjust for desired taste)
Coat bacon strips in contents of the bag by shaking the bag
Line them up on cookie sheet covered in aluminum foil
Add extra brown sugar mix to cover any bare spots
Put in oven until crispy (but not burned)
Remove from oven and immediately remove bacon from foil and transfer to non-stick parchment paper
Let cool
0 notes
Text
Appetizers
Day 8 - 6/24/16
Appetizers! Perfect for making your meal fancy, filling up your guests if you didn’t make enough servings of the entree, or for replacing dinner if you’re not that hungry. (For the record, I’ve only ever heard of the third one; I’m *always* that hungry. Sometimes hungrier.)
In any event, appetizers are a versatile course, so the Master and the Rebel decided to work up a couple versions.
Lori went first with her Mac and Cheese bites, her version of an idea she found “somewhere on the internet.” Clearly she’s a rebel when it comes to citing her sources as well. Don’t tell Strunk and White!
First, she set out the ingredients.
She pre-heated the oven to 350*F. While that was pre-heating, she boiled the macaroni to al dente. No pictures of that, I’m afraid. I trust you to boil water and throw in the macaroni. Al dente, for the non-Italians in the audience (or Italians who don’t cook - I assume there are some in the world), means “firm to the touch” according to Wikipedia; the literal translation from the Italian means “to the tooth.” Yes, I referenced Wikipedia; don’t tell Strunk and White that, either! (If you don’t know Strunk and White, I would recommend Google; at some point you’ll need to know.)
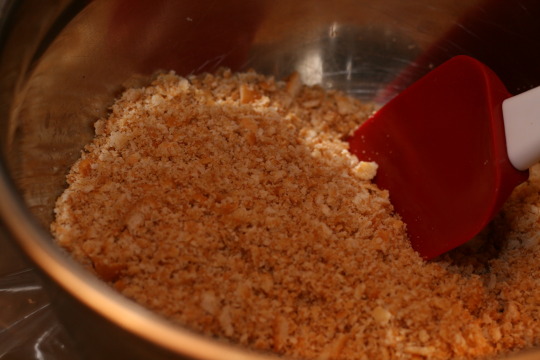
She put the crackers into a large ziplock bag and pulverized. Use a mallet, the bottom of a jar, or your fist if you’ve had a rough day and want to take out your frustrations. Lori, despite chronically stressful days at work, used the olive oil bottle.

Once the crackers are suitably pulverized, she poured the cracker dust into a bowl.
She added salt and olive oil to the dust and set aside.
She drained the al dente macaroni (is it firm to the touch? Good!) and returned it to the pot. She added the butter and eggs and mixed until melted and coated, then added the milk and all the cheese except for 0.5 cups of cheddar.
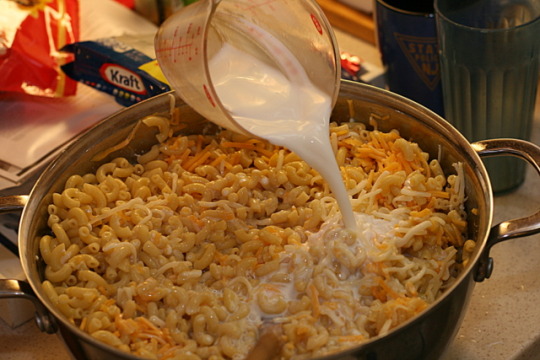
She stirred until all the macaroni was coated in cheese.

She greased the mini muffin pans with cooking spray and then filled each muffin spot with a dollop of macaroni mixture.

She topped with the cracker mix and sprinkle with the remaining cheddar cheese, then baked for 20 minutes. If using mini muffin pans (as you were instructed to), 20 minutes is enough. If you took direction poorly (or if you didn’t have mini muffin pans) and used regular muffin pans instead, bake for 35 minutes or until the macaroni is crispy on top.

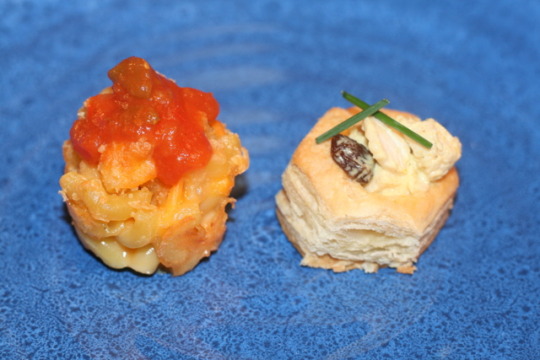
Once she removed the pans from the oven, she let cool for 30 minutes and then removed the bites from the pans. If desired, you can top with salsa, stewed tomatoes, or topping of your choice.

Mark chose to make Coronation Chicken Vol-au-vents. What a mouthful (and I’m not talking about the dish)! Clearly it merits an explanation. Vol-au-vents are puff pastry cases often stuffed with savory filling, though sweet is also possible. They were invented in approximately 1800 in Paris by Antonin Careme, who had the extremely fancy, descriptive, and cumbersome nickname of the “King of Chefs and the Chef of Kings.” I assume his friends called him Anton or something similar.
In 1953, in honor of the coronation of Queen Elizabeth II, a florist named Constance Spry (reports of her extreme agility are unconfirmed at this time) and a chef named Rosemary Hume (I’ll come up with a good joke about her name if you give me more thyme) invented “coronation chicken.” It is basically fancy chicken salad, so it can be served on lettuce, on a sandwich, or as an appetizer as shown here. You can also add chopped celery, grape halves, or anything else you feel would fit well.
The recipe for the coronation chicken is from Cuisine Magazine, Vol. 113, Oct. 2015, page 9 (they call it Curry Chicken Salad).
Having waited patiently for that explanation, Mark set out his ingredients.

He whisked together mayonnaise, yogurt, chutney, lime juice, and curry powder, then seasoned with salt and cayenne.

He chopped the cashews. Be careful! Raw fingertips are not a good way to honor a newly coronated queen.

He combined the chicken, cashews, and scallions (and raisins, if you want) in a bowl. Dropping them from a height for a dramatic photograph is an advanced technique (and is completely optional).


Once they were combined, he stirred in 1.25 cups of the mayonnaise mixture (or more if you want it creamier - personal preference).

He chilled it in the refrigerator then filled the pastry cups with the mixture and served.
They can be eaten in tandem; in fact, it’s highly recommended!
Remember what your mother told you: clean your plate! (Use of knives for finger food appetizers is completely optional.)

RECIPES:
Lori:
“Mac and Cheese Bites”
Ingredients:
3 cups mozerella cheese (shredded)
3 cups cheddar cheese (shredded)
3 tablespoons butter
2 eggs
2 lbs. elbow macaroni
1 sleeve Ritz crackers
1 teaspoon salt
2 teaspoons olive oil
2.5 cups milk
Recipe:
Preheat oven to 350
Boil macaroni to al dente
Put crackers into large ziplock bag and pulverize
Empty cracker dust into bowl
Add salt and olive oil and set aside
Once macaroni is ready, drain and return to pot
Add butter and eggs
Mix until melted and coated
Add milk and all the cheese except 0.5 cup of cheddar
Stir well until all macaroni is coated
Grease mini muffin pans with cooking spray
Place macaroni mixture and place in muffin pans
Top with cracker mix and sprinkle with cheddar cheese
Bake for 20 minutes if mini muffin pan, 35 minutes for larger muffin pan or until crispy on top
Let cool for 30 minutes
Remove from pan
If desired, top with salsa, stewed tomatoes, or topping of your choice
Mark:
“Coronation Chicken Vol-au-vents”
Ingredients:
0.75 cup mayonnaise
0.75 cup plain 2% greek yogurt
0.33 cup Major Grey’s chutney
4 teaspoons fresh lime juice
1 tablespoon curry powder
5 cups diced cooked chicken
0.75 cup roughly chopped roasted, salted cashews
3 scallions, sliced
1 box puff Pepperidge Farm puff pastry cups
6 ounce package of raisins (optional)
salt and cayenne pepper to taste
Recipe:
Whisk together mayonnaise, yogurt, chutney, lime juice, and curry powder; season with salt and cayenne
Combine chicken, cashews, and scallions (and raisins, if you desire), then stir in 1.25 cups mayonnaise mixture (or more - personal preference)
Chill in refrigerator
Fill puff pastry cups with mixture and serve
0 notes
Text
Summer Desserts
Day 7 - 5/28/16
Everyone loves desserts. Well, not everyone, but even if you don’t love desserts, you know someone who does. Also, everyone lives through summer (unless you live in Antarctica, and if you do live in Antarctica, bring me home a pet penguin!). What better way to get through the warm days of summer than to make delicious desserts?
Exactly. There isn’t a better way. Knowing this, the Master and the Rebel decided to make delicacies to suit the season. Fresh fruit pastries and chilled confections - truly the tastes of summer.
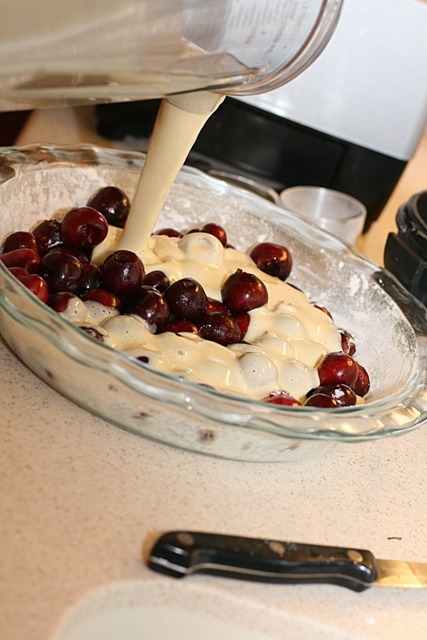
Mark went first because his recipe requires baking. He decided to make a cherry and a blueberry clafoutis. (www.simplyrecipes.com/recipes/cherry_clafouti) For those who don’t know, a clafoutis is a baked French dessert of fruit, traditionally black cherries, in a buttered dish and covered with a thick batter similar to flan. If you don’t know what flan is, Google it - we are moving right along. While cherries are traditional, it can be done with any fruit you can use in a pie, such as blueberries or apples (reports of rhubarb clafoutis are unconfirmed at this time). It can also be served warm, room temperature, or chilled and enjoyed at any time of day.
Naturally, Mark needed his ingredients.

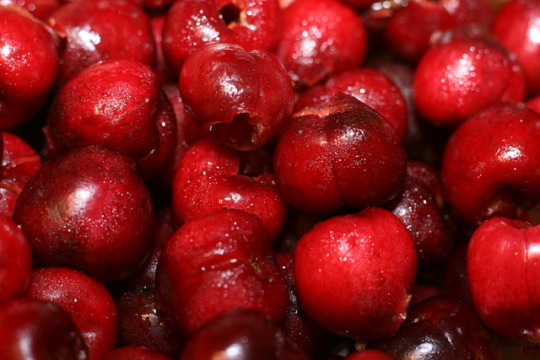
Observe the almonds and note that Mark only added them to the cherry clafoutis, not the blueberry. Also, these cherries are already pitted. Traditional clafoutis have cherries with pits intact, but since everyone involved with the blog is, to one degree or another, absent-minded or a klutz, cherry pits inside a dessert would only lead to disaster. Unless you’re a dentist, in which case it would no doubt lead to a new BMW or perhaps an extra year membership at your country club. However, since dentists are probably a small minority of our readers, we decided to avoid destroying our teeth.
Also, let’s take a moment to enjoy how beautiful the cherries and blueberries are. No photo editing done! (Okay, that’s a lie. Lori edited them a little bit. But they were still gorgeous.)

Mark preheated the oven to 350 degrees. Then, in a 9 inch buttered and floured pie pan, he added the cherries and almonds. (In an identical pan, he added the blueberries sans almonds. Sans is French, in honor of the origin of this dessert, and it means “without,” for those who don’t speak French. For those who do speak French, it also means “without.”)

Then he put the eggs, sugars, salt, flour, milk, almond extract, and vanilla extract in a Vitamix and blended them until the mixture was completely smooth. (As Mark said, you can’t call it a blender, because no one would pay that much for a blender.) If you don’t have a food processor or blender (or Vitamix!), or if you’re very strong, you can whisk it all together by hand, though that might best be left to the professionals.
Then he poured the batter over the fruit in the pie pans and put them in the oven.

Bake them for 45 to 50 minutes depending on your oven. The clafoutis won’t set like a pancake, but they won’t be loose as custard, either; they should be somewhere in between. Take the clafoutis out of the oven and let cool slightly. Then dust with powdered sugar and serve with whipped cream. (Observe the gently falling powdered sugar in the below picture. It’s like we left the clafoutis out in the snow, except for the fact this is a summer dessert, so snow is in short supply.)


Once Mark was done, Lori prepared her chilled cheesecake cubes. One of her favorite desserts is cheesecake dip (for another blog entry, perhaps?), so she came up with this modification of it, possibly with assistance from a barely remembered Facebook video. Or maybe not.
Anyway, regardless of the origins of this dish, she started with ingredients as always.

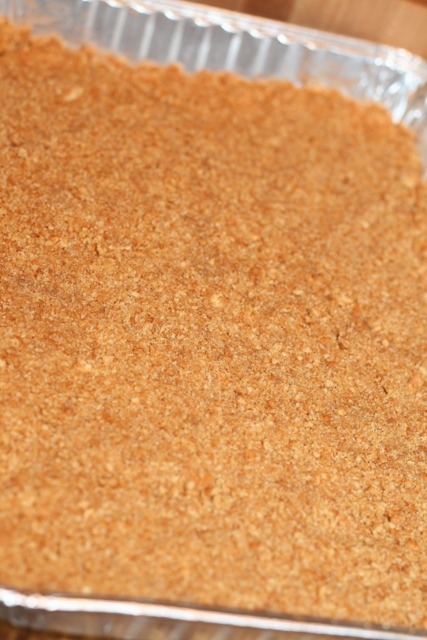
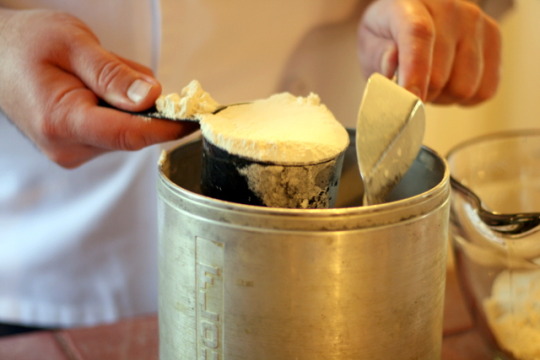
First she ground the graham crackers fine in a food processor, leaving her with about 2 cups of graham cracker dust.

Then she mixed 16 tablespoons (two sticks) of butter with the cracker dust. Try not to think about your arteries; they’ll be fine! Here’s a pro tip: to figure out if you have the proper amount of butter in the cracker dust, employ the “press test.” Simply press some of the mixture against the side of the bowl. If it stays intact against the side, you have enough butter. Once you’ve ascertained that you have the proper consistency, press the mixture into a cake pan (12.25″ by 8.25″ by 1.25″).
Lori put the graham cracker mixture in the freezer to chill (with or without alcohol and a book), much like Mark’s Surf and Turf crab cakes (Day 5 - scroll down!).
Then, using a mixer, she combined the cream cheese, powdered sugar, and vanilla.
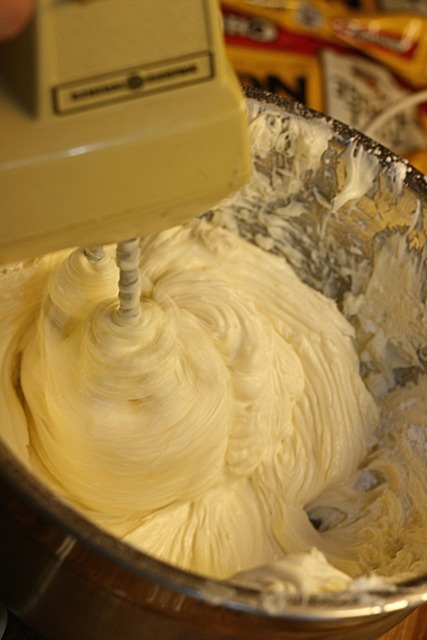
The mixture should end up smooth and creamy.
She spread the cream cheese mixture evenly on top of the pressed graham cracker.


She placed it in the freezer until hard - approximately an hour.
Next she melted the chocolate in a double boiler, though you can also use a microwave. This recipe calls for semi-sweet chocolate, but if you want to up the sweetness level, you can use milk chocolate. Once it was melted, she added 3 tablespoons of butter, though crisco works as well.

Once the cheesecake came out of the oven, Lori cut it into squares.

Using a skewer - a fork works, too - she rolled the squares in chocolate, covering them completely. The chocolate sticks better when the squares are cold. If some of them start to defrost before they’re coated, you can refreeze them.

Once the squares are all coated, she put them back in the freezer to chill again. Then dig in!

Feel free, once the squares are finished, to lick the bowl and spoon clean of melted chocolate. It’s okay; we promise your mother won’t mind. She especially won’t mind if you share some of the chocolate with her!
You should also share some of your clafoutis and cheesecake squares with her...if there’s any left. Take note: if you’re not careful, there might not be any left at all. Apparently we weren’t careful. We also aren’t sorry.

RECIPES:
Mark:
Cherry and Blueberry Clafoutis
Ingredients:
2 cups pitted cherries (pitting is optional)
2 tablespoons slivered almonds
3 eggs
0.75 cup granulated sugar
1 tablespoon brown sugar
0.25 teaspoon salt
0.5 - 0.75 cups all purpose flour (less for more like custard, more for more like bread)
1 cup milk or light cream
0.75 teaspoon almond extract
1.5 teaspoons vanilla extract
Powdered sugar for dusting
Recipe:
Preheat oven to 350.
In a 9 inch buttered and floured pie pan add the cherries and almonds
In a blender, food processor, or bowl, blend/whisk together the eggs, sugars, salt, flour, milk, almond extract, and vanilla extract until completely smooth.
Pour the batter over the cherries and almonds and put in the oven
Let the clafoutis cook for 35-45 minutes, depending on your oven
The clafoutis won’t set like a pancake, but it won’t be as loose as a custard; it should be somewhere in between
Take the clafoutis out of the oven and let it cool slightly
Dust with powdered sugar and serve with whipped cream
Lori:
Cheesecake Cubes
Ingredients:
Two packages of graham crackers
1.5 cups powdered/confectioner’s sugar
3 bricks cream cheese
1 teaspoon vanilla extract
24 ounces semi-sweet chocolate chips or chunks (two 12 ounce bags)
19 tablespoons butter or crisco
Recipe:
Grind the graham crackers in a food processor; should be about 2 cups
Mix 16 tablespoons (2 sticks) melted butter with processed graham crackers
Press graham cracker mixture into a cake pan (12.25” x 8.25” x 1.25”)
Put graham cracker mixture into the freezer
Using a mixer, combine cream cheese, powdered sugar, and vanilla
Spread cream cheese mixture evenly on top of the pressed graham cracker
Place in the freezer until hard - approximately an hour
Cut frozen confection into squares
Melt the chocolate in either microwave or double boiler
Add 3 tablespoons crisco or butter to the melting chocolate
Roll the squares in the chocolate using a skewer or fork to coat them fully
Place the coated squares on a cookie sheet with wax paper - it helps to spray the paper with cooking spray
Once the squares are coated, place in freezer
0 notes
Text
Game of Thrones Day
Day 6 - 4-24-16
A Song of Ice and Fire is George R.R. Martin’s (incomplete) literary epic known for violence, sex, violence, betrayal, violence, sex, and sweeping plot lines. Also violence. And sex.
HBO picked up the series and turned it into a hugely popular TV show called Game of Thrones with nearly as much sex and violence as the books.
In honor of the show, the Master and the Rebel decided to make food from Westeros, the world Martin created for his series. Meat pies and honey cakes. One entree, one dessert. No assassinations, incest, or torture involved. (Ordinarily I point out you can add whatever extras you want to these recipes, but since all three of those potential side dishes are illegal, I would dissuade you from using them if at all possible.)
Lori, as the creator of the entree, went first with her meat pies. The Ice-River clans from north of the Wall were prone to cannibalism, but since this is food eaten by the people from the Seven Kingdoms, you can safely assume beef is the preferred protein here. There was no formal recipe; the Rebel combined the theory of chicken pot pie with descriptions cobbled together from the books and show. She collected her ingredients.

First she cut the steak into bite-sized pieces. These went into a bowl and were seasoned with salt, pepper, garlic powder, onion powder, and adobo.

Then she put butter in a pan and melted it. Next into the pan went a clove of garlic, which she cooked down. Then came red wine and beef stock. She reduced the mixture.
As she was doing this, she browned the cubed beef in a separate pan.

She put the peas and carrots in a bowl and dusted them with flour.

Once coated with flour, the peas and carrots went into the reduced gravy mixture.

Next she added the browned beef.

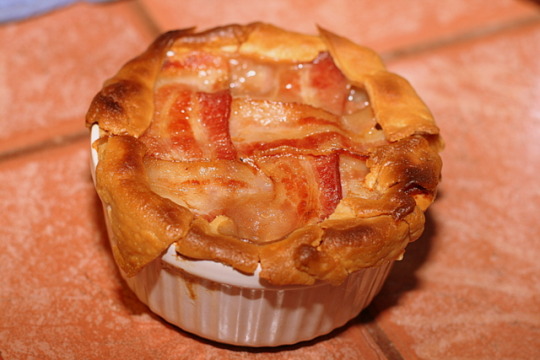
Once it’s all combined, remove from the heat and set it aside. Roll the Pillsbury dough out. After it’s flat and even, place a ramekin upside on the dough and cut around the circle, going about half an inch beyond the edge.

The extra dough will allow you to line the ramekin with enough extra to create a bit of a lip.


Fill the dough-lined ramekin with the beef gravy mixture.

Next: bacon!

Cut the pieces of bacon in half - this will make them the right length - and weave a lattice to place on top of each ramekin. Two pieces of bacon - four halves - should do just fine for your average ramekin. Curl the extra dough over the edges of the lattice to secure it in place.

Bake in the oven at 350 for approximately 30 minutes. Check them at 25, just because every oven is different. The bacon won’t get extremely crispy because of the moisture from the beef gravy, but it will be succulent and delicious anyway.
Mark went next with his dessert: honey cakes. What could be more appropriate way to end a meal with royalty? Okay, given Westerosi history, I guess poison, powdered glass, and a dagger through the heart would be an even more typical final course for the royal table, but we have to work with what we have. This recipe is from the Inn at the Crossroads: http://www.innatthecrossroads.com/2012/05/31/honeycakes/
First, Mark set out his ingredients. You can’t see any daggers or hemlock because we were careful to keep them away from the kitchen.

First, since this is a baking recipe, it’s important to remember that careful measuring is more important than it would be for regular cook. So keep your measuring cups handy!
Mark sifted together all the dry ingredients into a bowl.
Then he creamed together the butter and sugar.

Then he added an egg, beat thoroughly (reports that he had the Mountain administer the beating for him are unconfirmed), and added the honey.

At this point you should have a bowl with the butter/egg/sugar/honey mixture, a bowl with the dry ingredients, and your carefully measured buttermilk.

Add the dry ingredients and the buttermilk to the egg/butter/sugar/honey in alternating turns, starting and ending with the dry ingredients.

This should give you a beautiful, smooth batter.

Pour the batter into paper lines cupcake tins or a greased muffin pan, filling each cup 2/3 full.

Bake at 350 for 30 minutes or until cakes are golden brown.
Once they’re done, you can dust with powdered sugar. As an alternate option, you can make a nice glaze to top them. Simply sift 1.5 cups of confectioner’s sugar into a bowl and slowly stir in 3 tablespoons of milk and 2 teaspoons of vanilla or other extract. If the glaze isn’t thin enough to work with, stir in an additional tablespoon of milk.
So there you go. Meat pies and honey cakes, a fitting meal for enjoying the latest installment of Game of Thrones. Not recommended to serve at weddings, red or otherwise, but that’s only because apparently the only things appropriate to serve at weddings are death, destruction, and despair.
Since we didn’t eat these at a wedding, we enjoyed them greatly!

RECIPES:
Lori:
Game of Thrones Meat Pies
Ingredients:
2 lbs. beef round
4 cups beef stock
bacon
Pillsbury dough pie crust
1 clove fresh garlic
salt
pepper
garlic powder
0.5 cup red wine
onion powder
adobo
2 tablespoons of butter
8 cups frozen peas and carrots
Recipe:
Cut the steak into bite-sized pieces
Season with salt, pepper, garlic powder, onion powder, adobo
Butter in a pan until it melts
Add clove of garlic and let it cook down
Add red wine
Add beef stock
Let it reduce
In separate pan brown the cubed beef
Dust peas and carrots with flour
Add to gravy mixture
Add browned beef to the gravy with peas and carrots
Remove beef from heat
Roll the Pillsbury dough flat
Place a ramekin upside down and cut around the circle of the ramekin, going about half an inch beyond the edge
Fill the dough-lined ramekin with the beef mixture
Cut pieces of bacon in half and weave a lattice
Place bacon lattice on top of each ramekin (four halves should suffice for each pie)
Curl the extra dough at the edge of the ramekin over the edges of the bacon lattice
Bake in oven at 350 for approximately 30 minutes (check them at 25 minutes)
Mark:
Game of Thrones Honeycakes
Ingredients:
2.5 cups plain flour
0.5 teaspoon baking powder
1 teaspoon salt
1 teaspoon ground ginger
1 teaspoon cinnamon
0.5 cup butter
0.5 brown sugar, packed
1 egg
1 cup honey
1 cup buttermilk
Powdered sugar for dusting
Glaze:
1.5 cups confectioner’s sugar, sifted
3 to 4 tablespoons milk or water
2 teaspoons vanilla or other extract (optional)
Recipe:
Sift together dry ingredients
In a separate bowl, cream together the butter and sugar
Add egg and beat thoroughly, followed by the honey
Add the flour mixture and the buttermilk in alternating turns, starting and ending with the dry ingredients
Pour into paper lined cupcake tins, or a greased muffin pan, filling each cup 2/3 full. Bake at 350 degrees for 30 minutes or until the cakes are golden brown
Dust with powdered sugar
Glaze:
Sift confectioner’s sugar into bowl
Slowly stir in 3 tablespoons of milk and extract
If glaze isn’t thin enough, stir in additional tablespoon of milk
0 notes
Text
Surf and Turf Day
Day 5 - 4/9/16
Surf and turf. Wikipedia claims it’s the quintessential “middle-brow” meal (which is to say, not as swanky as high-brow and way fancier than low-brow), usually lobster and beefsteak, though it doesn’t have to be. The Master and the Rebel decided to make lobster tails and steak.
Stop. Of course they didn’t. You must be a new reader. (Which is fine. We love new readers! Skip to the bottom of the blog for the intro and biographies and work your way up. It’ll make more sense that way.)
So, like I was saying, the Master and the Rebel decided to make crab cakes and braciole. Practically the same thing, only this is way cooler and, since it’s coming from Mark and Lori, clearly much more delicious.
Mark went first because his dish needs to chill midway through the process. For the record, sometimes we all need to chill midway through things - I recommend an adult beverage and an excellent book, but that’s neither here nor there. He got his crab cake recipe from Cuisine Magazine, Volume 38 (April 2003), page 6.
If you’re not a new reader (or if you are a new reader who took my advice, started from the bottom, and is now back to the top), you know what comes first: ingredients!
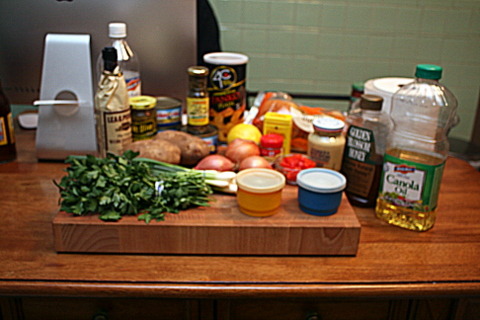
Next Mark combined crabmeat, panko breadcrumbs, minced parsley, and minced scallions (not to mince words, just ingredients).

Next he put eggs, lemon juice, dry mustard, Worcestershire sauce, cayenne, and kosher salt (despite this ingredient, shellfish is still not kosher) in a bowl and whisked.

Mark added the whisked mixture to the crabmeat mixture and kneaded with his hands.

Next he formed cakes approximately half a cup in size. Okay, Mark is very precise: they weren’t approximately half a cup, they were *exactly* half a cup. He measured. But feel free to approximate if you prefer.

Aren’t they lovely? Line a baking sheet with one cup of panko, press the cake into the breadcrumbs, and then sprinkle some more crumbs on top. Put them in the fridge to chill (alcoholic beverage and book optional, depending on whether your crab cakes are over 21 and like to read).

Once they have chilled for an hour, fry them in two tablespoons of oil over medium-high heat in a non-stick pan. Make sure that you don’t crowd your pan; cook the cakes in batches if you have to.

The cakes should be golden brown, which will take about three or four minutes per side.

Dry them on paper towels to take care of the extra oil.
It should be noted, both remoulade and tartar sauces are popular with crab cakes. The Master, considerate fellow that he is, made both. For the remoulade, he added red bell peppers, scallions, Dijon mustard, mayonnaise, shallots, parsley, honey, and lemon juice to the food processor and, y’know, processed.

Afterwards, he added salt and pepper to taste and chilled until it was time to eat.
For the tartar sauce, he added mayonnaise, sweet pickle relish, capers, grated onion, white wine vinegar, and Dijon mustard to a bowl and whisked away. Once they were combined, he added salt and pepper to taste. No picture, I’m afraid; we count on you to be able to whisk appropriately.
The crab cakes got plated on a brioche bun (hamburger buns work as well) and were served with both sauces.
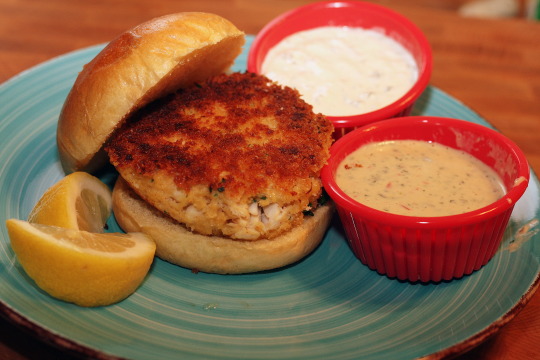
Seeing surf so satisfactorily served, time to transition to turf. (There was no reason for that, honestly, but who doesn’t love alliteration? Particularly when you manage five of each.)
Lori’s braciole “recipe” is cobbled together from watching numerous family members make it. Again, ingredients first.
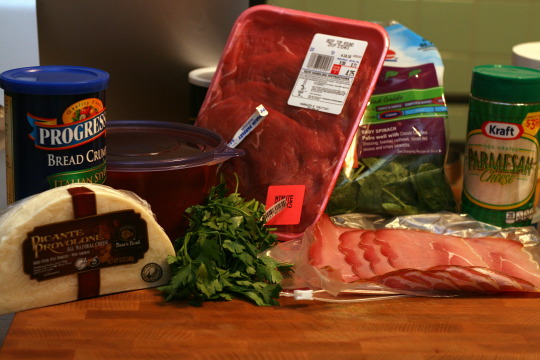
First, Lori sautéed the spinach.
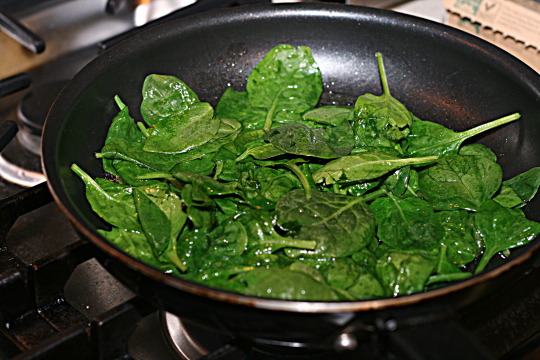
If you are using flank steak, you will have to pound it flat with a mallet or something similar. If you use minute steak, it comes nice and flat already.

Next she seasoned the steak with granulated garlic. You probably know whether you like garlic a lot or not. Season as you deem fit. Lori and Mark are both Italian, so you know there was a lot of garlic sprinkled on the steak.

Layer the steak, parsley, prosciutto, and spinach together, then combine bread crumbs and cheese and add on top. It should be noted that, although Lori and Mark are both Italian, they have a violent disagreement on how to pronounce the fancy Italian ham used here. Lori calls it “prozhoot,” while Mark remembers his Italian professor in college telling him that he is authorized to punch anyone who chops off the last vowel of Italian words. Fortunately, we have managed to avoid actual violence when debating this, though any cooking involving both of them and prosciutto has the potential to dissolve into fisticuffs at any moment. But I digress. Layer the ingredients, however you pronounce them.

Next, roll the layers up and secure with toothpicks.
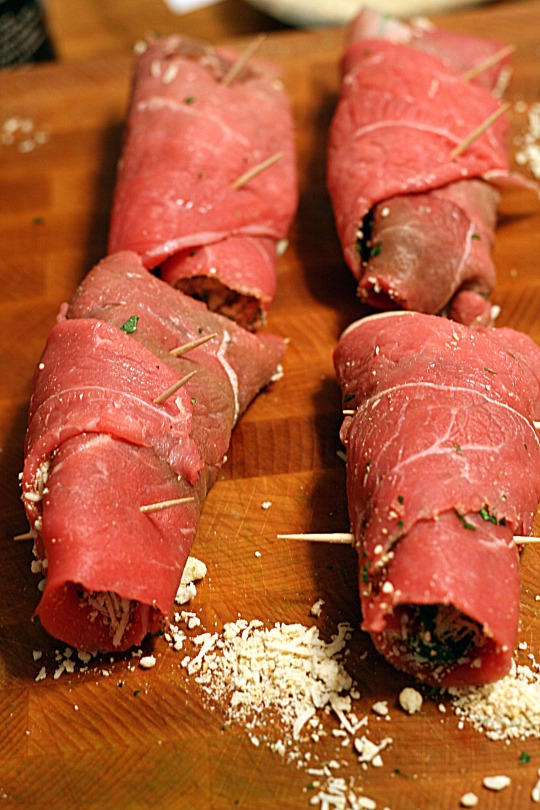
Sear the rolls on each side.

Add tomato sauce to the pan, enough to cover the bottom of the pan as well as the rolls. Did I mention the prosciutto/prozhoot battle? Don’t even get these two started on the sauce/gravy disagreement. I’m told that all Italians have a strong opinion on this, one way or another. Non-Italians, on the other hand, not so much. Anyway. Sauce. Or gravy. Whatever.

Cook for approximately 15 minutes or until done. Then plate and top with shredded cheese. Make sure you take out the toothpicks or you will have some unhappy guests!

And there you have it: surf and turf from the Master and the Rebel. Middle-brow my eye! (Though if my eye were in the middle of my brow, I’d probably be a cyclops.) Enjoy!

RECIPES
Mark:
Crab Cakes:
Combine:
14-16 oz. pasteurized lump crabmeat, drained
1.5 cups panko breadcrumbs
2 tablespoons minced fresh parsley
2 tablespoons scallions, minced
Whisk together; combine:
4 eggs
1 tablespoon lemon juice
1 teaspoon dry mustard
1 teaspoon Worcestershire sauce
0.5 teaspoon cayenne
0.5 teaspoon kosher salt
Form cakes with; chill:
1 cup panko bread crumbs
Fry in:
Vegetable oil
Recipe:
Combine crabmeat, panko, parsley, and scallions; set aside
Whisk together eggs and next five ingredients
Combine crabmeat mixture with wet ingredients using your hands or a wooden spoon to keep crabmeat intact
Form cakes with a 0.5 cup measure (though use a 0.25 cup if you prefer smaller cakes)
Transfer to a parchment-lined baking sheet covered with 1 cup breadcrumbs
Press cake into crumbs and sprinkle tops with more crumbs
Chill 1 hour
Fry cakes in 2 tablespoons oil over medium-high heat in a non-stick pan
Cook cakes in batches so the pan isn’t crowded
Fry until golden brown, about 3-4 minutes per side
Drain on paper towels
Plate with brioche or hamburger buns
Remoulade Sauce:
Combine:
0.5 cup red bell pepper, chopped
0.25 cup scallions, chopped
0.25 cup Dijon mustard
0.25 cup mayonnaise
2 tablespoons shallots, chopped
2 tablespoons chopped fresh parsley
2 tablespoons honey
1 tablespoon fresh lemon juice
salt and pepper to taste
Recipe:
Process all ingredients in a food processor fitted with a steel blade until vegetables are finely chopped
Season with salt and pepper
Chill until ready to use
Tartar Sauce:
Whisk Together:
1 cup mayonnaise
2 tablespoons sweet pickle relish
1 tablespoon capers
1 tablespoon yellow onion, grated
2 teaspoon white wine vinegar
1 teaspoon Dijon mustard
salt and pepper to taste
Recipe:
Whisk together first six ingredients, salt, and pepper
Lori:
Braciole:
Ingredients:
0.25 cup cooked spinach
4 pieces flank steak or minute steak (thin)
Granulated garlic
1 tablespoon fresh parsley (chopped)
4 slices prosciutto
0.5 cup shredded provolone cheese
0.5 cup Italian bread crumbs
3 cups tomato sauce/gravy (enough to cover bottom of pan and the rolls)
Recipe
If using flank steak, pound flat
Season steak with garlic
Layer steak, parsley, prosciutto, and spinach
Mix Italian bread crumbs and cheese together
Add mixed bread crumbs and cheese on top of layered steak
Roll layers up and secure with toothpicks
Sear rolls on each side in a pan
Add sauce to pan and then simmer for approximately 15 minutes
Serve topped with shredded provolone
0 notes
Text
Family Recipes
Day 4 - 3/25/16
Family Recipe Day
Family recipes are everywhere, though they aren't always referred to as such. Whether it’s the closely guarded secret (”Granny will pass it along to her eldest when she can’t cook anymore and not a second before!”) or something much more casual (”Let me show you how Mom does it.”), most cooks have made food following the instructions of those who came before.
The Master and the Rebel dug back into family lore to work up some deliciousness from their backgrounds. Not an entree to be found, I’m afraid, but if you supply the main dish (we ordered pizza!), we will hook you up with a great side and dessert.
Lori went first because baking takes longer. In honor of the approaching holiday (and because it gave her an excuse to make a second one for her father for Easter), she decided to make Easter Sweet Pie. Naturally, she couldn’t help but take two recipes and combine them. One recipe was from her Grandma and one from her great-uncle’s mother.
First: ingredients. Yes, that’s rice. You’re just going to have to trust us.
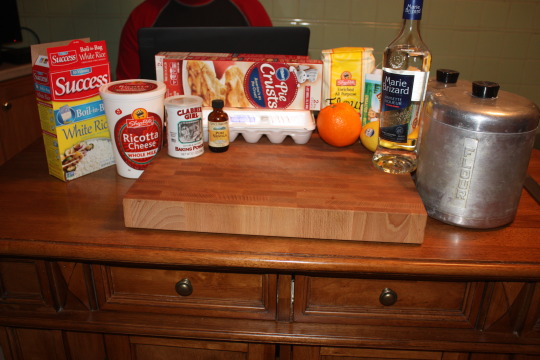
In the interest of ease (though it would probably give the Grandrebels indigestion), Lori is using Pillsbury pie crusts. In a 9 inch spring mold, grease the bottom with Crisco, then press the crust by hand along the bottom and sides of the pan. Sprinkle a few pinches of sugar on the pie crust (sadly, it doesn’t photograph as well as the salt did a few weeks ago).

In order to make the filling, put the ricotta, eggs, orange and lemon zest, orange and lemon juices, anisette, and vanilla in a bowl.

Stir with a spoon or spatula.

Once it’s mixed well, beat lightly with a beater for 20-30 seconds.

Once it’s smooth (but not too creamy), add the rice. Don’t forget to cook it first (we used boil in a bag rice)! Then pour it into the crust.
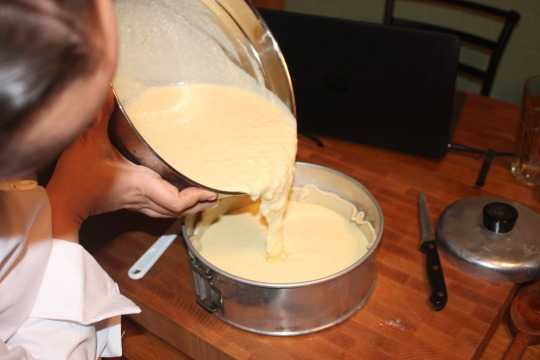
Bake at 350 degrees for 75 minutes (an hour and a quarter, for those of you who hate math).

Leave in for another 15 minutes if it isn’t brown on top. Turn off the oven and leave the pie in for another 15 minutes. Let cool on a board for at least an hour. Remove the spring pan and cover with foil. Refrigerate overnight. The next day, sprinkle with powdered sugar if desired.
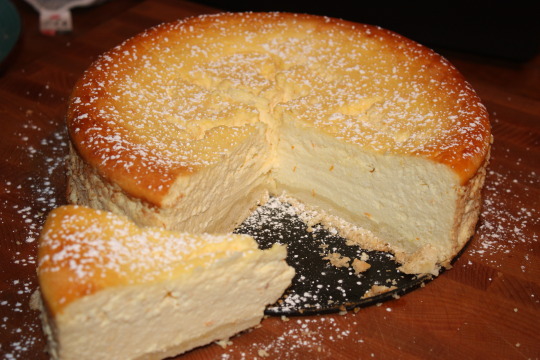
(Those of you who were paying attention, you caught us. Lori made a cake on the previous day so we would have a display one. The one she made at our cooking meeting was still in the fridge and not available for consumption until the next day.)
What do you pair with pizza to eat before getting to Sweet Easter Pie? Why, cole slaw, of course! I knew you were going to say that. Mark uses his Grandmom’s recipe.
By now, dear followers, you know what comes first:
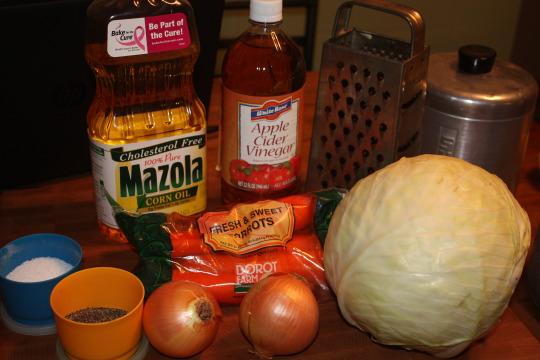
First, remove the core and outer leaves of the cabbage. Then food process or finely shred the cabbage.

Next, mince or process three to five carrots (some people like carrots more than others - and some people just really want to see in the dark).
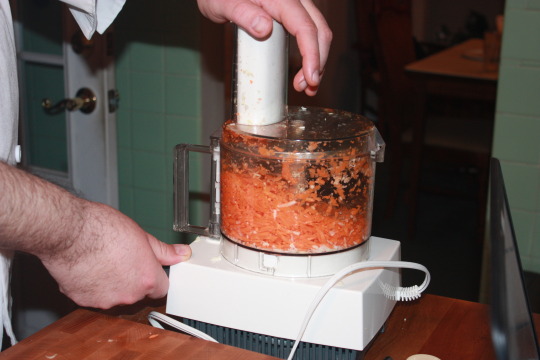
Puree onions next, then add all of the vegetables together in a large bowl.

If you don’t have a food processor, use a food grater.

Mix the vegetables together with a spoon.

Then add oil and vinegar and mix, adding salt to taste.

This is a vinegar based cole slaw rather than a mayonnaise based one, obviously, so it has a bit of a sharp taste. This is definitely not a sweet cole slaw, so proceed with cautions.

We did find, though, that both vinegar cole slaw and Sweet Easter Pie go perfectly with pizza. Enjoy!
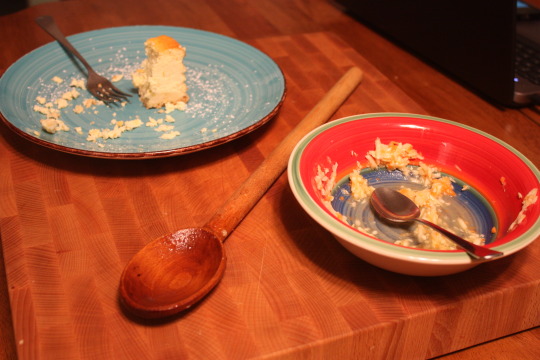
RECIPES
Lori:
Easter Sweet Pie
Grandma’s recipe meets great-uncle’s mother’s recipe
Ingredients:
3lbs ricotta
1 ½ cup sugar
8-10 eggs
1 orange peel grated
1 lemon peel grated
1 tsp orange and lemon juice
1 ½ shot anisette
½ cup cooked rice
1 teaspoon Vanilla
Pillsbury pie crust
Recipe:
Crust:
Use 9” spring mold. Grease bottom with Crisco. Press by hands along bottom and sides of pan. Sprinkle a few pinches of sugar on the pie crust.
Filling:
Put ricotta, eggs, orange and lemon peel, orange and lemon juice, anisette, cooked rice, and vanilla in a bowl. Stir with spoon to mix. Then beat lightly with beater (20-30 seconds). Don’t make too creamy. Pour into crust.
Bake at 350 for 1 hour 15 mins. Leave in another 15 min if not brown on top. Turn off gas leave pie in oven 15 mins. Let cool on board for at least an hour. Remove spring pan and cover with foil. Refrigerate overnight.
Mark:
Cole Slaw
Grandmom’s recipe
Ingredients:
1 large head of cabbage
3-5 Carrots (increase quantity on personal preference)
1 tablespoon sugar
Salt to taste
3 small Yellow onions
1.5 cups apple cider vinegar
2 cups of corn oil
Recipe:
Grate cabbage fine
Grate carrot
Add sugar
Add salt
Grate onion fine
Add vinegar
Add oil
Food process or finely shred cabbage after removing the core and outer leaves. Mince 3 -5 carrots depending on quantity desired and puree onions in food processor. If you do not have a food processor, use the round holes on the grater for the cabbage and the second smallest option on the grater for the carrots and onions. Add all vegetables to large bowl and mix. After stirring thoroughly, mix in oil and vinegar.
#foodporn cooking chef cook food miseenplace rebel miseenplaceandtherebel recipe recipes#grillsergeant grilling coleslaw easter easterpie sweeteasterpie dessert desserts sidedish
2 notes
·
View notes
Text
Soup Day
Day 3 – 3/5/16
Everyone loves soups. Whether it’s a thick and creamy almost-stew on a snowy night or a light broth to whet your appetite for the rest of the meal, soups come in all varieties. The Master and the Rebel, given free reign to pick their types of soup to make, went in completely different directions (is anyone surprised?).
Mark went first, making a creamy mushroom soup from Chef John’s Food Wishes (http://allrecipes.com/recipes/16791/everyday-cooking/special-collections/web-show-recipes/food-wishes/).
First things first, of course: ingredients!
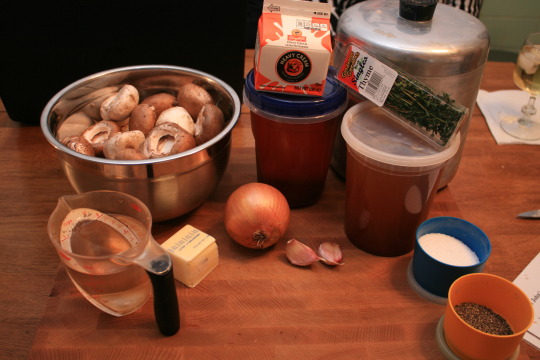
Then the knife-sharpening. Who let that man have a blade? Oh...right...he’s a professional (or at least a highly trained amateur).

With that freshly edged weapon - I mean implement - Mark proceeded to slice two pounds of mushrooms. Good thing the knife was sharp!
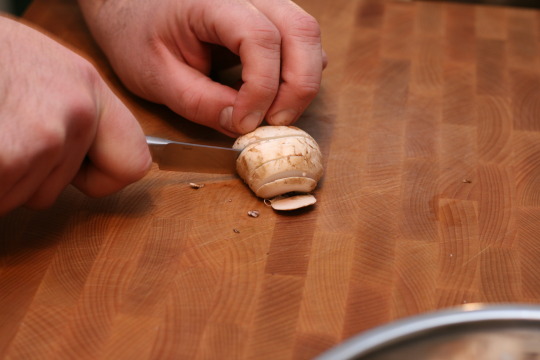
Next, he melted the butter in a large soup pot and added the mushrooms, seasoning them with a pinch of salt. Chefs always sprinkle the salt from way up high because it makes for a better picture!

Actually, it’s to spread the salt out evenly over a wider area, but they probably won’t tell you that. It’s a trade secret.
Once the mushrooms were golden brown, he added a chopped yellow onion to the mushrooms and cooked the mixture for about five more minutes.

He added flour, cooked for approximately another two minutes, then added sprigs of thyme and two cloves of garlic.

Next came the vegetable stock and water, and the whole mixture was brought to a simmer for approximately an hour.
After an hour, when the whole kitchen smells of mushrooms, remove the thyme bundles and add small batches to a blender. Puree at high speed until smooth and thick.

Once everything is blended, return it to the pot and stir in cream.
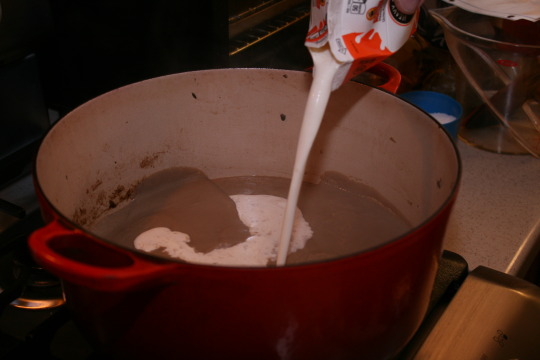
Serve in bowls and garnish with mushroom slices. Cut a few slices of bread and enjoy!

Don't want a heavy cream soup? We have options! Lori made ramen, but not the ramen of your college days. No styrofoam cups in a microwave here. This is adult ramen, though non-adults are certainly welcome to indulge as well. This is an original recipe from the Rebel - no citation needed.
First, the ingredients. (Ignore the kale - she planned to use it but, at the last moment, chopped it (Food Network reference!) from the recipe.)

Lori chopped up the green onions. Watch your fingers when you do that! (She also chopped mushrooms and carrots, but you’ll have to take my word for it since there aren’t any pictures.)

Then she prepared the ramen. No microwave! Use boiling water like an grown-up.
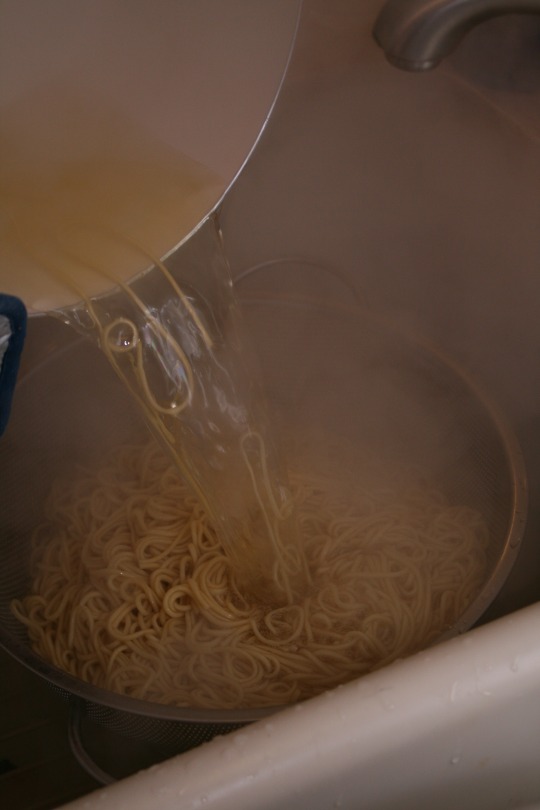
She cooked the sausages in a pan, then sliced them into discs.


She added oil and ginger into a pot, then cooked down the ginger with the green onions. Next came the chicken broth, carrots, mushrooms, and sausage slices.
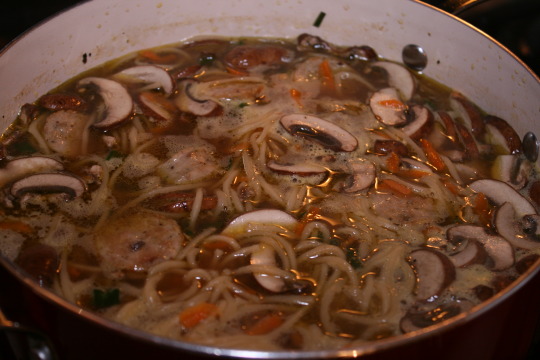
Once you've ladled out a bowl, garnish it with chopped green onion and a halved hardboiled egg. Doesn't get any easier than this recipe!

So regardless of whether you prefer a thick and creamy soup or a broth, the Master and the Rebel have an option for you. Enjoy!

RECIPES
Mark:
Creamy Mushroom Soup
Recipe: Chef John’s Food Wishes (http://allrecipes.com/recipes/16791/everyday-cooking/special-collections/web-show-recipes/food-wishes/)
Ingredients:
0.25 cup unsalted butter
2 pounds sliced fresh mushrooms
1 pinch salt
1 yellow onion, diced
1.5 tablespoons all-purpose flour
6 sprigs fresh thyme
2 cloves garlic, peeled
4 cups vegetable broth
1 cup water
1 cup heavy whipping cream
1 pinch salt and freshly ground black pepper to taste
1 teaspoon fresh thyme leaves for garnish or to taste
Directions:
Melt butter in a large soup pot over medium-high heat
Cook mushrooms in butter with 1 pinch salt until mushrooms give off their juices
Reduce heat to low
Continue to cook, stirring often, until juices evaporate and the mushrooms are golden brown (15 minutes)
Set aside a few attractive mushroom slice for garnish later, if desired
Mix onions into mushrooms and cook until onion is soft and translucent, about 5 more minutes
Stir flour into mushroom mixture and cook, stirring often, for 2 minutes to remove raw flour taste
Tie thyme sprigs into a small bundle with kitchen twine and add to mushroom mixture
Add garlic cloves
Pour chicken stock and water into mushroom mixture
Bring to a simmer and cook for 1 hour
Remove thyme bundle
Transfer soup to a blender in small batches and puree on high speed until smooth and thick
Return soup to pot and stir in cream. Season with salt and black pepper and serve in bowls, garnished with reserved mushroom slices and a few thyme leaves
Lori:
Adult Ramen
Ingredients:
10 ounces organic ramen noodles
3 quarts chicken broth
1 cup grated carrots
2 tablespoons liquid aminos (healthy soy alternative – soy sauce is also acceptable)
4 eggs, hard boiled and peeled
1 cup baby portabella mushrooms, sliced
1 tablespoon fresh ginger, grated
Green onions, chopped
1 pound chicken sausage
Directions:
Follow package instructions to cook ramen noodles
Cook sausages in pan until cooked through, then slice into discs
Oil in pot, add ginger, cook down the ginger together with green onions
Add chicken broth to pot
Add carrots, mushrooms, and sausage slices
Once the soup is in bowls, add some sprinkles of chopped green onion and a hardboiled egg cut in half as garnish
0 notes
Text
Internet Recipes
Day 2 – 2-22-16
Internet Recipe Day
Recipes are everywhere. Cookbooks, if you’re old school. Written in faded but beautiful handwriting on crinkly pieces of paper stained with coffee, oil, and love, if you’re Italian. The internet, if you’re tech-savvy (or, at the very least, not a complete Luddite).
The Master and the Rebel both have used all sorts of recipes, even the old crinkly ones (hey, they both are part Italian), but today they worked off of recipes they found online. Rather than doing a similar style, they agreed to do an entree and a dessert (who doesn’t love dessert?!) to create a complete meal.
Lori, as the creator of the entree, went first. She took a Bang Bang Shrimp recipe from Skinny Taste (www.skinnytaste.com), a blog for delicious and healthy recipes, and, as you’d expect, modified it into a po’ boy.
She got her ingredients ready to go.

To create the sauce, she mixed the mayonnaise, Sriracha, and Thai sauce in a bow. To prep the shrimp, she put them in a bowl and coated them well with corn starch

She cooked the shrimp over medium heat until cooked through.

To add the “bang bang” to the shrimp, simply pour the sauce over the shrimp in a bowl and ensure they are coated well.

Next step: slaw for the sandwich. Combine the vinegar, lemon pepper seasoning, honey, and lemon juice to create a dressing, then add that to the slaw and mix well.

Then simply cut a ciabatta roll in half, cover the bottom half with slaw, add shrimp, and place some avocado slices on top. Even Freddy Mercury from Queen couldn’t claim nobody loves him with a po’ boy like this!

What follows a delicious sandwich? Why, blueberry muffin bread, of course! This is basically a giant blueberry muffin in the shape of a loaf of bread, and the deliciousness is giant, too - especially when you’re loafing around the house. He got the recipe from Frugal Mom Eh (www.frugalmomeh.com), a blog written by a Canadian mother who creates magic with a limited budget.
Mark’s first step? Ingredients! (Duh - he is the Master of Mise en Place, is he not?)
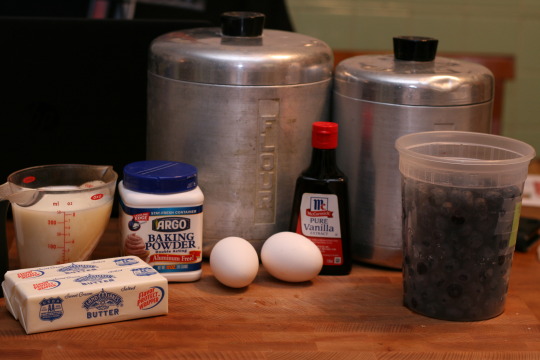
Fresh blueberries are a must for this recipe to live up to its true potential!
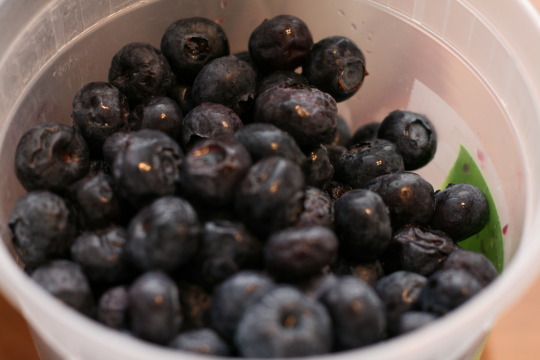
He preheated the oven to 350 degrees and greased a 9 inch loaf pan. Then he creamed together the butter and sugar and then added eggs, vanilla, and milk before beating well. Then the dry ingredients went in the bowl and the beating continued (reports that morale improved are unconfirmed at this time).
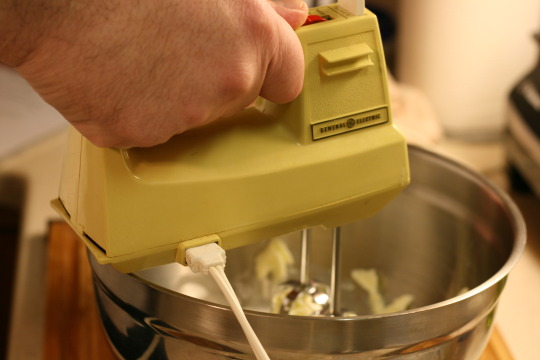
Then he added the blueberries to the bowl and mixed gently by hand - you don’t want to crush the blueberries, do you? When the berries were evenly distributed through the batter, he poured it into the loaf pan.
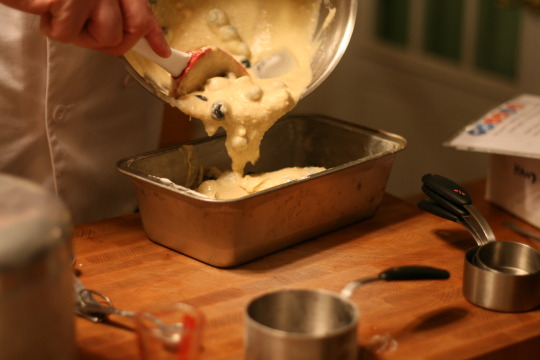
For an additional flourish, add more berries to the top. Decisions on whether to scatter them at random or arrange them in ranks with military precision are left up to the individual baker. (Mark was beginning the ranks until Lori, craving muffin bread, suggested that we could eat dessert sooner if he hurried the heck up.)

Bake the bread for 60-75 minutes, then let the pan cool for 10 minutes before attempting to remove the bread.

Trust me, it’s worth the wait.

Enjoying the muffin bread with coffee, tea, or hot chocolate is not required, but it is highly recommended.

RECIPES
Lori:
“Bang Bang Shrimp Po’ boy”
Recipe: Skinny Taste food blog (heavily modified, of course)
Ingredients:
1.5 pounds of raw peeled deveined tail off large (31/40 count) shrimp
2 tablespoons corn starch
1 teaspoon canola oil (for pan)
5 tablespoons light mayonnaise
3 tablespoons Thai Sweet Chili Sauce
1 teaspoon Sriracha (to taste)
1 12 oz. packet of Mann’s Family Favorites broccoli cole slaw
2 tablespoons rice vinegar
0.5 lemon’s worth fresh lemon juice
0.5 teaspoons honey
0.25 teaspoon lemon pepper seasoning (to taste)
1 ripe avocado, sliced
4 wheat ciabatta bread rolls
Recipe:
Sauce:
Combine mayonnaise, Sriracha, Thai sauce in bowl and mix
Shrimp:
Coat shrimp with corn starch, mixing well with hands
Heat oil in pan
Cook over medium heat, tossing a few times, until cooked through (approx. 3 minutes)
Remove from pan and combine with sauce, coating well
Slaw:
Combine rice vinegar, lemon pepper seasoning, honey, and lemon juice
Add to slaw and mix well
Plating:
Cut ciabatta roll in half
Cover bottom half of roll with slaw
Cover slaw with shrimp
Place avocado slices on top
Mark:
Blueberry Muffin Bread
Recipe: Frugal Mom eh!
Ingredients:
1 cup white sugar
0.5 cups salted butter (1 stick)
2 eggs
1 tablespoon vanilla extract
1 cup milk
2 cups all-purpose flour
2 teaspoons baking powder
2 cups blueberries
Recipe:
Preheat oven to 350 degrees
Grease a 9 inch loaf pan
Cream together the butter and sugar
Add the eggs, vanilla, and milk – beat well
Add dry ingredients and beat until well combined
Add blueberries and mix by hand gently – do not crush berries
Pour batter into your loaf pan and bake for 60-75
Allow to cool in pan for 10 minutes before removing to finish cooling
Tip: Reserve a handful of berries for after the batter is poured into the loaf pan. Gently press them into the top of the batter
#food foodporn miseenplace rebel miseenplaceandtherebel grillsergeant cooking cook#blueberrymuffin shrimp bangbang poboy blueberry
0 notes
Text
Wellington Day!
Day 1 - 2/6/16
Wellington Day
Beef Wellington. Everyone has heard of it. Many people have eaten it. Some are even aware that you can make Sausage, Lamb, or Salmon Wellington. So what happens when you take the Master and the Rebel and turn them loose on the project?
Mark went first since, naturally, he was prepared and ready to go.

He seared the filets on each side and removed them from the heat.

Next came the duxelles, which is a minced mixture of mushrooms, shallots, cream, wine, and spices sautéed and then reduced to a paste. Mark sautéed the mushrooms and shallots in the butter, stirring to keep it even. He added the cream and wine, letting it simmer until the liquid evaporated. He removed the pan from the heat and added thyme, salt, and pepper to taste, then he set it aside to cool.

Mark, precise as always, made sure the pastry was the proper size.
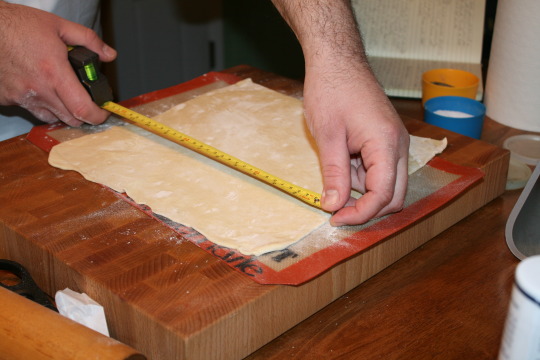
He cut the pastry into quarters and placed a filet in the center of each one. Each filet was topped with prosciutto and the duxelles and then carefully wrapped in the pastry.

While it was baking, he made the merlot sauce. One of the ingredients of the sauce is a slurry. If you’re planning on looking it up on Wikipedia, stick to the first sentence (“any fluid mixture of a pulverized solid with a liquid”) and don’t go too much further. Their description includes cement slurries, coal slurries, and manure slurries. It’s none of that - don’t worry! It’s simply flour (or a similar ingredient such as arrowroot or corn starch) dissolved in water. It’s a thickening agent, not some industrial concoction we’re trying to slip into your food.
Once the sauce was done, onto the plate it went, with the Wellington placed in the middle.


Lori also got her ingredients together.
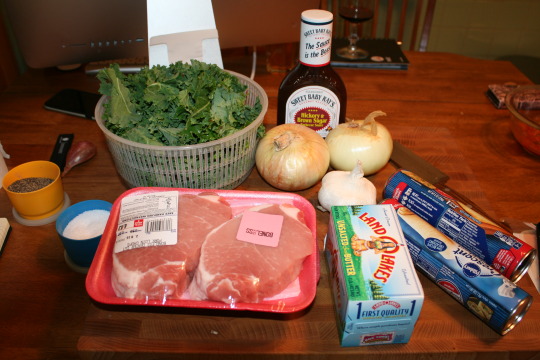
She trimmed the pork into medallions and tied a piece of twine around to maintain the proper shape.

She seasoned them and seared them in the pan before removing them and letting them cool.

She then sautéed the kale before making the brown butter onion sauce.
Then she cut the crescent roll sheets in half. Each half got a small handful of kale in the center. Then came the pork medallion brushed with bbq sauce and topped with the brown butter onions.
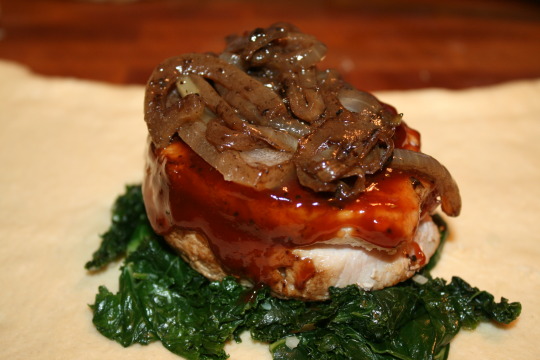
The crescent rolls were folded closed and put in the oven on a baking sheet covered with parchment.

Lori chose not to go with a sauce for the plate, so the golden brown Wellington stands alone.

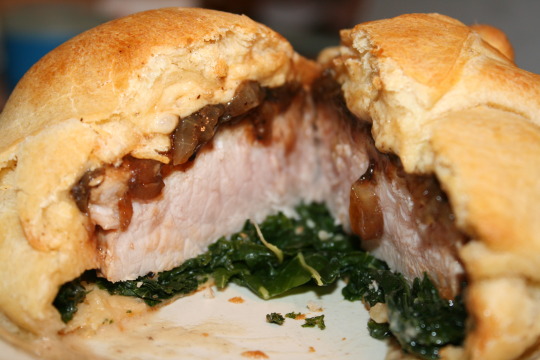
Enjoy! We sure did.
RECIPES:
Mark:
Beef Wellington
Recipe from Cuisine Magazine
Ingredients:
Puff Pastry sheets (2 sheets)
4 filet mignon 1.5” thick (6 oz each)
Prosciutto (in lieu of pate)
Egg wash (1 egg and 1 tablespoon water)
Duxelles
2 shallots
4 oz button mushrooms (and stems)
Heavy cream (2 tablespoons)
Dry sherry/port/merlot (2 tablespoons)
Thyme
Merlot sauce
Olive oil
1 cup chopped mushrooms
1 cup chopped onions
2 tablespoons tomato paste
2 tablespoons garlic (minced)
0.5 cups merlot
1 bay leaf
1.5 cups beef stock
Slurry (2 tablespoons of flour/arrowroot/corn starch dissolved in 1 tablespoon water)
1 tablespoon butter and 1 tablespoon merlot (to finish)
Directions:
Beef
Sear filets until well browned on one side (approx. 3 min.).
Turn, sear other side (approx. 1 min.).
Transfer to plate and chill 30+ min.
Duxelles
Sauté shallots and mushrooms (diced fine) in butter approx. 5 min - stir occasionally
Add cream and sherry
Simmer until liquid evaporates
Off heat, add thyme, salt, and pepper
Cool completely
Wellington
Pull out pastry to 13 inches square and cut into quarters
Place cooled filet in middle of a square
Top with 2 pieces of prosciutto (or pate)
Top prosciutto with Duxelles
Brush corners of pastry with egg wash
Fold two opposite corners together
When folding last other two corners, tuck in sides as if wrapping a gift
Adjust dough to cover any open areas
Place on baking sheet lined with parchment (seam side of wellingtons down)
Chill 1 - 24 hours (optional)
Baking
Preheat oven to 425*
Brush each wellington with egg wash
Bake 20-25 min. (until golden)
Merlot sauce
Sauté mushrooms and onions in oil and caramelize
Add garlic and tomato paste
Cook until dark (approx. 3 min.)
Deglaze with 0.5 cups merlot and reduce by half
Add beef stock and seasonings
Simmer 3 min.
Strain through cheesecloth or fine mesh and pour back into pan
Add 1.5 tablespoons of a slurry and cook until it thickens
Add 1 tablespoon merlot and 1 tablespoon butter off heat for flavor
Lori:
Pork Wellington
Recipe? What recipe?
Ingredients:
4 boneless pork tenderloins 1” thick (6 oz each)
2 containers Pillsbury crescent dough sheets
1 bunch kale
1 bottle Sweet Baby Ray’s Hickory and Brown Sugar BBQ sauce
1 dash of canola oil
1 clove minced fresh garlic
Salt and pepper
Brown butter onion sauce
1 large sweet onion
0.5 stick unsalted butter
Splash of dry pinot grigio or chardonnay
1 clove minced fresh garlic
White sauce
0.5 cup of dry pinot grigio or chardonnay
0.5 stick of butter
1 tablespoon flour
0.3 cup heavy cream
Directions:
Pork
Trim pork and tie into medallions
Season pork with salt and pepper
Sear medallions until well browned on one side (approx. 5 min.).
Turn, sear other side (approx. 5 min.).
Transfer to plate and let rest.
Once cool, remove strings
Kale
Sauté kale with 0.3 cup water, oil, 2 pinches of salt, and garlic
Remove from heat
Let cool
Squeeze dry
Brown butter onion sauce
Cut onion in half and thinly slice
Sauté onion and garlic in butter with wine in same pan as the pork was seared
Wellington
Unroll crescent rolls into sheets
Cut sheets in half
Put a small handful of kale on each portion of the sheet
Put pork medallion on top of kale
Brush two tablespoons of bbq sauce on top of the pork
Put sautéed onions on top of the pork, enough to cover the medallion generously
Fold opposite corners of crescent roll sheets up to wrap the contents completely
Place on baking sheets lined with parchment (folded seam side of wellingtons up)
Baking
Preheat oven to 375*
Bake 10-13 min. (until golden)
White sauce
Melt butter in pan
Add half the wine
Reduce it by a third
Add leftover sautéed brown butter onions
Add heavy cream
Add flour
Mix until thickened
Add 0.5 teaspoon salt
Add the rest of the wine as needed to thin the sauce
#miseenplace rebel miseenplaceandtherebel cooking cook food recipe recipes grillsergeant#wellington beefwellington beef pork porkwellington
1 note
·
View note
Text
Biographies
Mark (aka the Master of Mise en Place)
Mark is a life-long home cook. His interest in cooking began when he started traveling as a teenager. His desire to recreate all the dishes he encountered during his trips drove him into the kitchen. He has taken numerous cooking classes at various institutions, including a week-long course at the Culinary Institute of America (the other CIA). His favorite types of food to make are Northern Italian, French, and Central European. His newest focus is is sous vide, which he uses to make perfect fried chicken and New York strip steaks. He is primarily of German and Italian extraction, though when it comes to cooking, his Germanic side holds sway and he works carefully and precisely. Whether working from one recipe or combing details from several, he always has his accoutrements and his ingredients set out and prepared in advance. No grabbing things off a shelf, throwing them in a pot, and stirring!
Lori (aka the Rebel)
Lori started cooking about ten years ago, when she was in her early twenties. She came from an Italian household where her father did most of the cooking and the whole house smelled of meatballs and gravy on Sundays. She is almost completely self-taught, often creating meals from whatever can be found in the refrigerator on a given day. Even when she has a complete selection of ingredients, she still wings it. She loves to cook Italian, American, and breakfast. She also is an excellent baker, though she notes that recipes are far more important when it comes to the needed precision of baking. She very much enjoys cooking with wine - sometimes she even puts it in the food.
Oliver (aka the Grill Sergeant)
Oliver is a terrible cook, as anyone will tell you. This is a shame, as his mother was extremely skilled in the kitchen. However, he absolutely loves to eat. After a bit of a rough start (he nearly burned down Mark’s house at a BBQ), he has figured out the grill. He will be making guest appearances on this blog when grilling is necessary. He is also the designated taste-tester and the scribe who keeps track of the cooking procedures Mark and Lori use (or, more accurately, that Mark uses and Lori makes up as she goes).
0 notes
Text
Mise en Place and the Rebel
Mark likes everything in its place and in the proper order when he cooks. Lori makes things up as she goes along. This is the story of two contrasting cooking styles and what happens when they overlap.
0 notes