
straight-impin
Straight Impin: Masters of Nerdcraft
I am Smudge. I don't actually know what I'm doing.
454 posts
Don't wanna be here? Send us removal request.
Last Seen Blogs

zeihello
A product of fear
harmonikon
MR AVOCADO MAN

johnnysimmer
JohnnySims

blendskysphotography
BLENDSKYS Photography

choppedweaseleaglebandit
Paris Hilton Is Beyond
Photo

I wore (most of, it was too hot for the wig and tiara) my Wonder Woman armor to Pride yesterday along with a banner/standard I made myself and a shield that I repurposed from another cosplay. The shield said “Protect and Support Trans People”. Usually I don’t go to Pride because of a lack of discussion or representation for the -BTQIA in the acronym and because I’m not a heavy drinker or partier. But this year I decided that after the election I should go and, if anything, be representation. I wanted to be visible and my message to be unmistakable. Dunno if I succeeded, but it was great seeing the smiles on young trans peoples’ faces!
5K notes
·
View notes
Photo


was Eleven for Halloween and got some great shots of my costume in the woods😊
happy halloween, stay away from clowns, and don’t forget to floss🎃
📷 ig: chasplaycosplay
2K notes
·
View notes
Text
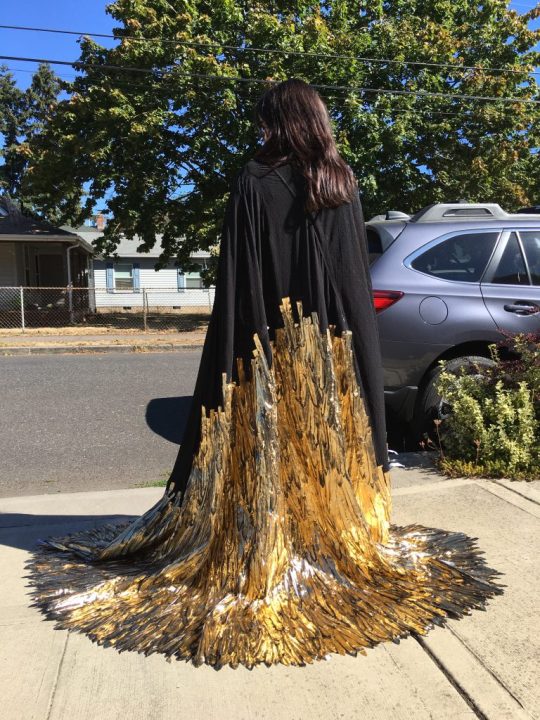
Costume Build: Queen Ravenna / The Huntsman: Winter’s War
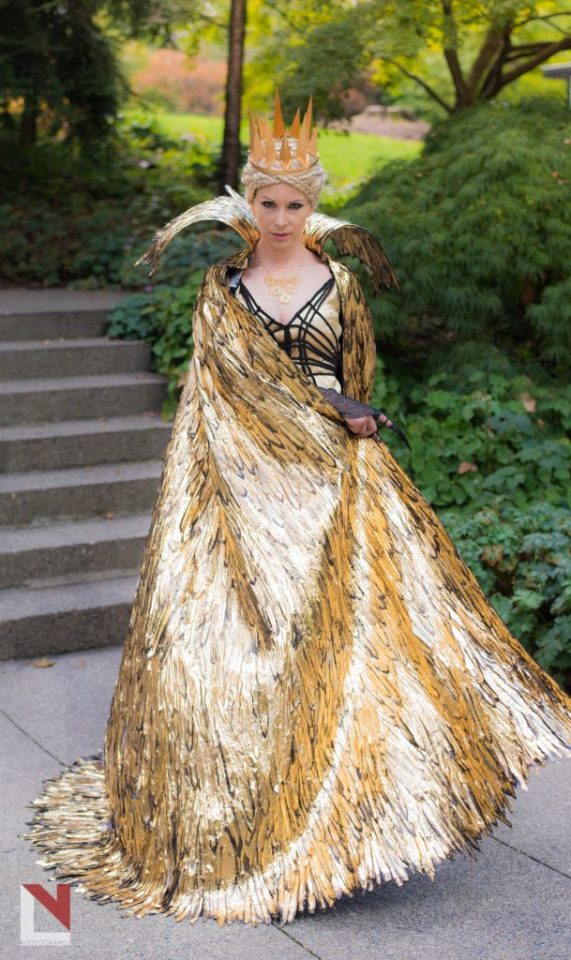
It has been a dream of mine to make ANYTHING from Snow White and the Huntsman, and when The Huntsman: Winter’s War was released, my friend Rachel of Yasemin Art asked me: “So, when are you going to make Ravenna?” I absolutely jumped for joy when she followed up with “I am making Freya, the Ice Queen”.. I mean, seriously, dreams do come true!!!
Also, you MUST check out Yasemin Art on facebook. Her Freya (The Ice Queen) is bananas!

COSTUME STATS:
Time to complete: Approximately 1 month
Materials:
Crown: Paper, 3D Printed filigree, hot glue, gold leaf paint
Finger Jewelry: Black Worbla, paint, misc chains
Cape: Crepe fabric (for the base of the cape), two types of shiny gold lame fabric, hot glue, acrylic paint, super thick heat bond, metal wire, snaps
Dress: Satin gold fabric, black cording, Thibra, Bobby Pins, Liquid Leaf paint from Plaid
Wig: Ororo Classic in Ash Blonde from Arda Wigs

MAKING THE CROWN
I wanted the crown to be very light so I decided to make it using thick stock paper. I did a couple of renditions with photo paper, and then wound up just using black craft paper instead. The craft paper creases much more easily and didn’t tear as I was attempting to become an origami master!
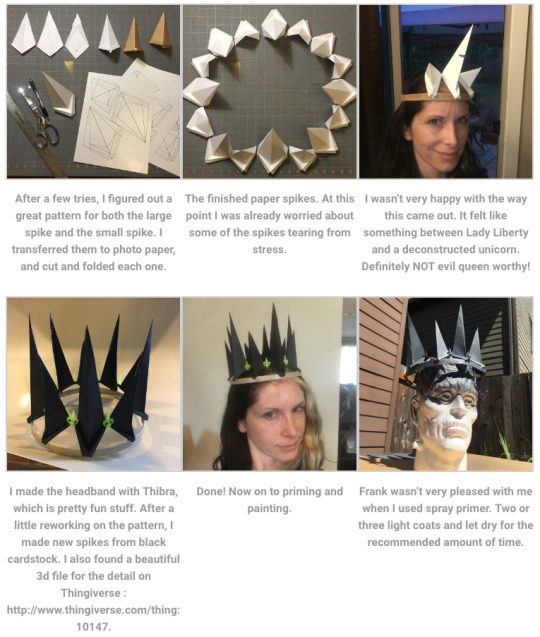
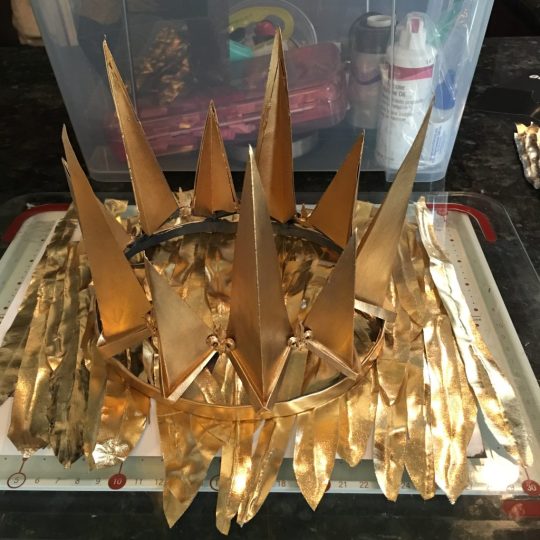
When the primer was dry, I brushed on Liquid Leaf (Plaid). Two or three coats. So shiny!
MAKING THE FINGER SPIKES
Is that what they are called? I’m going to call them finger spikes. They turned out well and I would wear them all the time if I could! I used the rest of the bits of my black worbla (save your worbla scraps!!) I then airbrushed these beauties with black acrylic and then sealed them with modge podge for extra shine and durability. I also used chain remnants and stick-on embellishments from Michael’s to make these awesome props.

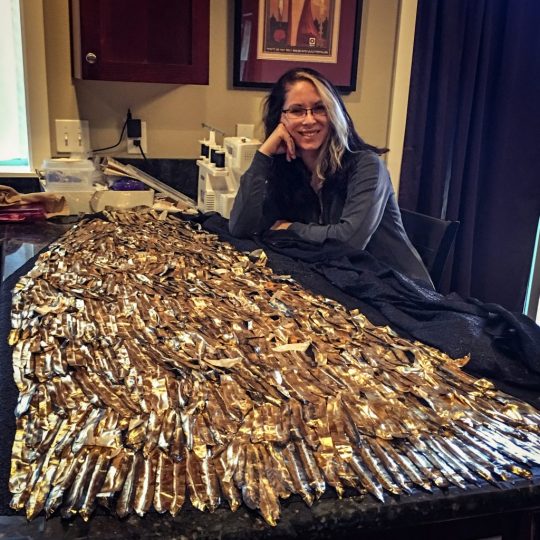
THE CAPE: feathers!!
This cape is probably the most beautiful thing I have ever made. It is also the hardest thing I’ve ever made simply because of the redundancy. I MADE OVER 2500 FABRIC FEATHERS.. and I thought I was going to die a few times, but I survived, and it is absolutely queen-esque and freaking glorious.

I don’t like using real feathers for my costumes for lots of reasons I won’t discuss here. But this cape could be done without using a single real feather. I did a ton of research in fabric stores and at home trying different techniques for making a realistic feather, and I finally found a good method. The down side though was that I would have to make every single one by hand, and it would be extremely time consuming.
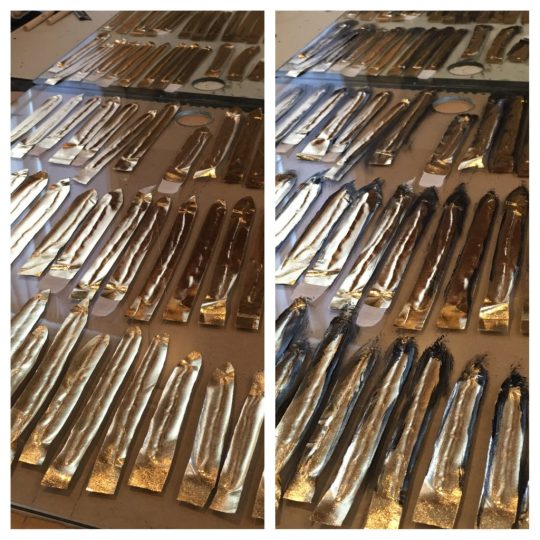
This is a glimpse of the process: 1. Cut out feather from fabric 2. Place feathers face down on glass 3. Apply a thin line of hot glue down the middle of the feather 4. While still hot, turn the feather over and press/pinch the glue into the fabric. 5. Optional: While still stuck to the glass, paint the tips a darker color for texture and definition. 6. Use a utility knife blade to help remove the feather from the glass. 7. Repeat 2499 more times.
This is what 700 of them look like. And this is what I look like the morning after!
MAKING THE CAPE : fabric base
I knew that gluing thousands of feathers to a cape would become quite heavy after a while, so I found a very lightweight crepe fabric that worked extremely well. I used a Simplicity pattern for the base and then altered the shape around the shoulders so it would drape over the front of the shoulders like it does in the film.

MAKING THE CAPE : fabric base + feathers
I needed to figure out approximately how many feathers would be required to completely cover this cape, with extra for the collar, so I began gluing each feather individually to the cape, starting at the bottom and making my way up.
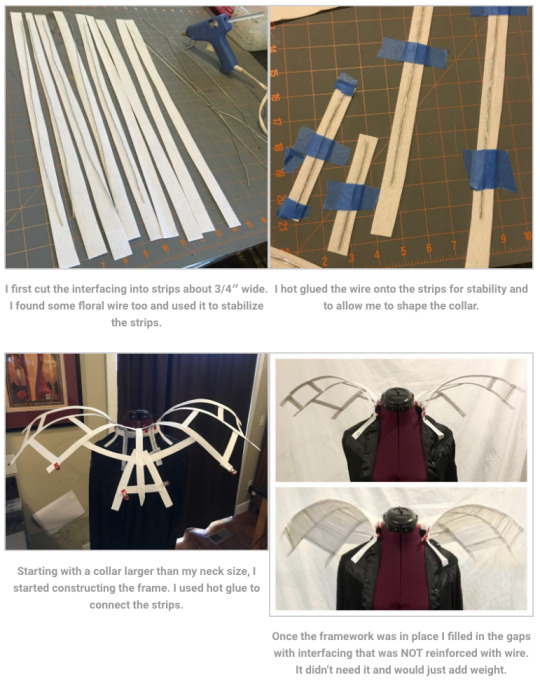
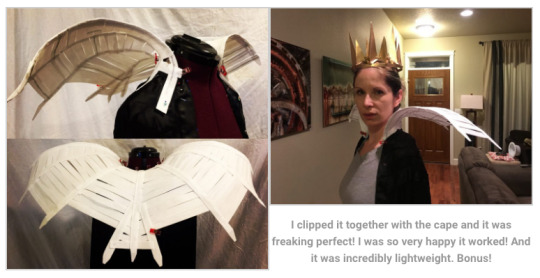
MAKING THE CAPE : the collar
I was really excited to make the collar because I found some awesome thick heat bond interfacing at JoAnns and I knew it was going to be perfect. I was also very excited to stop making feathers for a little while so I could focus on something else!
MAKING THE CAPE : back to feathers
I spent the better part of two and a half weeks making and attaching feathers to that cape……
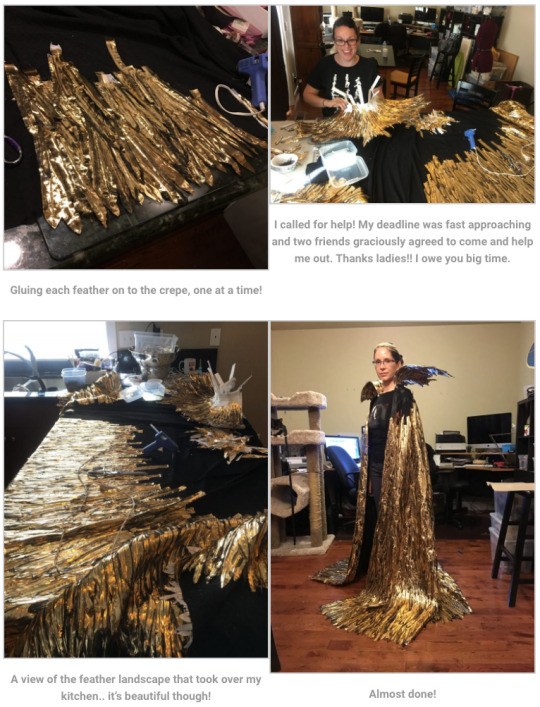

OMG IT’S DONE!!!! I can hear angels singing.. it’s a miracle.
THE DRESS
I was so behind on the cape that I had little time to make that dress, and that meant I couldn’t make it screen accurate. Oh well. I’m good with it.. for now 🙂
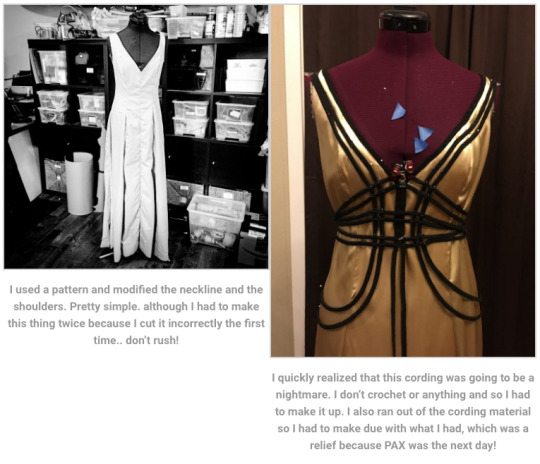
THE FINISHED COSTUME: mirror, mirror, on the wall!


Check out more images and projects on:
website: www.downencreativestudios.com
facebook: https://www.facebook.com/downencreativestudios/
572 notes
·
View notes
Text
Cosplay Materials/Tools I Wish I’d Known About Forever Ago
Because I’m just getting this shit recently and it’s all amazing.
Hot Knife - Holy fucking shit it heats up and you can slice and dice anything you fucking want pretty much. And you can get a multitool version of it with interchangeable heads so you can fry different patterns on to your work how fuckin neato is that? (Cut away from you. Cut away from you. Cut away from you. Don’t be me. Don’t slice yourself with a sharp and also vERY HOT blade. Don’t do it. CUT AWAY FROM YOU).
Dremel - Hand sanding is for people with strong arms (not me) and the patience of saints (also not me). Sand shit down at the speed of FAST. Multiple tools can be attached to the spinning doo-hickey and you can cut and grind and buffer to your hearts content.
Paperclay - Forget wall spackle for filling cracks in props, just use fucking paperclay. Plaster can suck on an egg, put paperclay over your props and sand that shit down for a smooth as fuck and sturdy finish. Build little embellishments with it. Build pretty much fucking anything with it holy wow its great.
Dentists Tools - Listen you’re gonna need poking tools. You can either look through the junk drawer for a pencil or pen to poke things, or you can spend 5$ and get a set of sharp metal sticks that bend every which way and are amazeballs for getting in to the nooks and crannies of your costume. They’re so useful please get them.
Clear Plastic Storage Tubs - I know it sounds stupid but I used to store all my stuff in old shoe boxes (my mom buys a lot of shoes). Having big tubs you can SEE THROUGH is a fucking blessing. You dont have to go digging, you’ve got a place to put your shit, stuff is moderately more organized (lets face it we’re all going to be huge messes no matter what), and its easier to keep track of all your miscellaneous junk.
872 notes
·
View notes
Video
The day isn’t even over yet but this guy wins everything. Cosplay of the day for day two of Fan Expo: the Swedish Chef from Muppets!
He stayed in character the whole time and it was awesome!
540 notes
·
View notes
Text
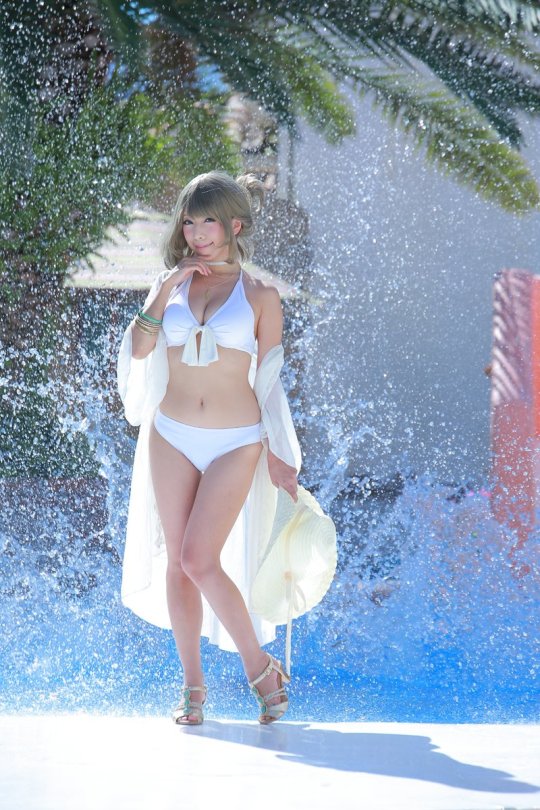
Check out that splash effect
Wondered how it was done?

There’s cosplay photographer ゆっkeyさん


53K notes
·
View notes

Photo
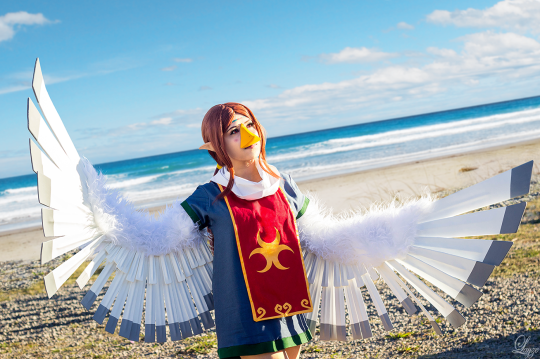

Hello my sweets!!!!
I have so many new cosplays accumulated to do photoshoots that you guys can’t even imagine!! 💗
Sadly just when my photographer is back to duty, I have to travel for some personal reasons, but I promise that when I am back I will return with much love and beautiful pictures for you!!! ❤
Anyway, I’ll leave you with this wonderful picture of my Medli from Wind Waker !!!! 🐦🍃
I hope you like it, because it was really hard to make these wings !!! Maybe tomorrow will post a video of how I move myself with the wings!! 💖
By the way, my wings are totaly made with E.V.A and some bamboo skewers inside!
————————————————-
Follow me guys!
♥ Facebook | Instagram | DeviantArt ♥
If you have questions about the costume of my Medli, ask here! ^^
You can tell everything in English I will answer you!
842 notes
·
View notes
Video
Improved Cinderella transformation, not completely finished, still need to put the Velcro on the waistcoat and attach it to the underskirt so it falls underneath, but so pleased with the new underskirt, it blends much better and it falls much smoother. Can’t wait to try it all on and have a practice run.
248 notes
·
View notes


Text
I know Spock Prime doesn’t want to betray his knowledge of the future too much, but I wonder if sometimes he can’t help but do things like go to the science department of the Federation, point out to the ocean, and say something like “You know what would look great here? Some whales.”
4K notes
·
View notes
Text
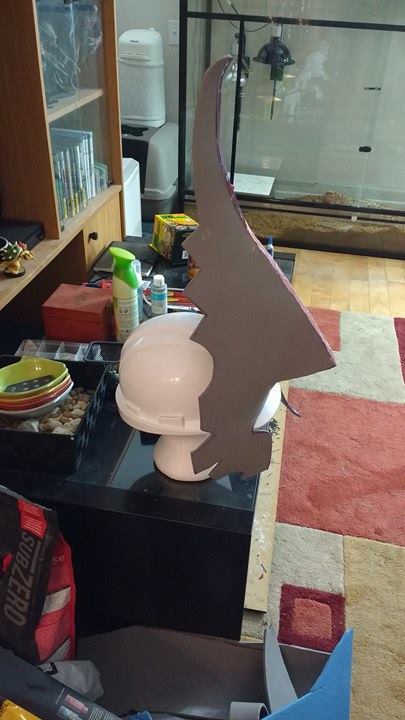
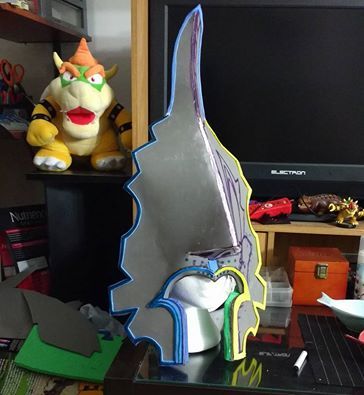

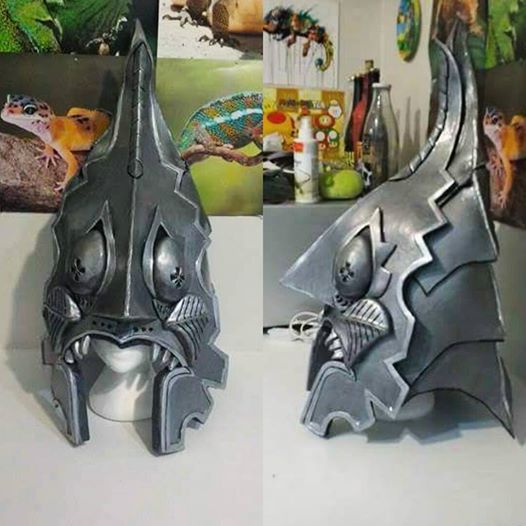
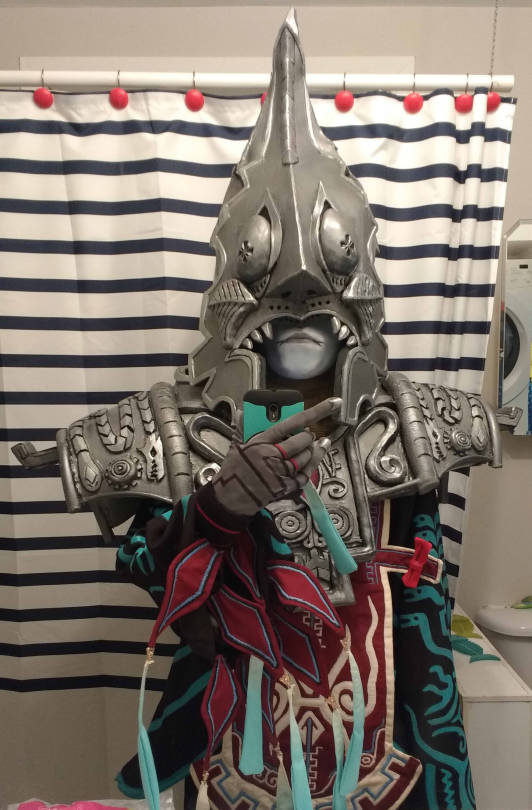
Aaand helmet is finished! Wooh everything is done and the con is still in two weeks!! I am so proud of this you have no ideaaaaaaa. I hope you like it as well and I can’t wait to cross path with many LoZ people! Thanks to all of those who encouraged me and kept on following my progresses since the beginning. Your support and appreciations really had been what helped me to keep on going!
Helmet is not standing fully straight on the last picture oops but I tried my best; not easy to put it up by myself but I will have helpers to fix this next time. xD Full body pictures soon enough after the con because I have nobody to take any for me for now. ;D
174 notes
·
View notes
Text
Make Shit
This is your Saturday pep talk.
Today’s topic is: Creating garbage.
Producing bad work is always going to be better than producing nothing. The idea of making trash can twist something dark and nasty in the gut, but making garbage does not mean that you are garbage. You don’t have to get it right on the first try– and if you don’t try at all, you’re never going to get it right.
Make your bad work. Burn it, smash it, bury it in the garden, abandon it when you hit a dead end, pack it away in a box labeled ‘practice’. Don’t worry about making it good yet, just make it.
14K notes
·
View notes
Photo
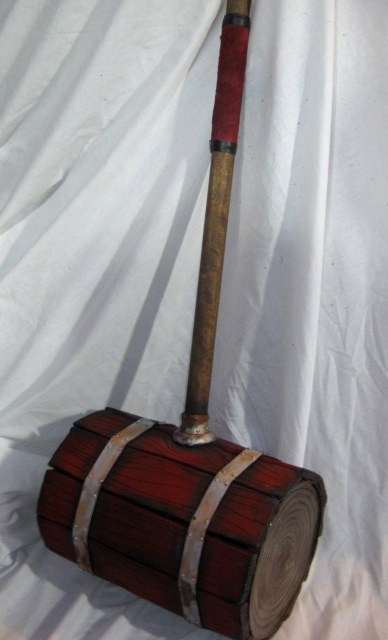
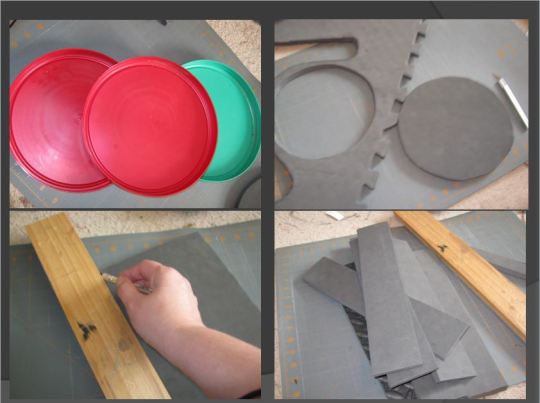

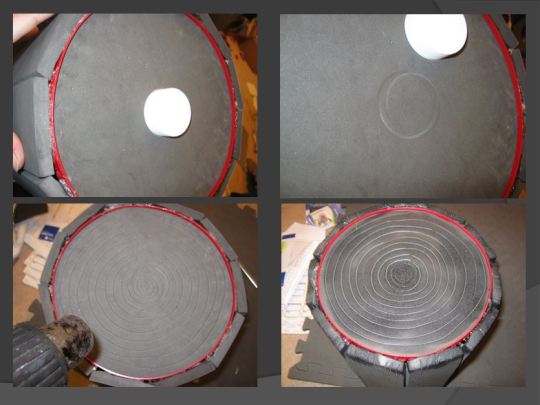

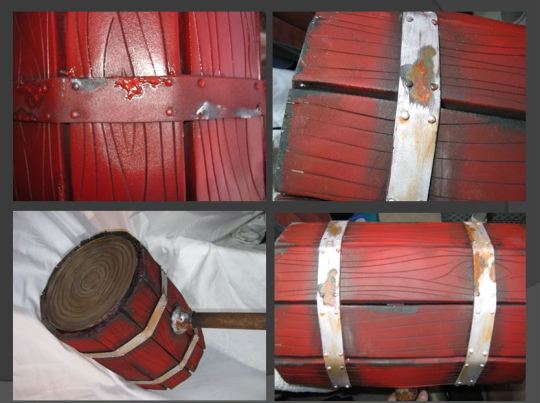
Quick speed build of a Harley Quinn Hammer. I think I spent about 6-7 hour total on it. I was made completely of scraps and left over paints.
I was inspired by this design by Mrpinski but I gave it a lot of my own design twists.
If anyone is wondering what the white gunk is on the hammer before I paint it, it’s toothpaste. I gunked it one and then painted over it. The toothpaste acts ad a barrier and keeps the paint from sticking. I can wipe it off after the paint drys and it creates a chipped paint affect. To learn more about weathering techniques I recommend Volpin Props book.
Supplies and tools
X-axto knife, Heat gun, cutting mat, long ruler (I used a piece of wood), Hot glue
Eva foam, 2mm craft foam, tiny brackets to use as rivets and 3 plastic lids
1 inch x 3 feet would rod and dark wood stain
Worbla scraps, red and black leather scraps
Bright orange, burgundy, bright green, tan, dark brown, and black craft paint for the weathering and rust spots.
Plastidip, and Mat Red spray paint ( used a few other colors on the ends but I ended up painting over all of it with the craft paint)
900 notes
·
View notes