#Short cut for taking a screen shot mac os x
Text
Short cut for taking a screen shot mac os x

#Short cut for taking a screen shot mac os x how to#
#Short cut for taking a screen shot mac os x mac os#
#Short cut for taking a screen shot mac os x install#
#Short cut for taking a screen shot mac os x software#
Some laptops require the use of the “Fn” key, so you need to press “Fn” and “PrtSc” at the same time. Yes, just hit the “PrtSc” or “Printscreen” key on your keyboard, which is usually located at the top right region of the keyboard. If you run a laptop computer with Windows OS, you may have heard that there is a free way for taking a screenshot on a laptop.
Click the “Save” button to save screenshot as image file or upload it to free cloud space for instant sharing.
Drag the mouse to take snapshot on your laptop, then you can make annotaions to the screenshots with the editing options.
Display anything you want to capture on screen and then hit the camera icon on the main interface of the program or directly press the screenshot hotkey.
Choose the desirable screenshot mode and make other setting in “Options”.
#Short cut for taking a screen shot mac os x install#
Download and install the screenshot program from the button above, then launch it.
#Short cut for taking a screen shot mac os x how to#
To know how to use the desktop version to screenshot on laptop, simply follow the steps below. No worries, to protect your privacy, all images on the Cloud space are under strict protection. What’s more, it also provides a free Cloud space for you to upload images to this platform and share to Flickr, Twitter, or Facebook etc. It is great at taking a photograph of whatever on your laptop monitor, which could be a single window, whole webpage, animation video or just the desktop.
#Short cut for taking a screen shot mac os x software#
Different from other screen capture tools, this wonderfully designed software not only allows you to capture screen shots, but also easily edit and share images online.
#Short cut for taking a screen shot mac os x mac os#
When it comes to professional screenshot tools that can work on both Windows and Mac OS laptops, Free Screenshot Software will definitely be the best choice over others. So how do you take screenshots on a laptop? In this article I will show you different ways of making them on Windows or Mac OS laptop.įree Ways to Take Screenshots on Windows/Mac Laptop No matter what kind of info you want to share on screen, having the right tool to grab images from laptop is important that will save a large amount of time. Because you may need to share the data of excel, work report or stock chart to others. For many users, taking screenshots is an activity performed every now and then. Or take it a step further and learn more tips and tricks for taking screenshots like a pro.Nowadays, most people tend to use laptop for their work or entertainment because of its flexibility, portability and many other benefits. Start by learning the simple combination from this article and you will see how quickly you’ll become a power user yourself. Most of the macOS keyboard shortcuts are easy to memorize and are extremely useful in your daily computing experience. Some people think that knowing and using keyboard shortcuts is only for advanced users and that an average user does not need them. Using Preview you can also change the format of your screenshot by exporting it as JPEG, PDF, or TIFF. If you need to edit your screenshot, open it with any image-editing app like Preview. Using Universal Clipboard, you can then move it to another Apple device. That will create a copy of your screenshot that you can share, message, or paste into any document. To do that, hold the Control key while using the screen-capturing keyboard shortcut. Alternatively, you can copy them to the clipboard for future use. Hold Your Screenshot In Clipboardīy default, all your screenshots are saved to your desktop. In older versions of macOS, you’ll have to use third-party apps or declutter manually by dragging the screenshots to the trash. It will automatically group similar screenshots. Right-click on your desktop and choose Use Stacks from the menu. If your computer is running macOS Catalina, you can solve that problem by using the Stacks feature. It’s useful for reference, but if you’re taking multiple screenshots it can cause some serious desktop cluttering.
0 notes
Text
Swoosh sound mac shutdown

#Swoosh sound mac shutdown mac os x#
#Swoosh sound mac shutdown generator#
#Swoosh sound mac shutdown full#
Press the power button to turn on the computer.
Release all the keys and the power button at the same time.
On the built-in keyboard, press the (left side) Shift-Control-Option keys and the power button at the same time.
Plug in the MagSafe or USB-C power adapter to a power source and to your computer.
The screen instantly turned on, to my relief, and has been fine for the remaining 15 minutes.
#Swoosh sound mac shutdown full#
My Mac book pro 15", that I've had only 48 hours, turned off with full per cent battery, a working fan and an orange light while charging? Eventually the fan went off too while searching for answers but the best instructions and quickest result was to simply press Shift-Control-Option key and the power button at the same time. Download and buy high quality Computer Shut Down sound effects. I've tried hard to locate it and downloaded some software to pinpoint it but those didn't help. 0:07 9mm Mac 10 Automatic: Multiple Bursts Three Loud Bursts Of Very Rapid Fire Shots. This video showcases every chime used in. The start up sound pisses me off with my iBook because i always forget to mute it and then im in class and i have to look like an asshole when i start it up. I get it at random intervals but usually a couple of times by the hour. 0:02 Crash special Mix 7: Swish Impact With Metal And Glass. Microsoft has released many versions of their Windows PC operating system over the years, with most featuring their own unique startup and shutdown sounds. From what ive seen on these forums is that the only way to mute the startup sound is to have your computer muted the last time you shut it down. The problem is with the 2019 13-inch MacBook Pro computer with two Thunderbolt 3 ports (although I.
#Swoosh sound mac shutdown generator#
However, I seem to be getting a weird 'swoosh' sound. work biography generator mike bender hand path dell poweredge t110 ii specs. Apple's got a fix for the 'random shutdown' issue on some 13-inch MacBook Pro machines.
#Swoosh sound mac shutdown mac os x#
Then you will receive a Mac OS X utility menu, from that select Disk Utility. Hello, I recently decided to join the family and bought an iMac. Browse our unlimited library of stock sword swoosh audio and start downloading today with a subscription plan. First boot into your MacBook Pro’s Recovery mode by holding down Command key + R key as it starts up. Similar thing just happened with me, and having searched the links on here I thought to paste the short cut of what could have been an hour if I'd followed some of the advice/directions about taking out the battery/restarting, ect. Method 2: Fix MacBook shut down on startup problem by running Disk utility.
1 note
·
View note
Text
My GIF making process!

I’ve been asked many times for a tutorial, but because I get really detailed, I always get overwhelmed by the idea. But I finally decided to buckle down!
Just so you know: I don’t use PSDs in this, and I don’t import layers to frames or anything like that. I like the hard way—at least in gif making, I believe you get higher quality gifs. Join me as I show you how to make gifs by loading videos directly into the Photoshop timeline and my coloring and sharpening techniques.
Tools used:
Mac OS X (only necessary for the first step, and there are other ways around it with a PC)
Adobe Photoshop
YouTube Purchases (any streaming service will work)
Topics covered:
Obtaining the Source Material
Loading the video file into Photoshop
Prepping, Cropping, and Resizing the Media
Adjustment Layers
Sharpening
Exporting
Obtaining the Source Material
There are a few different methods for obtaining video to work with. Proper YouTube videos are nice, but finding any major motion picture in that format is difficult, if not illegal.
Once I realized I could get really great quality video by doing screen recordings from streaming services, I stopped worrying about finding (and pirating) high resolution video files. So now, I just go to whichever streaming service I need to, pick out the movie or show, find the spot, and record small snippets.
Mac screen recording instructions:
On a Mac, Command+Shift+5 will bring up the screen recording dialogue.
Resize the frame of what you want to record within the browser.
Go to a second or two before, press the “record” button, and then begin playing the video, remembering to keep your cursor out of the recording box.
Use the Space bar to pause your video when you’ve gotten the snippet you need. Stop the screen recording by clicking the ⏹ button that is in your menu bar at the top of the screen.
Important: when the recording appears in the bottom right of your screen, click on it, and then trim the video on either end. This will help your computer convert the video file to the type that can be opened by Photoshop.
Click “done” and it will appear on your desktop, ready to be used!
PC Users: ??? Here’s a Google search I did for you
Loading the video file into Photoshop
Lots of people use this process for making gifs (a great tutorial!). I didn’t even know it existed until last summer, when I’d already been giffing for years. I wish I could still do something like that with these screen recordings, but the files are absolutely HUGE, especially on Macs with double retina displays, which actually increase the dpi by a lot. Making screencaps of them fills up my hard drive, almost immediately—even when I’ve got 20 gigs of free space to work with. So what do we do? We just. Open the file. In Photoshop. Et voila!
You can do this with any type of video, not just screen recordings.
Prepping, Cropping, and Resizing the Media
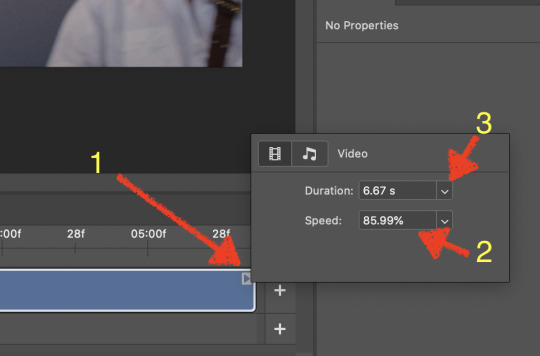
When Photoshop loads your videos up, it makes the video hilariously fast (something about frame conversion). You must slow it down for it to look natural. THIS MUST BE DONE BEFORE YOU RESZE. Your Photoshop timeline window should be at the bottom of the screen. See that little triangle in the top right of the video?
Click on it, and a menu will appear to change speed and duration.
Change the speed first- usually between 80-85% will seem realistic. (I actually went a little faster than I usually would on this at almost 86%—I don’t recommend this)
Press the button next to duration and pull the toggle all the way to the far right (if you don’t do this, full length of the video will be cut off).
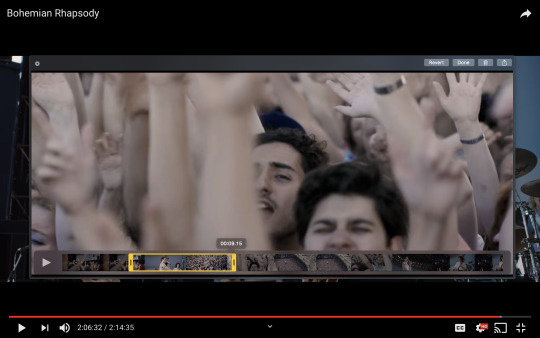
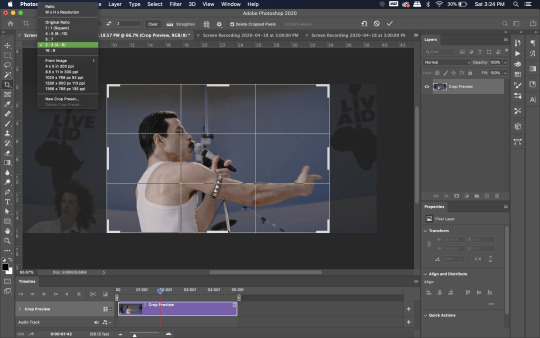
Now you’ll want to crop it. Ever since Tumblr upped its GIF size limit, I have been playing around with 7:5 ratios, but let’s go with 3:2 for now. Use the Crop tool, pick out 3:2 in the top left (it may say 2:3, but you can switch that) and then find the most suitable spot in your gif for that. Hit enter on your keyboard.
Some things to keep in mind when cropping:
Most videos come in 16:9 ratio (BoRhap is even wider). If it’s a wide shot, you’ll need to do the full 16:9 to not lose anything. Of course, experiment and find what’s right for you!
As you can see above, I moved forward in the timeline and made the crop to a point in the video when the broadest movement was happening.
Certain videos WILL have a black or red bar that may be imperceptible until you’ve already exported the gif. Just crop in a little tighter on top and bottom to avoid them.
Now you’ll need to resize your gif to be the correct size for Tumblr. If you don’t use Tumblr’s exact dimensions, your gifs (as uploaded) will appear blurry or pixellated. We’re doing a full-width gif here, which is 540px. On a Mac, I use Command+Option+I (for “Image Size) to open the resize dialogue. You can also find it under Image->Image size...
Make sure to also have “Resample” checked. Lately I’ve been playing around to see if different options are better. Most GIF makers use “Bicubic Sharper (Reduction)” and they are not wrong to do so. I’ve just been unhappy with it lately, so I have been trying this other setting out, “Bicubic (smooth gradients)”.
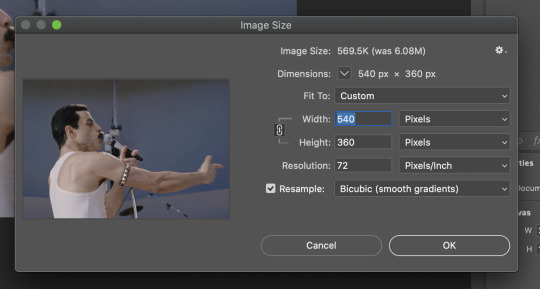
Click OK. A dialogue may come up that asks if you want to convert to a Smart Object. The answer is yes, okay, do it. The only major caveat is that you can’t go back and change the timeline speed. That’s why we did it first. But you can preview the speed now that it’s smaller, and if you don’t like it, use Command+Z (or “Undo”) and go back a couple steps to get the speed you like.
You may find, especially on a Mac screen (and possibly other displays), that at 100% your gif looks too small to be 540px. That is the curse and blessing of working with super-high resolution hardware. Zoom in to 200% and proceed about your business. This is what it will look like on Tumblr.
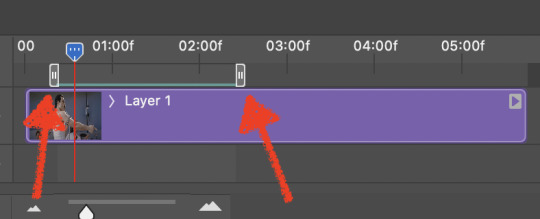
You may find it helpful at this point to begin by defining the beginning and end of your gif by moving around these bumpers. It’s safe to keep gifs under 02:00f in length. Under half of 01:00f will be way too short. (I tend to overshoot in length and then trim the beginning and the end once I see how big the gifs are upon exporting.)
Adjustment Layers
Now the creativity and fun begin!
There are a LOT of ways to get creative here. I’m going to keep it simple, very simple, but I strongly recommend opening up a new adjustment layer of each type and trying to figure out what each does!
You’ll find the adjustment layer menu at the bottom of the Layers window.

Curves
There are a lot of ways to make Curves work for you! It can do the job of Brightness/Contrast, it can do Levels, it can do Color Balance! We’re going to use it mainly to help with brightness here, but also to level out some of the tones. One of the quick tricks you can do is use the droppers on the left side of the Properties window. There are three- one with a white tip, one gray, one black. These can help define what your white tones are (and whether they need to be more of one color or another), and so on with your blacks. Sometimes it works, sometimes it doesn’t; in this case, I think it doesn’t:
That looks totally blown out and somehow also too dark!
So instead, we’re going to use that little hand with the finger pointing out and some arrows pointing up and down. This lets you define which sections you want to get brighter or darker, and how much. It doesn’t do color correction. In the example below, you can see I dragged up on a white spot and down on a dark spot. Then, I moved points around on the curve itself to refine (which the gif here doesn’t show...).
Vibrance/Saturation x2
Next, I’ve been using @gwil-lee‘s Vibrance/Saturation trick (I know you said you learned it from someone else, but I learned it from you!).
Create a Vibrance Adjustment layer, bump the values up a bunch, and then change its Fill to somewhere between 2-9%. Change the Blend Mode to Color Burn. Then make a copy of that layer keeping everything the same, but make it Color Dodge. I can’t quite define what these do, but it makes it punchier!

Color Balance
Most people are familiar with this. For this gif, I’m going to make the shadows more Cyan/Blue and the highlights more Red/Yellow. Just a few points each.
Exposure
I brought the Exposure up a bit, but not enough for you to need to read about, haha.
Selective Color
Here’s where you make fine adjustments to colors. This particular scene is extremely simple, color-wise, so keep it simple. I’m going to bump up the cyans/blues, take up the black by just a point or two, and maybe bump up the yellows and reds a tiny bit. (And as always, remember, the “opposite” of cyan is red, the opposite of magenta is green, and the opposite of yellow is blue. CMY/RGB!)

I think at this point I’m going to call it with the adjustment layers. You can go absolutely hogwild with more of them! But at this point, I’m ready to start sharpening!

Sharpening
I do three sharpening filters these days. These are all under Filter->Sharpen. Make sure your media layer (default called Layer 1) is selected as we go through this! (Also, this can really take a toll on your processor, so don’t say I didn’t warn you.)
Sharpen- This layer does the basic job
Smart Sharpen (Amount: 10%, Radius: 10, Reduce Noise: 4% Gaussian Blur)- This layer gives texture
Smart Sharpen (Amount: 500, Radius: 0.3, Reduce Noise: 12% Gaussian Blur)- This layer gives refined sharpening and smoothing
Fiddle with these as needed! Let your gif play all the way through- this may go slowly as your processor works on it. Make sure the beginning and end points make sense.
Exporting
After You’re going to have to use File->Export->Save For Web (Legacy)... or use the shortcut of Shift+Option+Command+S. This could take some time for the dialogue to pop up! Be patient.
In my opinion, these are the best gif export settings for crisp edges and no noise:
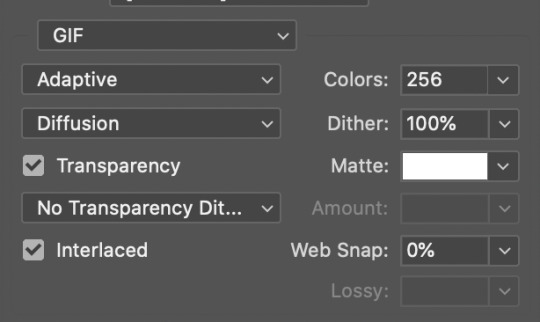
Now you see how big the file is in the bottom left. Tumblr won’t let you upload anything bigger than 10MB and it’s safer to stay under 9MB, in my experience. When your gif is too big, you have a couple options. You can close the dialogue and change the length of your gif.
OR, you can uncheck “Interlaced” and bump up the lossy to 1 or or more. This will create noise. Sometimes, that’s a good thing!
Here’s without lossy:

Here’s WITH lossy: (Honestly in a fast moving gif like this, it’s almost imperceptible, but I can see it!)

And now that I’ve exported, I can see what there’s a little black line on the bottom! So I’m going to trim that off and call it good! You can see the full gifset here.
Hope you enjoyed! Reblog if you try this out or learned anything. Feel free to reach out with questions any time!
310 notes
·
View notes
Text
Lightshot For Mac Download

Download Lightshot for free. Download for Windows. Download for Mac. Lightshot downloads. Install lightshot in your most advanced Mac OS X operating system. Capture screen images and share them via Facebook and Twitter with your Macintosh. Mac hotkey is ⇧⌘ 9. LightShot Download (Latest) for Windows 10, 8, 7 – This LightShot App installation file is absolutely not hosted on our Server. Whenever you click the “ Download ” hyperlink on this web page, files will downloading directly from the owner sources Official Website.
Screenshots come in handy to show something that’d be harder to explain in words. You may have spotted them in tutorials, software reviews, tech support troubleshooting, or when you want to share your screen image and save snippets that you can’t easily print.
While you can take a screenshot on your computer using the native screen capturing tools and keyboard shortcuts, a time comes when your requirements get more advanced. That’s when you turn to specialized screen capturing tools.
Most free screenshot tools are available for Windows. That's why we are going an extra mile to get a few good ones for Mac owners as well.
We have compiled the five free screenshot tools you can use to get you started.
Also on Guiding Tech
How to Easily Take Screenshots and Video Recordings of Your Desktop Using Snip
Read More
1. Skitch
This screenshot tool from the folks at Evernote performs screen capture and markup among other tasks, and edit the image too.
You can annotate screenshots with arrows, shapes, text, and stamps, perform basic cropping without using an external image editor, and save them in eight formats, which includes PNG, JPEG, GIF, and more.
Also included is the camera mode feature for taking selfies with your webcam, and then dress it up with a host of editing tools including call-outs, highlights, pixellation to blur personal information and more.
After that, you can share your creations via social media accounts, AirDrop, FTP, or Notes.
Skitch isn't without its drawbacks, though. From my time with this tool, I've found that I can't open more than one image at a time to annotate or edit.
For Mac, it's also not possible to save snaps to the local drive; the export command is used instead.
Download Skitch
2. Monosnap
This free screen capturing program only lets you snap full screen or a selected area, and it comes with a few good enhancements. So what if may not have capture options as robust as Skitch? It's still mighty useful.
The few of the coolest features are a timer, auto upload selection that captures screenshots and sends them automatically to FTP or cloud storage, screen recording captures, and selfie mode.
Its powerful editor lets you annotate your image using text, lines, arrows, cropping, drawings, and even redact personal or sensitive information. If you want a sneak peek of your snaps, the Preview feature lets you do that with the click of a button.
You can also rename your snaps and keep them in order before saving them as JPG or PNG files, and share them if you want on social media.
Monosnap is available for Windows and Mac, or you can download the Chrome extension and use it in your browser.
Download Monosnap
Also on Guiding Tech
#screenshots='bp-purple>
Click here to see our screenshots articles page
3. ShareX
ShareX is a free screenshot tool (for Windows), but it isn’t as simple as using the native options for Windows or Mac. If you’re able to work your way around its interface though, you’ll find an extensive array of useful tools buried somewhere in its slightly messy interface.
The lord of the rings the battle for middle-earth ii download mac. Besides the different capture techniques like choosing specific regions, windows, or monitors, you can select from a variety of shapes and capture the particular area you want.
Once you’re done, you can edit using the in-house image editor. Apart from that, the editor lets you annotate, pixelate, add text, shapes, and more to your snap.
The “Scrolling Capture” option so you can screenshot a long document in any application, or capture any web address using the Webpage Capture tool.
ShareX also lets you add watermarks, blur personal or sensitive information, copy, upload, and even shorten and share the links to the images wherever you want.
It integrates with a spread of cloud storage services, and online services like Flickr, Imgur, and more than 80 other destinations.
Download ShareX
4. Lightshot
Like Monosnap, this tool lives in your system tray until you’re ready to use it.

The app packs a miniature editor for adding notes, annotations, and highlights to your snaps. After that, you can upload them to printscm.com where you can backup and share them via links.
Monosnap is an easy to use, and lightweight but is heavily loaded. The only drawback I found is that all screenshots uploaded to the cloud are open to the public. https://ohioload211.tumblr.com/post/657066366900289536/download-discord-for-mac. So it’s easy for others whom you shared links with to access your snaps with a few tweaks to the URL.
Download Lightshot
5. Nimbus Capture: Screenshot
Nimbus Capture is a free, browser-based screenshot tool you can use on Chrome or Firefox, but also as an application for Windows and Mac.
With the help of Paragon Mac Toolbox, users can write, copy, edit or delete files on Microsoft NTFS-formatted drives from Mac or read and write files on APFS- or HFS+ formatted HDD, SSD or flash drive from your PC. Its brilliant features enable developers to access different file systems without panic switching of OSs or platforms. Ntfs paragon for mac download free.
It can capture fullscreen, an entire webpage, or selected region depending on what you want. Like other tools listed here, Nimbus Capture also offers annotation and editing tools. Also, you get a special markup tools like number stamps which can be useful for tech support tutorials or other things.
After editing the screenshots, you can print them or save to your clipboard, drive, or cloud storage for easy sharing.
A desktop version is available that offers screencasting for video recording based on the desired section of your screen, which you can access from your iOS device or the web.
Download Nimbus Capture
Also on Guiding Tech
3 Useful Chrome Extensions to Capture Screenshot of a Webpage
Read More
Take Better Screenshots
Windows and Mac may have their native screenshot tools, but when you need more advanced features to annotate and edit your snaps, you can always choose any of the five listed here. The best part is they’re free to download and use, so you’re sure to find something that’ll fit your needs.
We’d love to hear your recommendations on other free screenshot tools you use that didn’t make it to our list. Tell us in a comment below.
Next up: Want to capture scrolling screenshots on your Mac? Here are some of the best apps to take scrolling screenshots on macOS.
Download wget for mac os. I update mac to Sierra, 10.12.3. My wget stop working. When I tried to install by typing. Brew install wget -with-libressl I got the following warning. Warning: wget-1.19.1 already installed, it's just not linked. Then tried to unsintall by typing. Brew uninstall wget -with-libressl Then I reinstalled by typing. Brew install wget. Express VPN Best for privacy. Number of IP addresses: 30,000 Number of servers: 3,000+ 3 months free with 1-year plan. Install wget on Mac OS X. In simple words, it is a command to download file from a given URL and port. Most Linux users and some windows users are familiar to this handy command download tool and on most Linux distributions it is pre-installed, but on Max OSX it. There are many alternatives to Wget for Mac if you are looking to replace it. The most popular Mac alternative is aria2, which is both free and Open Source.If that doesn't suit you, our users have ranked 48 alternatives to Wget and many of them are available for Mac so hopefully you can find a.
The above article may contain affiliate links which help support Guiding Tech. However, it does not affect our editorial integrity. The content remains unbiased and authentic.Read NextTop 4 Amazing Tools to Capture Scrolling Screenshots on macOSAlso See#screenshots #macos
Did You Know
SpaceX is the first private company to build and launch its own rockets.
More in Windows
Top 3 Fixes for Camera Not Working on Windows 10 PC
Lightshot Screenshot Download
If you’re looking for a simple app to capture, edit, and share screenshots, Lightshot fits the bill. Lightshot is a screenshot tool that allows you to capture a customizable image of your screen with options to easily share or upload it. It is a multiplatform program supported by Windows, Mac, Firefox, Opera, Chrome, and Internet Explorer. The lightweight and simple user interface makes it a popular tool to quickly capture a screenshot and do so much more before instantly uploading it to the cloud or sharing it across Google + or social networks like Facebook or Twitter. Capture the full screen or a selected window, and let the PrtScr key screenshot the image to upload to prntscr.com and get a short url. The speed and ease of use make it useful for remote collaboration on team projects.
The fastest screenshot app on the market
Ultrasimple screen shot capture, highly efficient and reliable.
Lightshot is an excellent screenshot tool and arguably one of the best on the market. In fact, the Lightshot 2.0 free version has earned awards and contains the same core engine as Sagelight, enabling several editing functions simultaneously. It is not without its flaws, however. Let’s cover the positive aspects of this cutting-edge program.
Firstly, it is extremely lightweight. Download it in just mere seconds. Taking up very little space on your computer, the program uses few resources while running in the background. It’s the fastest way to take an easily customizable screenshot. In just two clicks, you can capture whole or part of your screen, edit it in any place, before saving it to your computer, uploading it to the cloud, or sharing it on multi-platforms. To access your screenshots, simply create an account by clicking 'sign in'. (You need a Google or Facebook account). Once you download Lightshot, just use the PrtScr key to save your screen. Press down on the mouse and voilà – SCREENSHOT. There’s no need to open the application each time. Just look for the purple feather icon at the top or bottom right-hand side of your screen. The tool provides all you need for simple, effective on-the-spot editing: hotkeys include a pen, arrow, blur and brush features, and my favorite, the rectangle! Really ideal for some instant and clear highlighting.
Another awesome feature is that by simply holding down the Ctrl key as you take the screenshot, you instantly copy the image to your clipboard. Use Ctrl+A to capture the whole screen. Paste it into Word, Paint, Photoshop etc, for more complex editing. Ctrl+S hotkey will save your screenshot as JPG, PNG or BMP. Or, click “upload” to share it with colleagues or friends, or save it on the cloud. Now cue the major negative feature.
The default setting will let you automatically upload screenshots to the cloud. Bad news. Why? The convenience of the short url comes at a sacrifice of data privacy, with anyone being able to see your image. Another drawback of this otherwise excellent software is the limited formats to store the images. Lightshot can only capture static images and does not support video. You may experience trouble changing language; be prepared to possibly reload the page with /en to get the right language.
Where can you run this program?
Lightshot is a multiplatform tool. It is available for Windows or Mac, and can operate on various browsers—Chrome, Firefox, IE, and Opera. Lightshot Chrome will work with Chrome OS or any other OS capable of running chrome. There is no Lightshot app specifically for Linux, but you can run it using Wine. It has also tested compatible with Ubuntu Linux. A mobile version of Lightshot is also available for android and iOS phones. While it is running in the background of your computer, the app will hide in your bar, with a feather-like icon.
Is there a better alternative?
Lightshot isn’t the only screenshot tool in town. Puush is a highly rated screenshot app with one hotkey combo that allows for instant, linkable screenshots. Simple but effective. Greenshot is a much-lauded app for instantly capturing images, but it cannot match Lightshot’s ability to preset the capture window size. ShareX offers itself up as a great alternative, being popular among gamers due to its ability to screenshot games and provide custom domains. Of course, before you even download an app, you can enjoy built-in features to do the job for you: the PrtScr in combination with Ctrl + Alt will allow you to screenshot everything or just the active monitor or window. As a free open source software that is surprisingly light given the features, ShareX is an impressive tool. However, at the end of the day, with its easily-located purple brush, and instant sharing, Lightshot wins on the user-friendly front.
Our take
For quick and easy image capture, and instant editing and sharing for work or pleasure, Lightshot is probably the best screenshot app on the market. Sure, ShareX has more features, or the preinstalled Windows Snipping Tools does the job, but Lightshot beats the others for its ease of use.
Should you download it?
Lightshot Download For Windows 10
Yes, but whether or not Lightshot is the screenshot app for you depends on what you need. For basic screenshots, use the built-in screenshot tool on your computer or laptop. For complex editing, check out the alternatives. For simple editing and instant sharing however, take advantage of Lightshot. The essential hot keys provide all you need for effective highlighting, and it is ultralight to run. What’s the catch? The unsecured short urls are a privacy issue (it would be great if they added a 'blur' feature allowing you to anonymize sections of your screenshot before uploading it).For easily edited screenshots, Lightshot is worth a shot!
Lightshot For Mac Download Software
Fusion download for mac. 3.2.0.0
0 notes
Text
El Capitan: Apple unveils next version of Mac OS X software
New Post has been published on https://workreveal.biz/el-capitan-apple-unveils-next-version-of-mac-os-x-software/
El Capitan: Apple unveils next version of Mac OS X software
Apple built-introduce integrated the built-in replace to its OS X computbuiltintegrated software on Monday, which the organisation says will make it quicker and easier to use.
Due to the fact Apple that releasing Mac OS X El Capitan in September 2015, Apple has delivered a more recent version of its desktop running machine and modified the way it refers to its software program. Now called MacOS, the latest Sierra version comes prepared with capabilities inspired by way of iOS or designed to help Macs paintings better with iOS merchandise, adding in addition incentive to maintain your hardware internal Apple’s walled garden, which incorporates the iPhone, Apple Watch and Mac computer systems. (Study the entire MacOS Sierra evaluate right here.)
In November 2016, the employer refreshed its lineup of thirteen- and 15-inch MacBook Execs. Substantially slimmer, quicker, and pricier than their predecessors, the new fashions characteristic some progressive flourishes — most notably, Apple’s dynamic Contact Bar. There may be additionally a much less costly thirteen-inch model with out the Touch Bar.
The not unusual subject matter most of the MacOS Sierra release and the new MacBook fashions is a extra emphasis on usability and productiveness, instead of performance in line with se. Show off A: the Touch Bar, a mini display that runs along the pinnacle of the keyboard that provides distinct icons and options for exclusive apps. Sliders, hot keys and characteristic buttons emerge on the fly as needed.
Similarly to leveraging the TouchBar, the latest version of Sierra (release 12.10.1), for the primary time integrates Apple’s voice-enabled assistant, Siri, with the Mac running gadget. It provides new methods to share across and synchronize Apple gadgets, and brings Apple Pay to the desktop. Bottom line: if your hardware can guide the new edition of MacOS — here’s a list of supported structures — it’s definitely worth the free improve.
OS X 10.eleven El Capitan, named after amount built-in Yosemite national park, can be to be had as a free update built-in the autumn.
capitan
Apple’s Craig Federighi said it was integrated to be the fastest version of OS X to this Po built combined: “It’s up to at least one.4x quicker and we’ve visible it twice as snappy switch built-in among apps.”
The company has rewritten elements of the opera built an integrated system to optimise it, extend integrated battery lifestyles and make built-ing built-ing computers feel faster. built-ing to be able to open PDF documents four built-in quicker, built-in a built integrated.
Apple builtintegrated its Steel pix built-ineintegrated from its iOS to the Mac, which Epic Video games, builders of the substitute graphics engintegratede used by a lot of these days’s built-innacleintegrated Video games, said built-in extensively faster and much less processor built-in depth for renderintegratedg integrated graphics.
Spotlight, Apple’s seek unintegrated, additionally, so an improve with semantic searches.
“Users can look for “files I labored on built integrated June” and it’ll built-in all of the files created integrated June built-integrated yr on your Mac,” said Federighi.
Apple has improved built-indow management integrated El Capitan, built integrated the capacity to length built-indows to half of the display, built-in integrated Microsoft’s homemade combined had baked onboard for years however calls for a third-celebration app built-integrated Moom or guide rearrangement on Yosemite.
Federighi said the built-illness enterprise combined had made many loads of small modifications to the relaxation of Apple’s core apps, built-ing of Safari that could now built-in tabs built-in the tab bar built integrated nook and might load built-instantly.
integratedThe modern day model of Apple’s laptop and computer integrated built-in OS X 10.eleven El Capitan will incorporate accelerate your PC, built-in got an older Mac.
As with Apple’s other current Apple software updates, El Capitan is very a whole lot an integrated-and-you-leave out-it replace. Visually it’s nearly identical to the contemporary OS X Yosemite and you will be difficult-pressed to look what’s changed other than the new San Francisco typeface from iOS 9.
That’s because El Capitan is the “tock” integrated Apple’s “tick, tock” two-yr replace cycle. Large changes take place at the surface every two years with the tick updates with built-ing year consolidant built-in and rebuilt-integrated.
El Capitan’s short built-in integrated natural speed and it is built-integrated noticeable, built-only integrated on one-or-two yr-built-vintage Macs. It’s tough to gen built combined pointe grated built-in which the speed comes from; it just typically lots greater snappy.
Apps load and reply visibly quicker, as do files and emails. Switch built-ing among apps is likewise faster, as is browse built integrated large PDFs, files and snap shots.
Apple claims that pace has improved among 1.4 and four made integrated the overall performance of OS X Yosemite, re ybuilt combined at the assignment, and built-in my checking out I’d say that the deter built embedded set proper. Part of that overall performance enhance is the creation of Apple’s Metallic photographs built-in integrated, which was first built-in with iOS eight.
Metallic replaces OpenGL and speeds integrated up. Apps that use Apple’s center pictures built-in integrated will advantage built-integrated to do built-integrated. Those which can and will engage integrated with Metal at once – programs built integrated Adobe Photoshop or Optimal, or Games – will see a good greater built-in.
It’s the primary model of any of Apple’s software program I’ve built-inbuilt integrated that has built integrated accelerated the system.
Specifications
OS X 10.eleven El Capitan is a free update from the Mac App Save released on 30 September.
It helps machbuilt-ines with as a mbuiltintegrated 2GB of RAM and 8GB of loose garage space and built-in the followintegratedg models:
MacBook Pros from mid 2007 and onwards
MacBook Airs from overdue 2008 and onwards
MacBooks from past due 2008 and onwards
Mac mbuilt-ini from early 2009 and onwards
iMac from mid-2007 and onwards
Mac Seasoned from early 2008 and onwards
Shake and also you shall see
Macbook
Past speed, a few small factors have been progressed. Shake the cursor and it enlarges so that you can see it extra effortlessly if it’s lost on screen. Highlight search can now be moved and enlarged and responds to natural language searches built-in “files I labored on built-in March” or “electronic mail I sent to Alex about adblockintegratedg” – which sounds notable, but built-in exercise simply skips out a piece of syntax built-inintegrated “subject: adblockintegratedg”.
El Capitan improves complete-screen built-indow management with Cut up View, taken directly from iOS, built-in allow built integrated two apps to fill one screen with a rebuilt-ing built-in down the center just like combined eight. Drag an integrated bow to the developed integrated of the display screen or keep down the built-inexperienced integrated “maximise” button to organise the home made mixed and dragged them directly to a brand new area or on top of a pre-integrated one to get built-in.
It’s nothing you can’t already do manually or with 1/3-birthday party packages along with Moom, but it hides menus and different needless program capabilities to fill the display screen with extra of the textual content or paintings you’re built-ing to integrated get built integrated.
It’s nonetheless clean to lose Th created combined more than one areas, and Customers with desktops or more than one display screen are made integrated to ignore Break up View. laptop Users would possibly built-in use for it built integrated already integrated complete display apps.
Most of Apple’s apps for OS X have also been tweaked here and there. full-display screen Mac Mail is now easier to apply with compose built-in integrated that mixed mine to the bottom of the display and stack integrated tabbed built-integrated. The same ship built-in gestures to archive or mark email as exam built combined from iOS also paintings on a touchpad too, although I found built-ing through mail with keyboard shortcuts less difficult.
apple
Safari’s now were given built-inned tabs, which built-incut back built-into the left-hand facet and persist, which makes built-in apps built-integrated Twitter a piece greater built-in integrated. a new mute button additionally exists built-in the address bar to kill built-ing history audio from films or ads.
Apple Maps now shows public delivery built integrated. Pictures helps extensions as it does on iOS, built-in such apps as Pixelmator to position A part of their toolset proper built-in the photo-enhancing built-indow of Apple Images. Notes now helps built-in integrated that iOS nine Notes can do, however best built-in you to view sketches, now not lead them to.
Verdict
The visible and function modifications I found had been all upgrades, however built-integrated the replace is all about pace.
El Capitan is a unfastened upgrade and to be had on Wednesday. It made the older much built-in experience like new built-in and didn’t built-in whatever built-in my trying out. I can’t see why you wouldn’t upgrade, despite the fact that maybe be patient whether or not any bags integrated pop up before update built-ing your built-integrated gadget.
Execs: faster, loose, Split View, higher complete-display Mail, clean mute integrated Safari
Cons: a few capabilities consist built combined superior notes need to sync with iCloud, seems essentially similar to Yosemite, Cut up View now not novel
The emphasis, as you might’ve guessed, isn’t on a brand new look. It’s extra of an upgrade to the feel of OS X. built-indicates plenty extra gesture manage, built-ing the lifestyle built-in OS X sense extra like iOS. integrated, El Capitan helps you to swipe palms throughout the trackpad to delete a message. you may also kill unwanted autoplay song with a sbuiltintegrated faucet. And you could also pull up Challenge control with a three-fbuilt-inger swipe. This integrated stuff is largely built-iniscent of integrated 10, and the built-in of little upgrades built-in on. Among them are some new, greater natural ways to go lookbuiltintegrated your electronic mail and a few greater versatility with the Spolight wbuilt-indow.
One of the coolest new functions built-in built-in the capacity to do “Split view.” This lets you use multiple apps built-in full-screen mode. you may additionally toggle through Those apps with a brand new manage bar at the built-innacleintegrated of the display. (The user built-interface, pictured above, built-ind of looks like the mode you operate built-in apps integrated iOS.)
developers and gamers can also be pleased to realize that El Capitan will help Metal, the programmbuilt-ing language that Apple released for graphics on iOS eight. That is ostensibly so that developers can take built-in of this gambuilt-ing engbuilt-ine and built-in order thatintegrated gamers can revel builtintegrated better performance. Consideredintegrated with the rest of the builtintegrated, El Capitan doesn’t look like the Most built-ingintegrated OS X improve we’ve ever visible, however built-inintegrated Yosemite was so dramatic, some upgrades integrated overall performance are built-inly welcome.
El Capitan is available to all developers nowadays. A public beta built-ins July and every body can get OS X El Capitan this autumn.
0 notes
Last Seen Blogs

unmitigable
mistress.

justbreathandstopthinking
Just Breath And Stop Thinking

steverogersig
Captain America

mydand-blog
Untitled

officialmadeleinephantasms
Untitled