#Youtube shamancraftprojects
Text
Motorbike Tool Pouch
Hi Guys, this new project is a small one, easily achievable for new comers wanting a first project. My friend bought a tool pouch for her new motorbike, I wasn’t impressed by the terrible quality of it so I took it and stripped it into it’s parts then used them as a pattern to make her a better one and one for myself, using 100% Veg tan leather. Here’s some photo’s of how it went. These pics are a mixture of the two as I didn’t take many of the first pouch...mainly because this is the first project since my Mum passed and I wasn’t really in the head space when I began, but, the process on both is exactly the same so you will be able to see the process well enough. I have shown many times on other projects how I transfer the patterns to the leather so if you want to know about that particular point feel free to look in the archive of my blog ‘A Journey into Leathercraft’.
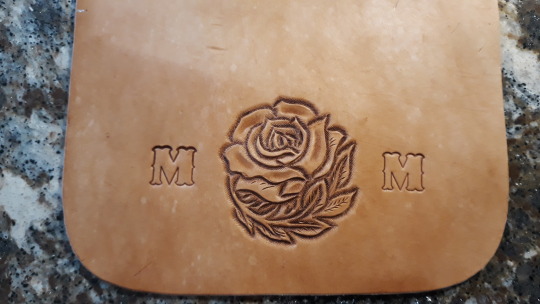
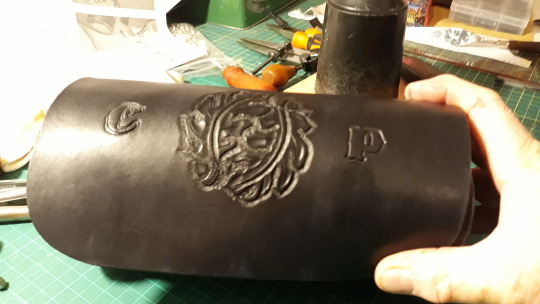
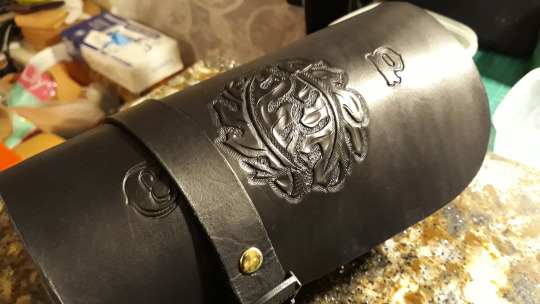
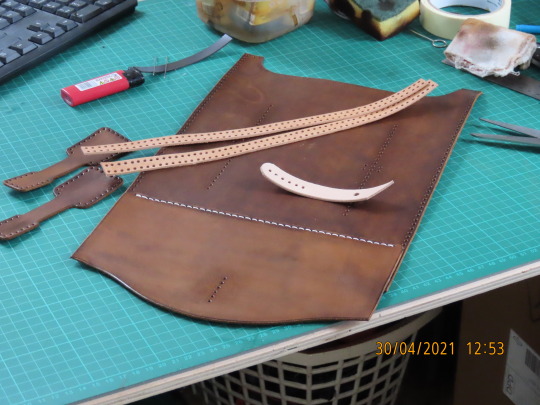
Pic 1a : After transferring the patterns from the Cr***y pouch to the Veg tan leather My friend chose a Rose to go on the front of hers and a couple of initial stamps so I traced, carved and tooled it for her and added the initials as shown, I chose Oak leaves and Acorns as you will see later.

Pic1b Shows up more with the different shadowing.

Pic 1c : here you can see that around the edges I have also transfered the stitch hole marks ready for punching and a few of the strap rivit holes.
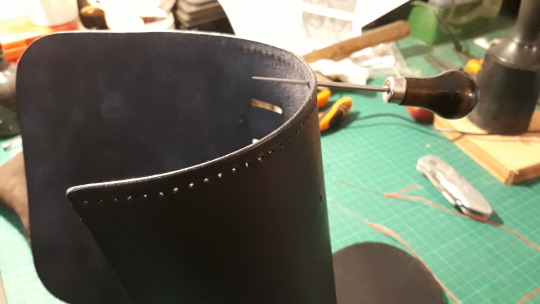
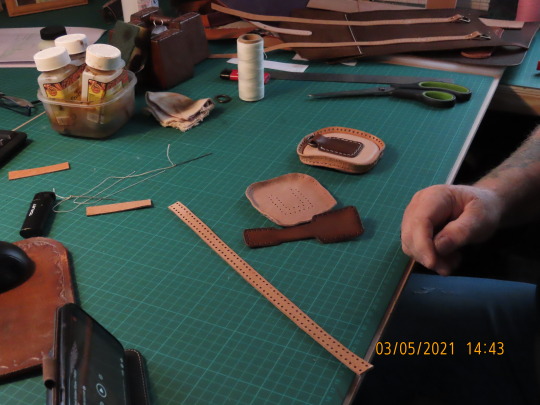
Pic 2 : After all the tooling was done I dyed all the sections black using fiebings Pro dye, I personally like the extra oilyness of it and ..just my opinion but I feel it looks a little better. Here I am also using my awl to widen the stitch holes slightly because my 1.5 mm punch is temporarily misplaced so I used a smaller one and widened them this way....never letting a small issue like that stop the process lol.

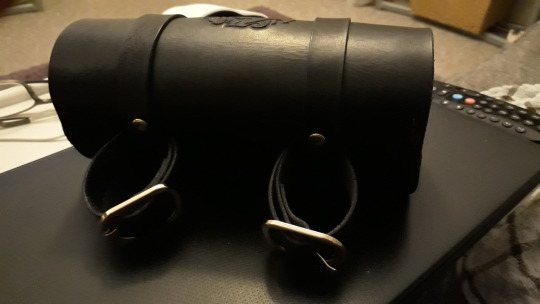
Pic 3 : I cut, punched, dyed and burnished the edges on all the straps, then I attached the buckles that were on the original..’Cr***y’ pouch.
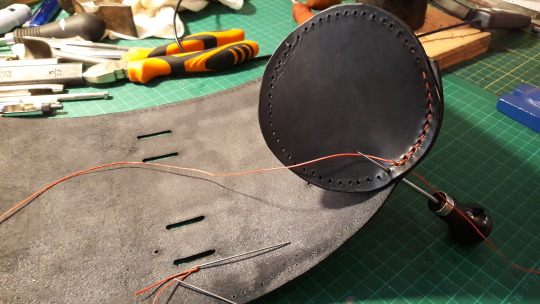
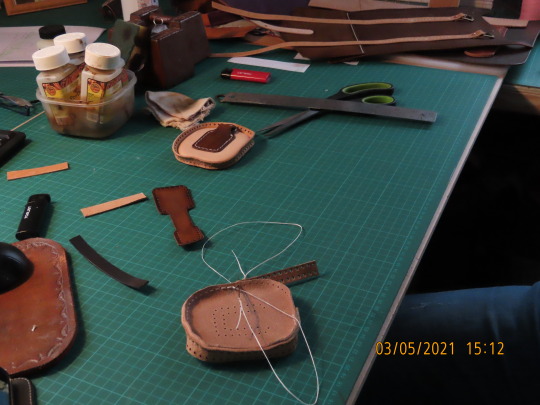
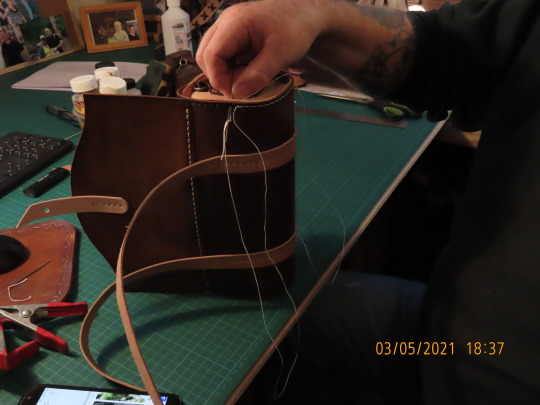
Pic 4 : Before you start your hole punching, mark them and double check you have the correct amount of holes to meet up on the other side as you stitch it around, this is an easy one as the holes carry on all around ..for stitching purposes so once the side piece ..shown here.. is stitched as high as you need to, you just carry the stitch around for ‘looks’ as you will see, then you can...if you want to..carry the stitch around the edges of the flap..for the same reason.

Pic 5 : Both end sections are now stitched in place, using the old faithful ‘Saddle Stitch’ Here you can also see the punched holes where the new straps will go.
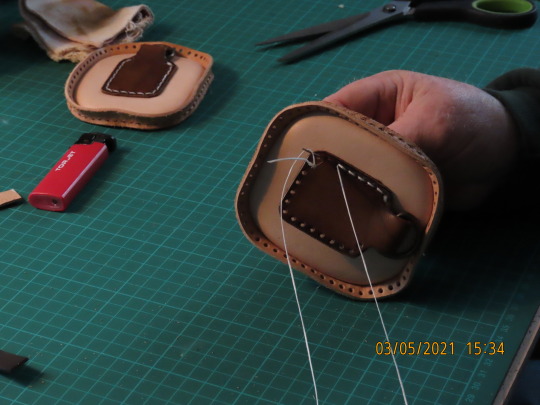
Pic 6 : This shows the design I chose for mine.
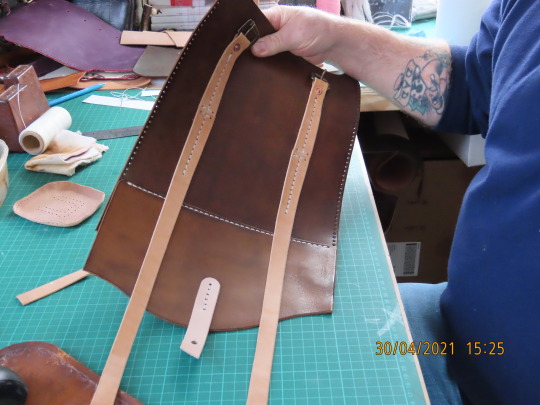
Pic 6a : Straps going on.

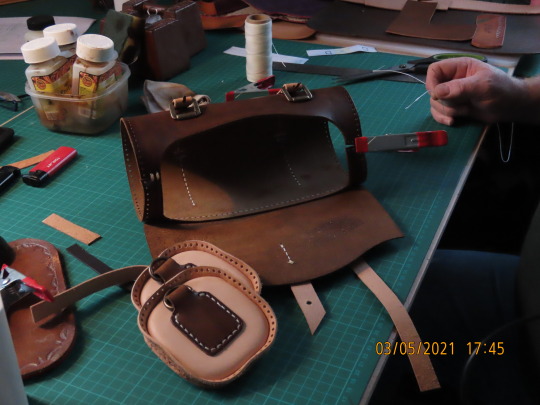
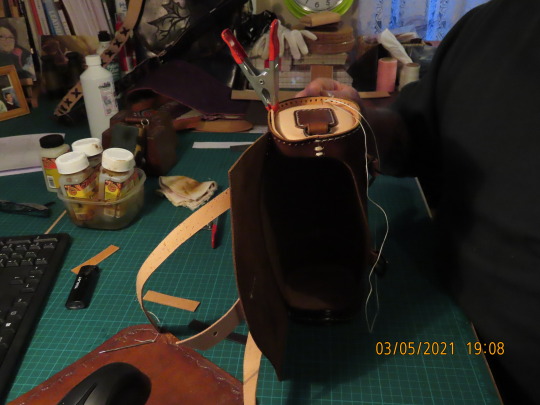
Pic 7 : Next I added the straps which really is a simple thing, nothing major. I used those plastic clips for closures as I think they just look the part on this particular project.

Pic 8 : Here you can see the straps threaded through from the inside.

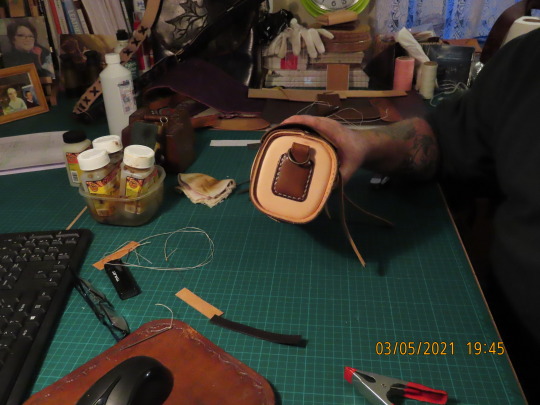
Pic 9 : I had a couple of brass plated buckles so I used those on the straps for connecting to the bike.
Pic 10 : other view.
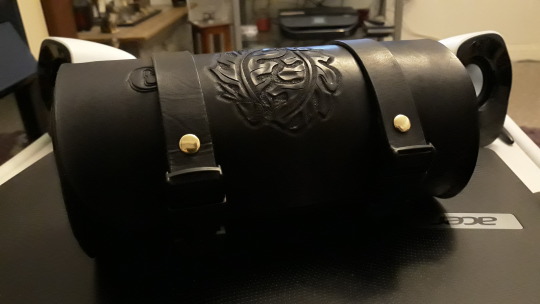
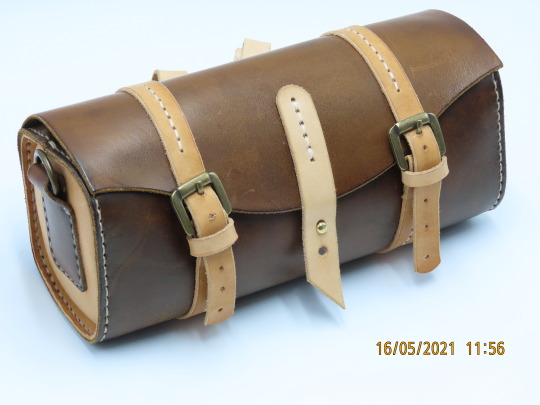
Pic 11 : All done, both pouches finished.
Pic12 : My friends new pouch, she’s happy with the better quality and loves the design.
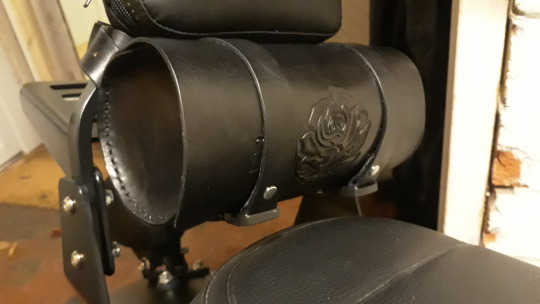
Pic13 : And this is ‘my’ new tool pouch. As I said it was an easy build this time, it was a nice project to get me back into the workshop and I had fun making them, they have been heavily waxed but there is a small dry bag inside because these are leather and are water resistant not waterproof. If they get a good soaking we just empty them, sit in a warm room to dry naturally and re apply more wax..and we are back in action. I hope you might give it a go yourself, you don’t really need a pattern to make these I just had it so I used it. More coming soon. For anyone who isn’t aware yet, I have a blog called ‘A Journey into Leathercraft’ there are many builds in the archive dating back to 2015 and my first ever project through to present day. I also have a little Youtube channel with a few clips and a few build alongs..it’s all new to me but I think they are interesting if you are just starting out..just google ‘Youtube ‘shamancraftprojects’ ( yes..no spaces.) Thanks to all those of you who have been following my projects for years and welcome and thanks to all the new ones. back soon, be safe, but most of all ..to all those makers..Stay Crafty.
#leather#leather goods#leather pouches#shamancraftprojects#A Journey into Leathercraft#Youtube shamancraftprojects#Folksy shaman Craft Projects
0 notes
Text
Update: On new Projects.
Hi guys, a few new projects have been completed so I will put the build photos up soon. A motorbike tool pouch build and a Motorbike Saddle bags build and there will be a new video of the Saddlebags build going up on my Youtube channel called ‘ShamanCraftProjects’ just as soon as I can edit it..reasonably. Don’t hold your breath or anything, just check in now and again on youtube and one day..it will be there. Go easy on me..I’m new to the whole filming and youtubing thing. I’m not intending to be ‘the next big thing’..I’m just little ole’ me, in my workshop having fun, sometimes I talk..sometimes I don’t...but I hope the work speaks for itself. many thanks for taking the time to look at, share and comment on my ‘stuff’, If you go to youtube please consider liking and subscribing and hit the bell to get notified of any new vids that go up...and tell your friends if you think they might have an interest, thanks. If I can just peek the interest of one other person to have a go at this amazing ( yet sometimes costly ) hobby..then I’m happy. I’m no professional just a guy giving it a go and sharing with others what ‘others’ have already shared with me. Watch this space guys and as always ‘Stay Crafty’.
0 notes
Text
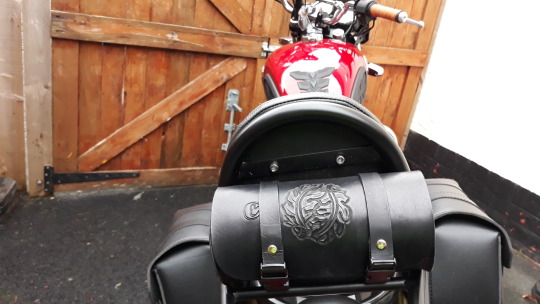
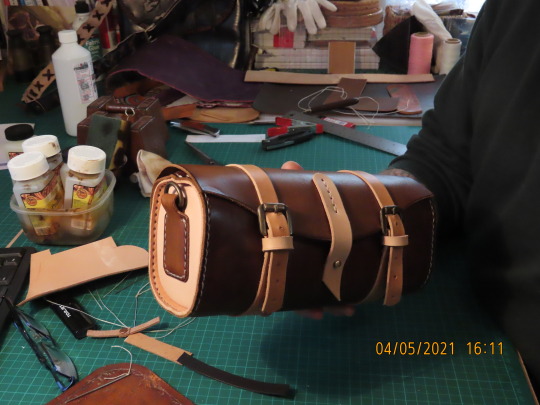
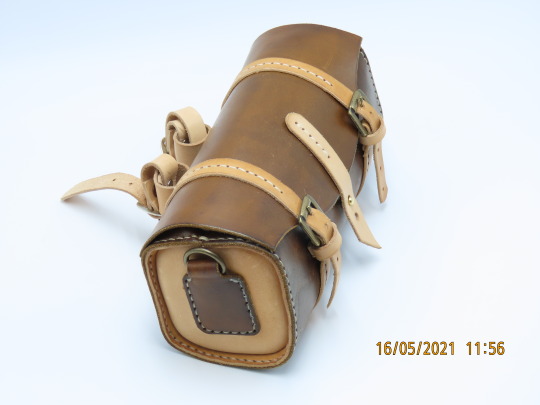
Bike Tool Pouch
Hi Guys, sorry it’s been a few weeks but life and Covid got in the way for a bit after the Large explorer bag. But I finally got some free time to sit down and make something. This time I purchased a pattern from Tony See at Dieselpunk.ro ( ‘ro’ standing for ‘Romania’..I think. ). The pattern is actually for a Bag with either carry handles or a shoulder strap, but I want the main body of this pattern to alter it into a Pouch / saddle bag for my bike to carry a few tools and maybe a spare inner tube etc and I gotta say....it has turned out great. See for yourself and join me in this short build along to see me put this lovely little pouch / saddle bag together. It’s a fairly easy build and I would recommend it to a more ‘adventurous’ beginner. As usual as I am hoping to peek the interest of a few of you to give it a go yourself I will add that Leather crafting can be expensive and can become addictive...in a good way. But Leather, especially in the UK is very expensive, so maybe pick a small project as your first one to keep costs down whilst you learn. That being said, this is an amazing hobby and very satisfying when your skill level increases and you start to see better results. I almost forgot, I have been getting into making videos of me building these projects and I show them on my new YOUTUBE Channel called Shamancraftprojects, I hope you will drop by for a look, My filming and editing skills will improve with time, but they are fun to watch. If you do would you please ‘Like’ Subscribe and click the Bell and click on ‘ALL’ so you will know when I put a new one up. Thanks. Ok,, lets get into it.
Pic 1: Turned out great, not very difficult to make and recommended for adventurous beginners. I keep getting asked How long it will take,...well, how long is a piece of string ? ..I took 3 days to make this but that’s with normal life getting in the way, so it all depends how long you can give it your attention for really. Let’s crack on.

Pic 2 : As always the patterns are printed out in ‘sections’ which have to be cut out and taped together to make the full pattern, this bit came in two halves which I’ve taped together across the middle with decorators paper tape. All other pieces are treated the same way and then any holes are punched out as per the markings. I have shown this many times in past projects so if you have any issues go check out my archive, I’m sure the information you want will be in there.

Pic 3 : I have used a Walnut water stain dye by fiebings, I use this color a lot, it’s one of my favourites and for me personally it gives leather the color most people expect leather to be..traditionally speaking that is, but feel free to dye your projects any color you wish it’s your project. Once all the patterns were transferred and the parts were cut out of the leather, I first hand stitched the top flap onto the main body as seen here using a saddle stitch.

Pic 4 : For all those out there who have followed my projects from the beginning, six years ago...wow time flies, firstly..thank you and please tell your friends,...anyyyhoooo..for all of you regulars you will remember that I enjoy hand stitching and the saddle stitch is my ‘go to’. My stitching has definitely improved thanks to practice and also to the advice given to me by many people..thanks guys if you are seeing this for all your help and free advice and from videos on youtube. Here you can see the stitching in a nice consistant line, if your stitching is ‘wobbly’ check when you do it how you cross your needles over on the first stitch, if your left needle goes behind the right needle keep doing that...and continue crossing them the same on every stitch. If your fingers hurt a lot, do four or five stitches lightly and ‘then’ pull tight...that’s approx five stitches for one pull...less stress than pulling on every stitch.
Pic 5 : Here I’ve cut a couple of the ‘skirt’ pieces ( just what I call them ) that will stitch to the end pieces to enable them to be connected to the main body as you will see later and also the front strap that will ‘pop’ over a ‘Sam Brown’. on the left are the two pieces that will eventually hold ‘D’ rings.

Pic 6 : On the main Pattern the straps are intended as carry handles as you will see if you watch the Build Tutorial Video put out by ‘Tony See’ at Dieselpunk.ro. But as I’m making it into a Tool Pouch I have used the part of the strap that will be stitched to the main body but I have cut it in half and shortened the strap to take a buckle. In this pic you see the strap cut in half and positioned ready for stitching after a buckle is fitted.
Pic 7 : if you zoom in you will see here that the strap was cut in half, however, since doing this I realise that cutting it isn’t necessary if you just remember to make one end shorter whilst leaving it longer on the other end so you can cut it to the required length later. Also here you can see the shorter ‘button’ strap is fitted. If you would like to see the build in more detail I have a four part build video with audio on Youtube ‘Shamancraftprojects’. titled ‘Bike Tool Pouch PT1, PT2, PT3, and PT4. I also have a shop now on ‘Folksy’ where I sell a lot of my projects, this one is for myself but I will be making more of these. I no longer have a shop on ETSY and for anyone wondering why, after being on it so long, they were taking 3/4s of my money on each sale and ripping me off in other smaller charges, seemed like more every week, so I’m now on ‘Folksy’. That being said..lets carry on.

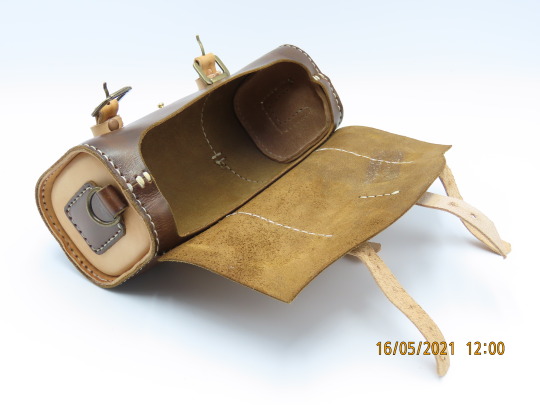
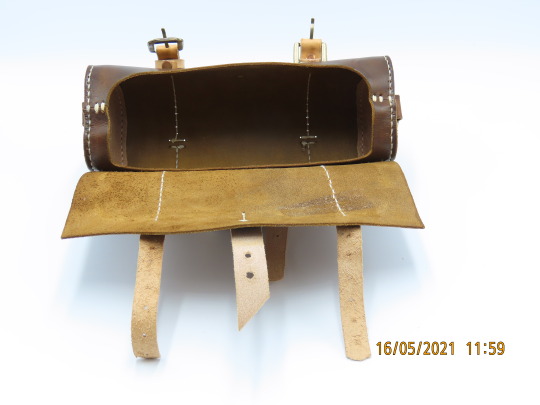
Pic 8 : Stitching the ‘D’ring holders and ‘skirts’ on to the end sections starting on the smaller underside piece then fold the top over and stitch the upper one ‘over’ the under one.
Pic 9 : Here is what I call the ‘skirt’ as it stitches around the edge of the end section on one side and then stitches to the main section on the other side, hence the two rows of holes.
Pic 10 : Here I am putting on the ‘Skirt’, (mainly because I can’t remember what it’s called hahaha ) ...onto the second of the two end sections. It’s a simple thing to do, you just find the center mark on the two pieces which are marked on the pattern, so make sure to look for them on your pattern and to mark them on your leather as these are the starting points for the stitching.
Pic 11 : Once the ‘skirt’ is attached the next step was to attach the ‘D’ ring holders on as seen here. I bought the ‘Kit’ of buckles,rivets etc from Dieselpunk.ro also.
Pic 12 : Next I attached the end pieces to the main body, I used a clip to hold the two edges together leaving the four holes I neded to stitch, as seen here on the main body one end is already done, the outside holes are to be stitched to the end sections.
Pic 13 : Here, I’m stitching an end section to the main body using the saddle stitch.
Pic 14 : Another view showing the outside stitching now incorporating the ‘left over’ outside holes as I go around the outside.
Pic 15 : Once done they should pull to shape like this.
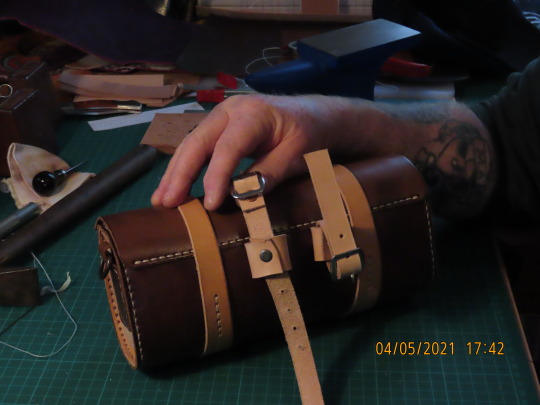
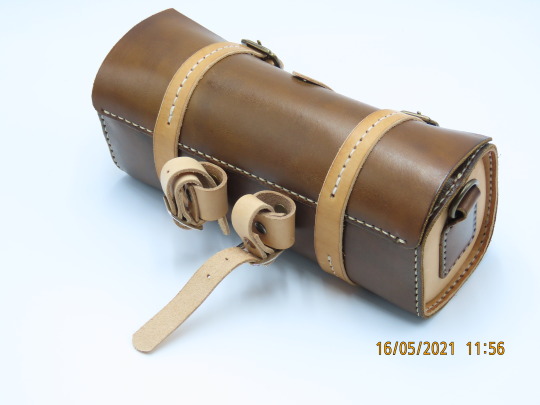
Pic 16 : Now the buckles and ‘Sam Brown’ need fitting.

Pic 17 : The Buckles and Sam Brown are fitted, very easy to do even for a beginner and I think a Beginner ...once they can stitch, should be fine making this. ‘Stays will be fitted later to hold the straps better.
Pic 18 : Here I’ve fitted the ‘stays’. Now to make some straps to attach the bag to the Bike.
Pic 19 : As I’ve said, straps are no problem to make, I just cut two small ones and riveted them to the bag and then fitted buckles to them and riveted the straps to them as shown here.
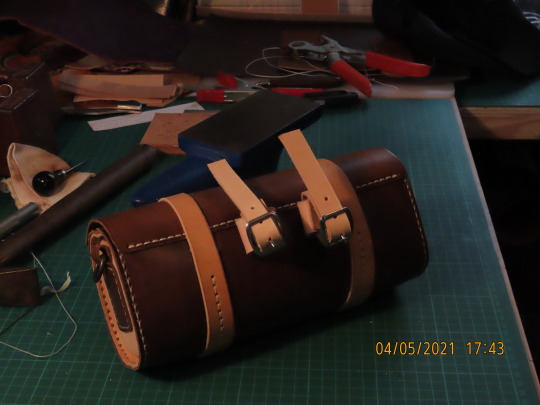
Pic 20 : Plenty of strap here to connect it to the frame of the Bike.
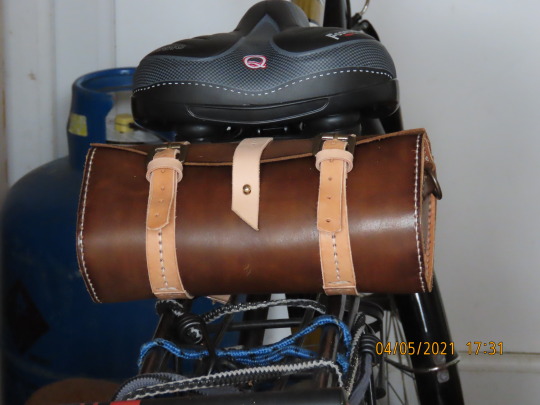
Pic 21 : Ta daaaa, I always wanted one of these on my bike to carry tools, spare inner tubes, puncture kit, gloves, hat etc. There’s more room than at first appears in this neat little bag. I recommend this project for beginners, but practice the saddle stitch first. You don’t have to use veg tan but I would recommend using a firm material that will last. I can re water proof this bag and treat it with balm now and again to keep it in good condition, I coated this in Effax Leather Balm. Hope you have enjoyed this small project, after the explorer bag I wanted a quick easy project and this fit the bill nicely. More to come, watch this space. I hope some of you will have a go yourself. ‘till next time...Stay Crafty, Stay Safe.


10 notes
·
View notes
Video
youtube
Hi Guys, Chris here from Shamancraftprojects, I’ve been putting ‘still’ photo build alongs on Tumblr for a few years now and I deccided it’s time to move forward so I’m doing a few videos now for youtube where you can watch me put some of my projects together, if that’s your thing I hope you’ll go over there and check it out, just put in ‘Youtube Shamancraftprojects’ and you’ll find the other vids I’ve already done. This is all new to me I’m learning as I go along so a few are just a few minutes long and no talking but as I’ve learned more there are vids where you can hear me explaining things as I go through the build. If you like them please consider likeing,subscribing and clicking the bell as this will help towards my doing more in the future and will also inform you automatically whenever I put a new video up. Many thanks.
2 notes
·
View notes
Last Seen Blogs

unstoppablefucka
M. Luna

1975babyy
the 1975

fedeath
A 3D artist just vibing - Commissions are Open!

imscar3d
Valorant

shadyufo
bones, art, & nature