#but the 'drywall' is much faster and cheaper
Text
A Comprehensive Guide to Basement Excavation Cost
Have you ever thought about how much space is beneath your home? You may need more storage space, a recreation area, or additional bedrooms and bathrooms to accommodate your growing family.
You can dig a new basement if you want to. Building contractors can lift your house from its foundation and excavate it, then pour a new basement foundation.
In this comprehensive guide, we’ll explore how much you’d need to budget for this project and the basement excavation cost factors you need to consider.
What is Basement Excavation?
Basement excavation is the process of removing rocks, dirt, and other debris to make room for a new basement. It is typically the initial step of building construction work, creating a hole where your new space will be constructed.
You can also excavate the basement after your existing house has been constructed. This process is more complex and requires skilled excavation contractors to dig into the soil and remove excavated debris without damaging the foundation or footings. It is generally more cost-effective to excavate before any part of the building is constructed.
Basement Excavation Cost
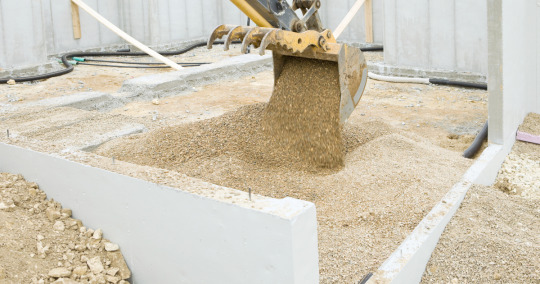
The cost for basement excavation in new construction can range from $12,000 up to $36,000. That’s roughly $10 to $20 a square foot.
If you plan to dig underground under an existing home, the average cost will be between $40,000 and $50,000. This is about $47-$100 per square foot.
When comparing costs, digging a new basement will cost slightly more than expanding a crawl space. A new basement measuring 1,000 square feet will cost between $22,500 and $45,000. The costs for crawl space extension range between $10,000 and $30,000.
Though crawl space expansion may seem cheaper than the cost to dig out an entirely new basement, you should still factor in all necessary expenses associated with basement construction.
Factors Affecting the Cost of Basement Excavation Project
Several factors influence the total cost of a full basement excavation project. Understanding these factors will help you plan and budget effectively:
Size of Excavation
Excavation projects that require large excavations require more time, labor of local contractors, and equipment which increases overall expenses significantly.
Cost: $75 to $150 per cubic yard of dirt removed.
Raising or Bracing
When excavating a basement, your home requires support to avoid structural damage. While hydraulic jacks offer faster and cheaper solutions, raising can compromise stability; bracing (underpinning) is more time-consuming but does preserve its structural integrity more fully than raising can.
Cost: Raising ($3,100 to $9,400); underpinning ($20,000).
Plumbing
Installing proper plumbing and drainage systems in your new basement is essential and should be taken into consideration when planning for your excavation costs.
Plumbing costs vary depending on the fixtures you want and the impact on the main sewer line. Drainage systems must be designed to keep the basement dry, especially in areas with a high water table.
Cost: Plumbing expenses for a new basement typically range from $1,000 to $3,000. Drainage systems can cost between $2,000 and $6,000, depending on local climate, soil conditions, and yard grading.
Permits
Every major construction project, including basement excavation, requires building permits. Permit costs depend on local building codes and regulations.
Cost: Budgeting around $1,200 to $2,000 for permits is a reasonable estimate.
Foundation

Once excavation and plumbing work has been completed, a concrete foundation must be laid. This includes pouring a concrete slab for foundation walls, floors, and footings.
Cost: Typically ranges from $10,000 to $30,000.
Unexpected Repairs
Excavating a basement involves foundation work, which may uncover existing issues. Unexpected repair costs may include foundation repairs, drywall repairs, or frame repairs.
Cost: Potential costs range from $2,100 to $7,800 for foundation repairs and $50 to $80 per square foot for other repairs.
Can you dig a basement deeper?
Yes, it is possible to dig a basement deeper by lowering its floor. Basement underpinning can increase the height of your basement without reducing square footage. This is an excellent option for those who wish to keep the existing space.
On the other hand, bench-footing involves digging out the crawl space to create a deeper basement, but it may result in a reduction of the overall square footage of the finished basement.
How to convert a crawl space into a basement?
Converting a crawl space into a basement involves the following steps:
Build a Scaffolding: Construct a supporting structure to support the weight of the home while the new foundation is being built.
Excavate the Crawl Space: Excavate the area beneath the house to create the basement space, which is normally eight feet deep.
Pour the New Foundation: For the basement, add four to six feet of concrete walls surrounding the house, establishing a firm link between the existing and new foundations.
Finish the Basement: Complete the full basement space and transfer the home onto the new foundation.
Monitor for Settling: Keep an eye on the foundation and basement for a few months to identify and address any potential issues.
Basement excavation offers a fantastic way to expand your property and boost its value. Make sure to consider the factors discussed above when getting basement cost quotations from local contractors.
source https://aspireconstructiongroup.co/blog/basement-excavation-cost/
1 note
·
View note
Text
The Benefits of Purchasing Construction Materials Online
Purchasing construction materials online has revolutionized the construction industry with convenience, cost-effectiveness, and a vast array of products. Online retailers offer an immense variety of materials, allowing for immediate access to buyers and dedicated support services, such as easier shipping, returns, and warranties. Furthermore, with the ability to shop for construction materials at any time and receive them within days, consumers can save on their transportation costs. Not to mention, they can compare prices in the convenience of their homes, in just a few clicks. By cutting out the “middleman”, they can get the material they need, faster and cheaper than ever before. Lastly, online purchases from global vendors are not limited by geographic boundaries, resulting in access to many more services and products than traditional purchases in a store.
Access to a Wide Range of Quality Products
With the internet, accessing quality construction products is easier than ever before. Online stores and auction houses carry a wide selection of building materials and equipment, ranging from lumber and drywall to tile, lighting, and flooring. These companies often have supply contracts with leading manufacturers, so customers can be sure they’re getting the highest quality materials and at the best prices. Online construction stores also offer competitive pricing on materials, so homeowners can get what they need at a price that fits their budget. Customers can easily browse and order through the convenience of online shopping, and they can also read customer reviews to ensure the product and store is dependable and trustworthy. At Builders' Marketplace, you can sell construction materials online.
Save Time and Money with Easy Transaction Processes
Shopping online for construction products is not only convenient, but it’s also much more affordable than shopping in stores. Most online suppliers offer free shipping on orders over a certain amount, as well as a range of discounts and promotions. This is especially beneficial for those who are in a rush to finish a project and don’t have the luxury to spend extra time in stores. With online stores, spending time and money on unnecessary trips to the store is eliminated, so projects can be completed faster and more efficiently without blowing the budget.
Create Accurate Cost Estimates without Leaving the Office
Shopping online for construction products also makes it much easier to create accurate cost estimates. Customers can easily compare prices between different online suppliers to determine which one is offering the most competitive price. Additionally, many online stores offer “virtual shopping carts” that allow customers to add items to their cart and accurately estimate the total cost of the project. This makes the process of creating budget estimates much easier than ever before.
Take Advantage of Special Online Deals and Discounts
By shopping online for construction products, customers often have the chance to take advantage of special deals and discounts. Many online retailers offer promotional codes or special pricing to customers who purchase items in bulk, so customers can save extra money each time they make a purchase. Seasonal or holiday sale items, along with clearance discounts, are also common, so customers can get the most from their transaction and stretch their budget further.
Enjoy Carefully Vetted Construction Products without the Hassle
Shopping for construction products online also eliminates the hassle of vetting products. Online stores are typically vetted by third-party organizations to ensure safety and quality, so customers can be confident they’re buying products from a dependable source. Customers can also easily compare products side-by-side to ensure they’re getting the best value for their investment.
Streamline Inventory Management and Build Sustainable Supply Chains
By shopping for construction products online, businesses can also streamline their inventory and build sustainable supply chains. Online stores make it easy for customers to keep track of what they need and when they need it, resulting in fewer trips to the store and a more efficient procurement process. This can also help businesses build sustainable supply chains with reliable suppliers who offer the most competitive pricing and delivery times.
Achieve Total Transparency about Product Specifications and Delivery Dates
Finally, shopping for construction products online helps to achieve total transparency with product specifications and delivery dates. Customers can easily read product descriptions and specifications, as well as reviews and customer feedback, so they can ensure they’re getting exactly what they need and when they need it. They can also easily track their shipment and get updates on when their order is expected to arrive. This helps eliminate buyer’s remorse by ensuring customers know exactly what they’re getting and when it will arrive.
Conclusion
In conclusion, purchasing construction materials online has many benefits. It enables businesses to compare prices, access thousands of products in a single place, encourages sustainability, provides easier access to materials, and facilitates secure financial transactions. Additionally, online shopping eliminates the need for on-site visits, resulting in time and money savings. Overall, purchasing construction materials online is a cost-effective, efficient, and convenient way to acquire the materials needed for a construction project.
0 notes
Text

This is the block that our son invented but it's from Greece and it was something he did in that era and it's somewhat interlocking because it was easy to use tons of buildings are made out of it and they're still up other buildings are gone and they do pour ground in it they have holes and they are cast with holes in them and they're not hard to make and the whole sometimes didn't line up but it's still very very strong and there was no laugh lead between it it was a glue and instead of a just motor and special mix and people try to replicate it and they can't do it perfectly but they come close and this is the point it should not be that hard to replicate but it is cuz we don't want you to and other people don't want you to but a ton of people should be aware that this block that is used in Florida is not very strong and not bullet resistant but the ones you see on the buildings in Greece and Rome have endured many many wars and horrific ones as you know and a lot of them are not even married and they're made out of regular concrete and extremely hard so please order up and we'll send it down there about 5000 PSI because we are not making it very strong ones and it's easy to make them and just cost more and 5,000 PSI is three times as strong no it's about twice as strong as regular block if you cast The block in the same manner but yes it's three times as strong and it's lighter because it's not as wide about 5 in wide and you need to have it changed on your plans and get the town to approve it before doing it and it does change the dimensions and some require you to re dimension it. And you can make a note not even dimensioned but it's the new block and the trust guy needs to know and they can change it at their shop but we are shipping a lot of this tonight we're getting orders already
Is a testament to his block design and the block concrete design because the mix on some of the buildings is the same it's not very high in PSI by comparison to the high strength block but what you see here is about 10,000 PSI but it is regular standard concrete mix it does have some fly ash in it which doesn't necessarily strengthen it and you have to reduce the acidity first and we have a process for that and if you want the higher strength block you must make a note of it when you're ordering it is a little bit more money and large of the block is some more it costs but these blocks are not very expensive and are cheaper than CMU by the sfca and they go up faster much faster and the machine can adapt to it and it puts it up fast as hell some people use brick machines because they can fit and these blocks are really easy to handle and they don't rip your hands apart and you can wear gloves or not and still use them as a wonderful product and a son should be committed and Florida will recover because of it a lot of people want to make little bunkers and all sorts of things safe rooms and it's perfect for it and we recommend it strongly these clones are at everyone and you can make it really really quick using the technique that we described it goes up very fast and you could use durock on the it's the ceiling joist or it's the trust choice you cut in durock and you coat the size of it and it's hard to get into believe it or not it can even coat it with with concrete and it makes it more resilient it's really really nice and it makes it waterproof too
A lot of people put the block on top of the door Rock but sideways and they buy the 4-in and they glue it together it makes it very very strong and it spans it almost and it doesn't move at all once it's cured it's hard as Stone and they make sure there's a positive connection meaning they cut the drywall out and they glue the stone together and he went ahead and did it and he figured out how to do it at the end of it he just opened the wall up and put them lock inside the wall and you have a 2x4 there but he put the rock on the inside and he had to put a new shower in so you might as well put the block on the inside and get a small shower and he didn't want to do that it's also way to keep your insulation value and it fools people then you dry all the outside of it it looks like nothing it's only like 5 in here hiding
Thor Freya
Well we started going on and on and it was like stop stop and we're young and we criticized but people shouldn't and we shouldn't it's a great presentation of our product but heck I'm doing it
Hera
Well she's a woman and wants me to talk and sometimes she doesn't want me to talk but she does and that's how it is but his talk is perfect and retrospect but really she wants to publish it because she wants people to buy stuff she wants them to buy this block and get it in we're suffering under the hamster all very gutteral
Zues
Olympus
0 notes
Text
so im just remaking this donations post bc the ones i have are so cluttered and im dying
so heres the rundown: im 2 months behind on rent, im being evicted and have to build a carport into a room at my moms house or else im homeless, and my dog arlo needs to go to the vet.
ive been saving up money to repair the room

this one to be specific. i have to clear it out, insulate, drywall, paint, repair all holes that cause water to leak in during rain (monsoon season is coming up so yikes) and finally pay an electrician to fix all exposed wires. its a huge project but is still cheaper than even a basic studio apartment. Because of this, im behind on rent, and my roommate/landlord is being lenient with me but i dont know for how much longer.
so im working, doing some translation work, and commissions, but im losing money faster than i can make it. this is all i have atm

then, theres arlo, this baby girl

shes been under the weather, poor appetite, diarrhea, mucus discharge from her bum, and seemingly random lacerations on her tummy and legs

the good news about this is that i have talked to a vet, and its nothing serious (thank god) but she still needs a full checkup, and its 80 just to walk in the door. now, there is a sort of credit system so i dont have to pay out of pocket right there, but it accumulates interest quickly, so depending on how long it takes to save up the money to pay it off, more will be needed.
so basically: shits fucked and i wanna die
1K notes
·
View notes
Photo

Are bamboo charcoal Air Purifying Bags useful?
One of the best ways to purify air naturally indoors is by using activated charcoal. It removes toxins, and gets rid of allergens and molds. Placing charcoal purifying bags in your home also removes bad odors giving clean air indoors. But, how effective is it?
Do bamboo charcoal air purifier bags really work?
Activate the charcoal bag by keeping under the sunlight. Activated bamboo charcoal air purifying bags work and not only they can get rid of some dust particles, mold spores but even cigarette smells and other bad odors. Since bamboo charcoal has a much larger surface area for absorbing impurities, they show better results. Activated bamboo charcoal has 10 times the surface area and so the structure is highly porous and thus absorbs many types of toxins including ammonia and formaldehyde.
Working of an activated bamboo charcoal bag
As air flows over the bag, the porosity of charcoal inside the bag creates a surface area that traps pollutant particles giving out clean air through a process called adsorption.
On a molecular level, adsorption is the process by which a solid holds gaseous molecules or of a liquid or solute as a thin film.
This solid material used for adsorption is a combination of porosity with high surface area.
Thus, Adsorption is the attraction of molecules onto the surface of a solid. While in the charcoal bag case, it commonly adsorbs household pollutants such as mold and unpleasant odors. Charcoal traps pollutants on the surface as dirty air passes over it, cleaning the air to circulate indoors. If you’re cleaning your house after a while, it's a great idea to place these charcoal air purifying bags in various corners to remove drywall dust from indoor air
Basic differences between regular charcoal and bamboo charcoal air purifying bags:
Regular charcoal Bamboo charcoal
low surface area for adsorption 10 times more surface area for adsorption
The air purification rate is slow Much faster at cleaning indoor air
Note: One gram of activated charcoal has approx 10,000 square feet of internal surface area. That’s why it is also used in some air purification filters.
Bamboo charcoal when activated has a bigger surface area per gram, that means it is more porous than regular charcoal for cleaning the air. It helps in removing excess humidity in the house.
Durability of a bamboo charcoal bag
A bamboo charcoal air purifying bag can last upto 2 years when being used indoors. After that, you can discharge the bag by mixing into the soil for the toxins and odors to break down and dissipate into the environment. They might not work as effectively in areas around construction sites. Otherwise, they work upto 2 years in a normal atmosphere indoors.
Best Bamboo Charcoal Air Purifier Bags (Reviews)
Air purifiers are great. Brands like AirOK have amazing reviews for their first ingenious air purification products. They have different bag sizes available for different room sizes. It is cheaper and a natural alternative in activated bamboo charcoal air purifying bags.
They have been tested and proven in different parts indoors for example for removing shoe odor, neutralising indoor room air, clearing dust particles, getting rid of mold spores, and cigarette smoke odors. They can also be used in car cabins. They last upto 2 years when refreshed regularly.
The best feature/quality of the Nature Fresh bamboo charcoal bag is that it has no scent at all, so it is a great choice for anyone suffering from allergies. This also makes them safe for pets.
The bags are usually designed with a small ringed hole or a loop to make it easy to place or hang them in any corner in your house. They are very effective in small indoor spaces like the bathroom or even if kept in a fridge. Because of the activated charcoal, they remove the smell in no time i.e within 2 or 3 hours. They are definitely best suited for your car, closets, drawers, refrigerator, and even kept inside shoes/gym bags.
The bags can even get rid of odors from new furniture such that there isn’t any discomfort in the house within the first day of using them. They are a good replacement for scented aerosol sprays. They dry up the air from excess humidity and give fresh air.
As a general conclusion and recommendation, bamboo charcoal air purifying bags do work to purify indoor air. For effective results, use the bag in small areas, or use more than one if the room size is large.
On a molecular level, adsorption is the process by which a solid holds gaseous molecules or of a liquid or solute as a thin film. This solid material used for adsorption is a combination of porosity with high surface area.
0 notes
Text
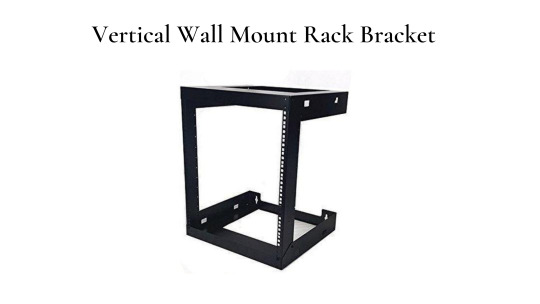
Vertical Wall Mount Rack Bracket: The Best Rack for Small Business
Many businesses only need a 1U server, a switch, router, and might not have enough space for a rack. Often this leads to the decision of purchasing a tower server which means they also buy a non-rack mount switch and router.
These are all excellent products to use, but it’s a bit harder to manage organizationally.
Usually, all of the networking equipment in a fast food restaurant is inside the manager’s office. These typically don’t have much space because the real-estate needs to be dedicated to food, workers, and customers.
Does rackmount equipment cost more?
The rack-mountable form factor doesn’t make your server faster, or necessarily cheaper. Still, pricing is relatively competitive.
Without considering the current sale, the rack mount server is about 9.3% more expensive. If you’re purchasing multiple servers the new cost compounds on itself and can become very significant, but you also would not be able to store as many in one rack. Purchasing additional racks can be even more costly.
How to mount the Vertical Wall Mount Rack Bracket?
Setup is easy enough. The bracket can be mounted on drywall with anchors or screwed directly into studs. Choosing where you set it up is what’s interesting.
Mixer/Amplifiers are usually light enough for their entire weight to be supported while mounted vertically under a desk. This means that you can install the bracket in an area that is convenient to access but still out of the way.
If you want to mount larger equipment horizontally, you’ll need to double down on the brackets. Full-sized servers should only be installed with four areas of support, meaning a bracket for the front and a bracket for the back. Using this method, as long as your desk is strong enough, you can have up to 4U of space to mount networking equipment.
When this equipment is mounted under the desk, it is effortless to route cables discreetly. The primary office computer is likely nearby, and if you need to route them through a wall, you can do so without wires being visible.
Mounting larger equipment with only one bracket is a breeze, but it might be more of a chore to manage cables. Whichever part of the wall you decide to place the IT equipment, it will likely be beneficial to have some zip ties or velcro straps to organize and direct cables.
#server rack#server cabinet#network rack#rack server#home server rack#computer rack#wall mounted cabinet#network cabinet#home network rack#wall mount network rack#42u server rack#Wall Mount Rack#6u wall mount rack#2u wall mount rack#wall mount audio rack
0 notes
Photo

The Tools (And Tricks) You Need To Install An Ikea Kitchen Yourself https://ift.tt/2EWSK2p
Many of you have asked for tips and tricks to make installing an Ikea kitchen go more smoothly and look (and function) the best it possibly can. And the good news is that after installing three of them in a little over a year and a half (!!!), we have learned A TON about how to make things a little easier and help you end up with a better result. So settle in, I’ve got twenty tools & tips that can make all the difference.

First off, we like Ikea cabinets and have personally installed them in five rooms: our laundry room & bonus room at home, our beach house kitchen, and now these two duplex kitchens. We have lived with the ones in our home for nearly five years and they’re great. Not a single issue. They are smartly made, very durable, and they have a great 25-year warranty and a great price tag (often thousands cheaper than other options). They also come with many thoughtful features like soft close drawers that come standard and tons of customization options. So yeah, some Ikea furniture is known for feeling a little cheap and wobbly, but that has not been our experience with their cabinets AT ALL.
Ok, but back to the point of this post – tips and tools to make your Ikea cabinet install easier. Some of the tools I’m listing here are absolutely necessary and some are optional (they’ll just make the process easier, faster, and less frustrating). And as you read through this list, I think you’ll also get a pretty good sense of the steps (and curveballs) involved too, which I hope will help as well.

I’ll include a short bulleted list of everything at the end of the post too, that way you can use it as a tool checklist. But let’s just get right into it.

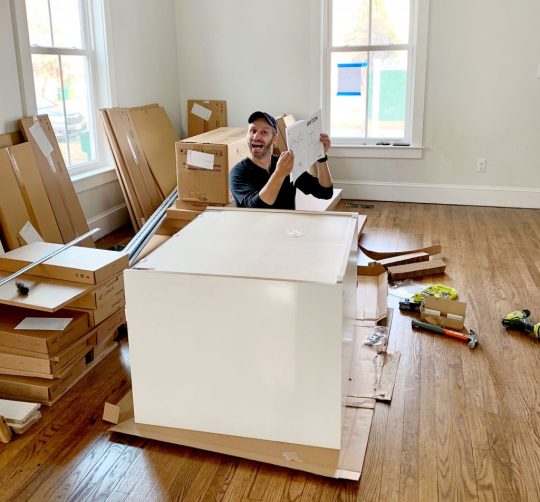
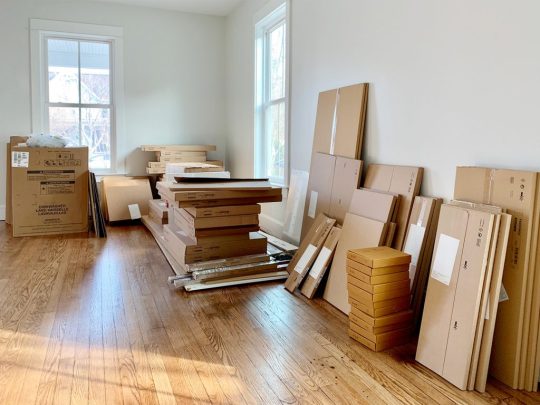
1. Your Itemized Receipt/Order
Before you build anything, you’ll want to take time to inventory and organize all of your boxes. We had over 200 boxes (!!!) delivered for our two duplex kitchens, so it helped to sort everything into piles beforehand.

We personally like to sort boxes by item (Sektion boxes over here, Maximera drawers over there, all of our cabinet fronts somewhere else, etc.) but you may find it helpful to sort yours by cabinet instead (ex: the box, drawer, hinges, and front for one cabinet all together in one pile – this is how Ikea breaks them up your order form). Either way you do it, this sorting process will help you identify any missing pieces and also make it faster once you start building.
2. Power driver (with Philips head)

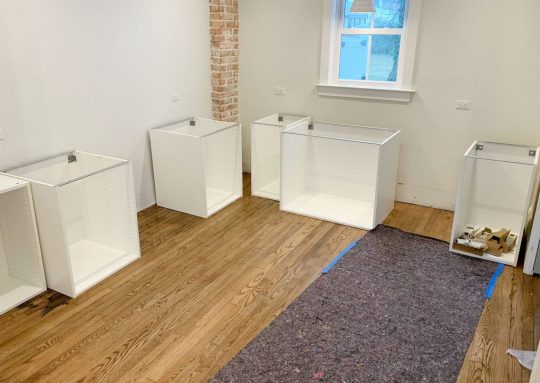
This combo gets a lot of use in this install (especially the power driver/drill) – but they’re needed first to construct your cabinet boxes (Sektion pieces). We love constructing the boxes first because you quickly get to see the shape of your kitchen come to life.

And even though Ikea is known for their allen wrenches, you don’t use them AT ALL during a typical kitchen installation! So don’t worry about having lots of specialty drill bits. You just need a normal Phillips head to screw these puppies together.
3. Hammer
You’ll also need a hammer handy to nail the MDF backings onto the cabinet backs. It may also be useful if you need to tap any anchors into your drywall when it comes time to hang your cabinets.
4. Magnetic Drill Bit Holder
Having one of these on your drill can save you a lot of frustration while building your cabinets and drawers. You can buy one separately for about $2 or it often comes included in drill/driver sets like ours. It’ll magnetize your drill bits, meaning many of the screws that Ikea provides will stick to your drill handsfree (thanks to the magic of magnets). We found this VERY helpful when trying to screw into small spots that were too tight for our fingertips (we couldn’t reach in and hold the screw steady, so having a magnetized drill bit that held it for us was key).

5. Measuring Tape
The next several tools are needed for attaching your cabinets to the wall. Whether you’re doing upper or lower cabinets, Ikea’s system uses a metal track (called the Sektion suspension rail) that you attach to your wall and then the cabinet boxes hang from these. The rail system is extremely handy because if you make sure the rail is level, your cabinets all hang from that and are guaranteed to be level! I know, it’s GREAT. The only time I don’t use their rail is when I don’t have a wall behind my cabinets, like if you’re doing an island. In that case I’ve built my own bases from 2×4″s, but more on that later.
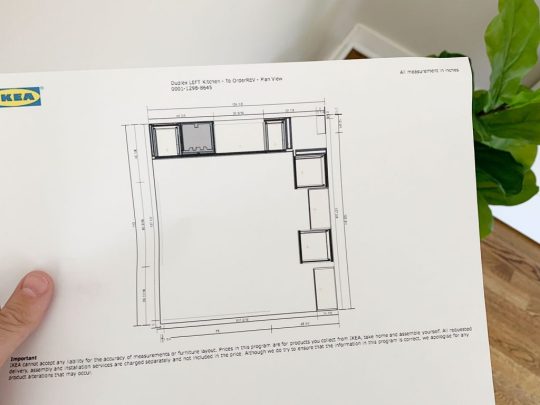
For now, just know the measuring tape will be useful in determining exactly where in your kitchen you’re placing your cabinets – both side-to-side on each wall, and how high the rails need to be hung (Ikea provides guides for this in their instructions). You will probably want to have your kitchen plan/schematic from Ikea handy too.

6. Dremel Or Hacksaw
Once you know where each run of cabinets is going, you’ll need to cut your metal suspension rails to size. The rails are sold in 7 foot lengths, but if you only have 4 feet of cabinetry in one area – you only want 4 feet of rail.
You can cut these by hand with a hacksaw, but we find it much faster to use our Dremel Multi-Max with a metal cutting blade.

I typically mark my cut on a piece of painters tape and cut across the open top of one of our cabinet boxes (with a piece of cardboard to protect the cabinet underneath).
7. Stud Finder
You want to screw the rail into at least a few studs in your wall for maximum hold. So it’s smart to use a stud finder to locate and mark the studs that fall within the area you’re hanging the rail – that way you can be sure to go into them and get a nice firm hold. Since studs are typically 1.5″ thick, I like to mark the full width that my stud finder indicates, since you may not know exactly where the holes on the Sektion rail will line up.

8. Medium-Size Level
Once I know where my studs are, I hold my cut-to-size metal rail and, with a medium sized level (like this 24″ level) held against it, I mark the top line of my rail AND where the holes line up with my studs. I suggest amedium sized level for this just because they’re easier to wrangle during this step.

I also mark a few additional holes where I’ll use screws paired with anchors. I believe Ikea suggests at least having a screw every 12″ inches – but for short sections like this, I like to make sure I hit at least 2 studs and then have a screw at either end of the rail that goes into an anchor.
9. Heavy Duty Screws & Anchors
After some trial and error, we found that we like using these GRK Fastener Cabinet Screws to secure our rails into studs. They’re easy to drive, they hold really tight, and they include the star-head bit you need for them. We have tried other, cheaper “cabinet screws” and the heads kept breaking off. It was MADDENING.

We also like to have some anchors on hand too, like these E-Z Ancor packs that come with screws, for those additional support screws that we add.
10. Long Level
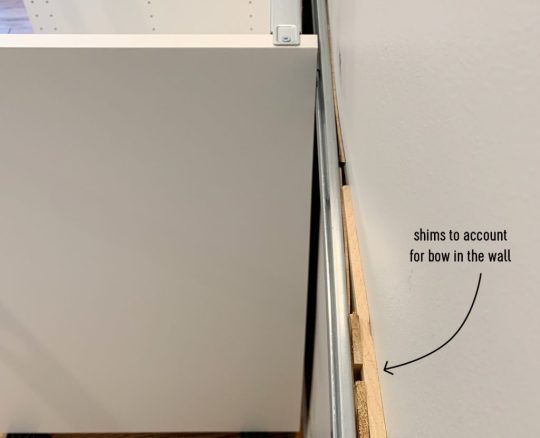
One of the biggest challenges we’ve found in this process is getting things level. Just because you’ve hung your rail level on the wall doesn’t prevent things like slopes in your floor or bows in your wall from chucking some additional curveballs in your direction. So your best defenses are a lot of patience and a nice long level, like this 4ft level we bought specifically for this task (after learning that it’s a lot harder to use a smaller level to solve these issues).
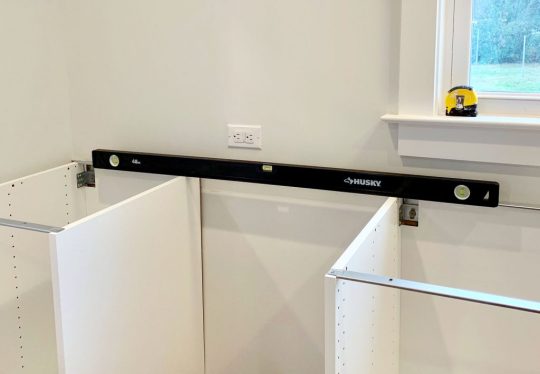
Your medium sized level will help with the process as well (especially in checking that each individual cabinet is level front-to-back) but you’ll want something bigger to check longer spans of cabinets. You could purchase an even longer level if you wanted, but they can start to get pricey, so we found a 4 foot long level to be sufficient, especially for checking across the gaps that you’ll leave for appliances like a 30″ stove or a standard 24″ dishwasher.
11. Shims
A lot of level issues can be corrected by twisting the adjustable plastic feet that come with your base cabinets, or by adjusting the placement of your metal rail. But if you’re dealing with bows in your wall (which you can find by placing your long level against it) you’ll want to have some wood shims on hand to place behind the metal rail. In these old houses, we had to use quite a few in a couple of places!
12. Jigsaw
When it comes time to install your sink base cabinet, you’ll need to make some holes for your plumbing. For smaller pipes like your water supply lines, you can just drill holes using a large drill bit (we used the 3/4″ bit in this set). But for things like your large drain pipe, you’ll either need to buy a larger hole bit or break out a jigsaw. Even though we don’t get the cleanest cut with it, the jigsaw gives us a little more wiggle room when placing the cabinet (since the drain pipe isn’t flexible like the supply lines) and we can also use it for other cuts like for exposing the outlets along the wall (the one below powers the garbage disposal under the sink).

Just be sure to make careful measurements before you cut. We usually put a layer of painters tape around the area we’re cutting. It allows us to mark our cut without marking the cabinet, plus the tape helps keep the white finish from cracking off. Either way, this stuff will all be hidden under the sink so it doesn’t have to look perfect.
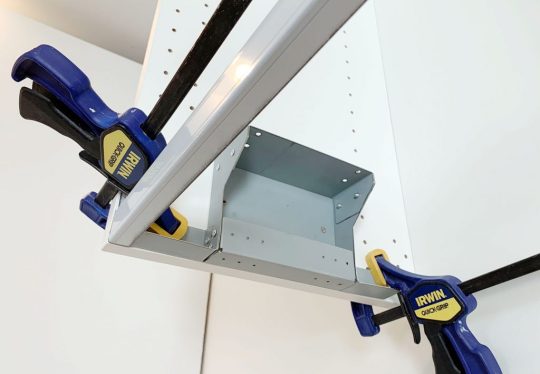
13. Clamps
As you start to get your cabinets in place and leveled, you’ll want to secure any adjacent cabinets together. Ikea provides screws for doing this, but you’ll want to use some clamps (we like these 6″ bar clamps) to hold the cabinets tightly together before you begin screwing.
We didn’t get a picture of that process, but the clamps come in handy A LOT as an extra set of hands – like when we were installing this bracket for the exhaust hoods that we hung over the stoves.
14. Circular Saw and/or Table Saw
In addition to screwing cabinets together, you may find yourself attaching cover panels or filler pieces at some point. Cover panels go on exposed ends of cabinets (so you can’t see the metal rail they hang on) or, in our case, we used some large cover panels to create a box around the fridges at the duplex. So you’ll need some sort of larger saw to make long, straight cuts. Our cover panels were a bit too wide, so I used a circular saw to shave a few inches off one side.

I didn’t use a table saw for that panel because running an 8 foot tall panel that’s this wide across my table saw would’ve been tough. But for smaller pieces (like filler pieces that are only about 3 feet long) a table saw is often easier, especially if you’re only shaving off a little bit. But if that’s too pricey and you’ve got a steady hand, you can get by with the circular saw.
15. 2 x 4″ Boards
Every time we’ve installed an Ikea kitchen we’ve needed some 2×4″s at some point. At the beach house we used them to make some bases for the island cabinets.

Basically, they were just some boxes we made almost the same size as each cabinet (slightly narrower to account for the toekicks) that we secured to the floor using pocket holes. To drill the pocket holes, you can use something like a…
16. Kreg Jig
Now, a Kreg Jig isn’t absolutely necessary here, but I’ve had one for around nine years now so I’m accustomed to breaking it out for tasks like this. So while I’m a big fan of having one in your arsenal, I understand that you’ve just bought a new kitchen so tacking on another $99 tool to your budget isn’t always practical.
I did use it again for the duplexes to make more 2×4″s into boxes (this time for mounting the above-fridge cabinet away from the wall, so it sat closer to the front of the fridge).

The boxes acted as an extension of the wall. The top one was for mounting the metal rail, and the bottom one gave the base of the cabinet a spot to rest so it didn’t tip back wildly. They also gave us a way to mount that large cover panel to box in the fridge.
I guess I should add in here that a step ladder is also useful, so let’s officially put that on the list.
17. Manual Screwdriver
Once your cabinets and panels are hung, leveled, and secured to each other, the next part of the process is to add your doors and drawers. The instructions here are pretty self-explanatory and the main tool you need is a power driver to screw everything together. Our main word of warning is to pay close attention to screw placements when you’re assembling drawers! Depending on where each drawer goes in the stack (top, middle, or bottom) there are sliiiiight differences in the instructions. So while we find it most efficient to do multiple drawers at once, we still pay close attention – especially for the first few.
Ok, back to the manual screw drivers. One big part of installing doors and drawers is tweaking and adjusting them for even and level spacing. For this you’ll want to a regular ol‘ manual Philips head screwdriver. It can be kind of tedious and frustrating, but it’s worth taking your time with it. This video shows it in a bit more detail.
You also will want a flathead screwdriver for twisting the little piece of plastic that locks each cabinet onto the metal rail, which comes up earlier in the process.
18. Miter Saw
Tasks like cutting your 2×4″s or even your filler pieces will be made easier and faster by having a miter saw on hand (we own this miter saw). You’ll also find that it’s helpful when it’s time to cut and install your toekicks. Ikea’s sells toekicks to match your cabinet fronts and they clip on to the plastic feet you will have attached to the bottom of your base cabinets.

In our beach house kitchen we installed quarter round in front of the Ikea baseboards to help disguise some floor level issues, as well as using quarter round around the island where we built our own base (we used standard wood baseboard trim instead of the Ikea toekicks around the island). Meanwhile, we just used the Ikea toekicks in the duplex kitchens and the floors were more level (and we think the wood and blue cabinets were more forgiving than white ones) so we didn’t need to add quarter round and it looks great.

19. Nail Gun
In addition to using a nail gun to attach additional molding like quarter round if you’re adding that (again, the Ikea baseboards just snap on so you won’t need it for that) I also find a nail gun comes in handy sometimes for attaching small filler pieces. Especially in cases where they’re too thin to take a screw.
20. Others Tools
Real quick, here are some other items you may want to have on hand. Some I’ve mentioned or shown already, but haven’t officially listed:
Pen or pencil
Painters tape
Step ladder
Utility knife or scissors (for opening boxes faster!)
Crowbar (if you need to remove any baseboard or molding)
Broom, dustpan, and/or vacuum with a hose (we have this one)

Your Ikea Kitchen Installation Tool Checklist
As promised, here’s all of the items in one place so you can make sure you have everything you need on hand. I’ve organized it a bit differently than above, just to put like items together. You may have special circumstances for your project that require more, less, or other tools – but I’ve found this to be a pretty comprehensive set:
Your itemized receipt / order
Hammer
Manual screwdrivers
Crowbar
Measuring tape
Pen or pencil
Painters tape
Step ladder
Power driver
Drill bit set with magnetic bit holder & 3/4″ bit for plumbing holes
Dremel or Hacksaw
Stud finder
Medium level (24″)
Large level (48″)
Wood shims
Cabinet screws (roughly 4 per cabinet)
Screws with anchors (roughly 2 per cabinet)
Jigsaw
Circular saw and/or table saw
Miter saw
Utility knife or scissors
Nail gun
Clamps
2×4″s (optional)
Kreg Jig (optional)
Broom, dustpan, and/or vacuum with hose
Good luck and happy installing!
P.S. For other posts we’ve written about installing Ikea cabinets, here’s one about installing our laundry room cabinets 5 years ago, and another one about using Ikea cabinets to make a wall of built-ins for our bonus room.
*This post contains affiliate links*
The post The Tools (And Tricks) You Need To Install An Ikea Kitchen Yourself appeared first on Young House Love.


0 notes
Text
The Tools (And Tricks) You Need To Install An Ikea Kitchen Yourself
Many of you have asked for tips and tricks to make installing an Ikea kitchen go more smoothly and look (and function) the best it possibly can. And the good news is that after installing three of them in a little over a year and a half (!!!), we have learned A TON about how to make things a little easier and help you end up with a better result. So settle in, I’ve got twenty tools & tips that can make all the difference.

First off, we like Ikea cabinets and have personally installed them in five rooms: our laundry room & bonus room at home, our beach house kitchen, and now these two duplex kitchens. We have lived with the ones in our home for nearly five years and they’re great. Not a single issue. They are smartly made, very durable, and they have a great 25-year warranty and a great price tag (often thousands cheaper than other options). They also come with many thoughtful features like soft close drawers that come standard and tons of customization options. So yeah, some Ikea furniture is known for feeling a little cheap and wobbly, but that has not been our experience with their cabinets AT ALL.
Ok, but back to the point of this post – tips and tools to make your Ikea cabinet install easier. Some of the tools I’m listing here are absolutely necessary and some are optional (they’ll just make the process easier, faster, and less frustrating). And as you read through this list, I think you’ll also get a pretty good sense of the steps (and curveballs) involved too, which I hope will help as well.

I’ll include a short bulleted list of everything at the end of the post too, that way you can use it as a tool checklist. But let’s just get right into it.

1. Your Itemized Receipt/Order
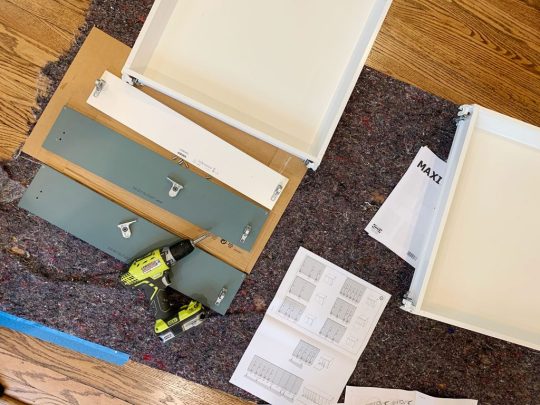
Before you build anything, you’ll want to take time to inventory and organize all of your boxes. We had over 200 boxes (!!!) delivered for our two duplex kitchens, so it helped to sort everything into piles beforehand.

We personally like to sort boxes by item (Sektion boxes over here, Maximera drawers over there, all of our cabinet fronts somewhere else, etc.) but you may find it helpful to sort yours by cabinet instead (ex: the box, drawer, hinges, and front for one cabinet all together in one pile – this is how Ikea breaks them up your order form). Either way you do it, this sorting process will help you identify any missing pieces and also make it faster once you start building.
2. Power driver (with Philips head)

This combo gets a lot of use in this install (especially the power driver/drill) – but they’re needed first to construct your cabinet boxes (Sektion pieces). We love constructing the boxes first because you quickly get to see the shape of your kitchen come to life.

And even though Ikea is known for their allen wrenches, you don’t use them AT ALL during a typical kitchen installation! So don’t worry about having lots of specialty drill bits. You just need a normal Phillips head to screw these puppies together.
3. Hammer
You’ll also need a hammer handy to nail the MDF backings onto the cabinet backs. It may also be useful if you need to tap any anchors into your drywall when it comes time to hang your cabinets.
4. Magnetic Drill Bit Holder
Having one of these on your drill can save you a lot of frustration while building your cabinets and drawers. You can buy one separately for about $2 or it often comes included in drill/driver sets like ours. It’ll magnetize your drill bits, meaning many of the screws that Ikea provides will stick to your drill handsfree (thanks to the magic of magnets). We found this VERY helpful when trying to screw into small spots that were too tight for our fingertips (we couldn’t reach in and hold the screw steady, so having a magnetized drill bit that held it for us was key).

5. Measuring Tape
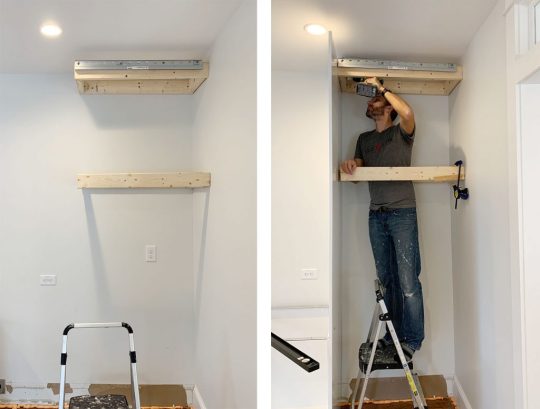
The next several tools are needed for attaching your cabinets to the wall. Whether you’re doing upper or lower cabinets, Ikea’s system uses a metal track (called the Sektion suspension rail) that you attach to your wall and then the cabinet boxes hang from these. The rail system is extremely handy because if you make sure the rail is level, your cabinets all hang from that and are guaranteed to be level! I know, it’s GREAT. The only time I don’t use their rail is when I don’t have a wall behind my cabinets, like if you’re doing an island. In that case I’ve built my own bases from 2×4″s, but more on that later.
For now, just know the measuring tape will be useful in determining exactly where in your kitchen you’re placing your cabinets – both side-to-side on each wall, and how high the rails need to be hung (Ikea provides guides for this in their instructions). You will probably want to have your kitchen plan/schematic from Ikea handy too.
6. Dremel Or Hacksaw
Once you know where each run of cabinets is going, you’ll need to cut your metal suspension rails to size. The rails are sold in 7 foot lengths, but if you only have 4 feet of cabinetry in one area – you only want 4 feet of rail.
You can cut these by hand with a hacksaw, but we find it much faster to use our Dremel Multi-Max with a metal cutting blade.
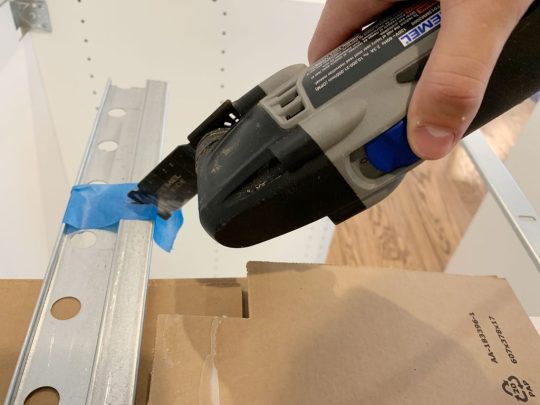
I typically mark my cut on a piece of painters tape and cut across the open top of one of our cabinet boxes (with a piece of cardboard to protect the cabinet underneath).
7. Stud Finder
You want to screw the rail into at least a few studs in your wall for maximum hold. So it’s smart to use a stud finder to locate and mark the studs that fall within the area you’re hanging the rail – that way you can be sure to go into them and get a nice firm hold. Since studs are typically 1.5″ thick, I like to mark the full width that my stud finder indicates, since you may not know exactly where the holes on the Sektion rail will line up.

8. Medium-Size Level
Once I know where my studs are, I hold my cut-to-size metal rail and, with a medium sized level (like this 24″ level) held against it, I mark the top line of my rail AND where the holes line up with my studs. I suggest amedium sized level for this just because they’re easier to wrangle during this step.

I also mark a few additional holes where I’ll use screws paired with anchors. I believe Ikea suggests at least having a screw every 12″ inches – but for short sections like this, I like to make sure I hit at least 2 studs and then have a screw at either end of the rail that goes into an anchor.
9. Heavy Duty Screws & Anchors
After some trial and error, we found that we like using these GRK Fastener Cabinet Screws to secure our rails into studs. They’re easy to drive, they hold really tight, and they include the star-head bit you need for them. We have tried other, cheaper “cabinet screws” and the heads kept breaking off. It was MADDENING.

We also like to have some anchors on hand too, like these E-Z Ancor packs that come with screws, for those additional support screws that we add.
10. Long Level
One of the biggest challenges we’ve found in this process is getting things level. Just because you’ve hung your rail level on the wall doesn’t prevent things like slopes in your floor or bows in your wall from chucking some additional curveballs in your direction. So your best defenses are a lot of patience and a nice long level, like this 4ft level we bought specifically for this task (after learning that it’s a lot harder to use a smaller level to solve these issues).

Your medium sized level will help with the process as well (especially in checking that each individual cabinet is level front-to-back) but you’ll want something bigger to check longer spans of cabinets. You could purchase an even longer level if you wanted, but they can start to get pricey, so we found a 4 foot long level to be sufficient, especially for checking across the gaps that you’ll leave for appliances like a 30″ stove or a standard 24″ dishwasher.
11. Shims
A lot of level issues can be corrected by twisting the adjustable plastic feet that come with your base cabinets, or by adjusting the placement of your metal rail. But if you’re dealing with bows in your wall (which you can find by placing your long level against it) you’ll want to have some wood shims on hand to place behind the metal rail. In these old houses, we had to use quite a few in a couple of places!

12. Jigsaw
When it comes time to install your sink base cabinet, you’ll need to make some holes for your plumbing. For smaller pipes like your water supply lines, you can just drill holes using a large drill bit (we used the 3/4″ bit in this set). But for things like your large drain pipe, you’ll either need to buy a larger hole bit or break out a jigsaw. Even though we don’t get the cleanest cut with it, the jigsaw gives us a little more wiggle room when placing the cabinet (since the drain pipe isn’t flexible like the supply lines) and we can also use it for other cuts like for exposing the outlets along the wall (the one below powers the garbage disposal under the sink).

Just be sure to make careful measurements before you cut. We usually put a layer of painters tape around the area we’re cutting. It allows us to mark our cut without marking the cabinet, plus the tape helps keep the white finish from cracking off. Either way, this stuff will all be hidden under the sink so it doesn’t have to look perfect.
13. Clamps
As you start to get your cabinets in place and leveled, you’ll want to secure any adjacent cabinets together. Ikea provides screws for doing this, but you’ll want to use some clamps (we like these 6″ bar clamps) to hold the cabinets tightly together before you begin screwing.
We didn’t get a picture of that process, but the clamps come in handy A LOT as an extra set of hands – like when we were installing this bracket for the exhaust hoods that we hung over the stoves.

14. Circular Saw and/or Table Saw
In addition to screwing cabinets together, you may find yourself attaching cover panels or filler pieces at some point. Cover panels go on exposed ends of cabinets (so you can’t see the metal rail they hang on) or, in our case, we used some large cover panels to create a box around the fridges at the duplex. So you’ll need some sort of larger saw to make long, straight cuts. Our cover panels were a bit too wide, so I used a circular saw to shave a few inches off one side.

I didn’t use a table saw for that panel because running an 8 foot tall panel that’s this wide across my table saw would’ve been tough. But for smaller pieces (like filler pieces that are only about 3 feet long) a table saw is often easier, especially if you’re only shaving off a little bit. But if that’s too pricey and you’ve got a steady hand, you can get by with the circular saw.
15. 2 x 4″ Boards
Every time we’ve installed an Ikea kitchen we’ve needed some 2×4″s at some point. At the beach house we used them to make some bases for the island cabinets.

Basically, they were just some boxes we made almost the same size as each cabinet (slightly narrower to account for the toekicks) that we secured to the floor using pocket holes. To drill the pocket holes, you can use something like a…
16. Kreg Jig
Now, a Kreg Jig isn’t absolutely necessary here, but I’ve had one for around nine years now so I’m accustomed to breaking it out for tasks like this. So while I’m a big fan of having one in your arsenal, I understand that you’ve just bought a new kitchen so tacking on another $99 tool to your budget isn’t always practical.
I did use it again for the duplexes to make more 2×4″s into boxes (this time for mounting the above-fridge cabinet away from the wall, so it sat closer to the front of the fridge).

The boxes acted as an extension of the wall. The top one was for mounting the metal rail, and the bottom one gave the base of the cabinet a spot to rest so it didn’t tip back wildly. They also gave us a way to mount that large cover panel to box in the fridge.

I guess I should add in here that a step ladder is also useful, so let’s officially put that on the list.
17. Manual Screwdriver
Once your cabinets and panels are hung, leveled, and secured to each other, the next part of the process is to add your doors and drawers. The instructions here are pretty self-explanatory and the main tool you need is a power driver to screw everything together. Our main word of warning is to pay close attention to screw placements when you’re assembling drawers! Depending on where each drawer goes in the stack (top, middle, or bottom) there are sliiiiight differences in the instructions. So while we find it most efficient to do multiple drawers at once, we still pay close attention – especially for the first few.

Ok, back to the manual screw drivers. One big part of installing doors and drawers is tweaking and adjusting them for even and level spacing. For this you’ll want to a regular ol‘ manual Philips head screwdriver. It can be kind of tedious and frustrating, but it’s worth taking your time with it. This video shows it in a bit more detail.

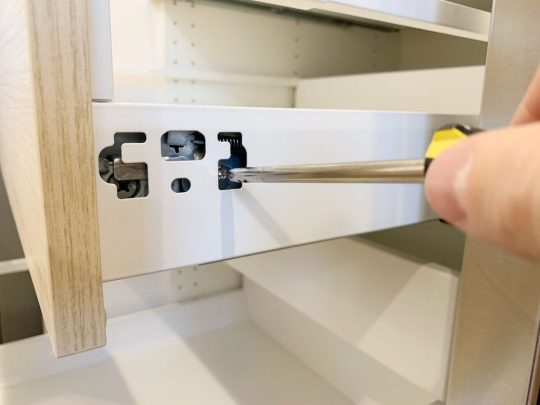
You also will want a flathead screwdriver for twisting the little piece of plastic that locks each cabinet onto the metal rail, which comes up earlier in the process.
18. Miter Saw
Tasks like cutting your 2×4″s or even your filler pieces will be made easier and faster by having a miter saw on hand (we own this miter saw). You’ll also find that it’s helpful when it’s time to cut and install your toekicks. Ikea’s sells toekicks to match your cabinet fronts and they clip on to the plastic feet you will have attached to the bottom of your base cabinets.

In our beach house kitchen we installed quarter round in front of the Ikea baseboards to help disguise some floor level issues, as well as using quarter round around the island where we built our own base (we used standard wood baseboard trim instead of the Ikea toekicks around the island). Meanwhile, we just used the Ikea toekicks in the duplex kitchens and the floors were more level (and we think the wood and blue cabinets were more forgiving than white ones) so we didn’t need to add quarter round and it looks great.

19. Nail Gun
In addition to using a nail gun to attach additional molding like quarter round if you’re adding that (again, the Ikea baseboards just snap on so you won’t need it for that) I also find a nail gun comes in handy sometimes for attaching small filler pieces. Especially in cases where they’re too thin to take a screw.
20. Others Tools
Real quick, here are some other items you may want to have on hand. Some I’ve mentioned or shown already, but haven’t officially listed:
Pen or pencil
Painters tape
Step ladder
Utility knife or scissors (for opening boxes faster!)
Crowbar (if you need to remove any baseboard or molding)
Broom, dustpan, and/or vacuum with a hose (we have this one)

Your Ikea Kitchen Installation Tool Checklist
As promised, here’s all of the items in one place so you can make sure you have everything you need on hand. I’ve organized it a bit differently than above, just to put like items together. You may have special circumstances for your project that require more, less, or other tools – but I’ve found this to be a pretty comprehensive set:
Your itemized receipt / order
Hammer
Manual screwdrivers
Crowbar
Measuring tape
Pen or pencil
Painters tape
Step ladder
Power driver
Drill bit set with magnetic bit holder & 3/4″ bit for plumbing holes
Dremel or Hacksaw
Stud finder
Medium level (24″)
Large level (48″)
Wood shims
Cabinet screws (roughly 4 per cabinet)
Screws with anchors (roughly 2 per cabinet)
Jigsaw
Circular saw and/or table saw
Miter saw
Utility knife or scissors
Nail gun
Clamps
2×4″s (optional)
Kreg Jig (optional)
Broom, dustpan, and/or vacuum with hose
Good luck and happy installing!
P.S. For other posts we’ve written about installing Ikea cabinets, here’s one about installing our laundry room cabinets 5 years ago, and another one about using Ikea cabinets to make a wall of built-ins for our bonus room.
*This post contains affiliate links*
The post The Tools (And Tricks) You Need To Install An Ikea Kitchen Yourself appeared first on Young House Love.
0 notes
Text
The Tools (And Tricks) You Need To Install An Ikea Kitchen Yourself
Many of you have asked for tips and tricks to make installing an Ikea kitchen go more smoothly and look (and function) the best it possibly can. And the good news is that after installing three of them in a little over a year and a half (!!!), we have learned A TON about how to make things a little easier and help you end up with a better result. So settle in, I’ve got twenty tools & tips that can make all the difference.

First off, we like Ikea cabinets and have personally installed them in five rooms: our laundry room & bonus room at home, our beach house kitchen, and now these two duplex kitchens. We have lived with the ones in our home for nearly five years and they’re great. Not a single issue. They are smartly made, very durable, and they have a great 25-year warranty and a great price tag (often thousands cheaper than other options). They also come with many thoughtful features like soft close drawers that come standard and tons of customization options. So yeah, some Ikea furniture is known for feeling a little cheap and wobbly, but that has not been our experience with their cabinets AT ALL.
Ok, but back to the point of this post – tips and tools to make your Ikea cabinet install easier. Some of the tools I’m listing here are absolutely necessary and some are optional (they’ll just make the process easier, faster, and less frustrating). And as you read through this list, I think you’ll also get a pretty good sense of the steps (and curveballs) involved too, which I hope will help as well.

I’ll include a short bulleted list of everything at the end of the post too, that way you can use it as a tool checklist. But let’s just get right into it.

1. Your Itemized Receipt/Order
Before you build anything, you’ll want to take time to inventory and organize all of your boxes. We had over 200 boxes (!!!) delivered for our two duplex kitchens, so it helped to sort everything into piles beforehand.

We personally like to sort boxes by item (Sektion boxes over here, Maximera drawers over there, all of our cabinet fronts somewhere else, etc.) but you may find it helpful to sort yours by cabinet instead (ex: the box, drawer, hinges, and front for one cabinet all together in one pile – this is how Ikea breaks them up your order form). Either way you do it, this sorting process will help you identify any missing pieces and also make it faster once you start building.
2. Power driver (with Philips head)

This combo gets a lot of use in this install (especially the power driver/drill) – but they’re needed first to construct your cabinet boxes (Sektion pieces). We love constructing the boxes first because you quickly get to see the shape of your kitchen come to life.

And even though Ikea is known for their allen wrenches, you don’t use them AT ALL during a typical kitchen installation! So don’t worry about having lots of specialty drill bits. You just need a normal Phillips head to screw these puppies together.
3. Hammer
You’ll also need a hammer handy to nail the MDF backings onto the cabinet backs. It may also be useful if you need to tap any anchors into your drywall when it comes time to hang your cabinets.
4. Magnetic Drill Bit Holder
Having one of these on your drill can save you a lot of frustration while building your cabinets and drawers. You can buy one separately for about $2 or it often comes included in drill/driver sets like ours. It’ll magnetize your drill bits, meaning many of the screws that Ikea provides will stick to your drill handsfree (thanks to the magic of magnets). We found this VERY helpful when trying to screw into small spots that were too tight for our fingertips (we couldn’t reach in and hold the screw steady, so having a magnetized drill bit that held it for us was key).

5. Measuring Tape
The next several tools are needed for attaching your cabinets to the wall. Whether you’re doing upper or lower cabinets, Ikea’s system uses a metal track (called the Sektion suspension rail) that you attach to your wall and then the cabinet boxes hang from these. The rail system is extremely handy because if you make sure the rail is level, your cabinets all hang from that and are guaranteed to be level! I know, it’s GREAT. The only time I don’t use their rail is when I don’t have a wall behind my cabinets, like if you’re doing an island. In that case I’ve built my own bases from 2×4″s, but more on that later.
For now, just know the measuring tape will be useful in determining exactly where in your kitchen you’re placing your cabinets – both side-to-side on each wall, and how high the rails need to be hung (Ikea provides guides for this in their instructions). You will probably want to have your kitchen plan/schematic from Ikea handy too.

6. Dremel Or Hacksaw
Once you know where each run of cabinets is going, you’ll need to cut your metal suspension rails to size. The rails are sold in 7 foot lengths, but if you only have 4 feet of cabinetry in one area – you only want 4 feet of rail.
You can cut these by hand with a hacksaw, but we find it much faster to use our Dremel Multi-Max with a metal cutting blade.

I typically mark my cut on a piece of painters tape and cut across the open top of one of our cabinet boxes (with a piece of cardboard to protect the cabinet underneath).
7. Stud Finder
You want to screw the rail into at least a few studs in your wall for maximum hold. So it’s smart to use a stud finder to locate and mark the studs that fall within the area you’re hanging the rail – that way you can be sure to go into them and get a nice firm hold. Since studs are typically 1.5″ thick, I like to mark the full width that my stud finder indicates, since you may not know exactly where the holes on the Sektion rail will line up.

8. Medium-Size Level
Once I know where my studs are, I hold my cut-to-size metal rail and, with a medium sized level (like this 24″ level) held against it, I mark the top line of my rail AND where the holes line up with my studs. I suggest amedium sized level for this just because they’re easier to wrangle during this step.

I also mark a few additional holes where I’ll use screws paired with anchors. I believe Ikea suggests at least having a screw every 12″ inches – but for short sections like this, I like to make sure I hit at least 2 studs and then have a screw at either end of the rail that goes into an anchor.
9. Heavy Duty Screws & Anchors
After some trial and error, we found that we like using these GRK Fastener Cabinet Screws to secure our rails into studs. They’re easy to drive, they hold really tight, and they include the star-head bit you need for them. We have tried other, cheaper “cabinet screws” and the heads kept breaking off. It was MADDENING.

We also like to have some anchors on hand too, like these E-Z Ancor packs that come with screws, for those additional support screws that we add.
10. Long Level
One of the biggest challenges we’ve found in this process is getting things level. Just because you’ve hung your rail level on the wall doesn’t prevent things like slopes in your floor or bows in your wall from chucking some additional curveballs in your direction. So your best defenses are a lot of patience and a nice long level, like this 4ft level we bought specifically for this task (after learning that it’s a lot harder to use a smaller level to solve these issues).

Your medium sized level will help with the process as well (especially in checking that each individual cabinet is level front-to-back) but you’ll want something bigger to check longer spans of cabinets. You could purchase an even longer level if you wanted, but they can start to get pricey, so we found a 4 foot long level to be sufficient, especially for checking across the gaps that you’ll leave for appliances like a 30″ stove or a standard 24″ dishwasher.
11. Shims
A lot of level issues can be corrected by twisting the adjustable plastic feet that come with your base cabinets, or by adjusting the placement of your metal rail. But if you’re dealing with bows in your wall (which you can find by placing your long level against it) you’ll want to have some wood shims on hand to place behind the metal rail. In these old houses, we had to use quite a few in a couple of places!

12. Jigsaw
When it comes time to install your sink base cabinet, you’ll need to make some holes for your plumbing. For smaller pipes like your water supply lines, you can just drill holes using a large drill bit (we used the 3/4″ bit in this set). But for things like your large drain pipe, you’ll either need to buy a larger hole bit or break out a jigsaw. Even though we don’t get the cleanest cut with it, the jigsaw gives us a little more wiggle room when placing the cabinet (since the drain pipe isn’t flexible like the supply lines) and we can also use it for other cuts like for exposing the outlets along the wall (the one below powers the garbage disposal under the sink).

Just be sure to make careful measurements before you cut. We usually put a layer of painters tape around the area we’re cutting. It allows us to mark our cut without marking the cabinet, plus the tape helps keep the white finish from cracking off. Either way, this stuff will all be hidden under the sink so it doesn’t have to look perfect.
13. Clamps
As you start to get your cabinets in place and leveled, you’ll want to secure any adjacent cabinets together. Ikea provides screws for doing this, but you’ll want to use some clamps (we like these 6″ bar clamps) to hold the cabinets tightly together before you begin screwing.
We didn’t get a picture of that process, but the clamps come in handy A LOT as an extra set of hands – like when we were installing this bracket for the exhaust hoods that we hung over the stoves.

14. Circular Saw and/or Table Saw
In addition to screwing cabinets together, you may find yourself attaching cover panels or filler pieces at some point. Cover panels go on exposed ends of cabinets (so you can’t see the metal rail they hang on) or, in our case, we used some large cover panels to create a box around the fridges at the duplex. So you’ll need some sort of larger saw to make long, straight cuts. Our cover panels were a bit too wide, so I used a circular saw to shave a few inches off one side.
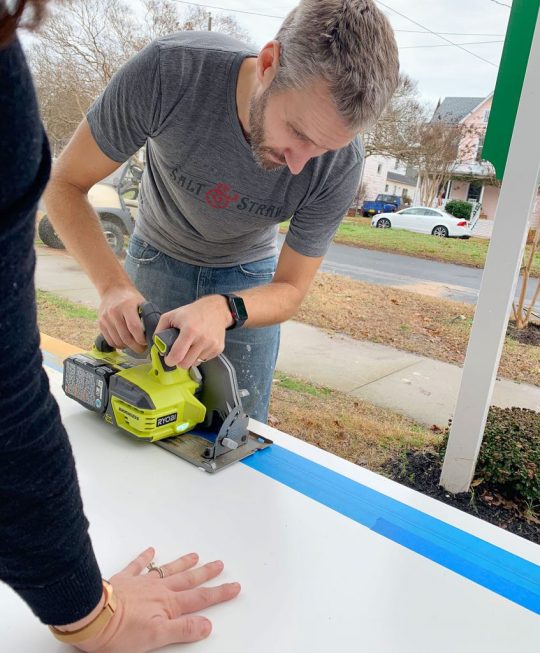
I didn’t use a table saw for that panel because running an 8 foot tall panel that’s this wide across my table saw would’ve been tough. But for smaller pieces (like filler pieces that are only about 3 feet long) a table saw is often easier, especially if you’re only shaving off a little bit. But if that’s too pricey and you’ve got a steady hand, you can get by with the circular saw.
15. 2 x 4″ Boards
Every time we’ve installed an Ikea kitchen we’ve needed some 2×4″s at some point. At the beach house we used them to make some bases for the island cabinets.
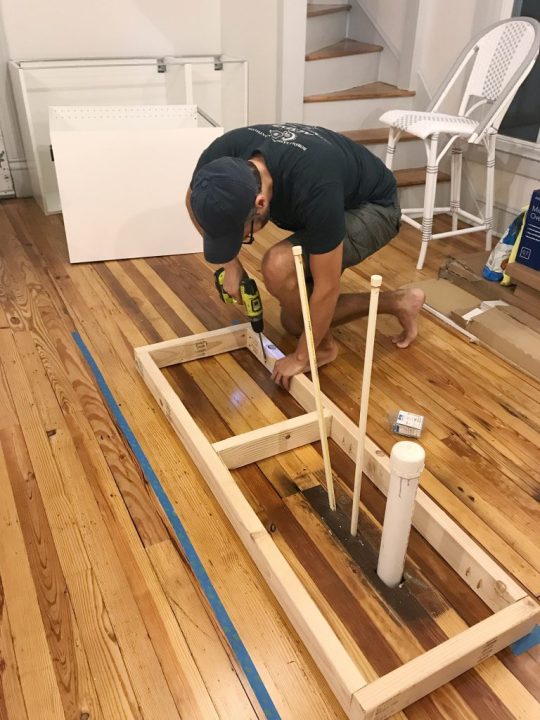
Basically, they were just some boxes we made almost the same size as each cabinet (slightly narrower to account for the toekicks) that we secured to the floor using pocket holes. To drill the pocket holes, you can use something like a…
16. Kreg Jig
Now, a Kreg Jig isn’t absolutely necessary here, but I’ve had one for around nine years now so I’m accustomed to breaking it out for tasks like this. So while I’m a big fan of having one in your arsenal, I understand that you’ve just bought a new kitchen so tacking on another $99 tool to your budget isn’t always practical.
I did use it again for the duplexes to make more 2×4″s into boxes (this time for mounting the above-fridge cabinet away from the wall, so it sat closer to the front of the fridge).

The boxes acted as an extension of the wall. The top one was for mounting the metal rail, and the bottom one gave the base of the cabinet a spot to rest so it didn’t tip back wildly. They also gave us a way to mount that large cover panel to box in the fridge.

I guess I should add in here that a step ladder is also useful, so let’s officially put that on the list.
17. Manual Screwdriver
Once your cabinets and panels are hung, leveled, and secured to each other, the next part of the process is to add your doors and drawers. The instructions here are pretty self-explanatory and the main tool you need is a power driver to screw everything together. Our main word of warning is to pay close attention to screw placements when you’re assembling drawers! Depending on where each drawer goes in the stack (top, middle, or bottom) there are sliiiiight differences in the instructions. So while we find it most efficient to do multiple drawers at once, we still pay close attention – especially for the first few.

Ok, back to the manual screw drivers. One big part of installing doors and drawers is tweaking and adjusting them for even and level spacing. For this you’ll want to a regular ol‘ manual Philips head screwdriver. It can be kind of tedious and frustrating, but it’s worth taking your time with it. This video shows it in a bit more detail.

You also will want a flathead screwdriver for twisting the little piece of plastic that locks each cabinet onto the metal rail, which comes up earlier in the process.
18. Miter Saw
Tasks like cutting your 2×4″s or even your filler pieces will be made easier and faster by having a miter saw on hand (we own this miter saw). You’ll also find that it’s helpful when it’s time to cut and install your toekicks. Ikea’s sells toekicks to match your cabinet fronts and they clip on to the plastic feet you will have attached to the bottom of your base cabinets.

In our beach house kitchen we installed quarter round in front of the Ikea baseboards to help disguise some floor level issues, as well as using quarter round around the island where we built our own base (we used standard wood baseboard trim instead of the Ikea toekicks around the island). Meanwhile, we just used the Ikea toekicks in the duplex kitchens and the floors were more level (and we think the wood and blue cabinets were more forgiving than white ones) so we didn’t need to add quarter round and it looks great.

19. Nail Gun
In addition to using a nail gun to attach additional molding like quarter round if you’re adding that (again, the Ikea baseboards just snap on so you won’t need it for that) I also find a nail gun comes in handy sometimes for attaching small filler pieces. Especially in cases where they’re too thin to take a screw.
20. Others Tools
Real quick, here are some other items you may want to have on hand. Some I’ve mentioned or shown already, but haven’t officially listed:
Pen or pencil
Painters tape
Step ladder
Utility knife or scissors (for opening boxes faster!)
Crowbar (if you need to remove any baseboard or molding)
Broom, dustpan, and/or vacuum with a hose (we have this one)

Your Ikea Kitchen Installation Tool Checklist
As promised, here’s all of the items in one place so you can make sure you have everything you need on hand. I’ve organized it a bit differently than above, just to put like items together. You may have special circumstances for your project that require more, less, or other tools – but I’ve found this to be a pretty comprehensive set:
Your itemized receipt / order
Hammer
Manual screwdrivers
Crowbar
Measuring tape
Pen or pencil
Painters tape
Step ladder
Power driver
Drill bit set with magnetic bit holder & 3/4″ bit for plumbing holes
Dremel or Hacksaw
Stud finder
Medium level (24″)
Large level (48″)
Wood shims
Cabinet screws (roughly 4 per cabinet)
Screws with anchors (roughly 2 per cabinet)
Jigsaw
Circular saw and/or table saw
Miter saw
Utility knife or scissors
Nail gun
Clamps
2×4″s (optional)
Kreg Jig (optional)
Broom, dustpan, and/or vacuum with hose
Good luck and happy installing!
P.S. For other posts we’ve written about installing Ikea cabinets, here’s one about installing our laundry room cabinets 5 years ago, and another one about using Ikea cabinets to make a wall of built-ins for our bonus room.
*This post contains affiliate links*
The post The Tools (And Tricks) You Need To Install An Ikea Kitchen Yourself appeared first on Young House Love.


0 notes
Text
The Tools (And Tricks) You Need To Install An Ikea Kitchen Yourself
Many of you have asked for tips and tricks to make installing an Ikea kitchen go more smoothly and look (and function) the best it possibly can. And the good news is that after installing three of them in a little over a year and a half (!!!), we have learned A TON about how to make things a little easier and help you end up with a better result. So settle in, I’ve got twenty tools & tips that can make all the difference.

First off, we like Ikea cabinets and have personally installed them in five rooms: our laundry room & bonus room at home, our beach house kitchen, and now these two duplex kitchens. We have lived with the ones in our home for nearly five years and they’re great. Not a single issue. They are smartly made, very durable, and they have a great 25-year warranty and a great price tag (often thousands cheaper than other options). They also come with many thoughtful features like soft close drawers that come standard and tons of customization options. So yeah, some Ikea furniture is known for feeling a little cheap and wobbly, but that has not been our experience with their cabinets AT ALL.
Ok, but back to the point of this post – tips and tools to make your Ikea cabinet install easier. Some of the tools I’m listing here are absolutely necessary and some are optional (they’ll just make the process easier, faster, and less frustrating). And as you read through this list, I think you’ll also get a pretty good sense of the steps (and curveballs) involved too, which I hope will help as well.
I’ll include a short bulleted list of everything at the end of the post too, that way you can use it as a tool checklist. But let’s just get right into it.
1. Your Itemized Receipt/Order
Before you build anything, you’ll want to take time to inventory and organize all of your boxes. We had over 200 boxes (!!!) delivered for our two duplex kitchens, so it helped to sort everything into piles beforehand.

We personally like to sort boxes by item (Sektion boxes over here, Maximera drawers over there, all of our cabinet fronts somewhere else, etc.) but you may find it helpful to sort yours by cabinet instead (ex: the box, drawer, hinges, and front for one cabinet all together in one pile – this is how Ikea breaks them up your order form). Either way you do it, this sorting process will help you identify any missing pieces and also make it faster once you start building.
2. Power driver (with Philips head)

This combo gets a lot of use in this install (especially the power driver/drill) – but they’re needed first to construct your cabinet boxes (Sektion pieces). We love constructing the boxes first because you quickly get to see the shape of your kitchen come to life.
And even though Ikea is known for their allen wrenches, you don’t use them AT ALL during a typical kitchen installation! So don’t worry about having lots of specialty drill bits. You just need a normal Phillips head to screw these puppies together.
3. Hammer
You’ll also need a hammer handy to nail the MDF backings onto the cabinet backs. It may also be useful if you need to tap any anchors into your drywall when it comes time to hang your cabinets.
4. Magnetic Drill Bit Holder
Having one of these on your drill can save you a lot of frustration while building your cabinets and drawers. You can buy one separately for about $2 or it often comes included in drill/driver sets like ours. It’ll magnetize your drill bits, meaning many of the screws that Ikea provides will stick to your drill handsfree (thanks to the magic of magnets). We found this VERY helpful when trying to screw into small spots that were too tight for our fingertips (we couldn’t reach in and hold the screw steady, so having a magnetized drill bit that held it for us was key).

5. Measuring Tape
The next several tools are needed for attaching your cabinets to the wall. Whether you’re doing upper or lower cabinets, Ikea’s system uses a metal track (called the Sektion suspension rail) that you attach to your wall and then the cabinet boxes hang from these. The rail system is extremely handy because if you make sure the rail is level, your cabinets all hang from that and are guaranteed to be level! I know, it’s GREAT. The only time I don’t use their rail is when I don’t have a wall behind my cabinets, like if you’re doing an island. In that case I’ve built my own bases from 2×4″s, but more on that later.
For now, just know the measuring tape will be useful in determining exactly where in your kitchen you’re placing your cabinets – both side-to-side on each wall, and how high the rails need to be hung (Ikea provides guides for this in their instructions). You will probably want to have your kitchen plan/schematic from Ikea handy too.

6. Dremel Or Hacksaw
Once you know where each run of cabinets is going, you’ll need to cut your metal suspension rails to size. The rails are sold in 7 foot lengths, but if you only have 4 feet of cabinetry in one area – you only want 4 feet of rail.
You can cut these by hand with a hacksaw, but we find it much faster to use our Dremel Multi-Max with a metal cutting blade.

I typically mark my cut on a piece of painters tape and cut across the open top of one of our cabinet boxes (with a piece of cardboard to protect the cabinet underneath).
7. Stud Finder
You want to screw the rail into at least a few studs in your wall for maximum hold. So it’s smart to use a stud finder to locate and mark the studs that fall within the area you’re hanging the rail – that way you can be sure to go into them and get a nice firm hold. Since studs are typically 1.5″ thick, I like to mark the full width that my stud finder indicates, since you may not know exactly where the holes on the Sektion rail will line up.

8. Medium-Size Level
Once I know where my studs are, I hold my cut-to-size metal rail and, with a medium sized level (like this 24″ level) held against it, I mark the top line of my rail AND where the holes line up with my studs. I suggest amedium sized level for this just because they’re easier to wrangle during this step.

I also mark a few additional holes where I’ll use screws paired with anchors. I believe Ikea suggests at least having a screw every 12″ inches – but for short sections like this, I like to make sure I hit at least 2 studs and then have a screw at either end of the rail that goes into an anchor.
9. Heavy Duty Screws & Anchors
After some trial and error, we found that we like using these GRK Fastener Cabinet Screws to secure our rails into studs. They’re easy to drive, they hold really tight, and they include the star-head bit you need for them. We have tried other, cheaper “cabinet screws” and the heads kept breaking off. It was MADDENING.
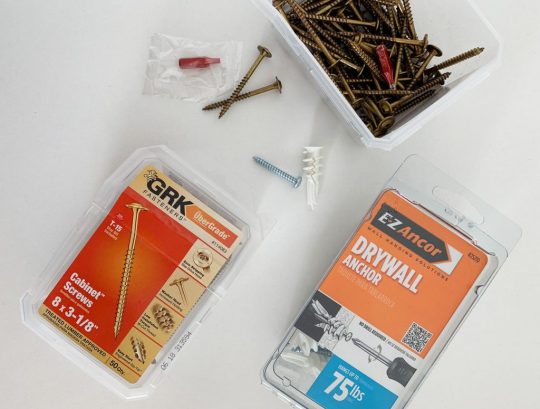
We also like to have some anchors on hand too, like these E-Z Ancor packs that come with screws, for those additional support screws that we add.
10. Long Level
One of the biggest challenges we’ve found in this process is getting things level. Just because you’ve hung your rail level on the wall doesn’t prevent things like slopes in your floor or bows in your wall from chucking some additional curveballs in your direction. So your best defenses are a lot of patience and a nice long level, like this 4ft level we bought specifically for this task (after learning that it’s a lot harder to use a smaller level to solve these issues).

Your medium sized level will help with the process as well (especially in checking that each individual cabinet is level front-to-back) but you’ll want something bigger to check longer spans of cabinets. You could purchase an even longer level if you wanted, but they can start to get pricey, so we found a 4 foot long level to be sufficient, especially for checking across the gaps that you’ll leave for appliances like a 30″ stove or a standard 24″ dishwasher.
11. Shims
A lot of level issues can be corrected by twisting the adjustable plastic feet that come with your base cabinets, or by adjusting the placement of your metal rail. But if you’re dealing with bows in your wall (which you can find by placing your long level against it) you’ll want to have some wood shims on hand to place behind the metal rail. In these old houses, we had to use quite a few in a couple of places!

12. Jigsaw
When it comes time to install your sink base cabinet, you’ll need to make some holes for your plumbing. For smaller pipes like your water supply lines, you can just drill holes using a large drill bit (we used the 3/4″ bit in this set). But for things like your large drain pipe, you’ll either need to buy a larger hole bit or break out a jigsaw. Even though we don’t get the cleanest cut with it, the jigsaw gives us a little more wiggle room when placing the cabinet (since the drain pipe isn’t flexible like the supply lines) and we can also use it for other cuts like for exposing the outlets along the wall (the one below powers the garbage disposal under the sink).

Just be sure to make careful measurements before you cut. We usually put a layer of painters tape around the area we’re cutting. It allows us to mark our cut without marking the cabinet, plus the tape helps keep the white finish from cracking off. Either way, this stuff will all be hidden under the sink so it doesn’t have to look perfect.
13. Clamps
As you start to get your cabinets in place and leveled, you’ll want to secure any adjacent cabinets together. Ikea provides screws for doing this, but you’ll want to use some clamps (we like these 6″ bar clamps) to hold the cabinets tightly together before you begin screwing.
We didn’t get a picture of that process, but the clamps come in handy A LOT as an extra set of hands – like when we were installing this bracket for the exhaust hoods that we hung over the stoves.

14. Circular Saw and/or Table Saw
In addition to screwing cabinets together, you may find yourself attaching cover panels or filler pieces at some point. Cover panels go on exposed ends of cabinets (so you can’t see the metal rail they hang on) or, in our case, we used some large cover panels to create a box around the fridges at the duplex. So you’ll need some sort of larger saw to make long, straight cuts. Our cover panels were a bit too wide, so I used a circular saw to shave a few inches off one side.

I didn’t use a table saw for that panel because running an 8 foot tall panel that’s this wide across my table saw would’ve been tough. But for smaller pieces (like filler pieces that are only about 3 feet long) a table saw is often easier, especially if you’re only shaving off a little bit. But if that’s too pricey and you’ve got a steady hand, you can get by with the circular saw.
15. 2 x 4″ Boards
Every time we’ve installed an Ikea kitchen we’ve needed some 2×4″s at some point. At the beach house we used them to make some bases for the island cabinets.

Basically, they were just some boxes we made almost the same size as each cabinet (slightly narrower to account for the toekicks) that we secured to the floor using pocket holes. To drill the pocket holes, you can use something like a…
16. Kreg Jig
Now, a Kreg Jig isn’t absolutely necessary here, but I’ve had one for around nine years now so I’m accustomed to breaking it out for tasks like this. So while I’m a big fan of having one in your arsenal, I understand that you’ve just bought a new kitchen so tacking on another $99 tool to your budget isn’t always practical.
I did use it again for the duplexes to make more 2×4″s into boxes (this time for mounting the above-fridge cabinet away from the wall, so it sat closer to the front of the fridge).
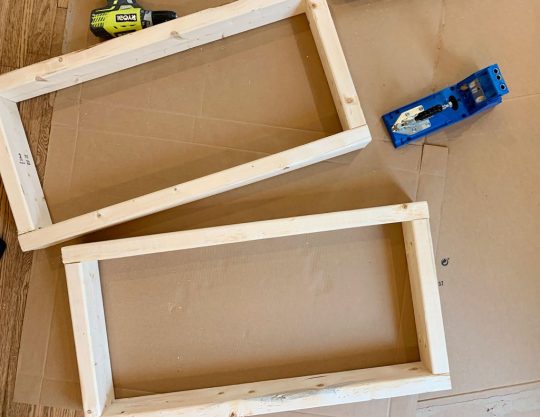
The boxes acted as an extension of the wall. The top one was for mounting the metal rail, and the bottom one gave the base of the cabinet a spot to rest so it didn’t tip back wildly. They also gave us a way to mount that large cover panel to box in the fridge.

I guess I should add in here that a step ladder is also useful, so let’s officially put that on the list.
17. Manual Screwdriver
Once your cabinets and panels are hung, leveled, and secured to each other, the next part of the process is to add your doors and drawers. The instructions here are pretty self-explanatory and the main tool you need is a power driver to screw everything together. Our main word of warning is to pay close attention to screw placements when you’re assembling drawers! Depending on where each drawer goes in the stack (top, middle, or bottom) there are sliiiiight differences in the instructions. So while we find it most efficient to do multiple drawers at once, we still pay close attention – especially for the first few.

Ok, back to the manual screw drivers. One big part of installing doors and drawers is tweaking and adjusting them for even and level spacing. For this you’ll want to a regular ol‘ manual Philips head screwdriver. It can be kind of tedious and frustrating, but it’s worth taking your time with it. This video shows it in a bit more detail.

You also will want a flathead screwdriver for twisting the little piece of plastic that locks each cabinet onto the metal rail, which comes up earlier in the process.
18. Miter Saw
Tasks like cutting your 2×4″s or even your filler pieces will be made easier and faster by having a miter saw on hand (we own this miter saw). You’ll also find that it’s helpful when it’s time to cut and install your toekicks. Ikea’s sells toekicks to match your cabinet fronts and they clip on to the plastic feet you will have attached to the bottom of your base cabinets.
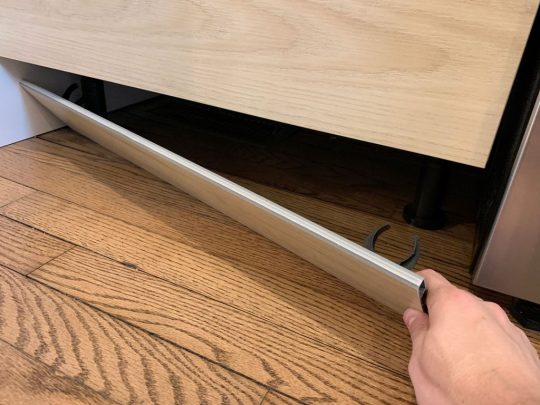
In our beach house kitchen we installed quarter round in front of the Ikea baseboards to help disguise some floor level issues, as well as using quarter round around the island where we built our own base (we used standard wood baseboard trim instead of the Ikea toekicks around the island). Meanwhile, we just used the Ikea toekicks in the duplex kitchens and the floors were more level (and we think the wood and blue cabinets were more forgiving than white ones) so we didn’t need to add quarter round and it looks great.

19. Nail Gun
In addition to using a nail gun to attach additional molding like quarter round if you’re adding that (again, the Ikea baseboards just snap on so you won’t need it for that) I also find a nail gun comes in handy sometimes for attaching small filler pieces. Especially in cases where they’re too thin to take a screw.
20. Others Tools
Real quick, here are some other items you may want to have on hand. Some I’ve mentioned or shown already, but haven’t officially listed:
Pen or pencil
Painters tape
Step ladder
Utility knife or scissors (for opening boxes faster!)
Crowbar (if you need to remove any baseboard or molding)
Broom, dustpan, and/or vacuum with a hose (we have this one)

Your Ikea Kitchen Installation Tool Checklist
As promised, here’s all of the items in one place so you can make sure you have everything you need on hand. I’ve organized it a bit differently than above, just to put like items together. You may have special circumstances for your project that require more, less, or other tools – but I’ve found this to be a pretty comprehensive set:
Your itemized receipt / order
Hammer
Manual screwdrivers
Crowbar
Measuring tape
Pen or pencil
Painters tape
Step ladder
Power driver
Drill bit set with magnetic bit holder & 3/4″ bit for plumbing holes
Dremel or Hacksaw
Stud finder
Medium level (24″)
Large level (48″)
Wood shims
Cabinet screws (roughly 4 per cabinet)
Screws with anchors (roughly 2 per cabinet)
Jigsaw
Circular saw and/or table saw
Miter saw
Utility knife or scissors
Nail gun
Clamps
2×4″s (optional)
Kreg Jig (optional)
Broom, dustpan, and/or vacuum with hose
Good luck and happy installing!
P.S. For other posts we’ve written about installing Ikea cabinets, here’s one about installing our laundry room cabinets 5 years ago, and another one about using Ikea cabinets to make a wall of built-ins for our bonus room.
*This post contains affiliate links*
The post The Tools (And Tricks) You Need To Install An Ikea Kitchen Yourself appeared first on Young House Love.


The Tools (And Tricks) You Need To Install An Ikea Kitchen Yourself published first on https://landscapingmates.blogspot.com
0 notes
Text
Construction is one of the largest industries still resisting the call of the 21st century, its practitioners opting for decades-old but tried and true methods. Ben Huh, of Cheezburger fame, aims to modernize the planning and assembly of buildings with software-generated floorplans and rooms that fit together like LEGO bricks.
Huh’s new company, Social Construct, handles everything from design to execution, leaving only the actual in-person work to construction contractors. By optimizing layouts, laying cables and pipes below floors instead of in walls, and standardizing both pieces and assembly, this new tech-informed method could reduce the time and cost of constructing a building by 20 to 30 percent.
The company emerged in 2017 out of a project at Y Combinator, where Huh worked after leaving web culture trailblazer Cheezburger. While researching the economics of construction, he was surprised at both the scale and dated nature of the industry.
Compared with the cost of manufacturing electronics or launching other large, multi-million-dollar endeavors, which have dropped precipitously, the costs and timeframes of construction have either remained fixed or increased for decades.
“There have been productivity increases everywhere, but not in construction. It peaks in the ’70s, then drops,” he explained, illustrating the problem as follows: “Imagine you have a 55-inch hole in your wall — it’s cheaper today to buy a TV to cover the hole than to get it fixed.”
It’s unarguably true, but why should that be? The simple fact is that most construction-related work hasn’t gotten any easier or more precise, and the jobs aren’t so desirable as they once were. So labor costs go up along with the costs of ever more sophisticated buildings. But this just raises another question: Why hasn’t the work gotten any easier or more precise?
It turns out that construction, although a huge industry, is a very fragmented one — and, understandably, rather risk-averse. Even if someone wanted to question the doctrines and practices by which buildings are made, they don’t command the capital to do so.
“People do stuff because it’s what they were taught to do. No one has the millions in venture dollars to say, ‘What if we did it different?’ All these benefits show up, but then you have to reinvent part of the wheel, and companies have no reason to. There’s just no reason a contractor would ever think about doing that,” Huh explained.
The industry has effectively insulated itself against a great deal of innovation with an “if it ain’t broke, don’t spend millions of dollars fixing it” attitude. It would take a venture-backed newcomer to upend the conventions that have held construction costs and methods in stasis for decades. So at least is Huh’s hypothesis, and he believes that Social Construct is that newcomer.
Computational construction
Huh recalls his team questioning the status quo: “We wondered, could we build a whole building out of precisely made parts, the way you’d build a plane?”
Turns out people have made attempts a few times, even before CAD made the idea so attractive. “They tried this in the 70s,” Huh said. “What they found out was they could never get the parts to fit. The designs assumed an idealized space – exactly 10 feet or whatever. but it’s never quite 10 feet, the parts just aren’t that precise. Half an inch of error over 10 feet is actually pretty good. So everyone works around each other, which means the parts have to be cut to fit. Flexibility is more important than precision.”
Where Social Construct’s process diverges from the industry norm is at the point where the general shape and purpose of the building and its floors have been decided. For instance, it may be a largely triangular building with flat corners, the elevator in the center, and with three one-bedroom and one two-bedroom apartments on each floor.
That sort of design can be roughed out by an architect in a few hours, but the specifics of where exactly everything goes, from water fixtures to electrical lines, can take much longer. So that’s where the computer takes over.
Image Credits: Social Construct
You could call it an AI, but Huh has deliberately shunned the term to avoid any suspicion of trying to take a ride on that particular hype train. Working from that level of detail, the Social Construct system plans out every aspect of the construction, optimizing the layout for a variety of parameters.
There are three key aspects:
First, construction uses pre-fabricated “assemblies,” of which there are about a hundred types total: walls with kitchen cabinets, walls with holes for shower fixtures, lighting and so on. These pieces can be carried by a single person or at most two, and snap into place onto the framing. This minimizes the chance that there will be any unusual dimensions or requirements that mean this wall has to be extra thick, or you need an extra length of piping to supply the bathroom sink. It also makes assembly and repair work simple. Where there are normal walls or non-standard widths, ordinary drywall is used.
Second, all the pipes, cables, and assorted in-wall infrastructure has been moved under the floor, the routes pre-determined by the computer. It all goes in a tiny space below the floorboards — which provides better sound and heat insulation as a side benefit. This further simplifies construction, as there is no need to adapt or improvise the angles, lengths, and other aspects of water or electrical work. The light switches don’t even need to be connected, as they’re wireless and kinetically powered.
Image Credits: Social Construct
Third, the layout is calculated to minimize the possibility of variance in measurements or construction. Cuts can never be perfect and microscopic errors add up so 20 feet hallway in the design document might actually need to be 20 feet and a quarter inch. The computer knows this and plans around it, avoiding situations that tend to create that type of variance wherever possible and allowing for last-minute adjustments when it’s inevitable.
So the sequence of events is that the basic “shell” of the building including all the usual stacks and structural pieces gets built as normal — that part doesn’t change at all. Once it’s done, the team measures the actual dimensions inside very, very carefully, which lets the computer design for exactly that space. Then the walls are raised per the generated plan, the cables are laid according to the same, the assemblies are carted in and click into place, and finally the hardwood floors are installed, with the pieces cut to fit what little differences from the plan have emerged.
Image Credits: Social Construct
“We compared this to a conventionally built building, and we’re seeing that we can save 20 percent on construction costs,” Huh said — and considering construction is about two thirds of a building’s entire budget, that may be saving tens of millions right off the bat. The Social Construct building was also finished 2 months faster.
Faster work may sound like less hours for subcontractors and the like, but Huh said they’re emphasizing that lower costs and quicker work mean more productivity, so take-home pay is comparable but jobs will be easier and more numerous.
It’s important to note that Social Construct isn’t actually getting into the contracting side of things. The plan is to partner with, train, and certify contractors so that they can scale more like a platform than a boots-on-the-ground company — “Which makes us venture-backable,” Huh noted.
Right now the first building built with these methods has been sold and the company is looking for its next site, local partner, and land owner — and so they decided to exit stealth mode.
Social Construct already has about $17 million in funding, from Floodgate, S28 Capital, Felicis, Founders Fund, and (“of course,” Huh said) Y Combinator. They’ll be looking for more soon as they begin the process of truly scaling up, but it seems wise to have remained quiet until there was a whole building they could point to and say, “look, it works!”
So if your dream was to live in a computer-designed building and apartment, you’re slightly late — but it sounds like this will be the first of many.
[ad_2]
Source link
Social Construct’s computer-optimized buildings could shake construction industry’s foundations – TechCrunch Construction is one of the largest industries still resisting the call of the 21st century, its practitioners opting for decades-old but tried and true methods.
0 notes
Text
The Tools (And Tricks) You Need To Install An Ikea Kitchen Yourself
Many of you have asked for tips and tricks to make installing an Ikea kitchen go more smoothly and look (and function) the best it possibly can. And the good news is that after installing three of them in a little over a year and a half (!!!), we have learned A TON about how to make things a little easier and help you end up with a better result. So settle in, I’ve got twenty tools & tips that can make all the difference.

First off, we like Ikea cabinets and have personally installed them in five rooms: our laundry room & bonus room at home, our beach house kitchen, and now these two duplex kitchens. We have lived with the ones in our home for nearly five years and they’re great. Not a single issue. They are smartly made, very durable, and they have a great 25-year warranty and a great price tag (often thousands cheaper than other options). They also come with many thoughtful features like soft close drawers that come standard and tons of customization options. So yeah, some Ikea furniture is known for feeling a little cheap and wobbly, but that has not been our experience with their cabinets AT ALL.
Ok, but back to the point of this post – tips and tools to make your Ikea cabinet install easier. Some of the tools I’m listing here are absolutely necessary and some are optional (they’ll just make the process easier, faster, and less frustrating). And as you read through this list, I think you’ll also get a pretty good sense of the steps (and curveballs) involved too, which I hope will help as well.

I’ll include a short bulleted list of everything at the end of the post too, that way you can use it as a tool checklist. But let’s just get right into it.

1. Your Itemized Receipt/Order
Before you build anything, you’ll want to take time to inventory and organize all of your boxes. We had over 200 boxes (!!!) delivered for our two duplex kitchens, so it helped to sort everything into piles beforehand.
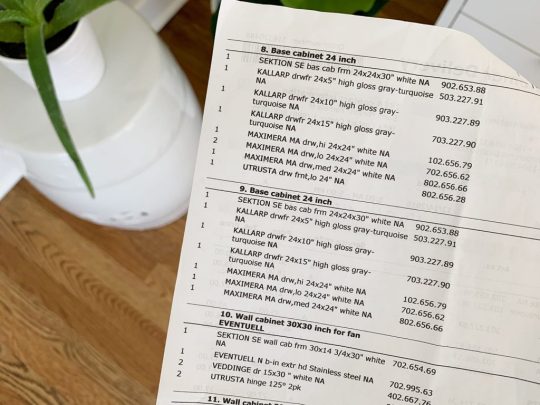
We personally like to sort boxes by item (Sektion boxes over here, Maximera drawers over there, all of our cabinet fronts somewhere else, etc.) but you may find it helpful to sort yours by cabinet instead (ex: the box, drawer, hinges, and front for one cabinet all together in one pile – this is how Ikea breaks them up your order form). Either way you do it, this sorting process will help you identify any missing pieces and also make it faster once you start building.
2. Power driver (with Philips head)
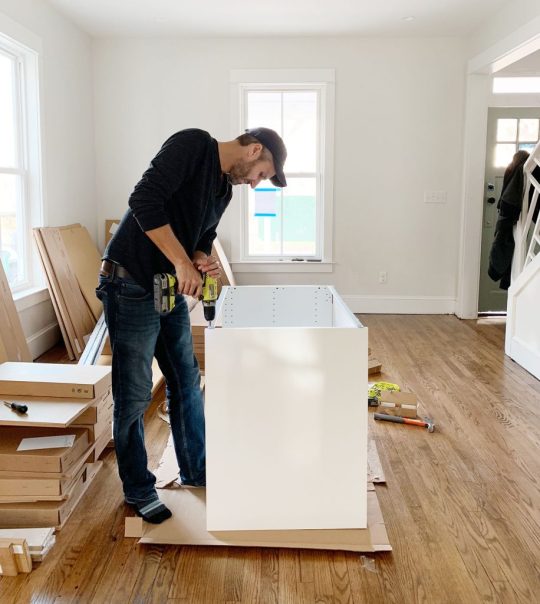
This combo gets a lot of use in this install (especially the power driver/drill) – but they’re needed first to construct your cabinet boxes (Sektion pieces). We love constructing the boxes first because you quickly get to see the shape of your kitchen come to life.

And even though Ikea is known for their allen wrenches, you don’t use them AT ALL during a typical kitchen installation! So don’t worry about having lots of specialty drill bits. You just need a normal Phillips head to screw these puppies together.
3. Hammer
You’ll also need a hammer handy to nail the MDF backings onto the cabinet backs. It may also be useful if you need to tap any anchors into your drywall when it comes time to hang your cabinets.
4. Magnetic Drill Bit Holder
Having one of these on your drill can save you a lot of frustration while building your cabinets and drawers. You can buy one separately for about $2 or it often comes included in drill/driver sets like ours. It’ll magnetize your drill bits, meaning many of the screws that Ikea provides will stick to your drill handsfree (thanks to the magic of magnets). We found this VERY helpful when trying to screw into small spots that were too tight for our fingertips (we couldn’t reach in and hold the screw steady, so having a magnetized drill bit that held it for us was key).
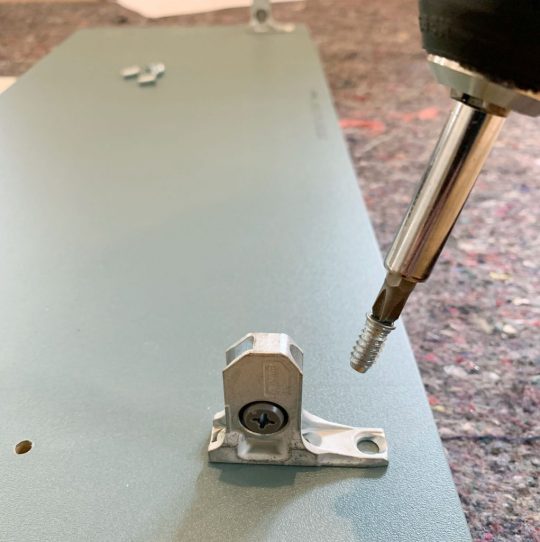
5. Measuring Tape
The next several tools are needed for attaching your cabinets to the wall. Whether you’re doing upper or lower cabinets, Ikea’s system uses a metal track (called the Sektion suspension rail) that you attach to your wall and then the cabinet boxes hang from these. The rail system is extremely handy because if you make sure the rail is level, your cabinets all hang from that and are guaranteed to be level! I know, it’s GREAT. The only time I don’t use their rail is when I don’t have a wall behind my cabinets, like if you’re doing an island. In that case I’ve built my own bases from 2×4″s, but more on that later.
For now, just know the measuring tape will be useful in determining exactly where in your kitchen you’re placing your cabinets – both side-to-side on each wall, and how high the rails need to be hung (Ikea provides guides for this in their instructions). You will probably want to have your kitchen plan/schematic from Ikea handy too.

6. Dremel Or Hacksaw
Once you know where each run of cabinets is going, you’ll need to cut your metal suspension rails to size. The rails are sold in 7 foot lengths, but if you only have 4 feet of cabinetry in one area – you only want 4 feet of rail.
You can cut these by hand with a hacksaw, but we find it much faster to use our Dremel Multi-Max with a metal cutting blade.

I typically mark my cut on a piece of painters tape and cut across the open top of one of our cabinet boxes (with a piece of cardboard to protect the cabinet underneath).
7. Stud Finder
You want to screw the rail into at least a few studs in your wall for maximum hold. So it’s smart to use a stud finder to locate and mark the studs that fall within the area you’re hanging the rail – that way you can be sure to go into them and get a nice firm hold. Since studs are typically 1.5″ thick, I like to mark the full width that my stud finder indicates, since you may not know exactly where the holes on the Sektion rail will line up.
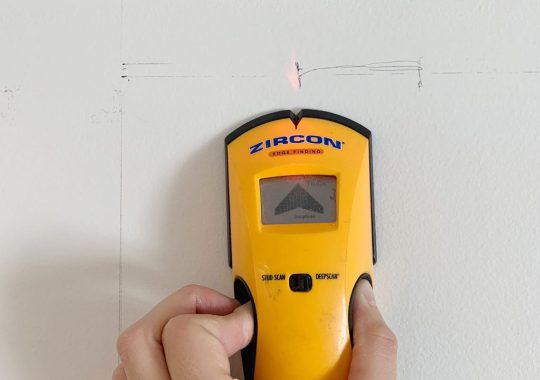
8. Medium-Size Level
Once I know where my studs are, I hold my cut-to-size metal rail and, with a medium sized level (like this 24″ level) held against it, I mark the top line of my rail AND where the holes line up with my studs. I suggest amedium sized level for this just because they’re easier to wrangle during this step.
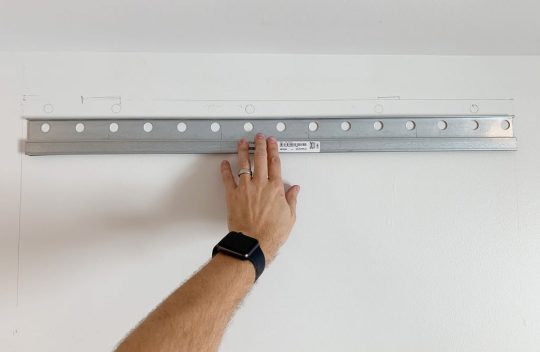
I also mark a few additional holes where I’ll use screws paired with anchors. I believe Ikea suggests at least having a screw every 12″ inches – but for short sections like this, I like to make sure I hit at least 2 studs and then have a screw at either end of the rail that goes into an anchor.
9. Heavy Duty Screws & Anchors
After some trial and error, we found that we like using these GRK Fastener Cabinet Screws to secure our rails into studs. They’re easy to drive, they hold really tight, and they include the star-head bit you need for them. We have tried other, cheaper “cabinet screws” and the heads kept breaking off. It was MADDENING.

We also like to have some anchors on hand too, like these E-Z Ancor packs that come with screws, for those additional support screws that we add.
10. Long Level
One of the biggest challenges we’ve found in this process is getting things level. Just because you’ve hung your rail level on the wall doesn’t prevent things like slopes in your floor or bows in your wall from chucking some additional curveballs in your direction. So your best defenses are a lot of patience and a nice long level, like this 4ft level we bought specifically for this task (after learning that it’s a lot harder to use a smaller level to solve these issues).

Your medium sized level will help with the process as well (especially in checking that each individual cabinet is level front-to-back) but you’ll want something bigger to check longer spans of cabinets. You could purchase an even longer level if you wanted, but they can start to get pricey, so we found a 4 foot long level to be sufficient, especially for checking across the gaps that you’ll leave for appliances like a 30″ stove or a standard 24″ dishwasher.
11. Shims
A lot of level issues can be corrected by twisting the adjustable plastic feet that come with your base cabinets, or by adjusting the placement of your metal rail. But if you’re dealing with bows in your wall (which you can find by placing your long level against it) you’ll want to have some wood shims on hand to place behind the metal rail. In these old houses, we had to use quite a few in a couple of places!

12. Jigsaw
When it comes time to install your sink base cabinet, you’ll need to make some holes for your plumbing. For smaller pipes like your water supply lines, you can just drill holes using a large drill bit (we used the 3/4″ bit in this set). But for things like your large drain pipe, you’ll either need to buy a larger hole bit or break out a jigsaw. Even though we don’t get the cleanest cut with it, the jigsaw gives us a little more wiggle room when placing the cabinet (since the drain pipe isn’t flexible like the supply lines) and we can also use it for other cuts like for exposing the outlets along the wall (the one below powers the garbage disposal under the sink).

Just be sure to make careful measurements before you cut. We usually put a layer of painters tape around the area we’re cutting. It allows us to mark our cut without marking the cabinet, plus the tape helps keep the white finish from cracking off. Either way, this stuff will all be hidden under the sink so it doesn’t have to look perfect.
13. Clamps
As you start to get your cabinets in place and leveled, you’ll want to secure any adjacent cabinets together. Ikea provides screws for doing this, but you’ll want to use some clamps (we like these 6″ bar clamps) to hold the cabinets tightly together before you begin screwing.
We didn’t get a picture of that process, but the clamps come in handy A LOT as an extra set of hands – like when we were installing this bracket for the exhaust hoods that we hung over the stoves.

14. Circular Saw and/or Table Saw
In addition to screwing cabinets together, you may find yourself attaching cover panels or filler pieces at some point. Cover panels go on exposed ends of cabinets (so you can’t see the metal rail they hang on) or, in our case, we used some large cover panels to create a box around the fridges at the duplex. So you’ll need some sort of larger saw to make long, straight cuts. Our cover panels were a bit too wide, so I used a circular saw to shave a few inches off one side.

I didn’t use a table saw for that panel because running an 8 foot tall panel that’s this wide across my table saw would’ve been tough. But for smaller pieces (like filler pieces that are only about 3 feet long) a table saw is often easier, especially if you’re only shaving off a little bit. But if that’s too pricey and you’ve got a steady hand, you can get by with the circular saw.
15. 2 x 4″ Boards
Every time we’ve installed an Ikea kitchen we’ve needed some 2×4″s at some point. At the beach house we used them to make some bases for the island cabinets.

Basically, they were just some boxes we made almost the same size as each cabinet (slightly narrower to account for the toekicks) that we secured to the floor using pocket holes. To drill the pocket holes, you can use something like a…
16. Kreg Jig
Now, a Kreg Jig isn’t absolutely necessary here, but I’ve had one for around nine years now so I’m accustomed to breaking it out for tasks like this. So while I’m a big fan of having one in your arsenal, I understand that you’ve just bought a new kitchen so tacking on another $99 tool to your budget isn’t always practical.
I did use it again for the duplexes to make more 2×4″s into boxes (this time for mounting the above-fridge cabinet away from the wall, so it sat closer to the front of the fridge).

The boxes acted as an extension of the wall. The top one was for mounting the metal rail, and the bottom one gave the base of the cabinet a spot to rest so it didn’t tip back wildly. They also gave us a way to mount that large cover panel to box in the fridge.

I guess I should add in here that a step ladder is also useful, so let’s officially put that on the list.
17. Manual Screwdriver
Once your cabinets and panels are hung, leveled, and secured to each other, the next part of the process is to add your doors and drawers. The instructions here are pretty self-explanatory and the main tool you need is a power driver to screw everything together. Our main word of warning is to pay close attention to screw placements when you’re assembling drawers! Depending on where each drawer goes in the stack (top, middle, or bottom) there are sliiiiight differences in the instructions. So while we find it most efficient to do multiple drawers at once, we still pay close attention – especially for the first few.

Ok, back to the manual screw drivers. One big part of installing doors and drawers is tweaking and adjusting them for even and level spacing. For this you’ll want to use a regular ol‘ manual Philips head screwdriver. It can be kind of tedious and frustrating, but it’s worth taking your time with it. This video shows it in a bit more detail.

You also will want a flathead screwdriver for twisting the little piece of plastic that locks each cabinet onto the metal rail, which comes up earlier in the process.
18. Miter Saw
Tasks like cutting your 2×4″s or even your filler pieces will be made easier and faster by having a miter saw on hand (we own this miter saw). You’ll also find that it’s helpful when it’s time to cut and install your toekicks. Ikea’s sells toekicks to match your cabinet fronts and they clip on to the plastic feet you will have attached to the bottom of your base cabinets.

In our beach house kitchen we installed quarter round in front of the Ikea baseboards to help disguise some floor level issues, as well as using quarter round around the island where we built our own base (we used standard wood baseboard trim instead of the Ikea toekicks around the island). Meanwhile, we just used the Ikea toekicks in the duplex kitchens and the floors were more level (and we think the wood and blue cabinets were more forgiving than white ones) so we didn’t need to add quarter round and it looks great.
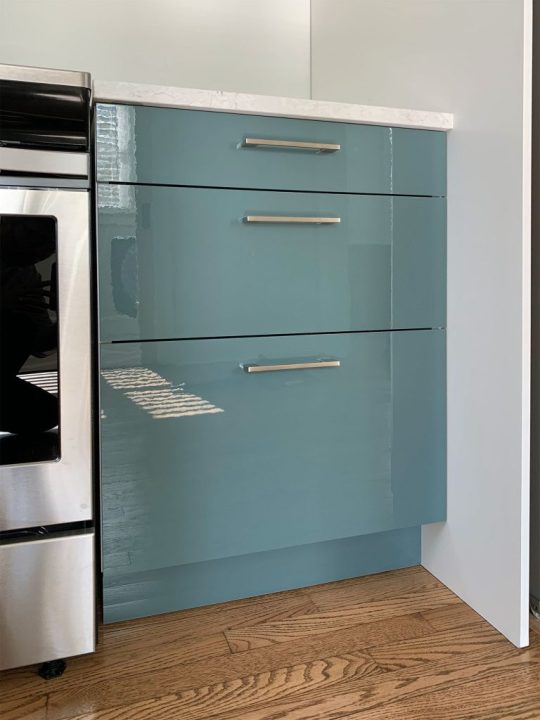
19. Nail Gun
In addition to using a nail gun to attach additional molding like quarter round if you’re adding that (again, the Ikea baseboards just snap on so you won’t need it for that) I also find a nail gun comes in handy sometimes for attaching small filler pieces. Especially in cases where they’re too thin to take a screw.
20. Others Tools
Real quick, here are some other items you may want to have on hand. Some I’ve mentioned or shown already, but haven’t officially listed:
Pen or pencil
Painters tape
Step ladder
Utility knife or scissors (for opening boxes faster!)
Crowbar (if you need to remove any baseboard or molding)
Broom, dustpan, and/or vacuum with a hose (we have this one)
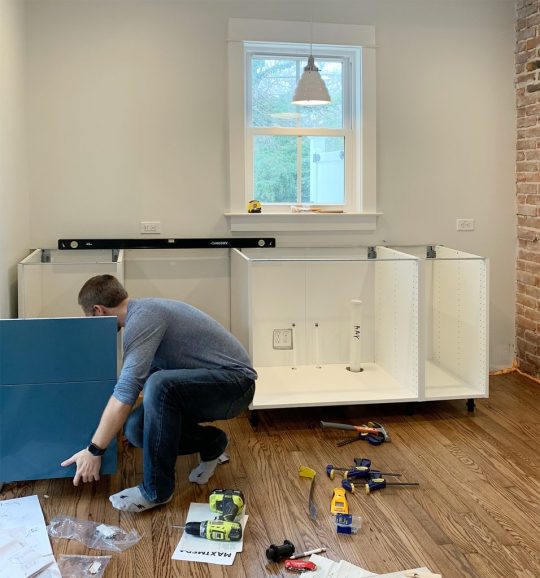
Your Ikea Kitchen Installation Tool Checklist
As promised, here’s all of the items in one place so you can make sure you have everything you need on hand. I’ve organized it a bit differently than above, just to put like items together. You may have special circumstances for your project that require more, less, or other tools – but I’ve found this to be a pretty comprehensive set:
Your itemized receipt / order
Hammer
Manual screwdrivers
Crowbar
Measuring tape
Pen or pencil
Painters tape
Step ladder
Power driver
Drill bit set with magnetic bit holder & 3/4″ bit for plumbing holes
Dremel or Hacksaw
Stud finder
Medium level (24″)
Large level (48″)
Wood shims
Cabinet screws (roughly 4 per cabinet)
Screws with anchors (roughly 2 per cabinet)
Jigsaw
Circular saw and/or table saw
Miter saw
Utility knife or scissors
Nail gun
Clamps
2×4″s (optional)
Kreg Jig (optional)
Broom, dustpan, and/or vacuum with hose
Good luck and happy installing!
P.S. For other posts we’ve written about installing Ikea cabinets, here’s one about installing our laundry room cabinets 5 years ago, and another one about using Ikea cabinets to make a wall of built-ins for our bonus room.
*This post contains affiliate links*
The post The Tools (And Tricks) You Need To Install An Ikea Kitchen Yourself appeared first on Young House Love.
The Tools (And Tricks) You Need To Install An Ikea Kitchen Yourself published first on https://bakerskitchenslimited.tumblr.com/
0 notes
Text
Construction is one of the largest industries still resisting the call of the 21st century, its practitioners opting for decades-old but tried and true methods. Ben Huh, of Cheezburger fame, aims to modernize the planning and assembly of buildings with software-generated floorplans and rooms that fit together like LEGO bricks.
Huh’s new company, Social Construct, handles everything from design to execution, leaving only the actual in-person work to construction contractors. By optimizing layouts, laying cables and pipes below floors instead of in walls, and standardizing both pieces and assembly, this new tech-informed method could reduce the time and cost of constructing a building by 20 to 30 percent.
The company emerged in 2017 out of a project at Y Combinator, where Huh worked after leaving web culture trailblazer Cheezburger. While researching the economics of construction, he was surprised at both the scale and dated nature of the industry.
Compared with the cost of manufacturing electronics or launching other large, multi-million-dollar endeavors, which have dropped precipitously, the costs and timeframes of construction have either remained fixed or increased for decades.
Where top VCs are investing in construction robotics
“There have been productivity increases everywhere, but not in construction. It peaks in the ’70s, then drops,” he explained, illustrating the problem as follows: “Imagine you have a 55-inch hole in your wall — it’s cheaper today to buy a TV to cover the hole than to get it fixed.”
It’s unarguably true, but why should that be? The simple fact is that most construction-related work hasn’t gotten any easier or more precise, and the jobs aren’t so desirable as they once were. So labor costs go up along with the costs of ever more sophisticated buildings. But this just raises another question: Why hasn’t the work gotten any easier or more precise?
It turns out that construction, although a huge industry, is a very fragmented one — and, understandably, rather risk-averse. Even if someone wanted to question the doctrines and practices by which buildings are made, they don’t command the capital to do so.
“People do stuff because it’s what they were taught to do. No one has the millions in venture dollars to say, ‘What if we did it different?’ All these benefits show up, but then you have to reinvent part of the wheel, and companies have no reason to. There’s just no reason a contractor would ever think about doing that,” Huh explained.
The industry has effectively insulated itself against a great deal of innovation with an “if it ain’t broke, don’t spend millions of dollars fixing it” attitude. It would take a venture-backed newcomer to upend the conventions that have held construction costs and methods in stasis for decades. So at least is Huh’s hypothesis, and he believes that Social Construct is that newcomer.
Computational construction
Huh recalls his team questioning the status quo: “We wondered, could we build a whole building out of precisely made parts, the way you’d build a plane?”
Turns out people have made attempts a few times, even before CAD made the idea so attractive. “They tried this in the 70s,” Huh said. “What they found out was they could never get the parts to fit. The designs assumed an idealized space – exactly 10 feet or whatever. but it’s never quite 10 feet, the parts just aren’t that precise. Half an inch of error over 10 feet is actually pretty good. So everyone works around each other, which means the parts have to be cut to fit. Flexibility is more important than precision.”
Where Social Construct’s process diverges from the industry norm is at the point where the general shape and purpose of the building and its floors have been decided. For instance, it may be a largely triangular building with flat corners, the elevator in the center, and with three one-bedroom and one two-bedroom apartments on each floor.
That sort of design can be roughed out by an architect in a few hours, but the specifics of where exactly everything goes, from water fixtures to electrical lines, can take much longer. So that’s where the computer takes over.
Image Credits: Social Construct
You could call it an AI, but Huh has deliberately shunned the term to avoid any suspicion of trying to take a ride on that particular hype train. Working from that level of detail, the Social Construct system plans out every aspect of the construction, optimizing the layout for a variety of parameters.
There are three key aspects:
First, construction uses pre-fabricated “assemblies,” of which there are about a hundred types total: walls with kitchen cabinets, walls with holes for shower fixtures, lighting and so on. These pieces can be carried by a single person or at most two, and snap into place onto the framing. This minimizes the chance that there will be any unusual dimensions or requirements that mean this wall has to be extra thick, or you need an extra length of piping to supply the bathroom sink. It also makes assembly and repair work simple. Where there are normal walls or non-standard widths, ordinary drywall is used.
Second, all the pipes, cables, and assorted in-wall infrastructure has been moved under the floor, the routes pre-determined by the computer. It all goes in a tiny space below the floorboards — which provides better sound and heat insulation as a side benefit. This further simplifies construction, as there is no need to adapt or improvise the angles, lengths, and other aspects of water or electrical work. The light switches don’t even need to be connected, as they’re wireless and kinetically powered.
Image Credits: Social Construct
Third, the layout is calculated to minimize the possibility of variance in measurements or construction. Cuts can never be perfect and microscopic errors add up so 20 feet hallway in the design document might actually need to be 20 feet and a quarter inch. The computer knows this and plans around it, avoiding situations that tend to create that type of variance wherever possible and allowing for last-minute adjustments when it’s inevitable.
So the sequence of events is that the basic “shell” of the building including all the usual stacks and structural pieces gets built as normal — that part doesn’t change at all. Once it’s done, the team measures the actual dimensions inside very, very carefully, which lets the computer design for exactly that space. Then the walls are raised per the generated plan, the cables are laid according to the same, the assemblies are carted in and click into place, and finally the hardwood floors are installed, with the pieces cut to fit what little differences from the plan have emerged.
Image Credits: Social Construct
“We compared this to a conventionally built building, and we’re seeing that we can save 20 percent on construction costs,” Huh said — and considering construction is about two thirds of a building’s entire budget, that may be saving tens of millions right off the bat. The Social Construct building was also finished 2 months faster.
Faster work may sound like less hours for subcontractors and the like, but Huh said they’re emphasizing that lower costs and quicker work mean more productivity, so take-home pay is comparable but jobs will be easier and more numerous.
It’s important to note that Social Construct isn’t actually getting into the contracting side of things. The plan is to partner with, train, and certify contractors so that they can scale more like a platform than a boots-on-the-ground company — “Which makes us venture-backable,” Huh noted.
Right now the first building built with these methods has been sold and the company is looking for its next site, local partner, and land owner — and so they decided to exit stealth mode.
Social Capital already has about $17 million in funding, from Floodgate, S28 Capital, Felicis, Founders Fund, and (“of course,” Huh said) Y Combinator. They’ll be looking for more soon as they begin the process of truly scaling up, but it seems wise to have remained quiet until there was a whole building they could point to and say, “look, it works!”
So if your dream was to live in a computer-designed building and apartment, you’re slightly late — but it sounds like this will be the first of many.
Social Construct’s computer-optimized buildings could shake construction industry’s foundations Construction is one of the largest industries still resisting the call of the 21st century, its practitioners opting for decades-old but tried and true methods.
0 notes
Text
Turn Your Garage Into The Perfect Mancave
A Brief Guide For Turning Your Garage Into The Perfect Mancave
If your a man who doesn’t rely on his garage for sheltering his vehicles, then you’ve probably entertained the idea of converting your Brisbane Garage into a man cave. A sanctuary where you can relax, drink, and do the things that you enjoy without any kids or uninvited guests bothering you.
The dream of the man cave is one that’s existed since the first caveman and cavewoman moved into together. Only they didn’t have garages to help them with this dream. The good news is that it’s easier than ever to convert a garage into a personalized living space.
The internet is flourishing with DIY guides for almost every project conceivable. And once you’ve figured out exactly how you want your mancave to look you can use those guides in addition to your own DIY knowledge to create a one-of-a-kind mancave.
The following guide isn’t an exact science. It’s not going to break down the small details of specific installations or remodeling needs. Instead, it’s going to provide you with a broad outline of how you can go about turning your garage into your own personal clubhouse.
How To Convert Your Garage Into an Ideal Living Space
1. Clear The Canvas
If you’ve lived in the home for a few years without using the garage for vehicles, then it’s safe to assume it’s filled with random junk. That’s why the first step is always clearing everything out. It’s the least fun of all the steps, but at least you’re getting it out of the way first.
Clearing the canvas means clearing everything. You’ll need uninhibited access to the floors, walls, ceiling, and doors. Many of these areas may need to be removed, repaired, or modified in some way. How you clean out the garage and what you do with the contents is entirely up to you. As long as there is no box, bag, tire, paint can, power tool, or half-used piece of plywood left in the way.
2. Start With The Floors
Insulating the garage is going to be one of your first major projects. You absolutely don’t want to spend cold evenings in a garage that is not insulated. The floors are going to be the first area you’ll want to insulate.
In most cases, a garage floor is just a concrete slab. How you approach insulating the floors is up to you because there are a few different options. It depends entirely on how you want the floor to look once you’re finished. You may need to add a new subfloor, apply insulation, and then add wood flooring on top of that. There are also some cheaper and faster options that aren’t quite as efficient but are still acceptable if you’re not interested in wood flooring.
3. Move To The Walls
The next step is to insulate the walls. How much work the walls require will vary depending on your current situation. Some people have garages that are attached to the house and have perfectly insulated walls. If that’s you, then you have nothing to worry about unless you’re interested in changing the appearance of the walls.
If you aren’t lucky enough to have an attached and insulated garage, then you’ll need to add insulation between your studs and then add the drywall. It’s often easier than insulating the floors but again it depends on the type of finish you want. Some people go the extra mile and add wood paneling, bricks, or stones on the inside to give it a more manly appearance.
3. Don’t Forget The Door And Ceiling
You’d be forgiven for overlooking the importance of the door and the ceiling. However, if you want a complete and unique mancave, then you should not ignore them. Finishing the ceiling isn’t much different than the walls. Throw up some drywall and then add your finishing touches.
The door is a little trickier because without the insulation it’s essentially a large gap in the wall. It can also be difficult to change the décor of a garage door on the inside. The easiest route here is to simply buy an insulated garage door that fits your desired style. In any case, it’s important that the door is insulated and fits with the rest of the theme. It’s a bonus if the door works as well.
Finishing Touches
The above three steps are essential for turning your garage into an acceptable living space. Once your walls, floors, ceiling, and door are complete you’re ready for the finishing touches. That means furniture, paint, beer signs, jerseys, and anything else that reflects your unique style. There are no real guidelines for this section because it’s all about you.
The post Turn Your Garage Into The Perfect Mancave appeared first on garageservicepros.com.au.
0 notes
Text
What It’s Like Dating A Exterior painting Roslindale MA.
Techniques For Doing Your House Improvements
Improving the style of your house may change the way you feel regarding your private space. Use ideas you may have and apply those to decorating your house. The following is some excellent advice that will help you improve your home affordably.
Prior to deciding to replace your home cabinets, see whether simply refinishing them would attain the same effect, especially since it is a lot cheaper to complete. For a fresh new appearance, install elegant new hardware, replace doors and offer the base a coat of paint. This will likely modernize your house without you being forced to spend a small fortune.
Use sponges on drywall. Use the sponge as opposed to sandpaper. Should you practice, you can use a wet sponge as effectively as using sandpaper.
One advantage to sponging is no dust is produced as happens when you use sand paper.
Installing all-new, complementary hardware can make your bath room look much more attractive and modern, and also the cost involved is eminently affordable. There are numerous kinds of bathroom hardware available, like cabinet knobs and toilet paper holders. You will find complete, coordinating packages of such products in many renovations stores.
Basements have little, if any, sun light. This implies the lights you install must be very effective. Many basements are situated only partially underground. If this sounds like the case, you must be able to place professional windows which allow an all-natural light to flood the area.
A beautifully crafted entrance door can potentially increase a home’s value around 10 percent. One particular strategy to update your front entryway is to purchase and install new hardware for your personal door.
Try to use only natural materials for just about any redesigning projects being carried out inside. Materials that can come from Nature are superior to their synthetic counterparts. They can be considerably more attractive and durable to work with. Choosing natural materials over synthetics can prove more cost-effective as synthetics need to have replacement more frequently.
Any decent home improvement project will include laying brick and purchasing up to necessary beforehand will make things flow faster. There is certainly some difficulty in locating matching bricks when you must do repairs or additions to your residence. The styles of bricks come in and out of fashion. When you have extras accessible, you will be geared up in the future.
A couple of coats of paint in new color is the easiest method to revitalize and brighten your house. A full room may be changed with paint. Though painting is pretty inexpensive, it adds significant value to the home. It is advisable to use light colors which go together with the decor of your property.
Using wall mounts for TVs can get back quite a bit of space, that you can eliminate the stand or perhaps clear the stand to use for other things. The directions for mounting can be easy and can be carried out in less than an hour or so.
The content above discussed the truth that home renovations can totally change your opinion of your home. There are so many alternative methods to alter the appearance of your own home. Take advantage of the tips with this article to create renovations you might have never known you could potentially make..
from Home Improvement with Compare Real Estate Agents http://www.compare-real-estate-agents.com/what-its-like-dating-a-exterior-painting-roslindale-ma/
0 notes
Text
Storage Building Kits
Storage Building Kits
Building storage sheds takes a lot of time, effort, and man power. Sometimes, working men just don’t have the time to spare to make all of that. Add on the cost of contractors to do it for you, and your backyard man cave shed starts looking like a pipe dream. Thankfully, there are lots of places that sell storage building kits to make your dream come true in an efficient and affordable manner.
Today, let’s talk all about how to use DIY shed kits, select the perfect kit for you, and build your wood shed kit. There are plenty of things you need to worry about while building your own shed, but this article walks you through all of it! Let’s get started.
Do You Need a Storage Building Kit?
Before we get into the dirty details about storage building kits and how it all relates to man caves, let’s step back and see if you even need a storage building kit. Without a doubt, if you reached this page, you need a storage shed. Whether you make a large one to house a man cave or a small one to house the stuff that can’t make it into the cave, a shed is an excellent thing to build, and a kit is a great way to get it done. However, they can be pricey.
When looking at the price range of building a shed, storage building kits sit somewhere in the middle. Using a shed plan, gathering the materials yourself, and building it by hand is the least expensive option. You may not know that shed plans are cheap and easily available to anyone who needs them. They also make it pretty easy to build according to city or county specifications, so consider them carefully.
If building isn’t your thing, there are still other options. First, you can have a contractor do it for you, according to the plan you set out for them. Contractors can even put together a kit for you, although that would be unnecessarily expensive. Second, you can buy a pre-built shed. It seems crazy, but it’s totally possible. You’d be amazed at what can fit on a road and ship to your door.
If you still want a big hand in building your shed, but can’t find the time to construct it from scratch, then congratulations. Storage building kits are the perfect fit for you! Now let’s talk details.
DIY Shed Kits
There are several different types of shed kit out there, and you still need to find the one that suits your needs. For larger sheds (which work better for a man cave), you will need to do a tiny amount of building. The walls come in large panels, but you will still need to put the basic frame together. Simple instructions help you through this and it goes by in a breeze. Once the frame is done, you secure the wall and roof panels. Many large shed kits also encourage you to make a foundation and even include parts for it.
For smaller storage shed kits, the entire thing is just putting together large pieces. The supports are built into the walls and you simply need to nail them together. It feels much like building a very large puzzle with less than ten pieces. Compared to building a shed from scratch, these DIY shed kits go up much faster and certainly save you a lot of sweat.
The cheap ones do not include paneling or roof tiles, so take note of that before you purchase and see if the extra cost and effort is worth it to you. At the same time, this allows you to customize your shed with a unique exterior. Stone walls and terracotta roof tiles set it apart from all the storage sheds in your area and make it look like a home. Or, at the very least, the entrance to a very cool man cave.
Wood Shed Kits
Once you have your wood storage shed built, it’s time to make the interior livable! If you found this blog post because you genuinely want to build a storage shed—and don’t care in the least bit about man caves—then you can skip this whole section (but at least read about why you need a man cave). For everyone else, let’s start making this place manageable!
Have an electrician run wires through it so you can install a TV or other electronics. If you want to put in a bar, small kitchen, or bathroom, then set up some pipes through a plumber or by your own effort. If you understand plumbing, you can usually make a safe setup, but working with electricity requires experts. Lastly, if you live in a particularly hot area, consider throwing in an AC unit. In very cold areas, insulation is a must, but a shed keeps things at a normal temperature without modifications during winter for most places south of Canada.
Use carpet, tile, or wood panels to make the floor more comfortable. You can hang flags and signs up directly onto the rough wall, but I find that encourages bugs and pests to move in. I encourage you to cover it with actual drywall if you spend a lot of time in there. For the ceiling, it’s fine to leave it open. It makes the man cave feel spacious and helps you install things in the roof down the line. For more tips on setting up a man cave in your new storage shed, check out this article.
Finding Shed Kits for Sale
There are several different ways to find a shed kit that’s right for you. First, figure out what style and material you want. Wood sheds with simple double doors are the most popular, but don’t overlook different styles! Many shed kit designs choose to use the long side of the shed for its entrance, along with a few windows, to emulate the appearance of a small home. Still more designs incorporate two stories, large ceilings, multiple entrances, and non-traditional shapes.
Some shed kits even use unique materials to elicit a very modern look. What serves as a storage shed will look like an amazing modern and minimal building on the outside! A metal exterior looks spectacular and they’re well-suited for a man cave. Vertical or horizontal side paneling dramatically changes the appearance of your storage shed. There are a huge amount of roof tiles and styles you can choose from as well.
Speaking of customization, a few storage building kits only include the bare minimum. While this might seem disadvantageous—after all, you need to apply the side paneling, foundation, and roof tiles yourself—this actually proves to be a huge bonus to a few hard working men out there. It not only drives down the cost of your storage building kit, but it also allows you to pick whatever appearance you want for your shed! You could even use stone or brick for the exterior. No one will know it was built from a kit! You can refer to some easily available shed plans for some inspiration on how to make your shed unique.
Completely DIY Storage Building Kits
It’s also worth mentioning that a few places sell the bare minimum for storage building kits. These kits only contain the materials for making your shed happen. You build everything from scratch, but they spare you the hassle of finding materials all on your own. When finding good wood is expensive—and difficult in remote locations—not to mention the equipment needed to actually cut the wood into proper dimensions, these bare minimum kits are a life saver.
They work great for the DIY man who just doesn’t have the time to go shopping around. A few places even let you send in some storage building kit plans and make everything according to your specifications. You may have to find the glass for your windows on your own, though. Furthermore, some essentials like exterior panels and roof tiles may not be included.
Regulations to Consider While Looking
I talk about county and city regulations in detail in another blog post, but I want to mention the basics of building codes here so that you don’t have to spend forever clicking through other pages to learn what you need. Here are some common city, county, and neighborhood regulations to consider while you pick out and place your storage shed:
Location (distance from house, visibility from road, etc.)
Insulation, Air Circulation, and other livability stuff
Size limits
Approved shed plan that confirms its integrity and stability
Specified foundations to plan for disasters
Materials used (wood, steel, etc.)
Colors
Purpose
Security
Where to Buy Storage Building Kits
Most people purchase their storage building kits from home improvement stores like Home Depot or Lowes. Their online selection generally has a better price than their in-store products (plus, way more options to browse through). The only disadvantage of buying from chain stores like that is the chance of receiving wood of poor quality. While they have a better system for returns, it’s still annoying to replace any pieces that they send with minor defects and such.
Buying straight from the companies that sell the storage building kits is cheaper with all the same advantages of customer service. Because these kits undergo less shipping across the world, they are also less likely to arrive with nicks or scratches. Another big issue for kits is the chance of bent or warped panels. That’s annoying to correct, if correction is even possible for your chosen material.
Lastly, sending in wood specifications according to a shed plan to your local lumber yard is guaranteed to get you some high-quality wood. However, you need to do the measurements an inventory yourself to make sure no one screwed up on the job. Mistakes happen. This is also the cheapest way to get your kit, although obviously, you have to work harder because nothing is set up in panels for you.
Make sure you know all of the regulations before you put down your shed so that you save yourself a huge hassle down the road. Find a shed that matches your personal aesthetic, the local building regulations, and the amount of work that you want to put into your build.
What to Do With Storage Building Kits
Now that you know how to procure the perfect storage building kits for your personal tastes, it’s time to put that knowledge to work! Get your backyard set up and prepare for a shed of your own. Use the rest of the site to learn how to convert a shed into a man cave and you’ll have a stunning setup in no time.
Above all, remember to build this like a man. Plan your shed effectively to minimize the building time you need. Don’t cut corners. Ensure everything is safe—properly piped, wired, and insulated according to your needs. As long as you follow these instructions, you can proudly show off your new shed, and no one will be the wiser about how you used a kit to build it!
The post Storage Building Kits appeared first on TrueManCave.
from TrueManCave https://www.truemancave.com/storage-building-kits/
0 notes
Last Seen Blogs

oyunhaberin
OyunHaberin

biking-vietnam
Biking Vietnam

myfuckingsilverlining
for reasons unknown

fattyl0ve
Love My Fattyness

clairechaphotographe-blog
Claire Challier Photographe