#its one of those small rooms above the galley kitchen and has two walls plus’s the ceiling exposed which is fine in winter because I cope
Text
I am going to overheat and die
It’s not SUPPOSED to be this hot ITS ENGLAND FFS
#hark says i#100%birdmade#me when air is nearing my body temp: I’m in danger#river helped but now I’m baking again#my room is like a fucking oven#its one of those small rooms above the galley kitchen and has two walls plus’s the ceiling exposed which is fine in winter because I cope#very well with cold(stack bankits) but in summer the fucking sun urh#how I am I expected to sleep in these conditions
16 notes
·
View notes
Text
6 Kitchen Layout Ideas for Homes of Any Size
From L-shaped or galley to an island kitchen, use these ideas to choose which kitchen layout is best for your home
Kitchens are tight spaces, so, it helps to thoroughly plan every square foot before starting a remodel. Kitchens also are complex spaces where many elements must meet code. Supply and drain pipes compete with wires, ducts, and cabinets. The kitchen is not the place for last-minute, informal planning. Where should you start when considering different designs and ideas for kitchen layouts?
Simply: homeowners should consider using the most common layouts found in kitchens. There are many benefits of starting with a tried-and-true layout in your kitchen: smooth traffic flow, and less wasted space. Additionally, kitchen functionalities—sink, stove, fridge, and dishwasher—will end up in sensible places. Ultimately, this saves money for routing plumbing and electrical work (expensive!) Below you’ll find renovations by Sweeten homeowners with kitchen layout inspiration.
Sweeten matches home renovation projects with vetted general contractors, offering advice, support, and up to $50,000 in renovation financial protection—for free.
L-shaped kitchen layout
(Above) Sweeten homeowner Amanda’s renovation
An L-shaped kitchen layout has two counters laid at a 90-degree angle to each other. Often, one counter is longer than the other counter.
The L-shaped kitchen layout usually divides the kitchen activities across the two legs of the L-shape. One leg may have the refrigerator, sink, and dishwasher. The other leg may have the stove or cooktop, plus a majority of the counter space for prep work.
There are many reasons that an L-shaped kitchen layout is a good idea for your home. For one, L-shaped kitchens are flexible enough to fit in kitchens of different sizes. For another, this layout lends itself perfectly to the concept of the kitchen triangle. With this, the sink, stove, and fridge are arranged in a triangle for better workflow.
PROS
Flexible, works for many kitchens
Good use of the kitchen triangle
CONS
Large kitchens can get too spread out
Difficult to find space for counter eating
U-shaped kitchen layout
(Above) Sweeten homeowners Tracey + Brian’s renovation
A U-shaped kitchen layout expands the L-shaped layout by adding an extra wing. Instead of two counters, the U-shaped kitchen has three counters arranged like a U.
With the U-shaped kitchen, various functions can be better spaced out than with the L-shaped layout. So, the leg of the L-shape that has the fridge, sink, and dishwasher can be broken up. The U-shaped kitchen’s third leg might contain the fridge.
For a U-shaped kitchen, you’ll need to have enough floor space available, but not too much. If the space is too small, the kitchen is cramped. If it’s too large, it takes longer to walk from one area to another. The National Kitchen + Bath Association recommends that no leg of the work triangle be less than 4 feet or more than 9 feet.
PROS
Utilizes the third wall
Spreads out kitchen services
CONS
Difficulty correctly sizing the kitchen
Center must be kept free of obstacles
One-wall kitchen layout
(Above) Sweeten homeowner Sarah’s renovation project
With the one-wall kitchen layout, all of the kitchen tasks are combined in a single counter against one wall.
Since they are all are in a line, design is mainly a matter of deciding the order of the functionalities. Usually, the sink and dishwasher are next to each other to share the water supply and drain lines.
Of the 6 kitchen layout ideas, the U-shape works perfectly for smaller homes such as condos or apartments. However, you’ll want to keep the layout fairly short. This avoids too much movement from one end to the other end.
PROS
Squeezes kitchen into tiny space
Keeps plumbing and electrical in one area
CONS
Too much walking if the layout is long
Little counter space
Galley kitchen layout
(Above) Sweeten homeowners Sheilaja + Sergio’s renovation
Galley kitchens have two counters that run parallel to each other. The counters are divided by a single aisle. Galley kitchens’ namesake is the kitchen found on boats. True to the inspiration, the aisle is usually narrow.
With galley kitchens, often one leg is devoted to the stove or cooktop and counter space. The other leg is usually the home’s exterior wall and has the sink, dishwasher, and refrigerator.
Galley kitchens do a great job of confining the workflow to a tight space. Just make sure that the cabinet, fridge, dishwasher, and oven doors don’t conflict with each other.
PROS
Tucks kitchen away, off to the side
Short traffic pattern
CONS
Poor layout for multiple people in the kitchen
Doors may conflict or open into each other
Island kitchen layout
(Above) Sweeten homeowners Tina + Fletcher’s renovation
An island kitchen layout combines a kitchen island with other layouts. These may be an L-shaped, U-shaped, or one-wall kitchen layout. The kitchen island is separate from the main counter area.
Many kitchen islands are counters only, with no water or cooking action. If a service is added to the island, it’s usually a cooktop. Large island kitchens may have a cooktop and a second sink for prep work.
Kitchen islands may be used less frequently than the owner had originally imagined. So, it helps to add one of those services as a magnet. Or, some homeowners extend one end of the island for use as an eating bar.
PROS
Additional counter space
Less expensive (you can even use a mobile island)
CONS
Difficult to bring water supply and drainage to an island
Takes up a lot of space, so a large kitchen is required
Peninsula kitchen layout
(Above) Sweeten homeowners Dalal + Frans’ renovation
A peninsula kitchen layout is a U-shaped layout that has a counter extension. Located at either end of the U shape, the extension partially juts into the kitchen. The result is generally a G-shape.
This kitchen usually retains its activities in its U-shaped section. The extension then becomes a breakfast bar or eating counter.
The outer part of the extension can take two or three chairs for eating. The inner (kitchen side) is less functional. Most of it becomes a blind-corner cabinet that’s difficult for storing items. One solution is to install a lazy-susan, swing-out, or pull-out in that corner.
PROS
Utilizes the end of a run of cabinets
Room for eating saves on the need for chairs and table
CONS
Creates another blind-corner cabinet
Short counter
No matter the size of your home, there’s a kitchen layout that’ll fit the space. Keep in mind the kitchen activities that are important to your lifestyle, plot the best layout and flow, and get ready for your dream cook space.
Ready to find an experienced, vetted contractor to bring your kitchen remodel plans to life?
—
Want to see these kitchen layout ideas in action? See an L-shaped Brooklyn Heights kitchen, a galley kitchen in Forest Hills, a one-wall kitchen in LIC.
ADUs or accessory dwelling units can transform into home offices, living space for family or as a rental, or a retreat.
Sweeten handpicks the best general contractors to match each project’s location, budget, scope, and style. Follow the blog, Sweeten Stories, for renovation ideas and inspiration and when you’re ready to renovate, start your renovation with Sweeten.

Source link
from CIVICLO Construction & Interior https://civilco.construction/6-kitchen-layout-ideas-for-homes-of-any-size-2/
0 notes
Text
6 Kitchen Layout Ideas for Homes of Any Size
From L-shaped or galley to an island kitchen, use these ideas to choose which kitchen layout is best for your home
Kitchens are tight spaces, so, it helps to thoroughly plan every square foot before starting a remodel. Kitchens also are complex spaces where many elements must meet code. Supply and drain pipes compete with wires, ducts, and cabinets. The kitchen is not the place for last-minute, informal planning. Where should you start when considering different designs and ideas for kitchen layouts?
Simply: homeowners should consider using the most common layouts found in kitchens. There are many benefits of starting with a tried-and-true layout in your kitchen: smooth traffic flow, and less wasted space. Additionally, kitchen functionalities—sink, stove, fridge, and dishwasher—will end up in sensible places. Ultimately, this saves money for routing plumbing and electrical work (expensive!) Below you’ll find renovations by Sweeten homeowners with kitchen layout inspiration.
Sweeten matches home renovation projects with vetted general contractors, offering advice, support, and up to $50,000 in renovation financial protection—for free.
L-shaped kitchen layout
(Above) Sweeten homeowner Amanda’s renovation
An L-shaped kitchen layout has two counters laid at a 90-degree angle to each other. Often, one counter is longer than the other counter.
The L-shaped kitchen layout usually divides the kitchen activities across the two legs of the L-shape. One leg may have the refrigerator, sink, and dishwasher. The other leg may have the stove or cooktop, plus a majority of the counter space for prep work.
There are many reasons that an L-shaped kitchen layout is a good idea for your home. For one, L-shaped kitchens are flexible enough to fit in kitchens of different sizes. For another, this layout lends itself perfectly to the concept of the kitchen triangle. With this, the sink, stove, and fridge are arranged in a triangle for better workflow.
PROS
Flexible, works for many kitchens
Good use of the kitchen triangle
CONS
Large kitchens can get too spread out
Difficult to find space for counter eating
U-shaped kitchen layout
(Above) Sweeten homeowners Tracey + Brian’s renovation
A U-shaped kitchen layout expands the L-shaped layout by adding an extra wing. Instead of two counters, the U-shaped kitchen has three counters arranged like a U.
With the U-shaped kitchen, various functions can be better spaced out than with the L-shaped layout. So, the leg of the L-shape that has the fridge, sink, and dishwasher can be broken up. The U-shaped kitchen’s third leg might contain the fridge.
For a U-shaped kitchen, you’ll need to have enough floor space available, but not too much. If the space is too small, the kitchen is cramped. If it’s too large, it takes longer to walk from one area to another. The National Kitchen + Bath Association recommends that no leg of the work triangle be less than 4 feet or more than 9 feet.
PROS
Utilizes the third wall
Spreads out kitchen services
CONS
Difficulty correctly sizing the kitchen
Center must be kept free of obstacles
One-wall kitchen layout
(Above) Sweeten homeowner Sarah’s renovation project
With the one-wall kitchen layout, all of the kitchen tasks are combined in a single counter against one wall.
Since they are all are in a line, design is mainly a matter of deciding the order of the functionalities. Usually, the sink and dishwasher are next to each other to share the water supply and drain lines.
Of the 6 kitchen layout ideas, the U-shape works perfectly for smaller homes such as condos or apartments. However, you’ll want to keep the layout fairly short. This avoids too much movement from one end to the other end.
PROS
Squeezes kitchen into tiny space
Keeps plumbing and electrical in one area
CONS
Too much walking if the layout is long
Little counter space
Galley kitchen layout
(Above) Sweeten homeowners Sheilaja + Sergio’s renovation
Galley kitchens have two counters that run parallel to each other. The counters are divided by a single aisle. Galley kitchens’ namesake is the kitchen found on boats. True to the inspiration, the aisle is usually narrow.
With galley kitchens, often one leg is devoted to the stove or cooktop and counter space. The other leg is usually the home’s exterior wall and has the sink, dishwasher, and refrigerator.
Galley kitchens do a great job of confining the workflow to a tight space. Just make sure that the cabinet, fridge, dishwasher, and oven doors don’t conflict with each other.
PROS
Tucks kitchen away, off to the side
Short traffic pattern
CONS
Poor layout for multiple people in the kitchen
Doors may conflict or open into each other
Island kitchen layout
(Above) Sweeten homeowners Tina + Fletcher’s renovation
An island kitchen layout combines a kitchen island with other layouts. These may be an L-shaped, U-shaped, or one-wall kitchen layout. The kitchen island is separate from the main counter area.
Many kitchen islands are counters only, with no water or cooking action. If a service is added to the island, it’s usually a cooktop. Large island kitchens may have a cooktop and a second sink for prep work.
Kitchen islands may be used less frequently than the owner had originally imagined. So, it helps to add one of those services as a magnet. Or, some homeowners extend one end of the island for use as an eating bar.
PROS
Additional counter space
Less expensive (you can even use a mobile island)
CONS
Difficult to bring water supply and drainage to an island
Takes up a lot of space, so a large kitchen is required
Peninsula kitchen layout
(Above) Sweeten homeowners Dalal + Frans’ renovation
A peninsula kitchen layout is a U-shaped layout that has a counter extension. Located at either end of the U shape, the extension partially juts into the kitchen. The result is generally a G-shape.
This kitchen usually retains its activities in its U-shaped section. The extension then becomes a breakfast bar or eating counter.
The outer part of the extension can take two or three chairs for eating. The inner (kitchen side) is less functional. Most of it becomes a blind-corner cabinet that’s difficult for storing items. One solution is to install a lazy-susan, swing-out, or pull-out in that corner.
PROS
Utilizes the end of a run of cabinets
Room for eating saves on the need for chairs and table
CONS
Creates another blind-corner cabinet
Short counter
No matter the size of your home, there’s a kitchen layout that’ll fit the space. Keep in mind the kitchen activities that are important to your lifestyle, plot the best layout and flow, and get ready for your dream cook space.
Ready to find an experienced, vetted contractor to bring your kitchen remodel plans to life?
—
Want to see these kitchen layout ideas in action? See an L-shaped Brooklyn Heights kitchen, a galley kitchen in Forest Hills, a one-wall kitchen in LIC.
ADUs or accessory dwelling units can transform into home offices, living space for family or as a rental, or a retreat.
Sweeten handpicks the best general contractors to match each project’s location, budget, scope, and style. Follow the blog, Sweeten Stories, for renovation ideas and inspiration and when you’re ready to renovate, start your renovation with Sweeten.

Source link
source https://civilco.construction/6-kitchen-layout-ideas-for-homes-of-any-size-2/
from Civilco Construction & Interior https://civilcoconstruction.blogspot.com/2021/05/6-kitchen-layout-ideas-for-homes-of-any.html
0 notes
Photo

A Duplex Demo Tour (Before & After Pics + A Video!) http://ift.tt/2t3SwDN
We finally got there guys – and not without a few notable setbacks. But that might be why it feels extra good to finally say: the duplex is officially demo’d! And today we’re going to show you around (in photos and even on video) and share some of our plans for this beast.
We learned from doing the pink house that when a house has this much moisture damage, it’s best to take all of the walls down so there’s no mystery about what kind of mold/decay/structural issues are lurking back there. And considering the duplex already had several troubling spots that were blatantly obvious before demo (see the black mold spots on that side wall and that ceiling caving in from moisture damage?), we knew a full gut job was the prudent first step here. Spoiler: we also found lots of bad framing, bad wiring, bad plumbing, and even a few squirrels nests within the walls and even the HVAC system itself, which was an especially nutty discovery. Get it? Squirrels? Nuts? I’ll pause for laughter.
The photo above is the living room on the LEFT side of the duplex (you can see more before photos in our original duplex tour) And below is what that room is looking like now. The hardwood floors look extra dusty at the moment, but they should clean up just as nicely as the ones at the pink house. And on that day I’ll dance on them like no one is watching.
Jumping over to the other side of the duplex, this was the living room on the RIGHT side when we bought it… which appeared to have slightly less water issues and mold.
…and here’s the same shot after demo. We lost some walls, but gained some ladders apparently. And we discovered some pretty impressive rot spots on that right-hand wall, along with some framing that will need to be reinforced in the name of safety. No squirrels living on this side though.
And one last “before and after” comparison before we move on to floor planning. Here’s a shot of the kitchen on the right side, which was located in a side porch that was enclosed at some point. Fun fact: if you listen to the podcast, this is the area where water started gushing out of the walls when we turned on the water meter. But this photo is from before that happened, so the discolored/rotten spots on the floor came with the house.
This is the same area after demo, where you can see some of the crazy, not-at-all-to-code structural stuff that was lurking behind those old walls. It looks kinda like someone built that back wall out of scrap wood they had laying around, so it’s a miracle it was staying up at all!
We have more photos for you, but the best way to get the full tour is through the video below (or here on YouTube), where Sherry points out a lot of the floor plan changes we’re considering, along with some strange things that were uncovered during demo. We’re going to do a follow-up post with an actual floor plan soon, but we’re still finalizing a couple of things.
For anyone who who doesn’t have time to watch the video at the moment, I’d definitely recommend coming back to watch it (a video tour is worth a thousand words and pics) but here’s some of what’s covered.
One update we’re excited about is opening up the entryway on each side, so that the stairs are a lot less closed off. We’re going to take that wall back several studs so that the side of the stairs are more open, so they become more connected to the living room and less of a dark, narrow vestibule.
To give you a better idea, here’s the view from within the living room. Don’t quote me on exactly how far back the wall will be opened, but that yellow line gives you a sense of the new opening we’re aiming for (and I added a white line to show where a railing would go). You know, something like this inspiration picture.
Another big functional change downstairs is that we’ll be adding a powder room/half bathroom. Originally both sides just had one full bathroom upstairs, assuming you don’t count the random toilet by the back door on the right side (it wasn’t behind a door or anything, it just kinda sat a few steps from the kitchen sink!). So we’re turning the former closet under the stairs into a half bathroom with a proper sink, toilet, and even a door. Imagine that!
The only other doorway we’re widening (in addition to the side-wall-of-the-stairs that we mentioned above) is between the living room and what will become the kitchen, which we believe was previously used as a dining space. We’re going to put the dining table at the far end of the living room instead, meaning we can create a larger and more spacious kitchen in that back room. And the wider doorway (which I’ve marked below in yellow) will help it to feel less closed off and more light-filled.
For the kitchen itself, we’re planning to put the sink across that back wall under the window (we’ll be switching out that window with a slightly less long one so cabinets can pass below it) and then we plan to continue the cabinetry along the entire right kitchen wall, where we’ll also put the stove and fridge. And yes, we’re psyched to have found that brick chimney behind the walls and plan to keep it exposed!
Like the yellow kitchen you saw above, here’s the original galley-style kitchen on the left side, in all of its orange glory. And true to form, it was also shoved into what used to be a former side porch.
Here’s what it’s looking like now, which we’re planning to use as a multi-functional space to house the washer and dryer, more cabinetry (think: pantry), and even a small mudroom area since it leads to the back door where the outdoor shower will be.
Just like on the other side, the framing in this section is crazy (you’ll see it better in the video – the studs are oriented the wrong way!) so there’s a chance it will have to be completely rebuilt from scratch. But it’s not like we haven’t already been there and done that with the pink house!
All of the changes I’m describing will be the same on both sides, so I won’t bother going through it twice, but before we move upstairs, I just have to share this one last view we took downstairs on our last visit. This is standing in the left side’s kitchen, looking into the right side. In a few months we won’t be able to see from one side into the other anymore, so we’re relishing views like this while we can. It’s so crazy looking!
Upstairs is kinda confusing to explain, but the main things to take away from this picture is that 1) we’re standing in the front of the house (the front bedroom on the left side) looking towards the back and 2) the bathroom was really disproportionately sized (so long that you could practically put a 5 x 7′ area rug in the middle of it and not touch the shower or the toilet/sink!). So we’re going to steal some of that wasted bathroom space (see the yellow line) to create a small third sleeping nook, sort of in the spirit of the pink house’s bunk room. It won’t be exactly the same (and we’re not certain we’ll do bunks again) but it will create some much needed bonus sleeping space, which is always nice in a vacation house.
The other thing you can see in some of these upstairs photos is just how shallow the roof is. See how there’s basically NO attic up there? Yes, those sloped beams that you see behind the ceiling joists are the actual roof supports! Just a few inches above the ceiling! That’s why we’ve been hankering to increase the pitch as much as possible so that we can try to sneak our upstairs HVAC system up there somewhere – and so when it rains the slope of the roof is a lot more conducive to avoiding leaks thanks to adequate water shedding. Thank goodness the Historic Review Board approved the change to make that happen!
The front bedroom is staying relatively the same layout-wise, but the other notable change in the upstairs is the back bedroom. It used to look like this, with that window overlooking the backyard. But we’re turning that window into a door that will lead to a very small addition to the top floor: another full bathroom.
The downstairs footprint of this house already has a little bump out on the back right there (it’s the area in the future mudroom/pantry/laundry room that leads to the back door) so we’re essentially just continuing that bump out upstairs too. It will give this bedroom an en suite bathroom AND bring both sides from just 1 bathroom to 2.5 bathrooms total. Plus, we already have approval from the Historic Review Board to add that tiny addition along with a new window between the chimney and the old window (which, again, is becoming the bathroom door) so we won’t lose any light in the bedroom. Victory!
Here’s another one of those shots looking through both sides of the house (from the back bedroom on the left side into the one on the right). Again, we’re planning to keep the brick exposed on each side. And fun fact number two: we discovered after demolition that this chimney TWISTS. Notice how it’s angled in the photo below? Scroll up to the kitchen photos and you’ll see that it’s parallel to the walls downstairs. So strange, right? It does this twisting between floors, but you can see it from the kitchen when you look up now that things are demo’d.
Speaking of strange, I still can’t get over how weird it is to see these two mirrored floorplans open to one another – especially where they meet at the stairs. It feels like the moment when American Lindsay Lohan meets the British Lindsay Lohan at summer camp in the Parent Trap and they realize they’ve had a twin all along.
Pretty exciting stuff, eh? Also, I clearly need to work on my squirrel jokes. But in the meantime remember that the video walk-through that we included earlier in this post has a lot more details about the floor plan that we’re leaning towards (along with generally being a lot more orienting than photos can be by nature). So be sure to watch that for more info and priceless quotes like “I don’t think that’s actually pee in there…” There’s a reason why our kids call this the smelly house, but hopefully not for long!
P.S. For more duplex background, here’s our podcast about buying it (complete with how much we paid), a post with a full before tour (pics AND video), and a podcast about some setbacks that popped up before we could even start renovations (and then a post about some additional bad news that made us feel extra rage-y). And here’s a podcast about the loophole we found that made demo possible, which gets us to today’s demo pics & video tour. Quite the journey already.
The post A Duplex Demo Tour (Before & After Pics + A Video!) appeared first on Young House Love.
0 notes
Text
A Duplex Demo Tour (Before & After Pics + A Video!)
We finally got there guys – and not without a few notable setbacks. But that might be why it feels extra good to finally say: the duplex is officially demo’d! And today we’re going to show you around (in photos and even on video) and share some of our plans for this beast.
We learned from doing the pink house that when a house has this much moisture damage, it’s best to take all of the walls down so there’s no mystery about what kind of mold/decay/structural issues are lurking back there. And considering the duplex already had several troubling spots that were blatantly obvious before demo (see the black mold spots on that side wall and that ceiling caving in from moisture damage?), we knew a full gut job was the prudent first step here. Spoiler: we also found lots of bad framing, bad wiring, bad plumbing, and even a few squirrels nests within the walls and even the HVAC system itself, which was an especially nutty discovery. Get it? Squirrels? Nuts? I’ll pause for laughter.
The photo above is the living room on the LEFT side of the duplex (you can see more before photos in our original duplex tour) And below is what that room is looking like now. The hardwood floors look extra dusty at the moment, but they should clean up just as nicely as the ones at the pink house. And on that day I’ll dance on them like no one is watching.
Jumping over to the other side of the duplex, this was the living room on the RIGHT side when we bought it… which appeared to have slightly less water issues and mold.
…and here’s the same shot after demo. We lost some walls, but gained some ladders apparently. And we discovered some pretty impressive rot spots on that right-hand wall, along with some framing that will need to be reinforced in the name of safety. No squirrels living on this side though.
And one last “before and after” comparison before we move on to floor planning. Here’s a shot of the kitchen on the right side, which was located in a side porch that was enclosed at some point. Fun fact: if you listen to the podcast, this is the area where water started gushing out of the walls when we turned on the water meter. But this photo is from before that happened, so the discolored/rotten spots on the floor came with the house.
This is the same area after demo, where you can see some of the crazy, not-at-all-to-code structural stuff that was lurking behind those old walls. It looks kinda like someone built that back wall out of scrap wood they had laying around, so it’s a miracle it was staying up at all!
We have more photos for you, but the best way to get the full tour is through the video below (or here on YouTube), where Sherry points out a lot of the floor plan changes we’re considering, along with some strange things that were uncovered during demo. We’re going to do a follow-up post with an actual floor plan soon, but we’re still finalizing a couple of things.
For anyone who who doesn’t have time to watch the video at the moment, I’d definitely recommend coming back to watch it (a video tour is worth a thousand words and pics) but here’s some of what’s covered.
One update we’re excited about is opening up the entryway on each side, so that the stairs are a lot less closed off. We’re going to take that wall back several studs so that the side of the stairs are more open, so they become more connected to the living room and less of a dark, narrow vestibule.
To give you a better idea, here’s the view from within the living room. Don’t quote me on exactly how far back the wall will be opened, but that yellow line gives you a sense of the new opening we’re aiming for (and I added a white line to show where a railing would go). You know, something like this inspiration picture.
Another big functional change downstairs is that we’ll be adding a powder room/half bathroom. Originally both sides just had one full bathroom upstairs, assuming you don’t count the random toilet by the back door on the right side (it wasn’t behind a door or anything, it just kinda sat a few steps from the kitchen sink!). So we’re turning the former closet under the stairs into a half bathroom with a proper sink, toilet, and even a door. Imagine that!
The only other doorway we’re widening (in addition to the side-wall-of-the-stairs that we mentioned above) is between the living room and what will become the kitchen, which we believe was previously used as a dining space. We’re going to put the dining table at the far end of the living room instead, meaning we can create a larger and more spacious kitchen in that back room. And the wider doorway (which I’ve marked below in yellow) will help it to feel less closed off and more light-filled.
For the kitchen itself, we’re planning to put the sink across that back wall under the window (we’ll be switching out that window with a slightly less long one so cabinets can pass below it) and then we plan to continue the cabinetry along the entire right kitchen wall, where we’ll also put the stove and fridge. And yes, we’re psyched to have found that brick chimney behind the walls and plan to keep it exposed!
Like the yellow kitchen you saw above, here’s the original galley-style kitchen on the left side, in all of its orange glory. And true to form, it was also shoved into what used to be a former side porch.
Here’s what it’s looking like now, which we’re planning to use as a multi-functional space to house the washer and dryer, more cabinetry (think: pantry), and even a small mudroom area since it leads to the back door where the outdoor shower will be.
Just like on the other side, the framing in this section is crazy (you’ll see it better in the video – the studs are oriented the wrong way!) so there’s a chance it will have to be completely rebuilt from scratch. But it’s not like we haven’t already been there and done that with the pink house!
All of the changes I’m describing will be the same on both sides, so I won’t bother going through it twice, but before we move upstairs, I just have to share this one last view we took downstairs on our last visit. This is standing in the left side’s kitchen, looking into the right side. In a few months we won’t be able to see from one side into the other anymore, so we’re relishing views like this while we can. It’s so crazy looking!
Upstairs is kinda confusing to explain, but the main things to take away from this picture is that 1) we’re standing in the front of the house (the front bedroom on the left side) looking towards the back and 2) the bathroom was really disproportionately sized (so long that you could practically put a 5 x 7′ area rug in the middle of it and not touch the shower or the toilet/sink!). So we’re going to steal some of that wasted bathroom space (see the yellow line) to create a small third sleeping nook, sort of in the spirit of the pink house’s bunk room. It won’t be exactly the same (and we’re not certain we’ll do bunks again) but it will create some much needed bonus sleeping space, which is always nice in a vacation house.
The other thing you can see in some of these upstairs photos is just how shallow the roof is. See how there’s basically NO attic up there? Yes, those sloped beams that you see behind the ceiling joists are the actual roof supports! Just a few inches above the ceiling! That’s why we’ve been hankering to increase the pitch as much as possible so that we can try to sneak our upstairs HVAC system up there somewhere – and so when it rains the slope of the roof is a lot more conducive to avoiding leaks thanks to adequate water shedding. Thank goodness the Historic Review Board approved the change to make that happen!
The front bedroom is staying relatively the same layout-wise, but the other notable change in the upstairs is the back bedroom. It used to look like this, with that window overlooking the backyard. But we’re turning that window into a door that will lead to a very small addition to the top floor: another full bathroom.
The downstairs footprint of this house already has a little bump out on the back right there (it’s the area in the future mudroom/pantry/laundry room that leads to the back door) so we’re essentially just continuing that bump out upstairs too. It will give this bedroom an en suite bathroom AND bring both sides from just 1 bathroom to 2.5 bathrooms total. Plus, we already have approval from the Historic Review Board to add that tiny addition along with a new window between the chimney and the old window (which, again, is becoming the bathroom door) so we won’t lose any light in the bedroom. Victory!
Here’s another one of those shots looking through both sides of the house (from the back bedroom on the left side into the one on the right). Again, we’re planning to keep the brick exposed on each side. And fun fact number two: we discovered after demolition that this chimney TWISTS. Notice how it’s angled in the photo below? Scroll up to the kitchen photos and you’ll see that it’s parallel to the walls downstairs. So strange, right? It does this twisting between floors, but you can see it from the kitchen when you look up now that things are demo’d.
Speaking of strange, I still can’t get over how weird it is to see these two mirrored floorplans open to one another – especially where they meet at the stairs. It feels like the moment when American Lindsay Lohan meets the British Lindsay Lohan at summer camp in the Parent Trap and they realize they’ve had a twin all along.
Pretty exciting stuff, eh? Also, I clearly need to work on my squirrel jokes. But in the meantime remember that the video walk-through that we included earlier in this post has a lot more details about the floor plan that we’re leaning towards (along with generally being a lot more orienting than photos can be by nature). So be sure to watch that for more info and priceless quotes like “I don’t think that’s actually pee in there…” There’s a reason why our kids call this the smelly house, but hopefully not for long!
P.S. For more duplex background, here’s our podcast about buying it (complete with how much we paid), a post with a full before tour (pics AND video), and a podcast about some setbacks that popped up before we could even start renovations (and then a post about some additional bad news that made us feel extra rage-y). And here’s a podcast about the loophole we found that made demo possible, which gets us to today’s demo pics & video tour. Quite the journey already.
The post A Duplex Demo Tour (Before & After Pics + A Video!) appeared first on Young House Love.
A Duplex Demo Tour (Before & After Pics + A Video!) published first on https://carpetgurus.tumblr.com/
0 notes
Text
A Duplex Demo Tour (Before & After Pics + A Video!)
We finally got there guys – and not without a few notable setbacks. But that might be why it feels extra good to finally say: the duplex is officially demo’d! And today we’re going to show you around (in photos and even on video) and share some of our plans for this beast.
We learned from doing the pink house that when a house has this much moisture damage, it’s best to take all of the walls down so there’s no mystery about what kind of mold/decay/structural issues are lurking back there. And considering the duplex already had several troubling spots that were blatantly obvious before demo (see the black mold spots on that side wall and that ceiling caving in from moisture damage?), we knew a full gut job was the prudent first step here. Spoiler: we also found lots of bad framing, bad wiring, bad plumbing, and even a few squirrels nests within the walls and even the HVAC system itself, which was an especially nutty discovery. Get it? Squirrels? Nuts? I’ll pause for laughter.
The photo above is the living room on the LEFT side of the duplex (you can see more before photos in our original duplex tour) And below is what that room is looking like now. The hardwood floors look extra dusty at the moment, but they should clean up just as nicely as the ones at the pink house. And on that day I’ll dance on them like no one is watching.
Jumping over to the other side of the duplex, this was the living room on the RIGHT side when we bought it… which appeared to have slightly less water issues and mold.
…and here’s the same shot after demo. We lost some walls, but gained some ladders apparently. And we discovered some pretty impressive rot spots on that right-hand wall, along with some framing that will need to be reinforced in the name of safety. No squirrels living on this side though.
And one last “before and after” comparison before we move on to floor planning. Here’s a shot of the kitchen on the right side, which was located in a side porch that was enclosed at some point. Fun fact: if you listen to the podcast, this is the area where water started gushing out of the walls when we turned on the water meter. But this photo is from before that happened, so the discolored/rotten spots on the floor came with the house.
This is the same area after demo, where you can see some of the crazy, not-at-all-to-code structural stuff that was lurking behind those old walls. It looks kinda like someone built that back wall out of scrap wood they had laying around, so it’s a miracle it was staying up at all!
We have more photos for you, but the best way to get the full tour is through the video below (or here on YouTube), where Sherry points out a lot of the floor plan changes we’re considering, along with some strange things that were uncovered during demo. We’re going to do a follow-up post with an actual floor plan soon, but we’re still finalizing a couple of things.
For anyone who who doesn’t have time to watch the video at the moment, I’d definitely recommend coming back to watch it (a video tour is worth a thousand words and pics) but here’s some of what’s covered.
One update we’re excited about is opening up the entryway on each side, so that the stairs are a lot less closed off. We’re going to take that wall back several studs so that the side of the stairs are more open, so they become more connected to the living room and less of a dark, narrow vestibule.
To give you a better idea, here’s the view from within the living room. Don’t quote me on exactly how far back the wall will be opened, but that yellow line gives you a sense of the new opening we’re aiming for (and I added a white line to show where a railing would go). You know, something like this inspiration picture.
Another big functional change downstairs is that we’ll be adding a powder room/half bathroom. Originally both sides just had one full bathroom upstairs, assuming you don’t count the random toilet by the back door on the right side (it wasn’t behind a door or anything, it just kinda sat a few steps from the kitchen sink!). So we’re turning the former closet under the stairs into a half bathroom with a proper sink, toilet, and even a door. Imagine that!
The only other doorway we’re widening (in addition to the side-wall-of-the-stairs that we mentioned above) is between the living room and what will become the kitchen, which we believe was previously used as a dining space. We’re going to put the dining table at the far end of the living room instead, meaning we can create a larger and more spacious kitchen in that back room. And the wider doorway (which I’ve marked below in yellow) will help it to feel less closed off and more light-filled.
For the kitchen itself, we’re planning to put the sink across that back wall under the window (we’ll be switching out that window with a slightly less long one so cabinets can pass below it) and then we plan to continue the cabinetry along the entire right kitchen wall, where we’ll also put the stove and fridge. And yes, we’re psyched to have found that brick chimney behind the walls and plan to keep it exposed!
Like the yellow kitchen you saw above, here’s the original galley-style kitchen on the left side, in all of its orange glory. And true to form, it was also shoved into what used to be a former side porch.
Here’s what it’s looking like now, which we’re planning to use as a multi-functional space to house the washer and dryer, more cabinetry (think: pantry), and even a small mudroom area since it leads to the back door where the outdoor shower will be.
Just like on the other side, the framing in this section is crazy (you’ll see it better in the video – the studs are oriented the wrong way!) so there’s a chance it will have to be completely rebuilt from scratch. But it’s not like we haven’t already been there and done that with the pink house!
All of the changes I’m describing will be the same on both sides, so I won’t bother going through it twice, but before we move upstairs, I just have to share this one last view we took downstairs on our last visit. This is standing in the left side’s kitchen, looking into the right side. In a few months we won’t be able to see from one side into the other anymore, so we’re relishing views like this while we can. It’s so crazy looking!
Upstairs is kinda confusing to explain, but the main things to take away from this picture is that 1) we’re standing in the front of the house (the front bedroom on the left side) looking towards the back and 2) the bathroom was really disproportionately sized (so long that you could practically put a 5 x 7′ area rug in the middle of it and not touch the shower or the toilet/sink!). So we’re going to steal some of that wasted bathroom space (see the yellow line) to create a small third sleeping nook, sort of in the spirit of the pink house’s bunk room. It won’t be exactly the same (and we’re not certain we’ll do bunks again) but it will create some much needed bonus sleeping space, which is always nice in a vacation house.
The other thing you can see in some of these upstairs photos is just how shallow the roof is. See how there’s basically NO attic up there? Yes, those sloped beams that you see behind the ceiling joists are the actual roof supports! Just a few inches above the ceiling! That’s why we’ve been hankering to increase the pitch as much as possible so that we can try to sneak our upstairs HVAC system up there somewhere – and so when it rains the slope of the roof is a lot more conducive to avoiding leaks thanks to adequate water shedding. Thank goodness the Historic Review Board approved the change to make that happen!
The front bedroom is staying relatively the same layout-wise, but the other notable change in the upstairs is the back bedroom. It used to look like this, with that window overlooking the backyard. But we’re turning that window into a door that will lead to a very small addition to the top floor: another full bathroom.
The downstairs footprint of this house already has a little bump out on the back right there (it’s the area in the future mudroom/pantry/laundry room that leads to the back door) so we’re essentially just continuing that bump out upstairs too. It will give this bedroom an en suite bathroom AND bring both sides from just 1 bathroom to 2.5 bathrooms total. Plus, we already have approval from the Historic Review Board to add that tiny addition along with a new window between the chimney and the old window (which, again, is becoming the bathroom door) so we won’t lose any light in the bedroom. Victory!
Here’s another one of those shots looking through both sides of the house (from the back bedroom on the left side into the one on the right). Again, we’re planning to keep the brick exposed on each side. And fun fact number two: we discovered after demolition that this chimney TWISTS. Notice how it’s angled in the photo below? Scroll up to the kitchen photos and you’ll see that it’s parallel to the walls downstairs. So strange, right? It does this twisting between floors, but you can see it from the kitchen when you look up now that things are demo’d.
Speaking of strange, I still can’t get over how weird it is to see these two mirrored floorplans open to one another – especially where they meet at the stairs. It feels like the moment when American Lindsay Lohan meets the British Lindsay Lohan at summer camp in the Parent Trap and they realize they’ve had a twin all along.
Pretty exciting stuff, eh? Also, I clearly need to work on my squirrel jokes. But in the meantime remember that the video walk-through that we included earlier in this post has a lot more details about the floor plan that we’re leaning towards (along with generally being a lot more orienting than photos can be by nature). So be sure to watch that for more info and priceless quotes like “I don’t think that’s actually pee in there…” There’s a reason why our kids call this the smelly house, but hopefully not for long!
P.S. For more duplex background, here’s our podcast about buying it (complete with how much we paid), a post with a full before tour (pics AND video), and a podcast about some setbacks that popped up before we could even start renovations (and then a post about some additional bad news that made us feel extra rage-y). And here’s a podcast about the loophole we found that made demo possible, which gets us to today’s demo pics & video tour. Quite the journey already.
The post A Duplex Demo Tour (Before & After Pics + A Video!) appeared first on Young House Love.
from RSSMix.com Mix ID 8265713 http://ift.tt/2FF52MV
via IFTTT
0 notes
Text
A Duplex Demo Tour (Before & After Pics + A Video!)
We finally got there guys – and not without a few notable setbacks. But that might be why it feels extra good to finally say: the duplex is officially demo’d! And today we’re going to show you around (in photos and even on video) and share some of our plans for this beast.
We learned from doing the pink house that when a house has this much moisture damage, it’s best to take all of the walls down so there’s no mystery about what kind of mold/decay/structural issues are lurking back there. And considering the duplex already had several troubling spots that were blatantly obvious before demo (see the black mold spots on that side wall and that ceiling caving in from moisture damage?), we knew a full gut job was the prudent first step here. Spoiler: we also found lots of bad framing, bad wiring, bad plumbing, and even a few squirrels nests within the walls and even the HVAC system itself, which was an especially nutty discovery. Get it? Squirrels? Nuts? I’ll pause for laughter.
The photo above is the living room on the LEFT side of the duplex (you can see more before photos in our original duplex tour) And below is what that room is looking like now. The hardwood floors look extra dusty at the moment, but they should clean up just as nicely as the ones at the pink house. And on that day I’ll dance on them like no one is watching.
Jumping over to the other side of the duplex, this was the living room on the RIGHT side when we bought it… which appeared to have slightly less water issues and mold.
…and here’s the same shot after demo. We lost some walls, but gained some ladders apparently. And we discovered some pretty impressive rot spots on that right-hand wall, along with some framing that will need to be reinforced in the name of safety. No squirrels living on this side though.
And one last “before and after” comparison before we move on to floor planning. Here’s a shot of the kitchen on the right side, which was located in a side porch that was enclosed at some point. Fun fact: if you listen to the podcast, this is the area where water started gushing out of the walls when we turned on the water meter. But this photo is from before that happened, so the discolored/rotten spots on the floor came with the house.
This is the same area after demo, where you can see some of the crazy, not-at-all-to-code structural stuff that was lurking behind those old walls. It looks kinda like someone built that back wall out of scrap wood they had laying around, so it’s a miracle it was staying up at all!
We have more photos for you, but the best way to get the full tour is through the video below (or here on YouTube), where Sherry points out a lot of the floor plan changes we’re considering, along with some strange things that were uncovered during demo. We’re going to do a follow-up post with an actual floor plan soon, but we’re still finalizing a couple of things.
For anyone who who doesn’t have time to watch the video at the moment, I’d definitely recommend coming back to watch it (a video tour is worth a thousand words and pics) but here’s some of what’s covered.
One update we’re excited about is opening up the entryway on each side, so that the stairs are a lot less closed off. We’re going to take that wall back several studs so that the side of the stairs are more open, so they become more connected to the living room and less of a dark, narrow vestibule.
To give you a better idea, here’s the view from within the living room. Don’t quote me on exactly how far back the wall will be opened, but that yellow line gives you a sense of the new opening we’re aiming for (and I added a white line to show where a railing would go). You know, something like this inspiration picture.
Another big functional change downstairs is that we’ll be adding a powder room/half bathroom. Originally both sides just had one full bathroom upstairs, assuming you don’t count the random toilet by the back door on the right side (it wasn’t behind a door or anything, it just kinda sat a few steps from the kitchen sink!). So we’re turning the former closet under the stairs into a half bathroom with a proper sink, toilet, and even a door. Imagine that!
The only other doorway we’re widening (in addition to the side-wall-of-the-stairs that we mentioned above) is between the living room and what will become the kitchen, which we believe was previously used as a dining space. We’re going to put the dining table at the far end of the living room instead, meaning we can create a larger and more spacious kitchen in that back room. And the wider doorway (which I’ve marked below in yellow) will help it to feel less closed off and more light-filled.
For the kitchen itself, we’re planning to put the sink across that back wall under the window (we’ll be switching out that window with a slightly less long one so cabinets can pass below it) and then we plan to continue the cabinetry along the entire right kitchen wall, where we’ll also put the stove and fridge. And yes, we’re psyched to have found that brick chimney behind the walls and plan to keep it exposed!
Like the yellow kitchen you saw above, here’s the original galley-style kitchen on the left side, in all of its orange glory. And true to form, it was also shoved into what used to be a former side porch.
Here’s what it’s looking like now, which we’re planning to use as a multi-functional space to house the washer and dryer, more cabinetry (think: pantry), and even a small mudroom area since it leads to the back door where the outdoor shower will be.
Just like on the other side, the framing in this section is crazy (you’ll see it better in the video – the studs are oriented the wrong way!) so there’s a chance it will have to be completely rebuilt from scratch. But it’s not like we haven’t already been there and done that with the pink house!
All of the changes I’m describing will be the same on both sides, so I won’t bother going through it twice, but before we move upstairs, I just have to share this one last view we took downstairs on our last visit. This is standing in the left side’s kitchen, looking into the right side. In a few months we won’t be able to see from one side into the other anymore, so we’re relishing views like this while we can. It’s so crazy looking!
Upstairs is kinda confusing to explain, but the main things to take away from this picture is that 1) we’re standing in the front of the house (the front bedroom on the left side) looking towards the back and 2) the bathroom was really disproportionately sized (so long that you could practically put a 5 x 7′ area rug in the middle of it and not touch the shower or the toilet/sink!). So we’re going to steal some of that wasted bathroom space (see the yellow line) to create a small third sleeping nook, sort of in the spirit of the pink house’s bunk room. It won’t be exactly the same (and we’re not certain we’ll do bunks again) but it will create some much needed bonus sleeping space, which is always nice in a vacation house.
The other thing you can see in some of these upstairs photos is just how shallow the roof is. See how there’s basically NO attic up there? Yes, those sloped beams that you see behind the ceiling joists are the actual roof supports! Just a few inches above the ceiling! That’s why we’ve been hankering to increase the pitch as much as possible so that we can try to sneak our upstairs HVAC system up there somewhere – and so when it rains the slope of the roof is a lot more conducive to avoiding leaks thanks to adequate water shedding. Thank goodness the Historic Review Board approved the change to make that happen!
The front bedroom is staying relatively the same layout-wise, but the other notable change in the upstairs is the back bedroom. It used to look like this, with that window overlooking the backyard. But we’re turning that window into a door that will lead to a very small addition to the top floor: another full bathroom.
The downstairs footprint of this house already has a little bump out on the back right there (it’s the area in the future mudroom/pantry/laundry room that leads to the back door) so we’re essentially just continuing that bump out upstairs too. It will give this bedroom an en suite bathroom AND bring both sides from just 1 bathroom to 2.5 bathrooms total. Plus, we already have approval from the Historic Review Board to add that tiny addition along with a new window between the chimney and the old window (which, again, is becoming the bathroom door) so we won’t lose any light in the bedroom. Victory!
Here’s another one of those shots looking through both sides of the house (from the back bedroom on the left side into the one on the right). Again, we’re planning to keep the brick exposed on each side. And fun fact number two: we discovered after demolition that this chimney TWISTS. Notice how it’s angled in the photo below? Scroll up to the kitchen photos and you’ll see that it’s parallel to the walls downstairs. So strange, right? It does this twisting between floors, but you can see it from the kitchen when you look up now that things are demo’d.
Speaking of strange, I still can’t get over how weird it is to see these two mirrored floorplans open to one another – especially where they meet at the stairs. It feels like the moment when American Lindsay Lohan meets the British Lindsay Lohan at summer camp in the Parent Trap and they realize they’ve had a twin all along.
Pretty exciting stuff, eh? Also, I clearly need to work on my squirrel jokes. But in the meantime remember that the video walk-through that we included earlier in this post has a lot more details about the floor plan that we’re leaning towards (along with generally being a lot more orienting than photos can be by nature). So be sure to watch that for more info and priceless quotes like “I don’t think that’s actually pee in there…” There’s a reason why our kids call this the smelly house, but hopefully not for long!
P.S. For more duplex background, here’s our podcast about buying it (complete with how much we paid), a post with a full before tour (pics AND video), and a podcast about some setbacks that popped up before we could even start renovations (and then a post about some additional bad news that made us feel extra rage-y). And here’s a podcast about the loophole we found that made demo possible, which gets us to today’s demo pics & video tour. Quite the journey already.
The post A Duplex Demo Tour (Before & After Pics + A Video!) appeared first on Young House Love.
A Duplex Demo Tour (Before & After Pics + A Video!) published first on https://landscapingmates.blogspot.com
0 notes
Text
A Duplex Demo Tour (Before & After Pics + A Video!)
We finally got there guys – and not without a few notable setbacks. But that might be why it feels extra good to finally say: the duplex is officially demo’d! And today we’re going to show you around (in photos and even on video) and share some of our plans for this beast.
We learned from doing the pink house that when a house has this much moisture damage, it’s best to take all of the walls down so there’s no mystery about what kind of mold/decay/structural issues are lurking back there. And considering the duplex already had several troubling spots that were blatantly obvious before demo (see the black mold spots on that side wall and that ceiling caving in from moisture damage?), we knew a full gut job was the prudent first step here. Spoiler: we also found lots of bad framing, bad wiring, bad plumbing, and even a few squirrels nests within the walls and even the HVAC system itself, which was an especially nutty discovery. Get it? Squirrels? Nuts? I’ll pause for laughter.
The photo above is the living room on the LEFT side of the duplex (you can see more before photos in our original duplex tour) And below is what that room is looking like now. The hardwood floors look extra dusty at the moment, but they should clean up just as nicely as the ones at the pink house. And on that day I’ll dance on them like no one is watching.
Jumping over to the other side of the duplex, this was the living room on the RIGHT side when we bought it… which appeared to have slightly less water issues and mold.
…and here’s the same shot after demo. We lost some walls, but gained some ladders apparently. And we discovered some pretty impressive rot spots on that right-hand wall, along with some framing that will need to be reinforced in the name of safety. No squirrels living on this side though.
And one last “before and after” comparison before we move on to floor planning. Here’s a shot of the kitchen on the right side, which was located in a side porch that was enclosed at some point. Fun fact: if you listen to the podcast, this is the area where water started gushing out of the walls when we turned on the water meter. But this photo is from before that happened, so the discolored/rotten spots on the floor came with the house.
This is the same area after demo, where you can see some of the crazy, not-at-all-to-code structural stuff that was lurking behind those old walls. It looks kinda like someone built that back wall out of scrap wood they had laying around, so it’s a miracle it was staying up at all!
We have more photos for you, but the best way to get the full tour is through the video below (or here on YouTube), where Sherry points out a lot of the floor plan changes we’re considering, along with some strange things that were uncovered during demo. We’re going to do a follow-up post with an actual floor plan soon, but we’re still finalizing a couple of things.
For anyone who who doesn’t have time to watch the video at the moment, I’d definitely recommend coming back to watch it (a video tour is worth a thousand words and pics) but here’s some of what’s covered.
One update we’re excited about is opening up the entryway on each side, so that the stairs are a lot less closed off. We’re going to take that wall back several studs so that the side of the stairs are more open, so they become more connected to the living room and less of a dark, narrow vestibule.
To give you a better idea, here’s the view from within the living room. Don’t quote me on exactly how far back the wall will be opened, but that yellow line gives you a sense of the new opening we’re aiming for (and I added a white line to show where a railing would go). You know, something like this inspiration picture.
Another big functional change downstairs is that we’ll be adding a powder room/half bathroom. Originally both sides just had one full bathroom upstairs, assuming you don’t count the random toilet by the back door on the right side (it wasn’t behind a door or anything, it just kinda sat a few steps from the kitchen sink!). So we’re turning the former closet under the stairs into a half bathroom with a proper sink, toilet, and even a door. Imagine that!
The only other doorway we’re widening (in addition to the side-wall-of-the-stairs that we mentioned above) is between the living room and what will become the kitchen, which we believe was previously used as a dining space. We’re going to put the dining table at the far end of the living room instead, meaning we can create a larger and more spacious kitchen in that back room. And the wider doorway (which I’ve marked below in yellow) will help it to feel less closed off and more light-filled.
For the kitchen itself, we’re planning to put the sink across that back wall under the window (we’ll be switching out that window with a slightly less long one so cabinets can pass below it) and then we plan to continue the cabinetry along the entire right kitchen wall, where we’ll also put the stove and fridge. And yes, we’re psyched to have found that brick chimney behind the walls and plan to keep it exposed!
Like the yellow kitchen you saw above, here’s the original galley-style kitchen on the left side, in all of its orange glory. And true to form, it was also shoved into what used to be a former side porch.
Here’s what it’s looking like now, which we’re planning to use as a multi-functional space to house the washer and dryer, more cabinetry (think: pantry), and even a small mudroom area since it leads to the back door where the outdoor shower will be.
Just like on the other side, the framing in this section is crazy (you’ll see it better in the video – the studs are oriented the wrong way!) so there’s a chance it will have to be completely rebuilt from scratch. But it’s not like we haven’t already been there and done that with the pink house!
All of the changes I’m describing will be the same on both sides, so I won’t bother going through it twice, but before we move upstairs, I just have to share this one last view we took downstairs on our last visit. This is standing in the left side’s kitchen, looking into the right side. In a few months we won’t be able to see from one side into the other anymore, so we’re relishing views like this while we can. It’s so crazy looking!
Upstairs is kinda confusing to explain, but the main things to take away from this picture is that 1) we’re standing in the front of the house (the front bedroom on the left side) looking towards the back and 2) the bathroom was really disproportionately sized (so long that you could practically put a 5 x 7′ area rug in the middle of it and not touch the shower or the toilet/sink!). So we’re going to steal some of that wasted bathroom space (see the yellow line) to create a small third sleeping nook, sort of in the spirit of the pink house’s bunk room. It won’t be exactly the same (and we’re not certain we’ll do bunks again) but it will create some much needed bonus sleeping space, which is always nice in a vacation house.
The other thing you can see in some of these upstairs photos is just how shallow the roof is. See how there’s basically NO attic up there? Yes, those sloped beams that you see behind the ceiling joists are the actual roof supports! Just a few inches above the ceiling! That’s why we’ve been hankering to increase the pitch as much as possible so that we can try to sneak our upstairs HVAC system up there somewhere – and so when it rains the slope of the roof is a lot more conducive to avoiding leaks thanks to adequate water shedding. Thank goodness the Historic Review Board approved the change to make that happen!
The front bedroom is staying relatively the same layout-wise, but the other notable change in the upstairs is the back bedroom. It used to look like this, with that window overlooking the backyard. But we’re turning that window into a door that will lead to a very small addition to the top floor: another full bathroom.
The downstairs footprint of this house already has a little bump out on the back right there (it’s the area in the future mudroom/pantry/laundry room that leads to the back door) so we’re essentially just continuing that bump out upstairs too. It will give this bedroom an en suite bathroom AND bring both sides from just 1 bathroom to 2.5 bathrooms total. Plus, we already have approval from the Historic Review Board to add that tiny addition along with a new window between the chimney and the old window (which, again, is becoming the bathroom door) so we won’t lose any light in the bedroom. Victory!
Here’s another one of those shots looking through both sides of the house (from the back bedroom on the left side into the one on the right). Again, we’re planning to keep the brick exposed on each side. And fun fact number two: we discovered after demolition that this chimney TWISTS. Notice how it’s angled in the photo below? Scroll up to the kitchen photos and you’ll see that it’s parallel to the walls downstairs. So strange, right? It does this twisting between floors, but you can see it from the kitchen when you look up now that things are demo’d.
Speaking of strange, I still can’t get over how weird it is to see these two mirrored floorplans open to one another – especially where they meet at the stairs. It feels like the moment when American Lindsay Lohan meets the British Lindsay Lohan at summer camp in the Parent Trap and they realize they’ve had a twin all along.
Pretty exciting stuff, eh? Also, I clearly need to work on my squirrel jokes. But in the meantime remember that the video walk-through that we included earlier in this post has a lot more details about the floor plan that we’re leaning towards (along with generally being a lot more orienting than photos can be by nature). So be sure to watch that for more info and priceless quotes like “I don’t think that’s actually pee in there…” There’s a reason why our kids call this the smelly house, but hopefully not for long!
P.S. For more duplex background, here’s our podcast about buying it (complete with how much we paid), a post with a full before tour (pics AND video), and a podcast about some setbacks that popped up before we could even start renovations (and then a post about some additional bad news that made us feel extra rage-y). And here’s a podcast about the loophole we found that made demo possible, which gets us to today’s demo pics & video tour. Quite the journey already.
The post A Duplex Demo Tour (Before & After Pics + A Video!) appeared first on Young House Love.
A Duplex Demo Tour (Before & After Pics + A Video!) published first on https://bakerskitchenslimited.tumblr.com/
0 notes
Text
A Duplex Demo Tour (Before & After Pics + A Video!)
We finally got there guys – and not without a few notable setbacks. But that might be why it feels extra good to finally say: the duplex is officially demo’d! And today we’re going to show you around (in photos and even on video) and share some of our plans for this beast.
We learned from doing the pink house that when a house has this much moisture damage, it’s best to take all of the walls down so there’s no mystery about what kind of mold/decay/structural issues are lurking back there. And considering the duplex already had several troubling spots that were blatantly obvious before demo (see the black mold spots on that side wall and that ceiling caving in from moisture damage?), we knew a full gut job was the prudent first step here. Spoiler: we also found lots of bad framing, bad wiring, bad plumbing, and even a few squirrels nests within the walls and even the HVAC system itself, which was an especially nutty discovery. Get it? Squirrels? Nuts? I’ll pause for laughter.
The photo above is the living room on the LEFT side of the duplex (you can see more before photos in our original duplex tour) And below is what that room is looking like now. The hardwood floors look extra dusty at the moment, but they should clean up just as nicely as the ones at the pink house. And on that day I’ll dance on them like no one is watching.
Jumping over to the other side of the duplex, this was the living room on the RIGHT side when we bought it… which appeared to have slightly less water issues and mold.
…and here’s the same shot after demo. We lost some walls, but gained some ladders apparently. And we discovered some pretty impressive rot spots on that right-hand wall, along with some framing that will need to be reinforced in the name of safety. No squirrels living on this side though.
And one last “before and after” comparison before we move on to floor planning. Here’s a shot of the kitchen on the right side, which was located in a side porch that was enclosed at some point. Fun fact: if you listen to the podcast, this is the area where water started gushing out of the walls when we turned on the water meter. But this photo is from before that happened, so the discolored/rotten spots on the floor came with the house.
This is the same area after demo, where you can see some of the crazy, not-at-all-to-code structural stuff that was lurking behind those old walls. It looks kinda like someone built that back wall out of scrap wood they had laying around, so it’s a miracle it was staying up at all!
We have more photos for you, but the best way to get the full tour is through the video below (or here on YouTube), where Sherry points out a lot of the floor plan changes we’re considering, along with some strange things that were uncovered during demo. We’re going to do a follow-up post with an actual floor plan soon, but we’re still finalizing a couple of things.
For anyone who who doesn’t have time to watch the video at the moment, I’d definitely recommend coming back to watch it (a video tour is worth a thousand words and pics) but here’s some of what’s covered.
One update we’re excited about is opening up the entryway on each side, so that the stairs are a lot less closed off. We’re going to take that wall back several studs so that the side of the stairs are more open, so they become more connected to the living room and less of a dark, narrow vestibule.
To give you a better idea, here’s the view from within the living room. Don’t quote me on exactly how far back the wall will be opened, but that yellow line gives you a sense of the new opening we’re aiming for (and I added a white line to show where a railing would go). You know, something like this inspiration picture.
Another big functional change downstairs is that we’ll be adding a powder room/half bathroom. Originally both sides just had one full bathroom upstairs, assuming you don’t count the random toilet by the back door on the right side (it wasn’t behind a door or anything, it just kinda sat a few steps from the kitchen sink!). So we’re turning the former closet under the stairs into a half bathroom with a proper sink, toilet, and even a door. Imagine that!
The only other doorway we’re widening (in addition to the side-wall-of-the-stairs that we mentioned above) is between the living room and what will become the kitchen, which we believe was previously used as a dining space. We’re going to put the dining table at the far end of the living room instead, meaning we can create a larger and more spacious kitchen in that back room. And the wider doorway (which I’ve marked below in yellow) will help it to feel less closed off and more light-filled.
For the kitchen itself, we’re planning to put the sink across that back wall under the window (we’ll be switching out that window with a slightly less long one so cabinets can pass below it) and then we plan to continue the cabinetry along the entire right kitchen wall, where we’ll also put the stove and fridge. And yes, we’re psyched to have found that brick chimney behind the walls and plan to keep it exposed!
Like the yellow kitchen you saw above, here’s the original galley-style kitchen on the left side, in all of its orange glory. And true to form, it was also shoved into what used to be a former side porch.
Here’s what it’s looking like now, which we’re planning to use as a multi-functional space to house the washer and dryer, more cabinetry (think: pantry), and even a small mudroom area since it leads to the back door where the outdoor shower will be.
Just like on the other side, the framing in this section is crazy (you’ll see it better in the video – the studs are oriented the wrong way!) so there’s a chance it will have to be completely rebuilt from scratch. But it’s not like we haven’t already been there and done that with the pink house!
All of the changes I’m describing will be the same on both sides, so I won’t bother going through it twice, but before we move upstairs, I just have to share this one last view we took downstairs on our last visit. This is standing in the left side’s kitchen, looking into the right side. In a few months we won’t be able to see from one side into the other anymore, so we’re relishing views like this while we can. It’s so crazy looking!
Upstairs is kinda confusing to explain, but the main things to take away from this picture is that 1) we’re standing in the front of the house (the front bedroom on the left side) looking towards the back and 2) the bathroom was really disproportionately sized (so long that you could practically put a 5 x 7′ area rug in the middle of it and not touch the shower or the toilet/sink!). So we’re going to steal some of that wasted bathroom space (see the yellow line) to create a small third sleeping nook, sort of in the spirit of the pink house’s bunk room. It won’t be exactly the same (and we’re not certain we’ll do bunks again) but it will create some much needed bonus sleeping space, which is always nice in a vacation house.
The other thing you can see in some of these upstairs photos is just how shallow the roof is. See how there’s basically NO attic up there? Yes, those sloped beams that you see behind the ceiling joists are the actual roof supports! Just a few inches above the ceiling! That’s why we’ve been hankering to increase the pitch as much as possible so that we can try to sneak our upstairs HVAC system up there somewhere – and so when it rains the slope of the roof is a lot more conducive to avoiding leaks thanks to adequate water shedding. Thank goodness the Historic Review Board approved the change to make that happen!
The front bedroom is staying relatively the same layout-wise, but the other notable change in the upstairs is the back bedroom. It used to look like this, with that window overlooking the backyard. But we’re turning that window into a door that will lead to a very small addition to the top floor: another full bathroom.
The downstairs footprint of this house already has a little bump out on the back right there (it’s the area in the future mudroom/pantry/laundry room that leads to the back door) so we’re essentially just continuing that bump out upstairs too. It will give this bedroom an en suite bathroom AND bring both sides from just 1 bathroom to 2.5 bathrooms total. Plus, we already have approval from the Historic Review Board to add that tiny addition along with a new window between the chimney and the old window (which, again, is becoming the bathroom door) so we won’t lose any light in the bedroom. Victory!
Here’s another one of those shots looking through both sides of the house (from the back bedroom on the left side into the one on the right). Again, we’re planning to keep the brick exposed on each side. And fun fact number two: we discovered after demolition that this chimney TWISTS. Notice how it’s angled in the photo below? Scroll up to the kitchen photos and you’ll see that it’s parallel to the walls downstairs. So strange, right? It does this twisting between floors, but you can see it from the kitchen when you look up now that things are demo’d.
Speaking of strange, I still can’t get over how weird it is to see these two mirrored floorplans open to one another – especially where they meet at the stairs. It feels like the moment when American Lindsay Lohan meets the British Lindsay Lohan at summer camp in the Parent Trap and they realize they’ve had a twin all along.
Pretty exciting stuff, eh? Also, I clearly need to work on my squirrel jokes. But in the meantime remember that the video walk-through that we included earlier in this post has a lot more details about the floor plan that we’re leaning towards (along with generally being a lot more orienting than photos can be by nature). So be sure to watch that for more info and priceless quotes like “I don’t think that’s actually pee in there…” There’s a reason why our kids call this the smelly house, but hopefully not for long!
P.S. For more duplex background, here’s our podcast about buying it (complete with how much we paid), a post with a full before tour (pics AND video), and a podcast about some setbacks that popped up before we could even start renovations (and then a post about some additional bad news that made us feel extra rage-y). And here’s a podcast about the loophole we found that made demo possible, which gets us to today’s demo pics & video tour. Quite the journey already.
The post A Duplex Demo Tour (Before & After Pics + A Video!) appeared first on Young House Love.
A Duplex Demo Tour (Before & After Pics + A Video!) published first on https://aireloomreview.tumblr.com/
0 notes
Text
A Tour Of Our New Beach Duplex!
If you haven’t already heard the news: we’re doubling down in the beach house department. And I mean the “double” part quite literally because we lost our minds and bought a DUPLEX!
If you caught our podcast yesterday, you already know the whys, hows, and wheres of this story. The price was right (we even got them down 30K), the location is awesome (close to the park, shops, and a few blocks from the beach), and we didn’t feel like we could ever afford this much house in such a great spot if we waited much longer. This small town only has so many affordable fixer-uppers available before everything gets renovated and we get priced out (we paid $220K for this, which breaks down to $110K per side – which is cheaper than the pink one!).
But there’s lots more of the story in the podcast (you can listen in the player below) including how it took us a few weeks to come around to its charm and how we’re making this all work financially (spoiler: we were able to pay off our mortgage here in Richmond – and we share specifics about exactly how we did that).
But if you just haven’t had a chance to listen yet, here are tons of details, photos, and even two video tours for you. #SoMuchMoreToTile #LonelyToilet #Also,WhoHidesWindows?!
The Basics
This is another historic fixer-upper in the quaint Chesapeake Bay-side town of Cape Charles on Virginia’s Eastern Shore. We talked more about why we’ve fallen hard for Cape Charles back when we shared our pink house purchase last year (and I’ll be calling it the “pink house” in this post for clarity’s sake). Not only is the duplex in the same town as our pink house, it’s actually on the same street – just two doors down!
Yep, our two houses are separated by just one home (the one that was featured on HGTV). This street was a big part of why we bought the pink house thanks to its proximity to the shops/park/beach, so location was also a HUGE reason that we were attracted to the duplex.
We’ve always known the pink house wouldn’t be our last big project, but I can’t say we were expecting to dive into another one quite this quickly. But over the months of working on our pink house, we noticed how limited the inventory was for houses in Cape Charles that fit our price range. So the good location and price of this duplex accelerated our plans a little bit – and despite our initial aversions to this house, we just couldn’t fight that feeling anymore. We wanted the dang duplex. Badly.
Beyond just the excitement of another project, the duplex made a lot of practical sense too:
It creates additional vacation rental opportunities. We won’t use this ourselves, so it creates two spaces dedicated solely for renting to others – great for times when we plan to stay at the pink house, but still want to earn rental income.
It accommodates larger groups or pink house overflow. Our pink house is 3 bedrooms (4 if you count the bunk room) but all together, we’re hoping to create 6 bedrooms in the duplex. So groups that can’t squeeze into ol’ pinkie could rent both sides of the duplex instead. We also may use it when our own extended family or friends want to vacation with us, which is pretty handy since it’s so close.
Renovating a duplex can be more efficient. Although we have double the kitchens and baths to redo (oh the tiling! THE TILING!!), many of the big tasks – like replacing the roof/siding, foundation fixes, or landscape updates – are a lot more cost effective and time efficient because we can do them all at once, whereas it may have taken us a few years to fix up two separate houses.
Plus, having already established our go-to contractors in Cape Charles and worked out some of the kinks of the process while doing the pink house, this project seems a LOT less daunting than our first go ’round.
The Before Tour
The duplex is split right down the middle, with each side being a mirror of the other in layout, but NOT in condition, look, or….um…smell. One side smells exactly like the apartment I rented in Queens for a year (and no, that is not a compliment). The home had previously been a long-term rental property but the tenants on both sides moved out earlier this summer before the owner listed it for sale. So let’s start with a video tour of the LEFT SIDE, since it’s the one we previewed in our podcast show notes yesterday. *Note: if you’re viewing through a feed reader, you may need to click through to see the video player.
If you can’t watch the video right now, I’ve got photos below – but first here’s the (shorter) video tour of the RIGHT SIDE, which is in slightly better condition. Oh, and be warned, there’s a smoke detector beep in this one, so if you’ve got a dog who freaks out at the stuff (we’re speaking from experience) you might want to throw on some headphones. *Note: if you’re viewing through a feed reader, you may need to click through to see the video player.
The Left Side
As you saw in the videos, both sides open right into the stairwell. We’re hoping we can open up the wall to the living room to let more natural light into the stairs and make them feel less cramped. You know, sort of like this.
From the doorway, you can step into the living room, which is pretty decently sized. The floors are in better shape than they look, so we know they’ll refinish beautifully (don’t mind that carpet pad that got stuck to them). And see that bubbled part of the ceiling to the left of the fan? That’s a leak with some mold on it. It continues down the wall and there’s actually a hole above that paneling that’s so big you could stick your arm into it. You could but I’m not volunteering.
Beyond the living room is a dining room of sorts, which has a narrow galley kitchen attached to it. Spoiler alert: we will not be keeping that fridge location or the trim color.
The kitchen is in rough shape. It appears to be squeezed into a former side porch area and connects to a small dark hallway in the back with an old water heater and a door that leads to the backyard. So we definitely want to rethink this layout to make it more functional.
Actually we want to tweak the entire downstairs layout so it’s more functional. Sherry mentioned trying to add a bedroom down here in the video, but since recording that we’re brewing another plan that’ll keep all the bedrooms upstairs and result in a larger kitchen, living room, dining room, bathroom, and laundry area down here instead. What’s that old saying? “Your first idea is rarely your best idea.” Truth.
Moving along… there are two bedrooms and one full bath upstairs right now, all of which are off of this little landing at the top of the steps.
The rooms upstairs are surprisingly large, which is why we think there’s gotta be a way to squeeze in a third bedroom (and maybe even a second bathroom) if we reconfigure things. Here’s the front bedroom:
The back bedroom got the same wood paneling treatment as the front bedroom (it’s just painted white) along with the same foam square ceiling panels that have been glued over the actual drywall or plaster. We have a working theory that someone many years ago just disguised problem areas with more and more coverings: wallpaper, foam ceilings panels, fake wood paneling, etc. So who knows what we’ll find behind them, but the pink house has trained us well. I ain’t afraid of no ghosts duplex.
The bathroom sits between the two bedrooms and is, again, remarkably large for the overall size of the house. It’s also shaped like a weirdly long triangle, which is why we’d love to find a way to split it into two better laid out bathrooms. We’re still sketching alternative floor plan options, so we’ll share those when we land on something we think could work.
Here it is from another angle. Is it bad that I’m actually kinda liking that treatment on the shower doors? It’s like a modesty decal.
The Right Side
While the layout on each side is identical, the look and condition of this side is slightly better. And the living room is keeping things interesting with green and blue trim. Oddly enough it has a ceiling leak along the exterior wall just like the other side, but it’s right out of frame in the shot below.
This side also sports a fridge just hanging out in the dining room, and some faux greenery (you know Sherry loves a faux plant or ten).
Upstairs is where things get sticky. And I mean that literally. The floors up here have a thin layer of adhesive that grabs your shoes with every step. It appears to be from some vinyl tiles that got peeled up, but the stickiness suspiciously continues ON TOP of the remaining vinyl tiles. Layers upon layers upon layers, guys. It’s a theme.
I personally have not even walked fully into this room yet because it’s so sticky. Sherry’s a braver person than me, but it basically ripped her flip-flops apart when she first toured this house with the realtor. She described it as hilarious for the first minute and then just plain savage as she fought to flip and flop her way outta there without getting glue all over her feet.
The stickiness stops at the back bedroom thanks to the carpet. And I can’t say I hate the wall color in here. It’s kind of a moody eggplant. But as you can see in the video, we think there’s some rot/moisture damage behind the foam ceiling panels and the fake wood paneling – but on the bright since there’s also a brick chimney hiding in one corner, so we’re hoping to expose it when we peel off all of the various other coverings.
The bathroom on this side actually has a clawfoot tub in it. Were we not in the midst of fixing up our tub in the pink house already, I’d be tempted to steal this one for that house since it’s in much better condition to start. Both this bathroom (and the one on the other side) are so large and oddly shaped you could drop a 5 x 7′ rug on the floor and it wouldn’t touch anything. It’s like a skating rink of space that’s not being used. So again, the name of the game is to bring this place back to its former glory, strip away all of the strange add-ons that hide/cover various things, and reconfigure things so they make a little more sense and are hopefully a lot more like how this house was laid out originally.
I’ll end this tour with the view looking back down the stairs at the front door (don’t mind the mylar “Happy Birthday” balloon that lives on this side of the house – it’s like a less sinister version of the red Pennywise balloon). Picture the left side of the stairway wall taken down so that it opens into the living room (again, sort of like this). Our contractor thinks we can do it so we’re itching to get started.
The Plan
Right now we’re in the excitement / daydreaming phase of this renovation. We don’t have any immediate plans to start knocking down walls yet since we’re trying to wrap up a few things on the pink house first (it’s so close to being done we can taste it!). But as you can tell, we’re certainly deep into brainstorming what this house COULD look like and how we could give it all the love it needs. Because it needs some serious love. And also some serious deodorizing. No one is sure of the exact year this was built (one local historian guessed the 1880’s, which might be a stretch, but we know it’s at least 100 years old) and it has certainly seen some things over the years.
We plan to work with the same contractor we have used on the pink house (he’s already brainstorming floorpans with us!) since we’ll need to do a lot of the same whole-house updates we did to the pink house: all new plumbing & electrical, new HVAC system, new roof & siding… THE WORKS. But our main decisions at the offset are: (1) how do we maximize the floorplan and (2) how do we make the front more attractive.
Sherry found this inspiration photo online and it’s definitely not identical to ours, but comparing them at the same angle like this definitely convinced us there’s plenty of charm to unlock here.
We also came across another duplex a couple blocks away that helped us “see” how ours might fit into town once we fix it up. Picture this one with mint green shutters and doors like this – or maybe wood doors and these shutters? Or maybe this color for the shutters? Please stand by as we flip flop more than Sherry’s sticky flip flops trying to make it out of that bedroom. It was like human flypaper, folks.
Unlike the house above, which appears to have its original decorative details (how awesome is that ornate trim under the porch ceiling?!) we learned that the decorative trim on our house is far from original and was probably added pretty recently – especially the wagon wheels) so we’re thinking that’ll go. But we do have those cool diamond windows in the middle which, get this, are currently covered over with plywood inside (!!!) to make for more closet space. No way those things are staying covered up!
So there’s the rundown. We’ll share a lot more info, photos, and videos as we go, and a big thank you to everyone who was so excited and encouraging about this news yesterday. We still feel a little bit like we’ve lost our minds, but your enthusiasm (and shouts of “you’re crazy… but I’m into it!” brought big smiles to our faces). So when our eyes are crossed from a month straight of tiling double the bathrooms and kitchens I want you to lean in real close and whisper “I told you you were crazy.”
The post A Tour Of Our New Beach Duplex! appeared first on Young House Love.
A Tour Of Our New Beach Duplex! published first on http://ift.tt/2r6hzQy
0 notes
Text
6 Kitchen Layout Ideas for Homes of Any Size
From L-shaped or galley to an island kitchen, use these ideas to choose which kitchen layout is best for your home
Kitchens are tight spaces, so, it helps to thoroughly plan every square foot before starting a remodel. Kitchens also are complex spaces where many elements must meet code. Supply and drain pipes compete with wires, ducts, and cabinets. The kitchen is not the place for last-minute, informal planning. Where should you start when considering different designs and ideas for kitchen layouts?
Simply: homeowners should consider using the most common layouts found in kitchens. There are many benefits of starting with a tried-and-true layout in your kitchen: smooth traffic flow, and less wasted space. Additionally, kitchen functionalities—sink, stove, fridge, and dishwasher—will end up in sensible places. Ultimately, this saves money for routing plumbing and electrical work (expensive!) Below you’ll find renovations by Sweeten homeowners with kitchen layout inspiration.
Sweeten matches home renovation projects with vetted general contractors, offering advice, support, and up to $50,000 in renovation financial protection—for free.
L-shaped kitchen layout
(Above) Sweeten homeowner Amanda’s renovation
An L-shaped kitchen layout has two counters laid at a 90-degree angle to each other. Often, one counter is longer than the other counter.
The L-shaped kitchen layout usually divides the kitchen activities across the two legs of the L-shape. One leg may have the refrigerator, sink, and dishwasher. The other leg may have the stove or cooktop, plus a majority of the counter space for prep work.
There are many reasons that an L-shaped kitchen layout is a good idea for your home. For one, L-shaped kitchens are flexible enough to fit in kitchens of different sizes. For another, this layout lends itself perfectly to the concept of the kitchen triangle. With this, the sink, stove, and fridge are arranged in a triangle for better workflow.
PROS
Flexible, works for many kitchens
Good use of the kitchen triangle
CONS
Large kitchens can get too spread out
Difficult to find space for counter eating
U-shaped kitchen layout
(Above) Sweeten homeowners Tracey + Brian’s renovation
A U-shaped kitchen layout expands the L-shaped layout by adding an extra wing. Instead of two counters, the U-shaped kitchen has three counters arranged like a U.
With the U-shaped kitchen, various functions can be better spaced out than with the L-shaped layout. So, the leg of the L-shape that has the fridge, sink, and dishwasher can be broken up. The U-shaped kitchen’s third leg might contain the fridge.
For a U-shaped kitchen, you’ll need to have enough floor space available, but not too much. If the space is too small, the kitchen is cramped. If it’s too large, it takes longer to walk from one area to another. The National Kitchen + Bath Association recommends that no leg of the work triangle be less than 4 feet or more than 9 feet.
PROS
Utilizes the third wall
Spreads out kitchen services
CONS
Difficulty correctly sizing the kitchen
Center must be kept free of obstacles
One-wall kitchen layout
(Above) Sweeten homeowner Sarah’s renovation project
With the one-wall kitchen layout, all of the kitchen tasks are combined in a single counter against one wall.
Since they are all are in a line, design is mainly a matter of deciding the order of the functionalities. Usually, the sink and dishwasher are next to each other to share the water supply and drain lines.
Of the 6 kitchen layout ideas, the U-shape works perfectly for smaller homes such as condos or apartments. However, you’ll want to keep the layout fairly short. This avoids too much movement from one end to the other end.
PROS
Squeezes kitchen into tiny space
Keeps plumbing and electrical in one area
CONS
Too much walking if the layout is long
Little counter space
Galley kitchen layout
(Above) Sweeten homeowners Sheilaja + Sergio’s renovation
Galley kitchens have two counters that run parallel to each other. The counters are divided by a single aisle. Galley kitchens’ namesake is the kitchen found on boats. True to the inspiration, the aisle is usually narrow.
With galley kitchens, often one leg is devoted to the stove or cooktop and counter space. The other leg is usually the home’s exterior wall and has the sink, dishwasher, and refrigerator.
Galley kitchens do a great job of confining the workflow to a tight space. Just make sure that the cabinet, fridge, dishwasher, and oven doors don’t conflict with each other.
PROS
Tucks kitchen away, off to the side
Short traffic pattern
CONS
Poor layout for multiple people in the kitchen
Doors may conflict or open into each other
Island kitchen layout
(Above) Sweeten homeowners Tina + Fletcher’s renovation
An island kitchen layout combines a kitchen island with other layouts. These may be an L-shaped, U-shaped, or one-wall kitchen layout. The kitchen island is separate from the main counter area.
Many kitchen islands are counters only, with no water or cooking action. If a service is added to the island, it’s usually a cooktop. Large island kitchens may have a cooktop and a second sink for prep work.
Kitchen islands may be used less frequently than the owner had originally imagined. So, it helps to add one of those services as a magnet. Or, some homeowners extend one end of the island for use as an eating bar.
PROS
Additional counter space
Less expensive (you can even use a mobile island)
CONS
Difficult to bring water supply and drainage to an island
Takes up a lot of space, so a large kitchen is required
Peninsula kitchen layout
(Above) Sweeten homeowners Dalal + Frans’ renovation
A peninsula kitchen layout is a U-shaped layout that has a counter extension. Located at either end of the U shape, the extension partially juts into the kitchen. The result is generally a G-shape.
This kitchen usually retains its activities in its U-shaped section. The extension then becomes a breakfast bar or eating counter.
The outer part of the extension can take two or three chairs for eating. The inner (kitchen side) is less functional. Most of it becomes a blind-corner cabinet that’s difficult for storing items. One solution is to install a lazy-susan, swing-out, or pull-out in that corner.
PROS
Utilizes the end of a run of cabinets
Room for eating saves on the need for chairs and table
CONS
Creates another blind-corner cabinet
Short counter
No matter the size of your home, there’s a kitchen layout that’ll fit the space. Keep in mind the kitchen activities that are important to your lifestyle, plot the best layout and flow, and get ready for your dream cook space.
Ready to find an experienced, vetted contractor to bring your kitchen remodel plans to life?
—
Want to see these kitchen layout ideas in action? See an L-shaped Brooklyn Heights kitchen, a galley kitchen in Forest Hills, a one-wall kitchen in LIC.
ADUs or accessory dwelling units can transform into home offices, living space for family or as a rental, or a retreat.
Sweeten handpicks the best general contractors to match each project’s location, budget, scope, and style. Follow the blog, Sweeten Stories, for renovation ideas and inspiration and when you’re ready to renovate, start your renovation with Sweeten.

Source link
from CIVICLO Construction & Interior https://civilco.construction/6-kitchen-layout-ideas-for-homes-of-any-size/
0 notes
Photo
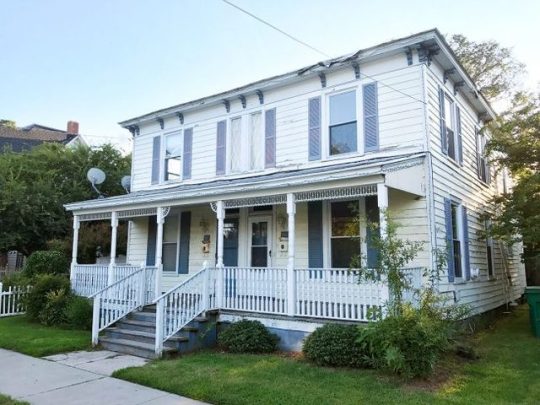
A Tour Of Our New Beach Duplex! http://ift.tt/2hdaQoM
If you haven’t already heard the news: we’re doubling down in the beach house department. And I mean the “double” part quite literally because we lost our minds and bought a DUPLEX!
If you caught our podcast yesterday, you already know the whys, hows, and wheres of this story. The price was right (we even got them down 30K), the location is awesome (close to the park, shops, and a few blocks from the beach), and we didn’t feel like we could ever afford this much house in such a great spot if we waited much longer. This small town only has so many affordable fixer-uppers available before everything gets renovated and we get priced out (we paid $220K for this, which breaks down to $110K per side – which is cheaper than the pink one!).
But there’s lots more of the story in the podcast (you can listen in the player below) including how it took us a few weeks to come around to its charm and how we’re making this all work financially (spoiler: we were able to pay off our mortgage here in Richmond – and we share specifics about exactly how we did that).
But if you just haven’t had a chance to listen yet, here are tons of details, photos, and even two video tours for you. #SoMuchMoreToTile #LonelyToilet #Also,WhoHidesWindows?!
The Basics
This is another historic fixer-upper in the quaint Chesapeake Bay-side town of Cape Charles on Virginia’s Eastern Shore. We talked more about why we’ve fallen hard for Cape Charles back when we shared our pink house purchase last year (and I’ll be calling it the “pink house” in this post for clarity’s sake). Not only is the duplex in the same town as our pink house, it’s actually on the same street – just two doors down!
Yep, our two houses are separated by just one home (the one that was featured on HGTV). This street was a big part of why we bought the pink house thanks to its proximity to the shops/park/beach, so location was also a HUGE reason that we were attracted to the duplex.
We’ve always known the pink house wouldn’t be our last big project, but I can’t say we were expecting to dive into another one quite this quickly. But over the months of working on our pink house, we noticed how limited the inventory was for houses in Cape Charles that fit our price range. So the good location and price of this duplex accelerated our plans a little bit – and despite our initial aversions to this house, we just couldn’t fight that feeling anymore. We wanted the dang duplex. Badly.
Beyond just the excitement of another project, the duplex made a lot of practical sense too:
It creates additional vacation rental opportunities. We won’t use this ourselves, so it creates two spaces dedicated solely for renting to others – great for times when we plan to stay at the pink house, but still want to earn rental income.
It accommodates larger groups or pink house overflow. Our pink house is 3 bedrooms (4 if you count the bunk room) but all together, we’re hoping to create 6 bedrooms in the duplex. So groups that can’t squeeze into ol’ pinkie could rent both sides of the duplex instead. We also may use it when our own extended family or friends want to vacation with us, which is pretty handy since it’s so close.
Renovating a duplex can be more efficient. Although we have double the kitchens and baths to redo (oh the tiling! THE TILING!!), many of the big tasks – like replacing the roof/siding, foundation fixes, or landscape updates – are a lot more cost effective and time efficient because we can do them all at once, whereas it may have taken us a few years to fix up two separate houses.
Plus, having already established our go-to contractors in Cape Charles and worked out some of the kinks of the process while doing the pink house, this project seems a LOT less daunting than our first go ’round.
The Before Tour
The duplex is split right down the middle, with each side being a mirror of the other in layout, but NOT in condition, look, or….um…smell. One side smells exactly like the apartment I rented in Queens for a year (and no, that is not a compliment). The home had previously been a long-term rental property but the tenants on both sides moved out earlier this summer before the owner listed it for sale. So let’s start with a video tour of the LEFT SIDE, since it’s the one we previewed in our podcast show notes yesterday. *Note: if you’re viewing through a feed reader, you may need to click through to see the video player.
If you can’t watch the video right now, I’ve got photos below – but first here’s the (shorter) video tour of the RIGHT SIDE, which is in slightly better condition. Oh, and be warned, there’s a smoke detector beep in this one, so if you’ve got a dog who freaks out at the stuff (we’re speaking from experience) you might want to throw on some headphones. *Note: if you’re viewing through a feed reader, you may need to click through to see the video player.
The Left Side
As you saw in the videos, both sides open right into the stairwell. We’re hoping we can open up the wall to the living room to let more natural light into the stairs and make them feel less cramped. You know, sort of like this.
From the doorway, you can step into the living room, which is pretty decently sized. The floors are in better shape than they look, so we know they’ll refinish beautifully (don’t mind that carpet pad that got stuck to them). And see that bubbled part of the ceiling to the left of the fan? That’s a leak with some mold on it. It continues down the wall and there’s actually a hole above that paneling that’s so big you could stick your arm into it. You could but I’m not volunteering.
Beyond the living room is a dining room of sorts, which has a narrow galley kitchen attached to it. Spoiler alert: we will not be keeping that fridge location or the trim color.
The kitchen is in rough shape. It appears to be squeezed into a former side porch area and connects to a small dark hallway in the back with an old water heater and a door that leads to the backyard. So we definitely want to rethink this layout to make it more functional.
Actually we want to tweak the entire downstairs layout so it’s more functional. Sherry mentioned trying to add a bedroom down here in the video, but since recording that we’re brewing another plan that’ll keep all the bedrooms upstairs and result in a larger kitchen, living room, dining room, bathroom, and laundry area down here instead. What’s that old saying? “Your first idea is rarely your best idea.” Truth.
Moving along… there are two bedrooms and one full bath upstairs right now, all of which are off of this little landing at the top of the steps.
The rooms upstairs are surprisingly large, which is why we think there’s gotta be a way to squeeze in a third bedroom (and maybe even a second bathroom) if we reconfigure things. Here’s the front bedroom:
The back bedroom got the same wood paneling treatment as the front bedroom (it’s just painted white) along with the same foam square ceiling panels that have been glued over the actual drywall or plaster. We have a working theory that someone many years ago just disguised problem areas with more and more coverings: wallpaper, foam ceilings panels, fake wood paneling, etc. So who knows what we’ll find behind them, but the pink house has trained us well. I ain’t afraid of no ghosts duplex.
The bathroom sits between the two bedrooms and is, again, remarkably large for the overall size of the house. It’s also shaped like a weirdly long triangle, which is why we’d love to find a way to split it into two better laid out bathrooms. We’re still sketching alternative floor plan options, so we’ll share those when we land on something we think could work.
Here it is from another angle. Is it bad that I’m actually kinda liking that treatment on the shower doors? It’s like a modesty decal.
The Right Side
While the layout on each side is identical, the look and condition of this side is slightly better. And the living room is keeping things interesting with green and blue trim. Oddly enough it has a ceiling leak along the exterior wall just like the other side, but it’s right out of frame in the shot below.
This side also sports a fridge just hanging out in the dining room, and some faux greenery (you know Sherry loves a faux plant or ten).
Upstairs is where things get sticky. And I mean that literally. The floors up here have a thin layer of adhesive that grabs your shoes with every step. It appears to be from some vinyl tiles that got peeled up, but the stickiness suspiciously continues ON TOP of the remaining vinyl tiles. Layers upon layers upon layers, guys. It’s a theme.
I personally have not even walked fully into this room yet because it’s so sticky. Sherry’s a braver person than me, but it basically ripped her flip-flops apart when she first toured this house with the realtor. She described it as hilarious for the first minute and then just plain savage as she fought to flip and flop her way outta there without getting glue all over her feet.
The stickiness stops at the back bedroom thanks to the carpet. And I can’t say I hate the wall color in here. It’s kind of a moody eggplant. But as you can see in the video, we think there’s some rot/moisture damage behind the foam ceiling panels and the fake wood paneling – but on the bright since there’s also a brick chimney hiding in one corner, so we’re hoping to expose it when we peel off all of the various other coverings.
The bathroom on this side actually has a clawfoot tub in it. Were we not in the midst of fixing up our tub in the pink house already, I’d be tempted to steal this one for that house since it’s in much better condition to start. Both this bathroom (and the one on the other side) are so large and oddly shaped you could drop a 5 x 7′ rug on the floor and it wouldn’t touch anything. It’s like a skating rink of space that’s not being used. So again, the name of the game is to bring this place back to its former glory, strip away all of the strange add-ons that hide/cover various things, and reconfigure things so they make a little more sense and are hopefully a lot more like how this house was laid out originally.
I’ll end this tour with the view looking back down the stairs at the front door (don’t mind the mylar “Happy Birthday” balloon that lives on this side of the house – it’s like a less sinister version of the red Pennywise balloon). Picture the left side of the stairway wall taken down so that it opens into the living room (again, sort of like this). Our contractor thinks we can do it so we’re itching to get started.
The Plan
Right now we’re in the excitement / daydreaming phase of this renovation. We don’t have any immediate plans to start knocking down walls yet since we’re trying to wrap up a few things on the pink house first (it’s so close to being done we can taste it!). But as you can tell, we’re certainly deep into brainstorming what this house COULD look like and how we could give it all the love it needs. Because it needs some serious love. And also some serious deodorizing. No one is sure of the exact year this was built (one local historian guessed the 1880’s, which might be a stretch, but we know it’s at least 100 years old) and it has certainly seen some things over the years.
We plan to work with the same contractor we have used on the pink house (he’s already brainstorming floorpans with us!) since we’ll need to do a lot of the same whole-house updates we did to the pink house: all new plumbing & electrical, new HVAC system, new roof & siding… THE WORKS. But our main decisions at the offset are: (1) how do we maximize the floorplan and (2) how do we make the front more attractive.
Sherry found this inspiration photo online and it’s definitely not identical to ours, but comparing them at the same angle like this definitely convinced us there’s plenty of charm to unlock here.
We also came across another duplex a couple blocks away that helped us “see” how ours might fit into town once we fix it up. Picture this one with mint green shutters and doors like this – or maybe wood doors and these shutters? Or maybe this color for the shutters? Please stand by as we flip flop more than Sherry’s sticky flip flops trying to make it out of that bedroom. It was like human flypaper, folks.
Unlike the house above, which appears to have its original decorative details (how awesome is that ornate trim under the porch ceiling?!) we learned that the decorative trim on our house is far from original and was probably added pretty recently – especially the wagon wheels) so we’re thinking that’ll go. But we do have those cool diamond windows in the middle which, get this, are currently covered over with plywood inside (!!!) to make for more closet space. No way those things are staying covered up!
So there’s the rundown. We’ll share a lot more info, photos, and videos as we go, and a big thank you to everyone who was so excited and encouraging about this news yesterday. We still feel a little bit like we’ve lost our minds, but your enthusiasm (and shouts of “you’re crazy… but I’m into it!” brought big smiles to our faces). So when our eyes are crossed from a month straight of tiling double the bathrooms and kitchens I want you to lean in real close and whisper “I told you you were crazy.”
The post A Tour Of Our New Beach Duplex! appeared first on Young House Love.
0 notes
Text
A Tour Of Our New Beach Duplex!
If you haven’t already heard the news: we’re doubling down in the beach house department. And I mean the “double” part quite literally because we lost our minds and bought a DUPLEX!
If you caught our podcast yesterday, you already know the whys, hows, and wheres of this story. The price was right (we even got them down 30K), the location is awesome (close to the park, shops, and a few blocks from the beach), and we didn’t feel like we could ever afford this much house in such a great spot if we waited much longer. This small town only has so many affordable fixer-uppers available before everything gets renovated and we get priced out (we paid $220K for this, which breaks down to $110K per side – which is cheaper than the pink one!).
But there’s lots more of the story in the podcast (you can listen in the player below) including how it took us a few weeks to come around to its charm and how we’re making this all work financially (spoiler: we were able to pay off our mortgage here in Richmond – and we share specifics about exactly how we did that).
But if you just haven’t had a chance to listen yet, here are tons of details, photos, and even two video tours for you. #SoMuchMoreToTile #LonelyToilet #Also,WhoHidesWindows?!
The Basics
This is another historic fixer-upper in the quaint Chesapeake Bay-side town of Cape Charles on Virginia’s Eastern Shore. We talked more about why we’ve fallen hard for Cape Charles back when we shared our pink house purchase last year (and I’ll be calling it the “pink house” in this post for clarity’s sake). Not only is the duplex in the same town as our pink house, it’s actually on the same street – just two doors down!
Yep, our two houses are separated by just one home (the one that was featured on HGTV). This street was a big part of why we bought the pink house thanks to its proximity to the shops/park/beach, so location was also a HUGE reason that we were attracted to the duplex.
We’ve always known the pink house wouldn’t be our last big project, but I can’t say we were expecting to dive into another one quite this quickly. But over the months of working on our pink house, we noticed how limited the inventory was for houses in Cape Charles that fit our price range. So the good location and price of this duplex accelerated our plans a little bit – and despite our initial aversions to this house, we just couldn’t fight that feeling anymore. We wanted the dang duplex. Badly.
Beyond just the excitement of another project, the duplex made a lot of practical sense too:
It creates additional vacation rental opportunities. We won’t use this ourselves, so it creates two spaces dedicated solely for renting to others – great for times when we plan to stay at the pink house, but still want to earn rental income.
It accommodates larger groups or pink house overflow. Our pink house is 3 bedrooms (4 if you count the bunk room) but all together, we’re hoping to create 6 bedrooms in the duplex. So groups that can’t squeeze into ol’ pinkie could rent both sides of the duplex instead. We also may use it when our own extended family or friends want to vacation with us, which is pretty handy since it’s so close.
Renovating a duplex can be more efficient. Although we have double the kitchens and baths to redo (oh the tiling! THE TILING!!), many of the big tasks – like replacing the roof/siding, foundation fixes, or landscape updates – are a lot more cost effective and time efficient because we can do them all at once, whereas it may have taken us a few years to fix up two separate houses.
Plus, having already established our go-to contractors in Cape Charles and worked out some of the kinks of the process while doing the pink house, this project seems a LOT less daunting than our first go ’round.
The Before Tour
The duplex is split right down the middle, with each side being a mirror of the other in layout, but NOT in condition, look, or….um…smell. One side smells exactly like the apartment I rented in Queens for a year (and no, that is not a compliment). The home had previously been a long-term rental property but the tenants on both sides moved out earlier this summer before the owner listed it for sale. So let’s start with a video tour of the LEFT SIDE, since it’s the one we previewed in our podcast show notes yesterday. *Note: if you’re viewing through a feed reader, you may need to click through to see the video player.
If you can’t watch the video right now, I’ve got photos below – but first here’s the (shorter) video tour of the RIGHT SIDE, which is in slightly better condition. Oh, and be warned, there’s a smoke detector beep in this one, so if you’ve got a dog who freaks out at the stuff (we’re speaking from experience) you might want to throw on some headphones. *Note: if you’re viewing through a feed reader, you may need to click through to see the video player.
The Left Side
As you saw in the videos, both sides open right into the stairwell. We’re hoping we can open up the wall to the living room to let more natural light into the stairs and make them feel less cramped. You know, sort of like this.
From the doorway, you can step into the living room, which is pretty decently sized. The floors are in better shape than they look, so we know they’ll refinish beautifully (don’t mind that carpet pad that got stuck to them). And see that bubbled part of the ceiling to the left of the fan? That’s a leak with some mold on it. It continues down the wall and there’s actually a hole above that paneling that’s so big you could stick your arm into it. You could but I’m not volunteering.
Beyond the living room is a dining room of sorts, which has a narrow galley kitchen attached to it. Spoiler alert: we will not be keeping that fridge location or the trim color.
The kitchen is in rough shape. It appears to be squeezed into a former side porch area and connects to a small dark hallway in the back with an old water heater and a door that leads to the backyard. So we definitely want to rethink this layout to make it more functional.
Actually we want to tweak the entire downstairs layout so it’s more functional. Sherry mentioned trying to add a bedroom down here in the video, but since recording that we’re brewing another plan that’ll keep all the bedrooms upstairs and result in a larger kitchen, living room, dining room, bathroom, and laundry area down here instead. What’s that old saying? “Your first idea is rarely your best idea.” Truth.
Moving along… there are two bedrooms and one full bath upstairs right now, all of which are off of this little landing at the top of the steps.
The rooms upstairs are surprisingly large, which is why we think there’s gotta be a way to squeeze in a third bedroom (and maybe even a second bathroom) if we reconfigure things. Here’s the front bedroom:
The back bedroom got the same wood paneling treatment as the front bedroom (it’s just painted white) along with the same foam square ceiling panels that have been glued over the actual drywall or plaster. We have a working theory that someone many years ago just disguised problem areas with more and more coverings: wallpaper, foam ceilings panels, fake wood paneling, etc. So who knows what we’ll find behind them, but the pink house has trained us well. I ain’t afraid of no ghosts duplex.
The bathroom sits between the two bedrooms and is, again, remarkably large for the overall size of the house. It’s also shaped like a weirdly long triangle, which is why we’d love to find a way to split it into two better laid out bathrooms. We’re still sketching alternative floor plan options, so we’ll share those when we land on something we think could work.
Here it is from another angle. Is it bad that I’m actually kinda liking that treatment on the shower doors? It’s like a modesty decal.
The Right Side
While the layout on each side is identical, the look and condition of this side is slightly better. And the living room is keeping things interesting with green and blue trim. Oddly enough it has a ceiling leak along the exterior wall just like the other side, but it’s right out of frame in the shot below.
This side also sports a fridge just hanging out in the dining room, and some faux greenery (you know Sherry loves a faux plant or ten).
Upstairs is where things get sticky. And I mean that literally. The floors up here have a thin layer of adhesive that grabs your shoes with every step. It appears to be from some vinyl tiles that got peeled up, but the stickiness suspiciously continues ON TOP of the remaining vinyl tiles. Layers upon layers upon layers, guys. It’s a theme.
I personally have not even walked fully into this room yet because it’s so sticky. Sherry’s a braver person than me, but it basically ripped her flip-flops apart when she first toured this house with the realtor. She described it as hilarious for the first minute and then just plain savage as she fought to flip and flop her way outta there without getting glue all over her feet.
The stickiness stops at the back bedroom thanks to the carpet. And I can’t say I hate the wall color in here. It’s kind of a moody eggplant. But as you can see in the video, we think there’s some rot/moisture damage behind the foam ceiling panels and the fake wood paneling – but on the bright since there’s also a brick chimney hiding in one corner, so we’re hoping to expose it when we peel off all of the various other coverings.
The bathroom on this side actually has a clawfoot tub in it. Were we not in the midst of fixing up our tub in the pink house already, I’d be tempted to steal this one for that house since it’s in much better condition to start. Both this bathroom (and the one on the other side) are so large and oddly shaped you could drop a 5 x 7′ rug on the floor and it wouldn’t touch anything. It’s like a skating rink of space that’s not being used. So again, the name of the game is to bring this place back to its former glory, strip away all of the strange add-ons that hide/cover various things, and reconfigure things so they make a little more sense and are hopefully a lot more like how this house was laid out originally.
I’ll end this tour with the view looking back down the stairs at the front door (don’t mind the mylar “Happy Birthday” balloon that lives on this side of the house – it’s like a less sinister version of the red Pennywise balloon). Picture the left side of the stairway wall taken down so that it opens into the living room (again, sort of like this). Our contractor thinks we can do it so we’re itching to get started.
The Plan
Right now we’re in the excitement / daydreaming phase of this renovation. We don’t have any immediate plans to start knocking down walls yet since we’re trying to wrap up a few things on the pink house first (it’s so close to being done we can taste it!). But as you can tell, we’re certainly deep into brainstorming what this house COULD look like and how we could give it all the love it needs. Because it needs some serious love. And also some serious deodorizing. No one is sure of the exact year this was built (one local historian guessed the 1880’s, which might be a stretch, but we know it’s at least 100 years old) and it has certainly seen some things over the years.
We plan to work with the same contractor we have used on the pink house (he’s already brainstorming floorpans with us!) since we’ll need to do a lot of the same whole-house updates we did to the pink house: all new plumbing & electrical, new HVAC system, new roof & siding… THE WORKS. But our main decisions at the offset are: (1) how do we maximize the floorplan and (2) how do we make the front more attractive.
Sherry found this inspiration photo online and it’s definitely not identical to ours, but comparing them at the same angle like this definitely convinced us there’s plenty of charm to unlock here.
We also came across another duplex a couple blocks away that helped us “see” how ours might fit into town once we fix it up. Picture this one with mint green shutters and doors like this – or maybe wood doors and these shutters? Or maybe this color for the shutters? Please stand by as we flip flop more than Sherry’s sticky flip flops trying to make it out of that bedroom. It was like human flypaper, folks.
Unlike the house above, which appears to have its original decorative details (how awesome is that ornate trim under the porch ceiling?!) we learned that the decorative trim on our house is far from original and was probably added pretty recently – especially the wagon wheels) so we’re thinking that’ll go. But we do have those cool diamond windows in the middle which, get this, are currently covered over with plywood inside (!!!) to make for more closet space. No way those things are staying covered up!
So there’s the rundown. We’ll share a lot more info, photos, and videos as we go, and a big thank you to everyone who was so excited and encouraging about this news yesterday. We still feel a little bit like we’ve lost our minds, but your enthusiasm (and shouts of “you’re crazy… but I’m into it!” brought big smiles to our faces). So when our eyes are crossed from a month straight of tiling double the bathrooms and kitchens I want you to lean in real close and whisper “I told you you were crazy.”
The post A Tour Of Our New Beach Duplex! appeared first on Young House Love.
A Tour Of Our New Beach Duplex! published first on http://ift.tt/2uiWrIt
0 notes
Text
A Tour Of Our New Beach Duplex!
If you haven’t already heard the news: we’re doubling down in the beach house department. And I mean the “double” part quite literally because we lost our minds and bought a DUPLEX!
If you caught our podcast yesterday, you already know the whys, hows, and wheres of this story. The price was right (we even got them down 30K), the location is awesome (close to the park, shops, and a few blocks from the beach), and we didn’t feel like we could ever afford this much house in such a great spot if we waited much longer. This small town only has so many affordable fixer-uppers available before everything gets renovated and we get priced out (we paid $220K for this, which breaks down to $110K per side – which is cheaper than the pink one!).
But there’s lots more of the story in the podcast (you can listen in the player below) including how it took us a few weeks to come around to its charm and how we’re making this all work financially (spoiler: we were able to pay off our mortgage here in Richmond – and we share specifics about exactly how we did that).
But if you just haven’t had a chance to listen yet, here are tons of details, photos, and even two video tours for you. #SoMuchMoreToTile #LonelyToilet #Also,WhoHidesWindows?!
The Basics
This is another historic fixer-upper in the quaint Chesapeake Bay-side town of Cape Charles on Virginia’s Eastern Shore. We talked more about why we’ve fallen hard for Cape Charles back when we shared our pink house purchase last year (and I’ll be calling it the “pink house” in this post for clarity’s sake). Not only is the duplex in the same town as our pink house, it’s actually on the same street – just two doors down!
Yep, our two houses are separated by just one home (the one that was featured on HGTV). This street was a big part of why we bought the pink house thanks to its proximity to the shops/park/beach, so location was also a HUGE reason that we were attracted to the duplex.
We’ve always known the pink house wouldn’t be our last big project, but I can’t say we were expecting to dive into another one quite this quickly. But over the months of working on our pink house, we noticed how limited the inventory was for houses in Cape Charles that fit our price range. So the good location and price of this duplex accelerated our plans a little bit – and despite our initial aversions to this house, we just couldn’t fight that feeling anymore. We wanted the dang duplex. Badly.
Beyond just the excitement of another project, the duplex made a lot of practical sense too:
It creates additional vacation rental opportunities. We won’t use this ourselves, so it creates two spaces dedicated solely for renting to others – great for times when we plan to stay at the pink house, but still want to earn rental income.
It accommodates larger groups or pink house overflow. Our pink house is 3 bedrooms (4 if you count the bunk room) but all together, we’re hoping to create 6 bedrooms in the duplex. So groups that can’t squeeze into ol’ pinkie could rent both sides of the duplex instead. We also may use it when our own extended family or friends want to vacation with us, which is pretty handy since it’s so close.
Renovating a duplex can be more efficient. Although we have double the kitchens and baths to redo (oh the tiling! THE TILING!!), many of the big tasks – like replacing the roof/siding, foundation fixes, or landscape updates – are a lot more cost effective and time efficient because we can do them all at once, whereas it may have taken us a few years to fix up two separate houses.
Plus, having already established our go-to contractors in Cape Charles and worked out some of the kinks of the process while doing the pink house, this project seems a LOT less daunting than our first go ’round.
The Before Tour
The duplex is split right down the middle, with each side being a mirror of the other in layout, but NOT in condition, look, or….um…smell. One side smells exactly like the apartment I rented in Queens for a year (and no, that is not a compliment). The home had previously been a long-term rental property but the tenants on both sides moved out earlier this summer before the owner listed it for sale. So let’s start with a video tour of the LEFT SIDE, since it’s the one we previewed in our podcast show notes yesterday. *Note: if you’re viewing through a feed reader, you may need to click through to see the video player.
If you can’t watch the video right now, I’ve got photos below – but first here’s the (shorter) video tour of the RIGHT SIDE, which is in slightly better condition. Oh, and be warned, there’s a smoke detector beep in this one, so if you’ve got a dog who freaks out at the stuff (we’re speaking from experience) you might want to throw on some headphones. *Note: if you’re viewing through a feed reader, you may need to click through to see the video player.
The Left Side
As you saw in the videos, both sides open right into the stairwell. We’re hoping we can open up the wall to the living room to let more natural light into the stairs and make them feel less cramped. You know, sort of like this.
From the doorway, you can step into the living room, which is pretty decently sized. The floors are in better shape than they look, so we know they’ll refinish beautifully (don’t mind that carpet pad that got stuck to them). And see that bubbled part of the ceiling to the left of the fan? That’s a leak with some mold on it. It continues down the wall and there’s actually a hole above that paneling that’s so big you could stick your arm into it. You could but I’m not volunteering.
Beyond the living room is a dining room of sorts, which has a narrow galley kitchen attached to it. Spoiler alert: we will not be keeping that fridge location or the trim color.
The kitchen is in rough shape. It appears to be squeezed into a former side porch area and connects to a small dark hallway in the back with an old water heater and a door that leads to the backyard. So we definitely want to rethink this layout to make it more functional.
Actually we want to tweak the entire downstairs layout so it’s more functional. Sherry mentioned trying to add a bedroom down here in the video, but since recording that we’re brewing another plan that’ll keep all the bedrooms upstairs and result in a larger kitchen, living room, dining room, bathroom, and laundry area down here instead. What’s that old saying? “Your first idea is rarely your best idea.” Truth.
Moving along… there are two bedrooms and one full bath upstairs right now, all of which are off of this little landing at the top of the steps.
The rooms upstairs are surprisingly large, which is why we think there’s gotta be a way to squeeze in a third bedroom (and maybe even a second bathroom) if we reconfigure things. Here’s the front bedroom:
The back bedroom got the same wood paneling treatment as the front bedroom (it’s just painted white) along with the same foam square ceiling panels that have been glued over the actual drywall or plaster. We have a working theory that someone many years ago just disguised problem areas with more and more coverings: wallpaper, foam ceilings panels, fake wood paneling, etc. So who knows what we’ll find behind them, but the pink house has trained us well. I ain’t afraid of no ghosts duplex.
The bathroom sits between the two bedrooms and is, again, remarkably large for the overall size of the house. It’s also shaped like a weirdly long triangle, which is why we’d love to find a way to split it into two better laid out bathrooms. We’re still sketching alternative floor plan options, so we’ll share those when we land on something we think could work.
Here it is from another angle. Is it bad that I’m actually kinda liking that treatment on the shower doors? It’s like a modesty decal.
The Right Side
While the layout on each side is identical, the look and condition of this side is slightly better. And the living room is keeping things interesting with green and blue trim. Oddly enough it has a ceiling leak along the exterior wall just like the other side, but it’s right out of frame in the shot below.
This side also sports a fridge just hanging out in the dining room, and some faux greenery (you know Sherry loves a faux plant or ten).
Upstairs is where things get sticky. And I mean that literally. The floors up here have a thin layer of adhesive that grabs your shoes with every step. It appears to be from some vinyl tiles that got peeled up, but the stickiness suspiciously continues ON TOP of the remaining vinyl tiles. Layers upon layers upon layers, guys. It’s a theme.
I personally have not even walked fully into this room yet because it’s so sticky. Sherry’s a braver person than me, but it basically ripped her flip-flops apart when she first toured this house with the realtor. She described it as hilarious for the first minute and then just plain savage as she fought to flip and flop her way outta there without getting glue all over her feet.
The stickiness stops at the back bedroom thanks to the carpet. And I can’t say I hate the wall color in here. It’s kind of a moody eggplant. But as you can see in the video, we think there’s some rot/moisture damage behind the foam ceiling panels and the fake wood paneling – but on the bright since there’s also a brick chimney hiding in one corner, so we’re hoping to expose it when we peel off all of the various other coverings.
The bathroom on this side actually has a clawfoot tub in it. Were we not in the midst of fixing up our tub in the pink house already, I’d be tempted to steal this one for that house since it’s in much better condition to start. Both this bathroom (and the one on the other side) are so large and oddly shaped you could drop a 5 x 7′ rug on the floor and it wouldn’t touch anything. It’s like a skating rink of space that’s not being used. So again, the name of the game is to bring this place back to its former glory, strip away all of the strange add-ons that hide/cover various things, and reconfigure things so they make a little more sense and are hopefully a lot more like how this house was laid out originally.
I’ll end this tour with the view looking back down the stairs at the front door (don’t mind the mylar “Happy Birthday” balloon that lives on this side of the house – it’s like a less sinister version of the red Pennywise balloon). Picture the left side of the stairway wall taken down so that it opens into the living room (again, sort of like this). Our contractor thinks we can do it so we’re itching to get started.
The Plan
Right now we’re in the excitement / daydreaming phase of this renovation. We don’t have any immediate plans to start knocking down walls yet since we’re trying to wrap up a few things on the pink house first (it’s so close to being done we can taste it!). But as you can tell, we’re certainly deep into brainstorming what this house COULD look like and how we could give it all the love it needs. Because it needs some serious love. And also some serious deodorizing. No one is sure of the exact year this was built (one local historian guessed the 1880’s, which might be a stretch, but we know it’s at least 100 years old) and it has certainly seen some things over the years.
We plan to work with the same contractor we have used on the pink house (he’s already brainstorming floorpans with us!) since we’ll need to do a lot of the same whole-house updates we did to the pink house: all new plumbing & electrical, new HVAC system, new roof & siding… THE WORKS. But our main decisions at the offset are: (1) how do we maximize the floorplan and (2) how do we make the front more attractive.
Sherry found this inspiration photo online and it’s definitely not identical to ours, but comparing them at the same angle like this definitely convinced us there’s plenty of charm to unlock here.
We also came across another duplex a couple blocks away that helped us “see” how ours might fit into town once we fix it up. Picture this one with mint green shutters and doors like this – or maybe wood doors and these shutters? Or maybe this color for the shutters? Please stand by as we flip flop more than Sherry’s sticky flip flops trying to make it out of that bedroom. It was like human flypaper, folks.
Unlike the house above, which appears to have its original decorative details (how awesome is that ornate trim under the porch ceiling?!) we learned that the decorative trim on our house is far from original and was probably added pretty recently – especially the wagon wheels) so we’re thinking that’ll go. But we do have those cool diamond windows in the middle which, get this, are currently covered over with plywood inside (!!!) to make for more closet space. No way those things are staying covered up!
So there’s the rundown. We’ll share a lot more info, photos, and videos as we go, and a big thank you to everyone who was so excited and encouraging about this news yesterday. We still feel a little bit like we’ve lost our minds, but your enthusiasm (and shouts of “you’re crazy… but I’m into it!” brought big smiles to our faces). So when our eyes are crossed from a month straight of tiling double the bathrooms and kitchens I want you to lean in real close and whisper “I told you you were crazy.”
The post A Tour Of Our New Beach Duplex! appeared first on Young House Love.
0 notes
Last Seen Blogs

philumen8-blog
Untitled

welikethisgame-blog
Hoodie & Batch

nuttoriouz-blog
Nuttoriouz OnTheBeat

askthetriviamurderpartycrew
WELCOME

chelseahotel2004
CONCENTRATE, LITTLE BIRD.