#since i started with the fabric facing the wrong way so the flappy bits would have to be on the outside when done
Text
So you wanna be a king (pt2)
(or at least cosplay one.)
Continuing the cosplay creation saga for anyone interested, here’s how I put together my King Graham cosplay:
Part 2: Jerkin
Disclaimer: I’m totally novice at cosplay and only do it for like one event per year if that, so take what you will or throw it all away.
Also this is not really a step by step tutorial post because this is several years ago and the details are hazy.
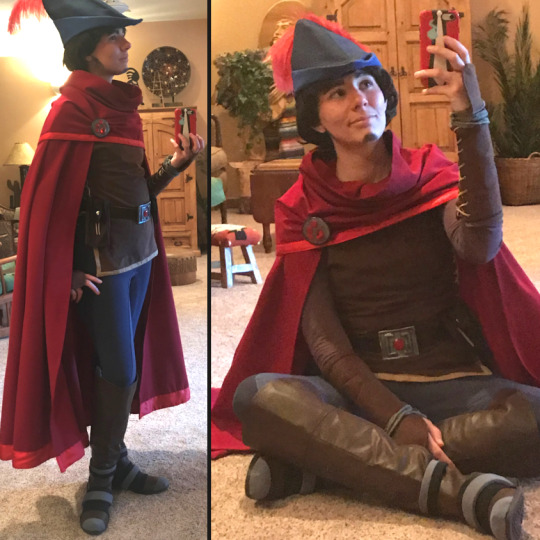
If you’re following along, then you should have a cloak and cowl (click for sort-of-instructions-here).
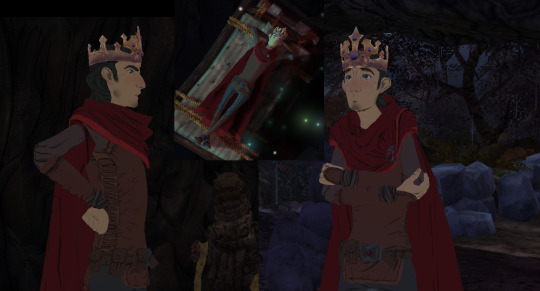
Step one: Pull out those reference screencaps you made in the first part and stare at them. Repeat that you still love this character and that you’re committed to this nonsense. Ready? Let’s go.

The long sleeved purple undershirt I just happened to find at Goodwill. Please try to find something lightweight--this costume is warm.
But you won’t be so lucky to find a jerkin at Goodwill too. You’ll have to make it, or at least modify something.
Still, it’s just an elaborate brown tank top, more or less. You don’t even have to worry about attaching sleeves! Surely this is an eas--wait, what are those lace things? Could you even bend down to pick up inventory items with laces that thick and close together? How can I translate that into something semi-practical I can wear without wanting to eat my adventuring hat?

It’s a great design, but I’m mortal, not digital. If you can determine a simple way to get that lacing to look accurate while still being comfortably wearable, let me, novice cosplayer that I am, know. (maybe if they were just made separately, flat, and sewn on, like a decal thing?)
I had planned on building this out of fake leather/suede-ish material, but then I remembered I wanted to also wear this as my new RenFest costume, and I didn’t want to die in July.
So I went to my local Joann’s and picked up a considerably lighter, thinner, and satisfactorily rich looking brown fabric (I think it was this stuff: https://www.joann.com/kona-cotton-solid-quilt-fabric/1378397.html) for both jerkin and bracers. I’ve lost the original receipt, so I’m not sure how much I bought. Too much, because my storage bin is full of leftovers. I’m sure 3 yards is more than plenty, but measure to be sure.

Tunic time!
This is the point where the “How To Graham” tutorial breaks down and becomes especially fuzzy and experimental, because I kept none of my in-process notes. High five, Gerbil, very helpful indeed. You might just want to glance at this for ideas before doing your own thing.
I laugh in the face of patterns, hahahaha. (bad idea, don’t be me.)
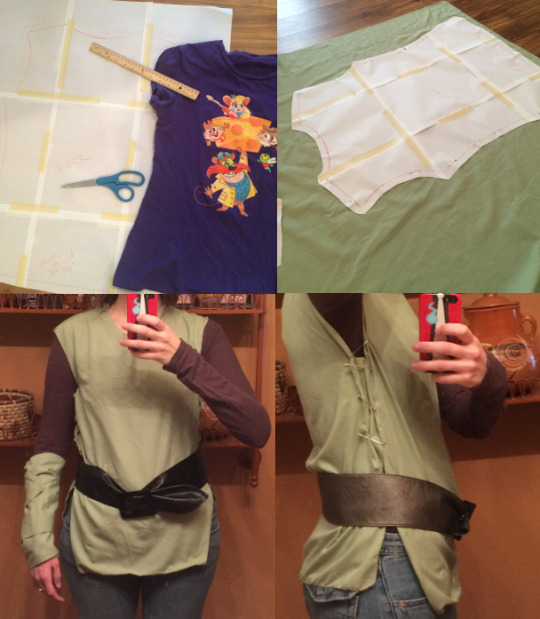
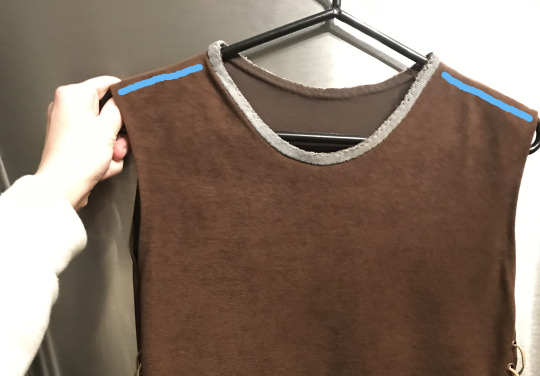
I got my favorite fitted t-shirt (Disney Afternoon ftw), paper, a ruler, and old scrap fabric to maul as practice. I pinned my shirt flat to paper and traced both the front and back separately (folded the sleeves in so my tracework was sleeveless). The front had a deeper neckline but was otherwise nearly identical to its back partner. Once both sides were traced, I added a half inch margin around them, cut them out, and started working on fake jerkins, so I could sculpt the right fit before I got out the nice fabric. I wanted the jerkin to be pretty form fitting as Graham’s is, so I curved the sides in a bit deeper.
I made at least two fake jerkins, fyi.
Since I went pattern-less (hahahaarrgh), tests were crucial, especially regarding the neck hole. The t-shirt is elastic, but my fabric is not. I personally require at least 22″ around the neck to get the thing over my nose, and it’s barely enough clearance. (I’m fairly certain I measured some other shirts with my fabric ruler for a loose size to aim for, then did edits on the junk fabric til I had a size that worked.)
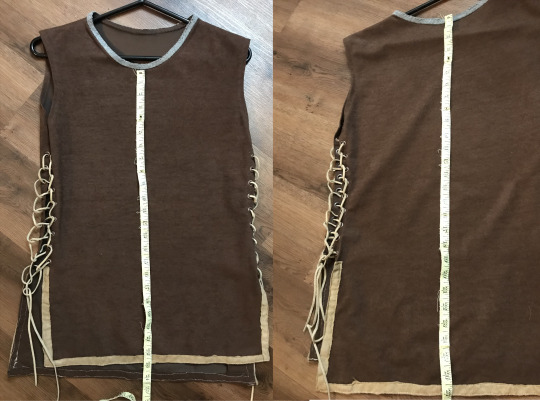
Tests also showed that the back piece needed an additional two and a half inches of fabric on the bottom thanks to how it sits on my shoulders. In the above image, you can see the green fabric is higher, but I wanted the piece to look balanced from the side.
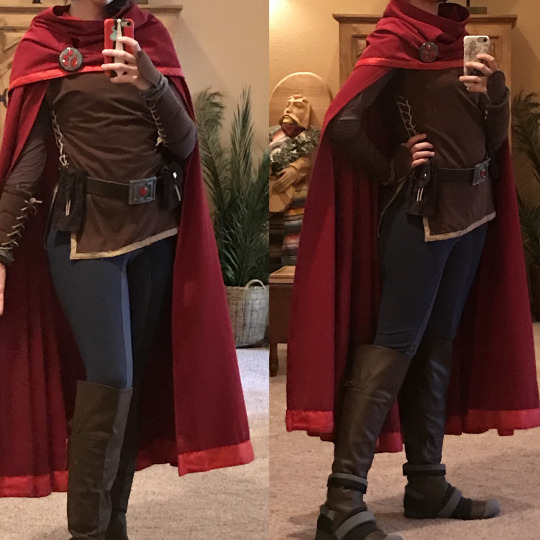
It’s a touch hard to see as it’s usually hidden by the cloak, but I find a balanced jerkin is a happy jerkin.

And here’s that additional fabric without a human in it. (ack don’t look at my uneven stitches)
By now, you should have a belt (in my method it doesn’t matter how it clasps, so pick any belt you please as you’ll be wearing it backward) so you can determine how long the flappy things on the front and back should be. Where your belt sits comfortably is where your side laces will stop and your trim on the flap things will start--the belt hides the transition.
Graham’s belt sits low on his (fantastically defined) hips. I prefer it on my waist so it doesn’t slide up when I’m walking, so my flap things are longer than his. For reference, my flap things...no, wait, there must be a technical term....Google says it’s a peplum. My peplum (??) are 8″ish long, though his look like they’re about half that.
For reference, as a 5′6″ person, from hanger to hem my jerkin’s back piece is approximately 28″ long. The most important things here are how long it is overall, and if the neck hole is big enough to fit over your head: nearly everything else can be altered when wearing it via the lacework I have planned.
Look, at this point, you might want to give up on me and find a real shirt pattern, fitted or not. I understand. I’ll wait. This isn’t actually a step by step tutorial so much as a vague What I Did And It’s Probably Wrong.
Okay, you’ve traced your favorite shirt (or bought a real pattern like a good person). Your tests have shown that your peplum sit at the same height on your leg, and you like the shape and feel of it when you wear your scrap fabric test (I recommend using safety pins to replicate the laces during the early size test phase). You’ve cut out the front and back shirt shaped pieces of brown fabric (with that half inch hem margin all around), and now they’re sitting on your floor, mocking you.
The actual construction part!
The only attachment you’ll give these pieces is via the shoulders. If you’re new to this Making Your Own Clothes thing and your fabric has a nice side and a not nice side, put the nice sides against each other and sew along the not nice side so when you turn it over your hem is inside.
I seam-ripped a collar from a shirt I loved but was too worn to wear otherwise--no math or sewing your own collar from scratch if you swipe it from another shirt. No one will ever see it since your cowl tucks into it, so it doesn’t matter how it looks, though natural colors are better than, say, blue, in case your cowl slips a bit. There are lots of lovely videos about attaching collars: this one seems nice, if you skip ahead to the actual sewing-on part at 4:50. https://www.youtube.com/watch?v=k31FWDp1s5I

At this point, since you’ve fitted it and trimmed it and done all that you want to it to get the shape you like, you’ll want to hem your shirt by that half inch margin all around so it’s clean and easy for the next part. It only looks vaguely shirt-like now since it’s held together just by the shoulders.
Now, let’s get medieval on it.
Time for lacing!
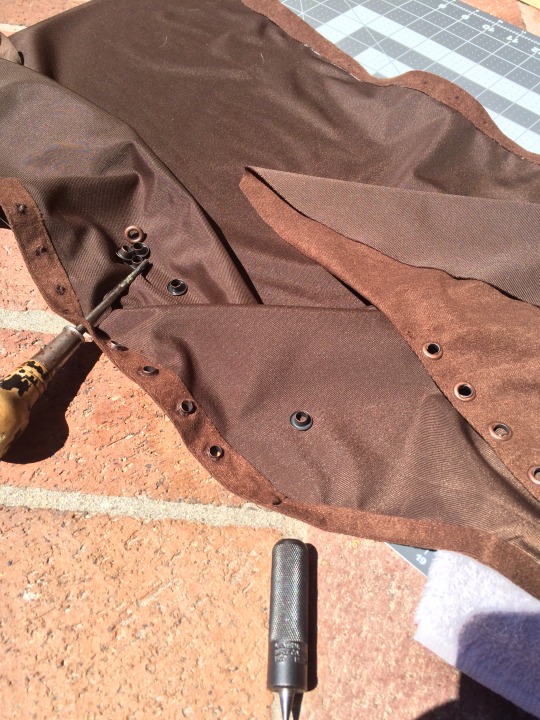
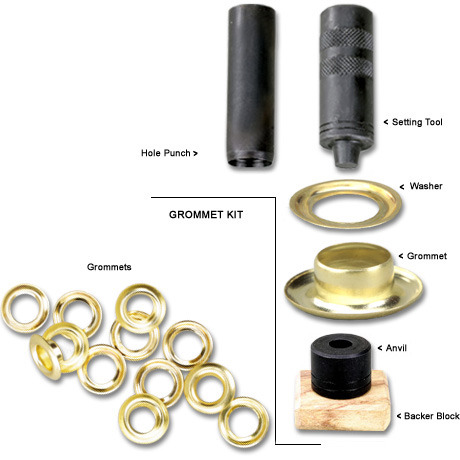
I used a blond suede leather rope to mimic the lighter color on Graham’s sides (check the beading or leather working section of the craft stores, and make sure it’s thick enough that it won’t snap under light strain, and thin enough it’ll fit through the grommet size you select). I already happened to own an anvil (...why?), so I just needed grommets. Mine appear to be 12mm--I got them in Ancient Copper. You’ll use them in the bracers later, too, so leftovers are a good thing for once. Hobby Lobby or Michaels can hook you up with supplies, but Etsy and eBay have more diverse color choices.

Every inch from where the armpit opening stops to where the trim of the peplums begins (the height of which was established earlier when I decided to how to wear the belt), I made a mark for a grommet, and marked its corresponding partner. For reference, I have 9 holes down each hem, for 18 total holes per side, and a grand total 36 grommets in the tunic. I jammed an awl through the holes marked and applied the grommets as per the packet’s instruction.
Like making a metal and fabric sandwich. With a hammer.
It’s totally therapeutic. I can see why Amaya’s into this stuff.
(It’s not a Looney Toons anvil, by the by: like this, instead.)
Unspool the suede rope and thread it through the grommets. To try and mimic the game, I use a ladder shoelace tie, starting with the grommet pair beneath the arms and running down until I tie a bow in the last pair. I tuck the loose ends into the waistband of the trousers. So, this: https://www.fieggen.com/shoelace/ladderlacing.htm

Finally, I made (because I couldn’t find to buy) my own trim about 1/2″ wide from some scrap light brown suede in the Joann Scrap Bin, and attached it to the peplum (is this truly a better word than flap, vote now).
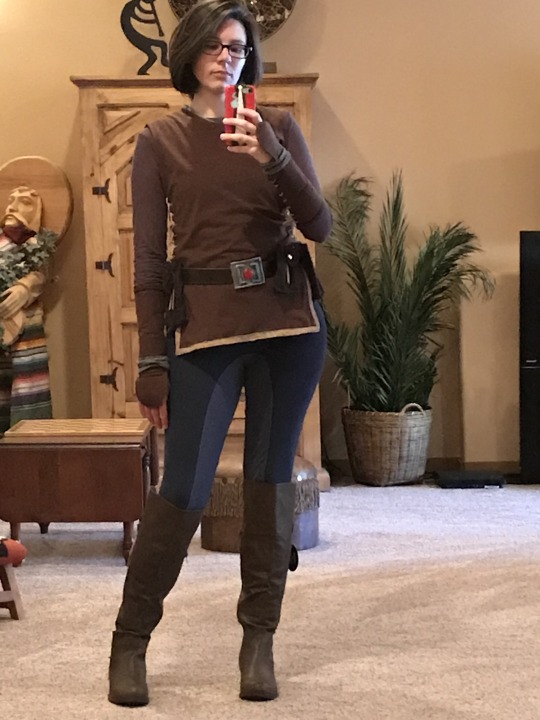
And that, friend, is a jerkin that would make any real medieval person flinch but should be cool for cosplay. You should try it with your cloak and cowl. If you’re following my method, you get to layer up, lucky you: anchor shirt, long-sleeved-purple-undershirt, jerkin, cloak (snaps through the jerkin’s collar onto the anchor shirt), cowl (to cover your shoulders so you don’t see the cloak tugging at your jerkin collar).
Yeah, it’s warm. Sorry.
Drink some water.
When you’re done sweating in it (eww, I know it’s awful, sorry), handwash it. Strip the rope out of the grommets, use handwashing detergent in a (clean!) bathroom sink, then hang it over a bathtub to dry before relacing it using that ladder shoelace technique and storing it on a hanger. I always have it laced, and pull it on over my head with it laced, too.
And with that, you’ve got about half of your entire cosplay done. Congrats! Take some time to relaaaax. You’re gonna be a king.

(is this helpful at all to anyone? should i keep going?)
(peplum?? really????)
#King's Quest#kings quest#King Graham#cosplay#ack i'm sorry this is probably zero help whatsoever#tutorial
21 notes
·
View notes
Last Seen Blogs

inber
how rare and beautiful it is to even exist

paleimitation-if
pale imitation

animegeekprincess-blog
Anime Geek

wickebinetres
demi-h u m a n/e

so-de-laze
warum nicht