#ta-daaaah that's it~ i hope it helped someone~!
Text
So you wanna be a king (pt6)
Or, at the least, you want very much to cosplay one, and you have put too much time and energy into this to stop now. Let’s finish this costume.
Part 6: The Adventuring Cap (and also hair and some makeup)
The rest of the tutorials are here: cloak, tunic, pants/boots, bracers/pouch, accessories, and as always, I’m a novice cosplayer making all this up as I go along, so feel free to ignore me or steal my ideas and run.
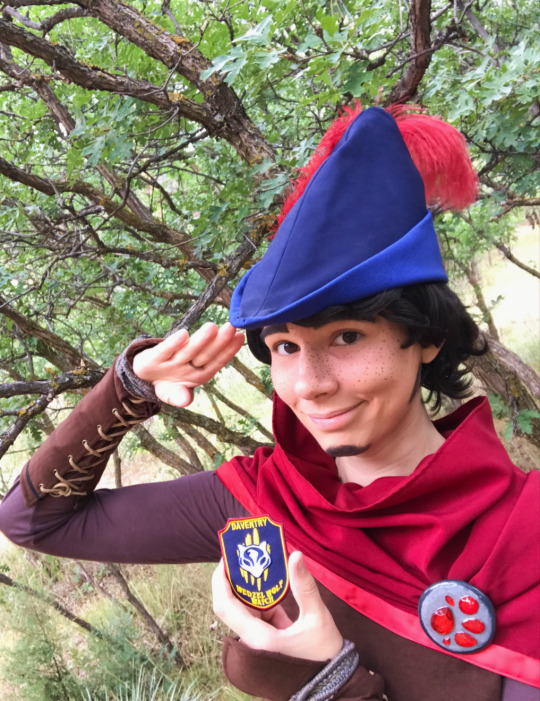
There’s one last piece to this costume. Something important. Something that unifies Graham across the years from 1983 to 2015: his adventuring cap.

Even when he has his crown on, that old hat isn’t far away. So let’s get into it.

But before we can actually start sewing a hat, we need to talk...hair. Because that will probably alter the hat size.
Hair (and also make-up):
Should you be blessed with the slightly curly black hair Graham has, then that’s fantastic!
I do not have such hair.
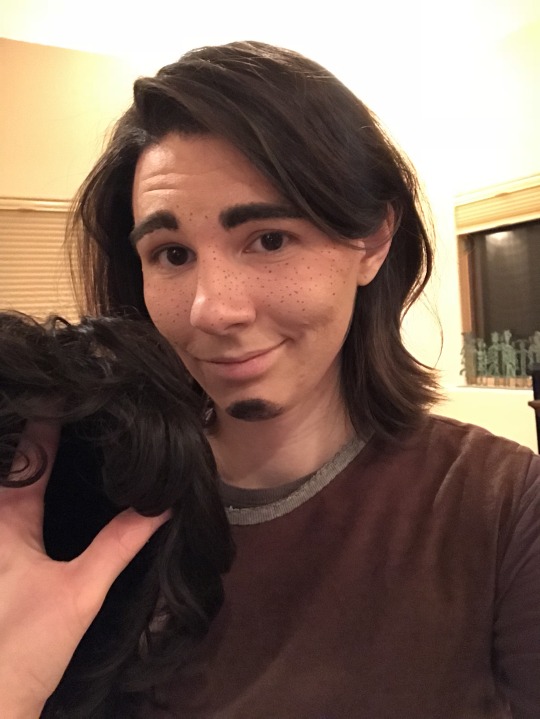
You remember how hot this costume is? At least three shirts, one and a half pants, a cloak, a cowl, bracers, and knee high boots? Let’s make it worse by adding a wig.
I buy all my wigs from Arda Wigs--I love that quality and those nice prices. I’m the sort of person who pulls the wig out of the bag, fluffs it up with hairspray (got2b glued is a miracle in a can), and runs, but should you want to try heat sculpting, they’re great wigs for that too.
Since I’m revealing all my secrets, this particular wig is a Benny in Deep Brown (when I bought it it was called Natural Black, but I think it’s the same color). It’s warmer than their pure black, which I wanted for this sunshine boy. https://arda-wigs.com/products/benny-classic?variant=27836199174

Incidentally, while we’re here, some quick make-up things:
If you can’t grow your own beard, spray some hairspray on your chin and sideburn patches, take an old tube of mascara (the older and weaker the more control you have--gosh that sounds mean), and build up your own with downward brush strokes. A little goes a shockingly long way--I tend to overdo it myself. Use an eyebrow wand brush to shape the beard and make it look more natural. Seal with more hairspray, maybe a touch of setting powder.
For the freckles, I smear a thin layer of eyeshadow primer across nose and cheekbones, and then go ham with a marker eyeliner in dark brown. Seal it with a touch of setting powder. I promise, it will go absolutely nowhere, even in the hot RenFest July sun, unless you yourself rub it. (I carry both beard and freckles makeup tubes in my pouch, just in case.)

Okay, fine, we’re done stalling. You want the hat, so let’s do it.
Hat time!
First, vocab lesson! Repeat after me: bycocket. That’s the name of your hat. It’s a medieval cap popular among men, women, nobility, and business classes. And also, yes, with Robin Hood too.
http://honorbeforevictory.com/14th-c-embriodered-bycocket-cap-of-maintenance-with-a-split-loop-seam-tutorial/ - I found my template from this page and scaled it up. Other Robin Hood hat tutorials will also likely suit, but this is my semi-tutorial, so this is what I used.
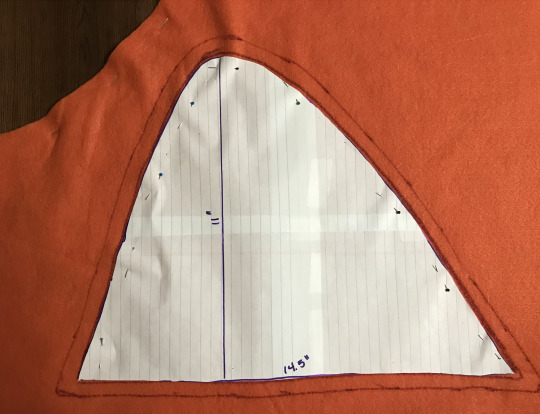
I bought what looks like less than a yard of some light blue denim and some dark blue denim. I wanted the stiffness of the fabric to help hold the triangular shape, thus, the denim. I also happened to have a large quantity of semi-stiff orange felt for some reason, which I used as a core strengthener, but this core is almost certainly unnecessary. The hat keeps its shape really well once it’s on your head--no wonder it was so popular. Feel free to skip the core if you want.
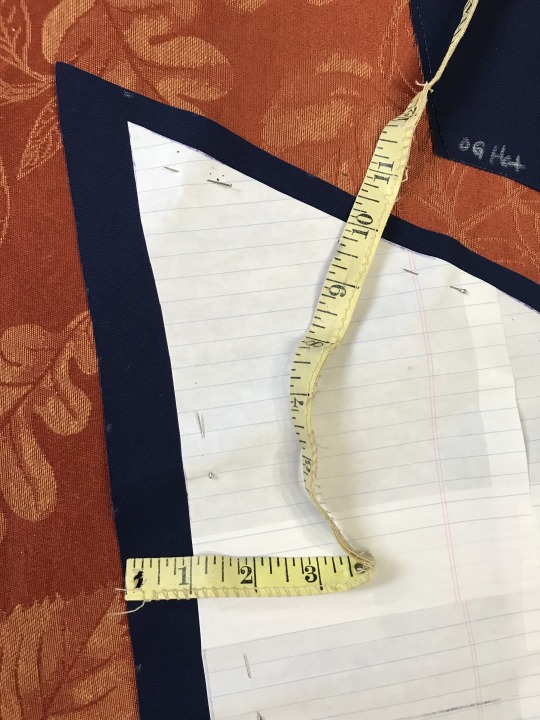
Grab your measuring tape, plonk your wig on your head, and measure where the hat will sit. I got 24″ around. Feel free to make tests with that boundless scrap from the rest of this cosplay to get the size you want. My shape is 14.5″ long, and 11″ from its highest tip to its brim. Don’t forget to add half an inch of hemming space to your pattern (which in my case is made of scraps of paper taped together because I Am Cheap).
Test your samples, adjust the pattern as necessary to make sure you’re happy with the brim length and how it sits.

At this point, I made another one of those choices. For some reason, I intentionally transposed the colors, putting the darker color for the main body and the lighter color for the brim. I don’t know why.
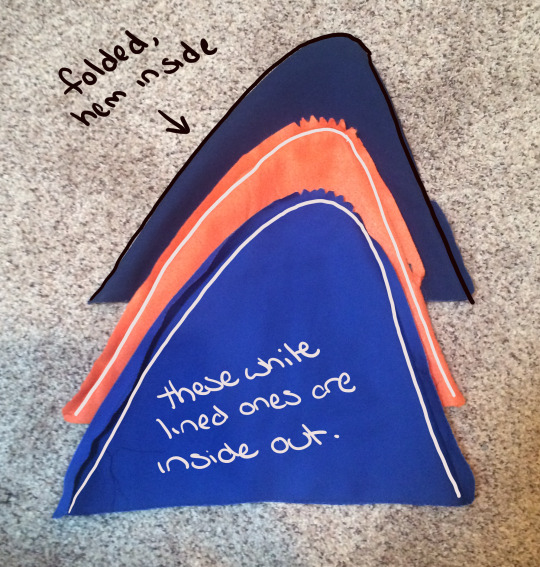
The following tutorial will get confusing if you look only at the colors. I didn’t have a lot of images of the process, and I felt like redoing the hat with the correct color order this week. Because I could. So, ignore the colors as some pictures are old and some are new, and look at the text instead. For reference, all things will be referred to via this image terminology:
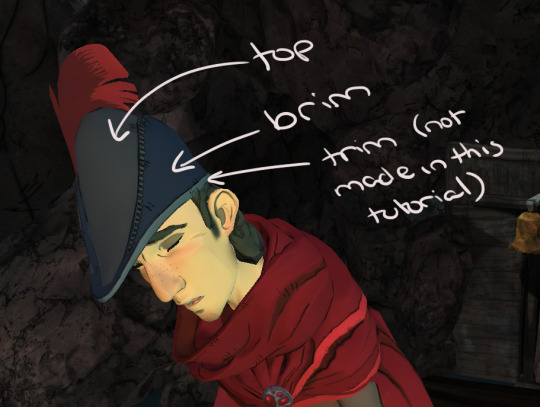
Your top color will be cut exactly to the pattern size you like (with that .5″ hem margin, as usual). Your brim color, however, gets an additional half inch on the bottom, where you wear it. For a visual, like this:
This way, you can fold the brim over the rest of your hat sandwich (...I’ll explain that, hang on), to sew a video-game-clean line.
Cut two identical shapes from each color, not forgetting that extra half inch on the brim bottom pieces. Sew them along the half inch hemline, so that you have two (three if you’re making a core) separate triangles, open at the bottom since that’s, y’know, where your head goes. They’re kinda like little tents.
Take your scissors and cut out tiny triangles close to, but not into, the hem stitch at the top curve, so that you can poke a smooth arc into the top (see visual below). Iron all hems flat. Take your top piece and turn it inside out, with the hem sitting inside. The core (if you’re making one) and your brim will remain inside-out looking, because that’s how you’ll build your hat sandwich.
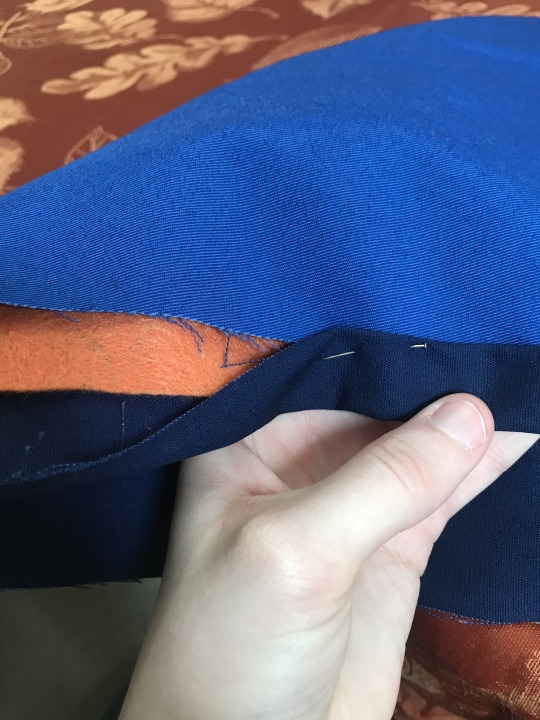
It’ll look like this. I stuffed the core piece inside the top piece, then shoved the brim piece into the core piece. All three pieces are tightly, cleanly, stacked together. It’s a hat sandwich! Stitch the hats together in key places so they don’t shift--like at the top of the arc, and in a few places along the hemlines.
Starting at the hemline in the back, fold the extra half inch from the brim piece up, curl it over itself just a smidge so your line stays nice and clean, pin, and hand stitch the top and brim together.
It’s a bit tricky to get a photo of what it looks like, but once it’s all done and you fold up the brim, the stitches will be hidden, giving you that nice clean edge.

Should you be so inclined, at this point you could get fancy with embroidery (that split loop stitch from the bycocket tutorial is one I eventually want to add), or determine a nice way to add the trim to the brim. Which I haven’t yet so...you’re on your own.
(Incidentally, if you’re in a hurry and you have one fabric choice like a sturdy felt, or maybe you’re doing Ch1Graham and don’t want to deal with this double-color nonsense, you can always go with a single sheet method. Cut the usual two triangles of your single sheet, sew them together like normal, but stop sewing when you get to the fold of the brim. That’s about 4.5″ along the back for me. Turn the whole hat inside out, so the nice hem is along the top, pin and sew the back flap that you had left unstitched, and when you fold up the brim, the ugly hem is hidden inside. A visual example is here:

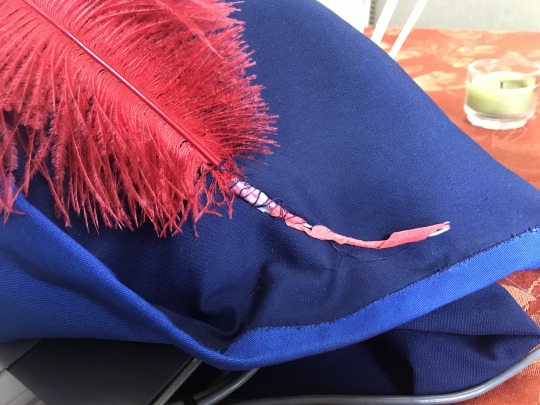
For the feather, I chose an ostrich feather because A: It’s huge and flouncy and bouncy and I like that, and B: ....it’s what the craft store had at the time. Because I figured I’d need to eventually replace it over time and wear, I did loose ugly stitchwork just under the brim, so I can unpick it and replace it as needed.
And with that, my friend, you are A Whole Entire King.
Go memorize some addenda, go act with bravery and compassion and wisdom, go make friends with some squirrels, and please watch out for fairy tale obsessed goblins.
Always seek adventure~!

(And that’s all for the cosplay how to semi-tutorial series! I hope it was helpful! If you have questions, feel free to DM me. I’m happy to help you look your best! At this point, that’s my last post on this topic unless someone asks for how I made the crown. 👑 Let me know if you want that too~)
#King's Quest#kings quest#King Graham#ta-daaaah that's it~ i hope it helped someone~!#cosplay#tutorial
17 notes
·
View notes
Last Seen Blogs

tinyleavesmusic
TINY LEAVES

wuxbis
Wuxbis (What did you expect?)

renovaid
RenovAid

thefrumpingdogs
thefrumpingdogs

sahtesiniz
İsimsiz