#this little girl is like trying to disassemble a skein of yarn??
Text
I simply do not understand why children will see a display and go "I think I need to make a mess of this and break things."
#volunteering to teach 3rd graders on a fieldtrip about fiber stuff#and like three minutes in with the first group#this little girl is like trying to disassemble a skein of yarn??#and then she's just like 'you know what a good idea would be?#what if I took MORE yarn out of the basket.'#had to yell at her like 'PLEASE leave the yarn in the basket (you little fucker)#you can touch but don't pick anything up'#and fifteen minutes in the display fibers were all mixed up??#why did they need to MOVE the fucking sheltie fur#and put the label on the rabbit skin#chaperones really need to just fucking yell at kids and tell them no#like my job is not to tell these kids not to be dumbasses#it's to sit there and crochet and correct all the parents going#'look she's knitting!' idiots. while you're busy misinforming one kid#the other is trying to spill dye on everything#and why the fuck to kids see a sign that says 'do not touch' and be like#'hahahahoohoo I'm gonna touch it. it's opposite day I'm gonna touch it'#swear this is gonna be the year a kid gets their finger torn up by a spinning wheel#teach your damn kids to read and follow signs goddamn#also if they wanted to know WHY they can't touch the spinning wheel#they could literally just ask instead of going 'I'm gonna touch it'
2 notes
·
View notes
Text
How to make a Backdrop for Photography
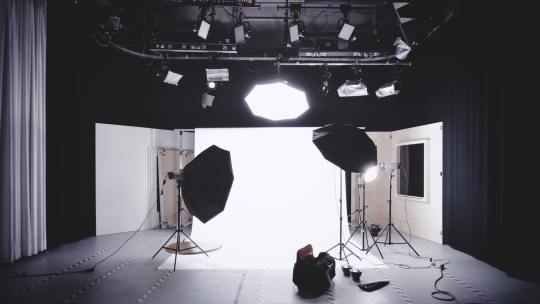
You can take those awesome holiday photos without spending many dollars on photo backdrops. Save your money – it should be spent on cameras since those would be much harder to form reception. And have some fun creating your own backdrops!
You can easily make them, albeit you’ve never made a thing in your life. You won’t be needing an entire lot of drugs to try to to it. Just use some items which will be sitting in your garage. Or find them in your local craft store for a dozen bucks – it’s quite a bargain considering that professional, ready-made backdrops cost many dollars!
It’s like having a home-made photo booth that you simply can customize and reuse many times over!
Just a fast tip before we dig in: whichever backdrop option you select, it'll need the brightest spot in your house, with much natural light coming in. inspect these seven simple scenarios you'll make right now!
1. the simplest Scenario – All you would like maybe a Poster Board
Are you into food photography? Your case is one among the simplest! All you would like maybe a long poster board, and you won’t even need to glue or nail it to the wall – some adhesive tape will do the trick! Actually, you won’t even need a wall, since your objects are sufficiently small to suit on a table. Choose poster board in white or another color, counting on your subject. Here’s how The Pieper Life does it.
“I love white walls because white reflects the sunshine and maybe a great backdrop for art.” – John Rocha
2. Make a Backdrop Using Paper, Staples and adhesive tape
Grab a bunch of colorful paper sheets and celebrate all day! All you would like to try to to is fold the sheets into little fans, staple them together into rosettes, and fasten them to the wall. this is often an excellent option since it allows you to mix different colors for various projects – but we don’t recommend using quite three colors at a time. an excellent idea for kids’ birthday parties! inspect the small print here.
Note that you simply also can make an easier and more elegant version of this backdrop with crepe ribbons and a few painter’s tapes. Just make a frame from the painter’s tape by attaching it to the wall therefore the sticky side is out. Then, attach the colorful crepe ribbons in order that they would hang down while ensuring they overlap. otherwise, you can attach them horizontally – fiddle and see which way works best for you.
“Photography was how on behalf of me to freeze time and to capture the moments that were happy and healthy. I saw a photograph as how to travel back to memory if I ever needed to.” – Rachel Morrison
Improvisation opportunities are endless. Is your loved one a fanatical knitter? Borrow a couple of skeins of yarn, cut it into strings and fasten the strings to the wall in order that they would hang down. Once they're in situ, you'll trim them to different lengths and form various shapes – a bit like performing a haircut. You’ll be surprised at the top result!
3. Get Some Pipes and Fabric
You can create a frame from PVC pipes that you simply can later disassemble and put away. you'll need regular pipes also as end caps, elbow and T pieces. But what to place into the frame?
Make a background from differing types of cloth – cotton or maybe polyester. you'll choose single-colored (blue, green or another color) or colorful fabric with a pattern. Just confirm to iron the material so it doesn’t have wrinkles. Muslin is perhaps one among the simplest fabric choices since it’s very easy to dye.
4. Wooden Boards + 2 Sheets of Vinyl Paper = TWO Cute Backdrops
This one is almost as simple, and the likelihood is that you've got these things in your garage already. inspect all the parts you need:
A wooden board (dimensions will vary counting on the peak of your model)
Two sheets of vinyl paper large enough to hide the board – choose your own styles
A baseboard to act just like the floor
A beadboard
This solution is extremely convenient because you'll have two awesome backdrops in one. Just flip the board over and there’s your second backdrop! Just just in case your kiddo gets bored.
5. Build a Backdrop Wall from Wooden Planks
Buy as many wooden planks as possible – these are pretty cheap since they don’t even need to be finished. Actually, the rawer and more unfinished they appear, the higher their impact is going to be. Maybe you don’t even need to buy them. Just investigate a construction site and ask the workers for a few leftovers they don’t need.
wooden planks as a backdrop
Two of these planks (preferably the strongest and thickest) are going to be used as support beams. Nail all of them together, paint if needed, and there’s your vintage backdrop!
Or you can always make the method even simpler if you choose up a couple of wooden boards (the more, the better), and paint them in several colors. Maybe it sounds too simple, but it’s effective – inspect how Recipe Girl did it.
6. Use Those Christmas Lights for Bokeh!
Here’s a thought that doesn’t require anything you don’t have already got.
Pick up an outsized open space, take your strings of Christmas lights and fasten them on the wall so all of them hang down. Ideally, space should be as spacious as possible, in order that you and your subject can both escape from the backdrop itself to require a correct angle and capture the Bokeh effect. Another requirement – get the maximum amount of natural light as you'll ahead of your subject while keeping it dark behind.
Christmas lights bokeh effect
7. Grandma’s Doilies Just Got Another Use
Those cute and nostalgic doilies from grandma would form an ideal backdrop for wedding photos.
Make a paste by mixing flour with water and soak the doilies in it. Blow a bunch of small balloons (adequate to the doilies’ size). These are getting to be your molds. Wrap the doilies around them, and put each on top of a glass. a few days later, they're going to have hardened enough so you'll blow out the balloons and glue the doilies on your wall. Head up here for full instructions.
If you don’t have enough time to fiddle with these DIY projects, inspect this blog post about Photoshop overlays which will assist you found out a background without moving a finger.
0 notes
Last Seen Blogs

aasn
aasn

nescafegoldblack
Untitled

eloisaberland
E L O I S A

slowturtlehunter
Untitled

foobear
Bluish light reflected on the horizon paradise 🍭