
tech-latest-blog
Tech Latest
Tech Latest provides latest and hot technology related resources that can make your digital life more interesting.
816 posts
Don't wanna be here? Send us removal request.
Last Seen Blogs


agentjul-blog
Julians Filmstübchen

piratecaptainscaptainpirates
I do love a good pirate's tale

rebyerp-blog
Be a Part of the Story

grupponuovacomautospa
Gruppo Nuova Comauto Spa
Link
If you are planning to build a gaming pc and are restricted to a budget of Rs. 40,000, then this PC build guide will help you build the best Gaming Desktop Under 40000 INR (500 USD).
For building a gaming PC, the first thing one has to consider is the budget. Because the PC components are available from low to high-end category which depends on performance and high price tag, but the less price tag components also do their job well because of the heavy competition in the gaming industries.
[su_note note_color="#7afd7d" text_color="#000000"]We may earn a commission for purchases using our links. Learn more.[/su_note] [su_note note_color="#7afd7d" text_color="#000000"]Pro Tip: Always search stores like MDComputers, VedantComputers in India and BestBuy, NewEgg, MicroCenter in the US for best pricing[/su_note]
Gaming Desktop Under 40000 INR (500 USD)
Components
These components are necessary to build a gaming PC. Let’s discuss the components which we have used to build the 40000 INR (500 USD) gaming PC.
Component Model Price Processor Ryzen 3 3100 ~ ₹ 8.6k ($ ) Motherboard MSI B450M Pro-VDH Max ~ ₹ 7.8k ($ ) RAM Corsair Vengeance 8GB DDR4 ~ ₹ 3.8k ($ 50) Hard Drive WD Blue 1TB PC Hard Drive [Optional]
Crucial MX500 240GB SSD ~ ₹ 6.3k ($ ) Power Supply or PSU In-built 550 W PSU ~ N/A PC Chassis Corsair Carbide SPEC-05 with 550 W PSU ~ ₹ 6.5k ($ 85) Graphics Card Zotac GTX 1650 AMP Edition 4GB ~ ₹ 13.7k ($ )
Component Details
Let’s dive into the individual component in this system:
AMD Ryzen 3 3100 Processor
Also Read: How to Check Graphics Card Details in Windows 10?
4 Cores & 8 Threads
Base Clock: 3.6GHz, Max Boost Clock: up to 3.9GHz, 18MB Cache, TDP: 65W
System Memory Specification: 3200MHz, System Memory Type: DDR4, Memory Channels: 2
Socket: AM4, Motherboard Compatibility: AMD 300, 400, 500 series chipset-based motherboards
Graphics: Separate Graphics Card is required, Heatsink Fan: Wraith Stealth
Buy from Amazon.in
Buy from MDComputers.in
Buy from Amazon.com
Buy from NewEgg
MSI B450M Pro-VDH Max Motherboard
If you are building a gaming desktop, make sure not to compromise with the core components like Motherboard, PSU, and Processor. If you are compromising with these then you might face issues in the near future and that can cost, you a lot more while recovery.
B450M MoBos are specially designed for best gaming performance in a tight budget. These are one of the best motherboards when comes to gaming. B450M Pro-VDH Max is a soft priced motherboard from MSI. B450M Pro-M2 and B450M Pro-VDH. Both models share the same black PCB with brownish traces and tracks, while the B450M Pro-VDH makes use of a heatsink on the CPU section of the power delivery, whereas the B450M Pro-M2 omits power delivery heatsinks completely.

AMD AM4 motherboard inspired from architectural design, with Core Boost, DDR4 Boost, Audio Boost, Turbo M.2 – Supports DDR4 Memory, up to 3466+(OC) MHz.
Turbo M.2: Running at PCI-E Gen3 x4 maximizes performance for NVMe based SSDs.
DDR4 Boost: Advanced technology to deliver pure data signals for the best performance and stability.
Core Boost: With premium layout and fully digital power design to support more cores and provide better performance.
i). EZ Debug LED: The easiest way to troubleshoot. ii). PCI-E Steel Armor: Protecting VGA cards against bending and EMI.
Buy from Amazon.in
Buy from MDComputers.in
Buy from Amazon.com
Buy from NewEgg
Corsair Vengeance 8GB DDR4 RAM

Specs:
XMP 2.0 SUPPORT: One setting is all it takes to automatically adjust to the fastest safe speed for your VENGEANCE LPX kit. You’ll get amazing, reliable performance without lockups or other strange behavior.
ALUMINUM HEAT SPREADER: Overclocking overhead is limited by operating temperature. The unique design of the VENGEANCE LPX heat spreader optimally pulls heat away from the ICs and into your system’s cooling path, so you can push it harder.
DESIGNED FOR HIGH-PERFORMANCE OVERCLOCKING: Each VENGEANCE LPX module is built from a custom performance PCB and highly-screened memory ICs. The efficient heat spreader provides effective cooling to improve overclocking potential.
LOW-PROFILE DESIGN: The small form factor makes it ideal for smaller cases or any system where internal space is at a premium.
Buy from Amazon.in
Buy from Amazon.com
WD Blue 1TB PC Hard Drive

Specs:
Upgrade and backup with ease
Future-proof storage
Improve PC performance
1TB capacity
3.5-inch internal hard drive
64MB buffer size
7200 RPM Class
Buy from Amazon.in
Buy from Amazon.com
Crucial BX500 240GB SSD
By installing an SSD instead HDD can enhance not only the storage but also the speed of the processor. Your motherboard has an additional slot to accommodate the SSD.
Installing this SSD will result in an enhanced performance because of the R/W speeds of 550MB/s and 520MB/s respectively. Yes, the costs of your gaming PC will exceed your budget, but you will end up with a better performing PC.
240 GB, SSD write cache is enabled, Low power consumption, Laptop, and Desktop
2.5Inch, /SATA 6 Gb/s interface, ATA modes supported
Sequential 128KB Read and Write speeds up to 540MB/s and 500MB/s respectively
Operating temperature – Commercial (0°C to 70°C)5, Voltage Input-Minimum: 4.5V, Maximum: 5.0V
Boot up faster. Load files quicker. Improve overall system responsiveness
300% faster than a typical hard drive
Improves battery life because it’s 45x more energy efficient than a typical hard drive
Buy from Amazon.in
Buy from Amazon.com
Corsair Carbide SPEC-05 Case with 550 W PSU

Specs:
Minimalist exterior design with an edge-to-edge tinted side panel window.
Room for up to five 120mm fans with one 120mm front fan pre-installed.
Expansive storage space with mounts for up to three HDD’s and two SSD’s
Clean, front panel with high-speed USB 3.0 port.
Cable routing cutouts and tie downs keep your build looking clean and uncluttered.
Removable, built-in dust filters help keep your PC clean and your components running longer.
Minimalist Exterior Design with Edge-to-Edge Side Panel Window: The asymmetrical, smooth-edged design adds bold styling to your build.
Room up to for Five 120mm Fans: Tons of room for excellent cooling potential with one 120mm front fan pre-installed.
Buy from Amazon.in
Zotac GTX 1650 AMP Edition 4GB GDDR GPU
Also Read: Graphics Card Buying Guide: All You Need to Know
GPU Clock: 1725 Mhz
Processors and Cores: 896 CUDA Cores
Bus Standard: PCI Express 3.0
Cooling and Heatsink: Dual Slot Dual Fan
Power Supply Required: 300-watt
Memory: 128-bit, 4 GB GDDR5 Memory
Additional Features: Turing Shaders, DirectX 12, Ansel, Fire Storm, Turing GPU Architecture
Buy from Amazon.in
Buy from Amazon.com
Buy from NewEgg
Conclusion
Well, we are almost ready with the Best Gaming Desktop Under 40000 INR or 500 USD. The Graphics Card may disturb your budget by a few bucks, but it is really worst the price. Additionally, you can later add other gaming accessories like the joystick, gaming headset, etc., for a better gaming experience.
Go through this and buy the best. If you end up buying any of these, tell us the same by commenting down below.
[su_box title="More Gaming Desktop Builds" box_color="#000000"]
Best Gaming Desktop Build Under 25000 INR (350 USD)
Best Gaming Desktop Build Under 30000 INR (400 USD)
Best Gaming Desktop Under 50000 INR (700 USD)
Best Gaming Desktop Build Under 60000 INR (800 USD)
[/su_box]
via TechLatest
0 notes
Link
[su_note note_color="#7afd7d" text_color="#000000"]We may earn a commission for purchases using our links. Learn more.[/su_note]
Speaking of gaming, the first and major requirement is a decent gaming desktop build, after that only you can show your gaming skills. So, you need to research the components for building a gaming setup that fits in your budget too. Then I would love to tell you that you have landed in the correct place, we did all the heavy tasks for you. Here, in this article, we have listed the Best Gaming Desktop Build Under 25000 INR (350 USD).
In this specific setup, we are using any dedicated Graphics Card (GPU), instead we are going to make use of AMD's Ryzen 3 3200G APU. Now, the question is what is an APU? So, according to Wikipedia, "The AMD Accelerated Processing Unit (APU), formerly known as Fusion, is the marketing term for a series of 64-bit microprocessors from Advanced Micro Devices (AMD), designed to act as a central processing unit (CPU) and graphics processing unit (GPU) on a single die."
Gaming Desktop Build Under 25000 INR (350 USD)
Components
These components are necessary to build a gaming PC. Let’s discuss the components which we have used to build the Best Gaming Desktop Build Under 25000 INR (350 USD).
Component Model Price Processor AMD Ryzen 3 3200G ~ ₹ 7.7k ($105) Motherboard MSI B450M Pro-M2 Max ~ ₹ 7.8k ($105) RAM HyperX Fury 8GB 3200MHz DDR4 ~ ₹ 3k ($40) Hard Drive Crucial MX500 240GB SSD ~ ₹ 2.7k ($37) Power Supply or PSU Aerocool VX Plus 450-watt ~ ₹ 2.1k ($28) PC Chassis Ant eSports ICE-200 TG ~ ₹ 2.9k($39)
Component Details
Let’s dive into the individual component in the Gaming Desktop Build Under 25000 INR (350 USD):
AMD Ryzen 3 3200G APU
When comes to gaming and AMD, they both have a good relation. Most of the gamers who have a tight budget, most of the time go with AMD CPUs or APUs. I don't think I have to tell you what the difference between a CPU and APU. Make sure to check the introductory para to understand the same.
AMD Ryzen 3 3200G is a 2nd Generation AMD processor which don't hurt your packet a lot but also doesn't makes you compromise with the performance. Ryzen 3200G comes with AMD Raden integrated GPU, the Radeon Vega 8 which can easily handle low-average graphics load.

Also Read: How to Check Graphics Card Details in Windows 10?
4 Cores & 4 Threads
Base Clock: 3.6GHz, Max Boost Clock: up to 4GHz, 6MB Cache, TDP: 65W
System Memory Specification: 2933MHz, System Memory Type: DDR4, Memory Channels: two
Socket: AM4, Motherboard Compatibility: AMD 300, 400, 500 series chipset-based motherboards
Graphics: AMD Radeon Vega 8 Graphics, Heatsink Fan: Wraith Stealth
Buy from Amazon.in
amzn_assoc_tracking_id = "teclat00-20"; amzn_assoc_ad_mode = "manual"; amzn_assoc_ad_type = "smart"; amzn_assoc_marketplace = "amazon"; amzn_assoc_region = "US"; amzn_assoc_design = "enhanced_links"; amzn_assoc_asins = "B07STGHZK8"; amzn_assoc_placement = "adunit"; amzn_assoc_linkid = "4d2c5b47e3571b359a5371b8322060cb";
MSI B450M Pro-M2 Max Motherboard
If you are building a gaming desktop, make sure not to compromise with the core components like Motherboard, PSU, and Processor. If you are compromising with these then you might face issues in the near future and that can cost, you a lot more while recovery.
B450M MoBos are specially designed for best gaming performance in a tight budget. These are one of the best motherboards when comes to gaming. B450M Pro-M2 Max is a soft priced motherboard from MSI.

Supports 1st, 2nd and 3rd Gen AMD Ryzen/ Ryzen with Radeon Vega Graphics and 2nd Gen AMD Ryzen with Radeon graphics/ Athlon with Radeon Vega Graphics desktop processors for Socket AM4
Supports DDR4 Memory, up to 3466+(OC) MHz
DDR4 Boost: advanced technology to deliver pure data signals for the best performance and stability
Audio Boost: reward your ears with studio grade sound quality
Pci-e steel slot: protecting VGA cards against bending
Buy from Amazon.in
amzn_assoc_tracking_id = "teclat00-20"; amzn_assoc_ad_mode = "manual"; amzn_assoc_ad_type = "smart"; amzn_assoc_marketplace = "amazon"; amzn_assoc_region = "US"; amzn_assoc_design = "enhanced_links"; amzn_assoc_asins = "B07XH4SK17"; amzn_assoc_placement = "adunit"; amzn_assoc_linkid = "ed9ac6291f71746c0da2ba9248db58c0";
HyperX Fury 8GB 3200MHz DDR4 RAM
RAM prices have reduced over the past year. We really cannot cheap out on RAM as using less than 8GB memory is not at all a good idea for gaming, as it will result in micro stuttering.
If you still think that your budget is exceeding the projected limit then you can reduce it to 4 GB stick, but make sure to take nothing less than 2666MHz.
In this build, we are going with the Fury 8GB 3200Mhz DDR4 stick from HyperX. HyperX is decent player PC components and accessories. The 3200Mhz stick will surely boost the windows experience. And if you are a Google Chrome user then you must have an 8GB stick, right, you know right, what does it mean.

Updated low-profile heat spreader design
Cost-efficient, high-performance DDR4 upgrade
Intel XMP-ready profiles optimized for Intel’s latest chipsets
Buy from Amazon.in
amzn_assoc_tracking_id = "teclat00-20"; amzn_assoc_ad_mode = "manual"; amzn_assoc_ad_type = "smart"; amzn_assoc_marketplace = "amazon"; amzn_assoc_region = "US"; amzn_assoc_design = "enhanced_links"; amzn_assoc_asins = "B07WJJFV9Z"; amzn_assoc_placement = "adunit"; amzn_assoc_linkid = "a16a4979e9b1b1725b23beeeaf0da62f";
Crucial MX500 240GB SSD
By installing an SSD instead HDD can enhance not only the storage but also the speed of the processor. Your motherboard has an additional slot to accommodate the SSD.
Installing this SSD will result in an enhanced performance because of the R/W speeds of 550MB/s and 520MB/s respectively. Yes, the costs of your gaming PC will exceed your budget, but you will end up with a better performing PC.

240 GB, SSD write cache is enabled, Low power consumption, Laptop, and Desktop
2.5Inch,/SATA 6 Gb/s interface, ATA modes supported
Sequential 128KB Read and Write speeds up to 540MB/s and 500MB/s respectively
Operating temperature – Commercial (0°C to 70°C)5, Voltage input-Minimum: 4.5V, Maximum: 5.0V
Boot up faster. Load files quicker. Improve overall system responsiveness
300% faster than a typical hard drive
Improves battery life because it’s 45x more energy efficient than a typical hard drive
Buy from Amazon.in
amzn_assoc_tracking_id = "teclat00-20"; amzn_assoc_ad_mode = "manual"; amzn_assoc_ad_type = "smart"; amzn_assoc_marketplace = "amazon"; amzn_assoc_region = "US"; amzn_assoc_design = "enhanced_links"; amzn_assoc_asins = "B07G3YNLJB"; amzn_assoc_placement = "adunit"; amzn_assoc_linkid = "783fca315bec5be5de6d2e24eff06ebd";
Aerocool VX Plus 450-watt PSU
In my opinion, the most important component of a PC is PSU, as the power supply actually handles all the other expensive components. So before buying any cheap PSU, think about it 10 times.
In this build, we are going with a 450-watt PSU unit from Aerocool named as Aerocool VX Plus 450. 450-watt will easily handle all the components.
Focused on delivering the best value power supply unit, the VX PLUS allows for easy installation while delivering reliable quality and excellent performance, making this the perfect PSU for entry-level system builders. Comes equipped with an upgraded transformer and a 12cm fan with optimized thermal fan speed control.

Best value power supply for entry-level system builders
Compatible with ATX 12V 2.3
Upgraded transformer allows for heavy 12V loading system support
Powerful single +12V rail offers compatible DC output
Silent 12cm fan with optimized thermal fan speed control
OPP/OVP/UVP/SCP/SIP electrical protection included
Buy from Amazon.in
amzn_assoc_tracking_id = "teclat00-20"; amzn_assoc_ad_mode = "manual"; amzn_assoc_ad_type = "smart"; amzn_assoc_marketplace = "amazon"; amzn_assoc_region = "US"; amzn_assoc_design = "enhanced_links"; amzn_assoc_asins = "B014W3EM2W"; amzn_assoc_placement = "adunit"; amzn_assoc_linkid = "b6400c0d98a6ab7bdf1a3509e8838c57";
Ant eSports ICE-200 TG
If you like RGB lighting and all then this is your one-stop solution. In my opinion, this is the best mid-tower desktop case with a ton of space for everything. Ant eSports makes a good range of Gaming Desktop cabinets. In this price range, you will not find anything better than this.
The front panel consists of 2 diagonal RGB strips with multiple options. Other than that, the front panel even has a space of 3 coolers. If you think to add more coolers to your PC in the future, then you will not have to change the cabinet. If we talk about the space inside, then don't worry, you have got a lot of space even after installing the MoBo and all. And the plus point is that it includes an RGB cooler inside the cabinet pre-installed.

RGB front panel with LED control button
Black glossy finish
Acrylic front panel
Front LED control button
Cable management support/separate zone for power supply and other components
Transparent tempered glass side panel
Support 2 x HDD and 2 x SSD, 1 x flashcard reader/support ATX, MICRO-ATX, MINI-ITX motherboard
I/O Panel: 2 x USB 2.0, 1 x USB 3.0, 1 x audio In, 1 x mic, flash card reader
Fan support: front 120 mm x 3 (optional)/top 120 mm x 2 (optional)/ rear auto rgb 120 mm x 1 (preinstalled)
Liquid cooling support (maximum): front 120 / 240 mm, rear 120 mm
Buy from Amazon.in
amzn_assoc_tracking_id = "teclat00-20"; amzn_assoc_ad_mode = "manual"; amzn_assoc_ad_type = "smart"; amzn_assoc_marketplace = "amazon"; amzn_assoc_region = "US"; amzn_assoc_design = "enhanced_links"; amzn_assoc_asins = "B079P1VBDY"; amzn_assoc_placement = "adunit"; amzn_assoc_linkid = "50d537875373499023f487a98b067a46";
Conclusion
Well, we are almost ready with the best gaming desktop under 25000 INR or 350 USD. Additionally, you can later add more storage, RAM and maybe a dedicated Graphics Card and also other gaming accessories like the joystick, gaming headset, etc., for a better gaming experience.
Also Read: Graphics Card Buying Guide: All You Need to Know
Go through this and buy the best. If you end up buying any of these, tell us the same by commenting down below.
[su_box title="More Like This" box_color="#000000"]
Best Gaming Desktop Build Under 30000 INR (400 USD)
Best Gaming Desktop Under 40000 INR (500 USD)
Best Gaming Desktop Under 50000 INR (700 USD)
Best Gaming Desktop Build Under 60000 INR
[/su_box]
via TechLatest
0 notes
Link
Airtel is offering 1000 GB additional data to its new Airtel Xtreme Fiber Home Broadband Plan subscriber as a part of the Independence Day offer. The offer is for a limited time duration, grab it as soon as possible you can.
Airtel is rolling out this plan as an Independence Day offer for a promotional period. Users can grab this offer by buying a new Airtel Xstreme Fiber Home Broadband Plan, this offer is available till August 16 at midnight.
This offer is available in all the top cities of the country where Airtel provides Xstream Fiber broadband services. If you reside in any such city so you have a golden opportunity to grab this amazing offer. With Airtel Xstream Fiber broadband connection, you can get ultra-fast internet speed up to 1 Gbps and you can also use it for multiple devices.
Airtel is Offering 1000 GB Additional Data For Xstreme Fibre Users
Also Read: Jio Independence Day Offer: Free Data and Voice Calls with JioFi for up to 140 Days
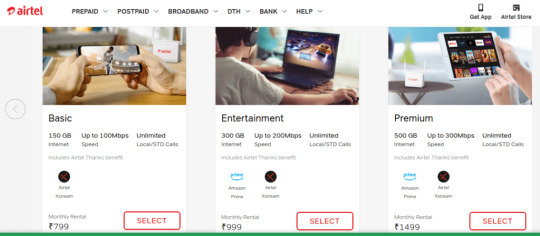
Airtel is offering 1000 GB additional data with some other cost-saving plans, Airtel's Independence day offers for new Airtel Xstream Fiber users are listed below
Airtel Xstream Basic Plan: It is available at INR 799 in this plan user will get 150GB of data with a maximum of 100Mbps of speed along with unlimited local and STD calls.
Airtel Xstream Entertainment Plan: Another plan is priced at INR 999 which comes up with 1 year of Amazon Prime Subscription + 300 GB of data with a maximum of 200 Mbps speed + unlimited calling.
Airtel Xstream Premium Plan: The Premium plans cost INR 1,499 which also has 1 year of Amazon Prime Subscription + 500 GB of data with a maximum of 300 Mbps speed + unlimited calling.
Airtel Xstream VIP Plan: Airtel is offering its most expensive plan which at a cost of INR 3,999 which comes up with unlimited data with 1Gbps of ultra-fast speed with Amazon Prime subscription and unlimited calling.
Buy Offer
Moreover, users can also buy Airtel's Xstream box that is also priced at INR 3,999. With Xstream box users will get access to all Google Play Store apps + in-built Chromecast + Google Assitant Voice Search+ support to all DTH channels and many more. The Airtel's Xstream box runs on Android 9.0 (Pie) and supports 4K content. It can be used to pair phones and it can also be used as a remote controller.
Airtel launches its Xstream Fiber service in some new cities including Ajmer, Bhilwara, Bundi, Ghazipur, Kota, and Rohtak, and the company was saying that they are planning to expand the service in some more cities of the countries including Akola, Amaravati, Bahraich, Barabanki, Bikaner, Chandauli, Chandrapur, Davanagere, Dharamshala, Dhule, Hosur, Jalgaon, Jhunjhunu, Latur, Muzzafarnagar, Nanded, Ramanathapuram, Ratnagiri, Satara, Solapur, Sonbhadra, Tirupati and Udaipur.
[su_box title="More Like This" box_color="#000000"]
WhatsApp Will Let Users Sync Their Chat History With Multi-device Support
New Leak Suggest the iPhone 12 Will Launch in October
Apple’s Launch Event for iPhone 12, New iPad and More Set to Take Place in September, New iPhone 12 Video
[/su_box]
via TechLatest
0 notes
Link
Jio is one of the leading ISPs in India and with very cheap data rates and exciting offers, it has captured the majority of the Indian cellular market. It is now offering another great offer, the Jio Independence Day offer on JioFi will bring free data and voice calls for up to 140 days.

Jio Independence Day Offer
As part of the Independence Day offer, Jio is offering up to 140 days of free data and Jio-to-Jio voice calls to customers who are buying the JioFi 4G hotspot device.
The JioFi 4G wireless hotspot device is available at all the Reliance Digital outlets and on the company’s official website too for INR 1,999.
The top three very affordable plans are for INR 199 offering 1.5GB data for 28 days daily, INR 249 offering 2GB data for 56 days daily, and INR 349 offering 3GB data for 84 days daily. Now to avail the “free” benefits, you will need to recharge additionally for INR 99 to get the ‘Jio Prime’ membership.
It will give you unlimited on-net voice calls, 1000 minutes off-net calling, and 100 national SMS per day. Now the free data will be dependent on the plan that you opt for.
For example, if you will go with the INR 199 plan, and recharge further with INR 99 to get the ‘Jio Prime’ membership, you will get benefits for extra 140 days( 28+140= 168 days). You will be able to enjoy 1.5GB daily data for 168 days. Similarly, if you recharge with INR 249( with Jio Prime for INR 99), you will get 2GB daily data for extra 112 days(56+ 112= 168 days).
This offer is not available for postpaid users. You can get the JioFi 4G wireless hotspot device from the company’s official website right now.
Buy JioFi
(VIA)
Read More About
WhatsApp Will Let Users Sync Their Chat History With Multi-device Support
Researchers Say That Over 1 Billion Devices are at Risk Because of Qualcomm Vulnerabilities
via TechLatest
0 notes
Link
The news about the launch of the upcoming iPhone 12 is just following a very bumpy path. Just yesterday, there were talks about the Apple’s launch event for the iPhone 12 is all set to take place in September now a new leak suggests that the iPhone 12 will launch in October that is a month late than the originally scheduled launch. This is mainly due to the multiple delays in production and then Apple also confirmed that the launch will be delayed.
iPhone 12 Will Launch in October
Jon Prosser is a trusted tipster when it comes to Apple and according to his sources, he tweeted that the iPhone 12 will launch in October. The launch is set to take place in the third week of October.
https://twitter.com/jon_prosser/status/1293682812411936768
He also mentions that the shipment of the iPhone 12 will start in the same month as well, most likely within just a week of its launch. However, the shipments for iPhone 12 will be delayed with pre-orders and shipments in November.
In his tweet, he also says that Apple is also going to launch a new iPad in September that too without any launch event, it’d be via a press release which is actually a bit weird.
This is again a leak so we suggest that you do not believe it completely and we will be adding everything that we find out related to the launch of the iPhone 12.
(VIA)
Read More About Everything Related to iPhone 12 So Far
Apple’s Launch Event for iPhone 12, New iPad and More Set to Take Place...
Apple Might Delay the 5G iPhone 12 Models Till Fourth Quarter of 2020
Launch Date for iPhone 12 Leaked, MacBooks With Apple Chips Also Coming Soon
iPhone 12 Battery Capacity Leaked: All You Need to Know
Apple is Planning to Sell the iPhone 12 Charger Separately
The Base Variant of iPhone 12 Will Reportedly Cost $549
New iPhone 12 Dummy Models Surfaced Online, Have a Look
Molds and CAD Renders of iPhone 12 Shows Flat Edges
via TechLatest
0 notes
Link
There are a bunch of talks about the launch date of the new upcoming iPhone 12 series. We hear that it’s going to be delayed and sometimes we hear that its on track. Well, according to a new leak Apple’s launch event for the iPhone 12 is all set to take place in September.
Apple’s Launch Event for September
According to komiya_kj on Twitter Apple’s launch event is set to take place in September and it will include the launch of a new iPad, Apple Watch Series 6, iPhone 12 line-up, AirTags, and AirPower.
As of now, there are many talks that the launch event is going to be delayed because of manufacturing issues with the iPhone 12 but komiya_kj mentioned the whole schedule for the launch event. And it goes like this:
Opening Video
Speech by Tim Cook
Apple Card Announcement for some Countries
iPad (8th Gen)
Apple Watch Series 6
iPhone 12 and iPhone 12 Max
AirTags
iPhone 12 Pro and iPhone 12 Pro Max
AirPower
https://twitter.com/komiya_kj/status/1292099914692886531
Apple’s launch event is set to take place on September 8 or September 22, account also added “fifty-fifty” below those dates so we do not have a solid launch date yet. And it seems quite skeptical given all the talks about the delay in production but we shall see
https://twitter.com/komiya_kj/status/1290666567651323906
iPhone 12 Video Surfaces the Internet Giving Stunning Details
Apple has not shared anything about the iPhone 12 but there have been numerous leaks and rumors about the upcoming iPhone 12 lineup. Now there’s a beautiful video on YouTube that is designed by MotionFox and is on the ConceptsiPhone YouTube channel. This video shows us everything that we know so far about the iPhone 12 in the best way possible.

via MotionFox/ ConceptsiPhone
The video shows us that the new iPhone may include- a Super Retina XDR OLED Display, the LiDAR scanner, A14 Bionic Chip with 5G capabilities. Then the video shows some great renders and features like wireless charging, water resistance, FaceID, and more. It also displays a message: welcome to future.
https://www.youtube.com/watch?v=qfhGTXcQNK8
The video just shows some very stunning render and give us an idea about how the actual iPhone 12 might look like. It also shows the thicker form factor of the iPhone 12. We strongly recommend you to check the video out.
(VIA 1) (VIA 2)
Read More About
Apple Might Delay the 5G iPhone 12 Models Till Fourth Quarter of 2020
Apple is Planning to Sell the iPhone 12 Charger Separately
via TechLatest
0 notes
Link
Data Loss is a horror dream for all smartphone users who saves all the data in their device's internal storage. But with recovery apps for Android nothing to worry about, you can easily recover all of your data easily.
Data can be deleted from the device due to various reasons sometimes it can happen accidentally, or due to some error or maybe you are trying to root your device without taking backup and due to some wrong actions, your complete data vanishes. Whatever the reason, the solution is recovery apps for Android.
Here in this article, we are going to discuss some best recovery apps for Android, through which you can restore deleted data completely. data loss isn't a pleasant experience to have, so always be cautious while performing any operation which can cause damage to your stored data. However, if the damage takes place due to obvious reasons, don't panic, you can always use data recovery applications to undelete your lost files.
Best Recovery Apps for Android
DiskDigger
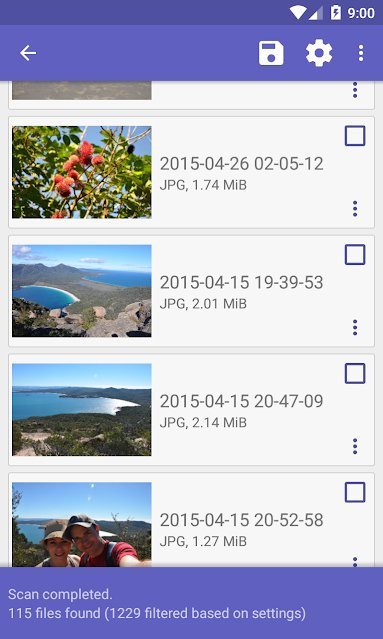
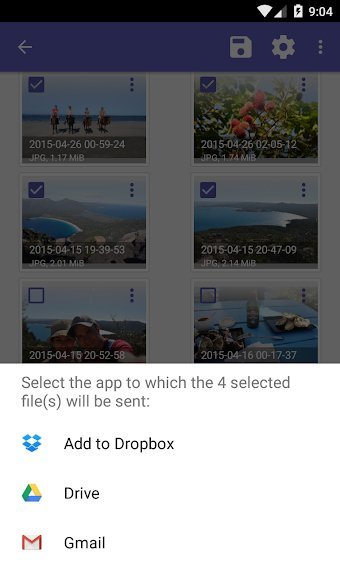
DiskDigger data recovery app is one of the best applications to restore the deleted data, especially photos and videos. If you are not using any backup service to store your photos and other data safely, and you have lost your data due to any reasons, so DiskDigger is a solution; you can use this app to restore the deleted item.
This app recovers data not only from the device's internal storage but also capable of restoring data from a memory card. This app can work for both rooted & non-rooted devices but if your smartphone is rooted then DiskDigger will give you outstanding performance.
Price- This app is available in two versions free as well as pro, in the free version it can restore photos and videos (videos can be restored in the rooted device), and for other kinds of file restoration you need to buy a Pro version of the app.
Download
MiniTool Mobile Recovery
MiniTool Mobile Recovery is a complete recovery software for Android it can recover not only photos and videos but also SMS, call logs, WhatsApp Messages, documents, files, etc.
This is one of the best recovery apps for Android as this recovery tool is professionally designed to recover data from a wide range of Android devices including smartphones, tablets, and SD cards too. MiniTools mobile recovery supports a wide range of gadgets and can recover almost every kind of data. No matter how you have lost your data either corrupted system, system crash, accidentally deleted, malware attack, or whatever else. You can always use MiniTools for restoring your lost data.
Supported Platform- Windows XP/Windows Vista/Windows 7/Windows 8/Windows 8.1/Windows 10
Price- Free user can recover upto 10 files at a time, to extend this limit you can upgrade to Pro version at $39 for 1-year and $ 49 for the lifetime.
Download
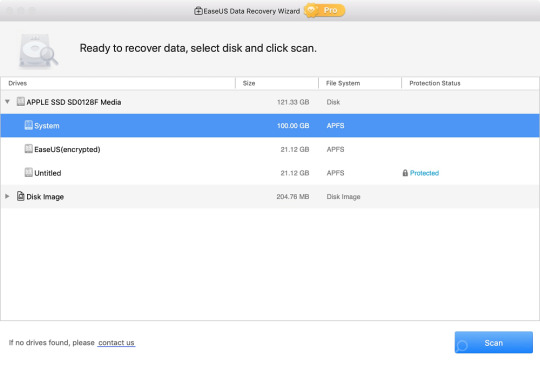
EaseUS Mobisaver

After reading EaseUS you might have thought of EaseUS Data Recovery Wizard Pro Review which is desktop software but here we are talking about its Mobile version EaseUS Mobisaver. This is also one of the best recovery apps for Android. The mobile app is as amazing as its desktop version, you can recover all deleted images, videos, call logs, contacts, SMS, and WhatsApp messages.
EaseUS Mobisaver can recover data of various file formats including JPEG/JPG, PNG, BMP, GIF, and TIF/TIFF it also supports a wide range of video formats including MP4, AVI, MOV, etc. It offers a very simple yet amazing UI to recover the data easily and effectively.
And as similar to DiskDigger this app also works for non-rooted devices, but if your device is rooted, then this app can perform a deep scan for recovering files more effectively.
Price- Its free version has limited features like you can recover files of JPG and MP4 format, to remove the limitation you can purchase the app at just $4.
Download
Dr.fone
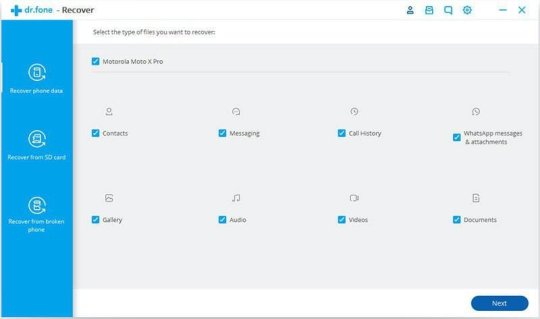
When it is about the best recovery apps for Android, so Dr.fone is a widely popular Android data recovery software. This software is specially designed for all situations of the smartphone, if your device is working fine without any cliches then this app will work fine, but if your device is not responding, black screen, or crashed so in such situations too this software can recover your data.
Dr.fone is excellent software which can recover almost all kind of data even if your device is in complicated condition. With such amazing features, this app gives a pretty cool and clean UI so that users can easily recover the data.
Price- Free version offers limited scanning for deleted files,so you can upgrade to its Pro version at $79.95.
Download
Undeleter

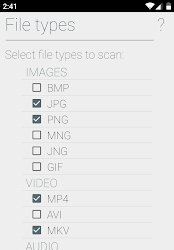
Undeleter is another one of the best recovery apps for Android. It comes with clean and simple UI, this application can scan and recover files from memory card or internal storage in rooted devices. This app can scan files from a wide file format ranging from BMP, JPEG/JPG, PNG, MNG, JNG, GIF, MP4, AVI, MKV, MP3, OGG, OGM, WAV, FLAC, AMR, MP4A, PDF, SXD, SXI, SXC, SXW, ODT, ODG, ODS, ODP, DOCX, XLSX, PPTX, ZIP, JAR, APK, to EPUB.
Undeleter can undelete data of WhatsApp and some other third-party applications too, but the recovered data would be in the form of HTML files.
Price- The app is completely free of cost but has some ads in it, so to remove all ads and enable background scanning you can buy the upgrades.
Download
Stellar Data Recovery
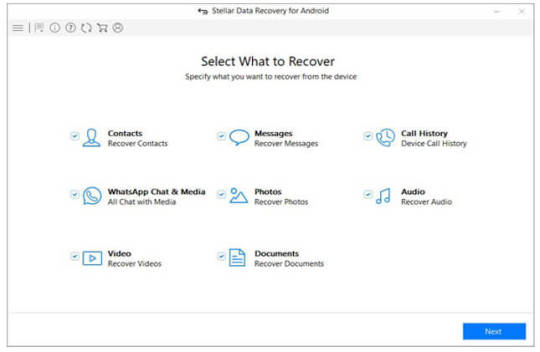
Stellar data recovery app for Android is an excellant and most popular data restoring application not only for personal purposes this application is also used by various businesses to restore the data. This software comes with several scan options, and it also displays a preview of all recoverable files.
The software comes up with advanced searching algorithms so that you can search for critical data quickly. It also supports a wide range of devices and formats making it easy to extract and restore each kind of data.
Price- With enormous features, the software is somewhat costly and comes up with different plans at different costs ranging from free to $299 per year and with some standard business plans too.
Download
So, these were some best data recovery apps for Android you can use any of them based on your preference. I hope you found this article useful and if you have some suggestions so do let us know in the comment section.
[su_box title="More Like This" box_color="#000000"]
How to Customize Notification Bar in Android [Non-Root]
5 Best Video Players for Windows PC
How to Download Instagram DP on Phone or PC
[/su_box]
via TechLatest
0 notes
Link
Data Loss is a horror dream for all smartphone users who saves all the data in their device’s internal storage. But with recovery apps for iOS nothing to worry about, you can recover all of your data easily.
Data can be deleted from the device due to various reasons sometimes it can happen accidentally, or maybe your system crashes, and various vulnerabilities are there which can lead to data loss from smartphones. Whatever the reason, the solution is data recovery apps for iOS.
Here in this article, we are going to discuss some best recovery apps for iOS, through which you can restore deleted data completely. data loss isn’t a pleasant experience to have, so always be cautious while performing any operation which can cause damage to your stored data. However, if the data loss happens due to obvious reasons, don’t panic, you can always use data recovery applications to undelete your lost files.
Best Recovery Apps for iOS
EaseUS Mobi Saver
Also Read: Best Recovery Software for macOS
After reading EaseUS you might have thought of EaseUS Data Recovery Wizard Pro Review which is desktop software but here we are talking about its Mobile version EaseUS Mobisaver. This is also one of the best recovery apps for iOS. The mobile app is as amazing as its desktop version, you can recover all deleted images, videos, call logs, contacts, SMS, and WhatsApp messages.
EaseUS Mobisaver can recover data of various file formats including JPEG/JPG, PNG, BMP, GIF, and TIF/TIFF it also supports a wide range of video formats including MP4, AVI, MOV, etc. It offers a very simple yet amazing UI to recover the data easily and effectively.
It is available for both Windows and Mac and it supports iOS devices from iPhone X, 8 Plus, 8, 7 Plus, 7, 6S Plus, 6S, 6 Plus, 6, 5S, 5c, 5, 4S to 4, also iOS from 11.x, 10.x, 9.x, 8.x, 7.x, to 6.x.
Price- Its free version has limited features and you can buy a Pro version with different plans between $59.95 to $99.95.
Download
Dr. Fone

Also Read: Best Recovery Software for Windows
When it is about the best recovery apps for iOS, so Dr.fone is a widely popular iOS data recovery software. This software is specially designed for all situations of the smartphone, if your device is working fine without any cliches then this app will work fine, but if your device is not responding, black screen, or crashed so in such situations too this software can recover your data.
Dr.fone is excellent software which can recover almost all kind of data even if your device is in complicated condition. With such amazing features, this app gives a pretty cool and clean UI so that users can easily recover the data.
Price- Free version offers limited scanning for deleted files, so you can upgrade to its Pro version at $79.95.
Download
Stellar Data Recovery for iOS

Also Read: 5 Best Video Players for Windows PC
Stellar data recovery app for Android is an excellent and most popular data restoring application not only for personal purposes this application is also used by various businesses to restore the data. This software comes with several scan options, and it also displays a preview of all recoverable files.
The software comes up with advanced searching algorithms so that you can search for critical data quickly. It also supports a wide range of devices and formats making it easy to extract and restore each kind of data.
It supports iOS devices from iPhone 11 Pro, 11, XS, XS Max, XR, X, 8 Plus, 8, 7 Plus, 7, 6S Plus, 6S, 6 Plus, 6, 5S, 5c, 5, 4S, 4 to iPad.
Price- With enormous features, the software is somewhat costly and comes up with different plans at different costs ranging from free to $299 per year and with some standard business plans too.
Download
MiniTool Mobile Recovery
MiniTool Mobile Recovery is a complete recovery software for iOS it can recover not only photos and videos but also SMS, call logs, WhatsApp Messages, documents, files, etc.
This is one of the best recovery apps for iOS as this recovery tool is professionally designed to recover data from a wide range of iOS devices including smartphones, iPads. MiniTools mobile recovery supports a wide range of gadgets and can recover almost every kind of data. No matter how you have lost your data either corrupted system, system crash, accidentally deleted, malware attack, or whatever else. You can always use MiniTools for restoring your lost data.
This software is completely compatible with all iOS versions.
Price- Free.
Download
Tenorshare iPhone Data Recovery

Also Read: 23 Best GIMP Plugins and Filters You Need to Try (2020)
This is another amazing data recovery tool for iOS, this software supports three data recovery modes- via, iPhones, iTunes, and iCloud. This is the best software for recovering data from iOS devices, You can undelete a wide range of files like you can recover photos, messages, message attachments, app data, contacts, videos, etc.
This software a special feature which lets you synchronize messages, contacts and other data directly to your iPhone
It offers selective recovery, and you can select a file using various filters, you can have a preview of all the files or data you are gonna recover, but at the same time, this software took too much time while scanning and in some cases, it doesn't provide complete data recovery in iPhone.
Price- It is available in Free as well as the Paid version, Paid version come sin different plans from $45.95 to $62.95.
Download
Also Read: 13+ Best Mac Keyboard Shortcuts
Disk Drill
Disk Drill is a perfect data recovery tool for iOS users, this software can repair data from 200+ file formats, and supports almost every iOS device. Along with data recovery this tool comes up with additional features too, it continuously monitors Disk Health and also finds unused or unnecessary files that are occupying additional disk space, you can also create byte-to-byte disk & partition backups so it will be easy for future recoveries.
You can scan for lost data from internal Macintosh hard drives, external hard drives, cameras, iPhones, iPods, Android devices, USB flash drives, Kindles, to memory cards.
You can recover complete data with just a single click, you can select and preview all the recoverable files. It is compatible with most of the iOS devices.
Price- The software is available in three versions first is Free, then you can upgrade to Pro at $108, and you can also buy an Enterprise version at $ 601, Pro and Enterprise versions will have some more and useful features than the basic version.
Download
So, these were some best data recovery apps for iOS you can use any of them based on your preference. I hope you found this article useful and if you have some suggestions so do let us know in the comment section.
[su_box title="More Like This" box_color="#000000"]
Top 10 Best Morse Code Apps For Android & iOS
5+ Best Xbox One Emulators for Windows
Top 5 Best Logo Maker App for Android
[/su_box]
via TechLatest
0 notes
Link
LAN Cables are very useful when it comes to transferring files between two PCs and especially if the files are too big. It is fairly easy and fast to transfer files between 2 PCs using a LAN cable, it is very fast too.
To give you some context, a very entry-level LAN cable can support transferring speeds of up to 1000Mbps and a typical USB 2.0 port only supports up to 480Mbps transferring speeds. So whenever you are having a lot of files to transfer, and want it to be done quickly, LAN cable should be your obvious choice.
In this article, we are going to show you how to transfer files between 2 PCs using a LAN cable. So follow the steps mentioned below to easily transfer your files.
Transfer Files Between 2 PCs Using a LAN Cable
Setting Up the Network
For this process, the very important thing that you will need is a LAN cable and for those who do not know what a LAN cable is can just go to any computer accessories shop and ask for one. Here is how it looks like. Now let’s jump into the process.
Buy LAN Cable
Step 1: Connect both of your computers via LAN cable.
Step 2: Open Control Panel from by typing in Windows Search Bar and click on ‘Network and Internet’.
Step 3: Click on ‘Network and Sharing Center’ to open it.
Step 4: In the left side, click on ‘Change advanced sharing settings.
Step 5 Click on ‘All Networks’, then click on, “Turn on sharing so anyone……Public folders” and “Turn off password protected sharing”. Click on ‘Save changes’.
Note: If you are transferring files just between your PCs, only then turn off password protected sharing otherwise keep it on.
Step 6: Repeat step 2-5 on the other computer as well.
Step 7: Now you need to set up a static IP and for that again open the Control Panel, navigate to ‘Network and Internet’, and click on ‘Network Sharing Center’.
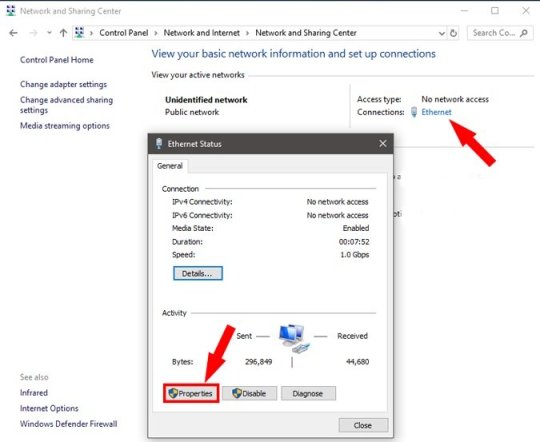
Step 8: Now you shall see active networks and it will be Ethernet as both the computers are connected via LAN cable, click on the ‘Ethernet’ link given on the right side and you will see a new dialog box. In the box, click on ‘Properties’.
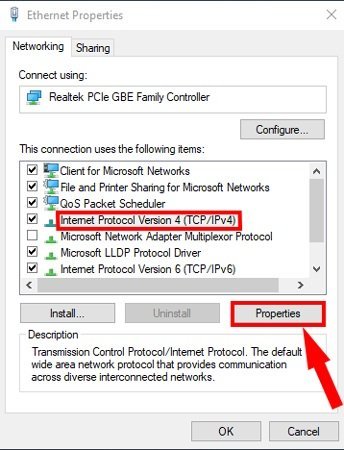
Step 9: Select “Internet Protocol Version 4(TCP/IPv4)” and click on ‘Properties’.
Step 10: Now configure the two computers with different IP settings. To do so, on the first computer, select “Use the following IP address.” And enter the following ones
IP Address: 192.168.1.1
Subnet mask: 225.225.225.0
Default gateway: 192.168.1.2
And click on OK.

Step 11: Repeat steps 7-10 on the second computer and enter the following ones in the second computer in step 10:
IP Address: 192.168.1.2
Subnet mask 225.225.225.0
Default gateway: 192.168.1.1
And click on OK.
Step 12: Open file explorer on the computer and navigate to ‘Network’ from the left side menu. If you have set up all the things right, you shall see both the computers on the network.
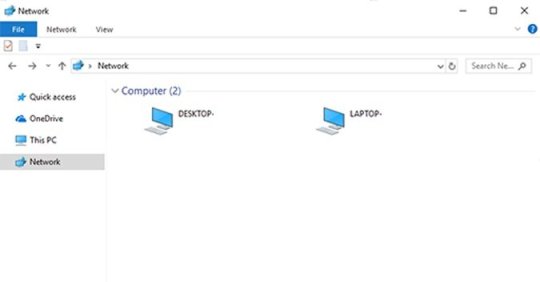
Sharing Files
Step 1: Create a new folder on desktop and transfer all the files here that you want to send to another PC connected on the network.
Step 2: Once you have moved everything to the folder, right-click on it and select ‘Give access to’ and navigate to ‘Specific people…’.
Step 3: From the drop-down menu, select ‘Everyone’ and click on ‘Add’. Once you did that, click on ‘Share’.
Step 4: You shall now see the network location the folder, click on ‘Done’.
That’s it, now go to the other computer and open the file explorer, click on Network. Now click on the name of another computer and you shall see the shared folder, you can now transfer all the files from the folder to your PC.
So that was all about how to transfer files between 2 PCs using a LAN cable. Do follow all the steps and make sure to connect the cable properly and let us know in the comments.
[su_box title="More Like This" box_color="#000000"]
Best Recovery Software for Windows
5 Best Video Players for Windows PC
How to Use USB Flash Drive to Lock Your PC
How to Fix Your Windows License Will Expire Soon Error in Windows 10
[/su_box]
via TechLatest
0 notes
Link
One of the most awaited features that are likely to come on WhatsApp is the multi-device support. WhatsApp has been testing the multi-device support for a while now and now there are talks that WhatsApp is working on some features that will let the users sync their chat history across platforms.
New Features to Sync Chat History Coming With Multi-Device Support
According to WABetaInfo, Along with the multi-device support, WhatsApp will also bring a feature to sync chat history. So when you will log in to different devices using one account, you will be able to sync your messages across the devices with ease.

Once this feature will be integrated, users will no longer have to go through the hassle of copying their chat history every time they log in to a different device. WhatsApp will do this all on its own and for that, it would actually require a WiFi connection as the files might be bigger in size.
“When WhatsApp has safely copied the chat history to the second device, it will be finally possible to use your account from it. Note that any message will be delivered to all your family devices, so your chat history will be always synced across platforms, and when you use or remove a device, your encryption key changes. When the encryption key changes, all active chats will be notified (if Security Notifications are enabled in WhatsApp Settings),” the report by Wabetainfo read.
It is also indicated in the report that WhatsApp has developed an app for iPad exclusively and it will bring multi-device support. That would mean that users can now log in to their iPads and smartphones at the same time and that will also support sync across Android and iOS which is really nice.

The feature is still in development and would take some time. The multi-device support is also not yet available for users and people are really excited about it.
(VIA) (SOURCE)
Read More About
WhatsApp Testing Most Awaited Self-Expiring Messages Feature
Upcoming WhatsApp Features Will Change Your Messaging Experience
via TechLatest
0 notes
Link
Losing data stored on a computer is the worst part of storing data digitally. Data loss can take place due to various reasons including malware attack, files got corrupted, or maybe you have deleted some files accidentally. So no need to worry about such a small issue, we have various data recovery software out there. But the question is which recovery software for macOS is best? which recovery software assure us to provide a 100% data recovery guarantee?
So here in this article, we have listed out some best recovery software for macOS, by using them you can easily recover your lost data within a few minutes. So, let’s get started.
Best Recovery Software for macOS
EaseUs Data Recovery Wizard Pro

EaseUS Data Recovery Wizard Pro is an efficacious system restoration software, that is designed with the motive to recover the deleted files from the system, which were deleted unintentionally or accidentally. It has an amazing user-friendly interface to provide mesmerizing user experience, with so many handy features that will help you to recover your deleted files. To know more about Ease Us Data Recovery Wizard follow the given article EaseUS Data Recovery Wizard Pro Review.
Data Rescue 6
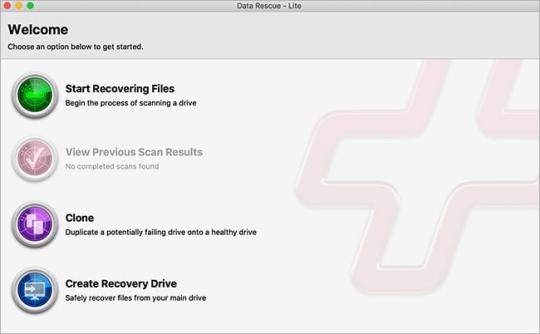
Prosoft’s Data Rescue 6 is an amazing data recovery software, which is packed up with some advanced data recovery tools. This tool was developed for years and it has been tested by a professional data recovery lab. From this, we can have an idea of how reliable and useful this tool is. It is a versatile data recovery software for macOS with some amazing features.
In this software, you can create a clone when a drive is getting fail while retrieving data or when the process is taking too much time for completion. This software requires 32GB of additional storage to perform recovery operations. It has a free file finder app so that tool can decide whether data can be recovered or not. It performs quick and deep scans for data recovery. It supports a large range of devices including
Mac Desktops / Laptops
PC Desktops / Laptops
Hard Disk Drives
External Drives
Solid State Drives
SD Cards
CF Cards
Thunderbolt Drives
FireWire Drives
RAIDs
This software lacks pricing as it doesn’t offer any free trial version so that we can experience the software on-hand and decide whether to use it or not. And its standard license limits allows only 5 drive recoveries to a user.
Price- $19 for the standard version, and for unlimited data recovery you should purchase an annual subscription.
Download
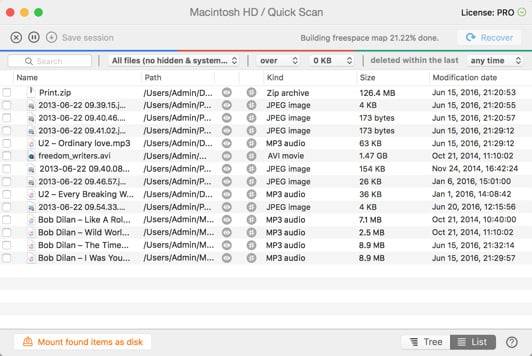
MiniTool Power Data Recovery & Stellar Data Recovery
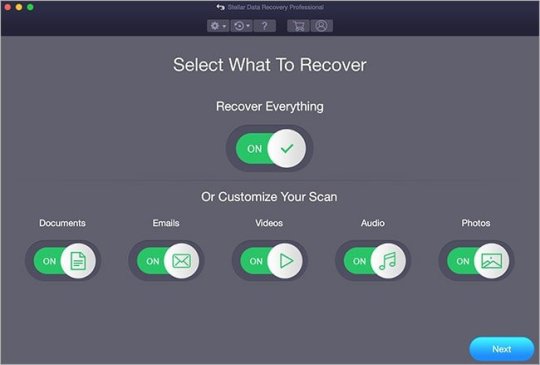
MiniTool Power Data Recovery and Stellar data recovery has joined their hands together for macOS and designed an amazing software which restores the lost/corrupted/deleted file from macOS supported systems. You can use the Minitool professional Data recovery tool to restore data from Mac, external HDD, SSD, USB, SD/memory card, etc. This software recovery tool also supports corrupted files, so if your data or folder get corrupted so you can retrieve the file using this professional tool.
This data recovery software supports a wide range of file systems, APFS, HFS+, FAT & NTFS drive on macOS Catalina, Mojave, High Sierra, etc. It is compatible with Mac OS X 10.7 & above versions. Combinative these software provides so many amazing features including
It allows users to recover permanently deleted files.
It can recover data from crashed Mac.
It can recover data from formatted/crashed partition.
You can perform a Quick Scan or Deep Scan for file recovery.
It previews all the recoverable files.
You can pause the scanning anytime and resume it later.
This software also offers a free Drive Monitor that keeps a track of the drive's performance, temperature, and overall health. It has a clone disk feature which creates a clone of the drive.
Price- This software comes in three variants
Professional- Buy at $99, this gives you a lifetime license for 1 Mac device.
Premium- Buy at $149, This also gives you a lifetime license for one mac along with some more features.
Technician- Buy at $149, this version can be used for 1 year with 3 different Mac devices.
Download
Disk Drill
Also Read: How to Make Phone Calls On Mac
Disk Drill is a reliable and great data recovery software for macOS as well as for Windows, it offers a very simple interface that makes the software easy to use and more reliable. It can recover data (upto 500 MB) from any "virtual storage device", and from internal and external storage devices such as hard disk, USB devices, memory cards, etc.
This software organizes all the deleted files category wise, so if you want to recover any deleted file, you can easily access it. Moreover, you can filter the data by date or size. It supports various file systems, and also perform quick and deep scans for the files. It is mentioned that this recovery tool can recover any file or folder and also reconstruct 200+ file types with multiple file recovery methods.
While recovering any file disk drill recovery software provides you a preview of the file[s] to be recovered. You can pause the scanning and can resume it later, and you can take the backup of the entire drive with this recovery software. Overall, we would say this is an excellent recovery software for macOS.
This software not only recover lost data but it is also packed up with some other useful tools like,
Disk Health
Mac Cleanup
Duplicate Finder
Recovery drive
Data Protection
Data Backup
Price- It offers a free trial, and a Pro version which costs around $107.13 with unlimited data recovery for a single user up to 3 activations, and an Enterprise version which costs around $600 and can be used by 10 users with infinite activations.
Download
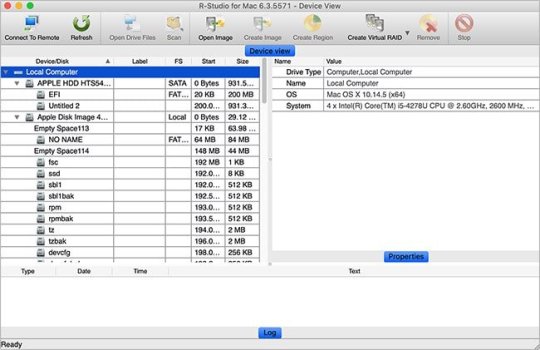
RStudio For Mac
Also Read: How To Get macOS Dynamic Desktop Feature on Windows 10
RStudio data recovery software for Mac is an integrated set of tools which are specially designed to help you to be more productive with R. This software uses advance algorithms to restore the formatted partitions and drives, this data recovery software can also create an image file by using bad sectors of the disk.
This software has various features including console, syntax-highlighting editor that supports direct code execution, and this tool also offers a wide range of robust tools that can be used for plotting, displaying the history, debugging, and you can also manage your workspace.
This software estimates that it restores almost all kinds of deleted data. RSrudio supports a wide range of file systems including APFS, HFS+/HFS, FAT, NTFS, ReFS, UFS1/UFS2, and Ext2/Ext3/Ext4. It uses graphics for previewing recoverable data, but at the same time, this software also lacks as it requires a high level of computer knowledge.
Price: - It is available in two versions for Desktop and two versions for Server too
For Desktop
Free
Commercial Licence at $995 /year.
For Server
Free
Commercial Licence at $ 4,975 /year.
Download
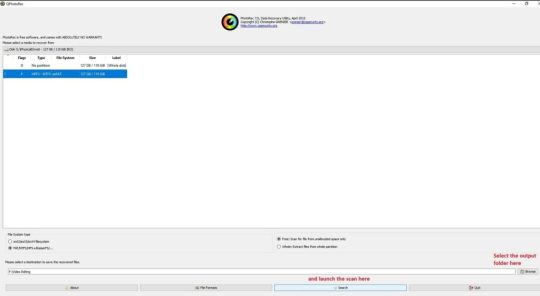
PhotoRec
Also Read: 13+ Best Mac Keyboard Shortcuts
Photorac is a free digital data recovery software for macOS supported devices, and it can undelete the data from not only computers but also from cameras, mobile devices, memory cards, etc. This tool offers features through which you can first upload a utility into the system to check whether it can restore data of that file format or not, instead of checking all the files.
But we can't consider this tool as a powerful data recovery tool because in many cases it can't restore complete files and sometimes it's tough for the user to understand its instructions.
Price: - Free
Download
M3 Mac Data Recovery
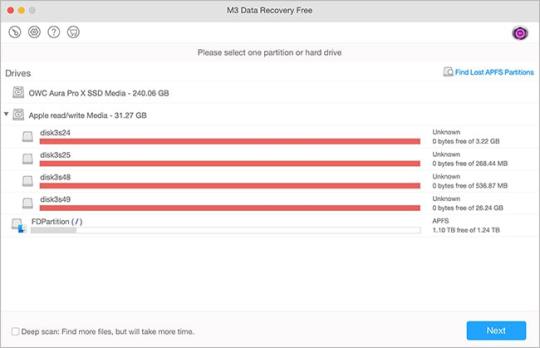
M3 Mac Data Recovery software for macOS is compatible with almost all recent versions of macOS. This file recovery tool supports a wide range of file systems. This software recovers data not only from normal systems drives other supported devices but it can also retrieve and restore the data from encrypted drives too.
this software updates very frequently so it is highly-reliable but sometimes it took so much time for recovering and restoring process, moreover, it doesn't perform well than other data recovery software for macOS.
Price: - It is available in two versions, including
Free
Paid- (i) $39.35 for 1 year, (ii) $ 59. 95 for a lifetime license.
Download
That was all about the best recovery software for macOS. I hope you found this useful if you have any doubts or you have any suggestions so please share your valuable thoughts with us.
[su_box title="More Like This" box_color="#000000"]
Microsoft Quietly Released Windows File Recovery Tool for Windows 10
5 Best Video Players for Windows PC
23 Best GIMP Plugins and Filters You Need to Try (2020)
[/su_box]
via TechLatest
0 notes
Link
Losing data stored on a computer is the worst part of storing data digitally. Data loss can take place due to various reasons including malware attack, files got corrupted, or maybe you have deleted some files accidentally. So no need to worry about such a small issue, we have various data recovery software out there. But the question is which recovery software for Windows is best? which recovery software assure us to provide a 100% data recovery guarantee?
So here in this article, we have listed out some best recovery software for Windows, by using them you can easily recover your lost data within a few minutes. So, let's get started.
Best Recovery Software for Windows
Ease Us Data Recovery Wizard Pro
EaseUS Data Recovery Wizard Pro is an efficacious system restoration software, which is designed with the motive to recover the deleted files from the system, which were deleted unintentionally or accidentally. It has an amazing user-friendly interface to provide mesmerizing user experience, with so many handy features that will help you to recover your deleted files. To know more about EaseUs Data Recovery Wizard follow the given article EaseUS Data Recovery Wizard Pro Review.
Disk Drill
Disk Drill is a reliable and great data recovery software for Windows, it offers a very simple interface that makes the software easy to use and more reliable. It can recover data (upto 500 MB) from any "virtual storage device", and from internal and external storage devices such as hard disk, USB devices, memory cards, etc.
This software organizes all the deleted files category wise, so if you want to recover any deleted file, you can easily access it. Moreover, you can filter the data by date or size. It supports various file systems, and also perform quick and deep scans for the files.
While recovering any file disk drill recovery software provides you a preview of the file[s] to be recovered. You can pause the scanning and can resume it later, and you can take the backup of the entire drive with this recovery software. Overall, we would say this is an excellent recovery software for Windows. This software works with Windows 10, 8,7, Vista, and XP.
But at the same time, it has some cons too like this recovery software lets you recover only 500 MB of data for free users, and it has to installed with HDD.
Price It offers a free trial with 500 MB if recovery limit, and a pro version which costs around $89 with unlimited data recovery.
Download
SoftPerfect File Recovery
SoftPerfect File Recovery is another amazing recovery tool. This software has a very simple yet powerful UI so that users can recover all the deleted files easily without any hassle. Users can search the recoverable file conveniently and this tool works from any portable location like a flash drive.
Moreover, it let us find a deleted file using a file extension or file name. You can undelete multiple deleted files simultaneously. The software is available for almost all versions of Windows from Windows 10 to Windows NT, ME, 98, and 95 too. But as others it also has some cons like it supports only two file systems, it doesn't offer a file preview before recovering it.
Price- Free
Download
Free Undelete
Here we are having one of the best recovery software for Windows operating system, i.e free Undelete. This is an excellently designed file recovery tool which can recover deleted files from a variety of storage devices. Like other mentioned file recovery software this also has a very simple yet interactive and user-friendly UI. The most amazing part about this software is, this is completely free file undeleting software.
It allows various filtering and sorting orders, moreover, it can restore complete folder at once along with it can use to restore multiple files simultaneously. It can recover files from various storage devices like hard drives, memory cards, etc. This file recovery tool works for Windows 10, 8, 7, Vista, and XP.
Similar to other recovery software for Windows, this one also has some cons like this tool work for only Windows home users and not for Windows business/commercial version.
Price- Free
Download
Recuva
Recuva is a lightweight and fast data recovery software for Windows, and it recovers data from various storage devices including hard drive, memory cards, etc. It comes up with a user-friendly interface, this file recovery tool can undelete a wide range of data from various storage devices and also from damaged or corrupted drives.
It performs deep scanning to search the traces of deleted files, It shows a preview of the files you are going to recover, it's clean user-interface is the biggest advantage if this data recovery software. It supports so many file systems including FAT12, FAT16, FAT32, exFAT, NTFS, NTFS5, and NTFS + EFS.
Price- Free and Paid both versions are available. Paid is for $ 19.95 with some additional features other than Advance file recovery.
Download
Data Rescue 6
Prosoft's Data Rescue 6 is an amazing data recovery software, which is packed up with some advanced data recovery tools. This tool was developed for years and it has been tested by a professional data recovery lab. From this, we can have an idea of how reliable and useful this tool is. It is a versatile data recovery software for Windows with some amazing features.
In this software, you can create a clone when a drive is getting fail while data retrieval or when the process is taking too much time for completion. This software requires 32GB of additional storage to perform recovery operations. It has a free file finder app so that tool can decide whether data can be recovered or not. It performs quick and deep scans for data recovery. It requires Windows 7 and above operating system and it can recover data from
Mac Desktops / Laptops
PC Desktops / Laptops
Hard Disk Drives
External Drives
Solid State Drives
SD Cards
CF Cards
Thunderbolt Drives
FireWire Drives
RAIDs
This software lacks at pricing as it doesn't offer any free trial version so that we can experience the software on-hand and decide whether to use it or not. And its standard license limits allows only 5 drive recoveries to a user.
Price- $19 for the standard version, and for unlimited data recovery you should purchase an annual subscription.
Download
PhotoRec

Photorac is a free digital data recovery software for Windows computers, and it can undelete the data from not only computers but also from cameras, mobile devices, memory cards, etc. This tool offers features through which you can first upload a utility into the system to check whether it can restore data of that file format or not, instead of checking all the files.
But we can't consider this tool as a powerful data recovery tool because in many cases it can't restore complete files and sometimes it's tough for the user to understand its instructions.
Price- Free
Download
Windows File Recovery Tool

Microsoft released Windows file recovery tool for Windows 10 2004 version, this is a tool that uses the command line to perform all the operations, so this may or may not be compatible for every user out there. This can be used to retrieve data from local hard drives as well as removable media such as USB drives and memory cards. To know more about Windows File recovery tool, follow the given article Microsoft's Windows File Recovery Tool for Windows 10.
That was all about the best recovery software for Windows. I hope you found this useful if you have any doubts or you have any suggestions so please share your valuable thoughts with us.
via TechLatest
0 notes
Link
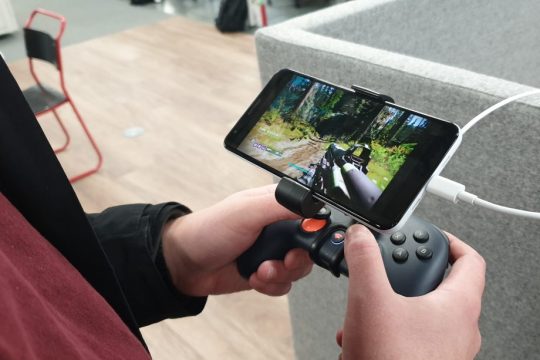
If you are a hardcore gamer and wish to play Google Stadia games on android devices, but you can't do that because according to Google only Google pixel smartphones are eligible to access the game on mobile devices.
If you are a gaming enthusiast so there is no need to explain what Google Stadia is, but if you are new to the gaming world so let me introduce Google Stadia. Basically, Google Stadia is an online cloud game provided by Google which does not require good system specifications, but a good internet connection is a must. That's the main reason why more and more users are seeking for online cloud gaming because these games do not require an expensive and hefty setup only a good internet connection completes all the need.
Google Stadia

Google launched its Stadia in last year November, i.e November 2019. The game can be accessed using Google Chrome web browser in computer, in ChromeOS tablets, as well as in Chromecast for TV but not for Android, that was a disappointing point.
Thanks to an XDA member, Aminelzumi who developed a bypass method, by using this Android users can also play Google Stadia games on Android. Because not every user is interested to buy Google Pixel Device to play Google Stadia games. He designed a module called Xtadia and using this module we can play Google Stadia games on Android; this module makes stadia games compatible with the Android environment.
Stadia is a cool online game, it is device independent, i.e you can play games from any device your progress will be saved online in the clouds. Moreover, Google charges $10 for Stadia Pro, you can try the game free for one month but after the trial period, you will be charged $9.99 per month. We would not consider this as a disadvantage because you haven't invested a single penny for the hardware and graphics.
Moreover, Google stadia is only available in some countries, for now, So if Google stadia isn't available in your country, you can use VPN and change your location to the USA, or to the countries where Google Stadia is available. Know more about Best VPN Services.
If you don't want a wired setup so you can play the game by connecting with a wireless Bluetooth controller, like Playstation 4 controller, to recognize your controller by Google Stadia, your Android device should have Android 10.

Also Read: How to Play PS3 Games on PS4?
How to Play Google Stadia Games on Android?
Xtadia
Xtadia is an Xposed module that is only available for rooted Android devices. If your device is rooted so you can play the game instantly, otherwise, if your device isn't rooted so follow our guide How to Root Your Android Device. So after rooting, you can install Xtadia on your device and enjoy playing Google Stadia games on Android devices too.
Also Read: Microsoft Project xCloud Cloud Gaming Service
Requirements
Here we have listed some basic requirements your device should possess before playing Google Stadia games on Android,
The first and most important thing is that your Android device must be rooted, Xtadia doesn't work on a non-rooted device.
Your device should be running on Android version 6.0 or above, (Android 10 is suggested for a better experience)
A good internet connection is a must (possessing at least 10Mbps of speed) so that you can enjoy the game without any glitches.
Backup essential data from your device. Know more about Best Cloud Storage
You should have an Xposed framework and Installer installed in your rooted Android device. [For the latest Android version, Xposed isn't available, so you can complete the process with EdXposed (an unofficial version of Xposed Framework)]
Also Read: GTA 5 for PS5, Bonus for PS4 Plus Members and Update on GTA 6
Install Xtadia on Your Rooted Android Device.
Download Xtadia Xposed module.
Tap on the downloaded Xtadia Xposed module to install it in your device.
The installation will take a few minutes, wait until it finishes.
Open the Xposed module installer on your smartphone.
Now, click on the hamburger menu from the top-left corner.
Now, go to the module option, and here you will find the Xposed module.
Check the checkbox beside the Xtadia module.
Reboot your smartphone and install playing Google Stadia games on Android.
Also Read: 5+ Best Xbox One Emulators for Windows
Xtadia on Non-Rooted Android Devices
If you don't want to root your device and still want to play Google Stadia games on Android, so you have to wait, because, in 2019, Director for Product for Stadia, Andrey Doronichev said that “We’re aiming to get more devices supported next year. I really want to have Stadia gameplay on every mobile device, across Android and iOS at some point. But it’s a hard technical challenge and will take us time. Just need to start somewhere. So we’re starting with the device we know the best and can provide an optimal experience – our latest Pixel phones.”
So, we can expect that Google will launch the Stadia for all Android devices this year. If you don't want to root your device and play Google stadia games on Android, so waiting until official launch is the only option. As soon as Google will update anything related to Stadia on Android, we will update the article.
Also Read: PlayStation 5 Pages are Live on Amazon India and Flipkart
via TechLatest
0 notes
Link
How to remove ads from Android mobile, TV, and Android box. A few days back we bought a Samsung's Android TV that has quiet decent features and a good price, after setup, we opened the TV for the first time and what it is displaying "ads" and it was the worst thing I felt. So I decided to found some method and tricks, so that I can remove those ads, after a few days I got some good methods though, and I successfully removed ads from my Android TV. I thought those methods will be worth sharing with you guys too. So here we go
Advertisements, is a good way of marketing, but having ads on Android devices, isn't it annoying? Ads on some websites, and even in YouTube videos are acceptable, but it is frustrating when you spent a thousand bucks to buy a Smart TV and it is showing you ads on its home screen. However, in some devices you can remove those ads by signing out from the company's marketing feature; this will also not remove all ads.
So to know how to remove Ads from Android Mobile, Android TV & Android Box, go through this article. Here we will discuss some methods that will help you and guide you on how to remove ads from Android devices.
Remove Ads from Android Devices
So here we are listing some methods, use one of them, if it doesn't work for you so you can try others too or a combination of two or more methods. So let's get started
Use AdBlocker Applications
We can use any AdBlocker application to block the ads, there are numerous ad-blockers are available to use, you can choose any. Some of the good and trusted adblocker applications are Adguard, Blockada, DNS66, AdAway, etc. If you are using a non-rooted device so, these apps will set up a VPN, while on rooted Android devices, ADway is an excellent way to remove ads.
In rooted devices, AdAway provides more controls to the users, you can set up a host file and can add specific URL's you want to block. In non-rooted devices, Adguard and Blockada will setup VPN and this can affect the device's performance and also lead to battery drainage as VPN will run on background continuously. You can use any of these apps to remove ads from Android TV, smartphone, or any other device.
Download Blockada, Adguard
Also Read: How To Remove Youtube Ads on Android? [No Root]
Setup Private DNS over TLS
Android 9 (Pie) comes up with various good features with it, it has an in-built Private DNS feature, which is also known as DNS over TLS, this feature will let you change or use other DNS service on your Android device. This feature uses AdGuard DNS, and it blocks ads within the Android device completely, without rooting the phone. Follow the given steps to enable the setting:
Open Settings in your Android device.
Go to Network and Internet settings.
Now, Private DNS.
Or simply, search Private DNS from the search bar in the settings.
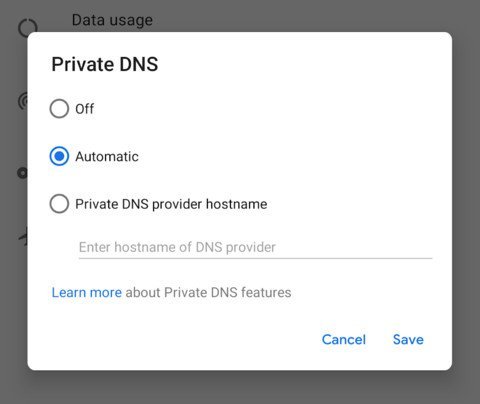
Now, you need to write a complete string of the particular DNS
You can use any one of the following:
dns.adguard.com (normal Adguard DNS):
dns-family.adguard.com (Family protection – non-adult stuff Adguard DNS)
dot-de.blahdns.com Blah DNS: (an alternative hobby project)
Tap on Save.
You can also reboot your device.
Also Read: YouTube Music Comes to Android TV
Setup Adblocking DNS at WiFi router level
You can setup adblocking DNS at the WiFi router level to remove ads from the Android device. To setup adblocking DNS follow the given steps:
Open a web browser on your computer and connect with your WiFi router.
Now for this, you need to enter the IP address of your router in the browser.
Enter the username and password to log into the router.
You will get all the information at the time of installation.
Now go to the Router configuration page.
Go to Network, and then Advance, now click on DNS server settings.
Note the DNS entries present there.
Add the following DNS entries:
176.103.130.130 and 176.103.130.131 for “Default”.
176.103.130.132 and 176.103.130.134 for “Family protection”.

Save all settings and restart your router and browser.
Now, you can check whether ads are coming or not.
Also Read: How to Mirror Android or iOS Screen to TV
Block Ads Manually
You can block ads manually instead of blocking all apps. But many websites have ad-blockers bypass, so they might not open, and you can't access that account. To block and remove ads from the Android device follow the given steps:
Open a web browser on your computer and connect with your WiFi router.
Now for this, you need to enter the IP address of your router in the browser.
Enter the username and password to log into the router.
You will get all the information at the time of installation.
Now go to the Router configuration page.
Locate the URL Filtering or Blocking section.
You can find it under Firewall, Security, or under parental Control (it differs from device to device).
Now enter the URL of the advertisement you wish to block, as I blocked in my Samsung TV, e.g.
https://bit.ly/2DGS84r
https://bit.ly/2F5eZH3
https://bit.ly/2PCHRIZ
Now save and reboot your WiFi router.
So, these were some methods to remove ads from Android TV, smartphone, or other devices. I hope you like all the methods and if you have some more suggestions so please let us know in the comment section.
via TechLatest
2 notes
·
View notes
Link
One of the downsides of the technological era is that it is always very vulnerable to attacks and breaches because there are so many new developments every year and the old one gets outdated very soon. According to researchers over a billion devices are at risk because of Qualcomm vulnerabilities
Over a Billion Devices at Risk Because of Qualcomm Vulnerabilities
During the latest DEF CON hacker conference, a cybersecurity firm named CheckPoint highlighted these Qualcomm vulnerabilities by presenting details that the Digital Signal Processor(DSP) chips on Qualcomm Snapdragon processors have “over 400 vulnerabilities”, and this is actually a major threat to the mobile users across the world.
To make it clear, the DSP chips handle a lot of important processing like charging, audio, video, AR, image processing, and various multimedia functions. And this chip also lets the manufacturers add their own functionality on the chip so that the manufacturers can run their own apps on the top of the existing framework.
Companies like Samsung, Google, Xiaomi, and others use Qualcomm Snapdragon chips on their phones and according to CheckPoint, 40% of Android devices have Qualcomm chips. There are 3 billion Android devices around the world and that means that over 1 billion devices are affected by these Qualcomm vulnerabilities.
Checkpoint had already submitted these findings to Qualcomm under the name of “Achillies” earlier this year. Qualcomm said that it has already released a fix for these flaws. Qualcomm said in a statement, “Regarding the Qualcomm Compute DSP vulnerability disclosed by Check Point, we worked diligently to validate the issue and make appropriate mitigations available to OEMs. We have no evidence it is currently being exploited. We encourage end users to update their devices as patches become available and to only install applications from trusted locations such as the Google Play Store”.
Now according to CheckPoint, Google has not yet incorporated the patch into ASOP, and the manufacturers have not released fixes for their devices as well. Keeping the sensitivity of this issue in mind, CheckPoint has not disclosed the technical details about the vulnerabilities. You can read about all the findings from CheckPoint in the source link given below.
(VIA) (SOURCE)
Read More About
Twitter is Now Testing Quote Tweet Counts
WhatsApp Testing Most Awaited Self-Expiring Messages Feature
via TechLatest
0 notes
Link
360-degree photos look really cool as they give you a closer and realistic look at the image surrounding. There are all sorts of 360-degree cameras in the market, but it’d be really fun if you could take 360-degree photos from Android and iOS devices, right?
Well, you can take 360-degree photos from Android and iOS devices easily. In this article, we are going to show you some methods to take 360-degree photos from Android or iOS devices.
Take 360-Degree Photos from Android and iOS Devices
There are a lot of individual apps available for Android and iOS separately to capture some really cool 360-degree panorama and the simplest one that works on both is the Google Street View app.
Using Google Street View App
Step 1: Download the Google Street View app on your Android or iOS device and complete the signup process. Now go to the location where you want to take the 360-degree shot.
Step 2: In the bottom-right of the app, you will see a camera icon, click on it.
Step 3: Now select ‘Take photo sphere’ from the options.
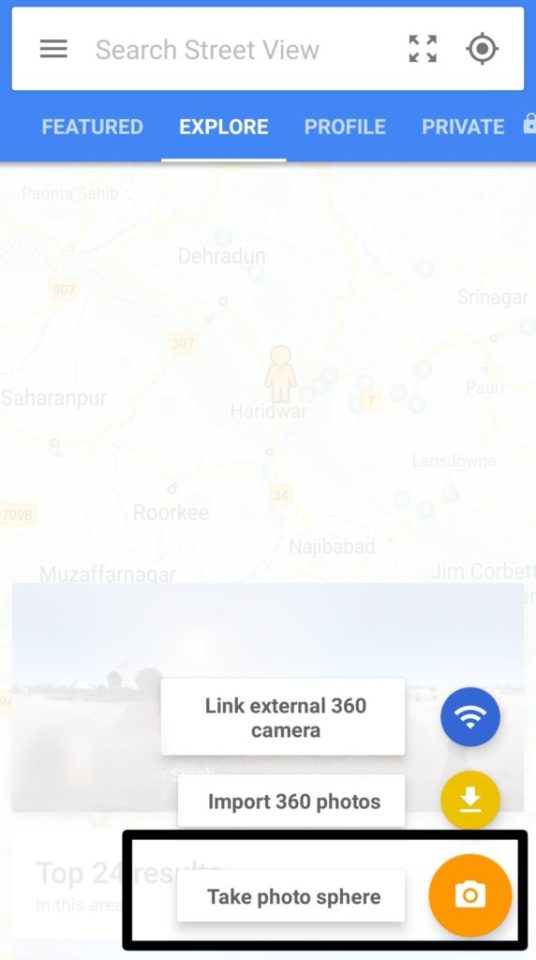
Step 4: You will be taken to the camera screen and the app will guide you to complete the process. Just stand still, capture and complete all the orange circles, when you hit all circles and reach the final dot, click on the white button at the middle of the screen.

Step 5: Once you press the white button, you will be taken to the home screen and the app will stitch all the images to make it a 360-degree photo.
Step 6: Android users can access the 360 images directly in the Gallery and iOS users will have to press on the “Private Share” tab and then, press the “Save to device” option.
That’s it and you are all set. Just make sure that you stand very still and patiently capture all the images so that your final shot is very clean.
Using 360 Camera Apps
By now you must have known that it is not just very easy to click a 360-degree photo. Thankfully, there are some really cool 360 camera apps for Android and iOS that will help you for sure.
Panorama 360 (Android/iOS)
Panorama 360 is available for both Android and iOS and lets you take some really cool 360-degree photos. You can embed your photos to your website, upload them on Facebook and other social media platforms, and the paid version will also let you capture shots in HD. It is a very cool app to take 360-degree photos.
Photaf Panorama (Android)
This app is quite advanced as it uses the camera’s orientation sensor to detect angles and create a seamless 360-degree photo. It has automatic image stitching, and you can also share the images on Facebook. The paid Pro version also brings HD support live-wallpaper creation feature and an ad-free interface.
360 Panorama (iOS)
The 360 Panorama app just transforms your iOS device into a 360-degree camera and you can do all sorts of stuff with your 360-degree photos. The whole app is actually quite cool.
So, these were some of the apps and methods by which you can take 360-degree photos from Android and iOS devices, do try them and let us know.
Read More About
How to Customize Notification Bar in Android [Non-Root]
How to Download Instagram DP on Phone or PC
How To Change The Punch-Hole Camera To Battery Indicator
via TechLatest
0 notes
Link
How to Change The Punch-Hole Camera To Battery Indicator? Since the Punch-hole cameras are introduced to smartphones many developers are trying to design something more innovative and attractive for smartphones with punch-hole cameras. In the initial days, some wallpaper designers introduced some mesmerizing wallpapers which are specially designed for Punch-hole camera smartphones.
And similarly, numerous new things were introduced to give a unique look to smartphones with punch-hole cameras. But the Energy ring application is best among all [at least for me]. With this application, you can change the punch-hole to the battery indicator. Here in this article, we will discuss how to change the punch-hole camera to battery indicator.
How to Change the Punch-Hole Camera to Battery Indicator?
In this article, we are going to use the Energy Ring app to change the punch-hole camera to battery indicator. So before getting started with how to change the punch-hole camera to the battery indicator, let's slightly look at what Energy Ring app is?
Energy Ring

Also Read: How to Stop Background Services on Android To Save Battery
The energy ring is an Android app that adds a configurable ring around the punch-hole of the camera. It provides a nice look and users can check the battery level of the smartphone quickly. This app shows not only battery level but also changes its color according to the battery level, and you can also use gradient colors for the battery.
How to Use?
So, to use this app and to put a battery ring around the punch-hole of your device, follow the given steps:
First of all, go to the Android app store, and download the Energy Ring App.
After downloading and successful installation, launch the app.
Provide all the required permissions.
Now, configure the thickness level of the ring under Ring Thickness Menu.
You will also find some options to change the charging animation of the device. you can customize charging animations too.
So, after doing all the adjustments, enjoy the new look of your device.
Is this app consumes battery?
So, in simple words, this app doesn't consume any battery, and this app won't affect your device's performance or battery health anyway. According to the app developer, this application consumes 0 CPU and this app is only active when the battery level is changed. So, this app would not drain your smartphone battery. If your smartphone's battery drains a lot so, read this article 5+ Tips to Reduce Battery Draining on Android.
Supported Device
This application is in development from several months, as because developers are making changes in the app so that it would be compatible with all the devices, for now, this app is available for
OnePlus 8
OnePlus 8 Pro
OnePlus Nord
Realme X50 Pro
Samsung Galaxy A60, A51, A71, S10 Lite, Z Flip, m40
Motorola Edge and Edge +
OPPO Find X2/Pro
Vivo iQOO 3 5G, Z1 Pro
Xiaomi Mi 10/Pro
Poco X2
Redmi K30/i/5/Racing, Note 9/Pro/Max/9S
Huawei Honor 20, View 20
Nova 4, 5T, P40 Lite, P40 Pro
Motorola One Action, One Vision
Realme 6, Realme 6 Pro
Moto G(8) Power only
These are some supported devices, and app developers are planning to launch it for more devices, enhancing its performance and adding some more new features into this app. You can download the Energy Ring app from the download link given below and can change the punch-hole camera to the battery indicator.
[su_box title="More Like This" box_color="#000000"]
Do You Really Need Battery Saver Apps on Your Smartphone?
How to Customize Notification Bar in Android [Non-Root]
How to Enable Always-on Display on Any OnePlus Phone
[/su_box]
via TechLatest
0 notes